1
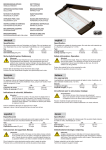
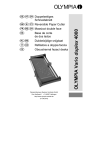
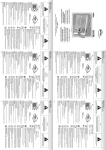
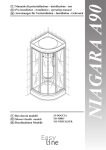
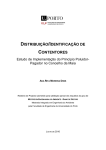
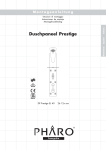
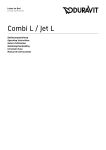
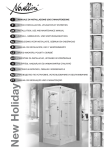
MANUALE DI INSTALLAZIONE USO E MANUTENZIONE
NOTICE D'INSTALLATION, UTILISATION ET ENTRETIEN
INSTALLATION, USE AND MAINTENANCE MANUAL
AUFBAU-, GEBRAUCHS- UND WARTUNGSANLEITUNG
HANDLEIDING VOOR INSTALLATIE, GEBRUIK EN ONDERHOUD
MANUAL DE INSTALACIÓN, USO Y MANTENIMIENTO
NÁVOD KMONTÁÏI, POUÏITÍ A ÚDRÏBù
Sweet 3
Sweet 1
Sweet 2
SWEET
Sweet 4
Scheda tecnica Fiche technique Technical specifications Technische daten
Technische gegevens Ficha técnica Technické údaje
Sweet 1
Sweet 2
338
Sweet 3
344
Sweet 4
340
342
1550
447
50
60
447
286
440
280
5
32
60
50
465
450
Acqua calda
Eau chaude
Hot water
Warmwasser
Warm water
Agua caliente
Teplá voda
Acqua fredda
Eau froide
Cold water
Kaltwasser
Koud water
Agua fría
Studená voda
Miscelatore meccanico
Mitigeur mécanique
Manual mixer
Mechanischer Mischer
Mechanische mengkraan
Mezclador mecánico
Odtokov˘ sifon na zemi
Miscelatore termostatico
Mitigeur thermostatique
Thermostatic mixer
Thermostatmischer
Thermostaatmengkraan
Mezclador termostático
Odtokov˘ sifon na zdi
•Pressione ottimale 2÷5 bar.
•Alimentazione idraulica 1/2”.
•N°12 bocchette idromassaggio (Sweet 1-2).
•N°7 bocchette idromassaggio (Sweet 3-4).
•Portata 6,6÷13,3 l/min.
•Optimale druk 2÷5 bar.
•Wateraansluiting 1/2”.
•12 hydromassage-jets (Sweet 1-2).
•7 hydromassage-jets (Sweet 3-4).
•Wateraanvoer 6,6÷13,3 l/min.
•Pression optimale 2÷5 bars.
•Alimentation hydraulique1/2”.
•N°12 hydrojets (Sweet 1-2).
•N°7 hydrojets (Sweet 3-4).
•Débit 6,6÷13,3 l/min.
•Presión ideal 2÷5 bar.
•Alimentación hidráulica 1/2”.
•N°12 jets hidromasaje (Sweet 1-2).
•N°7 jets hidromasaje (Sweet 3-4).
•Caudal 6,6÷13,3 l/min.
•Supply pressure 2 - 5 bar.
•Water connections 1/2”.
•Body massage 12 jets (Sweet 1-2).
•Body massage 7 jets (Sweet 3-4).
•Flow rate 6,6÷13,3 l/min.
•Tlak optimální 2÷5 bar.
•Vodní vedení 1/2”.
•N°12 hydromasáÏní trisky (Sweet 1-2).
•N°7 hydromasáÏní trisky (Sweet 3-4).
•Nosnost 6,6÷13,3 l/min.
•Optimaler Druck 2-5 bar.
•Wasseranschluß 1/2”.
•12 Wassermassagedüsen (Sweet 1-2).
•7 Wassermassagedüsen (Sweet 3-4).
•Durchsatz 6,6÷13,3 l/min.
870
430
5
465
357
30
297
450
357
135
470
295
150 ± 50
150
900 ± 50
600 ± 100
1275
870
1862
1110
470
900 ± 100
1870
1550
150 ± 50
IMPORTANTE:
prima di iniziare il montaggio del prodotto leggere con molta attenzione tutte
le istruzioni. Controllare che siano presenti nella confezione tutti i componenti
per il montaggio e che non abbiano difetti evidenti, OVE PRESENTE TOGLIERE
LA PELLICOLA PROTETTIVA TRASPARENTE. Prima di effettuare l’installazione
definitiva della colonna attrezzata è consigliabile effettuare un collaudo
preliminare facendo funzionare l’apparecchio per qualche minuto, in modo da
verificare che non ci siano perdite d’acqua o danni causati da urti subiti durante
il trasporto o nella movimentazione. È consigliata l’installazione da parte di
personale qualificato.
N.B.: L’installazione deve avvenire a pavimento e pareti finiti.
Per ogni reclamo, presentare la fattura/scontrino unitamente al libretto con le
istruzioni di montaggio.
IMPORTANT:
avant de commencer à monter le produit, lire très attentivement toutes les
instructions. S’assurer que l’emballage contient bien toutes les pièces nécessaires
au montage et que celles-ci ne sont pas défectueuses, ENLEVER LE FILM
TRANSPARENT DE PROTECTION (LÀ OÙ IL Y EN A UN). Avant d'effectuer
l'installation définitive de la colonne de douche, il est recommandé de faire un
essai préliminaire en laissant fonctionner l’appareil pendant quelques minutes
pour vérifier s’il n'a pas été abîmé à la suite de chocs subis pendant le transport
et la manutention et s’il n’y a pas de fuites d’eau. Il est conseillé de confier
l’installation à des techniciens qualifiés.
N.B.: Effectuer l’installation uniquement après avoir fini le sol et les murs.
Conserver la notice du produit et la facture/ticket de caisse pour toutes
réclamations.
IMPORTANT:
Before you start to assemble and install the product, carefully read through all
the instructions. Unpack the components and check that nothing is missing and
that there are no damaged or faulty components, REMOVE THE TRANSPARENT
PROTECTIVE FILM. Before you install the shower unit in its final position, perform
a test run. Run the unit for several minutes and check for water leaks and any
damage caused during transport and handling. This product should be installed
by suitably skilled personnel.
N.B.: This product is designed for installation on finished walls and floors.
Warranty claims must be produced with the purchase invoice and the product
assembling instructions.
BELANGRIJK:
alvorens te beginnen met de montage van het product dient u alle aanwijzingen
aandachtig door te lezen. Controleer of alle voor de montage benodigde
onderdelen in de verpakking aanwezig zijn, en of ze geen defecten vertonen,
VERWIJDER DE TRANSPARANTE BESCHERMFOLIE WAAR AANWEZIG. Alvorens
de douchepaneel definitief te installeren is het raadzaam een voorlopige test te
doen door het apparaat een paar minuten te laten werken, om na te gaan of er
geen waterlekkages zijn of schade ontstaan is door stoten tijdens het transport
of de verplaatsing. Het wordt geadviseerd de installatie over te laten aan
gekwalificeerd personeel.
N.B.: De installatie dient te worden uitgevoerd wanneer de vloer en wanden
afgewerkt zijn.
Bij elke service-aanvraag dient de faktuur/aankoopbon samen met de
installatiehandleiding te worden overlegd.
IMPORTANTE:
antes de iniciar el montaje del producto lea con atención todas las instrucciones.
Controle que el embalaje contenga todos los componentes para el montaje y
que los mismos no presenten defectos evidentes, ELIMINE EL FILM DE
PROTECCIÓN TRANSPARENTE EN AQUELLAS PARTES QUE LO LLEVEN. Antes de
efectuar la instalación definitiva de la columna equipada se aconseja efectuar
una prueba preliminar haciendo funcionar el aparato durante algunos minutos,
con el fin de comprobar que no hay pérdidas de agua ni daños causados por
posibles golpes sufridos durante el transporte o el desplazamiento. Se aconseja
que la instalación sea llevada a cabo por personal cualificado.
NOTA: La instalación deberá efectuarse cuando el pavimento y las paredes estén
terminadas.
Para cada reclamaciòn, presentar la factura/recibo junto al manual con las
instrucciones de montaje.
DÒLEÎITÉ:
Pfied zaãátkem montáÏe byste si mûli dÛkladnû pfieãíst ve‰keré pokyny.
Pfiezkou‰ejte, zda jsou v balení obsaÏeny v‰echny souãástky pro montáÏ a Ïe
nejsou zfietelnû po‰kozeny, POKUD JE K DISPOZICI, ODSTRA≈TE
PRÒHLEDNOU OCHRANNOU FÓLII. Pfied definitivní instalací panelu je
doporuãena peãlivá kontrola funkãní spolehlivosti zafiízení. Zafiízení uveìte na
nûkolik minut do provozu a vyzkou‰ejte zda nevznikly bûhem transportu
netûsnící místa nebo vady. Doporuãejeme pfienechat instalaci odborníkovi.
POZNÁMKA: Instalace mÛÏe následovat teprve po dokonãení podlahy a zdí.
V pfiípadû reklamace pfiedloÏte úãet spolu s pokyny k montáÏi.
WICHTIG:
Vor Beginn der Montage sollten Sie sämtliche Anweisungen aufmerksam lesen.
Überprüfen sie, ob die Packung mit den Bestandteilen für die Montage vollständig
ist, und dass diese nicht offensichtlich beschädigt sind, FALLS VORHANDEN, DIE
DURCHSICHTIGE SCHUTZFOLIE ABNEHMEN. Vor der endgültigen Installation der
funktionseinheit wird eine vorsorgliche Kontrolle der Funktionstüchtigkeit der
Einrichtung empfohlen. Dazu die Einrichtung einige Minuten lang betreiben
und auf undichte Stellen bzw. Schäden prüfen, die eventuell durch den Transport
verursacht wurden. Wir empfehlen, die Installation von Fachpersonal vornehmen
zu lassen.
ANMERKUNG: Die Installation darf erst nach Fertigstellung von Fußboden und
Wänden zu erfolgen.
Im Fall von Reklamation, die Rechnungsanlage zusammen mit den
Montageanleitungen vorlegen.
Le immagini e i disegni rappresentati nel manuale sono puramente
dimostrativi.
Il costruttore si riserva la facoltà di apportare modifiche e cambiamenti.
Les illustrations et dessins qui figurent dans cette notice sont purement
indicatifs.
Le fabricant se réserve la faculté d'apporter des modifications et des variations
à ses produits sans préavis.
The drawings and illustrations in this manual are provided for information
purposes only.
The manufacturer reserves the right to make changes and improvements without
prior notice.
De afbeeldingen en tekeningen in deze handleiding zijn zuiver als uitleg
bedoeld.
De fabrikant behoudt zich het recht voor wijzigingen en veranderingen aan te
brengen.
Las imágenes y los dibujos representados en el manual son puramente
orientativos.
El fabricante se reserva el derecho de realizar modificaciones y cambios.
Obrázky a nákresy, které jsou obsaÏeny v pfiíruãce slouÏí jen kpfiedstavû.
V˘robce si ponechává právo, provádût zmûny na v˘robcích.
Die im Handbuch enthaltenen Abbildungen und Zeichnungen dienen nur
der Veranschaulichung.
Die Garantie behält sich das Recht vor, Änderungen daran vorzunehmen.
Utensili e materiali necessari per l'installazione (non forniti)
Outils et matériel nécessaires au montage (non fourni)
Tools and materials required for installation (not supplied)
Für die Montage benötigte Werkzeuge und Hilfsmittel (nicht mitgeliefert)
Benodigde gereedschappen en materialen voor de installatie (niet meegeleverd)
Herramientas y materiales necesarios para la instalación (no suministrado)
Pro montáÏ jsou potfieba náfiadí a pomocné prostfiedky (nedodáno)
ø6/8 mm
ø3,5/4 mm
Sweet 1
Sweet 2
Sweet 3
Sweet 4
Componenti
Pièces
Components
Bestandteile
Onderdelen
Componentes
Souãástky
Posizionamento colonna attrezzata unit Anordnung der funktionseinheit Pfiipevnûní panelu
Positionnement de la colonne composee Positioning the shower
Plaatsen van het douchepaneel Instalación de la columna equipada
Sweet 1
32
5
5
32
1870
0 250
530
530
25
B
B+C
ø3
S6 n°2
C
4x40 n°2
3,5x16
A
S8 n°2
n°2
5x80 n°2
ø3
ø6
ø8
non fornita
non fourni
masonry bit (not supplied)
nicht im Lieferumfang
niet bijgeleverd
no incluida
Není souãástí balení
Sweet 2
5x60
5x80
S8 n°3
non fornita
non fourni
masonry bit (not supplied)
nicht im Lieferumfang
niet bijgeleverd
no incluida
Není souãástí balení
ø8
5x60 n°1
5x80 n°2
n°3
1050
350
40
1550
Sweet 3
ø6
non fornita
non fourni
masonry bit (not supplied)
nicht im Lieferumfang
niet bijgeleverd
no incluida
Není souãástí balení
S6 n°4
4x40 n°4
ø3,5/4
5x60
ø3,5/4
5x60
x2
ø3,5/4
non fornita
non fourni
masonry bit (not supplied)
nicht im Lieferumfang
niet bijgeleverd
no incluida
Není souãástí balení
n°2
5x60 n°2
Sweet 4
350
1550
5x60
5x80
ø 8mm non fornita
ø 8mm non fourni
ø 8mm masonry bit (not supplied)
ø 8mm nicht im Lieferumfang
ø 8mm niet bijgeleverd
ø 8mm no incluida
ø 8mm Není souãástí balení
S8 n°2
5x60 n°1
5x80 n°1
n°2
Istruzioni d’uso Instructions d'utilisation - Instructions for use - Gebrauchsanleitung Gebruiksaanwijzing - Instrucciones de uso Pokyny k pouÏití
Funzionamento del miscelatore meccanico (standard)
Fonctionnement du mitigeur mecanique (standard)
Using the manual mixer valve (standard)
Funktionsweise des mechanischen Mischers (Standard)
Werking van de mechanische mengkraan (standaard)
Funcionamiento del mezclador monomando (estándar)
Funkce pákové baterie (Standard)
Miscelatore manuale: regolatore di temperatura e intensità di
portata, per aprire il rubinetto, muovere la manopola verso l’alto, per
regolare la temperatura, ruotare la manopola verso destra o sinistra.
Mechanische mengkraan: temperatuur- en intensiteitregelaar.
Beweeg de knop naar boven om de kraan te openen. Draai de knop
naar links of naar rechts om de temperatuur te regelen.
Mitigeur mécanique: poignée réglage de la température et du
débit de l’eau. Pour ouvrir le robinet, déplacer la poignée vers le haut,
pour régler la température, tourner la poignée à droite ou à gauche.
Mezclador manual: regulador de temperatura e intensidad del
caudal, para abrir el grifo mover el mando hacia arriba, para regular la
temperatura
girar el mando hacia la derecha o hacia la izquierda.
Manual mixer: Use this to adjust the water temperature and flow.
To turn on the water, move the knob upwards. To adjust the temperature,
turn the knob to the left or to the right.
Páková baterie: Regulátor teploty a prÛtoku vody; K otevfiení
kohoutku zvednûte páãku; K nastavení teploty otoãte rukojeÈ doprava
popfi. doleva.
Manueller Mischer: Temperatur- und Wasserdurchflussregler; zum
Öffnen des Hahns den Griff anheben; zum Einstellen der Temperatur,
den Griff nach rechts bzw. links drehen.
Idromassaggio
Hydromassage
Hydromassage
Wassermassage
Hydromassage
Hidromasaje
Vodní masáÏ
Selettore di funzioni: agire sul selettore per selezionare la funzione
scelta tra:
1 doccetta, 2 cervicali, 3 verticali, 4 lombari, 5 plantari, 6 riempimento
vasca.
Omstelknop: bedien de knop om de gewenste functie te kiezen
uit:
1 handdouche, 2 nekmassage, 3 verticale massage, 4 lendemassage, 5
voetmassage, 6 baduitloop.
Sélecteur de fonctions: vous permet de choisir parmi les fonctions
suivantes:
1 Douchette, 2 Hydromassage cervical, 3 hydromassage dorsal, 4
hydromassage lombaire, 5 hydromassage plantaire, 6 Remplissage
baignoire (option).
Selector de funciones: mediante este selector seleccionar una de
las siguientes funciones:
1 ducha, 2 hidromasaje cervical, 3 hidromasaje vertical, 4 hidromasaje
dorsal, 5 hidromasaje plantar, 6 jet de llenado bañera.
Function selector. Use the selector to choose the following functions:
1 hand shower, 2 neck massage, 3 body massage, 4 lumbar massage,
5 feet massage, 6 bath filler.
Funktionenwähler: Es können folgende Funktionen eingestellt
werden:
1 Handbrause, 2 Nackenmassage, 3 Vertikale Wassermassage, 4 LendenWassermassage, 5 Fußsohlen-Wassermassage, 6 Einlauf für die
Wannenfüllung.
Ovladaã funkcí:otáãecím ovladaãem mÛÏeme zvolit následující
funkce:
1 sprcha, 2 krãní, 3 vertikální, 4 zadní, 5 chodidel, 6 napou‰tûní vany.
Funzionamento del miscelatore termostatico (opzionale)
Fonctionnement du mitigeur thermostatique (en option)
Using the thermostatic shower mixer (optional)
Funktionsweise des Thermostatmischers (optional)
Werking van de thermostaatmengkraan (optie)
Funcionamiento del mezclador termostático (opcional)
Fungování termostatického mixáÏního zafiízení (optional)
Rubinetto: regolatore di intensità di portata; permette di aprire,
regolare e chiudere il flusso d’acqua.
Regolatore di temperatura: è possibile impostare la temperatura
desiderata dell’acqua.
Il limite di sicurezza è fissato a 38°C da un dispositivo meccanico che
non permette di superare questa temperatura. Per poter avere una
temperatura superiore ai 38°C (forzatura della sicurezza) è necessario
premere il pulsante rosso mentre si ruota la manopola di regolazione
della temperatura.
Per un corretto funzionamento del miscelatore termostatico è necessario
disporre di una caldaia o di un boiler con un’erogazione di almeno 6/7
litri di acqua al minuto alla temperatura di 60/65° C. Nel caso di utilizzo
di caldaia con produzione istantanea di acqua calda, la fiamma deve
essere di tipo modulante e la pressione ottimale di uscita dell’acqua
della caldaia deve essere compresa tra 2 e 5 bar.
Kraan: regelaar van de hoeveelheid water; hiermee kan de
waterstroom worden geopend, geregeld en gesloten.
Temperatuurregelaar: het is mogelijk de gewenste temperatuur van het
water in te stellen.
De veiligheidslimiet is op 38° C bepaald door een mechanisme dat het
onmogelijk maakt deze temperatuur te overschrijden.
Om een temperatuur boven 38° C in te stellen (forcering van de
beveiliging) moet de rode knop worden ingedrukt terwijl de
temperatuurknop wordt gedraaid.
Voor de correcte werking van de thermostaatmengkraan dient men te
beschikken over een geiser of boiler met een waterafgifte van minstens
6/7 liter per minuut, bij een temperatuur van 60/65° C. Als er een geiser
met onmiddellijke productie van warm water gebruikt wordt, moet de
vlam modulerend zijn en dient de optimale uitgangsdruk van het water
van de geiser tussen 2 en 5 bar te liggen.
Robinet: règle l'intensité du jet d'eau. Vous permet d'ouvrir, de
régler et de fermer le débit d'eau.
Régulateur de température: vous permet de régler à volonté la
température de l'eau.
Pour votre sécurité, la température de l'eau ne doit pas dépasser 38° C.
Un dispositif de sécurité mécanique l'empêche de dépasser cette limite.
Pour pouvoir avoir une température supérieure à 38°C (et forcer la
sécurité), vous devez presser le bouton rouge et tourner simultanément
le bouton de réglage de la température.
Pour le bon fonctionnement du mitigeur thermostatique, vous devez
disposer d'un chauffe-eau pouvant produire de l'eau chaude à 60/65°
C à un débit d'au moins 6/7 litres par minute. Si vous disposez d'un
chauffe-eau à gaz produisant instantanément de l'eau chaude, la flamme
doit être du type modulante et la pression de sortie de l'eau doit être
comprise entre 2 et 5 bars.
Grifo: regulador del caudal; permite abrir, regular y cerrar el flujo
del agua.
Regulador de temperatura: para programar la temperatura deseada del
agua.
El límite de seguridad está fijado a 38°C. Un dispositivo de seguridad
impide que se supere dicha temperatura. Para conseguir una temperatura
superior a 38°C (forzando la seguridad) deberá accionarse el pulsador
rojo mientras se gira el mando de regulación de la temperatura.
Para un correcto funcionamiento del mezclador termostático es necesario
disponer de una caldera o un boiler con un caudal de por lo menos 6/7
litros de agua al minuto a la temperatura de 60/65° C. En caso de uso
de caldera con producción instantánea de agua caliente, la llama debe
ser de tipo modulante y la presión óptima de salida del agua de la
caldera debe estar comprendida entre 2 y 5 bar.
Tap: water flow regulator. Use this to turn, adjust and turn off the
water flow.
Temperature regulator: Use this to set the temperature of the water that
suits you most.
For your safety, the water temperature should not exceed 38°C and a
special mechanical device prevents it from going above this limit. To
obtain a temperature of more than 38°C (overriding the safety device),
press the red button while you turn the temperature regulating knob.
For correct operation of the thermostatic mixer, a boiler capable of
providing hot water at 60/65°C at a rate of at least 6/7 litres per minute
is required. If a gas-flame, instant water heater is used, the flame must
be of the modulating type. The water supply pressure must be between
2 and 5 bar.
Hahn: Wasserdurchflußregler; damit wird das Wasser geöffnet, der
Wasserdurchfluß eingestellt und das Wasser abgestellt.
Temperaturregler: Hier kann die gewünschte Wassertemperatur
eingestellt werden
Die Sicherheitstemperatur ist mit einem mechanischen Bauteil auf 38°C
eingestellt, das verhindert, daß diese Temperatur überschritten wird.
Um eine 38°C übersteigende Temperatur (Sicherheitsmissachtung) zu
erhalten, muss man während des Betätigens des Drehknopfes zur
Temperaturregulierung den roten Knopf drücken.
Zur korrekten Funktion des Thermostatmischers muß eine Therme, bzw.
ein Boiler vorhanden sein, der eine Wasserversorgung von mindestens
6/7 Liter pro Minute bei einer Temperatur von 60/65°C garantiert. Wird
ein Durchlauferhitzer verwendet, muß er über eine geregelte Flamme
verfügen. Der Ausgabedruck des Wassers aus dem Durchlauferhitzer
muß zwischen 2 und 5 bar liegen.
Kohout: regulátoru intenzity toku vody; umoÏÀuje otvírat, regulovat
a zavírat tok vody. Regulátor teploty: umoÏÀuje nastavovat poÏadovanou
teplotu. Bezpeãnostní limit je nastaven na 38°C mechanick˘m zafiízením,
které nedovolí tuto teplotu pfiekroãit. JestliÏe chcete dosáhnout vy‰‰í
teploty neÏ 38°C (násilné pfiekroãení bezpeãnostní pojistky), je tfieba
pfii otáãení rukojeti stisknout ãervené tlaãítko regulace teploty. Aby
mohlo termostatické zafiízení správnû fungovat, je tfieba mít k dispozici
ohfievn˘ kotel nebo boiler, kter˘ zásobuje alespoÀ 6/7 litry vody za
minutu pfii teplotû 60/65°C. PouÏíváte-li kotel s okamÏit˘m ohfievem
teplé vody, plamen musí b˘t sefiíditeln˘ a optimální tlak pfii v˘stupu
vody z kotle se musí pohybovat mezi 2 a 5 bary.
Regolazione doccetta
Reglage de la douchette
Adjusting the shower head
Regulierung der Brause
Instelling handdouche
Regulacion ducha
Regulování sprchy
La doccetta permette di scegliere tra 3 diverse funzioni-massaggio,
selezionabili ruotando la ghiera.
De handdouche kan in 3 verschillende massagefuncties worden
gezet, die worden ingesteld door de ring te draaien.
La douchette réglable vous permet de choisir parmi 3 fonctions
massantes différentes, que vous pouvez sélectionner en tournant la
bague.
La ducha permite escoger entre 3 funciones de masaje distintas,
las cuales pueden seleccionarse girando la virola.
The shower head has 3 massage function settings. Turn the ring
on the shower head to select the setting required.
Na hlavû sprchy je moÏné nastavení 3 masáÏní funkce pomocí
pootoãením krouÏku.
Am Duschkopf können, durch Drehen des Rings, 3 verschiedene
Massagefunktionen eingestellt werden.
Orientabilità
Orientation réglable
Angle adjustment
Verstellbarkeit
Verstelbaarheid
Posibilidad de orientación
Manipulovatelnost
Max 30°
Regolazione getto
Réglage du jet
Jet adjustment
Regulierung des Wasserstrahls
Instelling straal
Regulación del chorro
Regulování vodního paprsku
fig.1
A
Bocchette Rotojet
Buses "Rotojet"
Rotojet jets
Rotojet-Düsen
Rotojet
Boquillas Rotojet
Rotující trysky
B
Smontaggio bocchette Rotojet
Démontage des buses Rotojet
Dismantling the Rotojet jets
Ausbau der Rotojet-Düsen
Demontage Rotojets
Desmontaje boquillas Rotojet
Od‰roubování rotunících trysek
(a)
(b)
Svitare la ghiera (a) (fig.1) servendosi dell’apposita chiave (b) fornita,
estrarre la bocchetta Rotojet e con l’ausilio di un oggetto acuminato (fig.2)
premere il fermo bloccadiffusore. Smontare la bocchetta in tutte le sue
parti e rimuovere lo sporco residuo.
Dévisser la bague (a) (fig.1) à l’aide de la clef fournie (b), enlever la
buse Rotojet et avec un objet pointu (fig.2) appuyer sur l’arrêt qui bloque
la buse. Démonter complètement la buse et nettoyer.
fig.2
Unscrew the ring (a) (fig.1) using the Allen key provided (b). Remove
the Rotojet jet unit. Using a pointed tool (fig.2), press down and release
the diffuser stop. Disassemble the entire jet and clean the individual
components.
Den Schraubring (a) mit dem mitgelieferten Schlüssel (b) lösen
(Abb.1), die Rotojet-Düse herausziehen und mit Hilfe eines spitzen
Gegenstandes (Abb.2) auf die Düsensicherung drücken. Die Düse
vollständig auseinandernehmen und Schmutzrückstände entfernen.
Schroef de ringmoer (a) (afb.1) los met de bijgeleverde sleutel (b),
haal de Rotojet weg en druk met een scherp voorwerp tegen de blokkering
van de diffusor (afb.2). Demonteer de jet helemaal en verwijder het
resterende vuil.
Desenroscar la virola (a) (fig.1) utilizando la llave adecuada (b)
suministrada con el equipo, extraer la boquilla Rotojet y, con la ayuda de
un objeto afilado (fig.2) presionar sobre el tope que bloquea el difusor.
Desmontar la boquilla completamente y eliminar la suciedad.
Od‰roubujte matici (a obr.1) pomocí klíãe (b)-souãást balení,
vydûlejte trysku Rotojet. Otáãením vnitfiku trysky najdûte pojistku, na
kterou pomocí ‰piãatého pfiedmûtu zatlaãíte a od sebe odejmûte a
odstraníte neãistoty.
Pulizia della colonna attrezzata Entretien de la colonne de douche Cleaning the shower unit Reinigung der funktionseinheit Reiniging van de douchepaneel Limpieza de la columna equipada
âi‰tûní panelu se zafiízeníni
MANUTENZIONE
La colonna è realizzata in materiale acrilico,
pertanto quando si effettua la pulizia si deve
usare un detergente liquido con una spugna
Sapone liquido
o panno morbidi. Si consigliano prodotti
Savon liquide
come “Vim Liquido, Lysoform Casa, Cif
Liquid soap
Ammoniacal”. Per evitare il formarsi di tracce
di calcare è ideale asciugare la cabina dopo
Flüssiges Reinigungsmittel
l’uso con una pelle di daino o panno in
Vloeibare zeep
microfibra che pulisce a fondo senza lasciare
Jabón líquido
residui. Eventuali tracce di calcare si tolgono
utilizzando detergenti anticalcare specifici.
Tekuté ãistící prostfiedky
Per ridare lucentezza alle superfici acriliche
utilizzare un normale “Polish” usato anche per
lucidare la carrozzeria delle auto.
NON USARE ASSOLUTAMENTE DETERSIVI
ABRASIVI, ALCOOL, SOSTANZE A BASE DI ALCOOL, ACETONE O ALTRI SOLVENTI.
ENTRETIEN
La colonne est réalisée dans un matériau acrylique et ne doit être nettoyée qu'avec un détergent liquide
non agressif et une éponge ou chiffon doux. Pour empêcher la formation de traces de calcaire, essuyez la
cabine après utilisation avec une peau de chamois ou un chiffon en microfibre qui nettoie à fond sans
laisser de résidus. Eliminer toute trace de calcaire en utilisant des produits détergents anticalcaires spécifiques.
Pour rendre luisant la surface
acrylique utiliser un "Polish" ordinaire de carrossier.
NE JAMAIS UTILISER DE DETERGENTS ABRASIFS, ALCOOL, SUBSTANCES A BASE D'ALCOOL, ACETONE OU
AUTRES SOLVANTS.
CARING FOR YOUR WHIRLPOOL BATH
The shower unit is made of acrylic and must be cleaned using a liquid detergent and a soft cloth or sponge.
Use a good quality household liquid detergent. To prevent scale deposits, wipe dry using a chammy leather
or a soft lint-free cloth that removes stubborn deposits without leaving traces. Limescale deposits may be
removed using specific detergent products. To restore shine to the acrylic surface polish with an ordinary
wax polish such as car wax.
DO NOT USE ABRASIVE CLEANERS, ALCOHOL OR ALCOHOL BASED PRODUCTS, ACETONE OR OTHER
SOLVENTS.
Inconvenienti -
Problemes -
Troubleshooting -
Prima di chiamare l’Assistenza Tecnica verificare:
- Il collegamento corretto dei tubi flessibili e che questi non siano stati piegati durante il posizionamento
finale della colonna.
- Che giunga regolarmente l’acqua calda alla temperatura richiesta, e fredda sui relativi allacci a muro.
- Accertarsi che sia stato effettuato lo spurgo delle tubazioni prima dell’installazione.
Se nonostante i nostri consigli e il Suo attento utilizzo, la cabina attrezzata non dovesse ancora funzionare
correttamente, rivolgersi direttamente al Servizio Assistenza Tecnica più vicino individuando il numero
telefonico nell’opuscolo allegato.
Avant d'appeler l'Assistance Technique, vérifier que:
- les flexibles sont raccordés correctement et qu'ils n’ont pas été pliés pendant le positionnement final de
la colonne;
- le circuit principal produit régulièrement de l'eau froide et de l'eau chaude à la température souhaitée;
- les canalisations ont été purgées avant l’installation;
Si, malgré nos conseils et une utilisation appropriée, la cabine ne fonctionne toujours pas correctement,
contacter directement le centre d’assistance technique au voir le numéro de téléphone sur la brochure cijointe.
Before calling the Service Centre, check that:
- The hoses are properly connected and not kinked.
- Hot and cold water is being correctly delivered to the wall fittings.
- The water supply system was bled before the shower unit was installed.
If you have followed the instructions and the shower still does not work, call the nearest Service Centre.
The telephone numbers of authorised service centres are given in the enclosed list.
Smaltimento prodotto -
WARTUNG
Bei der Wanne handelt es sich um eine Acrylwanne. Zur Reinigung muß aus diesem Grund ein flüssiges
Reinigungsmittel mit einem Schwamm bzw. einem weichen Tuch verwendet werden. Es werden
handelsübliche Markenprodukte empfohlen. Zur Verhinderung von Kalkablagerungen sollte die Wanne
nach dem Gebrauch mit einem Fensterleder bzw. einem Mikrofasertuch ausgewischt werden. Eventuelle
Kalkablagerungen werden mit speziellen kalklosenden Produkten entfernt. Um glänzende Öberflächen
wieder zu erhalten, eine normale Autopolitur verwenden.
KEINESFALLS SCHEUERMITTEL, ALKOHOL, ALKOHOLHALTIGE STOFFE, ACETON BZW. ANDERE
LÖSUNGSMITTEL VERWENDEN.
ONDERHOUD
De wanden van de douchepaneel zijn vervaardigd uit acryl en voor het reinigen dient u dus een vloeibaar,
niet schurend, schoonmaakmiddel te gebruiken. Om kalkaanslag te voorkomen is het raadzaam de cabine
na gebruik droog te wrijven met een leren zeem of een zachte doek. Eventuele kalkaanslag op de wanden
kunt u verwijderen door regelmatig een normale “polish” aan te brengen die ook gebruikt wordt om de
carrosserie van auto’s te poetsen.
GEBRUIK ABSOLUUT GEEN SCHUURMIDDELEN, ALCOHOL, SCHOONMAAKMIDDELEN OP BASIS VAN ALCOHOL,
ACETON OF ANDERE OPLOSMIDDELEN.
MANTENIMIENTO
L a columna está realizada con material acrílico, por tanto al efectuar la limpieza es necesario utilizar un
detergente líquido con una esponja o un paño suave. Recomendamos productos detergentes como Vim
Líquido, Lysoform, Cif. Para evitar que se formen depósitos de cal es mejor secar la cabina el uso con una
gamuza o un paño de microfibra que limpie a fondo sin dejar residuos. Los posibles restos de cal pueden
eliminarse con cualquier producto antical. Para reavivar el brillo de la superficie acrílica usar un pulimento
de los que se usa para abrillantar la carrocería de los coches.
NO USAR NUNCA DETERGENTES ABRASIVOS, ALCOHOL, SUSTANCIAS A BASE
DE ALCOHOL, ACETONA U OTROS DISOLVENTES.
ÚDRÎBA
Tento panel je zhotoven zakrylového materiálu, ztohoto dÛvodu je nutno
pouÏívat tekuté ãistící prostfiedky shoubou popfi. jemn˘m hadfiíkem. Aby se
omezil vznik vodního kamene, doporuãujeme vytfiít kabinu koÏen˘m nebo
mikrovláknov˘m hadfiíkem. Vpfiípadû nahromadûní vodního kamene pouÏijte
ãistící prostfiedky ktomu urãené. KdosaÏení lesku pouÏívejte prostfiedky urãené
kle‰tûní karoserie auta.
V ÎÁDNÉM P€ÍPADù NEPOUÎÍVEJTE DRHNOUCÍ PROST€EDKY, ALKOHOL, LÁTKY
OBSAHUJÍCÍ ALKOHOL, ACETON POP€. ROZPOU·TùDLA.
Störungen -
Storingen -
Problemas -
Poruchy
Bevor Sie den Kundendienst verständigen, prüfen Sie bitte folgendes:
- Schläuche richtig angeschlossen und nicht geknickt.
- Kalt- und Warmwasser gelangt ordnungsgemäß zu den entsprechenden Wandanschlüssen.
- Sicherstellen, dass die Leitungen vor der Installation entlüftet wurden.
Sollte die Funktionseinheit trotz unserer Ratschläge und des ordnungsgemäßen Gebrauchs immer noch
nicht funktionieren, wenden Sie sich bitte an die nächste Kundendienststelle, deren Telefonnummer Sie
dem beiliegenden Blatt entnehmen können.
Controleer voordat u de Technische assistentie belt:
- of de slangen goed zijn aangesloten en niet zijn dubbelgevouwen.
- of het warme en koude water zijn aangesloten op de juiste aansluitingen op de muur.
- of de leidingen doorgespoeld zijn vóór de installatie.
Als de cabine ondanks onze adviezen en uw zorgvuldige gebruik niet goed zou functioneren, neem dan
rechtstreeks contact op met de Technische assistentiedienst bij u in de buurt; de telefoonnummers zijn te
vinden in het bijgaande boekje.
A n t e s d e l l a m a r a l s e r v i c i o d e A s i s t e n c i a Té c n i c a c o m p r o b a r q u e :
- Lo s t u b o s f l e x i b l e s e s t á n c o n e c t a d o s c o r r e c t a m e n t e y n o e s t á n d o b l a d o s .
- El agua caliente y fría llega regularmente a las conexiones en la pared.
- Se han vaciado las tuberías antes de la instalación.
Si a pesar de nuestros consejos y de un uso correcto, la cabina equipada siguiera sin funcionar correctamente,
dirigirse directamente al proveedor.
Dfiíve, neÏ se obrátíte na servis zákazníkÛ, vyzkou‰ejte prosím následující:
-zda jsou hadice dobfie upevnûny a nejsou pfiekfiíÏeny
-zda je zaji‰tûn proud teplé vody poÏadované teploty a studená voda na správné pfiípojce na stûnû.
-zda hadice nejsou zanesené odpadem
Pokud jste dÛkladnû ovûfiili ve‰keré na‰e rady a nena‰li jste Ïádnou závadu, obratˇte se na nejbliωí
servis, jehoÏ telefonní ãíslo najdete na pfiiloÏeném listu.
Elimination du produit Disposal Abfallentsorgung Desguace del producto Eliminace v˘robky
Verwerking als afval
Per lo smaltimento del prodotto o di suoi componenti, attenersi ai regolamenti locali in materia
di smaltimento rifiuti. Per il territorio Italiano D.L. vo n°22 del 5 Febbraio 1997, per gli altri paesi della CEE
direttive 91/156/CEE, 91/689/CEE e 94/62/CE.
Voor het afdanken van het product of van zijn onderdelen dient u zich te houden aan de lokale
voorschriften inzake afvalverwerking. Voor het Italiaanse grondgebied het Wetsbesluit n°22 van 5 februari
1997, voor de andere EEG-landen de richtlijnen 91/156/EEG, 91/689/EEG en 94/62/EEG.
Pour éliminer le produit et ses pièces, respectez les réglementations locales en matière d'élimination
des déchets. Sur le territoire italien, le Décret Loi n° 22 du 5 février 1997 ; dans les autres pays de la CEE,
les directives 91/156/CEE, 91/689/CEE et 94/62/CE.
Para la eliminación del producto o de partes del mismo, atenerse a las normativas locales en materia
de eliminación de residuos. Para el territorio Italiano D.L. vo n°22 del 5 Febrero de 1997, para los demás
países de la CE directivas 91/156/CEE, 91/689/CEE y 94/62/CE.
When disposing of the shower unit and its components at the end of their life cycle, follow local
disposal regulations. In Italy, Legislative Decree No. 22 of 5 February 1997 applies. In all other EU countries,
the following directives apply: 91/156/EC, 91/689/EC and 94/62/EC.
Eliminace a odstranûní v˘robku i jeho dílÛ musí souhlasit smístními zákonn˘mi pfiedpisy pro
manipulaci sodpadem. VItálii D.L. ã.22 ze dne 05.02.1997, vzemích EU smûrnice 91/156/EWG a 94/62/EG.
Die Entsorgung des Produkts und seiner Bestandteile muss unter Beachtung der örtlichen
Gesetzesvorschriften für die Abfallbehandlung erfolgen.
In Italien: D.L. Nr. 22 vom 5 Februar 1997. In den anderen Ländern der EU: Richtlinie 91/156/EWG, 91/689/EWG
und 94/62/EG.
60019IST (06 2013)