1
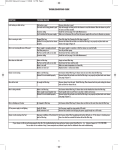
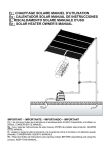
SISTEMAS DE CALEFACCIÓN SOLAR DE PISCINAS
PARA PISCINAS ENTERRADAS
Número de Producto S601
MANUAL DE INSTALACIÓN
Y OPERACIÓN
Cómo funciona la calefacción solar de piscinas
Por qué la calefacción solar funciona mejor
• Utilizando la bomba de su
piscina, se bombea agua
automáticamente a través
de los colectores solares.
• Cuando el sol calienta los
colectores, a continuación el
agua se calienta a medida que
se mueve por ellos.
• El agua calentada vuelve a la
piscina a través de las
líneas de retorno.
• Usted disfruta de su
propia piscina
calentada sin gastos
por combustible.
Sección transversal del colector
• El agua se calienta a medida que se mueve por
los muchos tubos en los colectores solares.
• El diseño de los tubos y la red atrapa el calor y
capta la luz cuando el sol se mueve por el cielo.
• El material de polipropileno resistente no se
oxida, corroe o descascarilla. Además el colector
es reversible.
POR FAVOR LEA ESTE MANUAL ATENTAMENTE. LA FORMA EN QUE SE INSTALA SU SISTEMA DE
CALEFACCIÓN SOLAR AFECTA EL DISFRUTE DE SU PISCINA CALENTADA MEDIANTE ENERGÍA
SOLAR Y SU GARANTÍA.
ADVERTENCIA: a) Los colectores solares con frecuencia se instalan en los tejados de edificios. A menos que usted
esté muy familiarizado con el trabajo en tejados y tenga las escaleras y equipo de seguridad apropiados para este tipo de
trabajo, debería contratar a alguien con la experiencia necesaria para hacer la instalación. El incumplimiento de las
prácticas de seguridad sobre tejados o cualquier otra estructura elevada puede resultar en una caída que puede
ocasionarle una lesión grave.
b) Al instalar los colectores en el suelo, no construya un bastidor que sirva a los niños como acceso a la piscina.
IMPORTANTE
ANTES DE EMPEZAR, LEA POR COMPLETO ESTE MANUAL
ORIENTACIÓN
¿Qué tan bien funciona la calefacción solar?
Un sistema con el tamaño y la instalación adecuados aumentará la temperatura de la piscina en hasta 10 durante la estación. Usted
sólo querrá hacer circular el agua cuando hay sol. Los días nublados o lluviosos, la calefacción solar no funcionará tan bien (y
probablemente usted no nadará en esos momentos), pero el agua recuperará la temperatura después de uno o dos días cálidos.
¿Necesito una bomba especial?
Si la bomba de su piscina funciona bien, no debería tener ningún problema si utiliza dicha bomba. Una bomba de un caballo de
fuerza podrá soportar instalaciones de hasta 30 pies (9.14 metros) de distancia del equipo de la piscina y hasta la altura equivalente
a un piso. Si los colectores están fríos al tacto cuando el agua circula por ellos en un día cálido de sol, significa que hay suficiente flujo.
¿Dónde puedo instalar los colectores solares?
En cualquier lugar donde llegue pleno sol al menos seis horas durante el día. Cuanto más tiempo estén los colectores a pleno sol,
mejor funcionarán. Si usted está haciendo el montaje en un ángulo (como un techo o bastidor), los colectores deben estar orientados
en dirección sur.
¿Qué herramientas necesitaré?
• Un desatornillador de cabeza plana o una llave para tuercas de 5/16 de pulgada
• Un taladro
• Una broca de 1/8 de pulgada y una broca “Phillips”
• Sellador de silicón (GE II o su equivalente)
• Un instrumento cortante afilado o unas tijeras de taller
¿Qué piezas adicionales necesitaré para instalar el sistema solar en un techo?
• Necesitará la cantidad correcta de tubería PVC cédula 40 de 1 _ pulgadas (3.81 cm) para la plomería que se conecta de ida y
vuelta al equipo de la piscina.
• También necesitará imprimador, pegamentos y accesorios para tubería PVC (que puede conseguir donde compra la tubería PVC).
¿Cuánto pesará el sistema solar cuando esté lleno de agua?
Cada caja solar (2 colectores) pesará aproximadamente 80 libras (36 kg) cuando esté llena de agua. La carga adicional para el techo
es bastante pequeña, ya que el peso se distribuye sobre una superficie grande.
¡ADVERTENCIA! SI VA A MONTAR LOS COLECTORES EN UN
BASTIDOR CONSTRUIDO SOBRE EL SUELO, COLOQUE EL
BASTIDOR DE MANERA QUE NO SIRVA A LOS NIÑOS COMO
ACCESO A LA PISCINA.
Guía de Pedido para S601
Dimensiones de la piscina
15’ x 30’
16’ x 36’
20’ x 40’
Número de cajas solares
2, más un Kit SK21 de instalación para piscinas enterradas
3, más un Kit SK21 de instalación para piscinas enterradas
4, más un Kit SK21 de instalación para piscinas enterradas
Use una manta solar para atrapar el calor durante la noche o en días de frío.
¡ SE ANULARÁ LA GARANTÍA SI SE USAN HERRAJES DE
MONTAJE QUE NO SEAN DEL FABRICANTE!
2
Componentes del kit del Producto No. S601
Cantidad No. del artículo Descripción
Kit de herrajes SK60 para piscinas enterradas
(Cada caja de colector solar incluye un kit de herrajes)
2
SCPNL220
Colectores solares de polipropileno de 2’ x 20’
4
SC375HOSE
Manguera de goma de 3 3/4”de largo
8
SC150CLMP
Abrazaderas de manguera 35-51 de 1.25
pulgadas de acero inoxidable
10
50077
Ménsulas de montaje de acero inoxidable
10
60630
Tornillos #14 de 2” de acero inoxidable
El kit viene en bolsa de plástico sellada al calor.
Kit SK21 de instalación de sistema / plomería / montaje para
piscinas enterradas (Este kit se vende por separado.)
1
18020
Rollo de 100’ de correa tejida
5
50077
Ménsulas de montaje de acero inoxidable
5
60630
Tornillos #14 de 2” de acero inoxidable
1
SC375HOSE
Manguera de goma de 3 3/4” de largo
1
SCVRCSK21
Tapón terminal para alivio de vacío
1
SCRBCSK21
Tapón terminal de 1 1/2” de goma
3
SC150CLMP
Abrazadera de manguera 35-64 de 1 1/2” de
acero inoxidable
2
30089-1
Adaptador de tubo “PVC a manguera”
1
60019-2
Válvula de retención de 1 1/2”
1
60527
Válvula de 3 vías de 1 1/2”
1
Manual de instalación
El kit viene en bolsa de plástico sellada al calor.
Los colectores SunHeater están fabricados
con moldes y materiales especiales
diseñados para ofrecerle el sistema de alto
rendimiento solar más duradero que existe
para calentar piscinas. Nota: Durante la
fabricación es necesario hacer ciertas
incisiones mecánicas para terminar de
ensamblar el colector (véanse las fotos a la
derecha). Estas incisiones son normales y no
afectan de manera adversa el desempeño o
la durabilidad de su equipo SunHeater.
Nótese, por favor, que los
pequeños agujeros en el
colector (véase la foto a la
derecha) NO deben ser
usados para montarlo.
Use únicamente el kit SK43 de montaje aprobado
por SmartPool y siga las
instrucciones que ahí se
proporcionan. De no
hacerlo, se invalidará su
garantía.
3
DISPOSICIÓN DEL SISTEMA
ADVERTENCIA: A menos que usted esté muy familiarizado con el trabajo en techos y tenga las escaleras y equipo de seguridad
apropiados para este tipo de trabajo, debería contratar a alguien con la experiencia necesaria para hacer la instalación. El
incumplimiento de las prácticas de seguridad sobre techos o cualquier otra estructura elevada puede resultar en una caída que
puede ocasionarle una lesión grave.
Se requiere:
• Un desatornillador de cabeza plana o una llave para
tuercas de 5/16 de pulgada
• Un taladro
• Una broca de 1/8 de pulgada y una broca “Phillips”
• Sellador de silicón (GE II o su equivalente)
• La cantidad correcta de tubería PVC cédula 40 de 1 1/2
pulgadas para la plomería que se conecta de ida y vuelta
al equipo de la piscina y accesorios.
• Imprimador y pegamentos para tubería PVC
• Nombre correct de tuyaux PVC de catégorie 40 de 1,5
po pour la plomberie aller-retour entre l’équipement de la
piscine et les raccords
• Apprêt et colle pour tuyaux PVC
Adaptadora de
tubo
RETORNO DEL COLECTOR SOLAR
Tapón terminal
para alivio de vacío
Manguera conectora
de goma negra
28” de centro de
agujero a centro
de agujero
Tapón terminal
de goma
ALIMENTACIÓN AL COLECTOR SOLAR
Adaptador
a de tubo
Bomba
Filtro
Válvula de retención
Válvula de 3 vías
Union en T
(no incluida)
Alimentación de agua fría
Retorno de agua caliente
4
INSTALACIÓN DE UN SISTEMA EN UN TECHO
1. Saque los colectores de la caja y póngalos al sol (de 30 minutos a una hora) para que
recuperen su forma. ¡NO PONGA LOS COLECTORES SOBRE EL PASTO, PORQUE ÉSTE
PUEDE DAÑARSE POR DEBAJO!
2. Deje libre por lo menos 1 pie (30 cm) alrededor del sistema solar para colocar ménsulas y
tubos y tener una zona de trabajo. Al planear la disposición de los colectores, deberá tomar
en cuenta la presencia de obstrucciones tales como los respiraderos del techo. En el caso de
respiraderos de hasta 3 pulgadas (7.6 cm) de diámetro, los colectores se pueden colocar a
ambos lados del respiradero.
ADVERTENCIA: NO PISE LOS COLECTORES SOLARES.
3. Determine la posición del colector superior. Distribuya las ménsulas de montaje, poniendo una
por cada una de las ranuras a lo largo del colector. El colector debe quedar ligeramente
inclinado hacia el punto de entrada (por donde entra el agua a los colectores) para facilitar el drenaje.
4
4. Taladre agujeros piloto de 1/8 de pulgada (0.3175 cm) para los tornillos que se incluyen para
todas las ménsulas. Los tornillos deben ser lo suficientemente largos para alcanzar a entrar en
el techo inferior, debajo de las tejas. Inyecte en los agujeros y sobre la superficie circundante del
techo una cantidad generosa de sellador de silicón. Monte la ménsula en el techo (como se
muestra), procurando que quede centrada en la ranura.
5. Retire y deseche los tapones negros que protegen las terminales con rosca de los tubos
ubicados en ambos extremos de los colectores.
6. Ponga las mangueras conectoras de goma negra y dos abrazaderas de 1 _ pulgadas (3.8 cm)
a las terminales de los cabezales (como se muestra).
7. Cada abrazadera debe quedar a _ pulgada (1.25 cm) del extremo de la manguera conectora de
goma. Centre la abrazadera sobre la hendidura en el cabezal y apriétela.
8. Empiece por amarrar la correa a la ménsula superior, luego pásela por las demás ménsulas y
finalmente amárrela a la ménsula inferior (como se muestra).
6
ADVERTENCIA:
NO USE HERRAJES DE MONTAJE ADICIONALES QUE NO ESTÉN APROBADOS POR LA FÁBRICA.
NO FIJE LOS CABEZALES.
DE HACERLO, PODRÁ DAÑAR LOS COLECTORES Y ANULARÁ SU GARANTÍA.
Nota: Al terminar, cada colector estará atravesado por cinco correas verticales. En zonas de vientos
fuertes, para cada colector recomendamos usar un Kit SK-34 para viento fuerte. Si desea pedir este
producto, llame al 1-888-560-7665.
¡NO MONTE LOS COLECTORES PONIENDO ABRAZADERAS “C” EN LOS CABEZALES!
9. Usando las abrazaderas para manguera incluidas, instale el tapón terminal para alivio de vacío
(incluido en el kit SK21) en la manguera de goma (incluida en el kit SK21), que se encuentra en el
ángulo superior del sistema (véase la página 4). Usando una de las abrazaderas incluidas,
instale en el ángulo inferior el tapón terminal de goma incluido (como se muestra en la página 4).
10.Usando los conectores y las abrazaderas para manguera incluidos, conecte a los cabezales de entrada y salida el extremo arponado
de los Adaptadores de tubo “PVC a manguera” (incluidos en el kit SK21). Conecte a los tubos de alimentación y retorno PVC (como
se muestra en la página 4) los extremos lisos de los Adaptadores de tubo “PVC a manguera” incluidos.
11.Verifique que todas las abrazaderas estén debidamente colocadas y apretadas. (NO LAS APRIETE DEMASIADO.)
NOTA: HAGA EL TRAZO DE LA PLOMERÍA ANTES DE APLICAR IMPRIMADOR Y PEGAMENTO.
12.Disponga como se indica en el diagrama proporcionado la tubería PVC de alimentación y retorno entre el sistema solar y el equipo
de la piscina.
13.Coloque en una zona conveniente la Válvula de 3 vías incluida y conéctela (como se muestra).
14.Coloque debidamente entre el filtro y la Válvula de 3 vías (como se muestra en la página 4) la Válvula de retención incluida
(procurando que la flecha en la Válvula de retención apunte hacia la Válvula de 3 vías). Esto evitará que al apagar la bomba el agua
fluya en sentido contrario hacia ella.
15.Aplique imprimador y pegamento a todos los tubos y accesorios. Al pegar tubos de PVC, siempre limpie de antemano las superficies
a pegar. Aplique imprimador a las piezas a unir y luego aplique el pegamento. Una las piezas y gírelas un cuarto de vuelta para que
se adhieran bien.
¡YA ESTÁ LISTO PARA ECHAR A ANDAR SU SISTEMA DE CALEFACCIÓN SOLAR PARA PISCINA!
16.Eche a andar su sistema y verifique que no tenga fugas.
8
NOTA: Al momento de echar a andar el sistema, en el retorno aparecerán burbujas de aire. Esto es
normal y dejará de suceder cuando se haya purgado todo el aire presente en el sistema de calefacción
solar. De no ser así, cambie la ubicación de la válvula para alivio de vacío y del tapón terminal de goma,
lo cual eliminará el problema.
5
OPERACIÓN Y MANTENIMIENTO
Operación
1. El colector debe estar frío al tacto cuando el sol da sobre el colector y el agua está pasando por él. Esto
significa que se está transfiriendo el calor al agua.
2. El agua que vuelve a su piscina estará unos grados (de 3 a 5 grados) más caliente que la propia piscina.
Ésta es la forma más eficaz de calentar una gran masa de agua como una piscina. Siga transfiriendo el
agua y añada unos cuantos grados cada vez que pase el agua.
3. Haga circular el agua a través del colector solar al menos 6 horas por día durante las horas de luz en los
días de sol. Si hace circular el agua a través del colector por la noche o en días nublados o de frío, enfriará
el agua de su piscina en lugar de calentarla. Si requiere usar su bomba durante la noche, abra la válvula de
desvío para que el agua se regrese directamente a la piscina, sin pasar por el sistema solar.
Acondicionamiento para el invierno
¡EL SISTEMA SOLAR DEBE DRENARSE PARA ACONDICIONARLO PARA EL INVIERNO¡ ¡SU
GARANTÍA NO CUBRE LOS DAÑOS PRODUCIDOS POR LA CONGELACIÓN! ¡DEBE DRENAR
LOS COLECTORES DE LA MISMA FORMA QUE DRENA EL RESTO DEL EQUIPO DE SU PISCINA¡
Retire el tapón blanco terminal que se encuentra en la parte superior del sistema solar. Retire el tapón blanco terminal ubicado en la
parte inferior y asegúrese de drenar del sistema TODA el agua. Vuelva a colocar los tapones terminales y sople aire comprimido a
través de todo el sistema. Después de sopletear el sistema, retire y guarde el tapón terminal inferior para usarlo nuevamente en la
primavera cuando vuelva a echar a andar el sistema. Los colectores se pueden dejar en su lugar (siempre y cuando estén
completamente drenados), porque resistirán aún el más crudo de los inviernos. Por supuesto, si así lo desea, puede almacenar los
colectores en algún lugar tibio y seco.
Reparacion del colector solar
SI EL COLECTOR TIENE UNA FUGA
Su colector solar está garantizado contra defectos de material y fabricación.
Si se produce una fuga por cualquier otra razón, puede utilizar el método de
reparación que se muestra más abajo. El colector no está garantizado contra
los daños producidos por la congelación.
REPARACIÓN DEL COLECTOR SOLAR
Este método permite una reparación fácil y permanente de un colector en
sitio aislando el tubo ascendente principal. Fijándose en la figura a la
derecha, localice el tubo que debe aislarse. (Se ha mostrado el tubo del
extremo por motivos de claridad). Utilizando un cuchillo universal afilado,
corte con cuidado aproximadamente 1 pulgada (2.5 cm) del tubo en ambos
cabezales. Introduzca un tornillo para lámina metálica Nº 10, preferiblemente de acero inoxidable, en el agujero en el cabezal. El
tornillo debe ser entre ? pulgada (1.27 cm) y ? de pulgada (1.91 cm) de largo. ¡NO LO APRIETE DEMASIADO¡ Si la rosca del tornillo
se estropea o si sigue habiendo fugas después de la reparación, utilice un tornillo Nº 12. Este método de reparación no anulará la
garantía del colector.
Con un cuidado y un acondicionamiento para el invierno adecuados, disfrutará por muchos años de sus colectores solares.
6
Colector solar SunHeater
Garantía limitada de cinco años
GARANTÍA DE CINCO AÑOS
Garantía limitada de cinco años a partir de la fecha de compra, con un año de garantía completa.
Después del primer año, el reclamante pagará el precio de lista vigente en la fecha de la reclamación
menos una sexagésima parte (1/60) de ese precio por cada mes que quede en el período de la garantía.
TODAS LAS RECLAMACIONES BAJO GARANTÍA DEBEN GESTIONARSE DIRECTAMENTE
CON SMARTPOOL. NO DEVUELVA EL PRODUCTO A SU DISTRIBUIDOR. SMARTPOOL
SÓLO ACEPTA RECLAMACIONES DE PROPIETARIOS DE PISCINAS.
SmartPool Inc. garantiza al comprador original del colector solar que la empresa, a su elección, reparará o reemplazará cualquier colector solar que sea defectuoso, en cuanto a la fabricación o a los materiales,
una vez que el propietario envíe el colector a SmartPool, Inc. con el franqueo pagado, sujeto a las disposiciones de la garantía limitada descrita más arriba, y las exclusiones y limitaciones descritas más abajo.
De conformidad con los términos y condiciones de esta garantía, SmartPool, a su discreción exclusiva, reparará el colector por un precio simbólico para el propietario o reemplazará el colector según las
disposiciones prorrateadas indicadas en esta garantía. El propietario correrá con los gastos de envío de todos los colectores reparados o reemplazados. Se indica la base prorrateada para el reemplazo de
colectores más arriba.
Qué está cubierto: Se garantiza que el colector solar está libre de defectos de materiales o fabricación cuando sale de la fábrica.
Qué no está cubierto: Los accesorios de ferretería, incluidas las mangueras, abrazaderas y accesorios de plástico; daños producidos por la congelación debido a un vaciado, acondicionamiento para el invierno
o almacenamiento inadecuados; daños, defectos, mal funcionamiento u otras fallas que surjan del uso del producto que no cumple con las instrucciones proporcionadas por el fabricante; daños, defectos, mal
funcionamiento u otras fallas causados por o relacionados con reparaciones realizadas por cualquier técnico que no sea un representante de servicio autorizado de SmartPool, Inc. No se aceptarán reclamaciones
SMARTPOOL, INC. BAJO NINGUNA CIRCUNSTANCIA Y POR NINGÚN MONTO SERÁ RESPONSABLE DE DAÑO EMERGENTE O INCIDENTAL ALGUNO, DE LESIONES O DAÑOS A PERSONAS O
PROPIEDAD ALGUNO QUE USE O SEA USADO EN CONEXIÓN CON ESTE PRODUCTO, O DE LA PÉRDIDA DE GANANCIAS U OTROS COSTOS O GASTOS DEL TIPO O DE LA NATURALEZA QUE
FUERE. SMARTPOOL, INC. NO OTORGA NINGUNA OTRA GARANTÍA Y NO HACE NINGUNA OTRA DECLARACIÓN, YA SEA EXPRESA O IMPLÍCITA, YA SEA DE COMERCIABILIDAD, DE IDONEIDAD
PARA UN PROPÓSITO EN PARTICULAR O DE OTRO TIPO, QUE NO SEAN AQUÉLLAS ESTABLECIDAS ESPECÍFICAMENTE EN ESTA GARANTÍA. SALVO EN LOS CASOS ESTIPULADOS EN ESTA
GARANTÍA, NINGUNA PERSONA, EMPRESA O SOCIEDAD ESTÁ AUTORIZADA PARA HACER DECLARACIONES O INCURRIR EN OBLIGACIONES A NOMBRE DE O POR PARTE DE SMARTPOOL, INC.
QUEDA EXPRESAMENTE ENTENDIDO QUE ESTA GARANTÍA ES EL ÚNICO RECURSO AL CUAL TIENE DERECHO EL COMPRADOR Y ESTA GARANTÍA CONTIENE EL CONVENIO PLENO Y TOTAL
ENTRE SMARTPOOL Y EL COMPRADOR. ESTA GARANTÍA ESTABLECE LAS ÚNICAS OBLIGACIONES DE SMARTPOOL CON RESPECTO A ESTE PRODUCTO Y NO EXISTE NINGUNA GARANTÍA QUE
SE EXTIENDA MÁS ALLÁ DE LA DESCRIPCIÓN QUE APARECE AQUÍ.
Para presentar una reclamación:
1.
2.
3.
4.
Llame al 1-732-730-9880 para iniciar el proceso de reclamación.
En un plazo de 10 días recibirá una carpeta de instrucciones.
Por favor espere entre 2 y 4 semanas a que se satisfagan las reclamaciones bajo garantía.
Si no recibe su colector en un plazo de 6 semanas, sírvase llamar al Departamento de Garantías de
SmartPool entre la 1 y las 4 de la tarde de lunes a viernes hora oficial del Este al 1-732-730-9880.
Las declaraciones presentadas en esta garantía son las únicas declaraciones hechas por SmartPool, Inc. con respecto al producto, y esta garantía no constituye una garantía de rendimiento o
satisfacción del producto. El propietario del producto tiene la responsabilidad de probar y verificar regularmente el producto para asegurar su buen funcionamiento y seguridad. Esta garantía
otorga al comprador original derechos legales específicos. Usted puede tener otros derechos dependiendo del lugar en el que viva.
Lakewood, NJ 08701 • www.smartpool.com
S220 72004
for Inground Pools
Product Number S601
INSTALLATION AND
OPERATION MANUAL
How Solar Pool Heating Works
Why SunHeaterTM Works Best
• Using your pool pump, water
is automatically pumped
through the solar collectors.
• The water is then heated by the
sun as it moves through the
collectors.
• The heated water is returned
back to the pool, through
your return lines.
• You enjoy your own
heated pool with no
fuel costs.
Collector Cross Section
• Water is heated as it moves through the many
tubes in the solar collectors.
• Tube and web design traps heat, catches light as
the sun moves across the sky.
• Tough polypropylene material won’t rust, corrode
or scale. Plus, the collector is reversible.
PLEASE READ THIS MANUAL CAREFULLY. YOUR ENJOYMENT OF YOUR SOLAR HEATED POOL
AND YOUR WARRANTY ARE AFFECTED BY HOW YOUR SOLAR HEATING SYSTEM IS INSTALLED
CAUTION: a) Solar collectors are often installed on the roofs of buildings. Unless you are very familiar with working
on roofs and have the proper ladders and safety equipment for such work, you should hire someone with
the necessary experience to do the installation. Failure to observe safe practices on a roof or other elevated
structure may result in falling, leading to serious injury to you.
b) When installing collectors on the ground, do not build a rack support that could allow children access
into the pool.
IMPORTANT
*READ THIS ENTIRE MANUAL BEFORE STARTING*
ORIENTATION
How Well Does Solar Heating Work?
A properly sized and installed system will raise pool temperatures up to 100F during the season. You will only want to circulate
water through the solar collector when the sun is shining. When it's cloudy or rainy, solar won't work as well (and you probably
won't be swimming during those times), but your water will be back up to temperature after one or two warm days.
Do I Need A Special Pump?
If your pool pump is in good working condition, there shouldn't be any problem using your existing pump. A one HP pump will
handle installations up to 30 feet away from the pool equipment and one story up. If the collectors are cool to touch when the
water is running through them on a warm sunny day, you are getting enough flow.
Where Can I Put The Solar Collectors?
Anywhere you get at least 6 hours of full sun during the day. The longer the collectors are in full sun, the better they will work.
If you are mounting the solar on an angle (like a roof or rack), the collectors should face a southerly direction.
What Tools Will I Need?
•
•
•
•
•
Flat head screwdriver or 5/16" nut driver
Power drill
1/8" drill bit and a Phillips head bit
Silicone sealant (GEII or equivalent)
A Sharp Cutting Instrument or Utility Scissors
What additional parts will I need to install the solar system on a roof?
• You will need the correct amount of 1 1/2" Schedule 40 PVC pipe for the plumbing, going to and from your pool equipment.
• You will also need PVC primer, glue, and fittings (available where you buy PVC pipe).
How much will the solar system weigh when filled with water?
Each solar box (2 collectors) will weigh approximately 80 lbs. when filled with water. There is very little additional load on your roof
especially since the weight is dispersed over a large area.
WARNING! IF MOUNTING ON A RACK PLACED ON THE
GROUND, POSITION THE RACK SO THAT IT DOES NOT
PROVIDE ACCESS TO THE POOL FOR CHILDREN.
Inground Pools up to
15 x 30’
16 x 36’
20 x 40’
Number of Solar Boxes
2 Plus one SK21 Inground Installation Kit
3 Plus one SK21 Inground Installation Kit
4 Plus one SK21 Inground Installation Kit
Use a solar blanket to hold in heat at night or during cool weather.
WARNING! USE OF NON-FACTORY INSTALLATION
MOUNTING HARDWARE WILL VOID YOUR WARRANTY.
2
Product # S601 Kit Components
Qty
Item #
Description
SK60 Inground Hardware Kit
(One Hardware Kit Packed In Each Solar Collector Box)
2
2’ x 20’ Polypropylene Solar Collectors
4
SC375HOSE
3 3/4” Long Rubber Hose
8
SC150CLMP
1 1/2” SS Hose Clamp 35-64
10
50077
SS Mounting Brackets
10
60630
2” #14 SS Screws
Packed In heat sealed plastic bag
SK21 Inground System Installation/Plumbing/Mounting Kit
(Purchased Separately)
1
18020
100ft. Roll of Web Strap
5
50077
SS Mounting Brackets
5
60630
2” #14 SS Screws
1
SC375HOSE 3 3/4” Long Rubber Hose
1
SCVRCSK21 Vacuum Relief End Cap
1
SCRBCSK21 1 1/2” Rubber End Cap
3
SC150CLMP 1 1/2” SS Hose Clamp 35-64
2
30089-1
PVC to Hose Pipe Adapter
1
60019-2
1 1/2” Check Valve
1
60527
1 1/2” 3-Way Valve
1
Installation Manual
Packed in heat-sealed plastic bag
SunHeater collectors are manufactured with
special molds and materials designed to provide you with the most durable, high performance solar pool heating system available.
Note: during manufacturing certain mechanical incisions are required to complete the
assembly of the collector (see photos on
right). These are normal and do not adversely affect the performance or durability of your
SunHeater.
Please Note: Small
holes in collector (see
photo at right) are NOT
to be used for mounting.
Use only SmartPoolapproved mounting
hardware and follow the
directions provided.
Failure to comply will
void your warranty.
3
SYSTEM LAYOUT
CAUTION:
CAUTION: Unless you are familiar with working on roofs and have the proper ladders and safety equipment for such work, you
should hire someone with the necessary experience to do the installation. Failure to observe safe practices on a roof
or other elevated structure may result in falling, leading to serious injury to you.
Required:
• Flathead screwdriver or 5/16" nut driver
• Power Drill
• 1/8" drill bit and Phillips head bit
• Silicone sealant (GE II or equivalent)
• Enough 1 1/2" Schedule 40 PVC pipe
for the plumbing going to and from your
pool equipment and fittings.
• PVC Primer and Glue
Pipe adapter
RETURN FROM SOLAR
Vacuum Relief
End Cap
Black Rubber Connector Hose
28” hole
center to
hole center
Pipe
Adapter
Rubber End Cap
FEED TO SOLAR
Pump
Filter
Check Valve
3-Way Valve
Cool Water Feed
Warm Water Return
4
ROOF MOUNT SYSTEM INSTALLATION
1. Remove the collectors from the box and allow the collectors to relax in the sun (30 minutes
to an hour). DO NOT LAY COLLECTORS ON THE GRASS IT CAN DAMAGE THE LAWN
UNDERNEATH!
2. Allow at least one foot around the solar system for brackets, piping, and working area. Roof
obstructions like vents should be taken into consideration when laying out collectors. With
a roof vent up to 3" in diameter, the collectors can be placed on either side of the vent.
WARNING: DO NOT WALK ON THE SOLAR COLLECTORS
3. Determine the position of the top collector. Lay out the mounting brackets at each slot
along the length of the collector. The collector should slope slightly toward the inlet point
(where the water enters the collectors) to allow for drainage.
4. Drill 1/8" pilot hole for lag screws provided for all brackets. Lag screws should be long
enough to reach the sub-roof under the shingles. Inject a generous amount of silicone
sealant into the holes and onto the surrounding roof surface. Mount the bracket to the roof
(as shown) with the bracket centered in the slot.
4
5. Remove and discard the black protective end caps covering the threaded ends of the
header pipes at both ends of the collectors.
6. Slip the black rubber connector hoses with two 1 1/2" hose clamps over the ends of
header pipes (as shown).
7. Position the hose clamps 1/2" in from each end of the rubber connector hose. Center
them over the grooves on the header and tighten.
8. Begin tying the strap to the top bracket, run through the brackets below and tie to the
bottom bracket (as shown).
WARNING:
6
DO NOT ADD ADDITIONAL NON-FACTORY APPROVED MOUNTING HARDWARE.
DO NOT CLAMP HEADER PIPES DOWN.
YOU MAY DAMAGE YOUR COLLECTORS AND WILL VOID YOUR WARRANTY.
Note: When completed, you will have five vertical straps running across each collector.
For high wind areas, we recommend one SK-34 High Wind Kit for each collector.
Call 1-888-560-7665 for ordering info.
DO NOT MOUNT COLLECTORS USING “C” CLAMPS ON HEADER PIPES!!
9.
Install the vacuum relief end cap (provided in SK21) in the rubber hose (provided in SK21)
located at the top corner of the system (see page 4) using hose clamps (provided). Install
the rubber end cap (provided) at the diagonal bottom corner (as shown on page 4) using a
hose clamp (provided).
8
10. Attach barbed end of the PVC to Hose Pipe Adapters (provided in SK21) to inlet and outlet headers using rubber hose connectors
(provided) and hose clamps (provided). Attach smooth ends of the PVC of the Hose Pipe Adapters (provided) to your feed and
return PVC pipes (as shown on page 4).
11. Inspect all clamps for proper position and tighten (DO NOT OVERTIGHTEN).
NOTE: LAYOUT PLUMBING BEFORE PRIMING AND GLUING.
12. Run your feed and return PVC pipe from the solar to the pool equipment as shown in the diagram provided.
13. Position the 3-Way Valve (provided) in a convenient area and connect (as shown).
14. Properly position the Check Valve (provided) between the filter and the 3-Way Valve (as shown on page 4) (with the arrow on the
Check Valve pointing toward the 3-Way Valve). This will prevent water from flowing in the reverse direction into filter when
the pump is turned off.
15. Prime and glue all plumbing and fittings. When gluing PVC pipe, always wipe clean parts to be glued. Apply primer to parts
being joined then swath with PVC glue. Connect parts and twist quarter turn for proper bonding.
YOU ARE NOW READY TO START-UP YOUR SOLAR POOL HEATER SYSTEM!
16. Start-up your system and check for leaks.
NOTE: Upon start-up you will see air bubbles come through the return. This is normal and will stop after all the air has
been purged from the solar heating system. If not, switch the locations of the vacuum relief valve and the rubber end
cap that will eliminate the problem.
5
OPERATION & MAINTENANCE
Operation
1. The collectors should feel cool to the touch when the sun is shinning on them and water is passing through. This means that the
heat is being transferred to the water.
2. The water returning to your pool will be a few degrees (3-5degrees) warmer than the pool itself. This is the most efficient
way to heat a large body of water like a pool. Keep circulating the water, which adds a few degrees each pass.
3. Circulate water though the solar collectors at least 6 hours per day during the daylight hours on sunny days. If you circulate
water through it at night, when it’s overcast or on chilly days, you will cool your pool water rather than heat it. If you need to
run your pump at night, divert the water directly back to the pool and bypass the solar system. An automatic controller will sense
the water temperature and available radiation from the sun and automatically turn the 3-Way Valve to direct the flow of water
accordingly. Contact your local dealer or SmartPool at 888-560-7665 for purchasing details.
Winterization
YOUR SOLAR SYSTEM MUST BE DRAINED FOR WINTERIZATION! FREEZE DAMAGE IS NOT
COVERED UNDER WARRANTY! YOU MUST DRAIN YOUR SOLAR COLLECTORS JUST LIKE
YOU DRAIN THE REST OF YOUR POOL EQUIPMENT!
Remove the vacuum relief valve at the top of the solar system. Remove the rubber end cap at the bottom and be sure ALL the
water is drained out of the system. Replace end caps and blow pressurized air in the reverse direction of normal water flow. This
is the most effective way to drain your system. You can leave the collectors in place (as long as they are completely drained) and
they will withstand even the harshest winters. Of course, you can store your collectors inside in a warm dry place. if you like.
Collector Repair
IF A COLLECTOR DEVELOPS A LEAK
Your solar collectors are warranted against defects in materials and workmanship.
If a leak develops for any other reason, you may use the repair method shown.
The collectors are not warranted against freeze damage.
SOLAR COLLECTOR REPAIR
This method allows for an easy and permanent, on-site repair of a collector by
isolating the leading riser tube. Referring to the figure at the right, locate the
tube to be isolated. (End tube has been shown for clarity). Using a sharp
utility knife, very carefully cut away approximately 1" of the tube at both
headers. Drive a #10 sheet metal screw, preferably stainless, into the
hole in the header. The screw must be between 1/2" and 3/4" long.
DO NOT OVERTIGHTEN! If the screw strips out, or if the repair leaks,
use a #12 screw. This repair method will not void the collector warranty.
With proper care and winterization, you will enjoy your solar collectors for many years.
6
SMARTPOOL SOLAR COLLECTOR
F i v e Ye a r L i m i t e d Wa r r a n t y
FIVE YEAR WARRANTY
Five year limited warranty from date of purchase with one year full.
After the first year, the claimant shall pay the list price at the date of the claim less one-sixtieth (1/60) of that
price for each full month remaining in the warranty period.
ALL WARRANTY CLAIMS MUST BE HANDLED DIRECTLY
WITH SMARTPOOL. DO NOT RETURN TO YOUR DEALER. SMARTPOOL
ACCEPTS CLAIMS FROM POOL OWNERS ONLY.
SmartPool Inc. warrants to the original purchaser of the Solar Collector that the company that it will, at its option, repair or replace any solar collector that proves to be defective in either workmanship or material upon prepaid return of the collector by the owner to SmartPool, Inc., subject to the provisions of the limited warranty stated above, and the exclusions and limitations set forth below. SmartPool, Inc. will, pursuant to the terms of this warranty, at its sole option. either repair the collector at a nominal charge to the owner, or replace the collector per the pro-rated provisions stated herein. All repaired or replaced collectors will be returned at the homeowner’s expense. The pro-rated basis for collector replacement is set forth above.
What is covered: The solar collector is warranted to be free of defects in material and workmanship when leaving the factory.
What is not covered: Hardware; including hoses, clamps and plastic fittings; Any damage due to freezing caused by or related to improper drainage, winterization, or storage; Damage, defects, malfunctions, or other failures
arising from use of the product which does not comply with the instructions provided by the manufacturer; Damage, defects, malfunctions, or other failure caused by or related to repairs performed by any servicer other than
an authorized service representative of SmartPool, Inc. Claims will not be accepted for a collector’s damage in transit unless damage to shipping container is noted at time of delivery on the transport company’s delivery bill.
SMARTPOOL, INC. SHALL IN NO WAY BE LIABLE OR RESPONSIBLE UNDER ANY CIRCUMSTANCES OR IN ANY AMOUNT FOR ANY CONSEQUENTIAL OR INCIDENTAL DAMAGES OR FOR ANY INJURY OR
DAMAGES TO PERSON OR PROPERTY USING OR USED IN CONNECTION WITH THIS PRODUCT, OR FOR LOSS OF PROFITS OR OTHER COSTS OR EXPENSES OF ANY KIND OR CHARACTER. THERE ARE
NO OTHER WARRANTIES OR REPRESENTATIONS, EITHER EXPRESS OR IMPLIED, WHETHER OF MERCHANTABILITY, FITNESS FOR A PARTICULAR PURPOSE, OR OTHER, MADE BY SMARTPOOL, INC.,
OTHER THAN THOSE SPECIFICALLY SET FORTH IN THIS WARRANTY. NO PERSON, FIRM, OR CORPORATION IS AUTHORIZED TO MAKE ANY REPRESENTATIONS, OR INCUR ANY OBLIGATIONS IN THE
NAME OF OR ON BEHALF OF SMARTPOOL, INC., EXCEPT AS STATED HEREIN. THIS WARRANTY IS IS EXPRESSLY UNDERSTOOD TO BE THE EXCLUSIVE REMEDY AVAILABLE TO THE PURCHASER, AND
THIS WARRANTY CONTAINS THE FULL AND COMPLETE AGREEMENT BETWEEN SMARTPOOL AND THE PURCHASER. THIS WARRANTY SETS FORTH THE ONLY OBLIGATIONS OF SMARTPOOL WITH
REGARD TO THIS PRODUCT, AND THERE ARE NO WARRANTIES WHICH EXTEND BEYOND THE DESCRIPTION ON THE FACE HEREOF.
To File a Claim:
1) Call 1-732-730-9880 to initiate a claim.
2) You will receive an instruction package within 10 days.
3) Please allow 2-4 weeks for warranty claims to be settled.
4) If you do not receive your collector within 6 weeks, please cal SmartPool Warranty
Department between 1pm-4pm Monday through Friday EST at 1-732-730-9880.
The representations set forth herein are the only representations made by SmartPool, Inc. with respect to the product, and this warranty does not constitute either a performance or satisfaction
guarantee. It is the responsibility of the product owner to regularly test and check the product for proper function and safety.
This warranty gives the original purchaser specific legal rights. You may have other rights depending on where you live.
©07/04 SmartPool Inc.
SmartPool Inc, Lakewood, NJ 732/730-9880