1
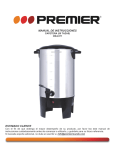
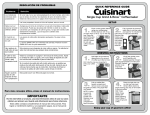
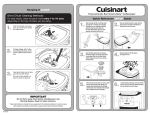
Keeping it CLEAN
Fully Automatic Burr Grind & Brew™ Coffeemaker
Grind Chute Cleaning Methods:
Quick Reference SETUP Guide
For best results, clean the grind chute every 7 to 10 uses
depending on the type of beans you are using.
1.
2.
3.
1.
Push the channel cover away
from you and lift up to access
the coffee chute.
To Clear Chute: With Coffee
Scoop/Cleaning Brush, brush
ground coffee toward front of
unit.
3.
Open the filter basket door by pressing
the Release button and insert a paper filter
or permanent filter into the filter basket
holder. Replace the cover, line up arrows,
and close door.
2.
4.
Pour your desired amount of water into
the water reservoir. A water level indicator
is located on the side of the unit.
Helpful Hint: “Preheat” your carafe by rinsing
it out with hot water before brewing.
Remove hopper lid, fill with beans,
and replace the lid.
Open grind chute lever to allow
grounds into filter basket.
Be sure the filter basket is in
place to catch the grounds.
5.
IMPORTANT
Do not throw away. Read before operating your new
Brewing System. Keep for future reference.
These helpful hints are intended to be a supplement to the Instruction Booklet. In order to ensure
safe operation and optimum performance, please read the entire Instruction Booklet.
G PG-25261B
Fully immerse the filter in cold tap water
and soak for 15 minutes (see complete
instructions in your Instruction Booklet).
Insert the charcoal water filter into
the water filter holder. Open the water
reservoir and insert it into the unit.
© 2015 Cuisinart
Select the amount of beans you wish to grind
with the Grind Control knob. Select your
desired coffee strength with the Strength
Control button. Your selected coffee strength
will be indicated in the bar on the LCD display.
6.
To start grinding & brewing, press the On/Off
button. Once the coffee has finished brewing,
the unit will immediately shut off and alert
you with a beep.
Quick Reference PROGRAMMING Guide
1.
To set the Time: Press and hold the Hour or Minute button until the clock begins flashing. Hold down the Hour
or Minute button to quickly scroll through the numbers. When desired time approaches, release the button and
press repeatedly to advance one digit at a time. To finish, wait for the numbers to stop flashing.
Keeping it CLEAN
Permanent filter, filter basket, filter basket cover,
carafe and lid.
Wash in warm soapy water and rinse thoroughly
or clean in the upper rack of the dishwasher.
Dry all parts after every use.
Hopper Cleaning Methods:
2.
To program the Auto-On: Press and hold
the Program button until the clock begins
flashing. Set the time you want coffee to
begin brewing (follow “set the time”
instructions). Once complete, press the Program button
again. The green indicator light will come on to remind
you that the programming function is in use.
3.
Remove hopper lid, turn hopper release knob to unlocked position
to remove hopper. Set aside unused coffee beans.
At the programmed time, the red On/Off
indicator light will come on, indicating that
the brew cycle is starting.
Wash hopper and lid with warm, soapy water,
rinse thoroughly. Or place hopper and lid on
upper rack of dishwasher.
NOTE: DRY ALL PARTS THOROUGHLY.
DO NOT ADD WATER TO UNIT ONCE
THE HOPPER IS REMOVED AS WATER
CAN DAMAGE THE GRINDER MOTOR.
4.
To start the brew cycle at the same time
on another day, simply press the Program
button and release. The green Auto-On
will illuminate.
5.
To program the Auto-Off: Press and hold
the On/Off button until the red light and
clock begin flashing. Set the desired
shutoff time by pressing the Hour button
to scroll from 0 to 4 hours. To exit, do
nothing for 5 seconds.
Note: Auto-Off is preset for 2 hours.
Remove any excess ground coffee
from the grinder area before placing
hopper and lid back on.
Cómo mantenerlo LIMPIO
Método para limpiar el conducto de salida del café molido:
Para obtener los mejores resultados, limpie el conducto de salida
del café después de 7 a 10 usos dependiendo del tipo de
grano de café que use.
1.
2.
3.
Empuje la cubierta del canal
en dirección opuesta a usted
y levántela para tener acceso
al conducto de salida del
café.
Limpieza del conducto: Con el
cepillo de limpieza de la
cuchara medidora, retire los
restos de café empujándolos
hacia la parte delantera de la
cafetera.
Guía de referencia rápida/preparación
1.
3.
Remoje el filtro de carbón en agua fría
durante 15 minutos (véase las
instrucciones en el manual de
instrucciones). Introduzca el filtro de
carbón en el soporte. Abra el depósito de
agua y coloque el filtro adentro.
Abra el compartimiento del portafiltros,
oprimiendo el botón de apertura de la puerta
del compartimiento. Instale un filtro de papel
o el filtro permanente. Vuelva a colocar la
tapa del portafiltros haciendo coincidir las
flechas y cierre la puerta.
2.
4.
Llene el depósito con agua hasta el nivel
deseado. Guíese con el indicador del nivel de
agua en el costado de la unidad.
Consejo útil: precaliente la jarra antes del
uso, enjuagándola con agua caliente.
Retire la tapa del depósito de café, eche los
granos de café y coloque de nuevo la tapa.
Abra la palanca del conducto
para dejar que los posos de
café caigan en el portafiltros.
Asegúrese de que el portafiltros
esté en su lugar para que los
residuos caigan en el
portafiltros.
5.
IMPORTANTE:
No tire este folleto a la basura. Lea esta información antes de usar su nueva
cafetera por primera vez. Guarde esta información para futura referencia.
Estos útiles consejos complementan el manual de instrucciones. Para lograr un rendimiento
óptimo y una operación segura, lea el manual de instrucciones.
G PG-25261B-SP
Cafetera térmica automática con molinillo incorporado Grind & Brew™
© 2015 Cuisinart
Usando la perilla de ajuste de molienda (Grind
Control), seleccione la cantidad de café en
grano que desee moler. Presionando el botón
Strength Control, seleccione la intensidad del
café. La barra en la pantalla indicará la
intensidad que haya seleccionado.
6.
Para empezar a moler y preparar café,
presione el botón On/Off. Al final de la
preparación, la cafetera se apagará
inmediatamente y emitirá cinco pitidos para
avisarle que el café está listo.
Guía de referencia rápida/PROGRAMACIÓN
1.
Cómo fijar la hora: Mantenga el botón “Hour” o “Min” oprimido hasta que la hora empiece a parpadear.
Mantenga oprimido el botón "Hour" o "Min" para desplazarse por las horas o los minutos más rápidamente.
Cuando llegue cerca del número deseado, suelte el botón y avance un número a la vez. Para terminar, espere
hasta que los números dejen de parpadear.
Cómo mantenerlo LIMPIO
Filtro permanente, portafiltros, tapa del portafiltros, jarra y tapa
de la jarra
Estas piezas pueden lavarse a mano, con detergente y agua tibia, o en la bandeja superior
del lavavajillas.
Seque todas las piezas después de lavarlas.
Método para limpiar el depósito de café en grano:
2.
Para programar el encendido automático:
Mantenga el botón “Program” oprimido hasta
que la hora empiece a parpadear. Fije la hora
a la cual desea que la cafetera se ponga en
marcha, siguiendo las instrucciones para fijar la hora.
Para confirmar, presione el botón "Program" otra vez. El
indicador luminoso verde se encenderá para indicar que
la hora de encendido automático está programada.
3.
Retire la tapa del depósito y gire la perilla de bloqueo/liberación del depósito en la posición
"UNLOCK" para retirar el depósito. Guarde el café en grano no usado.
A la hora prefijada, el indicador luminoso
rojo al lado de On/Off se encenderá y el ciclo
de preparación empezará.
Lave a mano el depósito y la tapa en agua
jabonosa tibia y enjuáguelos bien, o lávelos en
la bandeja superior del lavavajillas.
NOTA: SEQUE BIEN TODAS LAS PIEZAS.
NO PONGA AGUA EN LA UNIDAD
DESPUÉS DE RETIRAR EL DEPÓSITO;
ESTO PUEDE DAÑAR EL MOTOR.
4.
Si desea que la cafetera se ponga en marcha
automáticamente a la misma hora al día
siguiente, simplemente presione el botón
"Program". El indicador luminoso verde al lado
de Program se encenderá.
5.
Para programar el apagado
automático: Mantenga oprimido el botón
Auto Off hasta que la luz roja y el reloj
empiecen a parpadear. Presione
repetidamente el botón Hour para elegir y fijar
el tiempo de apagado automático deseado, de
0 a 4 horas. Luego, no haga nada y la
cafetera saldrá del modo de programación
automáticamente después de 5 segundos.
Antes de colocar el depósito de café
con su tapa en la unidad, limpie y
retire cualquier residuo de café molido
del área de molienda.