1
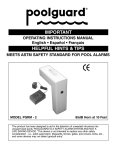
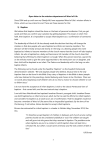
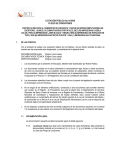
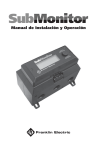
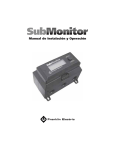
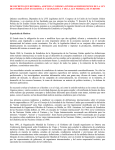
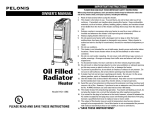
IMPORTANT
OPERATING INSTRUCTIONS MANUAL
English • Español
HELPFUL HINTS & TIPS
“MEETS REQUIREMENTS OF ASTM SAFETY SPECIFICATION F 2208”
MODEL PGRM - 2
85dB Horn at 10 Feet
This product has been designed to aid in the detection of unwanted intrusions into
unsupervised pools. POOLGUARD IS A SAFETY ALARM SYSTEM AND NOT A LIFE
SAVING DEVICE. "This device is not intended to replace any other safety consideration
- i.e., adult supervision, lifeguards, fences, gates, pool covers, locks, etc., and some
devices may not detect gradual entry."
GENERAL
POOLGUARD is the result of quality design and manufacturing techniques that are a standard at PBM Industries,
Inc.; a company dedicated to high quality products. POOLGUARD is a result of that dedication and we guarantee
and stand behind the POOLGUARD alarm system. POOLGUARD Pool Alarms have been tested and comply to
the ASTM Safety and Performance Standard for Pool Alarms, ASTM F 2208, see insert.
POOLGUARD is an electronic monitoring system that automatically sounds an alarm when children or pets fall into
your unsupervised pool.
POOLGUARD is a portable, self-contained, lightweight unit that is safe and simple to operate. Entry into the pool
will be detected by the unit's electronic sensor, triggering a loud pulsating alarm and an internal RF transmitter. The
remote receiver will receive the transmitted signal and sound an alarm within the home.
INSPECTION
POOLGUARD is packaged in a shipping carton that minimizes the chance of damage due to handling. Check for damage and confirm that the contents of the carton include the following items:
• POOLGUARD Unit
• Handle
• Remote Receiver and Power Supply
• Operating Instructions Manual
• Register your alarm online at www.poolguard.com
If an item is missing, contact either the place of purchase or PBM Industries, Inc. for replacement.
CARE AND HANDLING
POOLGUARD is constructed from sturdy plastic to withstand the adverse moisture environment of a
swimming pool. Care needs to be taken when handling to ensure against being dropped,
kicked, etc. Also, be sure to remove the pool unit and set it away from activity in the upright
position when the pool is being used, (See Figure 1).
If the pool unit accidentally falls into your pool, remove it immediately and drain the water from it.
Take the unit apart as indicated in the Battery Replacement Procedure and remove the battery. Tip
and shake unit and remove all excess water from inside the unit and the battery, and the circuit
board area with a paper towel or cloth. Completely test unit before each use as described in manual
to ensure proper operation. (Remember to always remove the pool unit from the pool while
swimming and set it aside away from pool activity).
ATTACHING HANDLE
The two handle screws are located in the top of the alarm, remove them and attach the handle,
(See Figure 1).
INSTALLING YOUR ALARM
RESET/SLEEP SWITCH (SEE FIGURE 1)
RESET: When the pool unit is installed in the pool and the horn is sounding; press the reset/sleep
switch once to silence the alarm.
SLEEP MODE: When the pool unit is removed from the pool and the horn is sounding; press and
hold the reset/ sleep switch for 3 seconds to silence the alarm. The pool unit will automatically wake
up when it is installed into the pool. THE POOL UNlT WlLL NOT GO INTO SLEEP MODE ONCE IT
IS INSTALLED IN THE POOL!
2
SILENT INSTALLATION AND REMOVAL FEATURE
• The poolguard system will sound an alarm (Horn will sound) when you install or remove the pool unit
from your pool. If you would like the poolguard system not to sound an alarm (horn will not sound)
when you install or remove the pool unit from your pool, follow the directions below.
1.SILENT INSTALLATION (HORN WILL NOT SOUND)
• Press and hold the reset/sleep switch for 3 seconds, until you hear the pool units horn chirp. Release
the reset/sleep switch, you now have 15 seconds to gently and slowly install the pool unit into your
pool without the horn sounding.
POOLGUARD WlLL INSTANTLY BE MONITORING YOUR POOL FOR AN INTRUSION.
2. SILENT REMOVAL (HORN WILL NOT SOUND)
• Before removing the pool unit from your pool. Press and hold the reset/sleep switch for 3 seconds,
until you hear the pool units horn chirp.
Release the reset/sleep switch, you now have 5 seconds to remove the pool unit from your pool without the horn sounding. IMPORTANT: THIS DOES NOT TURN POOLGUARD OFF, IF THE POOL
UNlT IS NOT REMOVED IT WlLL CONTINUE TO MONITOR YOUR POOL FOR AN INTRUSION.
3. POOLGUARD HAS DESIGNED THlS FEATURE FOR "ONLY" THOSE WHO HAVE THE
RESPONSIBILITY OF INSTALLING OR REMOVING THE ALARM FROM YOUR POOL!
BATTERY INSTALLATION / REPLACEMENT
(Battery not included), (Energizer Recommended)
POOLGUARD is powered by a standard 9 -volt alkaline battery. To install or replace the battery:
• Remove the screw from the bottom of the unit, (See Figure 1).
• Carefully slide out electronics assembly; do not pull or jerk on internal hook up cable. (If necessary,
gently shake unit to remove assembly.)
• Remove old battery and check for leakage or corrosion. (Remove any leakage or corrosion if present
before installing new battery.)
• IMPORTANT: WHEN A 9V BATTERY IS FIRST INSTALLED IN THE POOL UNIT, THE HORN WILL
SOUND. TO SILENCE THE ALARM PRESS AND HOLD THE RESET/SLEEP SWITCH FOR 3
SECONDS. THlS PLACES THE POOL UNlT IN SLEEP MODE. THE POOL UNIT WILL
AUTOMATICALLY WAKE UP WHEN IT IS INSTALLED INTO THE POOL
• Install new battery by attaching snap connection and sliding into battery holder.
• Slide electronics assembly into pool unit; do not pinch internal hookup cable..
• Replace the screw, hand tighten until screw is all the way in and flush against the pool unit.
To prevent possible damage, battery should be removed whenever storing the alarm, for an extended
period of time.
ON/ OFF INDICATOR - GREEN LED
When POOLGUARD is installed and monitoring your pool for an intrusion, the green LED will flash
once approximately every 10 seconds to indicate that the alarm is ON and OPERATING. When
POOLGUARD is installed in your pool and the alarm is sounding, the green LED will flash approximately 2 times per second.
When POOLGUARD is removed from your pool the GREEN LED will not flash indicating that the
alarm is OFF and NON-OPERATIONAL.
LOW BATTERY FUNCTION
The POOL UNlT AND THE REMOTE RECEIVER will beep once approximately every 10 seconds to
alert you that the battery is low in the pool unit and needs to be replaced.
3
PLACEMENT IN YOUR POOL
Figure 2 illustrates locations best suited for detecting intrusions
from any area of the pool. If your pool is larger than 800 square feet,
if you have more than 2 return lines, any concerns about the size, or if you have an irregular shaped
pool or water features such as waterfalls, please call customer service to clarify the recommended
number of alarms and locations for alarms: 1-800-242-7163. Poolguard Pool Alarms have been tested and comply to the ASTM Standard Specifications for Pool Alarms ASTM F 2208, in a 16’ x 32’
pool. POOLGUARD alarms can be used in pools up to 20’ x 40’ or 800 square feet.
FIGURE 2
Pools 800 Square Feet and Smaller.
POOLGUARD automatically compensates for variations in pool levels within the unit’s operating
range. The unit utilizes a sensing throat which projects into the water and is designed to operate in
most pools with an in-wall skimmer. The sensing throat cannot be less then 2.5 inches, (See Figure
3), and not more than 5.5 inches into the water, POOLGUARD recommends that the sensing throat
be approximately 4 inches in the water. POOLGUARD can be used with SOLAR BLANKETS on the
pool.POOLGUARD can also be used in spas.
SENSING THROAT CANNOT BE LESS
THAN 2.5” IN THE WATER, POOLGUARD
RECOMMENDS THAT THE SENSING
THROAT BE APPROXIMATELY 4” IN
THE WATER
4
FIGURE 3
IMPORTANT
POOLGUARD may not function properly if your pool's water level is not maintained within the
required levels of your alarm. Also, the unit may not operate effectively while certain types of
automatic pool cleaners are in operation.
Some irregular shaped decks may not provide a level foundation for the unit by the pool’s edge. This
minor problem can be overcome by appropriately supporting the unit, (See Figure 3).
STABILIZING YOUR POOL ALARM
The Alarm Stabilizing Pin (ASP) is factory installed onto your pool alarm. Tools needed to install your
alarm are: One 5/16” masonry drill bit that can be found at your local hardware store, a drill, a pencil,
a tape measure or yard stick.
1. Position your pool alarm so that the sensing throat is in the water and the ASP is touching the
deck, (leave a small space no more than 3/8" between the sensing throat and the top edge of your
deck or coping), (See Figure 4).
2. Mark with a pencil the spot where you wish to drill the hole for the ASP.
3. With the 5/16” masonry drill bit, drill a hole 2 1/4” inches deep, as straight as possible.
4. Clean off the debris and install the alarm by placing the ASP into the
5/16” diameter by 2 1/4” deep hole.
5.Your Pool Alarm is now ready for use. If you have any questions or need
help with installation, please give us a call at 1-800-242-7163.
6. Be sure to keep your ASP hole clean from debris and dirt so that your
alarm will always lay flat on the pool deck when installed.
REMEMBER THAT THE POOL UNIT MUST BE REMOVED FROM POOL
BEFORE SWIMMING!
Sensing throat cannot be less than 2.5" in the water, POOLGUARD
recommends that the sensing throat be approximately 4" in the water.
5
TEST BEFORE USING
To ensure effectiveness, test POOLGUARD every time you place it into the pool by performing the
following procedure:
• POOLGUARD DOES NOT HAVE AN ON/OFF SWITCH When the alarm is in the pool it is always
in the ON position and cannot be turned off. When the alarm is out of the pool it is always
in the OFF position.
• To test your alarm push an object of appropriate volume and weight off the deck edge at the
farthest location from the alarm. (A four (4) gallon jug of water or 3-one (1) gallon jugs of water tied
together are ideal for testing.) The alarm should sound when the water action caused by the
intrusion reaches the unit. It may take a few seconds for the alarm to react to the water action.
• After resetting the alarm and allowing time for the water action to settle, repeat the procedure
from another point in the pool until you are confident of detection performance.
• POOLGUARD includes a timer function which automatically resets the unit after the alarm
has sounded for approximately 5 minutes.
ADJUSTING YOUR RETURN LINE FITTINGS
The POOLGUARD alarm should not be placed too close to a return line, also do not place POOLGUARD in a location in the pool where a return line is pointing in the alarms direction. Water turbulence may be too strong, falsely setting the alarm off or the water turbulence may interfere with the
alarms ability to detect an intrusion. If you have more than 2 return lines please call customer service at 1-800-242-7163. It is very important in pools to adjust all the eyeball fittings on your return
lines so that the water flow will not interfere with your pool alarm. Point all the eyeball fittings down
and your pool will still circulate properly and this will allow POOLGUARD to function properly,
(See Figure 5). Pointing the eyeball fittings down also helps revent algae growth.
CORRECT
INCORRECT
FIGURE 5
6
POOLGUARD REMOTE RECEIVER
The POOLGUARD REMOTE RECEIVER has been integrated with the standard POOLGUARD unit
to provide a wireless remote alert operating at distances of up to 200 feet. The POOLGUARD
REMOTE RECEIVER sounds an alarm in the house when the POOLGUARD unit is activated at the
pool. The remote system consists of the following functional elements:
• A coded pulse receiver (Remote Receiver). (See Figure 6).
• A standard wall outlet power supply. (See Figure 6).
The REMOTE RECEIVER is a compact unit powered by a UL and CSA approved AC/DC power
supply. The REMOTE RECEIVER can be placed on a table or a counter top inside the house. The
pulse coded radio frequency signal is transmitted from the pool unit an is received and decoded to
sound the remote receiver. The remote receiver will sound for an additional 3 seconds after the
pool unit has been silenced. If the REMOTE RECEIVER beeps once approximately every 10
seconds, it is indicating the 9v battery in the pool unit is low and needs to be replaced. After
you have purchased your POOLGUARD alarm and you wish to add another remote receiver to your
alarm system you can acquire one from PBM Industries, Inc. Contact PBM by phone or mail or
contact your place of purchase.
85dB Horn at 10 feet
POWER SUPPLY
REMOTE RECEIVER
FIGURE 6
TO OPERATE YOUR REMOTE RECEIVER
Try to locate your REMOTE RECEIVER in a convenient part of your house close to the pool. Avoid
steel walls or any other large metal objects or obstructions that might interfere with the signal reception. The REMOTE RECEIVER has to be placed on the same level or a level above the pool in the
house (do not place receiver in an underground basement). The ideal location for your REMOTE
RECEIVER would be by a window overlooking your pool. Test your REMOTE RECEIVER in different
locations in your house to find the best working place for your receiver. Connect the power supply to
any 120V, electrical outlet and insert the jack into the receiver. Check that indicator light is on. Your
REMOTE RECEIVER unit is now ready to receive a transmission from your POOLGUARD unit. DO
NOT USE YOUR REMOTE RECEIVER OUTDOORS.
NOTE: THE MANUFACTURER IS NOT RESPONSIBLE FOR ANY RADIO OR TV INTERFERENCE
CAUSED BY UNAUTHORIZED MODIFICATIONS TO THIS EQUIPMENT. SUCH MODIFICATIONS
COULD VOID THE USER'S AUTHORITY TO OPERATE THE EQUIPMENT.
7
SWIMMING POOL SAFETY TIPS
• Supervise children at all times.
• Never permit swimming alone. Never leave a child alone, even to answer the telephone.
• Always remove the entire solar cover from a pool before swimming.
• Remember that alcohol and water safety do not mix.
• Have your pool area fenced and the gate locked to prevent unauthorized entry to the
pool, and install a gate alarm.
• Lock and secure all doors in the house which permit easy access to the pool, and
install a door alarm.
• Have a responsible adult teach swimming and water safety to your children.
• Maintain clean, clear water in the pool.
• Do not swim during electrical storms.
• Do not permit bottles, glass, or sharp objects to be used around the pool.
• Ask your pool dealer how you can improve your pool safety – they will be glad to
assist you.
• Above all: remember that common sense, awareness, and caution will allow you
to enjoy your pool.
WARRANTY AND REPAIRS
POOLGUARD is sold with a limited warranty to cover defects in parts and workmanship for three years
from date of purchase, (retain proof of purchase).
If POOLGUARD exhibits a defect, please call Customer Service at 1-800-242-7163. Unauthorized
returns will not be accepted. Proper repair is only ensured when the unit is returned to the manufacturer.
SEND CORRESPONDENCE TO:
PBM INDUSTRIES, INC.
P.O.BOX 658, NORTH VERNON, IN 47265
1-800-242-7163
This product has been designed to aid in the detection of unwanted intrusions into unsupervised pools.
POOLGUARD IS A SAFETY ALARM SYSTEM AND NOT A LIFE SAVING DEVICE. "This device is not intended to
replace any other safety consideration - i.e., adult supervision, lifeguards, fences, gates, pool covers, locks, etc.,
and some devices may not detect gradual entry.”
REV. 10/2008
8
HELPFUL HINTS AND TROUBLESHOOTING
FALSE ALARMS
All pool alarms will false alarm on occasion for different reasons. False alarms can be minimized; however, it
is important to remember that a false alarm is better than no alarm at all. WEATHER & WIND––POOLGUARD
sets stationary on the deck of the pool so the wind will not effect the alarm
unit itself.Wind may trigger a false alarm if it is strong enough or steady enough that it causes the water in the
pool to rock or bounce up and down the pool wall. When the water in the pool moves up and down the POOLGUARD sensing throat, it may finally cause the alarm to sound. On extremely windy days when the pool water
is rocking it is advised to remove the POOLGUARD from the pool. Light wind or rain will not effect the
POOLGUARD alarm.
Another false alarm occurs when the pool owner tries to install the alarm too soon after swimming. After swimming, the water in the pool will rock or bounce up and down the pool wall for some time depending on the
size of the pool and the type of swimming activity. Before installing the alarm, after swimming, the pool
must be given time to calm. Time will vary (around 10 to 30 minutes); once the pool owner sees that the
pool water is no longer rocking up and down the pool wall, it is time to install the alarm.
Certain automatic cleaners may set the POOLGUARD unit off in some cases. If the cleaner head or the
cleaner hose hits the POOLGUARD alarm it may cause it to false alarm. Solutions to this problem are to use
your cleaner at night and your alarm during the day. Another option would be
to find a place around the pool where the cleaner does not interfere with the alarm. Certain water features
such as waterfalls can cause POOLGUARD to false alarm. To avoid this problem do not install the POOLGUARD alarm too close to the water feature. If you are having a problem with any type of water feature call
POOLGUARD at 1-800-242-7163.
ALARM PLACEMENT
The alarm should be on a flat, solid surface for best results. The throat of the unit is designed to work in most
pools with an in-wall skimmer. The water level up on the throat is important and should be checked. The sensing throat cannot be less than 2.5 inches in the water, and not more than 5.5 inches into the water. POOLGUARD recommends that the sensing throat be approximately 4 inches in the water. POOLGUARD can be
used with a solar cover; however, before removing the cover, the alarm should be taken out so it does not get
pulled into the pool.
ALARM TESTING
Drop something of approximate size, weight and volume of the family’s smallest child, the farthest point
away from the alarm. A four (4) gallon jug of water or 3 one (1) gallon jugs of water tied together are ideal for
testing. Remember, when testing you must wait about 15 minutes between
tests for the pool to calm.
ALARM WILL NOT SOUND
Be sure that a 9 volt battery has been installed properly. If you are testing and POOLGUARD does not alarm,
be sure you are testing properly – putting your feet in the pool, splashing with your hands, making waves with
a leaf skimmer, or dropping something into the pool that does not have the proper size, weight and volume
will not set the POOLGUARD alarm off! Testing is very important and should be done correctly.
9
CARE AND HANDLING
POOLGUARD is made of sturdy, rigid vinyl PVC - UV rated. Because the alarm is electronic and
mechanical great care should be taken not to drop the unit; like any other appliance, it may break.
Sun and rain will not hurt the alarm. POOLGUARD is weatherproof but not waterproof. Great care
should be taken not to knock the alarm into the pool. If the alarm goes into the pool there are directions in the manual on how to dry it out, but more than likely it will have to be returned to the factory
for service. Always remember to remove the alarm before using the pool.
REMOTE RECEIVER
When the unit at the pool alarms, the remote receiver will sound. Maximum Range for the remote
is 200 feet from the poolside unit. Avoid placing remote in basements or close to metal walls. Be
sure that the red light on the remote is on. Remember the poolside unit must be beeping (alarming)
for the remote to work.
If your remote receiver is not getting a clear signal or no signal from the poolside unit, try the following: Before plugging in the power supply, be sure to stretch out the cord; do not leave it tied in a
bow as packaged. When you first plug in the remote it will give one short loud beep then stop.
Your Remote Receiver is similar to a small portable radio. If your remote is not sounding when the
poolside unit is sounding–move the remote to different locations and stand back for a few seconds
for the remote to pick up the signal.You may only have to move your remote a little to the left or right
to bring in the signal–in some cases you might have to move the remote to a different location or
another room. If you cannot get a signal on your remote receiver CALL CUSTOMER SERVICE AT
1-800-242-7163
QUICK DO’S AND DON’TS
•
•
•
•
•
•
DO
DO
DO
DO
DO
DO
•
•
•
•
•
DON’T
DON’T
DON’T
DON’T
DON’T
10
read the manual carefully
install a 9 volt battery
untie the bow on the power supply
test the alarm properly
carry your alarm by the handle
remove alarm before swimming
leave alarm in pool while swimming
drop your alarm, it may break
knock or let your alarm fall into the pool
install your alarm immediately after swimming
use your alarm on extremely windy days
NOTES: ____________________________________________________________________________________________________________________
________________________________________________________________________________________________________________________________
________________________________________________________________________________________________________________________________
________________________________________________________________________________________________________________________________
________________________________________________________________________________________________________________________________
________________________________________________________________________________________________________________________________
________________________________________________________________________________________________________________________________
________________________________________________________________________________________________________________________________
________________________________________________________________________________________________________________________________
________________________________________________________________________________________________________________________________
________________________________________________________________________________________________________________________________
________________________________________________________________________________________________________________________________
________________________________________________________________________________________________________________________________
________________________________________________________________________________________________________________________________
________________________________________________________________________________________________________________________________
________________________________________________________________________________________________________________________________
________________________________________________________________________________________________________________________________
________________________________________________________________________________________________________________________________
________________________________________________________________________________________________________________________________
________________________________________________________________________________________________________________________________
________________________________________________________________________________________________________________________________
________________________________________________________________________________________________________________________________
________________________________________________________________________________________________________________________________
________________________________________________________________________________________________________________________________
________________________________________________________________________________________________________________________________
________________________________________________________________________________________________________________________________
________________________________________________________________________________________________________________________________
11
IMPORTANTE
MANUAL DE INSTRUCCIONES DE FUNCIONAMIENTO
English • Español
CONSEJOS Y SUGERENCIAS ÚTILES
"CUMPLE CON LOS REQUISITOS DE LA ESPECIFICACIÓN DE SEGURIDAD ASTM F 2208”
MODELO PGRM = 2
Bocina de 85dB a 10 pies (3 m)
Este producto ha sido diseñado para permitir la detección de intrusiones indeseadas en las piscinas
sin supervisión. POOLGUARD ES UN SISTEMA DE ALARMA DE SEGURIDAD Y NO UN DISPOSITIVO SALVAVIDAS. “Este dispositivo no fue diseñado con la intención de reemplazar ningún otro método
de seguridad, por ej.: supervisión por parte de un adulto, salvavidas, cercas, rejas, cubiertas para piscinas, cerraduras, etc., y puede que algunos dispositivos no detecten una entrada gradual”.
GENERAL
POOLGUARD es el resultado del diseño de calidad y de las técnicas de fabricación que son norma de PBM
Industries, Inc.; una compañía dedicada a ofrecer productos de gran calidad. POOLGUARD es el resultado de
dicha dedicación y garantizamos y suscribimos el sistema de alarma POOLGUARD. Las alarmas de piscina
POOLGUARD han sido probadas y cumplen con la norma de seguridad y rendimiento ASTM para alarmas de
piscina, ASTM F 2208, vea el inserto.
POOLGUARD es un sistema de control electrónico que suena automáticamente cuando cae a la piscina un niño
o una mascota en una piscina sin supervisión.
POOLGUARD es una unidad portátil, autónoma y ligera, fácil y segura de manejar. El acceso a la piscina es
detectado por el sensor electrónico de la unidad, el cual dispara una alarma con sonido alto e intermitente y
transmisor interno de RF. El receptor remoto recibirá la señal transmitida y sonará una alarma en su hogar.
INSPECCIÓN
POOLGUARD viene embalada en una caja de cartón para envío que reduce las posibilidades de daños durante
su manipulación. Revise que no haya daños y confirme que el contenido de la caja incluya los siguientes artículos:
• Unidad POOLGUARD
• Asa
• Receptor remoto y suministro de corriente
• Manual de instrucciones de funcionamiento
• Registre su alarma en línea a www.poolguard.com
Si falta algún artículo, póngase en contacto con el establecimiento donde lo compró o con PBM Industries,
Inc., para su sustitución.
CUIDADOS Y MANIPULACIÓN
POOLGUARD está fabricado con plástico duradero para resistir el ambiente húmedo y hostil de la
piscina. Tenga cuidado cuando manipule la unidad para evitar que se caiga, reciba golpes,
etc. Cuando utilice la piscina, retire la unidad y colóquela en posición vertical lejos de ella,
(Véase figura 1).
Si la unidad cae accidentalmente en la piscina, sáquela inmediatamente y vacíe el agua. Desarme la
unidad siguiendo las indicaciones descritas en el Procedimiento de Sustitución y saque la pila. Incline
y agite la unidad y elimine todo el exceso de agua contenido en la unidad, en la pila y en la zona de
la placa del circuito con un paño o una toalla de papel. Pruebe la unidad antes de su uso, según se
describe en el manual, para garantizar su funcionamiento correcto. (No se olvide de sacar siempre
la unidad de la piscina y colocarla lejos de la misma cada vez que vaya a nadar.)
PARA UNIR EL ASA
Los dos tornillos para el asa están ubicados en la parte superior de la alarma, retírelos y atornille el
asa, (Véase figura 1).
PARA INSTALAR SU ALARMA
DE INTERRUPTOR DE REINICIO/PAUSA (Véase figura 1)
REINICIO: Cuando la unidad esté instalada en la piscina y esté sonando la bocina; presione una
vez el interruptor de reinicio/pausa para silenciar la alarma.
MODO PAUSA: Cuando retire la unidad de la piscina y suene la bocina; presione y mantenga apretado durante 3 segundos el interruptor de reinicio/pausa para silenciar la alarma. La unidad de la
piscina se activará automáticamente cuando se instale nuevamente en la piscina. ¡LA UNIDAD DE
LA PISCINA NO PODRÁ PONERSE EN MODO PAUSA UNA VEZ INSTALADA EN LA PISCINA!
14
CARACTERÍSTICA DE INSTALACIÓN Y RETIRADA SILENCIOSA
• El sistema Poolguard activará una alarma (sonará una bocina) cuando instale o retire la unidad de
la piscina. Si no desea que la alarma se dispare (no sonará la bocina) cuando instale o retire la
unidad de su piscina, siga las instrucciones descritas a continuación.
1. INSTALACIÓN SILENCIOSA (LA BOCINA NO SONARÁ)
• Presione y mantenga apretado durante 3 segundos el interruptor de reinicio/pausa hasta oír que la
bocina de la unidad emite un chirrido. Suelte el interruptor de reinicio/pausa, a partir de este momento
tendrá 15 segundos para instalar la unidad en su piscina sin que suene la bocina.
POOLGUARD COMENZARÁ A REVISAR INMEDIATAMENTE SU PISCINA EN BUSCA DE INTRUSIONES.
2. RETIRADA SILENCIOSA (LA BOCINA NO SONARÁ)
• Antes de retirar la unidad de su piscina, presione y mantenga apretado durante 3 segundos el interruptor de reinicio/pausa, hasta oír que la bocina de la unidad emite un chirrido.
Suelte el interruptor de reinicio/pausa, a partir de este momento tendrá 5 segundos para retirar la unidad de su
piscina sin que suene la bocina. IMPORTANTE: ESTO NO APAGARÁ LA UNIDAD POOLGUARD, SI NO RETIRA LA UNIDAD CONTINUARÁ MONITORIZANDO LA PISCINA EN BUSCA DE UNA INTRUSIÓN.
3. ¡POOLGUARD HA DISEÑADO ESTA CARACTERÍSTICA "ÚNICAMENTE" PARA AQUELLOS
QUE TIENEN LA RESPONSABILIDAD DE INSTALAR O RETIRAR LA ALARMA DE LA PISCINA!
INSTALACIÓN DE LAS PILAS DE RECAMBIO
(Pila no incluida), (“Energizer” Recomendado)
POOLGUARD funciona con una pila alcalina estándar de 9 voltios. Para instalar o retirar la pila:
• Saque el tornillo de la parte inferior de la unidad, (véase figura 1).
• Deslice cuidadosamente hacia afuera el ensamblaje electrónico; no tire del cable de conexión interna.
(En caso de que sea necesario, agite suavemente la unidad para retirar el ensamblaje).
• Saque la pila usada y revise si gotea o está oxidada. (Elimine cualquier gota u óxido que esté presente
antes de instalar la pila nueva).
• IMPORTANTE: CUANDO INSTALE POR PRIMERA VEZ UNA PILA DE 9 VOLTIOS EN LA UNIDAD DE
LA PISCINA, SONARÁ LA BOCINA. PARA SILENCIAR LA ALARMA PRESIONE Y MANTENGA APRETADO DURANTE 3 SEGUNDOS EL INTERRUPTOR DE REINICIO/PAUSA. ESTO CAMBIARÁ EL
ESTADO DE LA ALARMA AL MODO PAUSA. LA UNIDAD DE LA PISCINA SE ACTIVARÁ
AUTOMÁTICAMENTE CUANDO SE INSTALE EN LA PISCINA.
• Instale la pila nueva presionando la conexión e introduciéndola en el compartimiento para pilas.
• Introduzca el ensamblaje electrónico en la unidad de la piscina; no pellizque el cable de conexión interno.
• Vuelva a colocar el tornillo, apriete manualmente hasta que el tornillo quede completamente insertado y
a ras con la unidad de la piscina.
Para evitar posibles daños, quite la pila si va a guardar la unidad por un período de tiempo prolongado.
INDICADOR ENCENDIDO/APAGADO – LED VERDE
Cuando POOLGUARD está instalado y monitorizando su piscina en busca de una intrusión, el LED
verde destellará una vez aproximadamente cada 10 segundos para indicar que la alarma está
ENCENDIDA y OPERATIVA. Cuando POOLGUARD esté instalado en su piscina y la alarma esté
sonando, el LED verde destellará aproximadamente 2 veces por segundo.
Cuando retire POOLGUARD de su piscina, el LED VERDE no destellará indicando que la alarma está
APAGADA y NO OPERATIVA.
INDICADOR DE PILA BAJA
La UNIDAD DE LA PISCINA Y EL RECEPTOR REMOTO sonarán una vez aproximadamente cada 10
segundos para avisarle que la pila de la unidad de la piscina está baja y necesita reemplazarla.
15
COLOCACIÓN EN LA PISCINA
La figura 2 ilustra las mejores ubicaciones para detectar intrusiones
desde cualquier área de la piscina. Si la piscina tiene un tamaño superior a los 800 pies cuadrados
(74,3 m2), si tiene más de 2 líneas de retorno, si tiene dudas sobre el tamaño, o si tiene una piscina
de forma irregular o elementos decorativos tales como las cascadas, llame a nuestro departamento
de servicios al cliente para aclarar el número recomendado de alarmas y los lugares para colocarlas: 1-800-242-7163. Las alarmas para piscina Poolguard han sido inspeccionadas y cumplen con
las Especificaciones de la norma ASTM F 2208 para alarmas de piscinas en una piscina de 16 x 32
pies (4,9 x 9,8 m). Las alarmas POOLGUARD pueden utilizarse en piscinas de hasta 20 x 40 pies
(6,1 x 12,2 m) o 800 pies cuadrados (74,3 m2).
FIGURA 2
Piscinas de 800 pies cuadrados (74,3 m2) o más pequeñas.
POOLGUARD automáticamente compensa las variaciones en los niveles de la piscina dentro del
rango de operación de la unidad. La unidad utiliza un dispositivo sensor que se proyecta en el agua y
está diseñado para funcionar en la mayoría de las piscinas con un limpiador de pared. El dispositivo
sensor no puede tener menos de 2,5 pulgadas (6,4 cm) (véase la figura 3), y no más de 5,5 pulgadas
(14 cm) en el agua, POOLGUARD recomienda que el dispositivo se introduzca aproximadamente 4
pulgadas (10,2 cm) en el agua. POOLGUARD puede utilizarse con MANTAS SOLARES en la piscina.
POOLGUARD también puede utilizarse en bañeras de hidromasaje.
EL DISPOSITIVO SENSOR NO DEBE TENER
MENOS DE 2,5” (6,4 cm) EN EL AGUA.
POOLGUARD RECOMIENDA QUE EL DISPOSITIVO QUEDE INTRODUCIDO APROXIMADAMENTE 4” (10,2 cm) EN EL AGUA.
16
FIGURA 3
IMPORTANTE
POOLGUARD no puede funcionar adecuadamente si el nivel del agua de su piscina no se mantiene
dentro de los niveles necesarios de la alarma.Es posible que la unidad no funcione de forma efectiva
mientras se encuentren en funcionamiento ciertos tipos de limpiadores automáticos de piscina.
Algunas plataformas irregulares puede que no proporcionen una base nivelada para la unidad en el borde
de la piscina. Este inconveniente puede subsanarse apoyando la unidad adecuadamente (Ver la figura 3).
ESTABILIZACIÓN DE LA ALARMA DE LA PISCINA
El pasador de estabilización de la alarma (ASP) viene instalado de fábrica en la alarma de la piscina. Las herramientas necesarias para instalar la alarma son: Una broca de 5/16” (7,9 mm) que
puede encontrar en una ferretería local, un taladro, un lápiz, una cinta o una vara de medir.
1. Coloque la alarma de piscina de modo que el dispositivo sensor esté en el agua y el ASP esté
tocando la plataforma (deje un pequeño espacio de no más de 3/8” (9,5 mm) entre el dispositivo
sensor y la parte superior de la plataforma o el remate de la pared), (vea la figura 4).
2. Marque con un lápiz el lugar donde desea perforar el agujero para el ASP.
3. Con la broca de 5/16” (7,9 mm), taladre un agujero de 2 ¼” (5,7 cm) de profundidad, tan recto como sea posible.
4. Limpie los desechos e instale la alarma colocando el ASP en el agujero de 5/16” (7,9 mm) de
diámetro y 2 1/4" (5,7 cm) de profundidad.
5. Su alarma de piscina está ahora lista para ser utilizada. Si tiene preguntas o necesita ayuda con
la instalación, llámenos al 1-800-242-7163.
6. Conserve el agujero ASP limpio de desechos y suciedad para que su alarma siempre permanezca plana en la plataforma de la piscina cuando la instale.
¡RECUERDE QUE LA UNIDAD DE PISCINA DEBERÁ RETIRARSE DE
LA PISCINA ANTES DE NADAR!
El dispositivo sensor no debe estar introducido menos de 2,5” (6,4 cm) en el agua. POOLGUARD
recomienda que el dispositivo quede introducido aproximadamente 4 pulgadas (10,2 cm) en el agua.
17
PRUEBE ANTES DE UTILIZAR
Para asegurar la efectividad, pruebe POOLGUARD cada vez que lo coloque en la piscina efectuando el siguiente procedimiento:
• POOLGUARD NO TIENE UN INTERRUPTOR DE ENCENDIDO/APAGADO Cuando la alarma se
encuentra en la piscina está siempre en la posición ON (encendido) y no puede apagarse. Cuando
la alarma está fuera de la piscina siempre está en la posición OFF (apagado).
• Para probar la alarma presione un objeto de volumen y peso adecuado alejado del borde de la
plataforma en el lugar más lejano con respecto a la alarma. (Un envase de cuatro (4) galones de
agua o 3 de un (1) galón atados juntos son ideales para probar.) La alarma debe sonar cuando el
movimiento del agua causado por la intrusión alcance la unidad. Puede que tome unos segundos
que la alarma reaccione a la acción del agua.
• Después de reiniciar la alarma y permitir que el movimiento del agua se aquiete, repita el procedimiento desde otro punto de la piscina hasta que esté seguro del rendimiento de detección.
• POOLGUARD incluye una función con temporizador la cual automáticamente reinicia la unidad
después de que la alarma haya sonado aproximadamente 5 minutos.
REGULACIÓN DE LOS ACOPLES DE TUBERÍA DE RETORNO
La alarma POOLGUARD no debe estar colocada demasiado cerca de una tubería de retorno.
Tampoco coloque POOLGUARD en un lugar de la piscina donde exista una tubería de retorno
apuntando en la dirección de la alarma. La turbulencia del agua puede ser demasiado fuerte, disparando falsamente la alarma o la turbulencia puede interferir con la capacidad de la alarma para
detectar una intrusión. Si tiene más de 2 tuberías de retorno llame al servicio al cliente al 1-800-2427163. Es muy importante ajustar los acoples en forma de ojo en las tuberías de retorno de modo
que el flujo del agua no interfiera con la alarma de la piscina. Apunte todos los acoples en forma de
ojo hacia abajo y la piscina circulará adecuadamente, lo cual hará que POOLGUARD funcione adecuadamente (ver figura 5). Apuntar los acoples en forma de ojo hacia abajo también ayuda a evitar
el crecimiento de algas.
CORRECTO
INCORRECTO
FIGURA 5
18
RECEPTOR REMOTO POOLGUARD
El RECEPTOR REMOTO POOLGUARD ha sido integrado con la unidad estándar POOLGUARD
para proporcionar una alerta remota inalámbrica que opera a distancias de hasta 200 pies (61 m). El
RECIBIDOR REMOTO POOLGUARD emite una alarma en la casa cuando la unidad POOLGUARD
se activa en la piscina. El sistema remoto consiste en los siguientes elementos funcionales:
• Un receptor de pulso codificado (Receptor remoto), (Ver figura 6).
• Un tomacorriente estándar de pared (Ver figura 6).
El RECEPTOR REMOTO es una unidad compacta alimentada por un suministro de energía AC/DC
aprobado por UL y CSA. El RECEPTOR REMOTO puede colocarse en una mesa o en una cubierta
prefabricada dentro de la casa. La señal de pulsación codificada de radiofrecuencia se transmite
desde la unidad de piscina y se recibe y decodifica para que suene en el receptor remoto. El receptor remoto sonará durante 3 segundos más después de que la unidad de piscina se haya
silenciado. Si el RECEPTOR REMOTO suena una vez aproximadamente cada 10 segundos,
indica que la pila de 9 voltios de la unidad de piscina tiene poca carga y debe cambiarse.
Después de que haya comprado su alarma POOLGUARD y desea añadir otro receptor remoto a su
sistema de alarma puede adquirir uno de PBM Industries, Inc. Contacte PBM por teléfono o por
correo o en el lugar donde lo compró.
Bocina de 85dB a 10 pies (3 m)
SUMINISTRO DE ENERGÍA
RECEPTOR REMOTO
FIGURA 6
PARA HACER FUNCIONAR SU RECEPTOR REMOTO
Trate de ubicar su RECEPTOR REMOTO en una parte conveniente de su hogar cerca de la piscina.
Evite las paredes de acero o cualquier otro objeto grande de metal u obstrucciones que pudiesen
interferir con la recepción de la señal. El RECEPTOR REMOTO debe colocarse al mismo nivel o a
un nivel por sobre la piscina en la casa (no coloque el receptor en un sótano bajo tierra). La ubicación ideal de su RECEPTOR REMOTO debería ser cerca de una ventana que tenga vista hacia la
piscina. Pruebe su RECEPTOR REMOTO en diferentes ubicaciones de su casa para encontrar el
mejor lugar de trabajo para su receptor. Conecte el suministro de energía a cualquier tomacorriente
de 120V e inserte la clavija en el receptor.Verifique que la luz indicadora esté encendida. Su unidad
de RECEPTOR REMOTO está ahora lista para recibir una transmisión de su unidad POOLGUARD.
NO UTILICE SU RECEPTOR REMOTO EN EXTERIORES.
NOTA: EL FABRICANTE NO ES RESPONSABLE POR CUALQUIER INTERFERENCIA DE RADIO O
TELEVISIÓN CAUSADA POR MODIFICACIONES NO AUTORIZADAS REALIZADAS A ESTE EQUIPO. TALES
MODIFICACIONES PODRÍAN ANULAR LA AUTORIZACIÓN DEL USUARIO PARA OPERAR EL EQUIPO.
19
CONSEJOS DE SEGURIDAD EN LA PISCINA
• Supervise a los niños en todo momento.
• Nunca permita que naden solos. Nunca deje solo a un niño, ni siquiera para atender el teléfono.
• Siempre retire totalmente la cubierta solar de una piscina antes de nadar.
• Recuerde que el alcohol y la seguridad en el agua no combinan..
• Mantenga cercada el área de la piscina y la reja trancada para evitar la entrada no autor
izada a la piscina, e instale una alarma en la reja.
• Tranque y asegure todas las puertas de la casa que permitan el acceso fácil a la piscina
e instale una alarma en la puerta.
• Un adulto responsable debe enseñar a los niños a nadar y las medidas de seguridad en al agua.
• Conserve el agua de la piscina limpia y transparente.
• No nade durante tormentas eléctricas.
• No permita el uso de botellas, vidrio u objetos afilados en la piscina.
• Pida a su distribuidor cómo puede mejorar la seguridad en la piscina – les agradará asistirle.
• Sobre todo: Recuerde que el sentido común, la concienciación y la precaución le permi
tirán disfrutar de su piscina.
GARANTÍA Y REPARACIONES
POOLGUARD se vende con una garantía limitada para amparar los defectos en los materiales y la mano
de obra por un período de tres años a partir de la fecha de compra (conserve la prueba de compra).
Si POOLGUARD presenta un defecto, llame al Servicio al Cliente al 1-800-242-71 63. No se aceptarán devoluciones no autorizadas. La reparación adecuada se logra sólo cuando se devuelve la unidad al fabricante.
ENVÍE LA CORRESPONDENCIA A:
PBM INDUSTRIES, INC.
P.O.BOX 658, NORTH VERNON, IN 47265
1-800-242-7163
Este producto ha sido diseñado para permitir la detección de intrusiones indeseadas en las piscinas sin supervisión.
POOLGUARD ES UN SISTEMA DE ALARMA DE SEGURIDAD Y NO UN DISPOSITIVO SALVAVIDAS. “Este dispositivo
no fue diseñado con la intención de reemplazar ningún otro método de seguridad, por ej.: supervisión por parte de un
adulto, salvavidas, cercas, rejas, cubiertas para piscinas, cerraduras, etc., y puede que algunos dispositivos no detecten
una entrada gradual”.
REV. 10/2008
20
CONSEJOS ÚTILES Y LOCALIZACIÓN Y SOLUCIÓN DE PROBLEMAS
FALSA ALARMA
Todas las alarmas presentarán una alarma falsa en alguna ocasión por diferentes razones. Las alarmas falsas
pueden minimizarse; sin embargo, es importante recordar que una falsa alarma es mejor que ninguna. CLIMA y
VIENTO-POOLGUARD permanece estacionaria en la plataforma de la piscina de modo que el viento no afecta
la unidad de alarma misma. El viento puede desencadenar una falsa alarma si es lo suficientemente fuerte o
constante que hace que el agua de la piscina ondule o rebote contra las paredes de la piscina. Cuando el agua
de la piscina se mueve hacia arriba y hacia abajo en el dispositivo sensor POOLGUARD, puede hacer que finalmente se dispare la alarma. En días con mucho viento, cuando el agua de la piscina ondule aconsejamos retirar
el POOLGUARD de la piscina. El viento leve o la lluvia no afectan la alarma POOLGUARD.
Otra falsa alarma ocurre cuando el dueño de la piscina intenta instalar la alarma demasiado pronto después de
nadar. Después de nadar, el agua de la piscina ondula o rebota contra las paredes de la piscina durante algún
tiempo dependiendo del tamaño de la piscina y del tipo de actividad que se realice. Antes de instalar la alarma, después de nadar, debe dejarse que el agua de la piscina se aquiete. El tiempo puede variar (de 10 a
30 minutos); una vez que el dueño de la piscina vea que el agua no se está moviendo contra las paredes, es el
momento de instalar la alarma.
Ciertos limpiadores automáticos pueden disparar la unidad POOLGUARD en algunos casos.
Si el cabezal limpiador o la manguera limpiadora golpea la alarma POOLGUARD puede que ocasione una falsa
alarma. Las soluciones a este problema son utilizar su limpiador de noche y la alarma durante el día. Otra
opción sería encontrar un lugar en la piscina donde el limpiador no interfiera con la alarma. Ciertos elementos
decorativos tales como las cascadas pueden ocasionar que POOLGUARD dispare una falsa alarma. Para evitar este problema no instale la alarma POOLGUARD demasiado cerca del elemento decorativo. Si tiene problemas con cualquier tipo de elemento decorativo para agua llame a POOLGUARD al 1-800-242-7163.
COLOCACIÓN DE LA ALARMA
La alarma debe estar en una superficie plana y firme para mejores resultados. El dispositivo sensor de la
unidad está diseñado para que funcione en la mayoría de las piscinas con un limpiador de pared. El nivel del
agua en el sensor es importante y debe revisarlo. El dispositivo sensor no puede estar introducido menos de
2,5” (6,4 cm) en el agua ni más de 5,5” (14 cm). POOLGUARD recomienda que el dispositivo sensor esté
introducido aproximadamente 4” (10,2 cm) en el agua. POOLGUARD puede utilizarse con una cubierta solar;
sin embargo, antes de retirar la cubierta, deberá retirar.
PRUEBA DE LA ALARMA
Deje caer algo aproximadamente del tamaño, peso y volumen del niño más pequeño de la familia, en el
punto más alejado de la alarma. Un envase de cuatro (4) galones de agua o 3 de un (1) galón atados juntos
son ideales para probar. Recuerde, cuando pruebe deberá esperar alrededor de 15 minutos entre una y
otra prueba hasta que el agua se aquiete.
LA ALARMA NO SUENA
Compruebe que se haya instalado adecuadamente una pila de 9 voltios. Si está probando y no se activa la
alarma POOLGUARD, verifique si está probando adecuadamente – colocando su pie en la piscina, salpicando con las manos, haciendo olas con un limpiador de hojas o dejando caer algo en la piscina que no tenga el
tamaño, peso y volumen adecuados, ¡no disparará la alarma! Hacer las pruebas es muy importante y debe
efectuarse correctamente.
21
CUIDADOS Y MANIPULACIÓN
POOLGUARD se fabrica con PVC de vinilo fuerte y rígido – clasificación UV. Debido a que la alarma
es electrónica y debe ejercerse gran cuidado mecánico para no dejar caer la unidad; como cualquier
otro aparato, puede romperse. El sol y la lluvia no dañan la alarma. POOLGUARD es resistente al
agua pero no impermeable. Debe tenerse mucho cuidado de que no caiga la alarma en la piscina.
Si la alarma entra en la piscina refiérase al manual sobre cómo secarla, pero lo más probable es
que tenga que devolverla a la fábrica para prestarle servicio. Siempre recuerde retirar la alarma
antes de utilizar la piscina.
RECEPTOR REMOTO
El rango máximo para el remoto es 200 pies (61 m) desde la unidad de la piscina. Evite colocar
el remoto en sótanos o cerca de paredes metálicas. Compruebe que la luz roja del remoto esté
encendida. Recuerde que la unidad de la piscina deberá estar sonando (detectando) para que el
remoto trabaje.
Si su receptor remoto no obtiene una señal clara o ninguna señal desde la unidad de la piscina,
intente lo siguiente: Antes de enchufar al suministro de energía, cerciórese de estirar el cable; no
lo deje atado ni plegado como viene empacado. Cuando enchufe por primera vez el remoto, emitirá
un pitido corto y fuerte y luego se detendrá..
El receptor remoto e similar a un radio portátil pequeño. Si el remoto no suena cuando suene la
unidad de la piscina, mueva el remoto a diferentes lugares y aléjese por unos segundos para que el
remoto recoja la señal. Puede mover el remoto sólo un poco hacia la izquierda o la derecha para
atraer la señal. En algunos casos es posible que tenga que mover el remoto a un lugar diferente o a
otra habitación. Si no obtiene señal en el receptor remoto LLAME AL SERVICIO AL CLIENTE AL
1-800-242-7163
LO QUE DEBE HACER Y LO QUE NO
• LEA el manual atentamente
• INSTALE una pila de 9 voltios
• DESATE el cable de alimentación
• PRUEBE la alarma adecuadamente
• TRASLADE la alarma tomándola del asa
• RETIRE la alarma antes de nadar
•
•
•
•
•
NO DEJE la alarma en la piscina mientras nade
NO DEJE CAER la alarma, puede romperse
NO TROPIECE ni deje caer la alarma en la piscina
NO INSTALE la alarma inmediatamente después de nadar
NO UTILICE la alarma en días extremadamente ventosos
22
NOTAS:
____________________________________________________________________________________________________________________
________________________________________________________________________________________________________________________________
________________________________________________________________________________________________________________________________
________________________________________________________________________________________________________________________________
________________________________________________________________________________________________________________________________
________________________________________________________________________________________________________________________________
________________________________________________________________________________________________________________________________
________________________________________________________________________________________________________________________________
________________________________________________________________________________________________________________________________
________________________________________________________________________________________________________________________________
________________________________________________________________________________________________________________________________
________________________________________________________________________________________________________________________________
________________________________________________________________________________________________________________________________
________________________________________________________________________________________________________________________________
________________________________________________________________________________________________________________________________
________________________________________________________________________________________________________________________________
________________________________________________________________________________________________________________________________
________________________________________________________________________________________________________________________________
________________________________________________________________________________________________________________________________
________________________________________________________________________________________________________________________________
________________________________________________________________________________________________________________________________
________________________________________________________________________________________________________________________________
________________________________________________________________________________________________________________________________
________________________________________________________________________________________________________________________________
________________________________________________________________________________________________________________________________
________________________________________________________________________________________________________________________________
________________________________________________________________________________________________________________________________
23