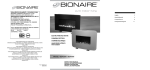
1
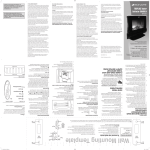
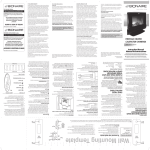
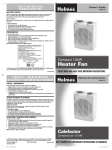
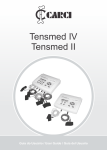
PLEASE SAVE THESE
INSTRUCTIONS
15.Avoid the use of an extension cord because the
extension cord may overheat and cause a risk of fire.
However, if you have to use an extension cord, The
electrical rating of the extension cord must be equal to or
greater than the electrical rating of the heater.
16.DO NOT attempt to repair or adjust any electrical or
mechanical functions on this unit. Doing so will void
your warranty. The inside of the unit contains no user
serviceable parts. All servicing should be performed by
qualified personnel only.
17.Discontinue use if plug or outlet is hot. It is
recommended that the outlet be replaced if plug or
outlet is hot to touch.
18.If the heater will not operate, see specific instructions on
Auto Safety Shut-off.
19.WARNING: In order to avoid overheating, do not cover
the heater ( ).
20.This appliance is not intended for use by persons
(including children) with reduced physical, sensory or
mental capabilities, or lack of experience and knowledge,
unless they have been given supervision or instruction
concerning use of the appliance by a person responsible
for their safety. Children should be supervised to ensure
that they do not play with the appliance.
21.Close supervision is necessary when any appliance is
used by or near children, or incapacitated individuals.
1.Lea completamente las instrucciones antes de utilizar el
aparato.
2.Para evitar incendios o descargas eléctricas, enchufe el
calefactor directamente al tomacorriente apropiado.
3.El calefactor se calienta al usarlo. Para evitar quemaduras,
NO toque las superficies calientes. Utilice las asas para
mover la unidad. Mantenga los materiales combustibles,
como muebles, almohadones, sábanas, papeles, ropa y
cortinas a una distancia de por lo menos 0,9m (3 pies) de la
parte delantera del calefactor y manténgalos alejados de los
costados y de la parte de atrás.
4.NO instale el cable debajo de alfombras. NO cubra el cable
con alfombrillas, tapetes o similares. Coloque el cable fuera
de las zonas de alto tráfico y donde no exista el riesgo de
tropezarse con él.
5.Este calefactor no está diseñado para ser utilizado en baños,
lavaderos y áreas interiores similares. NUNCA coloque el
calefactor donde pueda caerse dentro de una bañera u otro
recipiente con agua.
6.Siempre desenchufe el calefactor cuando no lo esté
utilizando.
7.Asegúrese de desenchufar la unidad halando por el enchufe
y no por el cable.
8.NO inserte o permita que ningún objeto extraño entre por las
rejillas de ventilación o de salida ya que pueden ocasionar
una descarga eléctrica o incendio, o dañar el calefactor.
9.NO opere ningún artefacto con un cable o enchufe dañados,
después de que el artefacto haya fallado o si se cae al suelo
o se daña de cualquier otra manera. Lleve el artefacto al
Centro de Servicio Autorizado más cercano para examinarlo,
repararlo o para ajustarlo mecánica o eléctricamente.
10.Un calefactor cuenta con partes calientes que podrían
producir chispas en su interior. NO lo use en áreas donde se
utiliza o guarda gasolina, pintura u otros líquidos inflamables.
11.NO utilice este artefacto para otro propósito que no sea para
el que ha sido diseñado. Si el artefacto no se utiliza como
se recomienda podría causar el riesgo de fuego, descarga
eléctrica y/o daños personales. El uso de accesorios no
recomendados por el fabricante podría causar incendios,
descargas eléctricas o lesiones corporales.
12.NO lo utilice al aire libre.
13.Para prevenir el riesgo de incendio, NUNCA tape la entrada
o salida de aire. NO lo utilice sobre superficies blandas,
como una cama, donde se puedan obstruir las aberturas.
Para reducir el riesgo de incendio, descarga eléctrica y/o daños
personales, siempre se deben seguir precauciones básicas de
seguridad, incluyendo las siguientes:
LEA Y GUARDE ESTAS
INSTRUCCIONES DE
SEGURIDAD IMPORTANTES
P.N. 142658
ESTE APARATO TIENE UN ENCHUFE POLARIZADO
(una pata es más ancha que la otra).
Para reducir el riesgo de choque
eléctrico, este enchufe está diseñado
para un tomacorriente polarizado en
un sólo sentido. Si el enchufe no cabe
completamente en el tomacorriente, voltee
el tomacorriente. Si de todas maneras no
calza, contacte a un electricista calificado para instalar el
tomacorriente adecuado. NO INTENTE MODIFICAR ESTE
ENCHUFE DE NINGUNA MANERA NI ALTERAR ESTA
FUNCIÓN DE SEGURIDAD DE NINGUNA MANERA.
Impreso en China
Garantía limitada de 1 año – por favor consulte los detalles
en el inserto.
© 2010 Sunbeam Products, Inc. Todos los derechos
reservados. Distribuido por Sunbeam Latin America, LLC,
5200 Blue Lagoon Drive, Suite 470, Miami, FL 33126.
© 2010 Sunbeam Products, Inc. Todos los derechos
reservados. Distribuido por Sunbeam Latin America, LLC,
5200 Blue Lagoon Drive, Suite 470, Miami, FL 33126.
INFORMACIÓN DE SEGURIDAD PARA
EL CONSUMIDOR
www.bionaire.com
CONSERVE ESTAS
INSTRUCCIONES
14.Para desconectarlo, mantenga presionado el botón de
MODO/ APAGADO por dos segundos hasta que se apague
el calefactor, luego retire el enchufe del tomacorriente.
15.Evite el uso de un cable de extensión ya que puede
sobrecalentar el artefacto y producir un incendio. Sin
embargo, si necesita utilizar un cable de extensión, la
capacidad nominal del mismo debe ser como igual o
superior a la especificada en el artefacto.
16.NO intente reparar o ajustar ninguna función eléctrica o
mecánica de esta unidad. El hacerlo invalidará la garantía. La
unidad no contiene partes que puedan ser reparadas por el
usuario. Toda reparación debe ser realizada únicamente por
un personal calificado.
17.Descontinúe su uso si el cable o el enchufe se recalientan.
Se recomienda que reemplace el contacto si éste o el
enchufe se recalientan.
18.Si el calefactor no funciona, refiérase a las instrucciones
específicas para operación automática, seguridad y
apagado.
19.ADVERTENCIA: Para evitar que se produzca un
sobrecalentamiento, NO cubra el calefactor ( ).
20.Este aparato no debe ser utilizado por personas (incluidos
niños) con capacidades físicas, sensoriales o mentales
reducidas, o que carezcan de la experiencia o los
conocimientos necesarios para ello, a no ser que hayan sido
supervisados o hayan recibido instrucciones relativas al uso
del aparato por una persona responsable de su seguridad.
Vigile a los niños y no permita que jueguen con el aparato.
21.Debe tener extremo cuidado cuando el calefactor sea
utilizado cerca de ñiños o personas inválidas, así como
cuando se deje el calefactor prendido o desatendido.
LEA EL INSTRUCTIVO ANTES DE USAR EL APARATO
CARACTERÍSTICAS ELÉCTRICAS
60 Hz
120 V
1 500 W
CONTENIDO: 1 PIEZA
S
CONSUMER SAFETY INFORMATION
THIS APPLIANCE HAS A POLARIZED PLUG (one blade is
wider than the other). To reduce the risk of electric shock,
this plug is intended to fit in a polarized
outlet only one way. If the plug does not
fit fully in the outlet, reverse the plug.
If it still does not fit, contact a qualified
electrician to install the proper outlet.
DO NOT ATTEMPT TO MODIFY THIS
PLUG OR DEFEAT THIS SAFETY
FEATURE IN ANY WAY.
(Back of Heater)
PARA MÉXICO SOLAMENTE - FOR MEXICO ONLY
Chimenea Electrica con MP3
MODELO BFH5010, BFH5010-LA013
MARCA: Bionaire™
IMPORTADOR: SUNBEAM MEXICANA, S.A. DE C.V.
AV. JUÁREZ No. 40-201,
EX–HACIENDA DE SANTA MÓNICA,
TLALNEPANTLA, ESTADO DE MÉXICO,
C.P. 54050, R.F.C. SME570928G90, TEL. 53660800
PAÍS DE ORIGEN: CHINA
PAÍS DE PROCEDENCIA: CHINA, E.U.A.
(Back of Heater)
CLEANING/MAINTENANCE
Always unplug the heater before cleaning and
allow to cool.
• To clean glass use household glass cleaner.
• Lightly run a vacuum cleaner nozzle over the heater grill
to remove any dust or dirt that may have accumulated.
• Carefully wipe the heater with a soft, damp cloth.
Please be very cautious near the heating elements.
• NEVER use abrasive or flammable solvents to clean the
heater.
• After cleaning, be sure to completely dry the heater
with a cloth or towel.
• Store your heater in a cool, dry location.
AUTO SAFETY SHUT-OFF
This heater is equipped with a patented, technologically
advanced, safety system that automatically shuts off
the current to the heater when a potential overheat
(Back of Heater)
temperature is reached. The heater can only resume
operation when you reset it.
To Reset the Heater
If your heater shuts down, follow these steps:
1. Unplug the heater and wait 30 minutes.
2. Plug in the heater, turn the power ON .
3. Your heater should now be operating properly.
(Front of Heater)
Tip-Over Shut-Off
If the heater is knocked over, it will instantly shut off. To
resume operation, simply place the heater in an upright
position and press the Power
button.
(Back of Heater)
Bulb Replacement
Two 25 W Candelabra Base Bulbs can be replaced by
opening doors on back of unit with a flathead screwdriver.
TROUBLESHOOTING
• Please DO NOT attempt to open or repair
the heater
other than bulb replacement.
(Front of Heater)
Please see the Warranty for Service Instructions
or call our Consumer Services Department.
Flame not bright enough
1. Regulate flame brightness using the Flame
Brightness
button.
2. C
heck both bulbs are working and replace if
necessary.
(Front of Heater)
3. Flame brightness
may vary when heater
is not engaged.
Simulated fire will not illuminate
1. Check power.
2. Press Flame Button .
(Front of Heater)
3. Check both bulbs and replace if necessary.
Heat will not turn off
1. Refer to operating instructions.
2. Press Thermostat
button until 00 is displayed.
The fan will continue to run for flame operation.
Heater blows cool air
(Back of Heater)
1. This is normal in order to cool down the heater and
preserve the heating element.
2. This is normal when the heat is turned off for Flame
Only mode.
Remote does not work
1. Change batteries (see Assembly Instructions).
2. Be sure to point Remote at Control Panel on unit.
(Front of Heater)
3. Be sure there are no obstructions between remote
and unit.
4. Make sure glass over LCD Display is clean.
5. Ideal range for Remote Control is within 20 feet straight on.
Not enough heat.
1. Increase thermostat setting to highest setting.
2. This is a 1500 watt heater and is intended for
supplement heat only.
Heater cycles on and off frequently
1. The thermostat automatically turns the heater on
and off to maintain selected comfort level.
2. To make this occur less frequently adjust the
thermostat setting up or down.
There is no sound
1. Make sure the heater is plugged into the outlet.
2. Ensure one end of auxiliary cable is firmly plugged
into the heater’s auxiliary jack and the other end of
the auxiliary cable is firmly plugged into your MP3
player / portable audio player.
3. Make sure your MP3 player / portable audio player
is turned on and a music track is selected and playing.
4. Make sure the speaker icon is displayed on the LCD
display. If no speaker icon is displayed, press the
sound button until it appears.
5. Increase volume control knob clockwise until you
hear sound.
PLEASE READ AND SAVE
THESE IMPORTANT
SAFEGUARDS
PLEASE READ AND SAVE
THESE IMPORTANT
SAFETY INSTRUCTIONS
(Back of Heater)
IMPORTANT INSTRUCTIONS
When using electrical appliances, basic safety precautions
should always be followed to reduce the risk of fire, electric
shock, and injury to persons, including the following:
1.Read all instructions before using the appliance.
2.To avoid fire or shock hazard, plug the appliance into the
appropriate outlet.
3.The heater is hot when in use. To avoid burns, DO NOT
let bare skin touch hot surfaces. If provided, use handles
when moving this heater. Keep combustible materials,
such as furniture, pillows, bedding, papers, clothes, and
curtains at least 0.9 m (3’) from the front of the heater and
keep them away from the sides and rear.
4.DO NOT run cord under carpeting. DO NOT cover cord
with throw rugs, runners, or the like. Arrange cord away
from traffic area and where it will not be tripped over.
5.This heater is not intended for use in bathrooms, laundry
areas and similar indoor locations. NEVER place heater
where it may fall into a bathtub or other water containers.
6.Always unplug the heater when not in use.
7.When unplugging, be sure to pull by the plug and not
the cord.
8.DO NOT insert or allow foreign objects to enter any
ventilation or exhaust opening as this may cause an
electric shock or fire, or damage the heater.
9.DO NOT operate heater with a damaged cord or plug,
or after the heater malfunctions, has been dropped or
damaged in any manner. Take appliance to Authorized
Service Center for examination, electrical or mechanical
adjustment, or repair.
10.A heater has hot and arcing or sparking parts inside. DO
NOT use it in areas where gasoline, paint, or flammable
liquids are used or stored.
11.Use appliance only for intended household use
as described in this manual. Any other use not
recommended by the manufacturer may cause
fire, electric shock, or injury to persons. The use
of attachments not recommended or sold by the
manufacturer may cause hazards.
12.DO NOT use outdoors.
13.To prevent a possible fire, DO NOT block air intakes or
exhaust in any manner. DO NOT use on soft surfaces,
like a bed, where openings may become blocked.
14.To disconnect heater, turn controls to the OFF
position,then remove the plug from outlet.
(Back of Heater)
(Front of Heater)
LIMPIEZA/ MANTENIMIENTO
Siempre desconecte el calentador y permita que se enfríe
antes de limpiarlo.
• Para limpiar el vidrio use limpiadores de vidrios de
uso casero.
• Limpie ligeramente la rejilla del calentador con la boquilla de
la aspiradora para retirar cualquier polvo o suciedad que se
haya acumulado.
• Limpie cuidadosamente el calentador con un paño suave
y húmedo. Tenga mucho cuidado cuando se acerque a los
elementos calefactores.
• Nunca use disolventes abrasivos o inflamables para limpiar
el calentador.
• Después de limpiarlo, asegúrese de secar completamente
el calentador, con un paño o toalla.
• Guarde el calentador en un lugar seco, fresco y libre de polvo.
APAGADO AUTOMÁTICO
Este calentador viene equipado con un sistema patentado de
tecnología avanzada, que cuando llega a una temperatura de
posible sobrecalentamiento, se apaga automáticamente la
of Heater)
corriente que va hacía el calentador. El(Back
calentador
sólo puede
volver a calentar cuando se vuelva a reiniciar.
Para reiniciar el calentador
Si su calentador se apaga, siga estos pasos:
1. Desconecte el calentador y espere 30 minutos.
2. Conecte y encienda el calentador (posición ON) .
3. El calentador debe funcionar correctamente ahora.
(Front of Heater)
APAGADO CONTRA VUELCO
Si el calentador se vuelco, se apagará instantáneamente.
Para reanudar el funcionamiento simplemente coloque el
calentador en posición vertical y enciéndalo presionando el
botón de encendido .
(Back of
Heater)
REEMPLAZO
DE
LAS BOMBILLAS
Las dos bombillas de 25 W con base de candelabro, se
pueden reemplazar abriendo las puertas de atrás del
calentador, con un destornillador de punta plana.
EN CASO DE PROBLEMAS
• Por favor NO trate de abrir o reparar el calentador.
Solamente puede reemplazar las bombillas. Por favor
of Heater)
lea la (Front
Garantía
para las Instrucciones de Servicios o
comuníquese con nuestro Departamento de Servicio al
Consumidor.
La llama no produce suficiente brillo
1. Regule el brillo de la llama utilizando el botón
Brillo/Llama .
2. O
bserve que ambas bombillas estén funcionando y
reemplácelas si es necesario.
3. El brillo de la llama puede variar cuando el calentador no
está prendido.
El fuego simulado no se ilumina:
1. Revise el botón de encendido.
(Front of Heater)
2. Oprima el botón de la llama .
3. R
evise ambas bombillas y reemplácelas si es necesario.
El calor no deja de producirse
1. Mire las instrucciones de operación
2. Presione el botón del termostato hasta que aparezca 00.
El ventilador continuará operando para el funcionamiento
de la llama.
El calentador expulsa aire frío
1. E
sto es normal para que el calentador pueda enfriarse y
para preservar el elemento de calefacción.
(Back
of T
2.
Heater)
ambién es normal cuando el calor se apaga, para dejar
únicamente La Función de la Llama.
El control remoto no funciona
1. Cambie las baterías (ver las instrucciones del ensamblaje).
2. Cerciórese de dirigir el control remoto en dirección al
panel del control de la unidad.
3. Cerciórese de que no haya ninguna obstrucción entre el
control remoto y la unidad.
erciórese de que el vidrio de la pantalla LCD esté limpio.
4.
(Front
of C
Heater)
5. El alcance ideal para el control remoto es 20 pies (6 m) en
línea recta.
Si no tiene suficiente calor
1. Aumente el grado de calor del termostato al grado más alto.
2. Este es un calentador de 1 500 watts y su función es para
suministrar solamente calor.
La frecuencia de los ciclos del calentador para
apagar (OFF) y encender (ON)
1. E
l termostato apaga y enciende el calentador
automáticamente para mantener un seleccionado
nivel de comodidad.
2. P
ara que esto ocurra con menos frecuencia ajuste
la posición del termostato a más alta o más baja.
No hay sonido
1. V
erifique que el calentador esté conectado al tomacorriente.
2. V
erifique que un extremo del cable auxiliar esté
firmemente conectado dentro la salida auxiliar del
calentador y el otro extremo del cable auxiliar esté
firmemente conectado dentro de su reproductor MP3/
reproductor portátil de audio.
3. V
erifique que su reproductor MP3/reproductor portátil de
audio esté encendido y se seleccione y se escuche un
tema musical.
4. V
erifique que el ícono del parlante aparezca en la pantalla
LCD. Si no aparece el ícono del parlante oprima el botón
de sonido hasta que aparezca.
5. A
umente el volumen girando la perilla del control del
volumen en el sentido del reloj hasta que escuche sonido.
MP3 Fireplace Heater
Chimenea Electrica con MP3
MODEL# BFH5010
MODELO# BFH5010
INSTRUCTION MANUAL
MANUAL DE INSTRUCCIONES
40.64 cm
Marcar
para
taladrar
GUÍA DEL
SOPORTE
Plantilla para montaje de pared
Incluidos para
el montaje
4 - Tornillos de 3.8 cm
autorroscantes con
cabeza Phillips
4 - Tornillos de expansión
2 - Soportes para montaje
Marcar
para
taladrar
Montaje sobre las vigas de la pared
Montaje en la pared
1. Busque las vigas en la pared. Generalmente estas vigas están
separadas por una distancia de 40.64 cm.
2. Corte la plantilla del montaje por las líneas punteadas y péguela a la
pared para centrar los soportes sobre las vigas.
3. Para asegurarse de que la plantilla está nivelada, use un nivelador.
Localice el lugar donde va a abrir el hueco y márquelo con un objeto
punzante.
4. Usando un destornillador eléctrico de punta Phillips, enrosque los
tornillos de 1.5” (3.8 cm) al soporte, atravesando la pared hasta llegar
a la viga de madera o metal.
Para una pared de yeso (drywall), con un espesor de 1 – 1.6 cm, use tornillos de expansión.
1. C
orte la plantilla de montaje por la línea punteada y péguela a la pared. Use
un nivelador para asegurarse de que la plantilla está nivelada y marque la pared
con un objeto punzante.
2. T
aladre huecos de 1 cm en la parte alta y baja de la guía del soporte en el centro
de las vigas.
3. A. C
oloque en línea los tornillos a través de los huecos del soporte y enrósquelos
a las aletas resortadas (Fig.A)
B. Cierre las aletas presionándolas a través del hueco en la pared. (Fig.A)
C. H
ale el tornillo para asegurar las aletas de expansión con la parte interna
de la pared; éstas se abrirán en el interior de la pared y sostendrán de manera
segura el tornillo y el soporte (Fig.B)
D. Enrosque bien el tornillo hasta que quede apretado.
IMPORTANTE: Antes de perforar la pared asegúrese de que no
haya ningún cable eléctrico en esa área.
Nota: Las herramientas de montaje, incluídas, son para montar el calentador sobre una pared de yeso (drywall) de 1 o 1.6 cm de espesor y que esté pegada a vigas de madera o metal.
Convenientemente, los soportes de montaje en la pared tienen 40.64 cm en el centro, para alinearlas con 2 vigas. No todas las vigas están a un espacio de 40.64 cm. Si no puede alinear
con las vigas, debe usar los tornillos de expansión que están incluidos. Para cualquier otro tipo de paredes, debe consultar con un profesional o visitar una ferretería para determinar que
clase de herramientas necesita para esa clase de pared.
Marcar
para
taladrar
Tornillo
Hueco
taladrado
Fig. A
Pared
Tornillo
resortado
de
expansión
se abre
dentro de
la pared
Tornillo de
expansión
Soporte
GUÍA DEL
SOPORTE
Fig. B
Pared
Nota: Este diagrama aplica
solo para paredes de yeso
(drywall).
Marcar
para
taladrar
FRONT
Control
Panel
Buttons
Key to Icons
LCD
Display
Remote Control
Fig. 1
On/Off
Thermostat
Timer
Flame Brightness
Sound
Control panel
Heat
Vent
BACK
Fig. 2
Removable
Stand
(Back of Heater)
Installing Batteries into the Remote:
Before operation, insert 2 “AAA” batteries into the back of
the remote control:
• Do not mix old and new batteries.
• Do not mix alkaline, standard (carbon-zinc), or
rechargeable (nickel-cadmium) batteries.
The remote control for this unit has the capability of
remote will not work through walls.
Handle
Hanging
Brackets
(Front of Heater)
Fig. 3
Audio Light Indicator
Auxiliary Jack
Amps:
12.5
Wattage: 1500W/ (+ 5% - 10%)
Working Voltage: 120V AC/60 HZ
Bulb Type:
(2) 25 W max Candelabra Base
Sound Speaker: 4 ohm/3~5W/90*50mm
Bass Speaker:
4 ohm/10~15W/3” diameter
Avoid overloading your circuit by not using other high
wattage appliances in the same outlet. At 1500 Watts,
this unit draws 12.5 Amps.
ASSEMBLY INSTRUCTIONS
Please make sure to check packaging for parts that
could be used to operate your heater.
This package includes:
1 - Fireplace Heater 2 - Light bulbs
1 - Remote Control 1 - Base
1 - Auxiliary Cable
4 - Machine Screws (for stand)
1 - Wall Mount Hardware Kit
Fahrenheit/Celsius
Glass
Panel
TECHNICAL SPECIFICATIONS
Volume Control
MP3/Audio
Player holder
Knob
Bulb Installation:
Unwrap the two 25 W Candleabra Bulbs from foam
packaging material and open doors on back of unit with a
flathead screwdriver.
Stand Assembly:
For floor use attach the Stand to the Fireplace heater
using the 4 machine screws (provided). Gently lay the unit
on the floor and attach the Stand to the bottom. For wall
mount see Wall Mount Instructions below.
Light Bulbs
Wall Mount Installation:
This product weighs 25 lbs (11.3 kgs). Do not install alone.
Mounting Template with instructions is attached below to
make mounting your Fireplace Heater easy.
• Wall Mount Hardware Kit includes:
4 - 3.8 cm Phillips head self tapping screws
4 - toggle bolts
2 - mounting brackets
IMPORTANT: Before drilling into any wall ensure no electrical
cables are present in the area. Max height of 47” (1.2m)
Make sure you allow at least 1 M of space on sides
of unit.
Listening to Music
(Back
of Heater)
You can listen
to music
through the heater’s internal speakers
by using an MP3 player or other portable audio players.
1.Plug one end of the auxiliary cable into the heater’s
auxiliary jack and the other end of the auxiliary cable
of Heater)
into your MP3 player(Front
or probably
audio player
2.Turn your MP3 player / portable audio player on and
ensure a music track is selected and playing.
3.Turn volume control knob clockwise until you
hearsound. NOTE: If you do not hear sound please
refer to the troubleshooting section of this manual.
Power (Front
On/Offof Heater)
First button
push will illuminate LCD and power light. The
(Back
of Heater)
Brackets
units default settings are:
Temperature
18C; Timer OFF;
(Back
of Heater)
Flame Brightness HIGH; Sound ON. After turning th unit
Off, the fan will continue to run for 10 seconds to cool unit
1M
down.After all settings are chosen, LCD will go dark.
(Back of Heater)
1M
Thermostat
• Press Thermostat button until desired temperature level
appears on LCD Display. It is recommended to start by
(Back of Heater)
(Front of Heater)
0.1 M
setting the temperature to the highest setting. Note: the
minim
um
fan will continue to run for flame operation without heat.
(Front
Heater)
• Theofsystem
now maintains the selected comfort level
by automatically turning the heater ON and OFF. The
1. Remove stand from main unit, if installed.
Thermostat
cycles ON and OFF with the heater
Heater)
2.Secure the mounting brackets(Back
to theof
wall
using the Wall
element as it maintains the programmed temperature.
Mounting Template provided (see below).
• When LCD reads 00 the heat will turn off but the fan will
(Front of Heater)
3.Hang main body on wall brackets by lifting over the
continue to run for flame operation.
bracket and sliding down.
Timer
4. Use Cord Wrap to hide extra cord.
You can set the timer to automatically turn the unit off.
(Front of Heater)
OPERATING INSTRUCTIONS
Press the Timer button, select between 1 and 12 hours.
• There may be an odor coming from the heater the
Your selection will then be displayed on the LCD.
first time you use it. This is normal during the break-in
Flame Brightness
period or after long term storage. Make sure the heater
There are four flame brightness settings: High, Medium,
is in a well ventilated area and continue running it until
(Front of Heater)
Low, Off. Press button to select desired brightness.
the smell goes away.
• You may hear a popping or crackling sound as the
Sound
heater heats up. This is normal and safe operation.
Press Sound button on control panel or remote to turn
• The Fireplace Heater can be operated by using the
sound on or off. Volume
is controlled
by the volume
(Back
of Heater)
remote control (Fig. 1) or the control panel (Fig. 2)
control knob located on the top of the unit (Fig. 3).
located on the top of the unit.
Fahrenheit/Celsius
• Place the heater on a firm, level surface or mount on wall.
Press to show temperature in Fahrenheit or Celsius.
• Avoid overloading your circuit by not using other high
wattage appliances in the same outlet. At 1500 Watts,
this unit draws 12.5 Amps.
(Back of Heater)
FRENTE
Botones del
panel de
control
BOTONES DE LOS ICONOS
Pantalla
LCD
CONTROL REMOTO
Prendido/Apagado Fig. 1
Termostato
Temporizador
Intensidad de la llamas
Sonido
Fahrenheit/Celsius
Panel de
vidrio
Ventilación
de calor
Soporte
removible
INSTRUCCIONES DE ENSAMBLAJE
Por favor asegúrese de buscar en el paquete las
partes que se pueden usar para operar su calentador
El paquete incluye:
1 - Calentador chimenea 1 - Cable auxiliar
1 - Control remoto
2 - Bombillas
1 - Base
4 - Tornillos para el soporte
1 - Estuche de herramientas para colocar el soporte en la pared.
Cómo instalar las baterías en el control remoto:
Antes de usarlo, inserte 2 baterías “AAA” en la parte de
atrás del control remoto:
• No combine las baterías viejas con las nuevas
• No combine las baterías alcalinas, con las estándar
(carbon-zinc), o las baterías recargables (níquelcadmium)
El control remoto de esta unidad tiene la capacidad de
operar todas las funciones del panel de control. Este
control remoto no opera a través de las paredes.
Instalación de las bombillas
Desempaque quitándole el material de espuma a las dos
bombillas candelabro de 25 W y abra las dos puertas de
atrás del calentador con un destornillador de punta plana.
Ensamblaje
Para uso sobre el piso, sujete el soporte al calentador
chimenea usando los 4 tornillos de ensamblaje, incluidos
en el paquete. Cuidadosamente, coloque la unidad en el
piso y sujete el soporte a la parte de abajo de la unidad.
Para montarlo en la pared, vea las instrucciones de
Montaje sobre la pared más abajo.
PANEL DE CONTROL
Fig. 2
PARTE POSTERIOR
ESPECIFICACIONES TÉCNICAS
Manija
Soportes
para colgar
(Frente del calentador)
Fig. 3
Indicador de luz de audio
Salida auxiliar
Compartimiento Perilla de control
para reproductor
de volumen
de MP3
Bombillas
Instalación del montaje sobre la pared
Este producto pesa 25 lbs (11.34 kgs) Instalelo con ayuda.
La plantilla del montaje con las instrucciones estan incluida
en la parte de abajo, para facilitar el montaje de su chimenea.
• El estuche de las herramientas para montaje de pared
incluye:
4 - tornillos Phillips con cabeza de 3.8 cm autorroscantes
4 - tornillos de expansión
2 - soportes para el montaje
IMPORTANTE: Antes de taladrar la pared asegúrese
de que no haya ningún cable eléctrico en esa área.
Altura Máxima 47” (1.2m).
del calentador y el otro extremo del cable dentro de su
reproductor MP3 o reproductor portátil de audio.
(Front of Heater)
2. Encienda su reproductor MP3/reproductor portátil de audio
y verifique que se seleccione y se escuche un tema musical.
3. Gire la perilla del volumen en el sentido de las agujas del
reloj hasta que escuche sonido. NOTA: Si no escucha
sonido, consulte la sección de solución de problemas de
este manual.
Botón de encendido/apagado (On/Off)
(Front of Heater)
La primera vez que oprima el botón se ilumina la pantalla LCD.
Las funciones de configuración de la unidad son: Temperatura
18C, temporizador apagado (OFF), brillo de la llama alto
(HIGH), sonido encendido (ON). Después de apagar (OFF)
(Back
of Heater)
la unidad,
el(Back
ventilador
continúa operando por 10 segundos
of Heater)
más, para permitir que la unidad se pueda enfriar.
Soportes
1M
1M
0.1 M
mínim
o
Cerciórese de dejar por lo menos un espacio de
1 M por los 2 lados de la unidad.
1. Separe el soporte de la unidad, si ya está instalado
Termostato
2. Sujete los soportes a la pared usando la plantilla de
• Presione el botón del termostato hasta que el nivel
montaje de pared, que viene incluída (ver instrucciones
de temperatura deseada aparezca en la pantalla
(Back of Heater)
más abajo).
LCD. Para empezar, es recomendable programar la
3. Coloque el cuerpo de la unidad sobre los soportes,
temperatura en el nivel más alto. Nota: el ventilador
levantándolos y después dejándolos que se deslicen
continuará
para que la llama siga
(Frontfuncionando
of Heater)
hacía abajo.
operando
sin
calor.
(Back of Heater)
4. Utilice la envoltura del cordón para esconder la parte
• Ahora el sistema puede mantener el nivel seleccionado
de éste que sobra.
y cómodo
de calor, encendiendo (ON) y apagando (OFF)
(Front
of Heater)
automáticamente el calentador. Los ciclos del termostato
INSTRUCCIONES DE OPERACIÓN
de encendido (ON) y apagado (OFF) con el elemento
• Es posible que el calentador emita un olor la primera
calefactor, mantiene la temperatura programada.
vez que lo use. Esto es normal durante el primer
• Cuando se vean los dos ceros (00) en la pantalla
periodo de uso y también cuando ha estado
LCD, el calor se apagará, pero el ventilador continuará
almacenado por mucho tiempo. Cerciórese de que el
(Front
of
Heater)
funcionando para que la llama pueda seguir operando.
calentador esté en un área bien ventilada y continúe
operándolo hasta que el olor desaparezca.
Temporizador
• Es posible que escuche crujidos provenientes del
Se puede programar el temporizador para que apague
calentador mientras éste se calienta. Esto es parte
la unidad automáticamente. Oprima el botón del
(Front of Heater)
de la operación normal y segura.
temporizador, seleccione entre 1 a 12 horas. Esta
• El calentador chimenea puede operarse usando el
selección aparece en la pantalla LCD.
control remoto (fig.1) o el panel de control (fig. 2)
Intencidad de la llama
localizado en la parte superior de la unidad.
Hay cuatro formas de ajustar la intencidad de la llama:
• Coloque el calentador sobre una superficie firme y
Alto, Mediano, Bajo y Apagado. Oprima el botón para
nivelada, o móntelo sobre la pared.
seleccionar el brillo deseado.
• No use otros electrodomésticos de alto voltaje en el
Sonido
mismo tomacorriente, para evitar el sobrecargo de su
Oprima el botón de sonido en el panel de control o en el
circuito. Con 1 500 watts esta unidad consume
control remoto para apagar o encender el sonido. El volumen
12.5 amperios.
se controla mediante la perilla de control del volumen que se
Cómo escuchar música
encuentra en la parte superior de la unidad (Fig. 3).
Usted puede escuchar música a través de los parlantes
Fahrenheit/Celsius °F °C
internos del calentador usando un reproductor MP3 u otro
reproductor portátil de audio.
Presione para mostrar la temperatura en Fahrenheit
o Celsius.
1. C
onecte un extremo del cable dentro de la salida auxiliar
40.64 cm
Mark for
Drill
BRACKET
GUIDE
Wall Mounting Template
Included for mounting:
4 - 3.8 cm Phillips head self
tapping screws
4 - toggle bolts
2 - mounting brackets
To mount into wall studs
To mount into drywall
1. Find studs in wall. Studs are typically 40.64 cm apart.
2.Cut Mounting Template on dotted line and tape onto wall so
brackets are centered on studs.
3.Use level to make sure template is level. Using a sharp object
such as an awl, mark hole location.
4.Using a Power Driver with Phillips head bit, drive 3.8 cm screws
through bracket and drywall into wood or metal stud.
Use toggle bolts for 1 – 1.6 cm thick drywall.
1.Cut Mounting Template on dotted line and tape onto wall. Use level to make sure
template is level and mark wall with a sharp object such as an awl.
2.Drill 1cm holes at top and bottom of bracket guide in center of studs.
3.A - Align bolts, through bracket holes then thread on Spring Loaded Wings. (Fig. A)
B - Collapse Wings while pushing through hole in wall. (Fig. A)
C - Pull bolt out to secure Toggle Wings against inside of wall (wings spring open
on other side of wall and securely hold bolt and bracket). (Fig. B)
D - Screw bolt in until tight.
IMPORTANT: Before drilling into any wall ensure no
electrical cables are present in the area.
Mark for
Drill
Note: The mounting hardware included is intended for mounting the heater on 1 to 1.6 cm drywall affixed to wood or metal studs. For your convenience the wall mount brackets are 40.64 cm
on center to align with 2 studs. Not all studs will be 40.64 cm on center. If you are not able to align with studs, toggle bolts are provided. For other wall types, please consult a professional or
visit your local hardware store to determine which type of hardware is best for your particular wall.
Mark for
Drill
Bolt
Drilled
Hole
Fig. A
Toggle
Wall
Spring
Loaded
Toggle
opens on
inside of
wall
Bracket
BRACKET
GUIDE
Fig. B
Wall
Mark for
Drill