1
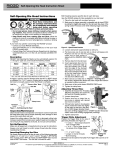
ÍNDICE
INTRODUCCIÓN ....................................................................................................................................... 2!
DESCRIPCIÓN .......................................................................................................................................... 3!
INSTRUCCIONES DE SEGURIDAD ......................................................................................................... 4!
INSTRUCCIONES DE OPERACIÓN......................................................................................................... 4!
PREPARACIÓN...................................................................................................................................... 4!
LAVADO ................................................................................................................................................. 5!
DRENAR EL AGUA ................................................................................................................................ 5!
CENTRIFUGADO ................................................................................................................................... 5!
REMOJO ................................................................................................................................................ 5!
CENTRIFUGADO SECO........................................................................................................................ 5!
MANTENIMIENTO ..................................................................................................................................... 6!
FILTROS................................................................................................................................................. 6!
RESOLUCIÓN DE PROBLEMAS ............................................................................................................. 7!
ESPECIFICACIONES ................................................................................................................................ 8!
DIAGRAMA DE CIRCUITOS..................................................................................................................... 8!
MANUAL DE INSTRUCCIONES
LAVADORA SEMIAUTOMÁTICA
LAV-3537
ESTIMADO CLIENTE
¡Felicitaciones por su compra!
Por favor lea cuidadosamente este manual y guárdelo para su futura referencia.
Si necesita soporte adicional no dude en escribir a: [email protected]
P-1
DESCRIPCIÓN
PRECAUCIÓN
RIESGO DE CHOQUE
ELÉCTRICO , NO ABRA
Precaución: Para reducir el riesgo de choque eléctrico, no retire
la cubierta, no hay partes manipulables por el usuario al interior
de la unidad. Refiera todo mantenimiento o intervención técnica
a personal técnico calificado.
Este símbolo indica la existencia de voltaje peligroso al
interior de esta unidad que constituye un riesgo de choque
eléctrico.
Este símbolo indica que hay importantes instrucciones de
operación y mantenimiento en la literatura que acompaña a
esta unidad.
LÍNEAS DE SERVICIO AL CLIENTE PREMIER
Venezuela:
Colombia:
Panamá:
Sitio Web:
E-mail:
No.
1
2
3
4
5
6
7
8
9
10
11
12
13
14
15
Parte
Entrada de Agua de Lavado
Temporizador
Selector de Lavado
Temporizador de Centrifugado
Entrada de Agua de Centrifugado
Tapa
Tina de Lavado
Pulsador
Cuerpo Exterior
Manguera de Entrada de Agua
Tapa de Seguridad
Cable de Poder
Tapa de Centrifugado
Cobertura Interna de Centrifugado
Manguera de Drenaje
0800 – ELECTRIC (353-2874)
01-900-331-PEJC (7352)
300-5185
www.premiermundo.com
[email protected]
NOTA
Nos reservemos el derecho de modificar las especificaciones, características y/u operación de este
producto sin previo aviso con el fin de continuar las mejoras y desarrollo del mismo.
INTRODUCCIÓN
Con el fin de que obtenga el mayor desempeño de su producto, por favor lea este manual de
instrucciones cuidadosamente antes de comenzar a utilizarlo.
P-3
P-2
LAVADO
1. Seleccione el nivel de entrada de agua hasta la posición deseada.
Llave del Agua
2. Agregue agua y detergente hasta que la mezcla alcance el nivel
deseado. Opere la unidad para repartir el detergente de manera
uniforme girando el botón de lavado.
3. Coloque las prendas.
4. Seleccione el tiempo de operación de acuerdo con el peso de las
prendas.
5. Seleccione el tipo de lavado (Normal o Fuerte) dependiendo del tipo
y peso de las prendas. Después de cada ciclo, ajuste la lavadora
Entrada de Agua
para drenar.
DRENAR EL AGUA
Ya que la máquina tiene una bomba de drenaje, el agua subirá rápidamente al activar el botón de
drenaje. Asegúrese de regresar el botón a la posición normal tan pronto como el agua termine de
drenarse.
No utilice la lavadora si observa que el cable de poder está dañado de forma alguna.
No permita que los niños jueguen con la lavadora.
Mantenga la lavadora alejada de fuentes de calor y evite exponerla a los rayos directos del sol.
No coloque cosas pesadas o calientes sobre la lavadora.
No lave las prendas con bencina y solventes orgánicos.
No conecte más de un cable de poder junto con la lavadora en el tomacorriente.
No introduzca las manos mientras la lavadora está funcionando.
No coloque la lavadora en el baño ya que se puede dañar el aislamiento eléctrico y oxidar la unidad.
No lave prendas resistentes al agua ya que puede haber una vibración excesiva en la lavadora.
Utilice la lavadora sobre una superficie plana y firme.
INSTRUCCIONES DE OPERACIÓN
PREPARACIÓN
1. Coloque la manguera de drenaje en el drenaje.
2. Conecte el cable de poder. Asegúrese que el voltaje de la unidad corresponde al área donde la va a
conectar.
3. Conecte la manguera de entrada de agua.
4. Seleccione el nivel de agua de acuerdo con la cantidad de prendas observando los diferentes
niveles marcados.
CENTRIFUGADO
Para retirar el detergente de las prendas y secar. Cambie las prendas de la tina de
lavado a la tina de centrifugado.
1. Coloque las prendas de manera uniforme en la tina de centrifugado sin apilarlas
muy juntas ni en un solo lado. La tina debe estar balanceada para evitar ruidos y
vibración.
2. Presione las prendas hacia abajo con firmeza y coloque la tapa sobre ellas.
3. Después de remojar, cierre la tapa de la tina y opere 1 minuto.
Coloque la
Tapa de
Seguridad
INSTRUCCIONES DE SEGURIDAD
•
•
•
•
•
•
•
•
•
•
Presione
hacia abajo
con firmeza
Llave del Agua
REMOJO
Entrada de Agua de Lavado
1. Coloque las prendas en la tina de lavado y luego seleccione el tipo de lavado.
2. Seleccione el nivel de agua, dependiendo de la cantidad de prendas.
3. Remojo Coloque el temporizador de 0 a 5 minutos y deje remojar.
CENTRIFUGADO SECO
1. Coloque las prendas de manera uniforme en la tina de centrifugado sin apilarlas muy juntas ni en un
solo lado. La tina debe estar balanceada para evitar ruidos y vibración.
2. Presione las prendas hacia abajo con firmeza y coloque la tapa sobre ellas.
3. Seleccione el tiempo de centrifugado dependiendo de la cantidad de prendas (1, 3 o 5 minutos).
P-5
P-4
Entrada de Agua
de Centrifugado
FILTRO DE PELUSA
El filtro de pelusa debe limpiarse después de cada lavada.
MANTENIMIENTO
1. Para retirar el filtro, sostenga el marco del filtro como se muestra en la figura. Presione suavemente
hacia abajo.
2. Lave el filtro en agua mientras aún está mojado. Al terminar séquelo. Evite secarlo al sol.
3. Para instalar de nuevo el filtro, coloque el marco del filtro en la ranura y luego empuje suavemente el
filtro.
•
•
•
•
•
•
Desconecte la unidad antes de hacer cualquier tipo de mantenimiento o limpieza.
Recuerde que los filtros de la lavadora también deben ser limpiados con frecuencia.
Limpie la lavadora con una prenda húmeda suave.
No aplique el agua directamente sobre la lavadora, sino sobre la prenda.
Si la lavadora está muy sucia, utilice un poco de detergente neutro para limpiar.
No utilice detergentes hechos de petróleo para limpiar la lavadora, ya que estos pueden dañar el
acabado exterior.
FILTROS
Filtro de
Pelusa
Limpie los filtros al menos cada 2 meses.
FILTRO DE SOBRE-FLUJO
1. Presione la palanca flexible y luego hale suavemente para retirar el filtro, como se muestra en la
figura.
2. Desuna los codos de los tubos en el filtro de sobre-flujo.
3. Limpie el filtro completamente con agua.
4. Para colocarlo de nuevo, coloque los codos, inserte la placa en la base de la tapa de la válvula,
coloque el gancho en la parte superior izquierda y presiones la palanca.
RESOLUCIÓN DE PROBLEMAS
Esta lista es para ayudarle a resolver problemas simples que pueden presentarse en el uso de la
unidad. Por favor léala y verifique estos puntos antes de solicitar ayuda de personal de servicio técnico
autorizado.
PROBLEMA
La unidad no funciona
CAUSA Y SOLUCIÓN
• Verifique que haya energía eléctrica, que el cable esté
bien conectado y que no se haya saltado un taco de la
electricidad.
No drena el agua
• Puede haberse bajado la manguera de drenaje, estar
bloqueada o haber prendas fuera del tubo de
centrifugado.
Hay ruidos mientras se lava
• Puede haber piezas sueltas en la unidad
Se reduce la cantidad de agua de la tina • Verifique la instalación de los codos del filtro de sobrede lavado
flujo
Hay ruidos y vibración
• La unidad debe estar puesta sobre una superficie
plana y estable. Puede haber objetos sobre la
lavadora, o muchas prendas al mismo tiempo dentro
de la lavadora.
P-7
No hale el tubo
de burbuja
Nivelador
de Agua
P-6
Codos
ESPECIFICACIONES
Capacidad de Lavado
Capacidad de Centrifugado
Voltaje
Frecuencia
Potencia de Entrada de Lavado
Potencia de Entrada de Centrifugado
Clase
10.5Kg
6.0Kg
AC 110V
60Hz
520 Vatios
250 Vatios
IPX4
DIAGRAMA DE CIRCUITOS
Café
Blanco/Gris
Café
Verd
e
Selector de
Lavado
Café
Café
Temporizador de
Lavado
Naranja
Naranja
Temporizador de
Centrifugado
Blanco
Negro
Café
Amarillo
Amarillo
Naranja
Gris
Rojo
Rojo
Amarillo
Amarillo
Amarillo/
Verde
Amarillo/
Verde
Azul
P-8
Azul
Motor de
Centrifugado
Amarillo/ Verde
Azul
Azul
Blanco
Blanco
Gris
Motor de
Lavado
Café
Blanco
Azul
Azul
CAUTION
RISK OF ELECTRIC
SHOCK, DO NOT
OPEN
INSTRUCTION MANUAL
SEMI-AUTOMATIC WASHING MACHINE
Caution: To reduce the risk of electric shock do not open
this device, there are not serviceable parts for customers.
Please refer any maintenance or repair to qualified
personnel.
LAV-3537
This sign means the existence of dangerous voltage at
the inside of the unit, which states a risk of electric shock.
This sign means that there are important instructions of
operation and handling in the manual that comes with this
device.
PREMIER CUSTOMER SERVICE
Venezuela:
Colombia:
Panama:
Website:
E-mail:
0800 – ELECTRIC (353-2874)
01-900-331-PEJC (7352)
300-5185
www.premiermundo.com
[email protected]
NOTE
This unit may be submitted to changes in specifications, characteristics and/or operation without prior
notice to the user, in order to continue improving and developing its technology.
CONTENTS
Before Using the Machine
Introduction to Parts
Point Of Attention
In Operation
Preparation before Wash
Washing Procedure
Maintenance
Troubleshooting
DEAR CUSTOMER
In order to achieve the best performance of your product, please read this instruction manual carefully
before using, and keep it for future reference.
If you need extra support, please write to [email protected]
P-1
POINT OF ATTENTION
BEFORE USING THE MACHINE
INTRODUCTION TO PARTS
*In case the plug top of the power
supply cord is damaged, user should
not attempt to fix it without electrical
knowledge. Seek advice from expert or
contact qualified technician.
*Do not share one power outlet
with other electrical appliances.
Do not use unappointed power
source. Keep the plug strip clean.
*Forbid children from playing near the
machine.
*Never put your hand in the tub
while it's running.
*Keep machine away from heatgenerating equipment.
* Avoid from direct sunlight.
*Do not place the machine in the
bathroom. Such action may
damage the electrical insulation
and cause body rust.
*Do not put heavy or hot things on top
of the machine.
*Do not wash waterproof clothes
like rain-coat. Abnormal vibration
may occur in spin tub.
*Do not wash laundry soaked with
petrol and organic solvent.
THE NAME OF PARTS
1. Wash Water Inlet
2. Wash Timer
3. Wash Selector
4. Spin Timer
5. Spin Inlet
6. Wash Cover
7. Wash Tub
8. Pulsator
9. Outer Body
10. Water Inlet Hose
11. Safety Cover
12. Power Cord
13. Spin Cover
14. Spin Inner Cover
15. Drain Hose
*Place machine on flat and solid
ground.
P-3
P-2
C) Intermediate -Spin (Removing Detergent/Dry)
1) Move laundry from wash tub to spin tub.
2) Spin to remove dissolved detergent.
a) Arrange laundry uniformly in the spin tub without stacking them all on one side. An unbalance spin
tub may cause abnormal vibration and noise.
b) Press the laundry down firmly and place the spinner cap on top of them.
c) After rinsing, close the outer cover of the spin tub and spin for 1 minute.
IN OPERATION
PREPARATION BEFORE WASH
1) Set the drain hose to drainage.
2) Plug the power supply cord to the mains but be sure to check first if the voltage
corresponds to the rating label of the appliance. It must use the two round European pins
plug.
3) Insert the water inlet hose into water inlet connector.
3) Soak Rinse
i) Place the laundry into the wash tub, and then select suitable washing type.
ii) Select the water level. (Select the water level according to the amount of laundry)
iii) Rinse: - Set the timer to 0 - 5 minutes and let it rinse.
Water Tap
Water Inlet
4) Dry Spin
i) Arrange laundry uniformly in the spin tub without stacking them all on one side.
An unbalance spin tub may cause abnormal vibration and noise.
ii) Press the laundry down firmly and place the safety cover on top of them.
iii) Select suitable spinning duration according to the quantity of laundry. (1 minute, 3 minutes, 5
minutes)
An unbalance spin tub may cause abnormal vibration or noise.
If such incident occurs, open the cover of the spin tub and rearrange the laundry, then
continue the spinning operation.
MAINTENANCE
Please unplug the power supply cord before performing any disposal.
There will be lint left behind in the overflow filter and the lint filter after each time of used. These filters
need to be cleaned frequently in order to maintain the top performance of the machine.
Clean of the entire machine
Clean the machine with a soft damp cloth.
* Do not spray water directly onto the machine.
* If the machine is too dirty, add neutral detergent to clean.
* Do not use petroleum-based detergent to clean the machine, as this will spoil the appearance.
P-5
4) Select the water level according to the quantity of Laundry by referring to water level marking.
WASHING PROCEDURE
A) Washing
1) Water Inlet
Select the water lever to the desired position.
2) Add in water and dissolved detergent to make
the water reach the expected level.
Operate the machine to stir the detergent evenly
by turning the Wash Knob.
3) Put in laundry.
4) Select wash duration according to the weight of laundry.
5) Select washing type (Normal/Stronger) according to the weight of laundry.
After each washing operation ends, set the Wash Selector to Drain.
B) Drain the water
Since the washing machine has a drain pump, the water will
Flow faster upon turning the Drain Selector to drain position.
Be sure to turn Drain Selector immediately back to Normal
Position when the water is completely gone from the Wash tub.
P-4
TROUBLESHOOTING
Before you call for technician or send your machine for repair, please
Check from this troubleshooting list:
PROBLEM
The machine does not work.
Unable to drain.
Abnormal sound while washing.
Water in the wash tub reduced.
There is abnormal sound and violent
vibration while spinning.
Cleaning of the overflow filter
Please clean the filter at least once in 2 months.
1) Dismantling of the overflow filter
Pinch the flexible-fastening claw; pull it gently away from machine as shown in picture.
POSSIBLE CAUSE
* Is the power cut?
* Is the power supply cord connected to a power outlet?
* Is the pulsator tangle with something?
* Has the drain hose being lowered?
* Is the drain hose frozen?
* Is the drain hose blocked?
* Are there any clothes fallen outside of the spin tub?
* Are there any loose articles in the wash tub?
2) Dismantling the bellows
Dismantle the top of the pipe in the overflow filter.
3) Cleaning the overflow filter
Clean the filter completely under running water.
4) Installing the overflow filter
* Install the bellows.
* Insert the tie plate of the bottom of valve cover.
* Put up the hook at the left top.
* Press the top to the slot as shown in picture.
* Is the bellows of the overflow filter being miss-installed?
* Is the machine place on a flat and solid ground?
* Is the spinner cap being placed into the spin tub?
* Are there any clothes fallen outside of the spin tub?
* Are there too much laundry in the spin tub?
CAUTION
Caution: Please turn off and unplug the unit before you repair to avoid electric shock and accident. If you
cannot resolve the troubles by yourself, please call the nearest authorized service centers. If the supply
cord is damage, it must be replaced by the manufacturer or its service agent or any qualified person.
This appliance is not intended for use by persons (including children) with reduced physical, sensory or
mental capabilities, or lack of experience and knowledge, unless they have been given supervision or
instruction concerning use of the appliance by a person responsible for their safety.
P-7
Please do not
pull the bubble
pipe
Water level
Elbows
adjustor
Cleaning the lint filter
* The lint filter must be used during each time of washing.
* The lint filter must be cleaned immediately each time after use.
1) Dismantling the lint filter
Hold the filter frame as shown in picture, gently press downward and pull off from the filter frame.
2) Cleaning the filter
Wash the filter while it is still wet. Wash only with plain water.
After wash, dry it. Avoid from drying under direct sunlight.
3) Installing the filter
Insert the bottom part of the filter frame into the slot, and then gently push the filter in place.
P-6
Specification
Model number
Wash capacity
MODEL NO. LAV-3537
10.5kg
Spin capacity
Rated Voltage/ Frequency
Rated input wash power
Rated input spin power
Water proof grade
6.0kg
AC110V / 60Hz
520W
250W
1PX4
WIRING DIAGRAM
P-8