1
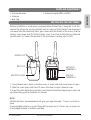
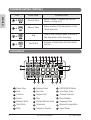
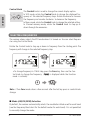
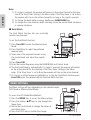
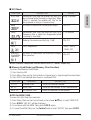
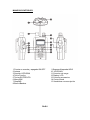
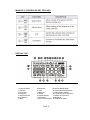
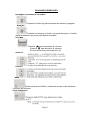
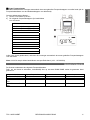
TSC-100R / 100RBT Bluetooth Compatible MULTIBAND SCANNING RECEIVER INSTRUCTION MANUAL Manufactured by www.ttikorea.co.kr CONTENTS 1. 2. 3. 4. 5. ENGLISH CAUTIONS................................................................................. 4 ABOUT TSC-100R/100RBT MODELS ............................................. 4 SUPPLIED EQUIPMENT ................................................................. 5 INSTALLING THE BATTERIES ....................................................... 5 CONTROLS .................................................................................... 6 Power On/Off Lock Button....................................................... 7 Antenna............................................................................... 7 Squelch Up/Down Keys ........................................................... 7 Function Key .......................................................................... 7 Enter/VFO Keys ...................................................................... 7 Menu/MW Keys ..................................................................... 7 Step/MR Keys ........................................................................ 7 Bank/Band&Skip Key ............................................................ 7 Scan / Search&DW Key ......................................................... 7 Up / Down Keys ..................................................................... 7 Charger Jack ......................................................................... 7 LCD Display .......................................................................... 7 Accessory Jack ...................................................................... 7 Control Knob ........................................................................ 7 Lanyard Slot .......................................................................... 7 6. EXTENDED KEYPAD CONTROLS .................................................... 8 7. LCD DISPLAY ............................................................................... 8 8. GENERAL OPERATION ................................................................. 9 Turning the unit On or Off....................................................... 9 KEY Lock................................................................................ 9 Volume...................................................................... 9 Squelch................................................................................ 9 Func Key................................................................................ 9 Menu Key .............................................................................. 9 E/VFO Key [Enter/VFO]............................................................. 9 Control Knob ........................................................................ 10 INSTRUCTION MANUAL TSC-100R/100RBT TSC-100R/100RBT INSTRUCTION MANUAL 10 10 10 11 12 12 12 13 14 14 15 15 15 15 16 16 17 17 18 18 19 19 19 ENGLISH 9. SELECTING FREQUENCIES ............................................................. Mode Selection ..................................................................... Frequency Step Selection........................................................ 10. FREQUENCY BANDS...................................................................... 11. FREQUENCY SEARCH..................................................................... Selected Band Search ............................................................. Full Band Search ..................................................................... Dual Watch ............................................................................ 12. MEMORY BANKS .......................................................................... 13. STORING FREQUENCIES INTO THE MEMORIES ............................. 14. RECALLING FREQUENCIES FROM THE MEMORIES ......................... 15. CHANNEL SCAN ........................................................................... Selected Bank Scan ................................................................ Full Band Scan ........................................................................ Dual Watch ............................................................................ 16. MENU SETTINGS ........................................................................... VFO Mode ............................................................................... Memory Read Mode(Memory Clear) ...................................... 17. BLUETOOTH COMPATIBLE OPERATION ......................................... 18. TROUBLE SHOOTING .................................................................... 19. SPECIFICATIONS ........................................................................... General.................................................................... Receiver ................................................................................. CAUTIONS ENGLISH Please read these instructions carefully before operating your receiver. Your scanner is a complex and powerful unit with many functions. Please retain this manual for future reference. Any illegal use offending the national law is not allowed. Never connect the receiver to the power source other than the specified battery. Otherwise the damage to your receiver may occur. Never use the receiver in or near the mining area, near explosives or where signs indicate ‘Blasting Area’. Never use or charge the receiver in a potentially explosive atmosphere. Do Not place the receiver in front of the vehicle air bag. Do Not operate the receiver on board the aircraft. Always charge the receiver at normal room temperature. Always replace the accessory jack cover when the jack is not in use. Do Not expose the receiver to water. It is not waterproof. Avoid storing or charging the receiver in direct sunlight. Avoid storing the receiver in temperatures below -10 C to +60 C Never try to charge Alkaline batteries or any dry cells. ABOUT TSC-100R/100RBT MODELS TTI offers two models of your scanner receivers. TSC-100R is the basic version and TSC-100RBT additionally includes the Bluetooth compatible operation. Except for the Bluetooth compatible operation, all other features, functions and specifications are same. Please carefully check whether your receiver is the Bluetooth compatible model or not before starting your use. INSTRUCTION MANUAL TSC-100R/100RBT SUPPLIED EQUIPMENT • Antenna Adaptor(SMA to BNC) ENGLISH • Scanner Receiver • Antenna • Belt Clip INSTALLING THE BATTERIES Battery installation is made more convenient when the belt clip is removed. To do this, release the spring clip securing the belt clip to radio and slide the belt clip downward and away from the radio body. Next, press down with the thumb at the arrow, slide the battery cover down and lift off the battery cover. Insert four AAA batteries (alternate positive ends (+) toward the bottom of the transceiver (starting right to left). SPRING CLIP BELT CLIP NEGATIVE TERMINALS BATTERY COVER POSITIVE TERMINALS 1. Using thumb, press down on battery cover at arrow and slide cover down to open. 2. Slide the cover down and then lift cover at bottom to open. Remove cover. 3. Insert four AAA batteries (positive(+) end toward the bottom beginning at right side and alternating positive terminals as shown). NOTE: Alkaline batteries (recommended) will give you approximately 7 hours constant receive. If rechargeable batteries are used these will give you up to 3 hours use, so spare sets of recharged batteries should be available. TSC-100R/100RBT INSTRUCTION MANUAL CONTROLS ENGLISH 15 1 2 14 13 12 3 4 5 6 7 ACC 10 9 CHG 11 8 1 Power On/Off Lock Button 9 Scan / Search&DW Keys 2 Antenna 10 Up / Down Keys 3 Squelch Up/Down Keys 11 Charger Jack 4 Function Key 12 LCD Display 5 Enter/VFO Keys 13 Accessory Jack 6 Menu/MW Keys 14 Control Knob 7 Step/MR Keys 15 Lanyard Slot 8 Bank/Band&Skip Keys INSTRUCTION MANUAL TSC-100R/100RBT 1 Power On/Off Lock Button Turns the receiver on and off. Also locks the keypad. 2 Antenna ENGLISH Provides reception of signals. 3 Squelch Up/Down Keys Opens and closes the squelch. 4 Function Key Enables extended keypad control functions. 5 Enter/VFO Keys Confirms selections and selects the VFO mode. 6 Menu/MW Key Provides access to setup menus and also access to write memories. 7 Step/MR Key Provides access to setup frequency steps and also access to read memories. 8 Bank/Band&Skip Key Used to change Memory Banks or Frequency Bands, and also Used to skip channels or frequencies. 9 Scan/Search&DW Key Used to activate or deactivate the Scan function in memory read mode or the Search function in VFO mode. Also used to activate or deactivate Dual Watch function. 10 Up/Down Keys Adjust the Volume and selects Menu items and frequency steps. 11 Charger Jack Provides Charging connection. (Optional accessories are required.) 12 LCD Display Shows frequencies and selected functions. 13 Accessory Jack Provides earphone connection. 14 Control Knob Selects frequencies and channels and selects values from menus. 15 Lanyard Slot Allows connection of the Lanyard to protect the receiver from being accidentally dropped.(Optional accessory required.) TSC-100R/100RBT INSTRUCTION MANUAL EXTENDED KEYPAD CONTROLS ENGLISH KEY Extended Function DESCRIPTION Keys FUNCTION + Manual Write Allows storage of frequencies into the Memory storage area. + Memory Read Allows reading of the frequencies in the stored memories. + Skip Used to Skip channels when Scanning or Skip frequencies when Searching. + Dual Watch Activates or Deactivates the Dual Watch function. LCD DISPLAY 2 3 4 5 6 7 8 9 10 11 12 1 13 21 14 15 16 17 18 19 20 1 Power Save 8 Memory Read 15 AM/FM WFM Mode 2 Scan 9 Key Tone 16 Scan Delay Timer 3 Function 10 Keypad Lock 17 Channel Indicator 4 Search 11 Skip 18 Bank Number 5 Memory Write 12 Battery Balance Level 19 Frequency Step 6 Dual Watch 13 Attenuator 20 Bluetooth compatible 7 Delta 14 Frequency Display 21 Signal Meter INSTRUCTION MANUAL TSC-100R/100RBT Key Lock Briefly press the RED Button on the top of the unit to turn the Key Lock ON. Briefly press the RED Button again to turn the Key Lock OFF again. Volume Press the p key to increase the volume. Press the q key to decrease the volume. The volume level will be displayed from 00 to 3. Squelch Func Key Menu Key Press the p key on the side of the radio to increase the Squelch setting and theq key on to decrease the Squelch setting. The Squelch level will be displayed from 00 to 09. 00 is open status and 09 is near the closed squelch. At maximum Squelch setting, ‘AT’ is selected which represents an automatic (preset) level setting. The Function key provides access to secondary (extended) keypadfunctions associated with the front panel keys. The secondary function labels are printed below respective keys. The Menu key provides access to the radio settings. E/VFO Key[Enter/VFO] Press the E/VFO key to select the VFO mode or confirm any selections. Note: The receiver always selects the VFO mode each time it is turned on. TSC-100R/100RBT INSTRUCTION MANUAL 9 ENGLISH GENERAL OPERATION Turning the unit On or Off Press and hold the RED Button on the top of the unit to turn the unit ON. Press and hold the RED Button again to turn the unit OFF. Control Knob ENGLISH The Control knob is used to change the current display option. In VFO mode, rotate the Control knob to change the displayed frequency at the selected frequency steps. Rotate clockwise to increase the frequency and counter clockwise to decrease the frequency. In Menu mode, rotate the Control knob to change the selected setting. In Channel memory mode, rotate the Control knob to step up or down through the memories. SELECTING FREQUENCIES The receiver always selects the VFO mode when it is turned on. You can select frequencies using the Control Knob. Rotate the Control knob to step up or down in frequency from the starting point. The frequency will change in the selected frequency step. • To change frequency in 1 MHz step, press the Func key, then use the Control knob to change the frequency. is displayed while the Function mode is activate). Note : Then Func mode clears a few seconds after the last key press or control knob change. n Mode (AM,FM,WFM) Selection By default, the receiver automatically selects the modulation Mode used for each band (see the Frequency Band chart for the default modes for each band). It is not permitted to manually change the mode. 10 INSTRUCTION MANUAL TSC-100R/100RBT ENGLISH n Frequency Step Selection By default, the receiver automatically selects the frequency Steps most commonly used for each band (see the Frequency Band chart for the default Steps for each band). To select a different step : 1) In VFO mode press STEP. 2) The following frequency steps are available for your selection. 5 kHz 6.25 kHz (6.2 displayed) 8.33 kHz (8.3 displayed) 10 kHz 12.5 kHz 15 kHz 20 kHz 25 kHz 30 kHz 50 kHz 100 kHz 500 kHz Auto 1 2 If Auto is selected the receiver will automatically select the appropriate default frequency Step for each band. Note : 8.33 KHz step is available only with specific band. (108.0083 - 135.99 MHz) FREQUENCY BANDS The Scanner supports the following Frequency Bands. To select a band, repeat momentarily pressing the BANK BAND key until the preferred band is selected. Frequency Band Start up Frequency Default Mode Default Step 66 MHz to 87.475 MHz 66 MHz FM 25kHz 87.5 MHz to 108 MHz 87.5 MHz WFM 100kHz 108.025MHz to 135.975MHz 118 MHz AM 25kHz 136 MHz to 174.000 MHz 150 MHz FM 25kHz TSC-100R/100RBT INSTRUCTION MANUAL 11 FREQUENCY SEARCH ENGLISH n Selected Band Search Use the Search function to locate active frequencies in one or more bands 1) Press the E/VFO key to select VFO Mode. (Note: the receiver automatically selects the VFO mode when it is turned on). 2) Press the BAND key to select the required Band. There are 4 factory preset Bands to choose from (see Frequency Band Table). 3) Set the Squelch level using the Squelch porq keys so that the noise just disappears. 4 3 1 2 5 6 4) Select a start frequency to Search from. 5) Press the SCAN SRCH key briefly. The ‘SRCH’ icon will be displayed and the receiver will search the selected Band starting from the start frequency. Once the end of the band is reached the Search continues at the beginning of the selected Band. 6) To stop the Search, press the SCAN SRCH key again. Note: 1) During the Search, press the BANK BAND key to move to the next Band. 2) To change the Search direction rotate the Control knob clockwise or counter clockwise. 3) The receiver will stay on an active channel according to the Busy Timer settings in the VFO Menu. If the Busy Timer is set to ‘5 Seconds’, the receiver will continue Searching after 5 seconds even if the channel is still busy. If the Busy Timer is set to ‘Busy’, the receiver will remain on the busy frequency for as long as it stays busy, then resume searching when the signal disappears. 12 INSTRUCTION MANUAL TSC-100R/100RBT n Full Band Search The Full Search function searches the entire scanner frequency range for signals. ENGLISH 1) Press the E/VFO key to select VFO Mode. (Note: the receiver automatically selects the VFO mode when it is turned on). 2) Set the Squelch level using the Squelch porq keys so that the noise just disappears. 2 3) Press and hold the SCAN SRCH key for 2 seconds. The ‘SRCH’ icon will be displayed and the receiver will Search the entire frequency range of the receiver. 1 3 4 4) To stop the Search, press the SCAN SRCH key again. Note: 1) During the Search, press the BANK BAND key to move to the next Band. 2) To change the Search direction rotate the Control knob clockwise or counter clockwise. 3) The receiver will stay on an active channel according to the Busy Timer settings in the VFO Menu. If the Busy Timer is set to ‘5 seconds’, the receiver will continue Searching after 5 seconds even if the channel is still busy. If the Busy Timer is set to ‘Busy’, the receiver remain on the busy frequency for as long as it stays busy, then resume searching when the signal disappears. n Dual Watch The Dual Watch function lets you constantly monitor two frequencies for activity. 1 4 To set the Dual Watch function: 1) Enter one of the required frequencies using the Control knob, 2 2) Adjust the squelch so that the receiver is muted. 3 6 3 6 3) Press Func DW. TSC-100R/100RBT INSTRUCTION MANUAL 13 4) Enter the second frequency using the Control knob. ENGLISH 5) The Dual watch begins automatically. If a signal is received, the receiver will remain on the active frequency for the duration of the ‘Busy Timer’ setting in the Menu setup. If the ‘Busy Timer’ is set to Busy the receiver will stay on the active frequency. 6) To stay on an active frequency indefinitely or to stop the Dual Watch function press Func DW again. The receiver will exit the Dual Watch function. MEMORY BANKS The scanner memory storage area has a capacity of 200 locations. These are split and stored into 10 banks. Each bank has 20 channel storage capability. n How to Memorize Frequencies The Memory area allows the user to manually store up to 200 individual frequencies. The default memory banks are labelled 0 to 9. STORING FREQUENCIES INTO THE MEMORIES To store a frequency into one of the memories: 3 7 1) Press the E/VFO key to select VFO Mode. 2) Press the BANK BAND key to select the required Band. 3) Select the frequency that you want to store using the control knob. 1 4 8 4) Press Func MW to enter the Memory Write mode. 5) The receiver will find and display an empty memory bank and memory location automatically. 2 6 4 5 6) If required, use the BANK BAND key to select a new memory bank. 7) To change the memory location, rotate the control knob. 8) Press Func MW again to store the frequency. 14 INSTRUCTION MANUAL TSC-100R/100RBT RECALLING FREQUENCIES FROM THE MEMORIES ENGLISH 1) Press the E/VFO key to select VFO Mode. 2) Press Func MR. The receiver will enter the Memory Read mode. 3) To step through the memory banks press the BANK BAND key. Memory banks are numbered 0 to 9. 4) Select the required channel using the control knob. CHANNEL SCAN n Selected Bank Scan Use the Scan function to locate active channels among the memorized channels in one bank. 1) Press Func MR to select the Memory Read mode. 2) Press Bank/Band to select the preferred memory bank. 3) Set the squelch level to a point where the receiver is just quiet. 4) Press SCAN/SRCH. The receiver will begin scanning the selected Band. 3 1 1 4 2 Note: 1) If a signal is received, the receiver will remain on the active channel for the duration of the ‘Busy Timer’ setting in the Menu setup. If the ‘Busy timer’ is set to Busy the receiver will stay on the active channel for as long as the signal is present. 2) To change the bank while scanning, briefly press BANK/BAND key. 3) To change the scan direction while scanning, rotate the control knob clockwise or counter clockwise. n Full Bank Scan The Full Bank Scan function scans the entire memorized channel range for signals. 1) Press Func MR to select the Memory Read mode. 2) Press Bank/Band to select the preferred memory bank. 3) Set the squelch level to a point where the receiver is just quiet. 4) Press and hold Scan/Srch for 2 seconds. The receiver will begin scanning the entire full Bands. TSC-100R/100RBT INSTRUCTION MANUAL 3 1 1 4 2 15 ENGLISH Note: 1) If a signal is received, the receiver will remain on the active channel for the duration of the ‘Busy Timer’ setting in the Menu setup. If the ‘Busy timer’ is set to Busy the receiver will stay on the active channel for as long as the signal is present. 2) To change the bank while scanning, briefly press BANK/BAND key. 3) To change the scan direction while scanning, rotate the control knob clockwise or counter clockwise. n Dual Watch The Dual Watch function lets you constantly monitor two channels. 3 5 To set the Dual Watch function: 1) Press Func MR to enter the Memory Read 3 Mode. 2) Press Bank/Band to select the preferred 7 memory bank. 4 7 1 3) Select one of the required channels using 5 2 the control knob, and adjust the squelch level. 4) Press Func DW. 5) Enter the second frequency using the BANK/BAND and Control knob. 6) The Dual watch begins automatically. If a signal is received, the receiver will remain on the active channel for the duration of the ‘Busy Timer’ setting in the Menu setup. If the ‘Busy Timer’ is set to Busy the receiver will stay on the active channel. 7) To stay on an active frequency indefinitely or to stop the Dual Watch function press Func DW again. The receiver will exit the Dual Watch function. MENU SETTINGS The Menu settings will vary depending on the selected mode. (VFO Mode or Memory Read Mode) 3 To access the VFO Mode Menu(default) 1) Press the MENU Key to access the Menu settings. 2) Press the volume pq keys to step through the Menu items. 3) Rotate the Control knob to change the values of each Menu item. 4) Press the E/VFO key to confirm the change. 16 INSTRUCTION MANUAL 4 1 2 TSC-100R/100RBT n VFO Mode Beep DESCRIPTION VALUES Determines how long the receiver will wait on a Busy, 5 Seconds busy channel while Scanning or Searching. When ‘Busy’ is selected, the receiver will stay on the busy channel as long as it remains busy. Activates or deactivates the key-press beeps. ON, OFF Delay Determines how long the radio will wait on a 1-10 Seconds frequency after a signal has disappeared while scanning or Searching. Attenuation Reduces the receive sensitivity by -10dB. ON, OFF Delta Shifts frequencies. -5kHz, -10kHz, -15kHz, OFF Bluetooth Compatible Operation Activates or deactivates the Bluetooth compat- ON, OFF ible operation. ENGLISH FUNCTION Busy Timer NOTE: Bluetooth compatible function works with TSC-100RBT model only. n Memory Read Mode (and Memory Clear Function) To access the Memory Read Mode. 1) Press Function MR. 2) Press Menu, then use the Control knob or Volume keys to step through the menu items. 3) Press E/VFO and selected item shown is confirmed./VFO. FUNCTION CH CLr BK CLr MEM CLr MEANING Channel Clear Bank Clear All Memory Clear DESCRIPTION Erases the selected channel. Erases all the channels in the selected Bank. Erases all memories in the receiver. NOTES for MEM CLEAR : To erase ALL data from the memories 1) Press Menu, then use the Control Knob or the volume pqkeys to select ’MEM CLR.’ 2) Press E/VFO. ‘dEF yES’ will be displayed. 3) To continue with the MEM Clear, press E/VFO again. 4) To cancel the MEM Clear, use the Control knob to select ‘dEF NO’ then press E/VFO. TSC-100R/100RBT INSTRUCTION MANUAL 17 BLUETOOTH COMPATIBLE OPERATION (ONLY FOR TSC-100RBT MODEL) ENGLISH To activate the paring between your receiver and your headset or any other external Bluetooth equipment ; 1 1) Pressing E/VFO, turn on your receiver. On the LCD, 5 pairing ( ) is displayed. 2) Make your headset or any other Bluetooth equipment enter the pairing mode too. 3) Make sure that your receiver automatically confirms “OK”. 4) Press MENU and step down to Bluetooth compat 4 1 ible ( ) Mode. 4 5) Select Bluetooth compatible “ON” to start the Bluetooth compatible operation. TROUBLE SHOOTING If you experience problem with your TSC-100R or TSC-100RBT, first check the battery power level as low battery can cause problems such as weak reception and reduced sound quality. Then check the manual and receiver display to ensure that a function such as Lock or Scan has not been activated by accident. 1 3 If these steps do not solve the problem, reset your unit as follows. 1. Partial Reset 1) Turn off your unit. 2) Press and hold the MENU and the STEP keys together. 3) Turn on your unit. 4) Memory Clear(MEM CLr) appears. This will erase all the memory data from the channel memory banks. 2 2 If you find problems not solved by this partial reset, try all reset as follows. 2. All Reset 1 1) Turn off your unit. 2) Press and hold the E/VFO and the STEP keys together. 3) Turn on your unit. 4) All clear (ALL CLr) appears. This will not only erase all the memory data but also reset all the basic operation data to the original factory default 2 settings. This should resolve most problems. 2 In case of further difficulties, please consult your dealer or visit our website at www.ttikorea.co.kr 18 INSTRUCTION MANUAL 3 TSC-100R/100RBT SPECIFICATIONS n General ENGLISH - Frequency coverage: 66-174 MHz - Number of memory channels : 200 Units - Frequency resolution : 5, 6.25, 8.33 *,10, 12.5, 15, 20, 25, 30, 50, 100, 500KHz & Auto. *8.33kHz step works in 108.0083-135.99MHz range only. - Operation temperature range : -107C to +607C - Reference frequency stability : 6 ppm 7C (-107C to +607C) - Power supply requirement : AAA x 4 Ni-MH or ALKALINE - Current drain Stanby (power saved) : 50mA typical max. audio : 320mA typical charging(at 9V DC) : 300mA typical - Antenna connector : SMA (50 ) - Dimensions (proj. not included) : 56(W) x 116.5(H) x 35.8(D)mm - Weight(w/o Battery) : 160g *Specifications are subject to change without prior notice or obligation. n Receiver - Receive system : Double superheterodyne. - Intermediate frequencies 1st : 19.65 MHz, 2nd : 450 KHz - Sensitivity and squelch sensitivity (except spurious points): FM (1 kHz/3.5 kHz Dev. 12dB SINAD) 66-87.495MHz 0.25uV 136-174MHz 0.25uV WFM (1 kHz/52.5 kHz Dev. 12dB SINAD) 87.5-108 MHz : 0.5uV AM (1 kHz/30% MOD. 10dB SINAD) 108.005-135.995MHz -0.56uV - Selectivity AM/FM : More than 15 kHz/-9dB Less than 150 kHz/-60dB WFM : More than 150 kHz/-6dB - AF output power : 500mW typical at 40% distortion with an 8 load - Ext.speaker connector : 3-conductor 3.5(d) mm (1/5”) 8 TSC-100R/100RBT INSTRUCTION MANUAL 19 DECLARATION OF CONFORMITY ENGLISH TTI TECH CO.,LTD. head quartered in 163-4 Gaepo-dong, Kangnam-ku, Seoul, Korea, 135-960 hereby declares under its own responsibility that this receiver equipment named TSC-100R and TSC-100RBT are in compliance with the basic requirements and all the related provisions of the EMC, R&TTE and LVD Council Directive of the EU. 20 INSTRUCTION MANUAL TSC-100R/100RBT TSC-100R / 100RBT Bluetooth Compatible RECEPTOR SCANNER MULTIBANDA MANUAL DE INSTRUCCIONES Fabricado por TTI www.ttikorea.co.kr www.ttispain.es INDICE 1. 2. 3. 4. 5. SPANISH PRECAUCIONES .......................................................................... 4 DIFERENCIAS EN TRE LOS MODELOS TSC100R/100RTB.................. 4 EQUIPAMIENTO Y ACCESORIOS....................................................... 5 INSTALACION DE LAS BATERIAS...................................................... 5 MANDOS/CONTROLES.................................................................. 6 Puesta en marcha ON/OFF y bloqueo ........................................ 7 Antena............................................................................. 7 Squelch Up/Down Keys ........................................................... 7 Function ................................................................................. 7 Enter/VFO ............................................................................. 7 Menu / MW ............................................................................ 7 Step/MR ......... ........................................................................ 7 Banco de memorias / bandas de frecuencia & sky............................ 7 Función scanner / scanner de frecuencias & DW............................ 7 Teclas UP/DOWN ..................................................................... 7 Conector carga...................................................................... 7 Display LCD .......................................................................... 7 Conexión accesorios .............................................................. 7 Control selección frecuencias y canales ....................................... 7 Entrada de protección .......................................................... 7 6. CONTROL MANDOS...................................................................... 8 7. DISPLAY LCD ............................................................................... 8 8. FUNCIONES GENERALES............................................................... 9 Puesta en marcha y apagado ON/OFF .......................................... 9 Tecla bloqueo ......................................................................... 9 Volumen ................................................................................ 9 Squelch ................................................................................. 9 Tecla Función......................................................................... 9 Tecla Menu .......................................................................... 9 Tecla E/VFO (Enter VFO) ......................................................... 9 Control Knob ........................................................................ 10 INSTRUCTION MANUAL TSC-100R/100RBT TSC-100R/100RBT INSTRUCTION MANUAL 10 10 10 11 12 12 12 13 14 14 15 15 15 15 16 16 17 17 18 18 19 19 19 SPANISH 9. SELECTOR DE FRECUENCIAS.......................................................... Selección Modo .................................................................... Selección saltos de frecuencias ................................................. 10. BANDA DE FRECUENCIAS…......................................................... 11. BUSQUEDA DE FRECUENCIAS………........................................... Busqueda selección de banda ................................................ Busqueda detallada de banda ............................................. Dual Watch / doble escucha ..................................................... 12. BANCO DE MEMORIAS…........................................................ 13. ALMACENAR FRECUENCIAS ENMEMORIAS………...................... 14. BUSCAR FRECUENCIAS EN LAS MEMORIAS………….................. 15. BUSQUEDA DE CANALES…......................................................... Scanner selección de bandas .............................................. Scanner bandas ...................................................................... Dual Watch / doble escucha ...................................... 16. MENU DE AJUSTES ................................................................ VFO Mode ............................................................................... Modo lectura de memoria ................................................. 17. BLUETOOTH COMPATIBLE OPERATION ......................................... 18. GUIA DE PROBLEMAS ............................................................... 19. ESPECIFICACIONES ....................................................................... General.................................................................... Receptor............................................................................... PRECAUCIONES * Por favor lea estas instrucciones cuidadosamente antes de operar en su receptor. Su escáner es un equipo complejo con muchas funciones. Por favor utilice este manual para cualquier consulta. Cualquier uso ilegal que interfiera en las normativas y leyes nacionales no esta permitido... Nunca conecte al receptor a una fuente de potencia que no sea la batería especificada. Por favor siga el procedimiento marcado por el fabricante, de lo contrario dañaría su receptor. * Nunca use al receptor cerca de áreas mineras, ni en zonas con explosivos o donde haya señales que lo indiquen Nunca use el receptor en una atmósfera potencialmente explosiva * No ponga al receptor delante del airbag del vehículo. * No opere con el receptor en el interior de un avión. * Siempre cargue el receptor en una temperatura normal * Siempre cierre la tapa protectora de los jacks, si no se utiliza. * Use sólo la batería original de su receptor (no use imitaciones) * No exponga el receptor al agua. No es impermeable. * Evite en su receptor la luz directa del sol. * Evite que su receptor trabaje en temperaturas por debajo de -10°C o por encima de +60°C. *Nunca cargue baterías ALKALINAS, estas baterías no estan preparadas para la carga. DIFERENCIAS ENTRE LOS MODELOS TSC-100R/100RBT Tti dispone de dos modelos de receptor Scanner. El TSC100R es la versión básica y el TSC100RBT que incluye adicionalmente el BLUETOOTH. Excepto el BLUETOOTH, las demás funciones son las mismas en ambos scanners. Por favor, si su modelo de Scanner es de BLUETOOTH, compruebe y lea atentamente este manual antes de su uso. PAG.4 EQUIPAMIENTO Y ACCESORIOS - Receptor Scanner Antena Clip sujeción Antenna Adaptor (SMA to BNC) INSTALACION DE LAS BATERIAS Para instalar las baterías, usted debe quitar el clip de sujeción. Presione la lengüeta del clip hacia fuera y tire del clip hacia abajo. Abra la tapa de las baterías, ejerciendo una pequeña presión en la tapa y tirando de ella hacia abajo. Inserte 4 baterías tipo AAA en su posición (positivo y negativo) PAG. 5 MANDOS/CONTROLES 1 Puesta en marcha y apagado ON/OFF 2 Antena 3 Squelch UP/DOWN 4 Tecla Función 5 Teclas ENTER/VFO 6 Menu/MW 7 Step/MR 8 Banco/Bandas PAG 6 9 Scanner/búsqueda &DW 10 UP/DOWN 11 Conector de carga 12 Display LCD 13 Conector accesorios 14 Control Knob 15 Hendidura correa sujeción 1. Encendido / apagado ON/OFF. Bloqueo Pulsador de puesta en marcha y apagado. Bloqueo del teclado 2. Antena Provisto para la recepción de señales 3. Squelch UP/DOWN Apertura y cierre del silenciador 4. Tecla función Control d las funciones del Edipo 5. Enter / VFO Confirmación de selecciones y selección del modo VFO 6. Menu / MW Proporciona acceso al Setup menús y acceso a las memorias 7. Step /MR Proporciona acceso al setup de frecuencia y acceso a las últimas memorias 8. Banco / Bandas & saltos Cambia el banco de memorias o las bandas de frecuencia, también se puede utilizar para el cambio de canales o frecuencias 9. Scanner /Búsqueda & DW Activa y desactiva la función scanner de memorias y el scanner en la función VFO. Activa y desactiva la función Dual Watch 10. Teclas UP/Down Ajusta el volumen y selecciona menús, así como los pasos de frecuencias 11. Conector de carga Entrada de carga baterías (Solo utilizar recambios originales) 12. Display LCD Pantalla para la visualización de frecuencias y selección de funciones 13. Conector de accesorios Conexión para auriculares 14. Control Knob Selecciona frecuencias y canales y selecciona los valores de los menús 15. Ranura correa sujeción Ranura para la colocación de una correa de protección, para evitar posible caídas del equipo (accesorio opcional) Pag. 7 MANDOS Y CONTROLES DEL TECLADO DISPLAY LCD 1 Potencia SAVE 2 Scanner 3 Funciones 4 Búsqueda 5 Ultima memoria 6 Dual Watch 7 Delta 8 Memorias 9 Tone 10 Bloqueo 11 Saltos 12 Estado batería 13 Atenuador 14 Frecuencia Display PAG. 8 15 Modos AM/FM WFM 16 Ajuste velocidad Escaneo 17 Indicador de canales 18 numero de banco memoria 19 Pasos de frecuencia 20 Bluetooth 21 Medidor de señal FUNCIONES GENERALES ENCENDIDO Y APAGADO DE LA UNIDAD Presione el botón rojo para la puesta en marcha y apagado BLOQUEO Presione brevemente el botón rojo para bloquear el teclado, repita la operación de nuevo para liberar el teclado VOLUMEN Presione para incrementar el volumen Presione para disminuir el volumen El nivel de volumen actúa des 00 a 32 SQUELCH FUNCION MENU Presionando la tecla Menú, usted tiene acceso a las diferentes funciones del receptor. E/VFO (ENTER/VFO) Pag. 9 CONTROL KNOB Este control se utiliza para cambiar las diferentes opciones del Display. En función VFO gire el mando para cambiar frecuencias. En posición MODE girar el mando para cambiar cetinas del equipo, en memoria de canales girar el control para subir y bajar memorias. SELECTOR DE FRECUENCIAS Para cambiar la frecuencia en 1 Mhz. apriete la tecla FUNC, a continuación use el mando KNOB para cambiar la frecuencia. FUNC actúa mientras la Función esta activada. OBSERVACIONES: SELECCIÓN MODOS (AM, FM, WFM) Este equipo recibe automáticamente los modos de las bandas, no se permite el cambio manual de los modos. Pag. 10 SELECCIÓN SALTOS DE FRECUENCIAS 1) En VFO mode presionar STEP 2) Los pasos del frecuencia siguientes están disponibles para su selección NOTA: 8.33 Khz. el salto sólo está disponible con la banda específica (108135.99 Mhz) BANDAS DE FRECUENCIA PAG. 11 BUSQUEDA DE FRECUENCIAS De fábrica el equipo viene con 4 bandas preseleccionadas. (Mirar tablas de frecuencias de bandas) PAG. 12 BUSQUEDA DETALLADA DE BANDA OBSERVACIONES: DUAL WATCH 1) Entre 1ª frecuencia, utilizando el mando giratorio. 2) Ajuste el nivel del Squelch 3) Presione FUNC DW PAG. 13 4) Entrar 2ª frecuencia, utilizando el mando giratorio BANCOS DE MEMORIA El área de memoria del scanner es de 200 localizaciones dentro de 10 bancos. Cada banco tiene una capacidad de 20 canales. ALMACENAR FRECUENCIAS EN LAS MEMORIAS PAG. 14 BUSCAR FRECUENCIAS EN LAS MEMORIAS 3) Para moverse por el banco de memoria, , presiona la tecla BANK entre el 0 y 9 Selecciona. BUSQUEDA DE CANALES OBSERVACIONES: PAG. 15 Dual Watch /doble escucha 4) Presiona FUNC DW 5) Entra segunda frecuencia usando BANK/BAND con el mando giratorio MENU DE AJUSTES 4) Presionar E/VFO para confirmar cambios PAG. 16 VFO MODO OBSERVACIONES: La función Bluetooth solo actúa en el modelo TSC100RTB Modo lectura de memoria (Memoria Claro) Observaciones: Borrado de memorias 1) Presionar Menu, utilizando el mando giratorio o el volumen “MEN CLR” 2) Presionar E/VFO “dEF yES” aparecerá en Display 3) Continuar, hasta que aparezca MEN clear, presionar E/VFO 4) Cancelar memoria y apretar E/VFO PAG. 17 seleccionar BLUETOOTH Solo disponible para la versión TSC100RBT Para activar el Bluetooth y usted pueda recibir la señal en su auricular, siga las siguientes indicaciones. 1) Presione E/VFO y ponga en marcha su receptor, en el Display aparecerá 2) Sincronice su auricular con el equipo Bluetooth 3) Sobre su equipo recibirá una confirmación de OK 4) Presione MENU y aparecerá modo 5) Seleccione Bluetooth “ON”, su Bluetooth estará operativo GUIA SOLUCION DE PROBLEMAS Reset parcial 1) 2) 3) 4) Apague su unidad Presione a la vez las teclas MENU y STEP Encienda su unidad Aparecerá en Display MEN CLr Esto borrará todos los datos de memoria de los bancos de memoria de los canales. Si sus problemas no se solventan con el borrado parcial, realice un borrado total. Reset total 1) 2) 3) 4) Apague su unidad Presione a la vez las teclas E/VFO y STEP Encienda su unidad Aparecerá en el Display ALL CLr Esto borrara todo y dejara los valores de fábrica. PAG. 18 ESPECIFICACIONES General Receptor Selectivity PAG. 19 DECLARACION DE CONFORMIDAD TTI TECH CO. LTD con sede social en 1163-4 Gaepo-dong, Kangnam-Ku, Seul, Korea 135-960, declara bajo su responsabilidad, que los equipos TSC100 R y TSC100RBT, cumplen con las normativas y requerimientos básicos relativos a la EMC, R&TTE y LVD de la Directiva de la EU. PAG. 20 TSC-100R / 100RBT Bluetooth Compatibel MULTIBAND ONTVANGER BEDIENINGSHANDLEIDING Gefabriceerd door www.ttikorea.co.kr www.k-po.com INHOUD NEDERLANDS 1. WAARSCHUWINGEN............................................................................................................................. 4 2. OVER TSC-100R/100RBT MODELLEN ................................................................................................. 4 3. MEEGELEVERDE UITRUSTING............................................................................................................ 5 4. DE BATTERIJEN INSTALLEREN ........................................................................................................... 5 5. BEDIENINGSELEMENTEN .................................................................................................................... 6 Aan/Uit toets, Lock-toets ................................................................................................................... 7 Antenne ............................................................................................................................................. 7 Toetsen Ruisonderdrukking Omhoog/Omlaag .................................................................................. 7 Functie Toets..................................................................................................................................... 7 Enter/VFO Toetsen ........................................................................................................................... 7 Menu/MW Toets .............................................................................................................................. 7 Stap/MR Toets .................................................................................................................................. 7 Bank/Band & Skip Toets .................................................................................................................... 7 Scan / Zoek & DW Toets ................................................................................................................... 7 Omhoog / Omlaag Toetsen ............................................................................................................... 7 Ingang Laadapparaat ........................................................................................................................ 7 LCD Display ........................................................................................................................................ 7 Meegeleverde stekker ....................................................................................................................... 7 Bedieningsknop................................................................................................................................... 7 Lanyard Gleuf...................................................................................................................................... 7 6. UITGEBREIDE BEDIENING TOETSENGROEP .................................................................................... 8 7. LCD DISPLAY......................................................................................................................................... 8 8. ALGEMENE BEDIENING........................................................................................................................ 9 De eenheid Aan- of Uitzetten .............................................................................................................. 9 Toetsvergrendeling ............................................................................................................................. 9 Volume ................................................................................................................................................ 9 Ruisonderdrukking .............................................................................................................................. 9 Functie Toets ...................................................................................................................................... 9 Menu Toets ....................................................................................................................................... 9 E/VFO Toets [Enter/VFO].................................................................................................................... 9 Bedieningsknop................................................................................................................................... 10 2 BEDIENINGSHANDLEIDING TSC-100R/100RBT TSC-100R/100RBT BEDIENINGSHANDLEIDING NEDERLANDS 9. FREQUENTIES SELECTEREN .............................................................................................................. 10 Modus Keuze .................................................................................................................................... 10 Keuze Frequentiestappen ................................................................................................................... 11 10. FREQUENTIEBANDEN ........................................................................................................................ 11 11. FREQUENTIE ZOEKEN ....................................................................................................................... 12 Geselecteerde Band Zoeken............................................................................................................... 12 Zoeken Volledige Band ..................................................................................................................... 13 Dual Watch.......................................................................................................................................... 13 12. GEHEUGENBANKEN ........................................................................................................................... 14 13. HET OPSLAAN VAN FREQUENTIES IN DE GEHEUGENS ................................................................ 14 14. HET TERUGROEPEN VAN FREQUENTIES UIT HET GEHEUGEN ................................................... 15 15. KANAALSCAN ...................................................................................................................................... 15 Scan Geselecteerde Bank ................................................................................................................. 15 Scan Volledige Bank ........................................................................................................................... 15 Dual Watch.......................................................................................................................................... 16 16. MENU-INSTELLINGEN......................................................................................................................... 16 VFO-Modus......................................................................................................................................... 17 Modus Geheugenlezen(Genheugen ontruim) ..................................................................................... 17 17. BLUETOOTH-COMPATIBELE BEDIENING ......................................................................................... 18 18. HET OPLOSSEN VAN PROBLEMEN................................................................................................... 18 19. SPECIFICATIES ................................................................................................................................... 19 Algemeen ............................................................................................................................................ 19 Ontvanger ........................................................................................................................................... 19 3 WAARSCHUWINGEN NEDERLANDS Lees deze instructies zorgvuldig voordat u met het bedienen van uw radio-ontvanger begint. Uw scanner is een complexe en krachtige eenheid met veel functies. Bewaar deze handleiding voor toekomstige referentie. Onwettig gebruik in strijd met de nationale wetgeving is niet toegestaan. Verbind de ontvanger nooit met een andere stroombron dan de aangegeven batterij. Anders kan er schade aan uw ontvanger optreden. Gebruik de ontvanger nooit op of in de buurt van het mijngebied, in de buurt van explosieven of waar de borden ‘Ontploffingsgebied’ aangeven. De ontvanger nooit in een mogelijk explosieve atmosfeer gebruiken of opladen. Plaats de ontvanger Niet voor de airbag van het voertuig. Bedien de ontvanger Niet aan boord van het vliegtuig. Laad de ontvanger altijd op bij normale kamertemperatuur. Plaats altijd het bijbehorende beschermkapje terug wanneer de stekker niet in gebruik is. Gebruik alleen een door de fabrikant geleverde oplaadbare batterij in uw ontvanger. Stel de ontvanger Niet bloot aan water. Hij is niet waterbestendig. De ontvanger niet opslaan of opladen in direct zonlicht. Sla op bij temperaturen tussen de -10℃ en +60℃. Probeer nooit Alkaline-batterijen of enige droge batterijen op te laden. Raadpleeg bij twijfel altijd uw dealer. OVER TSC-100R/100RBT MODELLEN TTI biedt twee modellen van uw scanner-ontvangers. TSC-100R is the basisversie en TSC-100RBT omvat aanvullend de Bluetooth-compatibele bediening. Afgezien van deze Bluetooth-verenigbare bediening zijn alle kenmerken, functies en specificaties hetzelfde. Controleer voordat u met gebruiken begint a.u.b. zorguldig of uw ontvanger wel of niet het Bluetoothcompatibele model is. 4 BEDIENINGSHANDLEIDING TSC-100R/100RBT - Scanner-Ontvanger Antenne Riemslot Antenne Adapter (SMA to BNC) DE BATTERIJEN INSTALLEREN Het installeren van de batterijen wordt gemakkelijker gemaakt wanneer de riemclip wordt verwijderd. Maak hiervoor eerst de borgveer los die de riemclip op de radio bevestigt is en schuif het riemclip naar beneden en weg van het radiotoestel. Druk vervolgens met de duim omlaag bij de pijl, schuif de batterijklep omlaag en til hem op. Steek vier AAA-batterijen (met de pluspolen (+) om en om richting de bodem van de ontvanger (beginnend van rechts naar links). BORGVEER RIEMCLIP NEGATIEVE POLEN POSITIEVE POLEN BATTERIJKLEP 1. Druk met de duim de batterijklep bij de pijl omlaag en schuif de klep omlaag om te openen. 2. Schuif de klep omlaag, til vervolgens de klep bij de bodem op om te openen. Verwijder de klep. 3. Steek vier AAA-batterijen (positief(+) uiteinde richting de bodem beginnend aan de rechterkant. TSC-100R/100RBT BEDIENINGSHANDLEIDING 5 NEDERLANDS MEEGELEVERDE UITRUSTING BEDIENINGSELEMENTEN NEDERLANDS 1. 2. 3. 4. 5. 6. 7. 8. 6 Aan/Uit toets, lock-toets Antenne Ruisonderdrukking Omhoog/Omlaag Toetsen Functietoets Enter/VFO Toetsen Menu/MW Toetsen Stap/MR Toetsen Bank/Band&Skip Toetsen 9. 10. 11. 12. 13. 14. 15. Scan / Zoek & DW Toetsen Omhoog / Omlaag Toetsen Ingang Laadapparaat LCD Display Extra toets Bedieningsknop Lanyard Groef BEDIENINGSHANDLEIDING TSC-100R/100RBT Aan/Uit toets, lock-toets Hiermee zet u de ontvanger aan en uit en bedient u de de lock functie. 2. Antenne Geeft ontvangst van signalen. 3. Toetsen Ruisonderdrukking Omhoog/Omlaag Opent en sluit de ruisonderdrukking. 4. Functie Toets Maakt vergrote toetsengroepcontrolefuncties mogelijk. 5. Enter/VFO Toetsen Bevestigt keuzes en selecteert de VFO mode. 6. Menu/MW Toets Geeft toegang tot opzetmenu’s en ook tot schrijfgeheugens. 7. Step/MR Toets Geeft toegang tot het instellen van de frequentiestappen en ook toegang tot leesgeheugens. NEDERLANDS 1. 8. Bank/Band&Skip Toets Gebruikt om Geheugenbanken of Frequentiebanden te wisselen, en ook Gebruikt om kanalen of frequenties over te slaan. 9. Scan/Search&DW Toets Gebruikt om de Scanfunctie in geheugenleesmodus of de zoekfucntie in VFO-modus te activeren of deactiveren. Ook gebruikt om de Dual Watch-functie te activeren of deactiveren. 10. Omhoog/Omlaag Toetsen Stelt het Volume bij en selecteert Menu-items en frequentiestappen. 11. Ingang Laadapparaat Geeft Ladingsschakeling. (Optionele accessoires zijn vereist.) 12. LCD Display Geeft frequenties en geselecteerde functies weer. 13. Accessoire plug Geeft verbinding met de oortelefoon. 14. Bedieningsknop Selecteert frequenties en kanalen en selecteert waarden en uit menu’s. 15. Lanyard Gleuf Maakt verbinding van de Lanyard mogelijk om de ontvanger te beschermen tegen per ongeluk vallen.(Optionele accessoire vereist.) TSC-100R/100RBT BEDIENINGSHANDLEIDING 7 UITGEBREIDE BEDIENING TOETSENGROEP NEDERLANDS TOETS FUNCTIE Handmatig Schrijven BESCHRIJVING Maakt opslag van frequenties in het Geheugenopslaggebied mogelijk. Geheugen Lezen Maakt het lezen mogelijk van de frequenties in de opgeslagen geheugens. Overslaan Gebruikt om kanalen Over te Slaan bij het Scannen of om frequenties Over te Slaan bij het Zoeken. Dual Watch Activeert of Deactiveert de functie Dual Watch. LCD DISPLAY 1. 2. 3. 4. 5. 6. 7. 8 Vermogenbesparing Scan Functie Zoeken Geheugen Schrijven Dual Watch Delta 8. 9. 10. 11. 12. 13. 14. Geheugen Lezen Toetstoon Toetsengroepvergrendeling Overslaan Batterij niveau Verzwakker Frequentiedisplay BEDIENINGSHANDLEIDING 15. 16. 17. 18. 19. 20. 21. AM/FM WFM Modus Timer Scanvertraging Kanaalindicator Banknummer Frequentiestap Bluetooth-compatibel Signaalmeter TSC-100R/100RBT De eenheid Aan- of Uitzetten Druk op de RODE Knop aan de bovenkant van het apparaat en houd deze ingedrukt om de eenheid AAN te zetten. Druk en houd de RODE Knop nogmaals ingedrukt om de eenheid UIT te zetten. Toetsvergrendeling Druk kort op de RODE Knop aan de bovenkant van het apparaat om de Toetsvergrendeling AAN te zetten. Druk nogmaals kort op de RODE Knop om de Toetsvergrendeling UIT te zetten. Volume Druk op de ▲ toets om het volume te verhogen. Druk op de ▼ toets om het volume te verlagen. Het volumeniveau zal van 00 tot 32 worden weergegeven. Ruisonderdrukking Druk op de toets ▲ aan de zijkant van de radio om de instelling voor Ruisonderdrukking te verhogen en op de toets ▼ om de instelling voor Ruisonderdrukking te verlagen. Het Ruisonderdrukkingsniveau zal worden weergegeven van 00 tot 09. 00 is open status en 09 is bijna gesloten status. Bij maximale instelling voor Ruisonderdrukking wordt ‘AT’ geselecteerd, dat een automatische (vooraf ingestelde) niveau-instelling weergeeft. Func Toets De toets Functie geeft toegang tot de secundaire (vergrote) toetsengroepfuncties verbonden met de toetsen van het frontpaneel. De secundaire functielabels respectievelijk toetsen zijn onder gedrukt. Menu Toets De toets Menu geeft toegang tot de radio-instellingen. E/VFO Toets [Enter/VFO] TSC-100R/100RBT BEDIENINGSHANDLEIDING 9 NEDERLANDS ALGEMENE BEDIENING Druk op de toets E/VFO om de VFO-modus te selecteren of een keuze te bevestigen. Let op: De ontvanger selecteert altijd de VFO-modus, iedere keer dat hij wordt NEDERLANDS aangezet. Bedieningsknop De knop Bediening wordt gebruikt om de huidige displayoptie te wijzigen. Draai in VFO-modus de knop Control om de weergegeven frequentie te wijzigen bij de geselecteerde frequentiestappen. Draai met de wijzers van de klok mee om de frequentie te verhogen en tegen de wijzers van de klok in om de frequentie te verlagen. Draai in Menu-modus de knop Bediening om de geselecteerde instelling. Draai in de modus Kanaalgeheugen aan de knop Bediening om omhoog of omlaag door de Geheugens te gaan. FREQUENTIES SELECTEREN De ontvanger selecteert altijd de VFO-modus wanneer hij wordt aangezet. U kunt frequenties selecteren met behulp van de Bedieningsknop. Draai de bedieningsknop om vanuit het beginpunt de frequentie te verhogen of verlagen. In de geselecteerde frequentiestap zal de frequentie toe- of afnemen. z Druk, om de frequentie te wijzigen in 1 MHz-stap, op de toets Func, gebruik vervolgens de Bedieningsknop om de frequentie te wijzigen. FUNC wordt weergegeven terwijl de Functiemodus actief is). Let op: De modus Func modus ruimt een paar seconden na het indrukken van de toets of verandering van de bedieningsknop op. Modus (AM,FM,WFM) Keuze Standaard selecteert de ontvanger automatisch de voor elke band gebruikte Modulatiemodus (zie de Frequentiebandkaart voor de standaardmodi voor elke band). Het is niet toegestaan de modus handmatig te wijzigen. 10 BEDIENINGSHANDLEIDING TSC-100R/100RBT Om een andere stap te kiezen: 1) Druk in VFO-modus op STEP. 2) De volgende frequentiestappen zijn beschikbaar voor uw keuze. 5 kHz 6.25 kHz (6.2 weergegeven) 8.33 kHz (8.3 weergegeven) 10 kHz 12.5 kHz 15 kHz 20 kHz 25 kHz 30 kHz 50 kHz 100 kHz 500 kHz Auto Indien Auto wordt geselecteerd, selecteert de ontvanger automatisch de meest gebruikte Frequentiestappen voor elke band. Note: 8.33 KHz stap is alleen beschikbaar met specifieke band. (108 - 135.99 MHz) FREQUENTIEBANDEN De Scanner ondersteunt de volgende Frequentiebanden. Druk, om een band te selecteren, herhaaldelijk kort op de toets BANK BAND totdat de gewenste band gekozen is. Frequentieband 66 MHz tot 87.5 MHz 87.5 MHz tot 108 MHz 108 MHz tot 135.975 MHz 136 MHz tot 174.000 MHz TSC-100R/100RBT Opstartfrequentie 66 MHz 88 MHz 118 MHz Standaardmodus FM WFM AM Standaardstap 25kHz 100kHz 25kHz 150 MHz FM 25kHz BEDIENINGSHANDLEIDING 11 NEDERLANDS J Keuze Frequentiestap Standaard selecteert de ontvanger automatisch de meest gebruikte Frequentiestappen voor elke band (zie de Frequentiebandkaart voor de Standaardstappen voor elke band). FREQUENTIE ZOEKEN NEDERLANDS J Geselecteerde Band Zoeken Gebruik de Zoekfunctie om van actieve frequenties in een of meer banden de positie te bepalen 1) Druk op de toets E/VFO om VFO-modus te selecteren. (Let op: de ontvanger selecteert automatisch de VFO-modus wanneer hij wordt aangezet). 2) Druk op de toets BAND om de gewenste Band te selecteren. Er zijn 4 vooraf in fabriek ingestelde Banden om uit te kiezen (zie Frequentiebandtabel). 3) Stel het Ruisonderdrukkingsniveau in met behulp van de toetsen Ruisonderdrukking ▲ of ▼, zodat de ruis net verdwijnt. 4) Selecteer een startfrequentie om van daaruit te Zoeken. 5) Druk kort op de toets SCAN SRCH. Het icoon ‘SRCH’ zal worden weergegeven en de ontvanger zal de geselecteerde Band zoeken vanaf de startfrequentie. Wanneer het einde van de band eenmaal is bereikt, gaat het Zoeken door aan het begin van de geselecteerde Band. 6) Druk, om het zoeken te stoppen, nogmaals op de toets SCAN SRCH. Let op: 1) Druk tijdens het zoeken op de toets BANK BAND om naar de volgende Band te bewegen. 2) Draai om de Zoekrichting te veranderen de Bedieningsknop met de wijzers van de klok mee of tegen de wijzers van de klok in. 3) De ontvanger zal op een actief kanaal blijven in overeenstemming met de instellingen van de Busy Timer in het VFO Menu. Indien de Busy Timer is afgestemd op ‘5 Seconden’, zal de ontvanger doorgaan met Zoeken na 5 seconden, zelfs wanneer het kanaal nog bezet is. Indien de Busy Timer is afgesteld op ‘Bezig’, zal de ontvanger op de bezette frequentie blijven zolang deze bezet blijft en dan het zoeken hervatten wanneer het signaal weer verdwijnt. 12 BEDIENINGSHANDLEIDING TSC-100R/100RBT NEDERLANDS J Zoeken Volledige Band De functie Volledig Zoeken zoekt het heel scannerfrequentiebereik af naar signalen. 1) Druk op de toets E/VFO om de VFO-Modus te selecteren. (Let op: de ontvanger selecteert automatisch de VFO-modus wanneer hij wordt aangezet). 2) Stel het Ruisonderdrukkingsniveau in met behulp van de toetsen ▲ of ▼ zodat het lawaai net verdwijnt. 3) Druk op de toets SCAN SRCH en houd deze 2 seconden ingedrukt. Het icoon ‘SRCH’ zal worden weergegeven en de ontvanger zal beginnen met met het Zoeken van zijn gehele frequentiebereik. 4) Druk, om het Zoeken te stoppen, nogmaals op de toets SCAN SRCH. Let op: 1) Druk tijdens het Zoeken op de toets BANK BAND om naar de volgende Band te bewegen. 2) Draai om de Zoekrichting te wijzigen de Bedieningsknop met de wijzers van de klok mee of tegen de wijzers van de klok in. 3) De ontvanger zal op een actief kanaal blijven in overeenstemming met de instellingen van de Busy Timer in het VFO-Menu. Indien de Busy Timer is afgesteld op ‘5 seconden’ zal de ontvanger doorgaan met Zoeken na 5 seconden, zelfs wanneer het kanaal nog bezig is. Indien de Busy Timer is afgesteld op ‘Bezig’, de ontvanger blijft op de drukke frequentie zolang hij bezig blijft, en hervat vervolgens het zoeken wanneer het signaal verdwijnt. J Dual Watch De functie Dual Watch laat u constant twee frequenties beluisteren voor activiteit. Om de Dual Watch-functie in te stellen: 1) Voer een van de vereiste frequenties in met behulp van de Bedieningsknop, 2) Stel de ruisonderdrukking zo bij dat de ontvanger wordt gedempt. 3) Druk op Func DW. TSC-100R/100RBT BEDIENINGSHANDLEIDING 13 4) Voer de tweede frequentie in met behulp van de Bedieningsknop. NEDERLANDS 5) De Dual Watch begint automatisch. Indien een signaal wordt ontvangen, de ontvanger zal op de actieve frequentie blijven voor de duur van de ‘Busy Timer’-instelling in de Menuconfiguratie. Indien de ‘Busy Timer’ is afgesteld op Druk, zal de ontvanger op de actieve frequentie blijven. 6) Druk, om permanent op een actieve frequentie te blijven of de Dual Watch-functie te stoppen, nogmaals op Func DW. De ontvanger zal de Dual Watch-functie verlaten. GEHEUGENBANKEN Het opslaggebied van het scannergeheugen heeft een capaciteit van 200 geheugenplaatsen. Deze worden gesplitst en opgeslagen in 10 banken. Elke bank heeft een opslagcapaciteit van 20 kanalen. J Hoe Frequenties in het Geheugen op te slaan Het Geheugengebied stelt de gebruiker in staat handmatig tot 200 individuele frequenties op te slaan. De standaard geheugenbanken worden van 0 tot 9 gelabeld. HET OPSLAAN VAN FREQUENTIES IN DE GEHEUGENS Om een frequentie in een van de geheugens op te slaan: 1) Druk op de toets E/VFO om de VFO-Modus te selecteren. 2) Druk op de toets BANK BAND om de gewenste Band te selecteren. 3) Selecteer de frequentie die u wilt opslaan met behulp van de bedieningsknop. 4) Druk op Func MW om de Geheugenschrijf-modus binnen te gaan. 5) De ontvanger zal een display vinden en automatisch geheugenbank en geheugenplaats legen. 6) Gebruik indien nodig de toets BANK BAND om een nieuwe geheugenbank te selecteren. 7) Draai om de geheugenplaats te wijzigen aan de bedieningsknop. 8) Druk nogmaals op Func MW om de frequentie op te slaan. 14 BEDIENINGSHANDLEIDING TSC-100R/100RBT 1) Druk op de toets E/VFO om de VFO-Modus te selecteren. 2) Druk op Func MR. De ontvanger zal de modus Geheugen uitlezen openen. 3) Druk om door de geheugenbanken te stappen op de toets BANK BAND. Geheugenbanken worden genummerd van 0 tot 9. 4) Selecteer het gewenste kanaal met behulp van de bedieningsknop. KANAALSCAN J Scan Geselecteerde Bank Gebruik de Scanfunctie om actieve kanalen te plaatsen langs de gememoriseerde kanalen in een bank. 1) Druk op Func MR om de modus Geheugen uitlezen te selecteren. 2) Druk op Bank/Band om de gewenste geheugenbank te selecteren. 3) Stel het ruisonderdrukkingsniveau in op een punt waar de ontvanger net rustig is. 4) Druk op SCAN/SRCH. De ontvanger zal beginnen met het scannen van de geselecteerde Band. Let op: 1) Indien een signaal wordt ontvangen, zal de ontvanger op het actieve kanaal blijven voor de duur van de ‘Busy Timer’ instelling in de Menu configuratie. Indien de ‘Busy timer’ wordt ingesteld op Druk, zal de ontvanger op het actieve kanaal blijven zolang het signaal aanwezig is. 2) Druk, om de bank te wisselen tijdens het scannen, kort op de toets BANK/BAND. 3) Draai, om tijdens het scannen de scanrichting te wijzigen, de bedieningsknop met de wijzers van de klok mee of tegen de wijzers van de klok in. J Scan Volledige Bank De functie Scan Volledige Bank scant het volledige in het geheugen opgeslagen kanaalbereik af naar signalen. 1) Druk op Func MR om de modus Geheugen uitlezen te selecteren. 2) Druk op Bank/Band om de gewenste geheugenbank te selecteren. 3) Stel het ruisonderdrukkingsniveau in op een punt waar de ontvanger net rustig is. 4) Druk op Scan/Srch en houd dit 2 seconden ingedrukt. De ontvanger zal beginnen met het scannen van de volledige volle Banden. TSC-100R/100RBT BEDIENINGSHANDLEIDING 15 NEDERLANDS HET TERUGROEPEN VAN FREQUENTIES UIT HET GEHEUGEN NEDERLANDS Let op: 1) Indien een signaal wordt ontvangen, zal de ontvanger op het actieve kanaal blijven voor de duur van de ‘Busy Timer’ –instelling in de Menuconfiguratie. Indien de ‘Busy timer’ wordt afgesteld op Druk, zal de ontvanger op het actieve kanaal blijven zolang het signaal aanwezig is. 2) Druk, om de bank te veranderen tijdens het scannen, op de toets BANK/BAND. 3) Draai, om tijdens het scannen de scanrichting te veranderen, de bedieningsknop met de wijzers van de klok mee of tegen de wijzers van de klok in. J Dual Watch Met de functie Dual Watch kunt u constant twee kanalen monitoren. Om de functie Dual Watch in te stellen: 1) Druk op Func MR om de Modus Geheugenlezen binnen te gaan. 2) Druk op Bank/Band om de gewenste geheugenbank te kiezen. 3) Kies een van de gewenste kanalen met behulp van de bedieningsknop, en stel het ruisonderdrukkingsniveau bij. 4) Druk op Func DW. 5) Voer de tweede frequentie in met behulp van de BANK/BAND en de Bedieningsknop. 6) De functie Dual Watch begint automatisch. Indien er een signaal wordt ontvangen, zal de ontvanger op het actieve kanaal blijven voor de duur van de ‘Busy Timer’-instelling in de Menuconfiguratie. Indien de ‘Busy Timer’ is afgesteld op Busy zal de ontvanger op het actieve kanaal blijven. 7) Duk om permanent op een actieve frequentie te blijven of de functie Dual Watch te stoppen nogmaals op Func DW. De ontvanger zal de Dual Watch-functie verlaten. MENU-INSTELLINGEN De Menu-instellingen zullen variëren afhankelijk van de geselecteerde modus. 1) Druk op de toets MENU om de Menu-instellingen binnen te gaan 2) Druk op de volumetoetsen ▲▼ om door de Menu –items te stappen. 3) Draai aan de Bedieningsknop om de waarden van elke Menu-item te wijzigen. 4) Druk op de toets E/VFO om de wijziging te bevestigen. 16 BEDIENINGSHANDLEIDING TSC-100R/100RBT FUNCTIE Busy Timer BESCHRIJVING Bepaalt hoe lang de ontvanger op een druk kanaal zal wachten tijdens het Scannen of Zoeken. Wanneer ‘Busy’ (bezet) is geselecteerd, zal de ontvanger op het drukke kanaal blijven zolang het druk blijft. Activeert of deactiveert de toetstonen. WAARDEN Druk, 5 seconden Bepaalt hoe lang de radio zal wachten op een frequentie nadat een signaal is verdwenen tijdens het scannen of Zoeken. Vermindert de ontvangstgevoeligheid met 10dB. 1-10 Seconden Delta Verandert frequenties. -5kHz, -10kHz, -15kHz, UIT Bluetooth Compatibele Bediening Activeert of deactiveert de Bluetooth-compatibele bediening. AAN, UIT Beep Uitstel Demping NEDERLANDS J VFO-Modus AAN, UIT AAN, UIT LET OP: Bluetooth-compatibele functie werkt alleen met TSC-100RBT model. J Modus Geheugenlezen (Geheugenlezen ontruim) FUNCTIE CH CLr BK CLr MEM CLr BETEKENIS Kanaal Opruimen Bank Opruimen Volledig Geheugen Opruimen BESCHRIJVING Wist het geselecteerde kanaal. Wist alle kanalen in de geselecteerde Bank. Wist alle geheugens in de ontvanger. OPMERKINGEN voor MEM CLEAR : Om ALLE gegevens uit de geheugens te wissen: 1) Druk op Menu, gebruik vervolgens de Bedieningsknop of de volumetoetsen ▲▼ om ‘MEM CLR’ te selecteren. 2) Druk op E/VFO. ‘dEF yES’ zal worden weergegeven. 3) Druk, om door te gaan met MEM Clear, nogmaals op E/VFO. 4) Gebruik, om MEM Clear af te breken, de knop Bediening om ‘dEF NO’ te selecteren, druk daarna op E/VFO. TSC-100R/100RBT BEDIENINGSHANDLEIDING 17 BLUETOOTH-COMPATIBELE BEDIENING (ALLEEN VOOR TSC-100RBT MODEL) NEDERLANDS Om de paring tussen uw ontvanger en uw koptelefoon of andere uitwendige Bluetooth-uitrusting te activeren; 1) Zet uw ontvanger aan door op E/VFO te drukken. Op het LCD wordt paring ( ) weergegeven. 2) Zorg dat uw koptelefoon of om het even welke andere Bluetooth-uitrusting ook de paringmodus binnengaat. 3) Zorg ervoor dat uw ontvanger automatisch “OK” bevestigt. 4) Druk op MENU en ga omlaag naar de met Bluetooth-compatibele ( ) Modus. 5) Selecteer Bluetooth-compatibel “AAN” om met de Bluetoothcompatibele bediening te beginnen. HET OPLOSSEN VAN PROBLEMEN Controleer, indien u problemen ervaart met TSC-100R of TSC-100RBT, eerst het capaciteitsniveau van de batterij, omdat een lage batterijcapaciteit problemen kunnen veroorzaken, zoals zwakke ontvangst en verminderde gek. Controleer vervolgens de gebruikershandleiding en het display van de ontvanger, om er zeker van te zijn dat een functie zoals Lock of Scan niet per ongeluk is geactiveerd. Stel, indien door deze stappen het probleem niet wordt opgelost, uw eenheid als volgt opnieuw in. 1. Gedeeltelijke Reset 1) Schakel uw eenheid uit. 2) Druk en houd de toetsen MENU en STEP samen ingedrukt. 3) Schakel uw eenheid in. 4) Geheugen Wissen (MEM CLr) verschijnt. Dit zal alle geheugengegevens wissen uit de kanaalgeheugenbanken. Indien u problemen die vindt die niet worden opgelost door de gedeeltelijke reset, probeer dan als volgt te resetten. 2. Alles Resetten 1) Schakel uw eenheid uit. 2) Druk en houd de toetsen E/VFO en STEP samen ingedrukt. 3) Alles wissen (ALL CLr) verschijnt. Dit zal niet alleen alle geheugengegevens wissen, maar ook alle basis bedieningsgegevens resetten tot de oorspronkelijke standaardinstellingen van de fabriek. De meeste problemen zouden hierdoor moeten worden opgelost. Neem in geval van verdere moeilijkheden a.u.b. contact op met uw handelaar of bezoek onze website op www.k-po.com 18 BEDIENINGSHANDLEIDING TSC-100R/100RBT NEDERLANDS SPECIFICATIES J Algemeen - Frequentiebereik: 66-174 MHz - Aantal geheugenkanalen: 200 Eenheden - Frequentiestappen: 5, 6.25, 8.33 *,10, 12.5, 15, 20, 25, 30, 50, 100, 500KHz & Auto. * 8.33kHz stap werkt alleen in 108-135.99MHz bereik. - Bereik bedieningstemperatuur: -10℃ tot +60℃ - Stabiliteit referentiefrequentie: 6 ppm ℃ (-10℃ tot +60℃) - Vereiste energievoorziening : AAA x 4 Ni-MH of ALKALINE - Stroomverbruik Stand-by (vermogen gespaard): 50mA kenmerkend max. audio: 320mA kenmerkend opladend (bij 9V DC): 300mA kenmerkend - Antenneconnector: SMA (50Ω) - Afmetingen (proj. niet inbegrepen): 56(B) x 116.5(H) x 35.8(D)mm - Gewicht (w/o Batterij): 160g * Specificaties zijn onderworpen aan verandering zonder voorafgaande kennisgeving of verplichting. J Ontvanger - Ontvangsysteem: dubbele superheterodyne. - Tussenfrequenties: 1e: 19.65 MHz, 2e: 450 KHz - Gevoeligheid en gevoeligheid voor ruisonderdrukking (behalve birdies): FM (1 kHz/3.5 kHz Dev. 12dB SINAD) 66-87.5MHz 0.25uV 136-173.995MHz 0.25uV WFM (1 kHz/52.5 kHz Dev. 12dB SINAD) 87.5 - 108.000 MHz: 0.5uV AM (1 kHz/30% MOD. 10dB SINAD) 108-135.995MHz -0.56uV - Selectiviteit AM/FM : Meer dan 15 kHz/-9dB Minder dan 150 kHz/-60dB WFM : Meer dan 150 kHz/-6dB - AF uitgangsvermogen: 500mW kenmerkend bij 40% vervorming met een 8Ω belasting - Ext. speakerconnector: 3-stroomgeleider 3.5(d) mm (1/5”) 8Ω -Drukfouten en technische wijzigingen voorbehouden- TSC-100R/100RBT BEDIENINGSHANDLEIDING 19 VERKLARING VAN CONFORMITEIT NEDERLANDS TTI TECH CO.,LTD. met het hoofdkwartier in 1163-4 Gaepo-dong, Kangnam-ku, Seoul, Korea, 135-960 verklaart hierbij onder eigen verantwoordelijkheid dat deze ontvangersuitrusting genaamd TSC-100R en TSC-100RBT zijn in overeenstemming met de basisvereisten en alle aanverwante bepalingen van de EMC, R&TTE en LVD De Richtlijnen van de Raad van de EU. 20 BEDIENINGSHANDLEIDING TSC-100R/100RBT Part No.:820-T10R-000