1
Models: AFP-1200G
Instruction Manual &
Cooking Guide
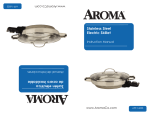
Sartén Eléctrico
Electric Skillet
Manual De Instrucciones y
Recetario De Cocina
Modelos: AFP-1200G
Felicidades por su Sartén Eléctrico de
. Seguramente será uno
de los aparatos electrodomésticos más prácticos en su hogar.
Sírvase leer todas las instrucciones antes de usar el tostador por primera
vez.
© 2006 Aroma Housewares Company All rights reserved.
Aroma Housewares Co.
6469 Flanders Drive
San Diego, CA 92121
U.S.A.
1-800-276-6286
www.aromaco.com
Published By:
Publicado por:
Aroma Housewares Co.
6469 Flanders Drive
San Diego, CA 92121
EE.UU.A.
1-800-276-6286
www.aromaco.com
© 2006 Aroma Housewares Company. Todos los derechos están reservados.
Please read all instructions before first use.
Congratulations on your purchase of the
Electric Skillet. It will
surely become one of the most practical appliances in your kitchen.
9.
10.
11.
12.
13.
8.
7.
6.
5.
1.
2.
3.
4.
Basic safety precautions should always be followed when using electrical
appliances, including the following:
IMPORTANT SAFEGUARDS
1
14.
GUARDE ESTAS INSTRUCCIONES
15.
16.
17.
18.
19.
Lea cuidadosamente todas las instrucciones antes de usar el aparato por primera vez.
No toque las superficies calientes. Utilice los mangos o perillas.
Úselo únicamente sobre una superficie nivelada, seca y resistente al calor.
Para protegerse y evitar un choque eléctrico, no sumerja en agua o en cualquier otro
líquido el cordón, la clavija o el aparato mismo.
5. Es necesario ejercer una estrecha vigilancia cuando se use el aparato cerca de
niños. Este aparato no está hecho para ser usado por niños.
6. Desconecte el aparato de la toma eléctrica cuando no lo esté usando y antes de
limpiarlo Deje que el aparato se enfríe completamente antes de ponerle o quitarle
cualquier parte y antes de limpiarlo.
7. No ponga a funcionar este aparato si el cordón eléctrico o la clavija de enchufe están
dañados o si no funciona bien o si se ha dañado de alguna manera. Regrese el
aparato a una agencia de servicio autorizada para revisión, reparación o ajuste.
8. No utilice aditamentos o accesorios que no sean surtidos o recomendados por el
fabricante. Es peligroso usar partes que no son compatibles con el aparato.
9. No se use en exteriores.
10.No permita que el cordón esté en contacto con superficies calientes o que cuelgue
sobre la orilla de algún mostrador o mesa.
11.No coloque el aparato sobre o cerca de una parrilla encendida ni dentro de un horno caliente.
12.No utilice el aparato para otro uso que no sea el indicado.
13.Se deberán tomar precauciones extremas al usar o mover un aparato que contenga
aceites calientes u otras substancias calientes.
14.Para limpiar el aparato no utilice fibras para tallar de metal, ya que pudieran
desprenderse de la fibra partículas pequeñas que al entrar en contacto con las
partes eléctricas del sartén crearían el riesgo de un choque eléctrico. Igualmente,
este tipo de fibras metálicas podría dañar el acabado del sartén.
15.Al usar el sartén, evite cambios bruscos de temperatura.
16.Úsese únicamente con tomas de corriente AC, de 120V.
17.Cuando ponga a funcionar el aparato, utilice únicamente el Probador del Control de
Temperatura Aroma®.
18 Asegúrese de que los mangos estén ensamblados y bien ajustados.
19.Siempre coloque el enchufe primero en el aparato electrodoméstico y luego conecte
el cable al tomacorriente de la pared. Para desconectarlo, gire todos los controles
hasta la posición de apagado ("OFF") y luego retire el enchufe del tomacorriente de
la pared.
Read all instructions carefully before first use.
Do not touch hot surfaces. Use handles or knobs.
Use only on a level, dry, and heat-resistant surface.
To protect against electric shock, do not immerse cord, plug or the appliance
itself in water or any other liquid.
Close supervision is necessary when the appliance is used near children. This
appliance is not intended to be used by children.
Unplug from outlet when not in use and before cleaning. Allow unit to cool
before putting on or taking off parts, and before cleaning the appliance.
Do not operate any appliance with a damaged cord or plug or after the
appliance malfunctions or has been damaged in any manner. Return appliance
to the nearest authorized service facility for examination, repair or adjustment.
Do not use attachments or accessories other than those supplied or
recommended by the manufacturer. Incompatible parts create a hazard.
Do not use outdoors.
Do not let cord hang over edge of table or counter, or touch hot surfaces.
Do not place on or near a hot burner or in a heated oven.
Do not use the appliance for other than intended use.
Extreme caution must be used when using or moving an appliance containing
hot oils or other hot substances.
Do not clean with metal scouring pads as small particles may break off the pad
and contact electric parts, creating a risk of electric shock. Metal scouring pads
may also damage the finish.
Avoid sudden temperature changes when using the skillet.
Use only with 120V AC power outlet.
Use only the Aroma® Temperature Control Probe when operating the appliance.
Always ensure that handles are assembled and securely fastened before use.
Always attach plug to appliance first, then plug cord into the wall outlet. To
disconnect, turn any control to “off”, then remove plug from wall outlet.
1.
2.
3.
4.
SAVE THESE INSTRUCTIONS
Cuando se usen aparatos eléctricos, siempre deberán observarse las precauciones de seguridad
básicas, incluyendo las siguientes:
1
MEDIDAS IMPORTANTES DE SEGURIDAD
INSTRUCCIONES PARA USAR EL CABLE CORTO
1. Se proporciona un cable eléctrico corto con el propósito de reducir el riesgo de
tropezarse o enredarse con un cable más largo.
2
This appliance is for household use only.
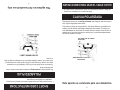
CLAVIJA POLARIZADA
Este aparato cuenta con una clavija polarizada (una espiga es más ancha que la
otra); siga las siguientes instrucciones:
Para reducir el riesgo de choque eléctrico, esta clavija debe ser conectada a una
salida o enchufe eléctrico polarizado solamente de una manera. Si la clavija no
entra debidamente en el enchufe de la salida eléctrica, voltee la clavija. Si aún no
queda bien en el enchufe, póngase en contacto con un electricista especializado.
No trate de modificar la clavija.
¡NO DEJE QUE EL CABLE
CUELGUE!
¡MANTÉNGASE LEJOS DE
LOS NIÑOS!
This appliance has a polarized plug (one blade is wider than the other); follow
the instructions below:
To reduce the risk of electric shock, this plug is intended to fit into a polarized
outlet only one way. If the plug does not fit fully into the outlet, reverse the plug. If
it still does not fit, contact a qualified electrician. Do not attempt to modify the plug
in any way.
POLARIZED PLUG
Este aparato es solamente para uso doméstico.
2
1. A short power-supply cord is provided to reduce risk resulting from becoming
entangled in or tripping over a longer cord.
SHORT CORD INSTRUCTIONS
3
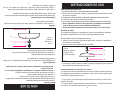
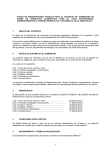
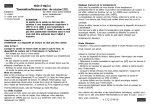
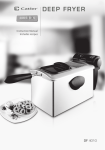
IDENTIFICACIÓN DE LAS PARTES
1. Lid
2. Handles
3. Skillet
4. Temperature Control Socket
5. Temperature Control Probe
6. Temperature Control Dial
7. Indicator Light
5
2
A
1
6
7
3
B
B
3
PARTS IDENTIFICATION
3
7
1
1. Tapa
2. Mangos
3. Sartén Eléctrico
4. Enchufe de control de temperatura
5. Detector de control de temperatura
6. Disco de control de temperature
7. Foco indicador
6
2
5
A
4
4
INSTRUCCIONES DE USO
Antes de usarlo por primera vez:
1. Lea todas las instrucciones y las medidas importantes de seguridad.
2. Retire todos los materiales de empaque y asegúrese de que los artículos se reciban
en buenas condiciones.
3. Rompa todas las bolsas de plástico, ya que pueden representar un riesgo para los niños.
4. Ensamble la tapa usando las instrucciones de abajo.
5. Lave el sartén y la tapa siguiendo las instrucciones de limpieza que aparecen en la página 6.
¾ No use limpiadores abrasivos, fibras para tallar o limpiadores considerados
como inseguros para uso sobre superficies antiadherentes.
¾ Do not immerse the temperature-control probe in water or any other liquid.
4
1. With a cloth or paper towel, apply cooking oil to the inside surface of the skillet.
2. Wipe off any excess oil with a clean towel. Your skillet is now ready to use. You will
not need to condition your skillet again.
Conditioning of the Coooking Surface
The non-stick cooking surface on the inside of the skillet must be conditioned to ensure nonstick cooking. Follow a couple simple steps to condition the cooking surface.
CAUTION:
• To prevent injury or damage to the product, make sure that the knob has been tightly
fastened to the lid before use.
4
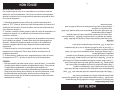
Ensamble de la tapa
Con propósitos de empaque, la agarradera de la tapa se ha empacado por separado.
Necesitará un desarmador de cruz Phillips común para ensamblar la tapa.
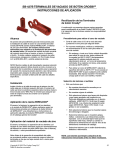
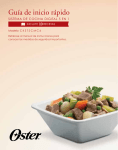
Para ensamblar la tapa (vea el diagrama de abajo):
1. Inserte el tornillo de la tapa a través de la tapa de vidrio, la base de la agarradera y
hacia dentro de la agarradera.
2. Apriete el tornillo con un desarmador de cruz Phillips.
1
1. Perilla
2. Base de la perilla
3. Tapa de vidrio
4. Tornillo de la tapa
2
3
4
CAUTION:
• Para evitar una lesión personal o un daño al producto, asegúrese de que la perilla se
haya apretado bien a la tapa antes de su uso.
Acondicionamiento de la superficie para cocinar
La superficie para cocinar antiadherente en el interior del sartén se debe acondicionar
para asegurar que los alimentos no se adhieran. Siga un par de pasos sencillos para
acondicionar la superficie para cocinar.
1. Con un paño o una toalla de papel, aplique aceite para cocinar en el interior de la
superficie del sartén.
2. Limpie cualquier exceso de aceite con una toalla limpia. Su sartén ahora está listo
para usarse. No necesitará acondicionar de nuevo su sartén.
4
3
1. knob
2. knob base
3. glass lid
4. screw
2
1
To assemble the lid (see diagram below):
1. Insert the lid screw through the glass lid, knob base, and into the knob.
2. Tighten the screw with a Phillips screwdriver.
Assembling the Lid
For packaging puposes, the knob for the lid has been packed separately. You will need a
common Phillips screwdriver to assemble the lid.
1. Read all instructions and important safeguards.
2. Remove all packaging materials and make sure items are received in good condition.
3. Tear up all plastic bags as they can pose a risk to children.
4. Assemble the lid using the instructions below.
5. Wash the skillet and lid using the cleaning instructions on page 6.
¾ Do not use abrasive cleaners or scouring pads considered unsafe for use on
non-stick surfaces.
¾ Do not immerse the temperature-control probe in water or any other liquid.
Before First Use
HOW TO USE
5
HOW TO USE
Uso de su sartén eléctrico:
Las configuraciones de calor de su sartén eléctrico se controlan a través del
detector de control de temperatura. Para hacer una selección de temperatura,
alinee la luz indicadora con la configuración de temperatura apropiada del disco
de control de temperatura.
HOW TO USE
5
Using Your Electric Skillet:
Heat settings for you electric skillet are controlled through the temperature
control probe. To make a temperature selection, align the indicator light with the
appropriate temperature setting on the temperature control dial.
de metal pueden dañar la superficie antiadherente del sartén. Para preservar
el recubrimiento antiadherente, recomendamos usar espátulas con
recubrimiento de plástico o de madera (adecuadas para temperaturas altas).
• Tenga precaución cuando retire el detector de control de temperatura, ya que
las partes del sartén pueden seguir calientes durante un tiempo largo.
• Siempre incline la tapa lejos de usted cuando descubra el sartén para evitar
quemaduras con el vapor.
1. Making sure that the temperature control dial has been set to “OFF”, insert
the temperature control probe firmly into the socket on the side of the skillet.
Plug the cord into an electric outlet. (See Diagram on page 3.)
2. Begin heating the skillet by turning the temperature control knob to the
desired setting. The indicator light will illuminate as the skillet starts to heat.
3. Once the skillet reaches the selected temperature setting, the indicator light
will turn off. The skillet is now ready for food to be added. While the food is
cooking, the indicator light will turn on and off indicating that the selected
temperature is being maintained.
4. After cooking has finished, set the temperature control dial to the “warm”
setting to keep food at serving temperature
5. If you wish to move the skillet for serving, be sure to set the temperature
control dial to “OFF” and remove the temperature control probe.
CUIDADO:
• Evite usar utensilios de metal cuando cocine o sirva del sartén. Los utensilios
CAUTION:
• Avoid using metal utensils when cooking or serving from the skillet. Metal
utensils may damage the non-stick surface of the skillet. To preserve the nonstick coating, we recommend using plastic coated or wooden spatulas
(suitable for high temperatures).
• Be careful when removing the temperature control probe as parts of the skillet
may remain hot for a long time.
• Always tilt the lid away from yourself when uncovering the skillet to avoid
burns from steam.
1. Habiéndose asegurado de que el disco de control de temperatura se ha
puesto en "OFF", inserte el detector de control de temperatura con firmeza en el
enchufe del lado del sartén. Conecte el cable a una toma de corriente eléctrica.
(Ver el diagrama a la pagina 3.)
2. Comience a calentar el sartén girando la perilla de control de temperatura a la
configuración deseada. La luz indicadora se iluminará conforme el sartén
comience a calentarse.
3. Una vez que el sartén alcance la configuración de temperatura seleccionada,
la luz indicadora se apagará. El sartén ahora estará listo para agregarle los
alimentos. Mientras los alimentos se están cocinando, la luz indicadora se
encenderá y apagará indicando que la temperatura seleccionada se está
manteniendo.
4. Después de que la cocción ha terminado, gire el disco de control de
temperatura a la configuración "Warm" para mantener los alimentos en la
temperatura para servir.
5. Si desea mover el sartén para servir, asegúrese de girar el disco de control
de temperatura a "OFF" y de retirar el detector de control de temperatura.
INSTRUCCIONES DE LIMPIEZA
6
Siempre desconecte la unidad y deje que se enfríe completamente antes de
limpiarla.
1. Asegúrese de que el detector de control de temperatura haya sido retirado.
2. Lave el sartén y la tapa con una esponja no abrasiva o un paño para trastes con
agua jabonosa caliente. La tapa también se puede lavar en una máquina
lavaplatos (sólo en la rejilla superior).
3. Enjuague y seque bien el sartén y la tapa.
4. Guarde su sartén eléctrico en un lugar seco. Enrede el cable eléctrico en forma de
rollo y asegúrelo con un sujetador.
¾ No utilice limpiadores abrasivos ásperos o productos que no se consideren
seguros para usarse sobre recubrimientos no adherentes.
NOTA:
¾ No sumerja el probador del control de temperatura, el cordón o la clavija en
agua o en cualquier otro líquido.
CUIDADO:
• No intente enfriar la unidad vaciándole adentro agua fría. Este cambio brusco de
temperatura puede ocasionar que el producto se tuerza.
• No sumerja el probador del control de temperatura, el cordón o la clavija en agua o
en cualquier otro líquido.
• Asegúrese que el conector del probador, localizado en el costado del sartén, esté
completamente seco después de lavarlo y antes de usarlo.
CAUTION:
• Do not attempt to cool the heated cooking surface by pouring cold water into the
skillet. The sudden temperature change may cause the cooking surface to warp.
• Do not immerse the temperature control probe, power cord, or plug in water or any
other liquid.
• Make sure that the temperature probe socket, located on the side of the skillet, is
completely dry prior to use.
NOTE:
¾ Do not immerse the temperature-control probe, cord, or plug in water or any
other liquid.
1. Make sure that the temperature control probe has been removed.
2. Wash the skillet and its lid with a non-abrasive sponge or dishcloth in hot soapy
water. The lid can also be washed in a dishwasher (top rack only).
3. Rinse and dry the skillet and lid thoroughly.
4. Store your electric skillet in a dry place. Wind the power cord into a coil and secure
it with a twist fastener.
¾ Do not use abrasive cleaners, scouring pads, or other materials considered
unsafe for use on nonstick coatings.
Always unplug unit and allow to cool completely before cleaning.
6
HOW TO CLEAN
7
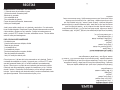
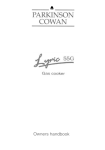
GUÍAS PARA COCINAR
Selección de Alimentos
Ajustes de Temperatura Tiempo Aproximado
Panqueques
375OF
1-3 min
O
Tostada Francesa
350 F
4-5 min
Tocino
375OF
4-7 min
O
Papa Rallada Dorada
375 F
8-10 min
Huevos
300OF
2-5 min
O
Hamburguesas
375 F
5-12 min
O
Pescado
350 F
6-9 min
Chuletas de Puerco
375OF
10-15 min
Rebanadas de Bistec de Jamón
350OF
10-15 min
Chorizo
350OF
10-12 min
O
Papas
325 F
10-12 min
Pollo
375OF
10-15 min
The temperatures and times given in the above table are only for reference.
Actual times and temperatures may vary due to differences in temperature and
consistency of the food. Be sure to adjust cooking times and temperatures to
your particular recipe.
Temperature Settings
375OF
350OF
375OF
375OF
300OF
375OF
350OF
375OF
350OF
350OF
325OF
375OF
Approximate Time
1-3 min
4-5 min
4-7 min
8-10 min
2-5 min
5-12 min
6-9 min
10-15 min
10-15 min
10-12 min
10-12 min
10-15 min
COOKING GUIDES
7
Food Selection
Pancakes
French Toast
Bacon
Hash Browns
Eggs
Hamburgers
Fish
Pork Chops
Ham Steak Slices
Sausage
Potatoes
Chicken
La temperatura y los tiempos que se dan en la tabla de arriba sólo son para
referencia. Los tiempos y las temperaturas reales pueden variar debido a las
diferencias de temperatura y la consistencia de los alimentos. Asegúrese de
ajustar los tiempos y las temperaturas de cocción a su receta en particular.
8
RECETAS
REFRITO DE PECHUGA DE POLLO CON QUESO ITALIANO
2 pechugas de pollo medianas, sin piel
2 onzas de perejil fresco, picado
4 onzas de queso italiano rallado
2 onzas de cebolla blanca, finamente picada
2 cucharadas de aceite vegetal
1 cucharadita de ajo fresco, picado
½ cucharadita de sal
1 cucharadita de maizena
½ cucharadita de vino de arroz
Pimienta blanca al gusto
Corte las pechugas de pollo en piezas de 1 pulgada. Ponga a marinar el pollo con la
sal y la maizena en un tazón mediano. Refrigere durante 20 minutos.
Precaliente el sartén a 375°F. Agruéguele el aceite vegetal, luego el ajo y la cebolla
y caliente durante 1 minuto. Añada el pollo marinado y siga revolviendo para que se
fría de 5 a 6 minutos. Cuando el pollo esté medio cocido y suelte el jugo en el
sartén, agregue el perejil y el queso italiano rallado. Revuelva para derretir el queso
durante aproximadamente 2 minutos. Añada el vino de arroz y la pimienta blanca y
ajuste la cantidad de sal al gusto. Tápelo y déjelo hervir durante 3 minutos. Sírvalo
caliente acompañado de pasta o arroz blanco. Rinde para 4 porciones.
FRITTATA DE PAPA
16 onzas de chorizo de pavo, sin grasa
2 cebollinos, picados
4 papas Russet, en rebanadas delgadas
½ taza de champiñones, rebanados
½ pimiento verde, picado
8 huevos
Cocine el chorizo, revolviendo continuamente, a 375°F, hasta que se dore. Escurra
el chorizo y sáquelo del sartén, reservando 2 cucharadas del jugo. Combine los
cebollinos, las papas, los champiñones y el pimiento verde dentro del sartén. Cocine
hasta que las papas estén doradas y suaves. En un tazón grande, revuelva el
chorizo y la mezcla de la papa con los huevos batidos. Vacíe de nuevo toda la
mezcla dentro del sartén extendiéndola pareja. Tape y cocine a 375°F de 15 a 20
minutos, aproximadamente.
8
Cook the sausage, continually stirring, at 375º F until the sausage browns. Drain and
remove the sausage from the skillet, but save about 2 tablespoons of the oil drippings.
Combine the green onions, potatoes, mushrooms and bell pepper together and add to
the skillet. Cook the vegetables until the potatoes are brown and tender. In a large
bowl, combine the sausage and potato mixture with 8 beaten eggs. Pour the entire
mixture back into the skillet, and spread the mixture evenly. Cover the skillet with the
lid and cook at 375º F for about 15-20 minutes.
POTATO FRITTATA
16 oz. Lean Turkey Sausage
2 Green Onions, chopped
4 Russet Potatoes, thinly sliced
½ cup Sliced Mushrooms
½ Green Bell Pepper, chopped
8 Eggs
Preheat the skillet to 375º F. Add vegetable oil, garlic and onion to the skillet, and cook
for 1 minute. Add the chicken and continue to stir-fry for about 5 to 6 minutes. When
the chicken is about half cooked and begins generating juices in the skillet, add the
parsley and shredded Italian cheese. Stir-fry to melt the cheese for about 2 minutes.
Add the rice wine and white pepper and salt to taste. Cover the skillet with the lid and
let the chicken simmer for about 3 minutes. Serve immediately with pasta or white rice.
Makes 4 servings.
Cut the chicken breasts into 1-inch pieces. Marinate the chicken pieces with salt and
cornstarch in a medium bowl. Refrigerate for 20 minutes.
ITALIAN CHEESE CHICKEN BREAST STIR FRY
2 Medium Skinless Chicken Breasts
2 oz. Fresh Parsley, chopped
4 oz. Shredded Italian Cheese
2 oz. White Onion, finely chopped
2 tbsp Vegetable Oil
1 tsp Fresh Garlic, minced
½ tsp Salt
1 tsp Cornstarch
½ tsp Rice Wine
White Pepper to taste
RECIPES
RECIPES
9
BLUE CHEESE BURGERS
1 ½ lbs. Lean Ground Beef
¼ cup Onion, finely chopped
1 Garlic Clove, pressed
¼ tsp Salt
¼ tsp Pepper
2 oz. Bleu Cheese, crumbled
4 Hamburger Buns
Cubra el pavo con ¼ de taza de la harina, sazonada con sal y pimienta. Derrita 1
cucharada de mantequilla en el sartén. Agregue el pavo y cocine a 375°F, hasta
que esté ligeramente dorado (de 3 a 5 minutos cada lado, aproximadamente);
escurra. Pase el pavo a un platón de servir, tapándolo para mantenerlo caliente.
Caliente el resto de la mantequilla y agregue los champiñones y el ajo. Sofríalos
durante 5 minutos. Revuélvales la harina restante y cocine hasta que aparezcan
burbujas. Vacíe el caldo de pollo dentro del sartén y revuelva continuamente, hasta
que espese ligeramente. Rocíe la salsa sobre el pavo y sirva.
Combine the ground beef, onions, garlic, salt and pepper together and mxing
thoroughly. Shape the beef mixture into eight thin patties. Sprinkle crumbled bleu
cheese on top of four of the patties and then cover each of the patties with one of
the remaining patties. Place the burgers in the skillet and cook at 375º F for about 15
minutes, turning once. Serve patties on hamburger buns.
PAVO CON SALSA DE CHAMPIÑONES
4 chuletas de pavo
½ taza de harina para usos múltiples, dividida
1 diente de ajo, prensado
½ cucharadita de sal
½ cucharadita de pimienta
¼ de taza de mantequilla o margarina, dividida
1 taza de champiñones rebanados
1 lata (14.5 onzas) de caldo de pollo
TURKEY WITH MUSHROOM SAUCE
4 Turkey Cutlets
½ cup All-Purpose Flour, divided
1 Garlic Clove, pressed
½ tsp Salt
½ tsp Pepper
¼ cup Butter or Margarine, divided
1 cup Sliced Mushrooms
1 can Chicken Broth (14.5 oz.)
Junte la carne molida, cebolla, ajo, sal y pimienta y mezcle bien. Con esta mezcla
forme 8 tortitas delgadas. Desparrame el queso Roquefort desmenuzado encima de
4 de las tortitas y cúbralas con las 4 restantes. Coloque las hamburguesa en el
sartén y cocine a 375°F durante 15 minutos, volteándolas una vez. Sirva las tortitas
sobre los bollos para hamburguesas.
Season the turkey with salt and pepper and coat with ¼ cup flour. Melt 1 tablespoon
of butter in the skillet. Add the turkey and cook at 375º F until lightly browned (about
3-5 minutes per side); drain any excess oil or fat. Transfer the turkey to a warm
serving tray and cover to keep warm. Heat the remaining butter in the skillet and add
mushrooms and garlic. Saute for about 5 minutes. Stir in the remaining flour and
cook until the sauce bubbles. Slowly add 1 can of chicken broth into the skillet,
stirring continuously, until the sauce thickens slightly. Drizzle the sauce over turkey
and serve.
HAMBURGUESAS CON QUESO TIPO ROQUEFORT
1 ½ libras de carne de res molida, sin grasa
¼ de taza de cebolla, finamente picada
1diente de ajo, prensado
¼ de cucharadita de sal
¼ de cucharadita de pimienta
2 onzas de queso tipo Roquefort, desmenuzado
4 bollos para hamburguesa
9
RECETAS
RECETAS
POLLO BARBACOA
4 pechugas de pollo
½ taza de mantequilla o margarina
¾ de taza de jugo de limón
2 cucharaditas de sal de ajo
2 cucharadas de cominos
2 cucharadas de pimiente de Cayena
1 cucharadita de sal
½ cucharadita de pimienta
Ponga la temperatura del sartén a 300°F y derrita la mantequilla. Añada el jugo de
limón, sal de ajo, cominos y pimienta de Cayena. Vacíe la mitad de esta marinada
dentro de un tazón grande. Perfore el pollo en varios lugares y rocíelo con sal y
pimienta. Coloque el pollo en el tazón con la marinada, volteándolo ocasionalmente
para cubrirlo por todos lados. Ajuste la temperatura del sartén a 375°F. Coloque el
pollo en el sartén, barnizándolo con la marinada que se reservó. Áselo, volteándolo
y bañándolo ocasionalmente con la marinada, hasta que esté completamente cocido
(15 minutos, aproximadamente).
ESTOFADO DE RES
4 tazas de agua
5 cubos de consomé de res
1 cucharadita de salsa inglesa Worcestershire
2 tazas de carne de res cocida, en cubos
6 zanahorias, peladas y cortadas en trozos
1 cebolla mediana, picada
2 cucharadas de harina
1 diente de ajo, picado
1 hoja de laurel, pequeña
Ajuste la temperatura del sartén a 350°F. Ponga a hervir el agua con los cubos de
consomé hasta que éstos se disuelvan completamente. Agregue la salsa inglesa
Worcestershire y una pizca de pimienta. Revuelva la carne de res, las zanahorias y
el ajo en la mezcla y deje que hierva de nuevo, ajustando la temperatura si es
necesario. Coloque la hoja de laurel encima, tape y baje el calor. Deje que hierva
durante 30 minutos o hasta que los vegetales estén suaves. Vacíe
aproximadamente la mitad del líquido en un tazón pequeño y mezcle con la harina.
Aumente el calor a punto de ebullición. Revuelva la mezcla de harina en el estofado
y cocine, revolviendo constantamente, hasta que los jugos espesen. Saque la hoja
de laurel.
10
10
Set the skillet temperature to 350º F. Add water and bouillon cubes to the skillet and
bring to a boil until the bouillon cubes completely dissolve. Add Worcestershire sauce
and a dash of pepper to the skillet. Add beef, carrots and garlic to the skillet and stir
until the sauce begins to boil, adjusting the temperature if necessary. Place the bay
leaf on top, then cover with the lid and reduce heat. Simmer for about 30 minutes or
until the vegetables become tender. Pour about ½ of the liquid into a small bowl and
blend with flour. Increase the temperature of the skillet again to bring the stew to a
boil. Slowly add the flour mixture to the stew and stir continuously until the stew
thickens. Remove the bay leaf and serve.
BEEF STEW
4 cups Water
5 Beef Bouillon Cubes
1 tsp Worcestershire Sauce
2 cups Cooked Beef, cubed
6 Carrots, Peeled and cut into chunks
1 Medium Onion, chopped
2 tbsp Flour
1 Garlic Clove, Minced
1 Small Bay Leaf
Set the skillet temperature to 300º F and melt the butter in the skillet. Add lemon
juice, garlic salt, cumin and cayenne pepper to the skillet. Pour ½ of this marinade
into a large bowl. Pierce the chicken in several places and sprinkle with salt and
pepper. Place the chicken in the bowl with the marinade, turning occasionally to coat
the chicken. Turn the skillet temperature to 375º F. Place the chicken into the skillet,
brushing with the reserved marinade. Grill, turning and basting the chicken with the
marinade occasionally, until the chicken is thoroughly cooked (about 15 minutes).
BARBECUE CHICKEN
4 Chicken Breasts
½ cup Butter or Margarine
¾ cup Lemon Juice
2 tsp Garlic Salt
2 tbsp Cumin
2 tbsp Cayenne Pepper
1 tsp Salt
½ tsp Pepper
RECIPES
GARANTÍA LIMITADA
Aroma Housewares Company garantiza que este producto no tenga defectos en
sus materiales y fabricación durante un período de un año a partir de la fecha
comprobada de compra dentro de la parte continental de los Estados Unidos.
Within this warranty period, Aroma Housewares Company will repair or replace, at its
option, defective parts at no charge, provided the product is returned, freight prepaid
with proof of purchase and U.S. $6.00 for shipping and handling charges payable to
Aroma Housewares Company. Before returning an item, please call the toll free
number below for return authorization number. Allow 2-4 weeks for return shipping.
Aroma Housewares Company warrants this product free from defects in material and
workmanship for one year from provable date of purchase in the continental United States.
LIMITED WARRANTY
AROMA HOUSEWARES COMPANY
6469 Flanders Drive
San Diego, California 92121
1-800-276-6286
L-V, 8:30 AM - 5:00 PM, Tiempo del Pacífico
Sitio Web: www.aromaco.com
This warranty does not cover improper installation, misuse, abuse or neglect on the
part of the owner. Warranty is also invalid in any case that the product is taken apart
or serviced by an unauthorized service station.
Esta garantía le da derechos legales específicos los cuales podrán variar de un
estado a otro y no cubre áreas fuera de los Estados Unidos.
This warranty gives you specific legal rights which may vary from state to state and
does not cover areas outside the United States.
Esta garantía no cubre la instalación incorrecta, el uso indebido, maltrato o
negligencia por parte del usuario. La garantía también es inválida en caso de que
el aparato sea desarmado o se le dé mantenimiento en un centro de servicio no
autorizado.
AROMA HOUSEWARES COMPANY
6469 Flanders Drive
San Diego, California 92121
1-800-276-6286
M-F, 8:30 AM - 5:00 PM, Pacific Time
Website: www.aromaco.com
Dentro de este período de garantía, Aroma Housewares Company reparará o
reemplazará, a su opción, las partes defectuosas sin ningún costo, siempre y
cuando el producto sea devuelto, con el flete prepagado, con comprobación de
compra y $6.00 dólares para cargos de envío y manejo a favor de Aroma
Housewares Company. Antes de devolver un producto, sírvase llamar al número
telefónico gratuito que está más abajo para obtener un número de autorización de
devolución. Espere entre 2-4 semanas para recibir el aparato nuevamente.