1
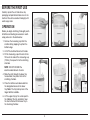
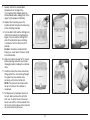
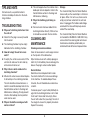
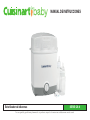
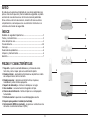
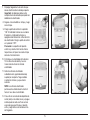
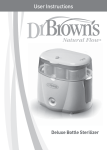
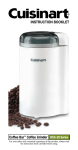
INSTRUCTION BOOKLET
Electric Steam Sterilizer
CS-6 SERIES
For your safety and continued enjoyment of this product, always read the instruction book carefully before using.
IMPORTANT SAFEGUARDS
14.
15.
When using an electrical appliance, basic safety precautions should
always be adhered to, including the following:
1. READ ALL INSTRUCTIONS.
2. Always unplug unit from outlet when not in use, before
putting on or taking off parts, and before cleaning. To
unplug, grasp plug and pull from electrical outlet. Never pull
cord. Allow to cool before handling.
3. To protect against risk of electric shock, do not put cord, plug
or unit base in water or other liquids.
4. Close supervision is necessary when any appliance is used by
or near children.
5. Do not operate any appliance with a damaged cord or plug,
or after the appliance malfunctions, or if appliance has been
dropped or damaged in any manner. Return the appliance to
the nearest authorized Cuisinart Service Facility for examination,
repair, and electrical or mechanical adjustment.
6. The use of attachments not recommended or sold by Cuisinart
may cause fire, electric shock or injury.
7. Do not let cord hang over edge of table or counter, or touch hot
surfaces.
8. Don’t attempt to handle the electrical cord to plug or unplug the
unit when your hands are wet.
9. Do not use outdoors.
10. Do not touch hot surfaces. Use handles or knobs.
11. Extreme caution must be used when moving an appliance
containing hot oil or other hot liquids.
12. When in use, the sterilizer contains hot water. Be careful to
avoid spilling any water on yourself when removing items from
the sterilizer.
13. Do not operate your appliance in an appliance garage or under
a wall cabinet. When storing in an appliance garage, always
unplug the unit from the electrical outlet. Not doing so could
16.
17.
18.
risk a fire, especially if the appliance touches the walls of the
garage or the door touches the unit as it closes.
Do not use the appliance for other than intended use.
Where applicable, always attach plug to appliance and check
that the control is OFF before plugging cord into wall outlet. To
disconnect, turn the control to OFF, then remove plug from wall
outlet.
Do not place on or near a hot gas or electric burner, or in a
heated oven.
WHEN IN USE THE STERILIZER CONTAINS BOILING WATER
AND STEAM ESCAPES FROM THE VENT IN THE LID.
Not for space heating purposes.
SAVE THESE INSTRUCTIONS
FOR HOUSEHOLD USE ONLY
SPECIAL CORD SET INSTRUCTIONS
A short power supply cord is provided to reduce the risks of
becoming entangled in or tripping over a longer cord. Extention
cord are available and maybe used if care is excercised in their use.
If an extension cord (or a long detachable power-supply cord) is
used:
1. The marked electrical rating of the detachable power-supply cord
or extension cord should be at least as great as the electrical
rating of the appliance.
2. If the appliance is of the grounded type, the extension cord
should be a grounding type 3-wire cord.
3. The longer cord should be arranged so that it will not drape over
the countertop or tabletop where it can be tripped over, snagged
or pulled on unintentionally (especially by children).
2
NOTICE
This appliance has a polarized plug (one prong is wider than the
other). As a safety feature, this plug will fit into a polarized outlet only
one way. If the plug does not fit fully in the outlet, reverse the plug. If
it still does not fit, contact a qualified electrician. Do not attempt to
defeat this safety feature.
1
CONTENTS
Important Safeguards..........................................................................2
Features and Benefits .........................................................................3
Before First Use .................................................................................4
Operation........................................................................................ 4-5
Tips and Hints .....................................................................................6
Troubleshooting ...................................................................................6
Cleaning and Maintenance .................................................................6
Warranty ..............................................................................................7
5
3
2
FEATURES AND BENEFITS
1. Lid - helps to accommodate different sized bottles and parts and
contains steam for quick sterilization.
2. Removable Lower Tray - holds 6 glass or plastic bottles of all
brands, shapes and sizes.
3. Removable Upper Tray - can be used to sterilize nipples, pacifiers,
teethers and other small items.
4. Stem - keeps the trays securely in place.
5. Measuring Cup - stores conveniently inside the unit lid.
6. Sterilizing Chamber - wipes clean with a damp cloth.
7. Simple Dial Control - easy ON/OFF operation.
8. Cord Wrap (not shown)
9. BPA Free (not shown) - all materials that come in contact with
food are BPA free.
4
6
7
3
BEFORE THE FIRST USE
Carefully unpack the unit and remove any
packaging and promotional labels in or on the
sterilizer. Rinse all accessories thoroughly with
warm soapy water.
OPERATION
Before you begin sterilizing, thoroughly wash
all bottles and feeding accessories in warm
soapy water or in the dishwasher.
1. Remove the measuring cup from the
sterilizer lid by popping it up from the
bottom edge.
1.
2.
3.
4.
5.
6.
2. Lift off the sterilizer lid and set it aside.
3. Fill the measuring cup with water to the
fill line on the side of the measuring cup
(100mL), then pour it into the sterilizing
chamber.
NOTE: DO NOT EXCEED the
recommended amount of water.
4. Slide the stem through the lower tray
to assemble, then place them in the
sterilizing chamber.
5. Place the bottles neck downward into
the designated areas on the lower
tray. Note: The tray hold up to 6 of the
largest bottles available.
6. Lift the upper tray by the center post in
the middle of the tray and slide it over
the stem attached to the lower tray in
the steaming chamber.
4
7.
Loosely scatter the unassembled
components on the upper tray.
(It is important that all bottle parts are
disassembled before adding them to the
upper tray for proper sterilization).
8. Replace the measuring cup in the
sterilizer lid and then place the lid on top
of the sterilizing chamber.
9. Turn the dial to ON and the LED light will
illuminate to indicate the sterilizing has
begun. The unit and the LED light will
shut off automatically once sterilizing
is complete. Turn the dial to the OFF
position.
Caution: Hot surface. Avoid contact.
During use, never touch the base, the lid
or the lid handles.
7.
8.
9.
10.
11.
12.
10. Allow the sterilizer to cool for 10 minutes
before opening, and wash your hands
thoroughly before handling the sterilized
items.
11. Carefully remove the sterile contents by
lifting up from the stem sticking through
the upper tray. Use caution when
removing, as the items will be hot.
NOTE: The contents will remain sterile
for up to 24 hours if the sterilizer is
unopened.
12. To help prevent a buildup of calcium in
the unit, drain and rinse the unit after
each use. To empty the unit of excess
water, wait until the unit has cooled, then
tip the unit onto its side over the sink and
any extra water will come out.
5
TIPS AND HINTS
For best results, use purified water to
minimize a buildup of calcium in the sterilizing chamber.
TROUBLESHOOTING
Q: Why won’t sterilizing start when I turn
the unit on?
A: Check that the plug is securely inserted
into the outlet.
A: The sterilizing chamber may be empty.
Add water to the sterilizing chamber.
A: This can happen when the sterilizer has a
buildup of calcium deposits. Refer to the
Decalcification section in Cleaning and
Maintenance, following.
Q: Why is the sterilizing cycle taking so
long?
A: Too much water has been added to the
sterilizing chamber. Exactly 100mL of water should be used each time to sterilize.
CLEANING AND
MAINTENANCE
Cleaning accessories and base
Q: How do I empty the unit of excess
water?
Clean all accessories in warm soapy water or
on the top rack of the dishwasher.
A: To empty the unit of excess water, tilt the
unit onto its side over the sink and any
extra water will come out.
Wipe the base clean with a damp sponge or
cloth. Dry it immediately. Never submerge the
base or the plug in water or other liquids.
Q: Why is there a white residue in the
sterilizing chamber?
Decalcification
Sometimes mineral deposits form inside
the steam chamber that can cause damage
to the machine. To avoid buildup of these
minerals, the unit should be de-scaled once
a month.
A: Mineral-rich water causes calcium deposits to build up in the sterilizing chamber.
The unit should be cleaned out once a
month to avoid this buildup. Refer to the
Decalcification section in Cleaning and
Maintenance, following. To help prevent/
minimize this buildup, fresh or purified
water can be used.
Q: Why are the bottles coming out with
marks on them?
To descale, pour 1 cup of white (distilled) vinegar into the sterilizing chamber. Let it stand
for at least 2 hours and then empty. Rinse
the unit with water after you empty the unit of
the vinegar to ensure it is properly rinsed out.
Repeat if necessary.
6
Storage
The Cuisinart Baby® Electric Steam Sterilizer
stores neatly on the countertop in a minimum
of space. When it is not in use, make sure to
empty any leftover water from the unit and
leave it unplugged. The hidden cord storage
underneath the base will help keep excess
cord off the countertop.
The Cuisinart Baby® Electric Steam Sterilizer
is intended for HOUSEHOLD USE ONLY. Any
service other than cleaning and normal user
maintenance should be performed by an
authorized Cuisinart Service Representative.
WARRANTY
BEFORE RETURNING YOUR CUISINART PRODUCT
Limited 3-Year Warranty
If your Cuisinart Baby® Electric Steam Sterilizer should prove to be defective within the
warranty period, we will repair or, if we think necessary, replace it. To obtain warranty
service, please call our Consumer Service Center toll-free at 1-800-726-0190 or write
to: Cuisinart, 7475 North Glen Harbor Blvd., Glendale, AZ 85307. To facilitate the
speed and accuracy of your return, enclose $10.00 for shipping and handling.
(California residents need only supply a proof of purchase and should call
1-800-726-0190 for shipping instructions.) Please be sure to include your return
address, description of the product’s defect, product serial number, and any other
information pertinent to the return. Please pay by check or money order. NOTE: For
added protection and secure handling of any Cuisinart product that is being returned,
we recommend you use a traceable, insured delivery service. Cuisinart cannot be held
responsible for in-transit damage or for packages that are not delivered to us. Lost
and/or damaged products are not covered under warranty.
This warranty is available to consumers only. You are a consumer if you own a
Cuisinart Baby® Electric Steam Sterilizer that was purchased at retail for personal,
family or household use. Except as otherwise required under applicable law, this
warranty is not available to retailers or other commercial purchasers or owners.
We warrant that your Cuisinart Baby® Electric Steam Sterilizer will be free of defects
in materials and workmanship under normal home use for 3 years from the date of
original purchase.
We recommend that you visit our website, www.cuisinart.com for a fast, efficient way
to complete your product registration. However, product registration does not eliminate
the need for the consumer to maintain the original proof of purchase in order to obtain
the warranty benefits. In the event that you do not have proof of purchase date, the
purchase date for purposes of this warranty will be the date of manufacture.
Your Cuisinart Baby® Electric Steam Sterilizer has been manufactured to the strictest
specifications and has been designed for use only in 120-volt outlets and only with
authorized accessories and replacement parts. This warranty expressly excludes any
defects or damages caused by attempted use of this unit with a converter, as well as
use with accessories, replacement parts or repair service other than those authorized
by Cuisinart. This warranty does not cover any damage caused by accident, misuse,
shipment or other than ordinary household use. This warranty excludes all incidental
or consequential damages. Some states do not allow the exclusion or limitation of
these damages, so these exclusions may not apply to you. You may also have other
rights, which vary from state to state.
CALIFORNIA RESIDENTS ONLY
California law provides that for In-Warranty Service, California residents have the
option of returning a nonconforming product (A) to the store where it was purchased
or (B) to another retail store that sells Cuisinart products of the same type. The retail
store shall then, according to its preference, either repair the product, refer the
consumer to an independent repair facility, replace the product, or refund the purchase
price less the amount directly attributable to the consumer’s prior usage of the product.
If neither of the above two options results in the appropriate relief to the consumer, the
consumer may then take the product to an independent repair facility, if service or
repair can be economically accomplished. Cuisinart and not the consumer will be
responsible for the reasonable cost of such service, repair, replacement, or refund for
nonconforming products under warranty. California residents may also, according to
their preference, return nonconforming products directly to Cuisinart for repair or, if
necessary, replacement by calling our Consumer Service Center toll-free at 1-800-7260190. Cuisinart will be responsible for the cost of the repair, replacement, and shipping
and handling for such nonconforming products under warranty.
Important: If the nonconforming product is to be serviced by someone other
than Cuisinart’s Authorized Service Center, please remind the servicer to call our
Consumer Service Center at 1-800-726-0190 to ensure that the problem is properly
diagnosed, the product is serviced with the correct parts, and to ensure that the
product is still under warranty.
©2013 Cuisinart
150 Milford Road
East Windsor, NJ 08520
Printed in China
13CE144035
IB-11645-ESP
7
NOTES:
Version no: N CS6 IB-11645-ESP
SIZE: 210mm(W) x 148mm(H)
Pages: 16pp
Paper:
105GSM ARTPAPER FOR WHOLE BOOK
Cover: 4C+1C (BLACK)
Inside: 1C+1C (BLACK)
Coating: varnishing in cover
Conair: Astor You / Andy Ws Chan
Date: 9/05/2013
SUN HING PRINTING CO., LTD.
MANUAL DE INSTRUCCIONES
Esterilizador de biberones
SERIE CS-6
Para su seguridad y para disfrutar plenamente de este producto, siempre lea las instrucciones cuidadosamente antes de usarlo.
13. No haga funcionar el aparato bajo o adentro de un armario.
Siempre desconecte el aparato antes de guardarlo en un
armario. Dejar el aparato conectado presenta un riesgo de
incendio, especialmente si éste toca las paredes o la puerta del
armario.
14. No utilice el aparato para ningún otro fin que no sea el indicado.
15. Si corresponde, conecte el cable al aparato y asegúrese de
que el aparato esté apagado antes de enchufar el cable en la
toma de corriente. Siempre apague el aparato (OFF) antes de
desconectarlo.
16. No coloque el aparato sobre o cerca de un quemador a gas o
una hornilla eléctrica caliente, ni en un horno caliente.
17. DURANTE EL USO, EL ESTERILIZADOR CONTIENE AGUA
HIRVIENDO Y SALE VAPOR POR EL ORIFICIO EN LA TAPA.
18. No diseñado para proporcionar calefacción de espacios.
MEDIDAS DE SEGURIDAD
IMPORTANTES
Siempre que use aparatos eléctricos, debe tomar precauciones
básicas de seguridad, entre las cuales las siguientes:
1. LEA TODAS LAS INSTRUCCIONES.
2. Desconecte el aparato cuando no esté en uso, antes
de instalar o remover piezas y antes de limpiarlo. Para
desconectar el aparato, agarre el cable por la clavija. Nunca
jale el cable. Permita que enfríe antes de manipularlo.
3. Para reducir el riesgo de electrocución, no coloque el cable, la
clavija o la base en agua u otro líquido.
4. Supervise el uso de este aparato cuidadosamente cuando esté
usado por o cerca de niños.
5. No utilice este aparato si el cordón o la clavija estuviesen
dañados, después de que hubiese funcionado mal o que se
hubiese caído o si estuviese dañado. Regrese el aparato a un
centro de servicio autorizado para su revisión, reparación o
ajuste.
6. El uso de accesorios no recomendados o vendidos por
Cuisinart presenta un riesgo de incendio, electrocución o herida.
7. No permita que el cordón cuelgue del borde de la encimera o
de la mesa, ni que haga contacto con superficies calientes.
8. No enchufe/desenchufe el cable con las manos mojadas.
9. No lo utilice en exteriores.
10. No toque las superficies calientes. Utilice el mango y los
botones o perillas.
11. Tenga sumo cuidado al mover un aparato que contenga aceite u
otros líquidos calientes.
12. El esterilizador contiene agua caliente. Tenga cuidado de
no derramar agua y quemarse al retirar los artículos del
esterilizador.
GUARDE ESTAS INSTRUCCIONES
PARA USO DOMÉSTICO
SOLAMENTE
USO DE EXTENSIONES
El cable proveído con este aparato es corto, para reducir el peligro
de que alguien se enganche o tropiece con un cable más largo.
Se podrá usar una extensión eléctrica, siempre que respete las
precauciones siguientes.
1. La clasificación nominal de la extensión debe ser por lo menos
igual a la del aparato.
2. Si el cable del aparato está dotado de un enchufe con puesta a
tierra, la extensión también debe serlo.
3. Coloque la extensión sobre la encimera o la mesa de tal forma
que niños no puedan jalar o tropezar con éste.
2
AVISO
El cable de este aparato está dotado de una clavija polarizada (una
pata es más ancha que otra). Como medida de seguridad, se podrá
enchufar de una sola manera en la toma de corriente polarizada.
Si no entrara en la toma de corriente, inviértela. Si aún no entrara
completamente, comuníquese con un electricista. No intente ir en
contra de esta función de seguridad.
1
ÍNDICE
5
Medidas de seguridad importantes ....................................................2
Piezas y características...................................................................... 3
Antes del primer uso ...........................................................................4
Funcionamiento ...............................................................................4–5
Consejos .............................................................................................6
Resolución de problemas ...................................................................6
Limpieza y mantenimiento ................................................................. 6
Garantía ...............................................................................................7
3
2
PIEZAS Y CARACTERÍSTICAS
1. Tapa alta - ayuda a acomodar biberones y artículos de varios
tama ños y sella el vapor, para una esterilización rápida
2. Bandeja inferior - acomoda hasta 6 biberones de plástico o vidrio
de cualquier marca, forma o tamaño.
3. Bandeja superior - ideal para esterilizar tetinas, chupones,
mordedores y otros artículos pequeños.
4. Soporte de la bandeja - mantiene la bandeja en su lugar.
5. Vaso medidor - convenientemente integrado a la tapa.
6. Cámara de esterilización - fácil de limpiar con un simple paño
humedecido.
7. Perilla de control - operación encendido/apagado sencilla.
8. Espacio para guardar el cordón (no ilustrado)
9. Sin bisfenol A (BPA) (no ilustrado) - las partes en contacto con los
alimentos no contienen bisfenol A (BPA).
4
6
7
3
ANTES DEL PRIMER USO
Retire cuidadosamente el aparato del material
de embalaje y quite las etiquetas promocionales pegadas en su cuerpo. Lave todos los
accesorios en agua jabonosa tibia.
FUNCIONAMIENTO
Antes de esterilizar los biberones y otros
artículos, lave éstos en agua jabonosa tibia o
en el lavavajillas.
1. Retire el vaso medidor de la tapa
2. Retire la tapa del esterilizador.
1.
2.
3.
4.
5.
6.
3. Llene el vaso medidor con 100 ml de
agua y vierta ésta en la cámara de
esterilización.
NOTA: NO EXCEDA la cantidad
recomendada de agua.
4. Deslice el soporte de la bandeja en la
bandeja inferior y coloque ésta en la
cámara de esterilización.
5. Coloque los biberones al revés (el cuello
del biberón apuntando hacia abajo) en las
áreas designadas en la bandeja inferior.
Nota: La bandeja puede acomodar hasta
6 biberones grandes.
6. Agarre la bandeja superior por el eje
central y deslícela sobre el soporte
conectado a la bandeja inferior.
4
7.
Disponga holgadamente los artículos que
desea esterilizar sobre la bandeja superior.
Importante: los biberones deben estar
completamente desarmados para poder ser
debidamente esterilizados.
8. Regrese el vaso medidor en la tapa, y luego
cierre la tapa.
9. Ponga la perilla de control en la posición
"ON". El indicador luminoso se encenderá.
El aparato y el indicador luminoso se
apagarán automáticamente al final del ciclo
de esterilización. Ponga la perilla de control
en la posición "OFF".
Precaución: La superficie del aparato
estará muy caliente. Evite tocarla. Nunca
toque la base, la tapa o las asas de la tapa
durante el funcionamiento.
7.
8.
9.
10.
11.
12.
10. Permita que el esterilizador enfríe durante
10 minutos antes de abrirlo y lave sus
manos antes de tocar los artículos
esterilizados.
11. Retire los artículos esterilizados
cuidadosamente, agarrando la bandeja
superior por el soporte. Tenga cuidado
al retirar los artículos, ya que estarán
calientes.
NOTA: Los artículos esterilizados
permanecerán estériles durante hasta 24
horas si no se abre el esterilizador.
12. Para evitar la acumulación de depósitos de
calcio (sarro) en la unidad, vacíe y enjuague
ésta después de cada uso. Para vaciar el
exceso de agua, permita que el aparato
enfríe y luego incline éste de lado encima
del fregadero.
5
minimizar el depósito de calcio,
utilice agua mineral o purificada.
CONSEJOS
Para evitar los depósitos de calcio en la
cámara de esterilización, utilice agua purificada.
RESOLUCIÓN DE
PROBLEMAS
Problema: Hay marcas/manchas sobre
los biberones.
Solución:
Problema: La esterilización no empieza al
encender el aparato.
Solución:
Solución:
Cerciórese que el cable está
debidamente enchufado en una
toma de corriente.
Puede que la cámara de esterilización esté vacía. Eche agua en
la cámara.
Problema: Queda agua en la cámara de
esterilización.
Solución:
Incline el aparato de lado encima
del fregadero para vaciar el
agua.
Esto puede suceder si hay
depósitos de calcio en el esterilizador. Véase las instrucciones
de eliminación del sarro en la
sección "Limpieza y mantenimiento".
Problema: El ciclo de esterilización está
demorando mucho.
Solución:
Hay demasiada agua en la cámara de esterilización. Cerciórese
de añadir exactamente 100 ml de
agua en la cámara.
LIMPIEZA Y
MANTENIMIENTO
Problema: Un residuo blanco se está
formando en la cámara de
esterilización.
Limpieza de los accesorios y de la base
Solución:
Limpie el cuerpo del aparato con un paño
ligeramente humedecido. Séquelo inmediatamente. Nunca sumerja la base o la clavija en
agua u otro líquido.
El agua rica en minerales causa
depósitos de calcio (sarro) en la
cámara de esterilización. Para
evitar que los depósitos se acumulen, limpie la cámara aproximadamente una vez al mes. Véase
las instrucciones de eliminación
del sarro en la sección "Limpieza
y mantenimiento". Para ayudar a
Lave todos los accesorios en agua jabonosa
tibia, o en la bandeja superior del lavavajillas.
Eliminación del sarro
El agua rica en minerales causa depósitos de
calcio (sarro) en la cámara de esterilización.
Esto puede dañar el aparato. Para evitar que
los depósitos se acumulen, limpie la cámara
6
aproximadamente una vez al mes.
Para eliminar el sarro, eche 235 ml de vinagre
blanco destilado en la cámara de esterilización. Deje reposar durante 2 horas o más,
y luego vacíe la cámara. Enjuague la cámara
a fondo después de vaciarla. Repita si es
necesario.
ALMACENAJE
El esterilizador de biberones Cuisinart Baby®
es fácil de almacenar directamente sobre
la encimera. Cuando no usa el aparato,
asegúrese de que la cámara de esté vacía y
manténgalo desconectado. Guarde el cable
en el espacio debajo de la base.
El esterilizador de biberones Cuisinart Baby®
ha sido diseñada para USO DOMÉSTICO
SOLAMENTE. Toda reparación, excepto la
limpieza y el mantenimiento por parte del
usuario, debe ser llevada a cabo por
personal de servicio autorizado.
GARANTÍA
ANTES DE HACER REPARAR SU APARATO
Garantía limitada de 1 año
Si este aparato presentara algún defecto de materiales o fabricación durante el
período de garantía, la reparemos o reemplazaremos (a nuestra opción). Para obtener
servicio bajo esta garantía, llame a nuestra línea directa gratuita al 1-800-726-0190 o
regrese el aparato defectuoso a: Cuisinart, 7475 North Glen Harbor Blvd. Glendale,
AZ 85307. Regrese el aparato defectuoso, junto con su recibo de compra y un cheque
o giro postal de US$10.00 por gastos de manejo y envío. Los residentes de California
sólo necesitan dar una prueba de compra y deben llamar al 1-800-726-0190 para
recibir instrucciones de envío. Recuerde incluir su nombre, dirección y teléfono, la
descripción del problema, así como cualquier información pertinente. Sentimos no
poder aceptar otras formas de pago. NOTA: Para mayor seguridad, le aconsejamos
que mande su paquete por un método de entrega con seguro y seguimiento. Cuisinart
no será responsable por los daños ocurridos durante el transporte o por los paquetes
mandados a una dirección equivocada. Los productos perdidos y/o lastimados
durante el envío no serán cubiertos bajo esta garantía.
Esta garantía es para los consumidores solamente. Usted es un consumidor si ha
comprado su aparato Cuisinart Baby® en una tienda, para uso personal o casero.
A excepción de los estados donde la ley lo permita, esta garantía no es para los
detallistas u otros comerciantes.
Cuisinart Baby garantiza este aparato contra todo defecto de materiales o fabricación
durante 1 año después de la fecha de compra original, siempre en cuando el aparato
haya sido utilizado para uso doméstico y según las instrucciones.
Le aconsejamos que llene el formulario de registro disponible en www.cuisinart.com
a fin de facilitar la verificación de la fecha de compra original. Sin embargo, registrar
el producto no es necesario para recibir servicio bajo esta garantía. En ausencia del
recibo de compra, el período de garantía será de 12 meses a partir de la fecha de
fabricación.
Este aparato satisface las más altas exigencias de fabricación y ha sido diseñado
para uso sobre corriente de 120V, usando accesorios y partes de repuesto
autorizados solamente. Esta garantía excluye expresamente los daños causados
por accesorios, partes o reparaciones no autorizados por Cuisinart, así como los
daños causados por el uso de un convertidor de voltaje. Esta garantía no cubre el
uso institucional o comercial del producto, y no es válida en caso de daños causados
por mal uso, negligencia o accidente. Esta garantía excluye expresamente todos
los daños incidentales o consecuentes. Algunos Estados no permiten la exclusión
o limitación de daños incidentales o consecuentes, de modo que las limitaciones
mencionadas pueden no regir para usted. Usted puede tener otros derechos que
varían de un Estado a otro.
RESIDENTES DE CALIFORNIA SOLAMENTE
La ley del estado de California ofrece dos opciones bajo el período de garantía. Los
residentes del estado de California pueden (A) regresar el producto defectuoso a la
tienda donde lo compraron o (B) a otra tienda que venda productos Cuisinart® de este
tipo. La tienda, a su opción, reparará el producto, referirá el consumidor a un centro
de servicio independiente, cambiará el producto o reembolsará el consumidor por el
precio original del producto, menos la cantidad imputable al uso del producto por el
consumidor hasta que éste se dañe. Si estas dos opciones no satisfacen al
consumidor, podrá llevar el aparato a un centro de servicio independiente, siempre en
cuando se pueda ajustar o reparar el aparato de manera económica. Cuisinart será
responsable por los gastos de servicio, reparación, reemplazo o reembolso de los
productos defectuosos durante el período de garantía. Los residentes de California
también pueden, si lo desean, mandar el aparato defectuoso directamente a Cuisinart
para que lo reparen o lo cambien. Para esto, se debe llamar a nuestro servicio
posventa al 1-800-726-0190. Cuisinart será responsable por los gastos de reparación,
reemplazo, manejo y envío de los productos defectuosos durante el período de
garantía.
Importante: Si debe llevar el aparato defectuoso a un centro de servicio no
autorizado, por favor informe al personal del centro de servicio que deberían llamar
al servicio posventa de Cuisinart al 1-800-726-0190 a fin de diagnosticar el problema
correctamente, usar las partes correctas para repararlo y asegurarse de que el
producto esté bajo garantía.
©2013 Cuisinart
150 Milford Road
East Windsor, NJ 08520
Impreso en la China
13CE144035
IB-11645-ESP
7
NOTES: