1
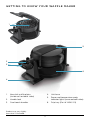
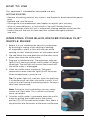
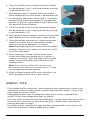
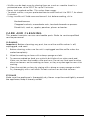
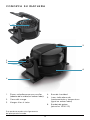
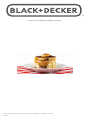
TM
DOUBLE FLIP ™
WAFFLE MAKER
WAFLERA
use and care manu al
ma n ual de uso y cui d ad o
WMD200B
Thank you for your purchase!
Gracias por su compra!
Merci de votre achat!
Should you have any questions or concerns with your new product,
please call our Customer Service Line at 1-800-231-9786 (US and
Canada). Please do not return to the store.
Si usted tiene alguna inquietud o pregunta con su producto, por
favor llame a nuestra línea de servicio al cliente una atención
inmediata 1-800-231-9786 (EE.UU/Canadá) 01-800-714-2503
(México). No devuela a la tienda.
Si vous avez des questions ou des préoccupations à propos de
votre nouveau produit, veuillez communiquer avec notre Service à
la clientèle au 1 800 231-9786 (États-Unis et Canada). Veuillez ne
pas rapporter le produit au magasin.
Please Read and Save this Use and Care Book.
IMPORTANT SAFEGUARDS.
When using electrical appliances, basic safety precautions should always be followed to reduce the risk of fire, electric shock, and/or injury, including the following:
•READ ALL INSTRUCTIONS
BEFORE USING.
•Do not touch hot surfaces. Use handles
or knobs.
•To protect against electrical shock, do
not immerse cord, plug, or appliance in
water or other liquid.
•Close supervision is necessary when any
appliance is used by or near children.
•Unplug from outlet when not in use
and before cleaning. Allow time to cool
before putting on or taking off parts,
and before cleaning the appliance.
•Do not operate any appliance with
a damaged cord or plug, or if the
appliance malfunctions or has been
damaged in any manner. Contact
consumer support at the toll-free
number listed in the warranty section.
•The use of accessory attachments
not recommended by the appliance
manufacturer may cause injuries.
•Do not use outdoors.
•Do not let cord hang over edge
of table or counter, or touch hot
surfaces.
•Do not place on or near a hot gas or
electric burner, or in a heated oven.
•Extreme caution must be used when
moving an appliance containing hot
oil or other hot liquids.
•Do not use appliance for other than
intended use.
•This appliance is not intended for use
by persons (including children) with
reduced physical, sensory or mental
capabilities, or lack of experience and
knowledge, unless they have been given
supervision or instructions concerning
use of the appliance by a person
responsible for their safety.
•Children should be supervised to ensure
that they do not play with the appliance.
SAVE THESE INSTRUCTIONS.
This product is for household use only.
POLARIZED PLUG (120V models only)
This appliance has a polarized plug (one blade is wider than the other). To reduce the
risk of electric shock, this plug is intended to fit into a polarized outlet only one way. If
the plug does not fit fully into the outlet, reverse the plug. If it still does not fit, contact
a qualified electrician. Do not attempt to modify the plug in any way
TAMPER-RESISTANT SCREW
Warning: This appliance is equipped with a tamper-resistant screw to prevent
removal of the outer cover. To reduce the risk of fire or electric shock, do not attempt
to remove the outer cover. There are no user-serviceable parts inside. Repair should
be done only by authorized service personnel.
ELECTRICAL CORD
1. A short power-supply cord is provided to reduce the risk resulting from becoming
entangled in or tripping over a longer cord.
2. Longer extension cords are available and may be used if care is exercised in their use.
3. If a long extension cord is used:
a) The marked electrical rating of the extension cord should be at
least as great as the electrical rating of the appliance.
b) If the appliance is of the grounded type, the extension cord should be a
grounding-type 3-wire cord.
c) The longer cord should be arranged so that it will not drape over the
countertop or tabletop where it can be pulled on by children or tripped over
unintentionally.
Note: If the power cord is damaged, please contact the warranty department listed
in these instructions.
3
CO NTE NTS
Important Safeguards . . . . . . . . . . . . . . . . . . . . . . . . . . . . . . . . . . . . . . . . . . . . . . . 3
Getting to know your Waf fle Maker . . . . . . . . . . . . . . . . . . . . . . . . . . . . . . . . . . . . 5
How to Use . . . . . . . . . . . . . . . . . . . . . . . . . . . . . . . . . . . . . . . . . . . . . . . . . . . . . . . . 6
Operating Your Black+Decker Double Flip™ Waf fle Maker . . . . . . . . . . . . . . . . . . 6
Useful Tips . . . . . . . . . . . . . . . . . . . . . . . . . . . . . . . . . . . . . . . . . . . . . . . . . . . . . . . . 7
Care and Cleaning . . . . . . . . . . . . . . . . . . . . . . . . . . . . . . . . . . . . . . . . . . . . . . . . . . 8
Troubleshooting . . . . . . . . . . . . . . . . . . . . . . . . . . . . . . . . . . . . . . . . . . . . . . . . . . . . 9
Recipes . . . . . . . . . . . . . . . . . . . . . . . . . . . . . . . . . . . . . . . . . . . . . . . . . . . . . . . . . . 10
Warranty and Customer Ser vice Information . . . . . . . . . . . . . . . . . . . . . . . . . . . . 12
4
G E T T I NG TO KN OW YO UR WA F FLE MAKER
1
5
2
3
6
4
1.
4. Unit base
onstick waffle plates
N
(inside unit on both sides)
2. Handle lock
5. P
ower and temperature ready
indicator lights (same on both sides)
3. Cool-touch handles
6. Drip tray (Part # 1404S-01)
Product may vary slightly
from what is illustrated.
5
HOW TO U S E
This appliance is intended for household use only.
GETTING STARTED
•Remove all packing material, any stickers, and the plastic band around the power
plug.
•Remove and save literature.
•Please go to www.prodprotect.com/applica to register your warranty.
•Wash all removable parts as instructed in Care and Cleaning Section.
•Select a location where this unit is to be used, allowing enough space from the
back of the unit and wall to allow heat flow without damage to cabinets
and walls.
OPERATING YOUR BLACK+DECKER DOUBLE FLIP™
WAFFLE MAKER
1. Before first use, condition the nonstick waffle plates
by brushing or wiping a light coating of cooking
oil (vegetable, canola, or corn oil) onto the entire
cooking surface. Wipe off excess oil with paper towel.
A
2. Flip and follow the same directions on the other set of
plates; then close the waffle maker.
3. Plug into a standard outlet. The red power indicator
light (A) will come on and the waffle maker will begin
to preheat. The red light will remain illuminated until
the waffle maker is unplugged.
4. Allow the waffle maker to preheat. The green
temperature-ready indicator light (B) will illuminate
when the appliance is ready to use.
B
Tip: The green light only indicates when the appliance
is at temperature, not when the waffle is ready. It will
cycle on and off during the cooking process to keep a
consistent temperature.
Note: During the initial preheating, you may notice
smoke and a light odor. This is normal and should
cause no concern.
5. Once the waffle maker is preheated, open the waffle
maker by pulling the handle lock to the unlock
position. (C) Lift the cool touch handle. Pour about ¾
cup of batter into the center of the lower waffle plate.
6
C
6. Close the waffle maker with the cool touch handle,
but do not force it shut. Lock the handle by pressing
in the handle lock. (D)
D
7. Wait approximately 10 seconds, then turn the cool
touch handle until the waffle maker is upside down. (E)
8. If making only one waffle, skip to step 11. If making a
second waffle, unlock the handle (C) and open the
second set of plates. Pour about ¾ cup of batter into
the center of the waffle plate.
9. Close the waffle maker with the cool touch handle,
but do not force it shut. Lock the handle by pressing
in the handle lock. (D)
E
10.Wait approximately 10 seconds, and then turn the cool
touch handle until the waffle maker is right side up.
11. Allow the waffle(s) to cook until steaming subsides,
about 3-4 minutes. For crispier waffles, extend
cooking time for an additional 1-2 minutes.
Note: Avoid opening waffle maker while the waffle is
cooking. Opening at this point may cause the waffle
to stick or cook poorly.
Follow the direction of the
arrow to flip.
12. When cooking is finished, flip the waffle maker,
unlock the handle and remove the first waffle. If
making two waffles: lock the handle, flip the waffle
maker, unlock the handle, open and remove the
second waffle.
Note: Only remove waffles with heat-resistant,
nonstick utensils. Do not use metal utensils, as they
can damage the nonstick coating.
13. When finished, unplug waffle maker and allow it to
cool completely before cleaning or storing.
USEFUL TIPS
•Fully cooked waffles freeze well. When cooled to room temperature, simply wrap
individually in plastic wrap or place in freezer bag and close airtight. They can be
kept frozen for several months.
•Packaged pancake mixes, including the whole wheat variety, make delicious
waffles. Follow the package directions for waffles.
•Don’t use water to clean the nonstick waffle plates. Simply allow them to cool and
brush off any crumbs that may be left in the grids. Cotton swabs are handy for
cleaning between the ridges.
•For lighter waffles, separate the eggs and beat the egg whites to soft peaks and
fold in to the batter just before cooking the waffles.
7
•Waffles can be kept warm by placing them on a rack or a cookie sheet in a
preheated oven set to 300ºF for up to 10 minutes.
•Never stack cooked waffles. This makes them soggy.
•To reheat waffles, use your preheated toaster oven and set it to 350º F, for about
5 minutes.
•Using a waffle mix? Add some excitement! Just before cooking, stir in:
Mashed banana
Chopped walnuts, macadamia nuts, toasted almonds or pecans
Diced fruit, such as, apples, peaches, plums or berries
C AR E A N D C L EA N IN G
This product contains no user serviceable parts. Refer to service qualified
service personnel.
CLEANING
Important: Before cleaning any part, be sure the waffle maker is off,
unplugged, and cool.
1.
efore cleaning, make sure the unit is unplugged and the waffle maker has
B
cooled completely.
2. Wipe the cooking surfaces with a damp sponge or cloth.
3. T
o remove cooked on food, use a plastic bristle brush or nylon mesh pad.
Make sure to clean the handles after each use. Do not use steel wool or other
abrasive cleaners on the cooking surfaces, as they may damage the non-stick
coating.
4. C
lean the outside surfaces by wiping with a damp or soapy sponge or cloth.
Dry thoroughly with a soft cloth. Do not use harsh or abrasive cleaners.
STORAGE
Make sure the appliance is thoroughly dry. Never wrap the cord tightly around
the appliance; keep it loosely coiled.
8
T RO U B L ES HO OTIN G
PROBLEM
POSSIBLE CAUSE
SOLUTION
Waffle maker does not
turn on.
Waffle maker is not
plugged in.
Check to make sure the
waffle maker is plugged in
to a working outlet.
The cooked waffles are
thin or uneven.
Waffle maker was not
rotated during cooking.
Ten seconds after waffle
maker begins cooking,
rotate waffle maker.
Waffles are too light.
Waffles may not have
been cooked completely.
Cooking time for waffles
will vary depending
upon the ingredients,
the temperature, and the
amount of batter. Cook
longer if needed.
Waffles are too dark.
Waffles may have cooked
too long.
Batters containing a high
amount of sugar or fruits
may tend to cook darker.
Cook for a shorter length
of time.
Temperature ready
indicator light (green)
goes on and off.
Waffle maker is cycling.
This is normal. The
temperature ready
indicator light shows that
the waffle plates are at
cooking temperature. This
light is not an indication
that the waffle is fully
cooked.
Waffles are sticking.
Plates are not properly
seasoned.
Waffle plates may not be
fully conditioned. Brush oil
onto plates.
If additional assistance is needed,
please contact our consumer service team at
1-800-231-9786.
9
RE C IP E S
RASPBERRY ALMOND WAFFLES
2 cups of unsifted all purpose flour
½ cup finely ground toasted almonds
1 Tbsp. baking powder
½ tsp. salt
3 eggs, separated
1¾ cups of milk
2 Tbsp. vegetable oil
1 tsp. grated orange peel
1 tsp. lemon extract
3 tbsp. sugar
1 pint Raspberries
Confectioners’ sugar
Maple syrup
In a large bowl, combine flour, almonds, baking powder and salt. In a second bowl,
beat egg yolks until well blended; blend in milk, vegetable oil, orange peel and lemon
extract. Pour over flour mixture and stir until well blended. Set aside.
Beat egg whites until foamy, gradually add sugar and continue beating until stiff
peaks form. Gradually fold into batter.
Pour about ¾ cup batter onto center of the preheated waffle plate. Close waffle
maker; lock the handle.
Wait 10 seconds, then using the cool-touch handle, turn over the waffle maker.
If making a second waffle, unlock the handle and open the second set of plates. Pour
about ¾ cup of batter into the center of the lower waffle plate. Wait 10 seconds, then
using the cool-touch handle, turn over the waffle maker.
Cook 3-4 minutes or until steaming subsides.
Note: Do not open the waffle maker before the steaming subsides. If waffle is not fully
cooked, it may split and be difficult to remove.
Remove each waffle using a non-metallic spatula.
Serve waffles topped with raspberries and dusted with confectioners’ sugar.
Close the waffle maker and wait for the temperature ready indicator light to
illuminate. Repeat with remaining batter.
Note: Cooked waffles can be placed on a rack or on a cookie sheet in a preheated
oven set to 300ºF for up to 10 minutes.
Serve with maple syrup.
Makes 6 waffles.
10
BACON ORANGE WAFFLES
2 cups pancake and biscuit mix
4 slices cooked bacon, crumbled
1 cup milk
1
/3 cup fresh orange juice
1 egg
2 Tbsp. bacon drippings or vegetable oil
1 tsp. grated orange peel
1 tsp. vanilla extract
In a large bowl combine all ingredients; stir until blended. Pour about ¾ cup of the
batter onto the center of preheated waffle plate and close the waffle maker. Lock the
handle.
Wait 10 seconds, then using the cool-touch handle, turn over the waffle maker.
If making a second waffle, unlock the handle and open the second set of plates. Pour
about ¾ cup of batter into the center of the lower waffle plate. Wait 10 seconds, then
using the cool-touch handle, turn over the waffle maker.
Cook 3-4 minutes or until steaming subsides.
Note: Do not open the waffle maker before the steaming subsides. If waffle is not fully
cooked, it may split and be difficult to remove.
Remove each waffle using a non-metallic spatula.
Note: Cooked waffles can be placed on a rack or on a cookie sheet in a preheated
oven set to 300ºF for up to 10 minutes.
Serve with maple syrup.
Makes 4 waffles.
FRENCH TOAST WAFFLES
3 eggs, slightly beaten
½ cup of milk
2 Tbsp. melted butter
1 tsp. vanilla extract
½ tsp. ground cinnamon
5 slices thick-sliced bread
Sliced bananas
Maple syrup
In a shallow baking dish, combine first 5 ingredients and whisk until blended. If
necessary, trim bread to fit the waffle iron. Dip 1 slice of bread into egg mixture and
turn it to coat both sides well.
Place bread onto center of preheated waffle plate and close the waffle maker. Wait 10
seconds, then using the cool-touch handle, turn over the waffle maker.
If making a second waffle, unlock the handle and open the second set of plates. Place
a second piece of coated bread in the second set of plates. Wait 10 seconds, then
using the cool-touch handle, turn over the waffle maker.
Cook 2-3 minutes or until the French toast waffle is golden brown.
Note: Do not open the waffle maker before the steaming subsides. If waffle is not fully
cooked, it may split and be difficult to remove.
Remove each waffle using a non-metallic spatula.
Note: Cooked French toast waffles can be placed on a rack or on a cookie sheet in a
preheated oven set to 300ºF for up to 10 minutes.
Serve topped with banana slices and maple syrup.
Makes 5 French toast waffles
11
WA RR AN T Y I N FO R M ATIO N
For service, repair or any questions regarding your appliance, call the
appropriate 800 number listed within this section. Please DO NOT return the
product to the place of purchase. Also, please DO NOT mail product back to
manufacturer, nor bring it to a service center. You may also want to consult
the website listed on the cover of this manual.
Two-Year Limited Warranty
(Applies only in the United States and Canada)
What does my warranty cover?
•Your warranty covers any defect in material or workmanship provided; however, the
liability of Spectrum Brands, Inc. will not exceed the purchase price of product.
For how long?
•Two years from the date of original purchase with proof of purchase.
What will we do to help you?
•Provide you with a reasonably similar replacement product that is either new or
factory refurbished.
How do you get service?
•Save your receipt as proof of date of sale.
•Visit the online service website at www.prodprotect.com/applica, or call toll-free
1-800-231-9786, for general warranty service.
•If you need parts or accessories, please call 1-800-738-0245.
What does your warranty not cover?
•Damage from commercial use
•Damage from misuse, abuse or neglect
•Products that have been modified in any way
•Products used or serviced outside the country of purchase
•Glass parts and other accessory items that are packed with the unit
•Shipping and handling costs associated with the replacement of the unit
•Consequential or incidental damages (Please note, however, that some states do
not allow the exclusion or limitation of consequential or incidental damages, so
this limitation may not apply to you.)
How does state law relate to this warranty?
•This warranty gives you specific legal rights. You may also have other rights that
vary from state to state or province to province.
12
Por favor lea este instructivo antes de usar el producto.
INSTRUCCIONES IMPORTANTES
DE SEGURIDAD
Cuando se utilizan aparatos eléctricos, siempre se debe respetar ciertas medidas
de seguridad a fin de reducir el riesgo de un incendio, un choque eléctrico y (o)
lesiones a las personas, incluyendo las siguientes:
•LEA TODAS LAS
INSTRUCCIONES ANTES DE
UTILIZAR EL APARATO.
•No toque superficies calientes.
Utilice mangos o perillas.
•Para protegerse contra
descargas eléctricas, no sumerja
el cable, enchufe o aparato en
agua u otro líquido.
•Todo aparato eléctrico utilizado
en la presencia de los niños
o por ellos mismos requiere
la supervisión de un adulto.
•Desenchufe el aparato del
tomacorriente cuando no esté en
uso y antes de limpiarlo. Espere
a que el aparato se enfríe antes
de instalarle o retirarle piezas y
antes de limpiarlo.
•No opere ningún aparato
eléctrico si el cable o el enchufe
está dañado, o si el aparato
funciona mal, o se ha dañado
de alguna manera. Comuníquese
con el departamento de servicio
para el consumidor para que
lo examinen, reparen o le
hagan los ajustes eléctricos o
mecánicos necesarios. También
puede llamar gratis al número
correspondiente en la cubierta
de este manual.
•El uso de accesorios no
recomendados por el fabricante
del aparato puede causar
lesiones personales.
•No utilice el aparato a la intemperie.
•No permita que el cable
cuelgue del borde de la mesa
o del mostrador ni que entre
en contacto con superficies
calientes.
•No lo coloque sobre o cerca
de una hornilla de gas o eléctrica,
ni en un horno caliente.
•Se debe ejercer extrema
precaución al mover un aparato
que contenga aceite u otros
líquidos calientes.
•No utilice el aparato para otro
fin que no sea el indicado en
este manual.
•Este aparato no está diseñado
para ser utilizado por personas
(incluyendo los niños) con su
capacidad física, sensorial o
mental reducida, o con falta de
experiencia o sabiduria, a menos
que sean supervisadas
o instruidas acerca del uso
del aparato por una persona
responsable de su seguridad.
•Los niños deben ser supervisados
para asegurar que no jueguen
con el aparato.
13
CONSERVE ESTAS INSTRUCCIONES.
Este aparato eléctrico es para uso doméstico solamente.
ENCHUFE POLARIZADO (Solamente para los modelos de 120V)
Este aparato cuenta con un enchufe polarizado (un contacto es más ancho que
el otro). A fin de reducir el riesgo de un choque eléctrico, este enchufe encaja
en un tomacorriente polarizada en un solo sentido. Si el enchufe no entra en le
tomacorriente, inviértalo y si aun así no encaja, consulte con un electricista. Por favor
no trate de alterar esta medida de seguridad.
TORNILLO DE SEGURIDAD
Advertencia: Este aparato cuenta con un tornillo de seguridad para evitar la remoción
de la cubierta exterior del mismo. A fin de reducir el riesgo de incendio o de choque
eléctrico, por favor no trate de remover la cubierta exterior. Este producto no
contiene piezas reparables por el consumidor. Toda reparación se debe llevar a cabo
únicamente por personal de servicio autorizado
CABLE ELÉCTRICO
1. El producto se debe de proporcionar con un cable eléctrico corto, a fin de reducir el
riesgo de tropezar o de enredarse en un cable más largo.
2. Cables de extensión pueden ser utilizados si se tiene el cuidado debido.
3.Si se utiliza un cable separable o de extensión,
a) El régimen nominal del cable separable o del cable de extensión debe ser, como
mínimo, igual al del régimen nominal del aparato.
b) Si el aparato es de conexión a tierra, el cable de extensión debe ser un cable de tres
alambres de conexión a tierra.
c) Uno debe de acomodar el cable más largo de manera que no cuelgue del mostrador o
de la mesa, para evitar que un niño tire del mismo o que alguien se tropiece.
Nota: Si el cordón de alimentación es dañado, por favor, póngase en contacto con el
departamento de garantía enumerado en estas instrucciones.
14
ÍN D IC E
Instrucciones Importantes de Seguridads . . . . . . . . . . . . . . . . . . . . . . . . . . . . . . . . . . 13
Conozca su Waflera . . . . . . . . . . . . . . . . . . . . . . . . . . . . . . . . . . . . . . . . . . . . . . . . . . 16
Como Usar . . . . . . . . . . . . . . . . . . . . . . . . . . . . . . . . . . . . . . . . . . . . . . . . . . . . . . . . 17
Operación de su Waflera Double Flip™ . . . . . . . . . . . . . . . . . . . . . . . . . . . . . . . . . . . . 17
Consejos Útiles . . . . . . . . . . . . . . . . . . . . . . . . . . . . . . . . . . . . . . . . . . . . . . . . . . . . . 18
Cuidado y Limpieza . . . . . . . . . . . . . . . . . . . . . . . . . . . . . . . . . . . . . . . . . . . . . . . . . . 19
Resolución de Problemas . . . . . . . . . . . . . . . . . . . . . . . . . . . . . . . . . . . . . . . . . . . . . . 20
Recetas . . . . . . . . . . . . . . . . . . . . . . . . . . . . . . . . . . . . . . . . . . . . . . . . . . . . . . . . . . . 21
Información de Garantía . . . . . . . . . . . . . . . . . . . . . . . . . . . . . . . . . . . . . . . . . . . . . . . 24
PRECAUCIÓN
ESTE HORNO SE CALIENTA CUANDO ESTÁ
EN USO. SIEMPRE USE AGARRADERAS O
GUANTES DE COCINA CUANDO TOQUE TODA
SUPERFICIE INTERNA O EXTERNA DEL HORNO.
15
CO NOZC A S U WA F L E R A
1
5
2
3
6
4
1.
4. Base de la unidad
lacas antiadherences para wafles
P
(adentro de la unidad, en ambos lados)
5. L
uces indicadoras de
funcionamiento y temperatura
(igual en ambos lados)
2. Cierre del mango
3. Mangos fríos al tacto
6. B
andeja de goteo
(pieza no. 1404S-01)
Este producto puede variar ligeramente
del que aparece ilustrado.
16
CO M O U SA R
Este aparato es para uso doméstico solamente.
PRIMEROS PASOS
•Retire todo material de empaque, cualquier etiqueta y la tira plástica alrededor
del enchufe.
•Retire y conserve la literatura.
•Por favor vaya a www.prodprotect.com/applica para registrar su garantía.
•Lave todas las piezas removibles según las intrucciones en la sección de Cuidado
y Limpieza.
•Seleccione un lugar para utilizar el aparato, dejando suficiente espacio entre la
parte posterior de la unidad y la pared para permitir que el calor fluya sin dañar
los gabinetes y las paredes.
OPERACIÓN DE SU WAFLERA DOUBLE FLIP™
DE BLACK+DECKER
1. Antes del primer uso, acondicione las placas
antiadherentes, úntandoles con un cepillo o
pasandoles una capa lígera de aceite para cocinar
(vegetal, canola o aceite de maíz) sobre toda la
superficie de cocción. Limpie el exceso de aceite con
una toalla de papel.
A
2. Gire y siga las mismas instrucciones con el otro juego
de placas; luego cierre la waflera.
3. Enchufe a un tomacorriente estándar. La luz roja
indicadora de funcionamiento (A) se iluminará y
la waflera comenzará a precalentar. La luz roja
se mantendrá iluminada hasta que la waflera es
desenchufada.
B
4. Permita que la waflera se precaliente. La luz verde
indicadora de temperatura lista (B) se iluminará
cuando el aparato esté listo para ser utilizado.
Consejo: La luz verde solo indica cuando el aparato ha
alcanzado la temperatura adecuada, no cuando el wafle
está listo. La luz se encenderá y apagará durante el ciclo
de cocción para mantener la temperatura consistente.
Nota: Durante el precalentamiento inicial, usted
podría notar humo y un ligero olor. Esto es normal y
no es motivo de preocupación.
5. Una vez que la waflera se haya precalentado, ábrala
tirando del cierre del mango hacia la posición de abierto
(C). Alce el mango frío al tacto. Vierta un aproximado de
¾ de taza de la mezcla en el centro de la placa inferior.
17
C
6. Cierre la waflera con el mango frío al tacto pero no la
fuerce para cerrarla. Cierre el mango presionando el
cierre. (D)
D
7. Espere aproximadamente 10 segundos y luego gire el
mango frío al tacto hasta que la waflera quede con la
parte superior mirando hacia abajo. (E)
8. Si va a preparar solo un wafle, proceda al paso 11. Si
va a preparar un segundo wafle, abra el mango (C)
y luego abra el segundo juego de placas. Vierta un
aproximado de ¾ de taza de la mezcla en el centro de
la placa.
9. Cierre la waflera con el mango frío al tacto pero no la
fuerce para cerrarla. Cierre el mango presionando el
cierre. (D)
E
10.Espere aproximadamente 10 segundos y luego gire el
mango frío al tacto hasta que la waflera quede con la
parte superior mirando hacia arriba.
11. Permita que los wafle(s) se cocinen hasta que
el vapor se reduzca, aproximadamente de 3 a 4
minutos. Para lograr wafles más crujientes, extienda
el tiempo de cocción 1 a 2 minutos adicionales.
Siga las instrucciones de la
flecha para girar la waflera.
Nota: Evite abrir la unidad durante el ciclo de cocción. Esto puede causar que el
wafle se pegue o que no se cocine bien.
12. Cuando el ciclo de cocción termine, gire la waflera, abra el mango y retire el
primer wafle. Si cocinó dos wafles: cierre el mango, gire la waflera, abra el
mango, abra la waflera y retire el segundo wafle.
Nota: Solo utilice utensilios antidaherentes, resistentes al calor para retirar
los wafles. NO Utilice utensilios de metal, ya que estos pueden dañar el
revestimiento antiadherente.
13. Cuando termine, desenchufe la waflera y permita que se enfrie completamente
antes de limpiar y almacenarla.
CONSEJOS ÚTILES
•Los wafles cocinados se congelan bien. Cuando se hayan enfriado a una
temperatura ambiente, simplemente envuelva cada uno individualmente en una
envoltura de plástico o colóquelos en una bolsa para el congelador y sellela
herméticamente. Los wafles pueden mantenerse congelados por varios meses.
•Las mezclas para panqueques de paquete, incluyendo las de harina integral, hacen
wafles deliciosos. Siga la instrucciones indicadas en el paquete para hacer wafles.
•No utilice agua para limpiar las placas antiadherentes para wafles. Simplemente
permita que se enfrien y utilice un cepillo para remover cualquier migaja que
haya quedado en las ranuras. Los hisopos de algodón son útiles para limpiar
entre las ranuras.
18
•Para wafles más ligeros, separe los huevos y bata la claras hasta que formen unas
puntas suaves e incorpore en la mezcla justo antes de cocinar los wafles.
•Los wafles se pueden mantener calientes colocándolos sobre una parrilla o una
bandeja para hornear galleticas dentro de un horno precalentado a 300°F por
hasta 10 minutos.
•Nunca apile los wafles. Esto hará que la textura se mantenga húmeda.
•Para recalentar los wafles, utilice su horno tostador precalentado y ajuste la
temperatura a 350°F por alrededor de 5 minutos.
•¿Va a utilizar una mezcla para wafles de paquete? ¡Hágala más excitante! Justo
antes de cocinar, añada y revuelva dentro de la mezcla:
Plátano aplastado
Nueces, nueces macadamia, almendras tostadas o pacanas picadas
Frutas cortadas en cubitos, tales como las manzanas, los duraznos
o frutos del bosque (berries)
C UIDA D O Y L I M P IE ZA
Este producto no contiene piezas que deban ser reparadas por el usuario.
Si necesita servicio, acuda a personal de servicio calificado.
LIMPIEZA
Importante: Antes de limpiar cualquier pieza, asegúrese de que la waflera
esté apagada, desenchufada y fría.
1.
segúrese de que la unidad esté desenchufada y de que la waflera se haya
A
enfriado completamente antes de limpiarla.
2. Limpie las superficies de cocción con una esponja o pano húmedo.
3. P
ara remover remanentes de comida cocinada que se ha pegado, utilice un
cepillo de cerdas plásticas o una almohadilla de malla de nylon. Asegúrese de
limpiar los mangos después de cada uso. No utilice esponjas de acero u otros
limpiadores abrasivos en las superficies de cocción ya que estos pueden dañar
el revestimiento antiadherente.
4. L
impie las superficies exteriores con una esponja jabonosa o un paño húmedo.
Seque por completo con un paño suave. No utilice limpiadores abrasivos.
ALMACENAMIENTO
Asegúrese de que el aparato esté completamente seco. Nunca enrolle el cable
ajustado alrededor del aparato; mantengalo enrollado holgadamente.
19
RE SOLUC I Ó N DE P R O B LE MAS
PROBLEMA
CAUSA POSIBLE
SOLUCIÓN
La waflera no se enciende.
La waflera no está
enchufada.
Verifique que la waflera
está enchufada a un
tomacorriente que
funciona.
Los wafles cocinados están finos o desnivelados.
La waflera no se giró
durante la cocción.
Diez segundos después
que la waflera comience a
cocinar, gírela.
Los wafles están demasiado claros.
Los wafles pueden
no haberse cocinado
completamente.
El tiempo de cocción
para los wafles variará
dependiendo de
los ingredientes, la
temperatura y la cantidad
de mezcla utilizada.
Cocine por más tiempo, si
es necesario.
Los wafles están demasiado oscuros.
Los wafles pueden
haberse cocinado
demasiado tiempo.
Las mezclas que
contienen una alta
cantidad de azúcar o
frutas pueden tender
a cocinar más oscuro.
Cocine por un período de
tiempo más corto.
La luz indicadora de
temperatura lista (verde)
se enciende y se apaga.
La waflera está en el ciclo
de temperatura.
Esto es normal. La luz
indicadora de temperatura
lista muestra que las
placas están en la
temperatura de cocción
adecuada. Esta luz no es
una indicación de que los
wafles están cocinados
completamente.
Los wafles se están
pegando
Las placas no están
acondicionadas
adecuadamente.
Las placas pueden no
estar acondicionadas
completamente. Únteles
aceite utilizando un cepillo.
Si necesita asistencia adicional, favor the ponerse en contacto con nuestro
equipo de servicio al consumidor llamando al número
1-800-231-9786.
20
RE C E TAS
WAFLES CON FRAMBUESAS Y ALMENDRAS
2 tazas de harina común cernida
½ taza de almendras tostadas, molidas finitas
1 cucharada de polvo de hornear
½ cucharadita de sal
3 huevos, separados
1¾ tazas de leche
2 cucharadas de aceite vegetal
1 cucharadita de cáscara de naranja rallada
1 cucharadita de extracto de limón
3 cucharaditas de azúcar
1 pinta de frambuesas
Azúcar en polvo
Sirope de arce (maple)
En un recipiente grande, combine la harina, las almendras, el polvo de hornear y la sal.
En un segundo recipiente, bata las yemas de huevo hasta que estén bien mezcladas;
mezcle la leche, el aceite vegetal, la cáscara de naranja y el extracto de limón. Vierta
sobre la mezcla de harina y revuelva hasta que todos los ingredientes estén bien
mezclados. Deje a un lado.
Bata las claras de huevo hasta que estén espumosas, añada azucar poco a poco y
continue batiendo hasta que se formen picos duros. Incorpore poco a poco en la
mezcla.
Vierta un aproximado de ¾ de taza de la mezcla en el centro de la placa precalentada.
Cierre la waflera y asegure el mango.
Espere 10 minutos, luego utilizando el mango frío al tacto, gire la waflera.
Si va a preparar un segundo wafle, libere el cierre del mango frío al tacto y abra el
segundo juego de placas. Vierta un aproximado de ¾ de taza de la mezcla en el
centro de la placa inferior. Espere 10 segundos, luego utilizando el mango frío al tacto,
gire la waflera.
Cocine 3 a 4 minutos o hasta que el vapor se reduzca..
Nota: No abra la waflera antes de que el vapor se reduzca. Si el wafle no está
cocinado completamente, este puede separarse y hacer que se dificulte el retirarlo.
Retire cada wafle utilizando una espátula que no sea de metal.
Sirva los wafles con frambuesas por encima y espolvoreados con azúcar en polvo.
Cierre la waflera y espere a que la luz indicadora de temperatura lista se ilumine.
Repita el proceso con la mezcla restante.
Nota: Los wafles cocinados pueden colocarse en una parrilla o en una bandeja para
hacer galleticas, dentro de un horno precalentado a 300˚ F por 10 minutos.
Sirva con sirope de arce (maple).
Rinde 6 wafles.
21
WAFLES DE TOCINO Y NARANJA
2 tazas de mezcla para panqueques
4 rebanadas de tocino, cocinado y desmoronado
1 taza de leche
1
/3 de taza de jugo de naranja fresco
1 huevo
2 cucharadas de caldo del tocino o aceite vegetal
1 cucharadita de cáscara de naranja rallada
1 cucharadita de extracto de vainilla
En un recipiente grande, combine todos los ingredientes y revuelva hasta que estén
mezclados. Vierta aproximadamente ¾ de taza de la mezcla sobre el centro de la
placa para wafles precalentada y cierre la waflera. Asegure el mango.
Espere 10 segundos, luego utilizando el mango frío al tacto, gire la waflera.
Si va a preparar un segundo wafle, abra el cierre del mango frío al tacto y abra el segundo
juego de placas. Vierta un aproximado de ¾ de taza de la mezcla en el centro de la placa
inferior. Espere 10 segundos, luego utilizando el mango frío al tacto, gire la waflera.
Cocine 3 a 4 minutos o hasta que el vapor se reduzca.
Nota: No abra la waflera antes de que el vapor se reduzca. Si el wafle no está
cocinado completamente, este puede separarse y hacer que se dificulte el retirarlo.
Retire cada wafle con un espátula que no sea de metal..
Nota: Los wafles cocinados pueden colocarse en una parrilla o en una bandeja para
hacer galleticas, dentro de un horno precalentado a 300ºF por 10 minutos.
Sirva con sirope de arce (maple).
Rinde 6 wafles.
22
WAFLES ESTILO TOSTADAS A LA FRANCESCA
3 huevos, batidos ligeramente
½ taza de leche
2 cucharadas de mantequilla derretida
1 cucharadita de extracto de vainilla
1 cucharadita de canela molida
5 rebanadas de pan, gruesas
Plátanos en rebanadas
Sirope de arce (maple)
En una bandeja llana, combine los primeros 5 ingredientes y bátalos hasta que estén
mezclados. Si es necesario, recorte el pan para acomodarlo en la placa.
Sumerja 1 rebanada de pan en la mezcla de huevo y voltee para cubrir bien por ambos lados.
Coloque el pan en el centro de la placa precalentada y cierre la waflera. Espere 10
segundos, luego utilizando el mango frío al tacto, gire la waflera.
Si va a preparar un segundo wafle, libere el cierre del mango y abra el segundo juego
de placas. Coloque una segunda rebanada de pan cubierta con la mezcla de huevo
en la placa del segundo juego. Espere 10 segundos, luego utilizando el mango frío al
tacto, gire la waflera.
Cocine 2 a 3 minutos o hasta que el wafle esté dorado.
Nota: No abra la waflera antes de que el vapor se reduzca. Si el wafle no está cocinado
completamente, este puede separarse y hacer que se dificulte el retirarlo.
Retire cada wafle utilizando una espátula que no sea de metal.
Nota: No abra la waflera antes de que el vapor se reduzca. Si el wafle no está cocinado
completamente, este puede separarse y hacer que se dificulte el retirarlo.
Retire cada wafle utilizando una espátula que no sea de metal.
Nota: Wafles estilo tostadas a la francesca cocinados pueden colocarse en una parrilla o
en una bandeja para hacer galleticas, dentro de un horno precalentado a 300˚F por 10
minutos.
Sirva con rebanadas de platano por encima y sirope de arce (maple).
Rinde 5 wafles estilo tostadas a la francesa.
23
INFOR M AC I ÓN DE GA R A N TÍA
Para servicio, reparaciones o preguntas relacionadas al producto, por favor
llame al número del centro de servicio que se indica para el país donde
usted compró su producto. NO devuélva el producto al fabricante. Llame o
lleve el producto a un centro de servicio autorizado.
Dos Años de Garantía Limitada
(Solamente aplica en los Estados Unidos y el Canadá).
¿Qué cubre la garantía?
•La garantía cubre cualquier defecto de materiales o de mano de obra que no haya
sido generado por el uso incorrecto del producto.
¿Por cuánto tiempo es válida la garantía?
•Por dos años a partir de la fecha original de compra mientras que tenga una
prueba de la compra.
¿Cómo se obtiene el servicio necesario?
•Conserve el recibo original como comprobante de la fecha de compra,
comuníquese con el centro de servicio de su país y haga efectiva su garantía si
cumple lo indicado en el manual de instrucciones.
¿Cómo se puede obtener servicio?
•Conserve el recibo original de compra.
•Para servicio al cliente y para registrar su garantía, visite
www.prodprotect.com/applica, o llame al número 1-800-231-9786,
para servicio al cliente
•Por favor llame al número del centro de servicio autorizado. 1-800-738-0245.
¿Qué aspectos no cubre esta garantía?
•Los productos que han sido utilizados en condiciones distintas a las normales.
•Los daños ocasionados por el mal uso, el abuso o negligencia.
•Los productos que han sido alterados de alguna manera.
•Los daños ocasionados por el uso comercial del producto.
•Los productos utilizados o reparados fuera del país original de compra.
•Las piezas de vidrio y demás accesorios empacados con el aparato.
•Los gastos de tramitación y embarque asociados al reemplazo del producto.
•Los daños y perjuicios indirectos o incidentales.
¿Qué relación tiene la ley estatal con esta garantía?
•Esta garantía le otorga derechos legales específicos y el consumidor podría
tener otros derechos que varían de una región a otra.
24
PÓ L IZ A D E G AR A N TÍA
(Válida sólo para México)
DURACIÓN
Rayovac de México SA de CV garantiza este producto por 2 años a partir de
la fecha original de compra.
¿Qué cubre esta garantía?
•Esta Garantía cubre cualquier defecto que presenten las piezas,
componentes y la mano de obra contenidas en este producto.
•Requisitos para hacer válida la garantía
•Para reclamar su Garantía deberá presentar al Centro de Servicio Autorizado
la póliza sellada por el establecimiento en donde adquirió el producto. Si no
la tiene, podrá presentar el comprobante de compra original.
¿Donde hago válida la garantía?
•Llame sin costo al teléfono 01 800 714 2503, para ubicar el Centro de
Servicio Autorizado más cercano a su domicilio en donde usted podrá
encontrar partes, componentes, consumibles y accesorios.
Procedimiento para hacer válida la garantía
Acuda al Centro de Servicio Autorizado con el producto con la póliza de
Garantía sellada o el comprobante de compra original, ahí se reemplazará
cualquier pieza o componente defectuoso sin cargo alguno para el usuario
final. Esta Garantía incluye los gastos de transportación que se deriven de su
cumplimiento.
Excepciones
Esta Garantía no será válida cuando el producto:
A) Se hubiese utilizado en condiciones distintas a las normales.
B) No hubiese sido operado de acuerdo con el instructivo de uso
que le acompaña.
C) Cuando el producto hubiese sido alterado o reparado por personas
no autorizadas por Rayovac de México SA de CV.
Nota: Usted podra encontrar partes, componentes, consumibles y
accesorios en los centros de servicios autorizados. Esta garantía incluyen los
gastos de transportación que se deriven de sus cumplimiento dentro de sus
red de servicio.
25
Por favor llame al número correspondiente que aparece en la lista a continuación para solicitar
que se haga efectiva la garantía y donde Ud. puede solicitar servicio, reparaciones o partes en
el país donde el producto fué comprado.
Argentina
Servicio Técnico
Monroe 3351
CABA Argentina
Tel: 0800 – 444 - 7296
[email protected]
México
Articulo 123 # 95 Local 109 y 112
Col. Centro, Cuauhtemoc,
México, D.F.
Tel. 01 800 714 2503
Nicaragua
ServiTotal
De semáforo de portezuelo
500 metros al sur.
Managua, Nicaragua,
Tel. (505) 248-7001
Chile
SERVICIO DE MAQUINAS Y HERRAMIENTAS
LTDA.
Portugal Nº 644
Santiago – Chile
Fonos: 02-6355208 / 02-6341169
Email: [email protected]
Call center: 800-171-051
Panamá
Servicios Técnicos CAPRI
Tumbamuerto Boulevard
El Dorado Panamá
500 metros al sur.
Tel. 3020-480-800 sin costo
(507) 2360-236 / 159
Colombia
Rayovac Varta S.A
Carrera 17 Número 89-40
Línea gratuita nacional
Tel. 018000510012
Perú
Servicio Central Fast Service
Av. Angamos Este 2431
San Borja, Lima Perú
Tel. (511) 2251 388
Costa Rica
Aplicaciones Electromecanicas, S.A.
Calle 26 Bis y Ave. 3
San Jose, Costa Rica
Tel. (506) 257-5716 / 223-0136
[email protected]
Puerto Rico
Buckeye Service
Jesús P. Piñero #1013
Puerto Nuevo, SJ PR 00920
Tel.: (787) 782-6175
Ecuador
SERVICIO MASTER ECUADOR
ALMERIA N50-71 Y DE LOS ALAMOS
Tel. (593) 2281-3882 / 2240-9870
Republica Dominicana
Prolongación Av. Rómulo Betancourt
Zona Industrial de Herrera
Santo Domingo, República Dominicana
Tel.: (809) 530-5409
El Salvador
Calle San Antonio Abad 2936
San Salvador, El Salvador
Tel. (503) 2284-8374
Guatemala
MacPartes SA
3ª Calle 414 Zona 9
Frente a Tecun
Tel. (502) 2331-5020 / 2332-2101
Venezuela
Inversiones BDR CA
Av. Casanova C.C.
City Market Nivel Plaza Local 153
Diagonal Hotel Melia,
Caracas.
Tel. (582) 324-0969
Honduras
ServiTotal
Contigua a Telecentro
Tegucigalpa, Honduras,
Tel. (504) 235-6271
www.applicaservice.com
[email protected]
26
Sello del Distribuidor:
Código de fecha / Date Code / Le code de date:
Fecha de compra:
Modelo:
WMD200B - 1200 W 120 V ~ 60 HZ
Comercializado por:
Rayovac de México S.A de C.V
Autopista México Querétaro
No 3069-C Oficina 004
Colonia San Andrés Atenco, Tlalnepantla
Estado de México, C.P. 54040
Mexico.
Tel: (55) 5831 – 7070
Servicio y Reparación
Art. 123 No. 95
Col. Centro, C.P. 06050
Deleg. Cuauhtemoc
Servicio al Consumidor,
Venta de Refacciones y Accesorios
01 800 714 2503
Importado por / Imported by:
RAYOVAC ARGENTINA S.R.L.
Humboldt 2495 Piso# 3
(C1425FUG) C.A.B.A. Argentina.
C.U.I.T No. 30-70706168-1
Importado por / Imported by:
Rayovac de México S.A de C.V
Autopista México Querétaro
No 3069-C Oficina 004
Colonia San Andrés Atenco, Tlalnepantla
Estado de México, C.P. 54040
Mexico.
Tel: (55) 5831-7070
Para atención de garantía marque:
01 (800) 714 2503
BLACK+DECKER and the BLACK+DECKER Logo are
registered trademarks of The Black & Decker Corporation,
or one of its affiliates, and used under license.
Made and printed in
People’s Republic of China
BLACK+DECKER y el logo BLACK+DECKER son marcas
registradas de The Black & Decker Corporation o de una de
sus compañias afiliadas y se utilizan bajo licencia.
Fabricado e Impreso en
la República Popular de China
Le nom et le logo BLACK+DECKER sont des
marques déposées de The Black & Decker Corporation,
ou une de ses sociétés affiliées, et sont utilisés sous licence.
Fabriqué et Imprimé en
République populaire de Chine.
T22-5001564
27
www.BlackAndDeckerAppliances.com
© 2015 The Black & Decker Corporation and Spectrum Brands, Inc.Middleton, WI 53562
11747-01
28