Transcript
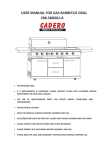
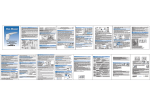
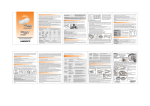
Electronica/Electronic
Multitemperaturas/Multitemperatures
Read carefully all installation instructions before installing the product. Keep this
manual for further reference in case needed. The installation of this product must be
done by a professional. This profesional is responsible for installation and standards
observations for your country.
Never connect devices or accessories that are not indicated in this manual. Do not
install the product in the exposed weather.
This product was developed to operate with water previously treated by the public
supplier .
The product may heat the water at a temperature above than the adequate one for
use.
Children and elderly, sick, physically or mentally ill people must be supervised if they
need to use the product, for this, regulate the temperature appropriately.
3 - Características Técnicas/ Technical Characteristics
Especificación/Specification
Modelo/Model
Tensión (V~)
Desconectado/OFF
Grado de protección/Protection degree: IP24
Ducha Jet Control *
220
127
0
0
0
0
0
Selector
Temperatura
1800
**2400
**2400
**2600
Potencia
Multitemperaturas
(Watios)
4400
4400
4400
**3200
Temperatura Selector
Power
Multitemperatures
5500
6800
5500
4500
(Watts) Seletor Temperatura
**2250
**2550
MIN
Electrónico
Electronic
7500
5500
MAX.
Temperature selector
40
50
30
35
40
Disyuntor /Circuit Breakers( Amperios/Ampers)
2
6
10
6
6
4
Cables / Wires (mm )***
Manual de Instrucciones
de Instalación
Installation Instruction Manual
Conexión Hidráulica
Hidraulic Connection
Conexión Eléctrica
Electric Connection
06
Despues que la consola de la ducha este devidamente colocada, alinie el producto en
sentido vertical (Fig. 10)
Marque el lugar exacto de la perforación en la pared con relación al lugar del tornillo,
localizado en la base de la consola de la ducha (Fig. 10)
Mueva la consola de la ducha solamente para la izquierda para ejecutar la perforación y
la colocación del manguito en la pared (Fig.11)
ATENCION: Certifiquese de la localización de los caños de agua empotrados en la
pared para que sean perforados.
Para perforar la pared use broca de 5mm.
Regrese la consola de la ducha a la posición vertical y fije el tornillo en su lugar.
After placed of the console, align the product at the vertically position (Fig. 10)
Mark the exact location to perforate the wall in relation of the screw’s place in the
base of the console(Fig. 10)
Move the console of the shower only by left direction for drilling and placement of the
sleeve in the wall (Fig.11)
ATTENTION: Certify the location of water pipes in the wall to be drilled.
Use a 5mm drill screwdriver to perforate the wall.
Return the console of the shower to the upright position and place the screw.
6
10
(AWG)***
10
Presión de funcionamiento Mínima/Minimum
Working Pressure
Máxima/Maximum
8
Entrada de agua - Rosca ½” BSP/ Water Inlet - Thread ½"BSP
Cables blanco - Fase/Fase - Fase /Neutro
Withe Wire - Phase/Phase - Phase / Neutral
Cable verde / amarillo - Puesta a tierra
Wire Green/Yellow - Grounding wire
07
7 - Instalación y funcionamiento de la ducha manual/ Shower hand, working and installation
Place the hose into the terminal, at the product
below. (Pic. 12).
Place the hose into the console at shower
head (Pic. 12).
Place the hand shower on the other end of the
hose and place the console of the shower (Pic.
12).
Para abrir la ducha manual, agarre la
manguera y estire la ducha.
Para cerrar la ducha manual, empuje la
ducha para junto de la manguera Fig.
13).
Jet Control
ELETRÔNICA
12
Terminal
manguera
Hose
Terminal
11
10
ELETRÔNICA
Jet Control
ELETRÔNICA
Ducha Manual
Hand Shower
Soporte
consola
de la ducha
Shower
support
console
Cerrado hose Fig. 13.)
Closed
Manguera
Hose
8 - Instalación Eléctrica/ Electric Installation
vertical
14
Lugar del tornillo
Screw place
Consola de ducha
Shower consola
13 cm
Alineamción/Align
Abierto
Open
l
tro
Con
S
PERATURA
Jet
MULTITEM
Certifiquese de que la
tensión (voltaje) de su
producto corresponda a
la tensión (voltaje) de la
red eléctica (127V~ o
220V~) (fig.: 01).
Barra
Neutro
Neutral
bar
Tanque
Reservoir
Barra Tierra02
Earth Bar
m.c.a.
w.m.c.
Product
Make sure that the voltage of the shower head is adequate to the voltage of the
line which comes from the main switchboard (110V~ or 220V~) (Pic. 01)
Capa
Cover
La altura del punto de salida del agua (donde está instalada la ducha) hasta el piso
del box o de la bañadera debe ser 2 metros, aproximadamente (Fig. 03).
Verifique si la salida del agua de ½" (pulgada) BSP está nivelada con el azulejo. En el
caso que esté más de 3mm para adentro, use un prolongador de hierro galvanizado,
latón o plástico. Este prolongador no acompaña la ducha (Figura 4). En el caso de
que la cañería no coincida con la rosca de ½" BSP, use un adaptador (Figura 5). Este
adaptador no acompaña la ducha.
1 - Pele las puntas de los cables, teniendo como medida la largura de las hendiduras del conector.
(Fig. 15);
2 - Sin torcer los cables, introduzcalos firmemente dentro del conector.
3 - Mantenga los cables firmemente y gire el conector en sentido horario hasta que los cables estén
firmes.
.
1 - Peel the end of the cable taking as measure
the lenght of the splits of the connector (Pic24)
2 - Without twisting the cables, insert them firmly
into the connector.
3 - Mould the cables and turn the connector to the
closkwise direction to have firm cables.
En el caso de nuevas construcciones, providencie una caja
de derivación a 13 cm de distancia, arriba de la salida del
agua (Fig. 14). Desconecte el disyuntor del circuito que
alimentará su ducha. Conecte los cables de conexión de la
ducha a los cables de la red eléctrica, usando conectores
suministrados con el producto, para garantizar una perfecta
conexión, conforme orientaciones de conexiones eléctricas
de la tabla de caracteritíscas técnicas (item3) y de las
instrucciones a seguir:
2
Hendiduras/Split
3
3
15
IMPORTANTE: No use ningún tipo de enchufe o toma para instalación de éste
producto.
No altere el regulaje de los contacto del producto, pues le garantizan el
funcionamiento seguro del aparato.
IMPORTANT: Do not use any type of plugs to install the product. Do not alter the
regulation of the contacts, because they assure a safety operation of the product.
Producto
Product
Presión
minima
Minimum
pressure
Revestimiento
Covering
Presión
maxima
Maximum
pressure
Revestimiento
Covering
Before installing the product, open the
register and let water flow to remove all
dirt in the pipe, close the registry. The
product allows direct installation to the
Teflon
Sealing tape water outlet of ½". For installation of the
shower the water outlet should be at
Reductor de
most to 8mm distant from the tile.
presión
Pressure reducer
Posicione la tecla selectora CONECT/DESC
en la posición conecta (Fig.:16).
Para el producto entrar en funcionamiento,
abra el registro de agua. El accionamiento es
automático.
Put the selector key ON/OFF at the ON position
(Pic 16).
Open the water valve, the product will turn
automatically ON.
Tecla CONEC/DESC - ON/OFF Button
16
Conecte/ON
Jet
Consola de
ducha
Shower console
11 - Control de temperatura/ Temperature Control
Jet Control
Electronica
Electronic
Tecla Seletora
Temperaturas
Temperature
Selector
17
07
Cabo de
comando
Command
cable
Encajar/Fit
Encajar/Fit
Chorro
multidirecional
Multidirectional
Flow
Alojamientos
Places
Terminal del cabo
de comando
Command
cable terminal
Encajar/Fit
Enca
jar/
Fit
Encajar/Fit
Base del producto
Product Base
IMPORTANTE: Haga correr agua por el producto antes de hacer la conexión a
la red eléctrica, para llenar la cámara de calentamiento de agua y para que no
ocurra la quema de la resistencia.
Verifique si hay alguna perdida de agua y luego cierre el registro de agua.
Atención: Repita esta operación siempre que el prodcuto es retirado por algún
motivo.
IMPORTANT: Before connecting the shower head to the electrical system, let
the water flow through the shower for some minutes in order to fill the heating
chamber and avoid burning the heating element.
While water runs through the unit check for any leakage points and then close the
water valve.
Atention: Repeat this operation always why the product is removed from the wall.
10
12- Economizando energia/ Energy economizing
En dias más calientes, éste producto le permite una gran economía de energía
eléctrica. Para ésto, gire el selector de temperaturas para una posición de menor
calentamiento y regule la temperatura del agua a través del registro.
In warms days. this product allows big savings on electrical energy. For this turn the
temperature button to the lower heating position and regulate the temperature
through the water main register
08
Enca
jar/
Fit
09
Consola de la
ducha
Shower console
15 - EVENTUALES PROBLEMAS Y RESPECTIVAS SOLUCIONES
FREQUENT QUESTIONS AND ANSWERS
Observe el cuadro abajo antes de solicitar ayuda tecnica.
Read the table below, before calling technical support.
Problema/Problem
El producto no
conecta al abrir
el registro
It does not
connect
No sale agua
por el producto
The water does
not flow from
the product
14 - Limpieza y mantenimiento/ Cleaning and Maintenance
Antes de iniciar la limpieza del producto, desconecte el disyuntor.
Use solamente paño humedo para la limpieza. El uso de producto abrasivos o
solventes dañan el producto.
Para la limpieza del esparcidor, use un cepillo para retirar los resíduos. Certifíquese
de la limpieza total, observando la desobstrucción de todos los orificios, lo que le
proporcionará un baño más agradable.
Suciedades y resíduos que el agua trae pueden perjudicar el funcionamiento de este
producto. Si el agua suministrada presenta tales características, providencie la
instalación de dispositivos / filtros (consulte la línea Loren Aqua Lorenzetti) que
evitan que suciedades y residuos lleguen hasta el producto. Ceritifíquese de que
estos dispositivos no comprometan la presión míinima de funcionamiento.
En caso de dudas, contacte el distribuidor en su ciudad.
Before cleaning the product, disconnect the circuit breaker or fuse key in the main
switchboard from the circuit which the shower head is installed.
Use a damp cloth only for cleaning, chemical products may damage the product.
During cleaning process, to not careful not to lean in the shower head neither to harm
the product.
Use a brush to clean the spreader. Solid particles in the water may harm the product
functioning. If the water supplied to this equipment presents such charactertistics,
provide the installation of filters/ devices (consult at Lorenzetti’s Loren Acqua Line)
that retain its entre to this equipment. Check that these devices do not jeopardize the
minimum working pressure of this product.
Doubts, please contact the distributor in your city.
Gire la consola de la ducha y visualize los
alojamientos en la parte trasera. (Fig. 07).
Coloque el cable de comando en los respectivos
lugares (Fig. 07).
Certifíquese de que el terminal del cabo de
comando esté debidamente colocado.(Fig. 08).
Turn the console of the shower and check the
accommodations of the behind (Pic.07)
Place the cable of command inside the respective
places (Pic.07)
Be certified that the terminal of the end of command
this place
Jet Control
Jet Control
Multitemperatures
Electronic
Gire la consola de la ducha, visualizando su parte frontal. (Fig. 09).
Conecte la consola de la ducha en la base del producto y empujelo en la dirección de la
pared. (Fig. 09).
Turn the console of the shower, viewing his frontal part (Pic.09)
Connect the console of the shower on the product base and push to the direction of the
wall. (Pic.09)
rol
rol
CA
13 - Chorro inteligente y multidireccional/ Multidirectional and and inteligent jet
MULTITEMPERATURAS
Si prefiere mayor o menor calentamiento, coloque la tecla selectora de temperatuas en
la posición que más le agrade (Fig.:17).
La temperatura de salida del agua tambien puede ser regulada a través del registro de
agua, aumentando o disminuyendo el flujo.
To change the power rating, place the temperature selector at the position desired.
The water temperture can also be controlled by the water valve.
Jet Control
Multitemperaturas
Multitemperatures
Cont
CA
ELETRÔNI
Cont
ELETRÔNI
Para terminar con aquellas gotas inconvenientes cuando use la duchita manual,
Lorenzetti creó el chorro inteligente.
Es normal, despues de cerrar el registro del agua o la apertura de la ducha manual,
escurrir algunas gotas por algunos segundos, hasta que toda el agua del interior del
chorro multidirecctional escurra.
To stop those inconvenients drops when the hand shower is operating, Lorenzetti has
created the smart jet. Water may continue dropping after the water valve is closed or the
hand shower is open due to an excess of water in the multidirection jet.
Jet Control
05
6 - Fijación de la consola de la ducha/ Cosole fixing shower
Consola de la
ducha
Shower
Console
06
05
Capa
Cover
Jet
09
10 - Utilización/ Usage
Conecte el disyuntor del cuadro de distribución en que está conectada la ducha
Turn on the circuit breaker or fuse of the main switchboard where the shower head
unit is connected.
9 - Puesta a tierra/ Grounding wire
IMPORTANTE PARA SU SEGURIDAD:
Para que no haya riesgos de choques eléctricos, conecte el cable de tierra (verde o
verde/amarillo) de éste producto a un sistema de puesta a tierra eficaz.
Se recomienda que la instalación eléctrica y el sistema de puesta tierra de éste
aparato se realizen por una persona calificada.
No use el cable de tierra como neutro.
El sistema de puesta a tierra le garantiza seguridad durante la utilización de aparatos
electrodomésticos. No use el cable neutro como puesta a tierra.
IMPORTANT FOR YOUR SAFETY:
In order to avoid the risk of electric shocks, make sure to connect the grounding
(green or green/yellow) wire from the product to a grounding system. For a maximum
efficiency the electrical system and grounding system should be done by a qualified
professional.
Do not use the grounding wire as a neutral system.
The grounding system guarantees your safety while home appliances are used.
Do not use the neutral wire to the grounding system.
Pero, si la columna de agua esta entre 8 m.c.a. y 40 m.c.a. o entrada de agua proveniente de la
calle (distribuidora), será necesário mantener el reductor de presión en el niple de entrada de
agua del producto ( fig.:04 ).
Use teflon en el niple de entrada de agua de la Ducha (fig.:04).
Sostenga la consola de la ducha y el revestimiento juntamente con la capa del producto e instale
girándola con suavidad sin usar herramientas. (fig.:05).
No usar el chorro multidirecional como palanca para instalar el producto (fig.:06).
However, if the water column is between 8 w.m.c and 40 m.w.c. or the water comes from the
street (distributor), you must keep the pressure reducer in the water inlet nipple of the product
(Pic: 04).
Use thread sealing tape over the nipple of the water inlet (Pic.: 04).
Hold the console shower and finish with the cover and install the product by turning it soflty
without using tools (Pic.: 05).
Do not use the multidirectional jet as a lever it to install the product (Pic: 06.)
04
08
04
The water column until the point of installing of the product must be at least 1 m.w.c and a
maximum of 40 m.w.c. (Meters water column)(Pic 03).
Verify if the water outlet of 1/2” is in the same level of the wall. If it is located at a
level above 3mm inwards, use a galvanized iron, brass or plastic prolonguer.
This prolonguer is not supplied with the shower head. If the pipe does not match
the 1/2” thread, use an adaptor which is not supplied.
Open the water valve and let the water flow through the tube to remove the dirt.
Use sealing tape over all threads.(Pic 04) For pressure smaller than 8 meters
(80kPa or 11,6psi), remove the pressure reducer that comes along with the
product. (Pic 04)
5 - Instalación hidráulica/ Hidraulic Installation
In the case of new installation , provide a derivation box from 13 cm distant above the water
outlet (Pic. 14).
Turn off the main switch or circuit breaker that feeds your shower install.
Connect the cables of the shower head using the connectors supplied with the product, to
assure a perfect connection, according to a guidance of technical characteristics table (item 3)
and instructions as follow:
La columna de agua hasta el punto de instalación del producto debe ser como mínimo de 1 m.c.a.
y como máximo de 40 m.c.a. (metro de columna de agua) (fig.:03).
Caso la cañeria no coincida con la rosca de 1/2” BSP, use una empaquetadura de reducción.
Esta empaquetadura no acompaña la ducha.
Abra el registro y deje correr bastante agua para retirar las suciedades de la cañeria.
Use cinta veda rosca en las conexiones. (Fig. 04). Retire el reductor de presión (Fig. 04)
cuando la altura del reservatório de agua hasta el punto de instalación del producto es menor
que 8 mca(80kPa or 11,6psi), o cuando el agua es de un reservatório.
Verifique o providencie una línea directa exclusiva del cuadro de distribución(fig.:02),
usando condutores (cables) y protección (disyuntor o fusible), considerando los
valores de tensión, potencia y la distancia del grifo hasta el cuadro de distribución,
conforme tabla de Características Técnicas.
Use disyuntor bipolar para 220V~(fase/fase) y disyuntor unipolar en el conductor fase
para 127V~ y 220V~(fase/neutro).
Desconecte el disyuntor del cuadro de distribución de energia eléctrica del circuito en
el cual será instalado el producto, antes de iniciar la instalación.
IMPORTANTE: Este producto puede ser usado en circuitos con Dispositivo Diferencial
Residual (DR) para una resistividad mínima de 2.950 ohms x cm.
Verify and provide an exclusive direct line from the switchboard (Pict 2), using
conductors (wires) and appropriate circuit breaker or fuse, considering the tension,
power rating and distance from the tap, according to the table of Technical
Characteristics.
Use two pole circuit breaker for 220V~(phase /phase) and a single pole circuit breaker
in the phase conductor for 127V~and 220V~(Phase/neutral). Disconnector the circuit
breaker at the main electric switchboard where the product will be installed, before
starting the installation.
IMPORTANT: This product can be used by circuits with Differential Residual
Dispositive (DR) for a minimum resistivity of water of 2.850 ohms x cm.
1
Manguera
Hose
To open the hand shower, hold the hose and pull
the shower.
To close the hand shower, push it closer by the
Ducha
Manual
Hand
Shower
01
Conector/Connector
13
Jet Control
127V~
220V~
03
The height from the water exit where the shower is to be installed up to the floor or bathtub should at
least 2 meters. (Pict.: 3)
Check if the water exit of ½" is leveled with the tile. If it is more than 3 mm inwards, use a
galvanized iron, brass or plastic prolonger. This prolonger is not supplied. (Pict.: 4). If the pipe
does not match with the thread of ½", use an adaptor (Pict.: 5). This adaptor is not supplied.
Antes de instalar el producto, abra el registro
y deje salir agua, para retirar todas las
suciedades existentes en la cañería, luego
cierre el registro. El producto permite
Jet Control 1,0 m.c.a. 40,0 m.c.a.
instalación directa en la salida del agua de o
1/2” (pulgadas) (fig.:04). Para instalación de
Salida de (m.c.a. = metro de columna de agua) la Ducha,la salida de agua debe estar como
(w.m.c.=
water
meter
column)
máximo 8 mm fuera del azulejo.
agua
Verifique si la salida de agua de 1/2”
Water
(pulgada) está nivelada con el azulejo, en el
oulet 2 metros/meters
caso de estar a más de 3 mm (milíme03
tros)hacia adentro, use un prolongador de
Piso/Floor
hierro galvanizado, latón o plástico. Este
10 kPa = 1 m.c.a./w.m.c. =1 metro linear/linear meter prolongador no acompaña la Ducha.
4 - Preparación para instalación eléctrica/Preparing Electrical Installation
8
10 kPa (1 m.c.a. /w.m.c.)
400 kPa (40 m.c.a./w.m.c. )
Coloque la manguera en su respectivo terminal,
localizado en la parte inferior del producto. (Fig.
12).
Coloque la manguera en el soporte de la consola
de la ducha (Fig. 12).
Coloque la ducha manual en la otra extremidad
de la manguera y coloque el soporte de la
consola de la ducha (Fig. 12).
02
* La resistividad del agua suministrada a este producto, a 22ºC, no debe ser inferior a 1300 ohms x cm.
** Potencia económica
*** Para distancias superiores a 30 m, use cables de mayor sección.
* The water resistivity for this product at 22ºC cant not be lower than 1300 ohms x cm.
**Economic power
*** For distances over 30 meters, thicker cables must be used.
El producto
calienta poco
mismo con la
tecla de
temperaturas en
la posición de
mayor
calentamiento.
The shower is
not heating
enough even
when the button
is on the hottest
position.
Causa Probable
Probable reason
Sugerencias / Answers
Disyuntor
desconectado
Circuit breaker is
turned off
Accione el disyuntor o chave fusible.
Turn the circuit breaker key ON
La techa
Conecta/Desconecta
se encuentra en la
posición desconecta
The selectior button
key is at the off
position.
Posicione la tecla CONECTA/DESCONECTA en la
posición CONECTA
Place the button ON/OFF at the ON position.
O registro principal
de su baño está
cerrado o hay aire
en la tuberíia.
The main register is
closed or there is air
inside the pipes.
Cableado
inadecuado
Inadequate
Hardwired
Tensión electrica
baja
Low tensión
11
Abra el registro principal y/o los grifos que
pertenecen al mismo circuito hidráulico, hasta retirar
todo el aire.
Open the main register and/or the taps and let the
water flow to remove the air.
Consulte un técnico para verificar si los cables estan
de acuerdo con las especificaciones de éste manual.
Contact a professional to check the hardwire are
proprer.
Consulte un técnico para verificar si la tensión eléctrica
esta abajo de los valores nominales de suministro
(127V~ o 220V~). En caso positivo, comunique a la
consecionaria de energía de su región.
Contact a qualified technician to verify your electrical
system. If the nominal voltage of your system is under
the values specified by your electrical supplier
(127V~or 220V~) Contact the utility responsible for
your electrical supply
IMPORTANTE: Ocurriendo quema de la resistencia, substituir por originales Lorenzetti.
En caso de defectos en los cables de alimentación del aparato, no los substituya, retire el
aparato del punto de uso y solicite ayuda técnica.
IMPORTANT: Replace the heating element for Lorenzetti’s originals
In case of defects in the feedings do not replace them, remove the product and take to a
qualifies technician.
Lorenzetti S.A. Indústrias Brasileiras Eletrometalúrgicas
Av. Presidente Wilson, 1230 - CEP 03107-901
Mooca - São Paulo - SP - Hecho en Brasil
Made in Brazil
www.lorenzetti.com.br
[email protected]
Phone(5511) 2065 7396/7
CÓD. 371221 - Mayo- May/07
01
2 - Atención/ Attention
Lea atentamente las instrucciones de instalación, antes de instalar el producto. La
instalación de este producto debe ser efectuada unicamente por profesionales
especializados. Este profesional es totalmente responsable por la observación de las
normas vigentes en su pais.
Nunca conecte dispositivos o accesórios no indicados en este manual en la salida del
aparato. No instalar el producto a la intemperie. Este producto fue desarrollado para
funcionar con agua previamente tratada. Conserve este manual para futuras consultas.
Este aparato puede calentar el agua a una temperatura superior a la adecuada para
uso, podiendo causar quemaduras.
Niños, personas de edad avanzada, enfermos, personas física o mentalmente
debilitadas, deben ser supervisionadas cuando de la utilización de éste aparato, para
esto regule adecuadamente la temperatura del agua.