1
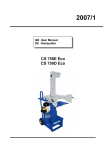
G
rapadora de martillo
I nstrucciones de utilización y de seguridad
Pistola sparapunti
I ndicazioni per l’uso e per la sicurezza
Agrafador-martelo
I nstruções de utilização e de segurança
Hammer Stapler
O
peration and Safety Notes
Hammertacker
B edienungs- und Sicherheitshinweise
Z
29621
5
ESInstrucciones de utilización y
de seguridad
IT / MTIndicazioni per l’uso e per
la sicurezza
PT Instruções de utilização e
de segurança
GB / MT
Operation and Safety Notes
DE / AT / CH Bedienungs- und Sicherheitshinweise
Página 5
Pagina 16
Página 27
Page 38
Seite 48
1
2
3
A
B
C
4
Introducción....................................... Página6
Uso adecuado....................................... Página7
Descripción
de las piezas...................... Página7
Datos técnicos....................................... Página8
Volumen de suministro.......................... Página8
Indicaciones de seguridad...... Página9
Uso
Llenar/vaciar el cargador........................Página12
Utilizar la grapadora martillo............. Página12
Conservación y cuidado........... Página14
E liminación.......................................... Página14
ES
5
Grapadora de martillo
Q Introducción
Familiarícese con el producto
antes de usarlo por primera vez.
Para ello, lea detenidamente
las instrucciones de uso y los consejos de
seguridad. Utilice el producto únicamente
como está descrito y para las aplicaciones
indicadas. Conserve adecuadamente
estas instrucciones. Adjunte igualmente
toda la documentación en caso de entregar el producto a terceros.
6
ES
Q Uso
adecuado
Este producto está diseñado para clavar
grapas cuadradas de alambre plano en
la madera. Este artículo sólo es apto para
el uso en interiores, en habitaciones secas
y cerradas. El producto solo está pensado
para el uso doméstico y no comercial. No
está previsto cualquier otro uso o modificación del producto y estos pueden ocasionar lesiones así como daños al producto.
El fabricante no se hace responsable de
los daños que puedan derivarse del uso
indebido del aparato.
Q Descripción
de las piezas
1 Asa
2 Guía deslizante de grapas
ES
7
Q Datos
técnicos
Medidas: aprox. 345 x 85 x 35 mm
Peso
(sin grapas): aprox. 952 g
Grapas: Grapas de alambre plano
6 - 14 mm
Q Volumen
de suministro
1 rapadora martillo
1 manual de instrucciones
8
ES
I ndicaciones de
seguridad
¡LEER LAS INSTRUCCIONES DE USO
ANTES DE UTILIZAR EL PRODUCTO!
¡CONSERVAR CUIDADOSAMENTE
LAS INSTRUCCIONES DE USO!
J ¡NO DEJE ESTE PRODUCTO AL
ALCANCE DE LOS NIÑOS!
J ¡ESTE PRODUCTO NO ES UN
JUGUETE! Este producto no debe
ser utilizado por niños.
¡Advertencia!
J ¡PELIGRO DE MUERTE
Y ACCIDENTE PARA
LOS NIÑOS! No deje nunca a los
niños sin vigilancia con el material
ES
9
de embalaje. Existe peligro de asfixia.
Los niños subestiman a menudo los
peligros. Mantenga siempre el producto fuera del alcance de los niños.
J Utilice unas gafas protectoras adecuadas.
J Antes de iniciar cualquier trabajo
verifique siempre el perfecto funcionamiento del dispositivo de disparo
así como el asiento firme de todos
los tornillos y tuercas.
J Tenga en cuenta que la grapadora
martillo sólo es adecuada para realizar trabajos en los que no haya un
punto exacto de engrapado (por ej.,
para fijar tela asfáltica, láminas y
capas aislantes).
10
ES
J Mantenga el mango
J
J
J
J
1 seco, limpio
y sin aceite ni grasa.
Agarre siempre la grapadora por el
mango previsto para ello 1 .
No utilice la grapadora como un
martillo, podría golpearse las uñas.
No realice variaciones en el producto
como, por ej., grabarla, reconstruirla
o doblarla con violencia. El producto
podría resultar dañado y perder su
función.
Asegúrese de que las grapas se han
introducido completamente. Si no es el
caso, retírelas, pues podrían producirle
heridas a Ud. o a otras personas.
ES
11
Q Uso
Q Llenar/vaciar
el cargador
j Retire el avance 2 del mango 1
de la grapadora martillo (fig. A).
j Introduzca las grapas en el cargador
o retírelas (fig. B).
j Retire el avance 2 del mango 1
de la grapadora martillo (fig. C).
Q Utilizar
la grapadora
martillo
j Agarre la grapadora martillo por el
mango y fije la cabeza en la superficie
que desea fijar. Si la grapa no se
introduce lo suficiente en la madera,
aumente lentamente la fuerza con la
que ha fijado la grapadora hasta
12
ES
que la grapa acabe por estar al nivel
del material que se va a fijar.
j No la fije con demasiada fuerza. La
parte posterior de la grapa no debe
atravesar el material que se va a fijar.
j Retire las grapas atascadas en el
cargador con unos alicates de punta
fina.
j Después de terminar el trabajo, vacíe
el cargador (véase capítulo “Llenar/
vaciar cargador”).
j Encargue la reparación del producto
a un taller especializado autorizado.
ES
13
Q Conservación
y cuidado
j Conserve la grapadora en un lugar
seco y fuera del alcance de los niños.
j Limpie la cubierta con un paño seco
y sin pelusa o con un pincel.
j En caso de suciedad persistente,
puede humedecer el paño también
con un jabón suave. Seque bien el
producto tras la limpieza.
Q Eliminación
El embalaje está compuesto por
materiales no contaminantes
que pueden ser eliminados en
el centro de reciclaje local.
14
ES
Puede averiguar las posibilidades de
eliminación del producto estropeado en
la administración de su comunidad o
ciudad.
Información sobre el producto:
Grapadora de martillo
Modelo Nº: Z29621
Versión: 01 / 2011
ES
15
Introduzione..................................... Pagina17
Uso corrispondente alle norme........... Pagina18
Descrizione dei pezzi .......................... Pagina18
Dati tecnici............................................. Pagina19
Ambito di fornitura................................ Pagina19
Avvertenze di sicurezza.......... Pagina19
Utilizzo
Riempimento/svuotamento del
magazzino............................................. Pagina22
Utilizzo del martello aggraffatore...... Pagina23
Stoccaggio e manutenzione... Pagina24
Smaltimento..................................... Pagina25
16
IT/MT
Pistola sparapunti
Introduzione
Q
Familiarizzate con il prodotto
prima del montaggio. Leggete
le seguenti istruzioni di montaggio e le avvertenze di sicurezza.
Utilizzate questo prodotto solo come
descritto e per gli ambiti d‘uso indicati.
Conservate bene queste istruzioni. Consegnate altrettanto tutte le documentazioni su questo prodotto quando lo date a
terzi.
IT/MT
17
Q Uso
corrispondente
alle norme
Questo prodotto è adatto a inserire
graffe angolari a filo piatto nel legno.
Altri ambiti d’uso o modifiche del prodotto
non corrispondono alle norme e possono
mettere a rischio, provocando ferite e
danneggiamenti. I danni causati da uno
contrario alle norme non sono coperti
dalla garanzia del costruttore. Il prodotto
non è adatto all’uso commerciale.
Q
Descrizione dei pezzi
1 Impugnatura
2 Spingipunti
18
IT/MT
Q Dati
tecnici
Dimensioni: circa 345 x 85 x 35 mm
Peso (senza
graffe): circa 952 g
Graffe: Graffe a filo piatto
6-14 mm
Q Ambito
di fornitura
1 pistola sparapunti
1 libretto di istruzioni d‘uso
Avvertenze
sicurezza
di
LEGGERE L‘ISTRUZIONE D‘USO
PRIMA DELL‘UTILIZZO! CONSERVARE
PER BENE L‘ISTRUZIONE D‘USO!
IT/MT
19
J IL PRODOTTO NON DEVE FINIRE NELLE MANI DI BAMBINI!
J QUESTO PRODOTTO NON E‘
UN GIOCATTOLO! Questo prodotto
non deve essere usato dai bambini.
AVVISO! PERICOJ
LO DI VITA E D’INFORTUNI PER BAMBINI ED INFANTI! Non lasciate i
bambini inosservati con il materiale
d’imballaggio. Persiste pericolo di
soffocamento con il materiale
d’imballaggio. I bambini spesso sottovalutano i pericoli. Tenete i bambini
lontano dall’apparecchio.
J
Indossare occhiali protettivi
adatti.
20
IT/MT
J
Prima di ogni utilizzo verificare il per-
fetto funzionamento dei dispositivi di
scatto nonché la saldezza di tutte le
viti e i dadi.
J Fare attenzione al fatto che il martello
aggraffatore è adatto solamente per
lavori per i quali non è necessaria
una graffettatura precisa al millimetro
(ad esempio per fissare cartoni catramati, pellicole e guaine sottotegola).
J Mantenere l’impugnatura 1 asciutta
e priva di olio e grasso.
J
Tenere in mano la graffettatrice esclusivamente all’impugnatura 1 prevista.
J
Non utilizzare la graffettatrice come
martello con il quale si conficca i chiodi.
J
Non modificare il prodotto, ad esempio facendo incisioni su di esso,
IT/MT
21
trasformandone la meccanica o
piegandolo con violenza. Il prodotto
potrebbe esserne danneggiato e
perdere la propria funzionalità.
J
Fare attenzione a che le graffe siano
completamente inserite. Rimuovere
graffe non inserite completamente
poiché potrebbero provocare lesioni
ad altre persone.
Utilizzo
Q
QRiempimento/svuota-
mento del magazzino
j Estrarre lo spingipunti 2 dall’impugnatura 1 del martello aggraffatore
(Fig. A).
22
IT/MT
j Riempire il magazzino di graffe o
rimuoverle da esso (fig. B).
j Spingere lo spingipunti 2 nell’impugnatura 1 del martello aggraffatore
fino a quando scatta (Fig. C).
QUtilizzo
del martello
aggraffatore
j Tenere martello aggraffature per il
manico e porre la testa del martello
aggraffatore sul materiale da fissare.
Qualora la graffa non penetrasse nel
legno in modo sufficientemente profondo è necessario aumentare lentamente la forza d’urto fino a che la
graffa non si unisce ermeticamente
con il materiale da fissare.
IT/MT
23
j Non colpire esercitando troppa
forza. Il retro delle graffe non deve
tagliare il materiale da fissare.
j Rimuovere le graffe incastrate nel
magazzino con una pinza a punta.
j Svuotare il magazzino una volta
terminato il lavoro (vedere il capitolo
“Riempimento/Svuotamento del
magazzino”).
j Fare riparare il prodotto esclusivamente da un’officina autorizzata,
Stoccaggio e
Q
manutenzione
j Conservare martello aggraffatore in
un luogo asciutto e non raggiungibile
24
IT/MT
da bambini.
j Pulire il prodotto con un panno
asciutto e privo di peli oppure con un
pennello.
j In caso di sporcizia più marcata è
possibile inumidire il panno anche
con acqua leggermente insaponata.
Dopo la pulizia asciugare il prodotto
con cura.
QSmaltimento
L’imballaggio consiste di
materiali ecologici che potete
smaltire portandoli nei luoghi
pubblici che si occupano di
riciclaggio.
IT/MT
25
Potete informarvi sulle possibilità di
smaltimento del prodotto consumato
dall’amministrazione comunale e cittadina.
Informazioni sul prodotto:
Pistola sparapunti
No. del modello: Z29621
Versione: 01 / 2011
26
IT/MT
Introdução........................................... Página28
Utilização correcta............................... Página29
Descrição das peças ........................... Página29
Dados técnicos...................................... Página30
Material fornecido................................ Página30
Indicações de segurança.......... Página31
Utilização
Encher / esvaziar carregador.............. Página34
Utilizar
o martelo agrafador............... Página34
Armazenamento
e conservação.................................. Página36
E liminação........................................... Página37
PT
27
Agrafador-martelo
Q Introdução
Antes da primeira utilização,
familiarize-se com o produto.
Para tal, leia atentamente o
manual de instruções e as indicações de
segurança. Utilize o artigo apenas da
forma que é descrita e de acordo com as
finalidades indicadas. Mantenha este
manual bem guardado. Se transmitir o
artigo a terceiros, entregue também os
respectivos documentos.
28
PT
Q Utilização
correcta
Q Descrição
das peças
Este produto é adequado para a inserção
de agrafos angulares de arame chato em
madeira. Este artigo é exclusivamente para
a utilização no interior, e em espaços
secos e fechados. O produto destina-se
apenas ao uso privado e não ao uso comercial. Quaisquer outras utilizações ou
alterações do produto são consideradas
incorrectas e podem provocar riscos de
ferimentos e danos materiais. O fabricante
não assume qualquer responsabilidade
por danos resultantes de uma utilização
indevida.
1 Punho
2 Corrediça dos agrafos
PT
29
Q Dados
técnicos
Dimensões: aprox. 345 x 85 x
35 mm
Peso
(sem os agrafos): aprox. 952 g
Agrafos: agrafos de arame
chato 6-14 mm
Q Material
fornecido
1 martelo agrafador
1 manual de instruções
30
PT
I ndicações
de segurança
ANTES DE UTILIZAR, LEIA O MANUAL
DE INSTRUÇÕES! CONSERVE
CUIDADOSAMENTE O MANUAL DE
INSTRUÇÕES!
J O PRODUTO NÃO DEVE SER
MANUSEADO POR CRIANÇAS!
J ESTE PRODUTO NÃO É UM
BRINQUEDO! Este produto não
deve ser utilizado por crianças.
Aviso! PERIGO
J DE MORTE E DE ACIDENTE PARA CRIANÇAS E BEBÉS! Nunca deixe as
crianças sem vigilância com o material
PT
31
da embalagem. Existe perigo de asfixia através do material de embalagem.
As crianças subestimam frequentemente
os perigos. Mantenha as crianças
sempre afastadas do produto.
J
Utilize uns óculos de protecção adequados.
J Antes do início do trabalho verifique
o funcionamento correcto do dispositivo de accionamento assim como a
fixação de todos os parafusos e
porcas.
J Tenha em atenção que o martelo
agrafador é adequado apenas para
trabalhos nos quais não se trata de
agrafar com grande precisão (por ex.
para a fixação de papel betumado,
32
PT
películas e capas isoladoras).
1 seco e sem
óleo nem lubrificante.
Segure o agrafador exclusivamente
pelo o punho 1 previsto para tal.
Não utilize o agrafador como martelo,
com o qual exerce impacto sobre os
pregos.
Não altere o produto, por ex., gravando, reconstruindo ou dobrando
violentamente. O produto pode ficar
danificado e perder as suas funções.
Verifique se os agrafos estão cravados
completamente. Não retire totalmente
os agrafos, visto que podem feri-lo
ou a outras pessoas.
J Mantenha o punho
J
J
J
J
PT
33
Q Utilização
Q Encher / esvaziar
carregador
j Retire a corrediça dos agrafos 2
do punho 1 do martelo agrafador
(fig. A).
j Coloque os agrafos no carregador
ou retire-os (fig. B).
j Faça deslizar a corrediça dos agrafos
2 no punho 1 do martelo agrafador até este encaixar (fig. C).
Q Utilizar
o martelo
agrafador
j Segure o agrafador de martelo pelo
punho e bata com a cabeça do martelo agrafador no material a fixar. Se
34
PT
os agrafos não estiverem suficientemente introduzidos na madeira,
aumente lentamente a força, até o
agrafo encaixar de forma nivelada
no material a fixar.
j Não bata com demasiada força. A
parte traseira do agrafo não pode
atravessar o material a fixar.
j Retire os agrafos que ficaram presos
no carregador com um alicate de
pontas.
j Esvazie o carregador após terminar
o trabalho (ver capítulo “Encher/
esvaziar o carregador”).
j As reparações do produto devem ser
realizadas exclusivamente por uma
oficina especializada autorizada.
PT
35
Q Armazenamento
e conservação
j Guarde o martelo agrafador num
local seco, fora do alcance de crianças.
j Limpe a caixa com um pano seco que
não largue fios ou com um pincel.
j Em caso de maior sujidade, pode
humedecer o pano com um pouco
de água morna e sabão. Seque o
produto após a limpeza.
36
PT
Q Eliminação
A embalagem é feita de materiais não poluentes que podem
ser eliminados nos contentores
de reciclagem locais.
As possibilidades de reciclagem dos artigos utilizados poderão ser averiguadas
no seu Município ou Câmara Municipal.
Informação do produto:
Agrafador-martelo
Modelo nr.°: Z29621
Versão: 01 / 2011
PT
37
Introduction....................................... Page39
Proper use.............................................. Page40
Description of parts.............................. Page40
Technical data....................................... Page40
Included items....................................... Page41
Safety advice.................................... Page41
Use
F illing or emptying the magazine ....... Page44
Using the hammer stapler ...................... Page44
Storage and care........................... Page46
Disposal................................................. Page46
38
GB/MT
Hammer Stapler
Introduction
Q
Before using the product for
the first time, take time to
familiarise yourself with the
product first. Read the following operating instructions and safety advice carefully.
Only use the product as described and for
the designated areas of application.
Please keep these instructions in a safe
place. If you hand this product on to a
third party, you must also pass on all
documents relating to the product.
GB/MT
39
Q
Proper use
This product is suitable for driving flat crown
flat wire staples into wood. Any use other
than that described or any modification
of the product is not permissible and may
result in injury and/or damage to the
product. The manufacturer is not liable for
damage caused by improper use. The
product is not intended for commercial
use.
QDescription
1 Handle
2 Staple pusher
QTechnical
of parts
data
Dimensions: approx.
345 x 85 x 35 mm
40
GB/MT
Weight
(without staples): approx. 952 g
Staples: Flat wire staples
6-14 mm
QIncluded
items
1 Hammer stapler
1 Operating instructions
Safety advice
READ THE DIRECTIONS FOR USE BEFORE USING! KEEP THE DIRECTIONS
FOR USE IN A SAFE PLACE!
J KEEP THE PRODUCT OUT OF
THE HANDS OF CHILDREN!
GB/MT
41
J THIS PRODUCT IS NOT A TOY!
This product must not be used by children.
Warning! DANJ
GER OF LOSS OF LIFE
OR ACCIDENT TO INFANTS AND CHILDREN! Never
leave children unsupervised with the
packaging materials. Packaging materials present a suffocation hazard.
Children often underestimate danger.
Always keep the product out of
reach of children.
J
Wear suitable protective
glasses.
J
Before you start work with the device,
check that its trigger fittings are
42
GB/MT
working properly and that all screws,
bolts and nuts are fixed tightly in place.
J
Note that the hammer stapler is only
suitable for work that does not require
precise stapling (e.g. for fixing roofing felt, foil or roofing membrane).
J
Keep the handle 1 dry and free of
oil and grease.
J
Hold the stapler only by the handle 1 .
J
Do not use the stapler as a hammer
to knock in nails.
J
Do not modify the product, e.g. by
engraving, dismantling or forcibly
bending it. The product could be
damaged and stop working.
J
Ensure that the staples are fully driven
in. Remove any staples that are not
GB/MT
43
fully driven in, as they may injure you
or other people.
Use
Q
QFilling
or emptying the
magazine
j Pull the staple pusher 2 out of the handle 1 of the hammer stapler (Fig. A).
j Place staples into magazine or
remove them (Fig. B).
j Push the staple pusher 2 back into
the handle 1 until it engages (Fig. C).
QUsing
the hammer stapler
j Hold the hammer stapler by the handle
and strike the head of the hammer
44
GB/MT
stapler on the material to be attached.
If the staple does not penetrate
enough into the wood, increase the
striking force slowly until the staple
finishes flush with the material to be
attached.
j Do not strike too hard. The crown of
the staple must not cut through the
material to be attached.
j Remove any staples jammed in the
magazine with a pair of pointed
pliers.
j Empty the magazine after you have
finished work (see Section “Filling or
emptying the magazine”).
j Have the product repaired at an
authorized workshop only.
GB/MT
45
Storage and care
Q
j Store the hammer stapler in a dry
place out of the reach of children.
j Clean the housing with a dry, fluff-free
cloth or narrow paintbrush.
j For more stubborn dirt you may also
apply a mild soap solution to the cloth.
Dry the product well after cleaning.
Disposal
Q
The packaging is made entirely of recyclable materials,
which you may dispose of at
local recycling facilities.
46
GB/MT
Contact your local refuse disposal authority for more details of how to dispose
of your worn-out product.
Product description:
Hammer stapler
Model no.: Z29621
Version: 01 / 2011
GB/MT
47
E inleitung............................................. Seite49
Bestimmungsgemäße Verwendung..... Seite50
Teilebeschreibung................................. Seite50
Technische Daten.................................. Seite51
Lieferumfang.......................................... Seite51
Sicherheitshinweise..................... Seite51
Gebrauch
Magazin befüllen/entleeren............... Seite54
Hammertacker verwenden.................. Seite55
Lagerung und Pflege................... Seite56
E ntsorgung.......................................... Seite57
48
DE/AT/CH
Hammertacker
Einleitung
Q
Machen Sie sich vor dem
Gebrauch mit dem Produkt
vertraut. Lesen Sie hierzu aufmerksam die nachfolgende Bedienungsanleitung und die Sicherheitshinweise. Benutzen Sie das Produkt nur wie beschrieben
und für die angegebenen Einsatzbereiche.
Bewahren Sie diese Anleitung gut auf.
Händigen Sie alle Unterlagen bei Weitergabe des Produkts an Dritte ebenfalls
mit aus.
DE/AT/CH
49
QBestimmungsgemäße
Verwendung
Dieses Produkt ist geeignet zum Eintreiben
von eckigen Flachdrahtklammern in Holz.
Eine andere Verwendung als zuvor beschrieben oder eine Veränderung des
Produkts ist nicht zulässig und kann zu
Verletzungen und/oder Beschädigungen
des Produkts führen. Für aus bestimmungswidriger Verwendung entstandene
Schäden übernimmt der Hersteller keine
Haftung. Das Produkt ist nicht für den
gewerblichen Einsatz bestimmt.
QTeilebeschreibung
1 Griff
2 Klammerschieber
50
DE/AT/CH
QTechnische
Daten
Maße: ca. 345 x 85 x 35 mm
Gewicht
(ohne Klammern):ca. 952 g
Klammern: Flachdrahtklammern
6-14 mm
QLieferumfang
1 Hammertacker
1 Bedienungsanleitung
Sicherheitshinweise
VOR GEBRAUCH BITTE DIE
BEDIENUNGSANLEITUNG LESEN!
BEDIENUNGSANLEITUNG BITTE
SORGFÄLTIG AUFBEWAHREN!
DE/AT/CH
51
J D
AS PRODUKT GEHÖRT NICHT
IN KINDERHÄNDE!
J DIESES PRODUKT IST KEIN
SPIELZEUG! Dieses Produkt sollte
nicht von Kindern benutzt werden.
J Warnung!
Lebens - und Unfallgefahr für
Kleinkinder und Kinder!
Lassen Sie Kinder niemals unbeaufsichtigt mit Verpackungsmaterial. Es
besteht Erstickungsgefahr. Kinder
unterschätzen häufig die Gefahren.
Halten Sie Kinder stets vom Produkt
fern.
J
Tragen Sie eine geeignete
Schutzbrille.
52
DE/AT/CH
J P rüfen Sie vor jedem Arbeitsbeginn
die einwandfreie Funktion der Auslöseeinrichtung sowie den festen Sitz
aller Schrauben und Muttern.
J Beachten Sie, dass der Hammertacker
nur für Arbeiten geeignet ist, bei
denen es nicht auf punktgenaues
Heften ankommt (z.B. zum Befestigen
von Dachpappen, Folien und Unterspannbahnen).
J Halten Sie den Griff 1 trocken und
frei von Öl und Fett.
J Halten Sie den Tacker ausschließlich
an dem vorgesehenen Griff 1 .
J Benutzen Sie den Tacker nicht als
Hammer, mit dem Sie Nägel
einschlagen.
J Verändern Sie das Produkt nicht, z.B.,
DE/AT/CH
53
indem Sie es gravieren, umbauen
oder gewaltsam verbiegen. Das
Produkt könnte beschädigt werden
und seine Funktion verlieren.
J Achten Sie darauf, dass die Klammern
vollständig eingeschlagen sind. Entfernen Sie nicht vollständig eingeschlagene Klammern, denn sie könnten
Sie oder andere Personen verletzen.
Gebrauch
Q
QMagazin
befüllen/
entleeren
j Ziehen Sie den Klammerschieber 2
aus dem Griff 1 des Hammertackers
(Abb. A).
54
DE/AT/CH
j Füllen Sie die Klammern in das
Magazin oder entnehmen Sie sie
(Abb. B).
j Schieben Sie den Klammerschieber 2
in den Griff 1 des Hammertackers
bis er einrastet (Abb. C).
QHammertacker
verwenden
j Halten Sie den Hammertacker am
Griff und schlagen Sie den Kopf des
Hammertackers auf das zu befestigende Material. Sollte die Klammer
nicht tief genug ins Holz eindringen,
erhöhen Sie die Schlagkraft langsam,
bis die Klammer bündig mit dem zu
befestigenden Material abschließt.
j Schlagen Sie nicht zu fest. Der Rücken
DE/AT/CH
55
der Klammer darf das zu befestigende
Material nicht durchschneiden.
j Entfernen Sie im Magazin verklemmte
Klammern mit einer Spitzzange.
j Entleeren Sie nach Arbeitsende das
Magazin (siehe Kapitel „Magazin
befüllen/entleeren).
j Lassen Sie das Produkt ausschließlich
von einer autorisierten Fachwerkstatt
reparieren.
Lagerung und Pflege
Q
j Bewahren Sie den Hammertacker an
einem trockenen, für Kinder nicht
erreichbaren Ort auf.
56
DE/AT/CH
j Reinigen Sie das Gehäuse mit einem
trockenen, fusselfreien Tuch oder
Pinsel.
j Bei stärkerer Verschmutzung können
Sie das Tuch auch mit einer milden
Seifenlauge befeuchten. Trocknen
Sie das Produkt nach der Reinigung
gut ab.
Entsorgung
Q
Die Verpackung besteht aus
umweltfreundlichen Materialien,
die Sie über die örtlichen Recyclingstellen entsorgen können.
DE/AT/CH
57
Möglichkeiten zur Entsorgung des ausgedienten Produktes erfahren Sie bei Ihrer
Gemeinde- oder Stadtverwaltung.
Produktbezeichnung:
Hammertacker
Modell-Nr.: Z29621
Version: 01/2011
58
DE/AT/CH
IAN 61659
Milomex Ltd.
c/o Milomex Services
Hilltop Cottage
Barton Road
Pulloxhill
Bedfordshire
MK45 5HP
UK
© by ORFGEN Marketing
Estado de las informaciones
Versione delle informazioni
Estado das informações
Last Information Update
Stand der Informationen: 10 / 2010
Ident.-No.: Z29621102010-5
5