1
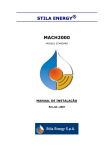
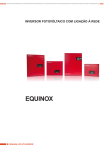
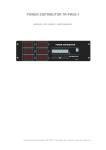
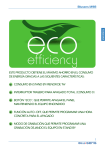
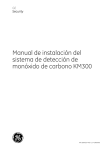
DM-1225
MANUAL DE INSTRUCCIONES
DM-1225
USER MANUAL
,www.triton-blue.com
INDICE
Seguridad.................................................................................................. 3
Capitulo 1. Introducción DM-1225............................................................. 3
1-1 Características......................................................................... 3
1-2 Especificaciones...................................................................... 4
1-3 Introducción al panel frontal.................................................... 4
1-4 Introducción al panel trasero................................................... 4
1-5 Diagrama de conexiones......................................................... 5
Capitulo 2 . Uso......................................................................................... 5
2-1 Señal DMX 512...................................................................... 5
2-2 Direccionamiento señal DMX................................................. 5
2-3 Visualización de salidas......................................................... 6
2-4 Test de salida......................................................................... 6
2-5 Función Dimmer / Interruptor................................................. 6
2-6 Precalentamiento de canales (0...6%)................................... 7
2-7 Limitación de salida............................................................... 7
2-8 Temperatura interna............................................................... 7
2-9 DMX Status y Dirección DMX................................................ 7
2
,www.triton-blue.com
SEGURIDAD
Leer antes de conectar
Tomar nota de estos datos para un funcionamiento normal en horas de uso.
1 Si el DM-1225 es instalado en rack, asegurese que este tenga una buena refrigeración.
El dimmer necesita una buena refrigeración para que sus funciones no esten limitadas.
2 La máxima salida del DM-1225 es de 20 A por canal para hacer funciones de test
con un máximo de 30 minutos de funcionamiento.
3 Si va a trabajar muy forzado y durante muchas horas, la máxima intensidad será de
16 A para usos como Teatro, escenarios etc.
4 Si el DM-1225 va a ser instalado en Hoteles, Restaurantes, iluminación para edificios
etc, y va a estar trabajando si apagar durante muchos periodos de tiempo, la
intensidad sera de un maximo 12 A por canal, para asegurar su buen funcionamiento.
CONDICIONES DE TRABAJO AMBIENTAL
1 Temperatura: hasta 35 grados C.
2 Si el dimmer es instalado en un rack, la temperatura interior del rack no puede
superar los 45 grados C.
3 Humedad: 40%----80%
CAPITULO DE INTRODUCCION AL DM-1225
CARACTERISTICAS
Autobúsqueda de frecuencia: El dimmer es muy estable ante distintas frecuencias
(45Hz a 63Hz).
Control de temperatura: Cuando la temperatura es superior a 45 grados el
ventilador arranca automáticamente.
Cada canal puede ser usado como Dimmer o como interruptor.
Posibilidad de hacer un test por canal sin mesa de control.
En el display se puede visualizar el nivel de dimmer y la temperatura interna.
Función de precalentamiento ( desde 0---6%).
Las salidas se pueden limitar desde 50% a 100%.
El uso del dimmer es muy sencillo.
3
,www.triton-blue.com
ESPECIFICACIONES
Alimentación
AC100-240v, 45---63Hz
Salida
Salida maxima 20 A(remítase a seguridad en
este manual)
Protocolo
DMX 512
Conectores de señal
XLR 5 pin (Macho x 1 , Hembra x 1 )
2 6p4c phone jack
Dimensiones
482(W) x 132(H) x 312(D)mm
Unidades de rack
19” 3U rack
Peso
13,5 Kg
INTRODUCCION AL PANEL FRONTAL
34 5 6 7 8
2
1
1 DMX IN
2 Magnetotermicos (1-6)
3 Botones de canales (1-6)
4 Led Display
5
Botón subida
6
10
9
Botón bajada
7
Botón de funciones
9
Botones de canales (7-12)
8
Botón Enter
10 Magnetotermicos (7-12)
INTRODUCCION AL PANEL FRONTAL
1
2
3
1 Terminales de salida
2 DMX IN
3 DMX IN
4
4 Terminales de acometida
4
,www.triton-blue.com
DIAGRAMA DE CONEXIONES
CAPITULO DE UTILIZACION
SEÑAL DMX 512
Este punto parpadea cuando está recibiendo señal DMX
DIRECCIONAMIENTO DE SEÑAL DMX 512
PASO 1. Pulse ENTER, pulsar
ENTER +
ENTER +
o
para buscar la dirección de inicio.
: mueve un número hacia arriba.
: mueve un número hacia abajo.
Subir hasta el canal 512
El DM-1225 es un dimmer de 12 canales.
Si se configura como d.001 las salidas de canales son del 1 al 12
Si se configura como d.0013 las salidas de canales son del 13 al 24
5
,www.triton-blue.com
VISUALIZACION DE SALIDAS
PASO 1: Entrar en estado DMX y presionar el botón ENTER.
PASO 2: Presionar
o
para verlo.
Canal 4 = 100% Full
TEST DE SALIDA
PASO 1: Presionar el botón del canal para comprobar su nivel
PASO 2: Presionar el botón del canal para apagarlo.
FUNCION DIMMER / INTERRUTOR
PASO 1: Entrar en el estado DMX y presionar ENTER
PASO 2: Presionar el botón FUNC y el display se coloca como abajo
Posición por defecto: Todos los canales son dimerizables
PASO 3: Presionar
o
para seleccionar dimmer (d) o interruptor (S).
(dimmer)
(interruptor)
PASO 4 : Presionar el botón del canal elegido del 1 al 12
6
,www.triton-blue.com
PASO 5: Presionar
o
para elegir si el canal es dimmer o interruptor.
Canal 1 = Interruptorl
PRECALENTAMIENTO
PASO 1: Presionar el botón FUNC hasta que en el display se ponga como abajo
PASO 2: Presionar
o
para ajustar el nivel deseado.
Todos los canales estan al 6%
LIMITACION DE SALIDA
PASO 1: Presionar el botón FUNC hasta que en el display se ponga como abajo
PASO 2: Presionar
o
para ajustar el nivel deseado.
Todos los canales estan limitados al 86%
TEMPERATURA INTERNA
PASO 1: Presionar el botón FUNC hasta que en el display se ponga como abajo
Temperatura en el radiador derecho
Temperatura en el radiador izquierdo
DMX STATUS Y DMX DIRECCION
Presionando ENTER el dimmer va inmediatamente a DMX status.
7
,www.triton-blue.com
CONTENTS
Safety Introdution...................................................................................... 9
Chapter 1 Introdution of DM-1225 ............................................................ 9
1-1 Feature.................................................................................... 9
1-2 Specification............................................................................ 10
1-3 Operation Panel Function Introducing...................................... 10
1-4 Output Rear Panel Introducing..................................................10
1-5 Wiring Diagram......................................................................
11
Chapter 2 . Operation..............................................................................
11
2-2 DMX Start Address Setting..................................................
11
2-1 Standard DMX 512 Signal....................................................
11
2-3 Channel Output Status Preview...........................................
12
2-5 Dimming / Swiching Setting..................................................
12
2-4 Output Testing......................................................................
2-6 Warn - Up setting (0...6%)....................................................
2-7 Output Limit Settin................................................................
12
13
13
2-8 Internal Temperature............................................................. 13
2-9 DMX Status y DMX Address................................................
8
13
,www.triton-blue.com
SAFETY INTRODUCTION
Please note the load power
Please refer to the data we suggest to ensure the normal total working hours of DM-1225
1 If DM-1225 is installed in a rack, please make sure the rack is airy.
Otherwise the machine will become over-heat and result in the mis-fuction.
2 DM-1225 The max output of each channel is 20A : For testing (do not over 30 minutes)
3 DM-1225 The max output of each channel is 16A: For several hours use.
(Theaters, stage).
4 DM-1225 The output of each channel is 12A: Can work for the whole year without
switching off. (Is suitable for hotels, restaurants and building).
CONDICIONES DE TRABAJO AMBIENTAL
1 Temperature: Under 35 C
2 If the machine is installed in a rack, then the temperature inside the rack must be
under 45 C.
3 Humidity: 40%----80%
CHAPTER 1 INTRODUCTION OF DM-1225
FEATURE
Automatic frecuency sensor can detec power frecuency (45Hz--63Hz) in differents
areas and stabilizes the dimming output.
The thermo-controlled fan will be activated automatically when the temperature is over
45 C.
The intelligent thermo-protection will cease the output when the temperature is over
85 C and restart output below 65 C.
Each channel can be set as dimming r non-dimming.
Self-testing function to test without a console.
Dimmer level and internal temperature monitor.
Warm up function to protect the loads. (Warm up setting 0%--6%)
Output can be limited from 50% to 100% for overload protection.
Each channel is equipped with a N.F.M.
Easy wiring.
9
,www.triton-blue.com
SPECIFICATION
Power
AC100-240v, 45---63Hz
Output
Maximal outputs is 20A per channel (Please refer to
the safety Introduction)
Protocol
DMX 512
Signal Connector
XLR 5 pin (Male x 1 , Female x 1 )
Dimension
482(W) x 132(H) x 312(D)mm
2 6p4c phone jack
Location
19î 3U standar rack
Weight
13,5 Kg
OPERATION PANEL FUNCTION INTRODUCING
34 5 6 7 8
2
1
1 DMX IN
6
2 N.F.B. (1-6)
3 Channel Button (1-6)
4 Led Display
5
Button
10
9
Button
7
Function Button
9
Channel Button (7-12)
8
Enter Button
10 N.F.B. (7-12)
INTRODUCCION AL PANEL FRONTAL
1
2
3
1 Output terminal board
2 DMX IN
3 DMX IN
4
4 Power input terminal board
10
,www.triton-blue.com
WIRING DIAGRAM
CHAPTER 2 OPERATION
STANDARD DMX 512 SIGNAL
This point flashing when receiving
DMX STAR ADDRESS SETTING
STEP1. Hold ENTER, press
ENTER +
ENTER +
or
: move 1 number forward.
to find the start address.
: move 1 number backward.
Up to 512 Channel
DM-1225 is 12 channels dimmer pack so when setting this units:
1. As the start channel is d.001, the output is from channel 1 to channel 12
2. As the start channel is d.007, the output is from channel 7 to channel 19
11
,www.triton-blue.com
CHANNEL OUTPUT STATUS PREVIEW
STEP 1: Enter to DMX status and press ENTER button.
STEP 2: Press
or
to preview.
Channel 4 = 100% Full
OUTPUT TESTING
STEP1: Press channel button for full load output.
STEP 2: Press channel Buton again for turn off output..
DIMMING / SWITCHING SETTING
STEP 1: Enter to DMX status and press ENTER button
STEP 2: Press FUNC button and LED displays as below.
Default setting: all channel are dimmable
STEP 3: Press
or
to select dimming (d) or switching (S).
(Dimming)
(Switching)
STEP 4 : Press channel button (channel 1---channel 6) to chosse the channel
12
,www.triton-blue.com
STEP 5: Press
or
to choose the channel is dimming or switching..
Channel 1 = Switching
WARN - UP SETTING
STEP 1: Press
STEP 2: Press
FUNC button untill the LCD displays as below
or
to adjust.
All channels are set on 6% for warm
OUTPUT LIMIT SETTING
STEP 1: Press
STEP 2: Press
FUNC button untill the LCD displays as below
or
to adjust
All channel output limit is 86%
INTERNAL TEMPERATURE
STEP 1: Press FUNC button untill the LCD displays as below
Temperature of left side heat sink
Temperature of right side heat sink
DMX STATUS Y DMX ADDRESS
In the middle of any of setting, press ENTER , the machine can immediately return
to DMX status.
13
,www.triton-blue.com
14
,www.triton-blue.com