1
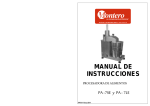
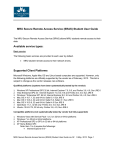
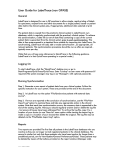
Instructions Manual / Manual de Instrucciones
CAUTION!
HAZARDOUS MOVING PARTS
Disconnect Power Before
Cleaning or Servicing
!ATENCIÓN!
PARTES MOVIBLES PELIGROSAS
Desconecte de la Red Electrica
antes de la Limpieza o Manutención
Food Processor / Procesadora de Alimentos
Office
Phone: 1-800-503-7534 / 305-868-1603
Fax: 305-866-2704
[email protected] - www.skyfood.us
TOLL FREE 1-800-503-7534
Model / Modelos
MASTER SKY
15276.5 - February/2015
SUMMARY / INDICE
1. ENGLISH
01
2. ESPAÑOL
24
MASTER SKY
SUMMARY
1.
1.1
1.2
Introduction
Safety
Main Components
1.3
1.4
Technical Characteristcs
Available Disc and Grilles
02
02
02
04
04
2.
2.1
2.2
2.3
2.4
Installation and Pre Operation
Installation
Pre Operation
Selecting the Disc and Grilles
Selecting the Throat
05
05
05
05
07
3.
3.1
3.2
3.3
3.4
Operation
Starting
Using one Disc
Using a Slicer Disc and Grille
Cleaning
08
08
08
10
12
4.
4.1
4.2
4.3
4.4
4.5
4.6
General Safety Practices
Basic Operation Practices
Safety Produceres and notes before Turning the Machine
Routine Inspection
Operation
After Finishinh the Work
Maintenance
14
14
16
16
17
17
18
5.
5.1
5.2
Analysis and Problems Solving
Problems, Causes e Solutions
Adjust and Components Removal
5.3
Electrical Diagram, Mod. MASTER SKY - 110 and 220 Volts
18
18
21
23
6.
General Advices
23
01
1. INTRODUCTION
1.1
Safety
If and when the Food Processor MASTER SKY is not correctly used, it is
potentially a DANGEROUS machine. Never place your hand inside the product outlet
, nor inside the throats . Only duly trained people shall change the Discs or Grilles ,
shall clean or perform any other maintenance service. To avoid ACCIDENTS follow
the instructions below:
1.1.1 Handle the Discs and grilles carefully, because they have sharp knives
.
1.1.2 Take the electric plug off its socket, before to withdraw any moving
part, change the discs or grilles, or before cleaning or any other maintenance
operation.
1.1.3 Never use any kind of tools , to introduce the food inside the throats ,
other than the pushers provided with the Food Processor .
1.1.4 Never open the frame lid , before to be sure the disc are completely
still
1.1.5 Never throw water directly to the machine
IMPORTANT
This equipment shall not be used by persons ( including children) having mental
or physical reduced capabilities , or insufficient experience or knowledge,
unless they did receive sufficient instructions or supervision regarding its use,
given by a person responsible for the equipment security .
IMPORTANT
If the cord is not in suitable conditions for use, it shall be changed by the
manufacturer, its Authorized Technical Assistant , or by a qualified person , in
order to avoid accidents .
1.2 MAIN COMPONENTS
The Food Processor MASTER SKY is fitted with two safety sensors . When
the Ram Feed Arm is lifted , the machine stops automatically , and will start again
when the Arm is lowered .
02
When the frame lid is opened , the machine stops and starts again when the
lid is closed.
The Food Processor MASTER SKY is a table machine , allowing to perform
different cutting shapes , such as : slices , shreds, scallop, dices , French fries , and
others. It is able to process practically all vegetables , preserving their nutrients , their
colors, their juices , and to avoid wasting .
All the machine different parts are mainly manufactured using high grade
materials , as food recommended aluminum , and polished stainless steel .
PICTURE-01
01
02
03
04
05
06
07
08
09
01
Ram Feed Arm
Round Pusher
ON/OFF switch
Round Throat
Motor Housing
Frame
Oblong Pusher
Oblong Throat
Lid
07
02
03
08
04
05
09
06
PICTURE-02
01
02
03
01
02
03
04
05
- Slicing Disc
- Dicing Grille
- Expeller Dish
- Shaft
- Grilles Support
04
05
03
1.3 Technical Characteristics
Table - 01
Characteristics
Unit
Average Production lb/h
Voltage
V
Electric Current
A
Frequency
Hz
Power Rating
CV
Consumption
kW.h
Height
inches
Width
inches
Depth
inches
Net Weight
lb
Gross Weight
lb
PAIE
600 to 800
110/220
10,8
50/60 (*)
0,25
0,2
17 3/8"
9 7/8"
23 1/4"
49
71
(*) Observation : Frequency will be the one indicated on motor label
1.4 Available Discs
TABLE 02 gives the food processor available discs
DISCS SUPPLIED WITH
THE EQUIPMENT
DESIGNATION
OPTIONAL DISCS
(sold separately)
DESIGNATION
SLICER DISC - 1 mm
SLICER DISC - 3 mm
SLICER DISC - 5 mm
SLICER DISC - 10 mm
SERRATE SLICER DISC - 3 mm
SERRATE SLICER DISC - 7 mm
SCALLOP CUT DISC - 2 mm
SCALLOP CUT DISC -3 mm
SCALLOP CUT DISC - 4 mm
SHREDDER DISC - 3 mm
SHREDDER DISC - 5 mm
SHREDDER DISC - 8 mm
CRIMPI NG DISC (JULIENE) - 2,5 mm
CRIMPI NG DISC (JULIENE) - 3 mm
CRIMPI NG DISC (JULIENE) - 7 mm
DICING DISC - 8x8 mm
DICING DISC - 12x12 mm
DICING DISC - 16x16 mm
FRENCH FRY DISC - 10 mm
GRATER DISC
04
MODEL
-
MODEL
E1
E3
E5
E10
EH3
EH7
W2
W3
W4
Z3
Z5
Z8
H2,5
H3
H7
GC8
GC12
GC16
GP
V
2. INSTALLATION AND PRE-OPERATION
2.1
Installation
The Food Processor should be placed on a leveled working surface ,
preferably 850 mm high above floor . Below the outlet, place a recipient to collect the
processed product .
Control the electricity source voltage , it shall be the same as the Food
Processor motor voltage, 110 or 220 V . The label stuck on the cord will give you the
right voltage.
The cord has a plug with two round pins and a grounding wire (earth wire) .
The three shall be well connected before to switch ON the machine .
Picture - 03
Cord With Grounding
Motor Housing
Leveled working Surface
Maximum height = 850mm
2.2
Pre- Operation
Be sure the Food Processor is stable . Before to start operation wash the discs
and the grilles with hot water and neutral soap , rinse and dry before to replace them into
the machine .
2.3
Selecting the Discs and Grilles
To be supplied as optional a complete range of discs and grilles are at your
disposal , to process a wide vegetables and fruits products .
05
Table 03 , Selecting Products Cuts , give the list of discs and grilles and their
combinations to be selected to obtain many cuts .
IMPORTANT
The Selecting Products Cuts Table aim is to suggest some kind of cuts to be
used
with some product. The result of the cuts depends on the condition,
the type and the quality of the processed product .
Table - 03
Selecting Products Cuts Table
Product
Beet
Carrots
Cabbage
Mushroom
Onion
Pepper
Radish
Leaves (*)
Potatoes
Bananas
Oranges
Apples
Papayas
Coco Nut
Kind of Cut
Slices
Scallop Cut
Dices
Shredder
Crimping Slices
Slices
Scallop Cut
Dices
Shredder
Crimping slices
Grater
Strips
Shredder
Slices
Dices
Slices
Dices
Slices
Slices
Scallop Cut
Shredder
Crimping Slices
Strips
Slices - Chip's
French Fry
Dices
Shredder
Crimping Slices - Juliene
Scallop Cut
Slices
Slices
Slices
Dices
Sherdder
Grater
(*) Only some kind of leaves. Consult your Dealer.
06
Discs
E1, E3, E5 e E10
W2, W4
E10 + GRADE CUBO
Z3, Z5 e Z8
H2,5, H3, H7, EH3, EH7
E1, E3, E5 e E10
W2, W4
E10 + GRADE CUBO
Z3, Z5 e Z8
H3, H7, EH3, EH7
V
E1, E3, E5 e E10
Z3, Z5 e Z8
E1, E3, E5
E10 + GRADE CUBO
E1, E3, E5, e E10
E10 + GRADE CUBO
E1, E3, E5, e E10
E1, E3, e E5
W2, W4
Z3, Z5 e Z8
H3, H7, EH3, EH7
EH3 , EH7
E1, E3 e E5
E10 + GRADE PALITO
E10, GRADE CUBO
Z3, Z5 e Z8
H3, H7, EH3, EH7
W2, W4
E3 e E5
E5 e E10
E1, E3 e E5
E10 + GRADE CUBO
Z3, Z5 e Z8
V
IMPORTANT
The expeller dish shall always be used , notwithstanding the other discs or
The expeller dish is used to help the processed products way out, ejecting
them.
Picture - 04
Expeller Dish
2.4
Selecting the Throat
IMPORTANT
Under no circumstances , hands or other objects , unless the pushers
supplied
with the machine , shall be used to push the food inside
the throats .
The use of the correct throat , with the correct pusher , shall be obeyed .
The Ram Feed Arm must be steadily pressed , because on the contrary the
food will be displaced inside the throat , producing irregular cuts .
The Food Processor PAIE works at high speed , therefore its feeding shall be
equally fast .
For smaller size products , such as carrots, a better cut achievement is
obtained using the Round Pusher B (Pic.-05) .
When to prepare a fruits or vegetables combination , using only one disc , or
one disc and a grille , always start cutting the softer product , finishing with the hard
ones .
When using the Grater Disc , it will be possible to change the grain size . With
a light pressure the grains will be thinner, increasing the pressure the resulting grain
size will be larger .
07
Picture - 05
A
B
3. Operation
3.1 Starting
IMPORTANT
Unplug the machine before to change the discs or the grilles.
Wait till the disc is completely still , before to open the frame lid .
Before starting be assured the frame lid is surely closed and locked .
To start the machine press the ON/OFF switch green button , on the
machine right side .
The Food Processor MASTER SKY has two safety devices :
One of them is meant to avoid the machine to start with an open lid , and
therefore to guaranty the operator safety , it shall not be used to switch OFF the
machine , rising the lid .When the frame lid is lowered the machine starts
automatically .
The other safety device switch OFF the machine when the Ram Feed
Arm is lifted , the machine will run again when the Ram Feed Arm is lowered .
3.2 Using One Disc
IMPORTANT
The Expeller Dish shall always be on place , independently of the
disc or grille currently in use . Before to open the frame lid , be
assured the disc is completely still .
08
‘All the discs shall fit with ease on the shaft , by means of a little turning
movement .
Foto-06
Any contact between the disc and the frame lid , means the disc is wrongly
placed .
Follows the instruction to place and remove the discs :
3.2.1 With the machine switched OFF and the disc still, move the frame lid
open/close trigger , placed below on the right side , as shown on the open/close label
- Picture - 06 stuck on the lid . With the frame lid open , be careful with the Ram Feed
Arm which has to be handled slowly .
9.AVISOS GENERALES
SIEMPRE desligue la maquina antes de la limpieza o manutención.
PROVIDENCIE espacio suficiente alrededor de la maquina para evitar accidentes.
SIEMPRE mantenga el suelo seco. Suelos mojados pueden causar deslizamientos.
SIEMPRE desligue la maquina cuando hubiera caida de energia.
NUNCA deje suciedad o agua entrar en los componentes electricos y mecánicos de la maquina.
NO modifique las caracteristicas originales de la maquina.
NO remova o rompa las calcomanias de seguridad y identificación.
* La vida de servicio - 2 años para la jornada de trabajo normal
Picture - 06
10.DIAGRAMA ELECTRICO MODELO PAIE
3.2.2
Place the expeller dish , care to be taken to have it perfectly fitted .
3.2.3 Be careful with the disc blades , fit the disc on the shaft and turn it lightly
anticlockwise, to have it perfectly locked .
Contactora
3.2.4 Close the frame lid , till to have it securely locked .
11. CONSEJOS GENERALES
3.2.5
To remove the disc proceed inversely .
To place and to remove the disc follow Picture - 07 .
- Do not wear loose fitting clothes while operating the unit. Do not use bracelets or any other piece of jewelry. Have your
hair always shortened and held up (use hair fishnets if necessary) in a way it cannot reach any part of the machine. Roll up
any loose sleeves.
- SKYFOOD is not responsible for any harm or injury caused by the negligent or inappropriate use of this equipment by
any operator. This equipment must be operated only by persons whose age equals or exceeds 18 years old, in a safe and
sound state of mind, free from the influence of any kind of drugs and alcohol, that received proper training and
instructions regarding the correct operation of this machine, that are wearing correct and authorized safety clothes. All
and any kind of modifications carried on and applied to this machine immediately nullifies any kind of warranty and may
result in harm and injuries to the individuals operating this machine and to individuals that are located in the machine
surrounding areas while it is being operated.
- Under no circunstances place your hands in the moving parts of the machine while it is being used. Make sure the
machine has come to a complete stop before acessing the processed ingredients.
09
30
Picture - 07
Foto-05
Reja French Fry
Slicer Disc E5
Expeller Dish
Reja Cubo
3.3 Using a Slicer Disc and a Grille
IMPORTANT
The Expeller Dish shall always be on place , independently of the disc or
grille currently in use . Before to open the frame lid , be assured the disc is
completely still .
The grille shall be fitted in between the expeller dish and the disc , that will
have to be perfectly clean to fit perfectly .
8.LIMPIEZA
Limpie la maquina antes de la primera operación y después de cada operación.
IMPORTANTE: Siempre desconecte la maquina de la red electrica antes de empezar
la limpieza.
Abra la tapa. Remova la tapa empujandola para arriba hasta que la misma salga
completamente de la bisagra, como muestra la Foto 06.
Only Slicer disc shall be used : E1, E5, E10, EH3, EH7
Follows the instruction to place and remove the discs and the grille :
3.3.1 With the machine switched OFF and the disc still, move the frame lid
open/close trigger , placed below on the right side , as shown on the open/close
label - Picture - 06 stuck on the lid . With the frame lid open , be careful with the
Ram Feed Arm which has to be handled slowly .
Lave todas las partes removibles de la maquina con agua caliente y jabón neutro. Pase un
paño húmedo por el lado externo de la maquina y sequela usando un paño seco y limpio.
Nunca use objetos de metal como: cuchillas, tenedores, etc. para ayudar a limpiar las
laminas. Usted puede usar una zanahoria o una papa para hacer eso.
IMPORTANTE: La maquina no es protejida contra jorros de agua. No la limpie con
jorros de vapor, manguera de presión o metodos similares. No coloque la maquina
en la pila o debajo del grifo, eso podrá resultar en cortocircuito o en serios perjuicios
a la maquina.
29
IMPORTANT
The Slicer Dented Discs EH3 and EH7 are suitable to cut products with
skin and leaves ( example : tomatoes and lettuce ) .
10
Empezando la operación:
Picture - 06
Antes de inserir los discos en la maquina averigue si la misma está desligada y
desconectada de la red electrica.
Para abrir la Tapa tire la traba que se encuentra abajo de la tapa en la parte frontal al
lado derecho.
Averigue si el Disco Expelidor está posicionado en el eje. El Disco Expelidor debe
siempre ser el primer disco a ser posicionado en el eje, y debe estar bién encajado.
Después seleccione el disco deseado y lo coloque cuidadosamente en el eje
girandolo en el sentido horario para fijarlo, como muestra la Foto 04 abajo.
Cierre la tapa No.09 (Foto 01) y averigue si la traba está trabando bien la tapa antes
de ligar la maquina.
3.3.2Place the expeller dish , care to be taken to have it perfectly fitted.
3.3.3 After to have selected the desired grille , place it with the grille itself on
the left side of the machine . Then fit it into the machine frame hollow .
Para ligar la maquina use la Llave Liga/Desliga No.03 (Foto 01).
IMPORTANTE: Cuidado al manosear los Discos.
Foto-04
3.3.4 Be careful with the disc blades , fit the disc on the shaft and turn it lightly
anticlockwise, to have it perfectly locked .
Disco Cortador E5
3.3 5 Close the frame lid , till to have it securely locked .
To place and to remove the disc follow Picture - 08 and 09 .
Disco Expelidor
Picture - 08
Haciendo Cubos o Papas Fritas:
Slicer Disc E3
Para hacer cubos Usted necesita usar un Disco Cortador y una Reja Cubo. Para
hacer papas fritas es también necesario usar un Disco Cortador junto con la Reja de
French Fries.
French Fry Grille
IMPORTANTE: Para obtener cubos y papas fritas solamente utilize la Entrada
Semi-circular.
Las rejas deben ser encajadas en su debido lugar, de modo que las laminas se
queden en el lado izquierdo del eje. Después seleccione el Disco Cortador deseado
y pongalo arriba de la Reja, como muestra la Foto-05 (pagina 05).
Expeller Dish
11
Para remover los discos siga los pasos arriba pero inversamente.
28
Picture - 09
5.INSTALACIÓN
La Procesadora de Alimentos PAIE debe ser instalada en una superficie nivelada, non
derrapante. Solamente personas calificadas y/o experientes deben hacer la instalación.
La altura de la superficie del soporte debe ser de 850mm. En la frente de la salida del
producto procesado debe haber un espacio para se colocar una bandeja para colectar el
producto.
French Fry Grille
Verifique el voltaje. El voltaje del motor debe ser el mismo que lo de la red electrica. Atierre
la maquina correctamente.
Contacte a su Distribuidor si Usted tiene alguna pregunta o problema en instalar la
maquina.
6-PRE-OPERACIÓN
Averigue si la maquina esta firme en su posición, no es permitido movimiento en la
superficie del soporte.
Lave todos los discos con agua caliente y jabón neutro, y sequelos.
IMPORTANTE: El disco expelidor, mostrado en la Foto 03 abajo, debe siempre ser
colocado abajo de cualquier disco.
Dicing Grille
Foto-03
Disco Expelidor
7.OPERACIÓN
Utilización de las Entradas de Alimentación:
Para se obtener un buén resultado de la operación seleccione la entrada correcta para
introducir el alimento en la maquina, por ejemplo: pequeños alimentos como zanahoria
deben ser introducidos en la entrada tubular No.04 (Foto - 01) y alimentos más grandes,
como papas, deben ser introducidos en la entrada semi-circular No.08 (Foto - 01).
Debese aplicar una cierta presión en el empujador, de lo contrario el alimento puede
quedarse parado dentro de los tubos alimentadores causando cortes irregulares.
La Procesadora de Alimentos PAIE trabaja en alta velocidad, y de la misma manera ella
debe ser alimentada.
Cuando preparar ensalada empieze siempre procesando el producto más blando y
después los más duros.
Usted puede controlar el tamaño de los granos cuando usar el Disco Rallador V a través
de la presión que se aplica en el empujador, si Usted coloca poca presión en el
empujador un grano fino será obtenido, de lo contrario granos más grandes serán
obtenidos.
27
3.4 Cleaning
IMPORTANT
Never clean the machine connected to the electric network , unplug it .
Before to open the frame lid , be sure the disc is completely still .
To clean the machine , unplug it .
All the moving parts shall be removed and cleaned .
Follows the instructions to remove the moving parts :
3.4.1 With the machine switched OFF and the disc still, move the frame lid
open/close trigger , placed below on the right side , as shown on the open/close label Picture - 06 stuck on the lid . With the frame lid open , be careful with the Ram Feed
Arm which has to be handled slowly .
12
Foto-02
Picture - 06
01
04
01
02
03
04
Disco Cortador
Disco Reja 12 x 12mm
Disco Expelidor
Eje
02
03
05
3.4.2 Be careful with the blades . Hold the disc , turn it anticlockwise and lift
it , it will be removed
Picture - 10
3.CARACTERISTICAS TECNICAS
Tabla-01
Característica
Capacidad de Carga
Voltaje
Corriente Eléctrica
Frecuencia
Potencia
Consumo
Altura
Ancho
Profundidad
Peso Neto
Peso Bruto
Unidad
PAIE
kg/h
hasta 400
V
110/220 (*)
A
10,8
Hz
50/60 (*)
HP
0,25
kW.h
0,2
mm
440
mm
250
mm
590
kg
24,5
kg
25,5
* La máquina es provida con frecuencia y voltage unicos, conforme solicitado en el pedido.
1.4 Discos Disponibles
3.4.3 Hold the inferior left side of the grille and lift it , always being careful
with the blades .
Tabla-02
En la TABLA 02 están
listados los discos
disponibles para su
procesadora.
Picture - 11
French Fry Grille
13
DISCOS SUMINISTRADOS
CON EL EQUIPO
DESIGNACIÓN
DISCOS OPCIONALES
(vendidos por separado)
DESIGNACIÓN
DISCO CORTADOR - 1 mm
DISCO CORTADOR - 3 mm
DISCO CORTADOR - 5 mm
DISCO CORTADOR - 10 mm
DISCO CORTADOR DENTADO - 3 mm
DISCO CORTADOR DENTADO - 7 mm
DISCO CORTE ONDULADO - 2 mm
DISCO CORTE ONDULADO -3 mm
DISCO CORTE ONDULADO - 4 mm
DISCO DESHILADOR - 3 mm
DISCO DESHILADOR - 5 mm
DISCO DESHILADOR - 8 mm
DISCO DESH. CUADRADRO (JULIENE) - 2,5 mm
DISCO DESH. CUADRADRO (JULIENE) - 3 mm
DISCO DESH. CUADRADRO (JULIENE) - 7 mm
DISCO PARA CORTE CUBO - 8x8 mm
DISCO PARA CORTE CUBO - 12x12 mm
DISCO PARA CORTE CUBO - 16x16 mm
DISCO PARA CORTE BASTON - 10 mm
DISCO RALLADOR
26
MODELO
-
MODELO
E1
E3
E5
E10
EH3
EH7
W2
W3
W4
Z3
Z5
Z8
H2,5
H3
H7
GC8
GC12
GC16
GP
V
AVISO A LOS PROPIETARIOS Y OPERADORES
La Procesadora de Alimentos es desarollada para procesar alimentos eficientemente y con
seguridad. Aúnque el usuario sea bien entrenado y supervisionado existe la posibilidad de un serio
accidente. Es responsabilidad del propietario asegurar que la maquina sea usada correctamente y
seguramente, siguiendo las instrucciones contenidas en este Manual y los requisitos de las leyes
locales.
3.4.4 Remove the frame lid . To do that slide it backwards , until have it
completely removed from the frame .
Picture - 12
1.PRINCIPALES PRECAUCIONES
La Procesadora de Alimentos puede ser una maquina potencialmente peligrosa cuando usada
incorrectamente. Limpieza, manutención o servicio deben ser hechos solamente por operadores
experientes. Por lo tanto, lea todas las siguientes instrucciones con atención para evitar accidentes:
PARA USO COMERCIAL SOLAMENTE por operadores calificados.
ANTES de limpiar la maquina desconectela de la red electrica.
NUNCA use herramientas que no pertenezcan a la maquina para ayudar en la operación.
MANTENGA las manos lejos de las partes movibles, siempre use la palanca empujadora.
NUNCA ponga las manos dentro de los tubos de alimentación ni en la salida del producto procesado.
NUNCA levante la tapa antes de la parada completa del disco.
NUNCA conecte la maquina a la red electrica con las manos o ropas mojadas.
NUNCA chorree agua o otro liquido directamente al motor, llave electrica o en cualquier otro
componente electrico.
SIEMPRE instale el equipo en una area de trabajo con luz y espacio adecuados y lejos de niños y
visitantes.
NUNCA opere la maquina sin las calcomanias de Atención y sin el Manual de Instrucciones al alcanze
del usuario.
NUNCA deje la maquina trabajando sola.
SIEMPRE atierre la maquina adecuadamente.
PARE la maquina inmediatamente si Usted escuchar ruidos anormales o sentir que accidentes
pueden ocurrir.
CONTACTE a su Distribuidor si hubiera cualquier problema con la instalación y/o operación de esta
maquina.
3.4.5
Wash all the parts with hot water and soap , rinse them and dry
them .
3.4.6 To clean food eventually remaining stuck to the grilles , do not use
hard objects such as knives , forks and similar . Use a potato or a carrot to remove
4. General Safety Practices
IMPORTANT
If any item from the GENERAL SAFETY NOTIONS section is not applicable to
your product, please disregard it.
2.PRINCIPALES COMPONENTES
La tapa es provida con una llave de seguridad, o sea, cuando abierta, el motor para de funcionar, y
vuelve a funcionar cuando la tapa es nuevamente cerrada.
Lo mismo ocurre con la palanca empujadora, cuando levantada el motor para de funcionar, y
vuelve a funcionar cuando la palanca es bajada.
Algunas partes de la maquina son hechas en aluminium polido y otras en acero inoxidable.
Foto-01
01
07
01
02
03
04
05
06
07
08
09
02
03
08
09
04
05
06
25
Palanca Empujadora
Empujador
Llave Liga/Desliga
Entrada Tubular
Gabinete
Caja de los Discos
Empujador
Entrada Semi-circular
Tapa
The following safety instructions are addressed to both the operator of the
machine as well as the person in charge of maintenance. The machine has to be
delivered only in perfect conditions of use by the Distributor to the user. The user
shall operate the machine only after being well acquainted with the safety
procedures described in the present manual. READ THIS MANUAL WITH
ATTENTION.
4.1 Basic Operation Practices
4.1.1 Dangerous parts
Some areas of the electric device have parts that are connected or have
parts connected to high voltage. These parts when touched may cause severe
electrical shocks or even be fatal.
Never touch manual commands such as switches, buttons, keys and knobs
with your hands wearing wet clothes and/or wet shoes. By not following these
instructions operator could be exposed to severe electrical shocks or even to a fatal
situation.
14
4.1.2 Warnings
The operator has to be well familiar with the position of ON/OFF Switch to
make sure the Switch is easy to be used when necessary. Before any kind of
maintenance, physically remove the plug from its socket .
Provide space for a comfortable operation thus avoiding accidents.
Water or oil spilled on the floor will turn it slippery and dangerous. Make sure the floor
is clean and dry.
Before to give any manual command (switch, buttons, turn keys or lever) be
sure the command is the correct one . Check this manual for further details if
necessary.
Never use a manual command ( switch , buttons , lever ) unadvisedly.
If any work is to be made by two or more persons, coordination signs will have
to be given for each operation step . Every step of the operation shall be taken only if
a sign has been made and responded.
4.1.3 Advices
In case of power shortage, immediately turn the machine OFF.
Use recommended or equivalent lubricants, oils or greases .
Avoid mechanical shocks as they may cause failures or malfunction.
Avoid penetration of water, dirt or dust into mechanical or electrical
components of the machine.
DO NOT MODIFY original characteristics of the machine.
DO NOT REMOVE, TEAR OFF OR MACULATE any safety or identification
labels . If any labels has been removed or is no longer legible contact your nearest
dealer for replacement.
15
INDICE
01-PRINCIPALES PRECAUCIONES
25
02-PRINCIPALES COMPONENTES
25
03-CARACTERISTICAS TECNICAS
26
04-DISCOS Y REJAS
26
05-INSTALACIÓN
27
06-PRE-OPERACIÓN
27
07-OPERACIÓN
27
08-LIMPIEZA
29
09-AVISOS GENERALES
30
10-DIAGRAMA ELECTRICO
30
11-DIAGRAMA ELECTRICO
30
24
5.3 Electrical Diagram Mod. MASTER SKY
110 and 220 Volts
F
N
4.2 Safety Procedures and Notes Before Turning Machine
ON
IMPORTANT
Carefully read ALL INSTRUCTIONS of this manual before turning the
machine ON. Be sure to be familiar with the set and that you have well
understood all information contained in this manual. If you have any
question contact your supervisor or your nearest Dealer.
4.2.1 Danger
M
PUSH-BUTTON SWITCH
An electric cable or electric wire with damaged insulation could cause
electrical shocks as well as electrical leak. Before use check conditions of all wires
and cables.
MAGNET SENSOR
4.2.2 Advices
CONTACTOR
ON/OFF SWITCH
6. GENERAL ADVICES
- Do not wear loose fitting clothes while operating the unit. Do not use bracelets or any other piece of
jewelry. Have your hair always shortened and held up (use hair fishnets if necessary) in a way it
cannot reach any part of the machine. Roll up any loose sleeves.
- SKYFOOD is not responsible for any harm or injury caused by the negligent or inappropriate use of
this equipment by any operator. This equipment must be operated only by persons whose age equals
or exceeds 18 years old, in a safe and sound state of mind, free from the influence of any kind of drugs
and alcohol, that received proper training and instructions regarding the correct operation of this
machine, that are wearing correct and authorized safety clothes. All and any kind of modifications
carried on and applied to this machine immediately nullifies any kind of warranty and may result in
harm and injuries to the individuals operating this machine and to individuals that are located in the
machine surrounding areas while it is being operated.
Be sure ALL INSTRUCTIONS in this manual have been thoroughly
understood. Every function and operational procedure have to be very clear to the
operator.
Any manual command ( switch, button or lever ) shall be given only after to
be sure it is the correct one .
4.2.3 Precautions
The electric cable has to be compatible with the power required by the
machine,
Cables touching the floor or close to the machine need to be protected against
short circuits.
Oil reservoirs if any have to be full up to the required level as indicated.
Check level and add oil if necessary.
4.3 Routine Inspection
4.3.1 Advice
When checking the tension of the belts or chains, DO NOT introduce your
- Under no circunstances place your hands in the moving parts of the machine while it is being used.
Make sure the machine has come to a complete stop before acessing the processed ingredients.
16
23
4.3.2 Precautions
Check if motors, belts, chains or gears and the turning or sliding parts of the
machine produce abnormal noises .
Check the tension of the belts and chains and replace the set when belt,
chain or gears show signs of being worn out.
When checking tensions of belts or chain DO NOT introduce your fingers
between belts and pulleys , nor between the chains and gears.
Check protections and safety devices to make sure they are working properly.
4.4 Operation
4.4.1 Advices
Be sure your hair is not loose in order to avoid getting caught by turning parts
which could lead to a serious accident. Tie your hair up well and/or cover your head
with a scarf.
The operation performed by not trained or skilled personnel shall be
forbidden.
Never touch turning parts with your hands or in any other way.
NEVER operate machine without all original safety devices under perfect
conditions.
4.5
After Finishing The Work
5.2.3 Removing the Motor Housing
a)
remove the frame lid ( 10308.0) and any disc assembled on the
machine , to do so follow the instructions at item 3.4 .
b)
Place the machine had down, and remove the four feet (03086.4) ,
unscrewing them manually . Remove them with the protection plate(08826.9).
c)
With the help of a screwdriver, partially loose the two screws
(01639.0) placed behind the electric motor (A) , that fix the motor housing (08708.4).
Then remove completely the other four screws (01639.0) that fix the motor housing
(08708.4)
d)
Move the motor housing (08708.4) towards the cord side until it gets
out of the two screws that were initially partially loosen . The motor housing will be
removed .
5.2.4 Belts
To achieve a good performance of the machine and to have a long life belt, the
belt must be perfectly adjusted . If the belts are loosen they will slide during operation.
As well as, care must be taken not to tight the belt too much because it will
prematurely wear the bearings .
To adjust the belt , after having removed the motor housing (08708.4) , item
5.2.3 , using a 13 mm spanner, loose the two screws (03793.1) fixing the electric
motor (A) , then using a large screwdriver , press the electric motor to tight the belt ,
and tight again the two screws .
5.2.5 Safety Sensor
4.5.1 Precautions
Always TURN THE MACHINE OFF by removing the plug from the socket
before cleaning the machine. Never clean the machine unless it has come to a
complete stop. Put all components back to their functional positions before turning it
ON again. Check level of oil, if any . DO NOT place your fingers in between belts
and pulleys nor chains and gears.
17
To adjust the Ram Feed Arm safety device , open the frame lid , and using a
7mm spanner loose the M4 nut (09205.3). With the help of a 1.5 mm allen key adjust
the allen screw M4 (10193.1) until the push button (08698.3) inside the machine acts.
22
Causes
Problems
Solutions
4.6
Maintenance
4.6.1 Danger
* disc is wrongly placed.
* place the disc on its rigght
position.
Any maintenance with the machine in working situation is dangerous. TURN
IT OFF BY PULLING THE PLUG OFF THE SOCKET DURING MAINTENANCE.
IMPORTANT
Pull the plug off its socket when any emergency arises .
* Abnormal noises.
* The grilles support is
dirty.
* Cealn the support.
4.6.2 Advice
Electrical or mechanical maintenance has to be undertaken by qualified
personal. Person in charge has to be sure that the machine is under TOTAL SAFETY
conditions when working .
* Bearings failure.
* Call technical assistence.
5 Analysis and Problems Solving
5.2
Adjustments and Components Removal
5.2.1 Blades Sharpening
Blades may be removed and thence they may be sharpened with ease .
However a special care must be given to keep the right cutting angle . The dicing grille
and the French fry grille blades must be sharpened using a thin sandpaper , or a
sharpening stone .
5.1 Problem, causes and solutions
The Food Processor MASTER SKY were designed to operate with the need
of minimum maintenance but the natural wearing caused by long use of the equipment
may occasionally cause some malfunctions.
If such problem occurs with your processor refer to Table 04 in which the most
common situations are listed with recommended solutions.
* Service life – 2 years for regular work shift
5.2.2 Adjustment of the French fry grille
When the French fry sticks start to become irregular, then the grille blades
tension shall be tightened . With the help of a screwdriver , loose the two screws under
the grille. Then turn the two screws on the grille front side , until the grille blades tight .
To finish tight again the two screws under the grille .
Table - 04
Problems
Irregula Cuts
21
Causes
* Disc or Feeding
procedure do not follow
c h a p t e r
2
recommendations.
18
Solutions
* Refer to charter 2 and
follow the instructions
Problems
* The cut product remains
inside the machine.
Causes
Solutions
* The expeller dish is not in
place.
* Electric Failure.
* Motor belts are sliding.
* The ram feed arm safety
device has a bad contact or
is out of order.
Problems
* Place the expeller dish, as
recommended at item 3,2
and 3,3l.
* the ON/OFF switch has a
bad contact.
* he plug or the cord has a
bad contact.
* The food Processor does
not start.
* Electricity shortage.
19
Solutions
* The machine is
unplugged.
* Insert the plug on its socket.
* The frame lid reed switch
sensor is not working.
* Call technical assistence.
*The frame lid is open.
* Close the lid.
* See if the machine cord
is plugged on its socket.
*Tight the belt in
accordance with item 5,2l.
* The food Processor does
not start.
* The ram feed arm sensor is
not working.
* Adust the safety device,
and check the electric
contacts.
* The disc stops during
operation.
* The frame lid safety device
has a bad contact.
Causes
* Adust the safety device, and
check the electric contacts as
recommended at item 5,2.
* The contactor failed.
* Call technical assistence.
* Electric system probelms.
* Call technical assistence.
* Electric motor Problem.
* Call technical assistence.
* Call technical assistence.
* Check the contacts.
* Burn smell, or smoke.
* Check the cord to find out
if there is an interruption,
and check the plug pins.
* The machine starts but the
disc delays to begin turning.
* Belts are sliding.
* the machine starts but the
disc delays to begin turning.
* The motor starting
capacitor failed.
* Tight the belts following
item 5.2 instructios.
* Check electricity supply.
20
* Call technical assistence.