1
{
STIHL KA 85
Manual de instrucciones
Instruction Manual
E Manual de instrucciones
1 - 27
G Instruction Manual
28 - 53
español
© ANDREAS STIHL AG & Co. KG, 2014
0458-513-8721-A. VA3.B14.
0000000794_006_E
Impreso en papel blanqueado sin cloro.
Los colores de la impresión contienen aceites vegetales, por lo
que el papel es reciclable.
Original de Instrucciones de
servicio
Índice
Sistema de acople multifunciones
Notas relativas a este manual de
instrucciones
Indicaciones relativas a la
seguridad y técnica de trabajo
Herramientas de acople permitidas
Montar el asidero tubular cerrado
Montar la argolla de porte
Combustible
Repostar combustible
Arrancar / parar el motor
Indicaciones para el servicio
Limpiar el filtro de aire
Ajustar el carburador
Rejilla parachispas en el
silenciador
Bujía
Cambiar el cordón de arranque /
resorte de retracción
Guardar la máquina
Instrucciones de mantenimiento y
conservación
Minimizar el desgaste y evitar
daños
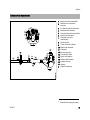
Componentes importantes
Datos técnicos
Accesorios especiales
Indicaciones para la reparación
Gestión de residuos
{
KA 85 R
2
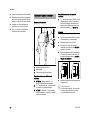
Distinguidos clientes:
2
Muchas gracias por haber depositado
su confianza en un producto de calidad
de la empresa STIHL.
3
7
8
9
10
11
12
14
15
16
17
18
19
21
Este producto se ha confeccionado con
modernos procedimientos de
fabricación y amplias medidas para
afianzar la calidad. Procuramos hacer
todo lo posible para que usted esté
satisfecho con este producto y pueda
trabajar con él sin problemas.
En el caso de que tenga usted alguna
pregunta sobre este producto, diríjase a
su distribuidor STIHL o directamente a
nuestra empresa de distribución.
Atentamente
Dr. Nikolas Stihl
22
24
25
26
26
27
27
Este manual de instrucciones está protegido por derechos de autor. Nos reservamos todos los derechos, especialmente el
derecho a la reproducción, traducción y elaboración con sistemas electrónicos.
1
español
Los motores universales para acople
multifunciones se denominan también
máquinas básicas en este manual de
instrucciones.
Sistema de acople
multifunciones
Las máquinas a motor permitidas para
el acople figuran en el capítulo
"Máquinas básicas permitidas".
+
Notas relativas a este
manual de instrucciones
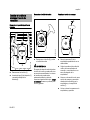
Símbolos gráficos
Todos los símbolos gráficos existentes
en la máquina están explicados en este
manual de instrucciones.
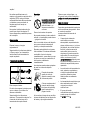
Marcación de párrafos de texto
ADVERTENCIA
..
..
002BA532 KN
+
Advertencia de peligro de accidente y
riesgo de lesiones para personas y de
daños materiales graves.
En el sistema de acople multifunciones
STIHL se combinan diferentes motores
universales y herramientas de acople
para constituir una máquina. La unidad
operativa constituida por el motor
universal para acople multifunciones y
la herramienta de acople se denomina
máquina en este manual de
instrucciones.
Por lo tanto, los manuales de
instrucciones para el motor universal
para acople multifunciones y la
herramienta de acople constituyen el
manual de instrucciones completo para
la máquina.
INDICACIÓN
Advertencia de daños de la máquina o
de los diferentes componentes.
Perfeccionamiento técnico
STIHL trabaja permanentemente en el
perfeccionamiento de todas las
máquinas y dispositivos; por ello, nos
reservamos los derechos relativos a las
modificaciones del volumen de
suministro en la forma, técnica y
equipamiento.
De los datos e ilustraciones de este
manual de instrucciones no se pueden
deducir por lo tanto derechos a
reclamar.
Antes de ponerla en marcha por primera
vez, leer con atención siempre los dos
manuales de instrucciones y guardarlos
en un lugar seguro para posteriores
consultas.
2
KA 85 R
español
Indicaciones relativas a la
seguridad y técnica de
trabajo
Será necesario tomar
medidas de seguridad
especiales al trabajar con
una máquina a motor.
Antes de ponerla en servicio por primera vez, se
han de leer siempre con
atención los dos manuales de instrucciones
(motor universal para
acople multifunciones y
el de la herramienta de
acople) y se han de guardar luego en un lugar
seguro para posteriores
consultas. La inobservancia de los manuales de
instrucciones puede
tener consecuencias
mortales.
Observar las normas de seguridad del
país, de p. ej. las Asociaciones
Profesionales del ramo, organismos
sociales y autoridades competentes
para asuntos de prevención de
accidentes en el trabajo y otras.
Al trabajar por primera vez con esta
máquina: dejar que el vendedor o un
experto le muestre cómo se maneja con
seguridad – o tomar parte en un cursillo
apropiado.
KA 85 R
Los menores de edad no deberán
trabajar con esta máquina – a excepción
de jóvenes mayores de 16 años que
estén aprendiendo bajo la tutela de un
instructor.
No dejar que se acerquen niños,
animales ni espectadores.
Si la máquina no se utiliza, se deberá
colocar de forma que nadie corra
peligro. La máquina deberá ser
inaccesible para personas ajenas.
El usuario es el responsable de los
accidentes o peligros que afecten a
otras personas o sus propiedades.
Prestar o alquilar esta máquina a motor
únicamente a personas que estén
familiarizadas con este modelo y su
manejo – entregarles siempre los
manuales de instrucciones del motor
universal para acople multifunciones y
de la herramienta de acople.
El uso de máquinas a motor que emitan
ruidos puede estar limitado
temporalmente por disposiciones
nacionales o también comunales.
Para trabajar con esta máquina a motor,
se deberá estar descansado,
encontrarse bien y estar en buenas
condiciones.
Quien por motivos de salud no pueda
realizar esfuerzos, debería consultar
con su médico si puede trabajar con una
máquina a motor.
Sólo para implantados con marcapasos:
el sistema de encendido de esta
máquina genera un campo
electromagnético muy pequeño. No se
puede excluir por completo que influya
en algunos tipos de marcapasos. Para
evitar riesgos sanitarios, STIHL
recomienda que consulte a su médico y
al fabricante del marcapasos.
Tras la ingestión de bebidas alcohólicas,
medicamentos que disminuyan la
capacidad de reacción, o drogas, no se
debe trabajar con esta máquina a motor.
Emplear la máquina – según la
herramienta de acople utilizada – sólo
para los trabajos especificados en el
manual de instrucciones de la
herramienta de acople.
No se admite utilizar esta máquina a
motor para otros trabajos, ya que puede
originar accidentes o daños en la
misma. No modificar este producto – ello
también puede causar accidentes o
daños en la máquina.
Trabajar con el motor universal para
acople multifunciones únicamente
estando montada la herramienta
combinada – en caso contrario, pueden
producirse daños en la máquina.
Acoplar únicamente herramientas de
acople o accesorios que hayan sido
autorizados por STIHL para esta
máquina o piezas técnicamente
equivalentes. Tener en cuenta sin falta
el capítulo "Herramientas de acople
permitidas". Si tiene preguntas al
respecto, consulte a un distribuidor
especializado. Emplear sólo
herramientas o accesorios de gran
calidad. De no hacerlo, existe el riesgo
de que se produzcan accidentes o
daños en la máquina.
STIHL recomienda emplear
herramientas y accesorios
originales STIHL. Las propiedades de
éstos armonizan óptimamente con el
producto y las exigencias del usuario.
3
español
No realizar modificaciones en la
máquina – ello puede ir en perjuicio de la
seguridad. STIHL excluye cualquier
responsabilidad ante daños personales
y materiales que se produzcan al
emplear equipos de acople no
autorizados.
No emplear hidrolimpiadoras de alta
presión para limpiar la máquina. El
chorro de agua duro puede dañar piezas
de la máquina.
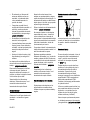
Repostaje
La gasolina se enciende
con muchísima facilidad
– guardar distancia respecto de llamas – no
derramar combustible –
no fumar.
Parar el motor antes de repostar.
Ropa y equipo
No repostar mientras el motor está aún
caliente – el combustible puede rebosar
– ¡peligro de incendio!
Ponerse la ropa y el equipo
reglamentarios.
Abrir con cuidado el cierre del depósito
para que se reduzca lentamente la
presión y no despida combustible.
Véase también la indicaciones relativas
a "Ropa y equipo" en el manual de
instrucciones de la herramienta de
acople empleada.
Transporte de la máquina
Fijarse en que no haya fugas – no
arrancar el motor si sale combustible –
¡peligro de muerte por quemaduras!
Antes de arrancar
Comprobar que el estado de la máquina
reúna condiciones de seguridad – tener
en cuenta los capítulos
correspondientes del manual de
instrucciones:
–
Comprobar el sistema de
combustible en cuanto a
estanqueidad, especialmente las
piezas visibles como p. ej. el cierre
del depósito, las uniones de tubos
flexibles, la bomba manual de
combustible (sólo en caso de
máquinas con bomba manual de
combustible). En caso de fugas o
daños, no arrancar el motor –
¡peligro de incendio! Antes de poner
en marcha la máquina, llevarla a un
distribuidor especializado para su
reparación
–
La combinación de herramienta de
corte, protector, empuñadura y
cinturón de porte deberá estar
permitida y todas las piezas
deberán estar correctamente
montadas
–
La herramienta de acople tiene que
estar autorizada para el motor
universal para acople
multifunciones
–
El cursor del mando
unificado/interruptor de parada se
pueden poner con facilidad
en STOP o bien 0
Repostar combustible sólo en lugares
bien ventilados. De haberse derramado
combustible, limpiar la máquina
inmediatamente – poner atención a que
la ropa no se moje con combustible; si
ello ocurriera, cambiársela
inmediatamente.
Las máquinas pueden estar equipadas
de serie con cierres de depósito
diferentes.
Después de repostar,
apretar el cierre de
depósito roscado lo más
firmemente posible.
Parar siempre el motor.
En vehículos: asegurar la máquina para
que no vuelque, no se dañe ni se
derrame combustible.
Véase también las indicaciones
relativas a "Transportar la máquina" en
el manual de instrucciones de la
herramienta de acople utilizada.
4
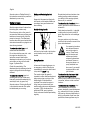
Colocar correctamente el
cierre de estribo plegable (cierre de bayoneta),
girarlo hasta el tope y
plegar el estribo.
Así se reduce el riesgo de que se afloje
el cierre del depósito por las vibraciones
del motor y que salga combustible.
KA 85 R
español
El acelerador y el bloqueo del
mismo se deberán mover con
suavidad – el acelerador debe
volver automáticamente a la
posición de ralentí
–
Comprobar que esté firme el
enchufe del cable de encendido – si
está flojo, pueden producirse
chispas que enciendan la mezcla
de combustible y aire que salga –
¡peligro de incendio!
–
No modificar los dispositivos de
mando ni los de seguridad
–
Las empuñaduras tienen que estar
limpias y secas, libres de aceite y
suciedad – esto es importante para
manejar la máquina de forma
segura
–
Ajustar el cinturón de porte y la(s)
empuñadura(s) con arreglo a la
estatura.
La máquina sólo se deberá utilizar si
reúne condiciones de seguridad para el
trabajo – ¡peligro de accidente!
Para casos de emergencia al utilizar
cinturones de porte: practicar la
deposición rápida de la máquina. Al
practicar, no arrojar la máquina al suelo,
a fin de evitar que se dañe.
Véase también las indicaciones
relativas a "Antes de arrancar" en el
manual de instrucciones de la
herramienta de acople utilizada.
Arrancar el motor
Al menos a 3 m del lugar donde se ha
repostado – no hacerlo en lugares
cerrados.
KA 85 R
Hacerlo sólo sobre terreno llano,
adoptar una postura estable y segura,
sujetar la máquina de forma segura – la
herramienta de trabajo no deberá tocar
objeto alguno ni el suelo, ya que puede
empezar a girar al arrancar.
En ejecuciones de asidero tubular
cerrado
Evitar el contacto con la herramienta de
trabajo – ¡peligro de lesiones!
No arrancar el motor con la máquina
suspendida de la mano – hacerlo tal
como se describe en el manual de
instrucciones. La herramienta de trabajo
sigue funcionando todavía un momento
tras soltar el acelerador – efecto de
funcionamiento por inercia.
Comprobar el ralentí: la herramienta de
trabajo debe estar parada en ralentí – al
estar el acelerador en reposo.
Mantener apartados materiales
fácilmente inflamables (p. ej. virutas de
madera, cortezas de árbol, hierba seca,
combustible) de la corriente caliente de
gases de escape y de la superficie
caliente del silenciador – ¡peligro de
incendio!
Véase también las indicaciones
relativas a "Arrancar el motor" en el
manual de instrucciones de la
herramienta de acople utilizada.
Sujeción y manejo de la máquina
Sujetar siempre la máquina por las
empuñaduras con ambas manos.
Adoptar siempre una postura estable y
segura.
002BA273 KN
–
La mano izquierda, en el asidero tubular
cerrado; la derecha, en la empuñadura
de mando – también al tratarse de
zurdos.
Durante el trabajo
En caso de peligro inminente, o bien de
emergencia, parar inmediatamente el
motor – poner el cursor del mando
unificado / el interruptor de parada
en STOP o 0.
Prestar atención a que el ralentí sea
perfecto, a fin de que deje de girar la
herramienta de trabajo al soltar el
acelerador. Si pese a ello gira la
herramienta de trabajo en ralentí,
encargar la reparación a un distribuidor
especializado. STIHL recomienda un
distribuidor especializado STIHL.
Controlar o bien corregir periódicamente
el ajuste del ralentí.
Al llevar un protector para los oídos, hay
que prestar más atención y tener más
precaución – se perciben peor las
señales de aviso de peligro (gritos,
señales acústicas y similares).
Hacer siempre oportunamente pausas
en el trabajo para prevenir el cansancio
y el agotamiento – ¡peligro de accidente!
5
español
Trabajar con tranquilidad y prudencia –
sólo en buenas condiciones de luz y
visibilidad. Trabajar con precaución, no
poner en peligro a otras personas.
Utilizar la máquina sólo las aplicaciones
indicadas en el manual de instrucciones
de la herramienta de acople.
La máquina produce
gases de escape tóxicos
en cuanto se pone en
marcha el motor. Estos
gases puede que sean
inodoros e invisibles pero
pueden contener hidrocarburos y benceno sin
quemar. No trabajar
nunca con la máquina en
locales cerrados o mal
ventilados – tampoco con
máquinas de catalizador.
Al trabajar en zanjas, fosas o espacios
reducidos, se ha de procurar que haya
siempre suficiente ventilación – ¡peligro
de muerte por intoxicación!
En caso de malestar, dolores de
cabeza, dificultades de visión
(p. ej. reducción del campo visual),
problemas de audición, mareos y
pérdida de concentración, dejar de
trabajar inmediatamente – estos
síntomas se pueden producir, entre
otras causas, por una concentración de
gases de escape demasiado alta –
¡peligro de accidente!
Trabajar con la máquina tratando de
hacer poco ruido y acelerando poco – no
dejar innecesariamente el motor en
marcha, dar gas sólo para trabajar.
6
No fumar trabajando con la máquina ni
en el entorno inmediato de la misma –
¡peligro de incendio! Del sistema de
combustible pueden salir vapores de
gasolina inflamables.
El polvo, la neblina y el humo que se
generan al trabajar pueden ser nocivos
para la salud. Ponerse una mascarilla si
se produce mucho polvo o humo.
En el caso de que la máquina haya
sufrido percances para los que no está
prevista (p. ej., golpes o caídas), se ha
de comprobar sin falta que funcione de
forma segura antes de continuar el
trabajo – véase también "Antes de
arrancar".
Comprobar en especial la estanqueidad
del sistema de combustible y la
operatividad de los dispositivos de
seguridad. De ningún modo se deberá
seguir trabajando con máquinas que ya
no sean seguras. En caso de dudas,
consultar a un distribuidor
especializado.
No trabajar con gas de arranque – el
régimen del motor no se puede regular
estando el acelerador en esta posición.
Parar el motor antes de ausentarse de la
máquina.
Para cambiar la herramienta de acople,
parar el motor y retirar el enchufe de la
bujía – ¡peligro de lesiones! por un
arranque accidental del motor
Vibraciones
La utilización prolongada de la máquina
puede provocar trastornos circulatorios
en las manos ("enfermedad de los
dedos blancos") originados por las
vibraciones.
No se puede establecer una duración
general del uso, porque ésta depende
de varios factores que influyen en ello.
El tiempo de uso se prolonga:
–
Protegiendo las manos (guantes
calientes)
–
Haciendo pausas
El tiempo de uso se acorta por:
–
La predisposición personal a una
mala circulación sanguínea
(síntomas: dedos fríos con
frecuencia, hormigueo)
–
Bajas temperaturas
–
Magnitud de la fuerza de sujeción
(la sujeción firme dificulta el riego
sanguíneo)
En el caso trabajar con regularidad y
durante mucho tiempo con la máquina y
manifestarse repetidamente tales
síntomas (p. ej. hormigueo en los
dedos), se recomienda someterse a un
examen médico.
Mantenimiento y reparaciones
Efectuar con regularidad los trabajos de
mantenimiento de la máquina. Efectuar
únicamente trabajos de mantenimiento
y reparaciones que estén descritos en el
manual de instrucciones. Encargar
todos los demás trabajos a un
distribuidor especializado.
STIHL recomienda encargar los
trabajos de mantenimiento y las
reparaciones siempre a un distribuidor
especializado STIHL. Los distribuidores
especializados STIHL siguen
KA 85 R
español
No trabajar estando dañado el
silenciador ni sin éste – ¡peligro de
incendio! – ¡daños en los oídos!
Emplear sólo repuestos de gran calidad.
De no hacerlo, existe el peligro de que
se produzcan accidentes o daños en la
máquina. Si tiene preguntas al respecto,
consulte a un distribuidor especializado.
No tocar el silenciador si está caliente –
¡peligro de quemaduras!
STIHL recomienda emplear piezas de
repuesto originales STIHL. Las
propiedades de éstas están
armonizadas óptimamente con la
máquina y las exigencias del usuario.
Para la reparación, el mantenimiento y
la limpieza, parar siempre el motor ¡peligro de lesiones! - Excepción: ajuste
del carburador y el ralentí.
Estando desacoplado el enchufe del
cable de encendido o con la bujía
desenroscada, poner en movimiento el
motor con el dispositivo de arranque
únicamente si el cursor del mando
unificado / interruptor de parada se
encuentra en STOP o bien 0 – peligro de
incendio por chispas de encendido fuera
del cilindro.
No realizar trabajos de mantenimiento
en la máquina ni guardar ésta cerca de
fuego abierto – peligro de incendio
debido al combustible.
Comprobar periódicamente la
estanqueidad del cierre del depósito.
Emplear únicamente bujías en perfecto
estado, autorizadas por STIHL – véase
"Datos técnicos".
El estado de los elementos
antivibradores influye en el
comportamiento de vibración – controlar
con regularidad dichos elementos.
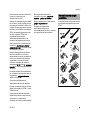
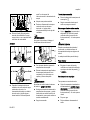
Herramientas de acople
permitidas
En la máquina básica se pueden montar
las siguientes herramientas de acople
STIHL:
FH
HT
FS
(B)
FS
(A)
SP
BF
FCS
SP 10
KW
228BA057 KN
periódicamente cursillos de instrucción
y tienen a su disposición las
informaciones técnicas.
Inspeccionar el cable de encendido
(aislamiento perfecto, conexión firme).
Comprobar con regularidad el
silenciador en cuanto a perfecto estado.
KA 85 R
7
español
FS (B) 1)
BF 1)
SP 4)
SP 10 3)
FCS 2) 5)
KW 2)
1)
El asidero tubular cerrado es
posible con o sin limitador de paso
3)
El asidero tubular cerrado o el tubo
flexible de agarre son posibles
4)
Sólo se autoriza con tubo flexible
de agarre
5)
No se precisa emplear el cinturón
de porte
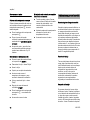
2
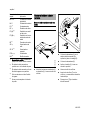
4
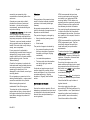
Montar el asidero tubular cerrado con
estribo
3
5
6
2
7
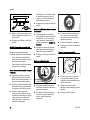
N
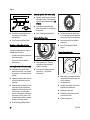
Colocar la abrazadera (3) en el
asidero tubular cerrado (4) y
aplicarlos juntos al vástago (5)
N
Colocar la abrazadera (6)
N
Aplicar el estribo (2) – tener en
cuenta la posición
Introducir las tuercas cuadradas (1)
en el estribo (2) – hacer coincidir los
orificios
N
Hacer coincidir los orificios
N
Insertar los tornillos (7) en los
orificios – y enroscarlos en el estribo
hasta el tope
N
Proseguir con "Fijar el asidero
tubular cerrado"
1
1
Se precisaun estribo (limitador de
paso) en el asidero tubular cerrado
2)
8
Montar el asidero tubular
cerrado
N
002BA099 KN
HL 0°
FH 1)
HT 3)
FS (A) 2)
Aplicación
Cortasetos de altura
(ajustable)
Cortasetos de altura
Cortamatorrales
Podadora de altura
Guadaña con cabezal de corte
Guadaña con herramienta de corte de
metal
Fresadora de suelo
Cosechadora de
café
Cosechadora
especial
Cortabordes
Rodillo barredor
002BA098 KN
Herramienta de
acople
HL 135° 1)
KA 85 R
español
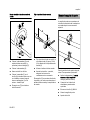
Montar el asidero tubular cerrado sin
estribo
8
7
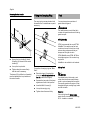
Fijar el asidero tubular cerrado
Montar la argolla de porte
La argolla de porte se encuentra en el
volumen de suministro de la máquina o
se puede adquirir como accesorio
especial.
8
7
4
A
9
1
4
10
3
1
N
Fijar el asidero tubular cerrado (4) a
una distancia de (A) aprox. 20 cm
(8 in) delante de la empuñadura de
mando (9)
N
Colocar la abrazadera (3) en el
asidero tubular cerrado (4) y
aplicarlos juntos al vástago (5)
N
Colocar la abrazadera (6)
N
Alinear el asidero tubular cerrado
N
Hacer coincidir los orificios
N
N
Colocar la arandela (7) en el
tornillo (8) e introducir éste a su vez
en el taladro; enroscar luego la
tuerca cuadrangular (1) en el
mismo – hasta el tope
Apretar los tornillos – para ello,
asegurar las tuercas con
contratuercas si es necesario.
N
Proseguir con "Fijar el asidero
tubular cerrado"
KA 85 R
1
El manguito (10) se monta en función de
los países y se ha de encontrar entre el
asidero tubular cerrado y la empuñadura
de mando.
2
002BA142 KN
1
002BA147 KN
6
002BA136 KN
5
Para la posición de la argolla de porte,
véase "Componentes importantes".
N
Aplicar la abrazadera (1) con la
rosca en el lado izquierdo al
vástago (lado del usuario)
N
Comprimir las bridas de la
abrazadera y mantenerlas
oprimidas
N
Enroscar el tornillo (2) M6x14
N
Alinear la argolla de porte
N
Apretar el tornillo
9
español
Combustible
El motor se ha de alimentar con una
mezcla compuesta por gasolina y aceite
de motor.
ADVERTENCIA
Evitar el contacto cutáneo con la
gasolina y la inhalación de vapores de la
misma.
STIHL MotoMix
STIHL recomienda emplear
STIHL MotoMix. Este combustible
mezclado ya está exento de benceno y
plomo, se distingue por un alto índice
octano y tiene siempre la proporción de
mezcla correcta.
El STIHL MotoMix está mezclado para
obtener la máxima durabilidad del motor
con el aceite de motor de dos tiempos
HP Ultra STIHL.
MotoMix no está disponible en todos los
mercados.
Mezclar combustible
INDICACIÓN
Si los productos de servicio no son
apropiados o la proporción de la mezcla
no corresponde a la norma se pueden
producir serios daños en el motor. La
gasolina o el aceite de motor de mala
calidad pueden dañar el motor, los
retenes, tuberías y el depósito de
combustible.
10
Gasolina
Proporción de la mezcla
Emplear sólo gasolina de marca con un
índice octano de 90 ROZ, como mínimo
– con o sin plomo.
Con aceite de motor de dos tiempos
STIHL 1:50; 1:50 = 1 parte de aceite +
50 partes de gasolina
Las máquinas equipadas con
catalizador se han de alimentar con
gasolina sin plomo.
Ejemplos
INDICACIÓN
En el caso de emplear varias cargas del
depósito de combustible con plomo,
puede disminuir notablemente el efecto
del catalizador.
Cantidad de
gasolina
Litros
1
5
10
15
20
25
Aceite de dos tiempos
STIHL 1:50
Litros
(ml)
0,02
(20)
0,10
(100)
0,20
(200)
0,30
(300)
0,40
(400)
0,50
(500)
La gasolina con una proporción de
alcohol superior al 10% puede provocar
anomalías de funcionamiento en
motores con ajuste manual del
carburador, por lo que no se deberá
emplear para alimentar estos motores.
N
Los motores equipados con M-Tronic
suministran plena potencia empleando
gasolina con una proporción de alcohol
de hasta 25% (E25).
Guardar la mezcla de combustible
Aceite de motor
Emplear sólo aceite de motor de dos
tiempos de calidad – preferentemente,
el aceite de motor de dos tiempos STIHL
HP, HP Super o HP Ultra; éstos aceites
armonizan óptimamente con los
motores STlHL. El más alto rendimiento
y la máxima durabilidad del motor la
garantiza el HP Ultra.
Estos aceites de motor no están
disponibles en todos los mercados.
En máquinas con catalizador de gases
de escape, sólo se deberá emplear
aceite de motor de dos tiempos STIHL
1:50 para realizar la mezcla.
En un bidón homologado para
combustible, echar primero aceite
de motor, luego gasolina, y
mezclarlos bien
Sólo en bidones homologados para
combustible, guardándolos en un lugar
seco, fresco y seguro, protegidos contra
la luz y el sol.
La mezcla de combustible envejece –
mezclar sólo la cantidad que se necesite
para algunas semanas. No guardar la
mezcla de combustible durante más de
30 días. El efecto de la luz, el sol, altas
o bajas temperaturas, pueden echar a
perder con mayor rapidez la mezcla de
combustible.
Sin embargo, la STIHL MotoMix se
puede almacenar 2 años sin problemas.
N
Antes de repostar, agitar con fuerza
el bidón con la mezcla
KA 85 R
español
ADVERTENCIA
Repostar combustible
Repostar combustible
En el bidón puede generarse presión –
abrirlo con cuidado.
N
Al repostar, no derramar combustible ni
llenar el depósito hasta el borde. STIHL
recomienda utilizar el sistema de
llenado STIHL para combustible
(accesorio especial).
Limpiar de vez en cuando a fondo el
depósito de combustible y el bidón
Recoger el combustible residual y el
líquido utilizado para la limpieza y
llevarlos a los puntos limpios.
Preparar la máquina
N
Abrir el cierre del depósito
N
Repostar combustible
ADVERTENCIA
Tras el repostaje, apretar el cierre del
depósito lo más firmemente posible con
la mano.
N
Antes de repostar combustible,
limpiar el cierre del depósito y sus
alrededores, a fin de que no penetre
suciedad en el depósito.
N
Posicionar la máquina, de manera
que el cierre del depósito esté
orientado hacia arriba
389BA032 KN
389BA031 KN
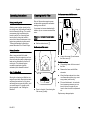
Cambiar el cabezal de aspiración de
combustible
Cambiar anualmente el cabezal de
aspiración, para ello:
KA 85 R
11
español
N
Extraer del depósito el cabezal de
aspiración de combustible con un
gancho y retirarlo del tubo flexible
N
Insertar un nuevo cabezal de
aspiración en el tubo flexible
N
Volver a poner el cabezal de
aspiración en el depósito
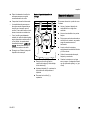
Símbolo en el cursor del mando
unificado
Arrancar / parar el motor
7
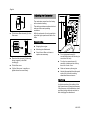
Elementos de mando
7
4
Arrancar
STOP
6
START
3
5
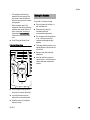
N
Oprimir sucesivamente el bloqueo
del acelerador y el acelerador
N
Mantener ambos oprimidos
N
Empujar el cursor del mando
unificado a la posición de START y
sujetarlo asimismo
N
Soltar sucesivamente el acelerador,
el cursor del mando unificado y el
bloqueo del acelerador = posición
de gas de arranque
2
002BA181 KN
1
1
2
3
8
Bloqueo del acelerador
Acelerador
Cursor del mando unificado
Posiciones del cursor del mando
unificado
4
5
6
12
h – Señal de parada y flecha – para
desconectar el motor, empujar el
cursor del mando unificado en el
sentido de la flecha que hay en la
señal de parada (h) a STOP-0
STOP-0 – Motor descon. – el
encendido está desconectado
F – Funcionamiento – el motor está
en marcha o puede arrancar
START – Arrancar – el encendido
está conectado – el motor se puede
poner en marcha
8
N
393BA017 KN
Vaciar el depósito de combustible
STOP-
N
Ajustar la palanca de la mariposa de
arranque (8)
g Con el motor frío
e Con el motor caliente – aun cuando
el motor haya estado ya en marcha, pero todavía esté frío
KA 85 R
español
9
N
393BA018 KN
motor" en el manual de
instrucciones de la herramienta de
acople
Pulsar el fuelle (9) de la bomba
manual de combustible 5 veces,
como mínimo – aun cuando el fuelle
esté lleno de combustible
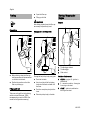
Arrancar
N
Adoptar una postura estable
N
Presionar firmemente la máquina
contra el suelo con la mano
izquierda – el pulgar debe
encontrarse debajo de la caja del
ventilador
Tras el primer encendido
N
Poner la palanca de la mariposa de
arranque en e
N
Seguir arrancando hasta que el
motor se ponga en marcha
Una vez que el motor esté en marcha
N
INDICACIÓN
¡No poner el pie sobre el vástago ni
arrodillarse encima del mismo!
Oprimir inmediata y brevemente el
acelerador; el cursor del mando
unificado salta a la posición de
funcionamiento F – el motor pasa a
ralentí
ADVERTENCIA
002BA038 KN
002BA072 KN
Estando correctamente ajustado el
carburador, no deberá moverse la
herramienta de trabajo en régimen de
ralentí.
Con la mano derecha, agarrar la
empuñadura de arranque
N
Extraer lentamente la empuñadura
de arranque hasta percibir una
resistencia y tirar entonces con
rapidez y fuerza de aquélla
002BA040 KN
N
N
Depositar la máquina de forma
estable en el suelo sobre el apoyo
existente en el motor. La
herramienta de trabajo no deberá
tocar el suelo ni objeto alguno –
véase también "Arrancar/parar el
INDICACIÓN
No extraer el cordón hasta el extremo
del mismo – ¡peligro de rotura!
N
N
KA 85 R
La máquina está lista para el trabajo.
Parar el motor
N
Empujar el cursor del mando
unificado en el sentido de la flecha
que hay en la señal de parada (h)
a STOP-0
Con temperaturas muy bajas
Tras ponerse en marcha el motor:
N
No dejar retroceder bruscamente la
empuñadura de arranque – guiarla
hacia atrás en sentido contrario al
de extracción, para que el cordón se
enrolle correctamente
Oprimir brevemente el acelerador =
se desencastra la posición de gas
de arranque – el cursor del mando
unificado salta a la posición de
funcionamiento F – el motor pasa a
ralentí
N
Dar poco gas
Seguir arrancando
N
Dejar calentarse brevemente el
motor
13
español
Si no arranca el motor
El depósito se ha vaciado por completo
con el motor en marcha
Palanca de la mariposa de arranque
N
Si tras el primer encendido del motor no
se ha puesto a tiempo la palanca de la
mariposa de arranque en e, el motor
estará ahogado.
N
Poner la palanca de la mariposa de
arranque en e
N
Poner el cursor del mando
unificado, la palanca de bloqueo y el
acelerador en la posición de gas de
arranque
N
Arrancar el motor – para ello, tirar
con fuerza del cordón de arranque –
pueden hacer falta entre 10 y 20
intentos
Si no arranca el motor pese a ello
N
Poner el cursor del mando unificado
en la posición de STOP-0
N
Desmontar la bujía – véase "Bujía"
N
Secar la bujía
N
Oprimir por completo el acelerador
N
Accionar varias veces el
mecanismo de arranque – para
ventilar la cámara de combustión
N
Volver a montar la bujía – véase
"Bujía"
N
Empujar el cursor del mando
unificado a START
N
Poner la palanca de la mariposa de
arranque en e – aun estando frío
el motor
N
Arrancar de nuevo el motor
14
Tras el repostaje, pulsar 5 veces,
como mínimo, el fuelle de la bomba
manual de combustible – aun
cuando el fuelle esté lleno de
combustible
N
Ajustar la palanca de la mariposa de
arranque en función de la
temperatura del motor
N
Arrancar de nuevo el motor
Indicaciones para el servicio
Durante el primer tiempo de servicio
Siendo la máquina nueva de fábrica, no
se deberá hacer funcionar sin carga en
un margen elevado de revoluciones
hasta haber llenado por tercera vez el
depósito de combustible, a fin de que no
se produzcan esfuerzos adicionales
durante la fase de rodaje. Durante este
fase se tienen que adaptar las piezas
móviles entre sí – en el motor se da una
elevada resistencia de fricción. El motor
alcanza su potencia máxima tras un
tiempo de rodaje que corresponde a 5
hasta 15 cargas del depósito.
Durante el trabajo
Tras un cierto tiempo de servicio a plena
carga, dejar funcionando el motor en
ralentí todavía durante un breve tiempo
hasta que la corriente de aire de
refrigeración haya extraído el calor
excesivo, con el fin de que los
componentes del motor (sistema de
encendido, carburador) no queden
expuestos a una carga extrema
originada por la acumulación de calor.
Después del trabajo
En pausas de servicio breves: dejar
enfriarse el motor. Guardar la máquina
con el depósito de combustible lleno, en
un lugar seco que no esté cerca de
fuentes de ignición, hasta el siguiente
servicio. En pausas de servicio de cierta
duración – véase "Guardar la máquina".
KA 85 R
español
Los filtros de aire sucios disminuyen la
potencia del motor, aumentan el
consumo de combustible y dificultan el
arranque.
2
Las máquinas pueden estar equipadas
de serie con diferentes tapas de filtro.
2
Si disminuye perceptiblemente la
potencia del motor
3
Poner la palanca de la mariposa de
arranque en g
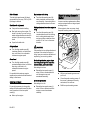
Aflojar el tornillo (3) y quitar la tapa
del filtro (2)
N
Colocar el filtro de fieltro (5) en la
caja del filtro (6) con el rotulado
hacia dentro
N
Asentar la tapa del filtro
N
Encastrar la tapa del filtro o apretar
el tornillo en la tapa del filtro
En ambas ejecuciones
N
355BA014 KN
Oprimir la brida (1) y apartar la tapa
del filtro (2) girándola
Eliminar la suciedad más
importante de las zonas
circundantes del filtro
N
Quitar el filtro de plástico celular y el
filtro de fieltro
N
Lavar el filtro de plástico celular en
un líquido detergente limpio y no
inflamable (p. ej. agua jabonosa
caliente) y secarlo
N
Cambiar el filtro de fieltro – no
lavarlo. – para salir del paso,
golpearlo ligeramente o soplarlo
2
KA 85 R
6
392BA046 KN
N
N
Colocar el filtro de plástico
celular (4) en la tapa del filtro (2)
5
Estando encastrada la tapa del filtro
1
4
392BA048 KN
N
N
392BA047 KN
Estando atornillada la tapa del filtro
Limpiar el filtro de aire
Sustituir las piezas dañadas
15
español
necesario realizar una pequeña
corrección del ajuste del tornillo
regulador principal (H).
Ajustar el carburador
El carburador se ha ajustado en fábrica
a valores estándar.
H
3/4
Valor orientativo
L
1
Girar el tornillo regulador principal (H)
aprox. 1/4 de vuelta por cada 1000 m
(3300 ft) de diferencia de altitud
Este ajuste del carburador está
armonizado, de manera que el motor
recibe una mezcla óptima de
combustible y aire en cualesquiera
estados operativos.
Condiciones para el ajuste
En este carburador se pueden efectuar
correcciones en el tornillo regulador
principal sólo en un estrecho margen.
N
Montar la herramienta de acople
N
Comprobar el filtro de aire –
limpiarlo o sustituirlo si lo requiere
su estado
265BA024 KN
Parar el motor
Realizar el ajuste estándar
N
Dejar calentarse el motor: unos
5 min, si hay montada una
herramienta de corte de metal –
unos 3 min, si hay montado un
cabezal de corte
N
Acelerar a fondo
LA
Ajuste estándar
N
N
N
N
Girar el tornillo regulador
principal (H) en sentido antihorario
hasta el tope – 3/4 de vuelta, como
máximo
Girar con sensibilidad el tornillo de
ajuste del ralentí (L) en sentido
horario hasta que asiente
firmemente, girarlo luego 1 vuelta
en sentido antihorario
N
Arrancar el motor y dejar que se
caliente
N
Ajustar el ralentí con el tornillo de
tope del ralentí (LA), de manera que
no se mueva la herramienta de
trabajo
Ajuste de precisión
En la sierra
N
Girar el tornillo regulador
principal (H) en sentido horario
(empobrecer la mezcla) – hasta que
deje de percibirse un aumento del
número de revoluciones – hasta el
tope, como máx.
Al nivel del mar
N
Girar el tornillo regulador
principal (H) en sentido antihorario
(enriquecer la mezcla) – hasta que
deje de percibirse un aumento del
número de revoluciones – hasta el
tope, como máx.
Puede ocurrir que se alcance ya el
número de revoluciones máximo en
cada caso al realizar el ajuste estándar.
Si la potencia de motor no es
satisfactoria al trabajar en la sierra, al
nivel del mar o tras cambiar la
herramienta de trabajo, puede ser
16
KA 85 R
español
Ajustar el ralentí
Tras cada corrección efectuada en el
tornillo de ajuste del ralentí (L), suele ser
necesario modificar también el ajuste
del tornillo de tope del ralentí (LA).
N
Dejar calentarse el motor en
marcha
El motor se para en ralentí
N
Girar lentamente el tornillo de tope
del ralentí (LA) en sentido horario,
hasta que el motor funcione con
regularidad – la herramienta de
trabajo no deberá moverse
N
Girar el tornillo de ajuste del
ralentí (L) (aprox. 1/4 de vuelta) en
sentido antihorario, hasta que el
motor funcione con regularidad y
acelere bien
Régimen de ralentí irregular
El ajuste del ralentí es demasiado rico –
N
Girar el tornillo de ajuste del
ralentí (L) (aprox. 1/4 de vuelta) en
sentido horario hasta que el motor
funcione con regularidad y todavía
acelere bien
Rejilla parachispas en el
silenciador
En algunos países, los silenciadores de
repuesto pueden estar equipados con
una rejilla parachispas montada.
Si disminuye la potencia del motor,
controlar la rejilla parachispas en el
silenciador.
La herramienta de trabajo se mueve en
ralentí
Girar el tornillo de tope del
ralentí (LA) en sentido antihorario
hasta que se detenga la
herramienta de trabajo, seguir
luego girándolo de media a 1 vuelta
en el mismo sentido
392BA035 KN
N
ADVERTENCIA
Si la herramienta de trabajo no
permanece parada en ralentí tras
realizar el ajuste, encargar la reparación
de la máquina a un distribuidor
especializado.
Régimen irregular en ralentí, el motor se
para pese a haber corregido el ajuste
del LA, aceleración deficiente
N
Levantar la rejilla parachispas y
extraerla
N
Limpiar la rejilla parachispas si está
sucia – sustituirla si está dañada o
muy coquizada
N
Volver a colocar la rejilla
parachispas
El ajuste del ralentí es demasiado pobre
–
KA 85 R
17
español
Examinar la bujía
Bujía
N
Tras unas 100 horas de servicio,
sustituir la bujía – hacerlo antes ya
si los electrodos están muy
quemados – emplear sólo bujías
autorizadas por STIHL y que estén
desparasitadas – véase "Datos
técnicos"
A
N
Limpiar la bujía si está sucia
N
Comprobar la distancia entre
electrodos (A) y reajustarla si es
necesario – para el valor de la
distancia, véase "Datos técnicos"
N
Subsanar las causas del
ensuciamiento de la bujía
Desmontar la bujía
N
Empujar el cursor del mando
unificado a STOP-0
Causas posibles:
393BA053 KN
1
N
Retirar el enchufe de la bujía (1)
N
Desenroscar la bujía
18
–
Exceso de aceite de motor en el
combustible
–
Filtro de aire sucio
–
Condiciones de servicio
desfavorables
000BA039 KN
Si la potencia de motor es
insuficiente, el arranque es
deficiente o el ralentí es irregular,
comprobar primero la bujía
000BA045 KN
1
N
ADVERTENCIA
Al tratarse de una bujía con tuerca de
conexión (1) por separado, enroscar sin
falta dicha tuerca en la rosca y apretarla
firmemente - ¡peligro de incendio! por la
formación de chispas
Montar la bujía
N
Enroscar la bujía y presionar
firmemente el enchufe de la misma
KA 85 R
español
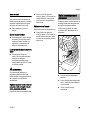
Desmontar el rodillo del cordón
Cambiar el cordón de
arranque / resorte de
retracción
Cambiar el cordón de arranque
6
Desmontar la tapa del dispositivo de
arranque
5
1
392BA013 KN
3
N
N
Desenroscar los tornillos (1)
N
Levantar la tapa (2) del depósito (3)
y sacarla de debajo de la
cubierta (4)
KA 85 R
Desenroscar el tornillo (5) y retirar
el rodillo del cordón
ADVERTENCIA
El resorte de retracción está alojado en
el rodillo del cordón y puede saltar si no
se manipula correctamente. Los trozos
del resorte roto pueden estar
pretensados todavía y saltar de
improviso al sacarlos de la caja – ¡riesgo
de lesiones! Ponerse un protector para
la cara y guantes.
392BA015 KN
2
1
7
4
392BA014 KN
1
N
Sacar la caperuza (6) de la
empuñadura apalancando con un
destornillador
N
Quitar los residuos del cordón del
rodillo y de la empuñadura de
arranque – poner atención en no
sacar el manguito de la
empuñadura
N
Hacer un nudo sencillo en el nuevo
cordón de arranque y pasar éste
desde arriba hacia abajo por la
empuñadura y el casquillo del
cordón (7)
N
Volver a colocar la caperuza en la
empuñadura y apretarla
19
español
N
Pasar el cordón de arranque por el
rodillo y asegurarlo en éste con un
nudo sencillo
N
Proseguir con "Montar el rodillo del
cordón"
Sustituir el resorte de retracción roto
De fábrica se puede suministrar el
resorte de repuesto de forma diferente:
–
Como resorte de retracción listo
para el montaje provisto de un lazo
de alambre como seguro
Proseguir con "Montar el rodillo del
cordón"
Montar el rodillo del cordón con resorte
de retracción
N
N
N
Desempaquetar con cuidado el
nuevo rodillo del cordón con resorte
de retracción – si se no se hace
como es debido. puede saltar el
resorte de retracción – ¡peligro de
lesiones!
Humectar el resorte con algunas
gotas de aceite exento de resina –
véase "Accesorios especiales"
N
Colocar el rodillo del cordón en el
eje – girarlo un poco en vaivén
hasta que encastre el ojal (8) del
resorte de retracción
N
Enroscar el tornillo (5) y apretarlo
N
Proseguir con "Tensar el resorte de
retracción"
Tensar el resorte de retracción
Proseguir con "Montar el rodillo del
cordón"
Montar el rodillo del cordón
Como rodillo del cordón con resorte
de retracción ya montado
392BA044 KN
–
N
8
392BA025 KN
392BA024 KN
deslizándose. Si al hacerlo saltara
el resorte hacia afuera, volver a
ponerlo – en sentido antihorario –
desde fuera hacia dentro
N
Humectar el resorte con algunas
gotas de aceite exento de resina –
véase "Accesorios especiales" – no
abrir el lazo de alambre (seguro).
N
Quitar con cuidado las piezas rotas
de resorte de la tapa del dispositivo
de arranque y el rodillo del cordón
N
Colocar el nuevo resorte de
retracción en el rodillo del cordón –
introducir al mismo tiempo el ojal de
resorte exterior en el rebaje del
rodillo del cordón – al hacerlo, se
quita el lazo de alambre
20
a
a = 2mm
(0.08 in)
389BA029 KN
Montar el resorte de retracción listo para
el montaje
N
Formar un lazo con el cordón de
arranque desenrollado y girar el
rodillo seis vueltas con este lazo en
sentido antihorario
N
Comprobar la medida (a) para el
ojal interior del resorte – doblarlo un
poco si es necesario
N
Sujetar el rodillo del cordón –
extraer el cordón retorcido y ponerlo
en orden
N
Humedecer el taladro de cojinete
del rodillo con aceite exento de
resina – véase "Accesorios
especiales"
N
Soltar el rodillo del cordón
KA 85 R
español
Dejar ir lentamente el cordón de
arranque para que se enrolle
correctamente en el rodillo.
N
Comprobar la tensión del resorte:
–
La empuñadura de arranque se
tiene que asentar firmemente por
tracción en el casquillo para el
cordón. Si se vuelca hacia un lado:
tensar el resorte una vuelta más.
–
N
Montar la tapa del dispositivo de
arranque
En pausas de servicio a partir de unos
3 meses
1
Con el cordón completamente
extraído, el rodillo se deberá poder
seguir girando aún media vuelta. Si
no es posible, el resorte estará
demasiado tensado – ¡peligro de
rotura! – desenrollar entonces el
cordón una vuelta en el rodillo
N
Vaciar y limpiar el depósito de
combustible en un lugar bien
ventilado
N
Llevar el combustible a los puntos
limpios
N
Dejar que se vacíe el carburador en
marcha; de lo contrario, se pueden
pegar las membranas en el
carburador
N
Limpiar a fondo la máquina,
especialmente las aletas del cilindro
y el filtro de aire
N
Quitar la herramienta de acople,
limpiarla y examinarla
N
Guardar la máquina en un lugar
seco y seguro – protegerla contra el
uso por personas ajenas (p. ej. por
niños)
4
2
1
Proseguir con "Montar la tapa del
dispositivo de arranque"
1
3
KA 85 R
Guardar la máquina
393BA045 KN
N
N
Empujar el tornillo de fijación
superior de la tapa (2) hacia debajo
de la cubierta (4)
N
Ajustar el depósito (3) – presionar la
tapa inferior de la tapa sobre el
depósito
N
Enroscar los tornillos (1) y
apretarlos
21
español
Máquina completa
Empuñadura de mando
Filtro de aire
Bomba manual de combustible (en caso
de estar disponible)
control visual (estado, estanqueidad)
X
limpiar
comprobación del funcionamiento
X
X
X
sustituir
comprobar
Depósito de combustible
limpiar
Carburador
comprobar el ralentí, la herramienta de
trabajo no deberá moverse
X
X
X
reparar por un distribuidor
especializado2)
Cabezal de aspiración en el depósito de
combustible
X
X
sustituir
X
X
X
X
Aberturas de aspiración para aire de
refrigeración
Rejilla parachispas1) en el silenciador
22
X
X
X
reajustar el ralentí
Bujía
Si lo requiere su estado
X
X
limpiar
comprobar
En caso de daños
En caso de avería
Anualmente
Mensualmente
Semanalmente
Tras cada llenado del
depósito
Tras finalizar el trabajo o
diariamente
Estos datos se refieren a condiciones de trabajo normales. En condiciones de trabajo más dificultosas (fuerte acumulación de polvo, etc.) y trabajos diarios de mayor
duración, acortar correspondientemente los intervalos indicados.
Antes de comenzar el trabajo
Instrucciones de mantenimiento y conservación
X
reajustar la distancia entre electrodos
X
sustituir cada 100 horas de servicio
Control visual
X
limpiar
comprobar
sustituir
X
X
X
X
X
KA 85 R
Tornillos y tuercas accesibles (excepto
tornillos de ajuste)
reapretar
comprobar
X
X
X
X
Elementos antivibradores
sustituir por un distribuidor
especializado2)
X
Rótulos adhesivos de seguridad
sustituir
X
1)
2)
Si lo requiere su estado
En caso de daños
En caso de avería
Anualmente
Mensualmente
Semanalmente
Tras cada llenado del
depósito
Tras finalizar el trabajo o
diariamente
Estos datos se refieren a condiciones de trabajo normales. En condiciones de trabajo más dificultosas (fuerte acumulación de polvo, etc.) y trabajos diarios de mayor
duración, acortar correspondientemente los intervalos indicados.
Antes de comenzar el trabajo
español
Los silenciadores de repuesto pueden estar equipados con una rejilla parachispas montada.
Stihl recomienda un distribuidor especializado STIHL
KA 85 R
23
español
Minimizar el desgaste y
evitar daños
La observancia de las instrucciones de
este manual de instrucciones evita un
desgaste excesivo y daños en la
máquina.
El uso, mantenimiento y
almacenamiento de la máquina se han
de realizar con el esmero descrito en
este manual de instrucciones.
Todos los daños originados por la
inobservancia de las instrucciones de
seguridad manejo y mantenimiento son
responsabilidad del usuario mismo. Ello
rige en especial para:
–
Modificaciones del producto no
autorizadas por STIHL
–
El empleo de herramientas o
accesorios no autorizados o no
apropiados para la máquina o que
sean de baja calidad
–
El empleo de la máquina para fines
inapropiados
–
Empleo de la máquina en actos
deportivos o competiciones
–
Daños derivados de seguir
utilizando la máquina pese a la
existencia de componentes
averiados
mantenimiento el usuario mismo,
deberá encargarlos a un distribuidor
especializado.
STIHL recomienda encargar los
trabajos de mantenimiento y las
reparaciones siempre a un distribuidor
especializado STIHL. Los distribuidores
especializados STIHL siguen
periódicamente cursillos de instrucción
y tienen a su disposición las
Informaciones técnicas.
De no efectuar a tiempo estos trabajos o
si no se realizan como es debido,
pueden producirse daños que serán
responsabilidad del usuario mismo. De
ellos forman parte, entre otros:
–
Daños en el motor como
consecuencia de de un
mantenimiento inoportuno o
insuficiente (p. ej. filtros de aire y
combustible), ajuste erróneo del
carburador o limpieza insuficiente
del recorrido del aire de
refrigeración (rendijas de
aspiración, aletas del cilindro)
–
Daños por corrosión y otros daños
derivados de un almacenamiento
inadecuado
–
Daños en la máquina como
consecuencia del empleo de piezas
de repuesto de mala calidad
Piezas de desgaste
Algunas piezas de la máquina están
sometidas a un desgaste normal aun
cuando el uso sea el apropiado y se han
de sustituir oportunamente en función
del tipo y la duración de su utilización.
De ellas forman parte, entre otras:
–
Embrague
–
Filtro (para aire, combustible)
–
Dispositivo de arranque
–
Bujía
Trabajos de mantenimiento
Todos los trabajos especificados en el
capítulo "Instrucciones de
mantenimiento y conservación" se han
de realizar con regularidad. Si no puede
efectuar estos trabajos de
24
KA 85 R
español
Componentes importantes
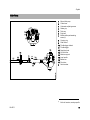
1
2
3
4
5
6
7
8
9
10
11
12
13
14
15
16
17
#
1)
KA 85 R
Bomba manual de combustible
Palanca de la mariposa de
arranque
Tornillos de ajuste del carburador
Empuñadura de arranque
Cierre del depósito de combustible
Depósito de combustible
Silenciador (con rejilla
parachispas)1)
Argolla de porte
Cursor del mando unificado
Bloqueo del acelerador
Acelerador
Enchufe de la bujía
Tapa del filtro de aire
Apoyo de la máquina
Asidero tubular cerrado
Limitador de paso
Vástago
Número de máquina
Existente sólo según qué países
25
español
Sin combustible ni herramienta de
acople
KA 85 R:
5,0 kg
Motor
Motor monocilíndrico de dos tiempos
Cilindrada:
25,4 cm3
Diámetro:
34 mm
Carrera:
28 mm
Potencia según
0,95 kW (1,3 CV)
ISO 8893:
a 8500 rpm
Régimen de ralentí: 2800 rpm
Régimen de
10500 rpm
limitación de caudal
(valor nominal):
Sistema de encendido
Encendido por magneto, de control
electrónico
Bujía
(desparasitada):
Bosch WSR 6 F1),
NGK BPMR 7 A,
Champion
RCJ 6 Y1)
0,5 mm
Distancia entre
electrodos:
1) No adquirible en Brasil
Sistema de combustible
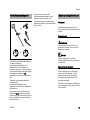
Accesorios especiales
Protector
386BA011 KN
Peso
Datos técnicos
Juego de protección 4138 007 1003
para montar en la unidad motriz para
proteger la máquina al depositarla y
apoyarla sobre el muslo derecho
durante el trabajo.
Otros accesorios especiales
–
STIHL ElastoStart (cordón de
arranque con empuñadura)
Del volumen de suministro de la
máquina forman parte:
1 gafas protectoras
1 cinturón sencillo
1 llave universal
Carburador de membrana
independiente de la posición con bomba
de combustible integrada
Cabida depósito de 440 cm3 (0,44 l)
combustible:
Mezcla de
véase
combustible:
"Combustible"
26
En los distribuidores especializados
STIHL se pueden obtener
informaciones actuales sobre éstos y
otros accesorios especiales.
Véase también las indicaciones
relativas a los accesorios especiales en
el manual de instrucciones para la
herramienta de acople.
KA 85 R
español
Los usuarios de esta máquina sólo
deberán realizar trabajos de
mantenimiento y conservación que
estén especificados en este manual de
instrucciones. Las reparaciones de
mayor alcance las deberán realizar
únicamente distribuidores
especializados.
STIHL recomienda encargar los
trabajos de mantenimiento y las
reparaciones siempre a un distribuidor
especializado STIHL. Los distribuidores
especializados STIHL siguen
periódicamente cursillos de instrucción
y tienen a su disposición las
informaciones técnicas.
En casos de reparación, montar
únicamente piezas de repuesto
autorizadas por STIHL para esta
máquina o piezas técnicamente
equivalentes. Emplear sólo repuestos
de gran calidad. De no hacerlo, existe el
peligro de que se produzcan accidentes
o daños en la máquina.
Gestión de residuos
En la gestión de residuos, observar las
normas correspondientes específicas
de los países.
000BA073 KN
Indicaciones para la
reparación
Los productos STIHL no deben echarse
a la basura doméstica. Entregar el
producto STIHL, el acumulador, los
accesorios y el embalaje para reciclarlos
de forma ecológica.
El distribuidor especializado STIHL le
proporcionará informaciones actuales
relativas a la gestión de residuos.
STIHL recomienda emplear piezas de
repuesto originales STIHL.
Las piezas originales STlHL se
reconocen por el número de pieza de
repuesto STlHL, por el logotipo
{ y, dado el caso, el anagrama
de repuestos STlHL K (en piezas
pequeñas, puede encontrarse este
anagrama también solo).
KA 85 R
27
English
Contents
30
34
35
36
36
38
38
41
41
42
43
44
It has been built using modern
production techniques and
comprehensive quality assurance.
Every effort has been made to ensure
your satisfaction and troublefree use of
the product.
45
47
48
50
51
52
52
53
53
Thank you for choosing a quality
engineered STIHL product.
Please contact your dealer or our sales
company if you have any queries
concerning this product.
Your
Dr. Nikolas Stihl
Original Instruction Manual
28
Dear Customer,
© ANDREAS STIHL AG & Co. KG, 2014
0458-513-8721-A. VA3.B14.
0000000794_006_GB
{
29
29
Printed on chlorine-free paper
Printing inks contain vegetable oils, paper can be recycled.
KombiAttachmentSystem
Guide to Using this Manual
Safety Precautions and Working
Techniques
Approved Power Tool Attachments
Mounting the Loop Handle
Fitting the Carrying Ring
Fuel
Fueling
Starting / Stopping the Engine
Operating Instructions
Cleaning the Air Filter
Adjusting the Carburetor
Spark Arresting Screen in Muffler
Spark Plug
Replacing the Starter Rope and
Rewind Spring
Storing the Machine
Maintenance and Care
Minimize Wear and Avoid Damage
Main Parts
Specifications
Special Accessories
Maintenance and Repairs
Disposal
This instruction manual is protected by copyright. All rights reserved, especially the rights to reproduce, translate and process
with electronic systems.
KA 85 R
English
In this instruction manual the
KombiAttachmentEngines are also
referred to as basic power tools.
KombiAttachmentSystem
The approved power tool models are
listed in the chapter on "Approved Basic
Power Tools".
+
Guide to Using this Manual
Pictograms
All the pictograms attached to the
machine are shown and explained in this
manual.
Symbols in text
WARNING
..
..
002BA532 KN
+
Warning where there is a risk of an
accident or personal injury or serious
damage to property.
In the STIHL KombiAttachmentSystem
a number of different
KombiAttachmentEngines and
attachments can be combined to
produce a power tool. In this instruction
manual the functional unit formed by the
KombiAttachmentEngine and
attachment is referred to as the power
tool.
Therefore, the separate instruction
manuals for the
KombiAttachmentEngine and
attachment should be used together for
the power tool.
NOTICE
Caution where there is a risk of
damaging the machine or its individual
components.
Engineering improvements
STIHL's philosophy is to continually
improve all of its products. For this
reason we may modify the design,
engineering and appearance of our
products periodically.
Therefore, some changes, modifications
and improvements may not be covered
in this manual.
Always read and and make sure you
understand both instruction manuals
before using your power tool for the first
time and keep them in a safe place for
future reference.
KA 85 R
29
English
Safety Precautions and
Working Techniques
Special safety precautions must be observed
when working with a
power tool.
The user is responsible for avoiding
injury to third parties or damage to their
property.
Never attempt to modify your power tool
in any way since this may result in
accidents or damage to the machine.
Lend or rent your machine only to
persons who are familiar with this model
and its operation – do not lend of rent
your machine without the instruction
manuals of the KombiAttachmentEngine
and power tool attachment.
Do not operate the
KombiAttachmentEngine without a
properly mounted power tool attachment
since this may result in damage to the
machine.
The use of noise emitting power tools
may be restricted to certain times by
national or local regulations.
Always read and and
make sure you understand both instruction
manuals (KombiAttachmentEngine and power
tool attachment) before
using your power tool for
the first time and keep
them in a safe place for
future reference. Nonobservance of the safety
precautions may result in
serious or even fatal
injury.
Observe all applicable local safety
regulations, standards and ordinances.
If you have not used this type of power
tool before: Have your dealer or other
experienced user show you how to
operate your unit or attend a special
course in its operation.
Minors should never be allowed to use
this product.
Keep bystanders, especially children,
and animals away from the work area.
When the power tool is not in use, shut it
off so that it does not endanger others.
Secure it against unauthorized use.
30
To operate the power tool you must be
rested, in good physical condition and
mental health.
If you have any condition that might be
aggravated by strenuous work, check
with your doctor before operating a
power tool.
Persons with pacemakers only: The
ignition system of your power tool
produces an electromagnetic field of a
very low intensity. This field may
interfere with some pacemakers. STIHL
recommends that persons with
pacemakers consult their physician and
the pacemaker manufacturer to reduce
any health risk.
Do not operate the power tool if you are
under the influence of any substance
(drugs, alcohol) which might impair
vision, dexterity or judgment.
Use your power tool only for the
applications described in the instruction
manual of the power tool attachment you
are using.
It must not be used for any other
purpose because of the increased risk of
accidents and damage to the machine.
Only mount attachments and
accessories that are explicitly approved
for this power tool by STIHL or are
technically identical. It is important that
you read the chapter on "Approved
Attachments". If you have any questions
in this respect, consult a servicing
dealer. Use only high quality tools and
accessories in order to avoid the risk of
accidents and damage to the machine.
STIHL recommends the use of genuine
STIHL tools and accessories. They are
specifically designed to match the
product and meet your performance
requirements.
Never attempt to modify your unit in any
way since this may increase the risk of
personal injury. STIHL excludes all
liability for personal injury and damage
to property caused while using
unauthorized attachments.
Do not use a pressure washer to clean
the unit. The solid jet of water may
damage parts of the unit.
Clothing and Equipment
Wear proper protective clothing and
equipment.
See also notes on "Clothing and
Equipment" in the instruction manual of
the power tool attachment you are using.
KA 85 R
English
Transporting the Power Tool
Your power tool comes standard with
either a screw-type or bayonet-type fuel
cap.
After fueling, tighten
down the screw-type fuel
cap as securely as
possible.
Insert the fuel cap with
hinged grip (bayonet-type
cap) correctly in the
opening, turn it clockwise
as far as stop and fold the
grip down.
Always turn off the engine.
In vehicles: Properly secure your power
tool to prevent turnover, fuel spillage and
damage.
See also notes on "Transporting the
Machine" in the instruction manual of the
power tool attachment you are using.
Fueling
Gasoline is an extremely
flammable fuel. Keep
clear of naked flames. Do
not spill any fuel – do not
smoke.
Always shut off the engine before
refueling.
Do not fuel a hot engine – fuel may spill
and cause a fire.
Open the fuel cap carefully to allow any
pressure build-up in the tank to release
slowly and avoid fuel spillage.
Fuel your power tool only in wellventilated areas. If you spill fuel, wipe
the machine immediately – if fuel gets on
your clothing, change immediately.
KA 85 R
This reduces the risk of unit vibrations
causing the fuel cap to loosen or come
off and spill quantities of fuel.
To reduce the risk of serious or fatal
burn injuries, check for fuel leakage. If
fuel leakage is found, do not start or run
the engine until leak is fixed.
there are any leaks or damage, do
not start the engine – risk of fire.
Have your machine repaired by a
servicing dealer before using it
again.
–
Use only an approved combination
of cutting attachment, deflector,
handle and harness. All parts must
be assembled properly and
securely.
–
The power tool attachment must be
approved for use with this
KombiEngine.
–
Slide control / stop switch must
move easily to STOP or 0.
–
Smooth action of throttle trigger
lockout and throttle trigger – the
throttle trigger must return
automatically to the idle position.
–
Check that the spark plug boot is
secure – a loose boot may cause
arcing that could ignite combustible
fumes and cause a fire.
–
Never attempt to modify the controls
or safety devices in any way.
–
Keep the handles dry and clean –
free from oil and dirt – for safe
control of the power tool.
–
Adjust the harness and handle(s) to
suit your height and reach.
Before Starting
Check that your power tool is properly
assembled and in good condition – refer
to appropriate chapters in the instruction
manuals.
–
Check the fuel system for leaks,
paying special attention to visible
parts such as the tank cap, hose
connections and the manual fuel
pump (on machines so equipped). If
To reduce the risk of accidents, do not
operate your power tool if it is damaged
or not properly assembled.
If you use a shoulder strap or full
harness: Practice removing and putting
down the power tool as you would in an
emergency. To avoid damage, do not
throw the machine to the ground when
practicing.
31
English
See also notes on "Before Starting" in
the instruction manual of the power tool
attachment you are using.
Starting the Engine
Start the engine at least 3 meters from
the fueling spot, outdoors only.
Holding and Controlling the Unit
Always hold the power tool firmly with
both hands on the handles. Make sure
you always have good balance and
secure footing.
Models with loop handle
To reduce the risk of injury, avoid
contact with the attachment.
Do not drop start the power tool – start
the engine as described in the
instruction manual. Note that the
attachment continues to run for a short
period after you let go of the throttle
trigger – flywheel effect.
Check idle speed setting: The
attachment must be stationary when the
engine is idling with the throttle trigger
released.
To reduce the risk of fire, keep hot
exhaust gases and hot muffler away
from easily combustible materials (e.g.
wood chips, bark, dry grass, fuel).
See also notes on "Starting the Engine"
in the instruction manual of the power
tool attachment you are using.
32
To reduce the risk of accidents, take a
break in good time to avoid tiredness or
exhaustion.
Work calmly and carefully – in daylight
conditions and only when visibility is
good. Stay alert so as not to endanger
others.
002BA273 KN
Place the power tool on firm ground in
an open area. Make sure you have good
balance and secure footing. Hold the
power tool securely. The attachment
must be clear of the ground and all other
obstructions because it may begin to run
when the engine starts.
Be particularly alert and cautious when
wearing hearing protection because
your ability to hear warnings (shouts,
alarms, etc.) is restricted.
Left hand on loop handle, right hand on
control handle, even if you are lefthanded.
During Operation
In the event of impending danger or in
an emergency, switch off the engine
immediately by moving the slide control
/ stop switch to STOP or 0.
The correct engine idle speed is
important to ensure that the attachment
stops moving when you let go of the
throttle trigger. If the attachment
continues to run when the engine is
idling, have your dealer check your
machine and make proper adjustments
or repairs. STIHL recommends an
authorized STIHL servicing dealer.
Check and correct the idle speed setting
regularly.
Use your machine only in the areas
specified in the instruction manual of the
power tool attachment.
Your power tool produces
toxic exhaust fumes as
soon as the engine is
running. These fumes
may be colorless and
odorless and contain
unburned hydrocarbons
and benzol. Never run
the engine indoors or in
poorly ventilated locations, even if your model
is equipped with a catalytic converter.
To reduce the risk of serious or fatal
injury from breathing toxic fumes,
ensure proper ventilation when working
in trenches, hollows or other confined
locations.
To reduce the risk of accidents, stop
work immediately in the event of
nausea, headache, visual disturbances
(e.g. reduced field of vision), problems
with hearing, dizziness, deterioration in
ability to concentrate. Apart from other
possibilities, these symptoms may be
KA 85 R
English
caused by an excessively high
concentration of exhaust gases in the
work area.
Operate your power tool so that it
produces a minimum of noise and
emissions – do not run the engine
unnecessarily, accelerate the engine
only when working.
To reduce the risk of fire, do not smoke
while operating or standing near your
power tool. Note that combustible fuel
vapor may escape from the fuel system.
The dusts, vapor and smoke produced
during operation may be dangerous to
health. If the work area is very dusty or
smoky, wear a respirator.
If your power tool is subjected to
unusually high loads for which it was not
designed (e.g. heavy impact or a fall),
always check that it is in good condition
before continuing work – see also
"Before Starting".
Check the fuel system in particular for
leaks and make sure the safety devices
are working properly. Do not continue
operating your power tool if it is
damaged. In case of doubt, consult your
servicing dealer.
Do not operate your power tool in the
starting throttle position – engine speed
cannot be controlled in this position.
Vibrations
Prolonged use of the power tool may
result in vibration-induced circulation
problems in the hands (whitefinger
disease).
No general recommendation can be
given for the length of usage because it
depends on several factors.
The period of usage is prolonged by:
–
Hand protection (wearing warm
gloves)
–
Work breaks
The period of usage is shortened by:
–
Any personal tendency to suffer
from poor circulation (symptoms:
frequently cold fingers, tingling
sensations).
–
Low outside temperatures.
–
The force with which the handles
are held (a tight grip restricts
circulation).
Continual and regular users should
monitor closely the condition of their
hands and fingers. If any of the above
symptoms appear (e.g. tingling
sensation in fingers), seek medical
advice.
Before leaving the power tool
unattended: Shut off the engine.
Maintenance and Repairs
To reduce the risk of unintentional
engine start and injury, always shut off
the engine and remove the spark plug
boot before changing the power tool
attachment.
Service the machine regularly. Do not
attempt any maintenance or repair work
not described in the instruction manual.
Have all other work performed by a
servicing dealer.
KA 85 R
STIHL recommends that you have
servicing and repair work carried out
exclusively by an authorized STIHL
servicing dealer. STIHL dealers are
regularly given the opportunity to attend
training courses and are supplied with
the necessary technical information.
Only use high-quality replacement parts
in order to avoid the risk of accidents
and damage to the machine. If you have
any questions in this respect, consult a
servicing dealer.
STIHL recommends the use of genuine
STIHL replacement parts. They are
specifically designed to match your
model and meet your performance
requirements.
To reduce the risk of injury, always shut
off the engine before carrying out any
maintenance or repairs or cleaning the
machine. – Exception: Carburetor and
idle speed adjustments.
Do not turn the engine over on the
starter with the spark plug boot or spark
plug removed unless the slide control /
stop switch is on STOP or 0 since there
is otherwise a risk of fire from
uncontained sparking.
To reduce the risk of fire, do not service
or store your machine near open flames.
Check the fuel filler cap for leaks at
regular intervals.
Use only a spark plug of the type
approved by STIHL and make sure it is
in good condition – see "Specifications".
Inspect the ignition lead (insulation in
good condition, secure connection).
Check the condition of the muffler.
33
English
To reduce the risk of fire and damage to
hearing, do not operate your machine if
the muffler is damaged or missing.
Do not touch a hot muffler since burn
injury will result.
Attachment
HL 135° 1)
Approved Power Tool
Attachments
The following STIHL attachments may
be mounted to the basic power tool:
Vibration behavior is influenced by the
condition of the AV elements – check the
AV elements at regular intervals.
HL 0°
FH 1)
HT 3)
FS (A) 2)
FS (B) 1)
FH
BF 1)
SP 4)
SP 10 3)
FCS 2) 5)
KW 2)
HT
FS
(B)
FS
(A)
1)
Barrier bar must be mounted on the
loop handle
2)
Loop handle may be used with or
without barrier bar
3)
Loop handle or handle hose
allowed
4)
Only approved with handle hose
5)
Shoulder strap is not necessary
SP
BF
KW
228BA057 KN
FCS
SP 10
Application
Hedge trimmer,
adjustable
Hedge trimmer
Power scythe
Pole pruner
Brushcutter with
mowing head
Scythe with metal
cutting attachment
Pick tines
Coffee harvester
Special harvester
Power edger
PowerSweep
34
KA 85 R
English
Loop handle without barrier bar
Mounting the Loop Handle
2
4
Loop handle with barrier bar
8
7
8
7
4
3
5
7
1
N
Fit the clamp (3) in the loop
handle (4) and place them both on
the drive tube (5).
N
Place the clamp (6) in position.
N
002BA098 KN
1
N
Fit the square nuts (1) in the barrier
bar (2); the holes must line up.
KA 85 R
5
6
002BA136 KN
6
002BA099 KN
3
2
1
1
N
Place the barrier bar (2) in position
as shown.
Fit the clamp (3) in the loop
handle (4) and place them both on
the drive tube (5).
N
Place the clamp (6) in position.
N
Line up the holes.
N
Line up the holes.
N
Insert the screws (7) and tighten
them down moderately against the
barrier bar.
N
N
Go to "Securing the loop handle".
Fit washers (7) on the screws (8)
and insert the screws in the holes.
Fit the square nuts (1) and screw
them down as far as stop.
N
Go to "Securing the loop handle".
35
English
Securing the loop handle
Fitting the Carrying Ring
Fuel
The carrying ring comes standard with
the machine or is available as a special
accessory.
Your engine requires a mixture of
gasoline and engine oil.
WARNING
For health reasons, avoid direct skin
contact with gasoline and avoid inhaling
gasoline vapor.
A
9
1
4
STIHL MotoMix
002BA147 KN
10
1
Secure the loop handle (4) about
20cm/8in (A) forward of the control
handle (9).
N
Line up the loop handle.
N
Tighten down the screws firmly –
lock the nuts if necessary.
The sleeve (10) (not fitted on all models)
must be between the loop handle and
the control handle.
2
002BA142 KN
N
STIHL recommends the use of STIHL
MotoMix. This ready-to-use fuel mix
contains no benzol or lead, has a high
octane rating and ensures that you
always use the right mix ratio.
For position of carrying ring see "Main
Parts".
STIHL MotoMix uses STIHL HP Ultra
two-stroke engine oil for an extra long
engine life.
MotoMix is not available in all markets.
Mixing Fuel
N
Place the clamp (1) against the
drive tube with the tapped hole on
the left (viewed from engine).
N
Squeeze the two ends of the clamp
together and hold in that position.
N
Insert the M6x14 screw (2).
N
Line up the carrying ring.
Unsuitable fuels or lubricants or mix
ratios other than those specified may
result in serious damage to the engine.
Poor quality gasoline or engine oil may
damage the engine, sealing rings, hoses
and the fuel tank.
N
Tighten down the screw firmly.
Gasoline
NOTICE
Use only high-quality brand-name
gasoline with a minimum octane rating
of 90 – leaded or unleaded.
36
KA 85 R
English
If your machine is equipped with a
catalytic converter, you must use
unleaded gasoline.
NOTICE
A few tankfuls of leaded gasoline will
greatly reduce the efficiency of the
catalytic converter.
Gasoline with an ethanol content of
more than 10% can cause running
problems in engines with a manually
adjustable carburetor and should not be
used in such engines.
Engines equipped with M-Tronic deliver
full power when run on gasoline with an
ethanol content of up to 25% (E25).
Engine oil
Use only high-quality two-stroke engine
oil – preferably STIHL HP, HP Super or
HP Ultra, which are specially formulated
for use in STIHL engines. HP Ultra
guarantees high performance and a
long engine life.
These engine oils are not available in all
markets.
Use only STIHL 50:1 two-stroke engine
oil for the fuel mix in models with a
catalytic converter.
Examples
Gasoline
Liters
1
5
10
15
20
25
N
STIHL engine oil 50:1
Liters
(ml)
0.02
(20)
0.10
(100)
0.20
(200)
0.30
(300)
0.40
(400)
0.50
(500)
Dispose of remaining fuel and cleaning
fluid properly in accordance with local
regulations and environmental
requirements.
Use a canister approved for storing
fuel. Pour oil into canister first, then
add gasoline and mix thoroughly.
Storing Fuel
Store fuel only in approved safety-type
fuel canisters in a dry, cool and safe
location protected from light and the sun.
Fuel mix ages – only mix sufficient fuel
for a few weeks work. Do not store fuel
mix for longer than 30 days. Exposure to
light, the sun, low or high temperatures
can quickly make the fuel mix unusable.
STIHL MotoMix may be stored for up to
2 years without any problems.
N
Thoroughly shake the mixture in the
canister before fueling your
machine.
Mix Ratio
STIHL 50:1 two-stroke engine oil: 50
parts gasoline to 1 part oil
WARNING
Pressure may build up in the canister –
open it carefully.
N
KA 85 R
Clean the fuel tank and canister
from time to time.
37
English
Fueling
N
Open the filler cap.
N
Filling up with fuel
Starting / Stopping the
Engine
WARNING
Controls
After fueling, tighten down the filler cap
as securely as possible by hand.
7
Changing the Fuel Pickup Body
4
STOP-
Preparations
STOP
5
6
START
3
2
N
N
Before fueling, clean the filler cap
and the area around it to ensure that
no dirt falls into the tank.
Change the fuel pickup body every year:
N
Drain the fuel tank.
Position the machine so that the
filler cap is facing up.
N
Use a hook to pull the fuel pickup
body out of the tank and take it off
the hose.
N
Push the new pickup body into the
hose.
N
Place the pickup body in the tank.
Filling up with fuel
Take care not to spill fuel while fueling
and do not overfill the tank. STIHL
recommends you use the STIHL filler
nozzle for fuel (special accessory).
38
389BA032 KN
389BA031 KN
002BA181 KN
1
1
2
3
Throttle trigger lockout
Throttle trigger
Slide control
Positions of slide control
4
5
6
STOP-0 – engine off – ignition is
switched off
F – normal run position – the engine
is running or can start
START – ignition is switched on –
the engine can start
KA 85 R
English
/ Stopping the Engine" in the
instruction manual of the
attachment you are using.
h – stop symbol and arrow. To stop
the engine, push the slide control in
the direction of the arrow on the stop
symbol (h) to STOP-0.
9
Starting
N
Press down the trigger lockout lever
and squeeze the throttle trigger
N
and hold them in that position.
N
Move the slide control to START
and hold it there.
N
Now release the throttle trigger,
slide control and trigger lockout in
that order. This is the starting
throttle position.
N
002BA038 KN
393BA017 KN
8
g if the engine is cold
e for warm start – also use this position if the engine has been running
but is still cold.
002BA040 KN
Set the choke lever (8) to:
KA 85 R
Make sure you have a safe and
secure footing.
N
Hold the unit with your left hand and
press it down firmly – your thumb
should be under the fan housing.
NOTICE
Do not stand or kneel on the drive tube.
Cranking
8
N
Press the manual fuel pump
bulb (9) at least five times – even if
the bulb is filled with fuel.
N
N
Place the power tool on the ground
so that it rests on the machine
support: Check that the attachment
is not touching the ground or any
other obstacles – see also "Starting
002BA072 KN
7
393BA018 KN
Symbol on slide control
N
Hold the starter grip with your right
hand.
N
Pull the starter grip slowly until you
feel it engage and then give it a brisk
strong pull.
NOTICE
Do not pull out the starter rope all the
way – it might otherwise break.
N
Do not let the starter grip snap back.
Guide it slowly back into the housing
so that the starter rope can rewind
properly.
N
Continue cranking.
39
English
When engine begins to fire
N
Set the choke lever to e.
N
Continue cranking until the engine
runs.
As soon as the engine runs
N
Blip the throttle trigger immediately.
The slide control moves to the
normal run position F – and the
engine settles down to idle speed.
WARNING
Make sure the carburetor is correctly
adjusted. The working tool must not
move when the engine is idling.
Your machine is now ready for
operation.
Stopping the Engine
N
Push the slide control in the
direction of the arrow on the stop
symbol (h) to STOP-0.
If engine does not start
If you did not move the choke lever to e
quickly enough after the engine began to
fire, the combustion chamber is flooded.
N
Set the choke lever to e.
N
Set the slide control, lockout lever
and throttle trigger to the starting
throttle position.
N
Start the engine by pulling the
starter rope briskly – 10 to 20 pulls
may be necessary.
N
Open the throttle slightly.
N
Warm up the engine for a short
period.
40
After refueling, press the manual
fuel pump bulb at least five times –
even if the bulb is filled with fuel.
N
Set the choke lever to suit the
engine temperature.
N
Now start the engine.
If the engine still does not start
N
Move the slide control to STOP-0.
N
Remove the spark plug – see
"Spark Plug".
N
Dry the spark plug.
N
Open the throttle wide.
N
Crank the engine several times with
the starter to clear the combustion
chamber.
N
Refit the spark plug – see "Spark
Plug".
N
Move the slide control to START.
N
Set the choke lever to e – even if
the engine is cold.
N
Now start the engine.
As soon as the engine runs:
Blip the throttle trigger to disengage
the starting throttle position. The
slide control moves to the normal
run position F – and the engine
settles down to idle speed.
N
Choke lever
At very low outside temperatures
N
Fuel tank run until completely dry
KA 85 R
English
During break-in period
A factory-new machine should not be
run at high revs (full throttle off load) for
the first three tank fillings. This avoids
unnecessary high loads during the
break-in period. As all moving parts
have to bed in during the break-in
period, the frictional resistances in the
engine are greater during this period.
The engine develops its maximum
power after about 5 to 15 tank fillings.
On the screw-mounted filter cover:
Cleaning the Air Filter
Dirty air filters reduce engine power,
increase fuel consumption and make
starting more difficult.
Your power tool comes standard with
either a clip-on or screw-mounted filter
cover.
2
If there is a noticeable loss of engine
power
3
N
Set the choke lever to g.
On the clip-on filter cover:
392BA046 KN
Operating Instructions
During Operation
After a long period of full throttle
operation, allow the engine to run for a
short while at idle speed so that engine
heat can be dissipated by the flow of
cooling air. This protects enginemounted components (ignition,
carburetor) from thermal overload.
N
On both versions:
After Finishing Work
KA 85 R
N
Clean away loose dirt from around
the filter.
N
Remove the foam and felt filter
elements.
N
Wash the foam element in a clean,
non-flammable solution (e.g. warm
soapy water) and then dry.
N
Fit a new felt element – do not wash.
As a temporary measure you can
knock it out on the palm of your
hand or blow it out with compressed
air.
2
1
N
Press in the tab (1) and swing the
filter cover (2) away.
355BA014 KN
Storing for a short period: Wait for the
engine to cool down. Empty the fuel tank
and keep the machine in a dry place,
well away from sources of ignition, until
you need it again. For longer out-ofservice periods – see "Storing the
Machine".
Loosen the screw (3) and remove
the filter cover (2).
Replace any damaged parts.
41
English
Adjusting the Carburetor
392BA047 KN
The carburetor comes from the factory
with a standard setting.
This setting provides an optimum fuel-air
mixture under most operating
conditions.
Fit the foam filter element (4) in the
filter cover.
With this carburetor it is only possible to
adjust the high speed screw within fine
limits.
2
N
4
H
3/4
LA
392BA048 KN
6
N
Place the felt element (5) (lettering
facing inwards) in the filter
housing (6).
N
Fit the filter cover.
N
Clip the filter cover in position or
tighten down the screw firmly.
N
Stopping the engine
N
Mounting the Attachment
N
Check the air filter and clean or
replace as necessary.
265BA024 KN
Standard Setting
5
L
1
N
Turn high speed screw (H)
counterclockwise as far as stop (no
more than 3/4 turn).
N
Turn the low speed screw (L)
carefully clockwise as far as stop,
then turn it back 1 turn.
N
Start and warm up the engine.
N
Adjust idle speed with the idle speed
screw (LA) so that the cutting
attachment does not move.
Fine Tuning
A slight correction of the setting of the
high speed screw (H) may be necessary
if engine power is not satisfactory when
operating at high altitude, sea level or
after changing the attachment.
42
KA 85 R
English
Rule of thumb:
Engine stops while idling
Turn the high speed screw (H) about
one quarter turn for every 1000 m (3300
ft) change in altitude.
N
N
Carry out the standard setting.
N
Start and warm up the engine: For
about 5 minutes if you are using a
metal cutting attachment or about 3
minutes if you are using a mowing
head.
N
Open the throttle wide.
Cutting attachment runs when engine is
idling
N
At high altitude
N
Turn the high speed screw (H)
clockwise (leaner), no further than
stop, until there is no noticeable
increase in engine speed.
At sea level
N
Turn the high speed screw (H)
counterclockwise (richer), no further
than stop, until there is no
noticeable increase in engine
speed.
It is usually necessary to change the
setting of the idle speed screw (LA) after
every correction to the low speed
screw (L).
N
In some countries replacement mufflers
may be equipped with an integral spark
arresting screen.
If the engine is down on power, check
the spark arresting screen in the muffler.
WARNING
If the working tool or cutting attachment
continues to run when the engine is
idling, have your machine checked and
repaired by your servicing dealer.
Erratic idling behavior, engine stops
even though setting of LA screw has
been corrected, poor acceleration
Idle setting is too lean
N
It is possible that maximum engine
speed may be reached with the standard
setting in each case.
Adjusting Idle Speed
Turn the idle speed screw (LA)
counterclockwise until the working
tool or cutting attachment stops
moving and then rotate the screw
another 1/2 to 1 turn in the same
direction.
Spark Arresting Screen in
Muffler
392BA035 KN
Conditions for adjustment
Turn the idle speed screw (LA)
slowly clockwise until the engine
runs smoothly – the working tool or
cutting attachment must not move.
Rotate the low speed screw (L)
about 1/4 turn counterclockwise
until the engine runs and
accelerates smoothly.
Erratic idling behavior
N
Lift the spark arresting screen and
pull it out.
N
Clean the spark arresting screen. If
the screen is damaged or heavily
carbonized, fit a new one.
N
Refit the spark arresting screen.
Idle setting is too rich
N
Rotate the low speed screw (L)
about 1/4 turn clockwise until the
engine runs and accelerates
smoothly.
Warm up the engine.
KA 85 R
43
English
Checking the spark plug
N
If the engine is down on power,
difficult to start or runs poorly at idle
speed, first check the spark plug.
N
Fit a new spark plug after about 100
operating hours – or sooner if the
electrodes are badly eroded. Install
only suppressed spark plugs of the
type approved by STIHL – see
"Specifications".
Removing the Spark Plug
N
Move the slide control to STOP-0.
1
N
Unscrew the spark plug.
Screw home the spark plug, fit the
boot and press it down firmly.
A
N
Clean dirty spark plug.
N
Check electrode gap (A) and
readjust if necessary – see
"Specifications".
N
Rectify the problems which have
caused fouling of the spark plug.
–
Too much oil in fuel mix.
–
Dirty air filter.
–
Unfavorable running conditions.
1
000BA045 KN
Pull off the spark plug boot (1).
N
Possible causes are:
393BA053 KN
N
Installing the spark plug
000BA039 KN
Spark Plug
WARNING
If the spark plug comes with a
detachable adapter nut (1), screw the
adapter onto the thread and tighten it
down firmly to reduce the risk of arcing
and fire.
44
KA 85 R
English
Removing the Rope Rotor
Replacing the Starter Rope
and Rewind Spring
Replacing the Starter Rope
6
Removing the Starter Cover
4
5
1
N
Take out the screws (1).
N
Lift the cover (2) away from the
tank (3) and pull it out from under
the shroud (4).
392BA013 KN
1
3
KA 85 R
392BA014 KN
2
7
N
Take out the screw (5) and remove
the rope rotor.
WARNING
The rewind spring is seated in the rope
rotor and may pop out and uncoil if care
is not taken. The pieces of broken spring
may be under tension and fly apart
unexpectedly when you remove the rope
rotor – to help reduce the risk of injury,
wear a face shield and work gloves.
392BA015 KN
1
N
Use a screwdriver to pry the cap (6)
out of the starter grip.
N
Remove the remaining rope from
the rotor and grip, making sure the
ElastoStart sleeve is not pushed out
of the grip.
N
Tie a simple overhand knot in the
new rope and then thread it through
the top of the grip and the rope
bushing (7).
N
Refit the cap in the grip.
45
English
Installing rope rotor with rewind spring
N
N
Thread the rope through the rotor
and secure it with a simple
overhand knot.
Carefully unpack the new rope rotor
with rewind spring. The spring may
pop out if not handled with care –risk
of injury.
Lubricate the spring with a few
drops of resin-free oil – see "Special
Accessories".
N
Go to "Installing the Rope Rotor".
Two types of replacement springs are
available from the factory:
–
A rope rotor with pre-installed
rewind spring.
a
a = 2mm
(0.08 in)
N
Check dimension "a" for inner
spring anchor loop and bend it
slightly if necessary.
N
Coat rope rotor bearing bore with
resin-free oil – see "Special
Accessories".
Installing the ready-to-fit rewind spring
N
Lubricate the spring with a few
drops of resin-free oil – see "Special
Accessories" – do not open the wire
retainer!
N
Carefully remove the parts of the old
spring from the starter cover and
rope rotor.
N
Insert the new rewind spring in the
rope rotor and, at the same time,
engage the outer spring loop in the
rotor’s recess – the wire retainer
slips off in this process. If the spring
pops out and uncoils, refit it in the
counterclockwise direction, starting
outside and working inwards.
N
46
389BA029 KN
Replacing a Broken Rewind Spring
A ready-to-fit rewind spring secured
with a wire retainer.
N
Slip the rotor over the starter post –
turn it back and forth to engage the
anchor loop (8) of the rewind spring.
N
Insert the screw (5) and tighten it
down firmly.
N
Go to "Tensioning the Rewind
Spring".
Installing the Rope Rotor
Go to "Installing the Rope Rotor".
–
392BA025 KN
N
8
Tension the rewind spring.
392BA044 KN
392BA024 KN
N
N
Make a loop in the unwound starter
rope and use it to turn the rope rotor
six full revolutions
counterclockwise.
N
Hold the rotor steady. Pull out and
straighten the twisted rope.
N
Release the rope rotor.
N
Release the rope slowly so that it
winds onto the rotor.
N
Check spring tension:
Go to "Installing the Rope Rotor".
KA 85 R
English
–
–
N
The starter grip must be firmly
seated in the rope bushing. If the
grip droops to one side: Add one
more turn on rope rotor to increase
spring tension
When the starter rope is fully
extended it must still be possible to
rotate the rotor another half turn. If
this is not the case, the spring is
overtensioned and could break.
Take one turn of the rope off the
rotor.
Storing the Machine
For periods of 3 months or longer
N
Drain and clean the fuel tank in a
well ventilated area.
N
Dispose of fuel properly in
accordance with local
environmental requirements.
N
Run the engine until the carburetor
is dry – this helps prevent the
carburetor diaphragms sticking
together.
N
Thoroughly clean the machine – pay
special attention to the cylinder fins
and air filter.
N
Remove, clean and inspect the
attachment.
N
Store the machine in a dry and
secure location – out of the reach of
children and other unauthorized
persons.
Go to "Fitting the Starter Cover".
Fitting the Starter Cover
1
4
2
1
3
393BA045 KN
1
N
Push the upper mounting boss of
the cover (2) under the shroud (4).
N
Line up the tank and push the
bottom of the cover onto the tank.
N
Insert the screws (1) and tighten
them down firmly.
KA 85 R
47
English
Complete machine
Control handle
Air filter
Manual fuel pump (if fitted)
Pickup body in fuel tank
Visual inspection (condition, leaks)
X
Clean
Check operation
X
X
X
Replace
X
X
Check
X
Replace
Clean
Carburetor
Check idle adjustment – the attachment
must not move
X
X
Have repaired by servicing dealer2)
Fuel tank
X
X
X
X
Cooling inlets
Spark arrestor1) in muffler
48
X
X
X
Readjust idle
Spark plug
as required
X
X
Clean
Check
if damaged
if problem
every 12 months
monthly
weekly
after each refueling stop
before starting work
The following intervals apply to normal operating conditions only. If your daily working time is longer or operating conditions are difficult (very dusty work area, etc.),
shorten the specified intervals accordingly.
after finishing work or daily
Maintenance and Care
X
Readjust electrode gap
X
Replace after every 100 operating hours
Visual inspection
X
Clean
Check
Replace
X
X
X
X
X
KA 85 R
All accessible screws and nuts (not adjustRetighten
ing screws)
Anti-vibration elements
Safety labels
1)
2)
X
Check
Have replaced by servicing
as required
if damaged
if problem
every 12 months
monthly
weekly
after each refueling stop
before starting work
The following intervals apply to normal operating conditions only. If your daily working time is longer or operating conditions are difficult (very dusty work area, etc.),
shorten the specified intervals accordingly.
after finishing work or daily
English
X
dealer2)
Replace
X
X
X
X
Replacement mufflers may be equipped with an integral spark arresting screen
STIHL recommends an authorized STIHL servicing dealer.
KA 85 R
49
English
Minimize Wear and Avoid
Damage
Observing the instructions in this manual
helps reduce the risk of unnecessary
wear and damage to the power tool.
The power tool must be operated,
maintained and stored with the due care
and attention described in this owner's
manual.
servicing dealer. STIHL dealers are
regularly given the opportunity to attend
training courses and are supplied with
the necessary technical information.
If these maintenance operations are not
carried out as specified, the user
assumes responsibility for any damage
that may occur. Among other parts, this
includes:
–
Damage to the engine due to
neglect or deficient maintenance
(e.g. air and fuel filters), incorrect
carburetor adjustment or
inadequate cleaning of cooling air
inlets (intake ports, cylinder fins).
–
Corrosion and other consequential
damage resulting from improper
storage.
–
Damage to the machine resulting
from the use of poor quality
replacement parts.
The user is responsible for all damage
caused by non-observance of the safety
precautions, operating and maintenance
instructions in this manual. This includes
in particular:
–
Alterations or modifications to the
product not approved by STIHL.
–
Using tools or accessories which
are neither approved or suitable for
the product or are of a poor quality.
–
Using the product for purposes for
which it was not designed.
–
Using the product for sports or
competitive events.
–
Consequential damage caused by
continuing to use the product with
defective components.
Maintenance Work
All the operations described in the
"Maintenance Chart" must be performed
on a regular basis. If these maintenance
operations cannot be performed by the
owner, they should be performed by a
servicing dealer.
Parts Subject to Wear and Tear
Some parts of the power tool are subject
to normal wear and tear even during
regular operation in accordance with
instructions and, depending on the type
and duration of use, have to be replaced
in good time. Among other parts, this
includes:
–
Clutch
–
Filters (air, fuel)
–
Rewind starter
–
Spark plug
STIHL recommends that you have
servicing and repair work carried out
exclusively by an authorized STIHL
50
KA 85 R
English
Main Parts
1
2
3
4
5
6
7
8
9
10
11
12
13
14
15
16
17
#
1)
KA 85 R
Manual fuel pump
Choke lever
Carburetor adjusting screws
Starter grip
Tank cap
Fuel tank
Muffler (with spark arresting
screen)1)
Carrying ring
Slide control
Throttle trigger lockout
Throttle trigger
Spark plug boot
Air filter cover
Machine support
Loop handle
Barrier bar
Drive tube
Serial number
Not in all versions, country-specific
51
English
Weight
dry, without attachment
KA 85 R:
Engine
Single cylinder two-stroke engine
Displacement:
25.4 cc
Bore:
34 mm
Stroke:
28 mm
Engine power to
0.95 kW (1.3 HP)
ISO 8893:
at 8,500 rpm
Idle speed:
2,800 rpm
Cut-off speed
(rated):
10,500 rpm
Ignition System
Electronic magneto ignition
Special Accessories
5.0 kg
Deflector
386BA011 KN
Specifications
Guard kit 4138 007 1003 for mounting to
and protecting the powerhead when the
machine is put down. Also for resting the
machine on the right thigh during
operation.
Spark plug (resistor Bosch WSR 6 F1),
NGK BPMR 7 A,
type):
Champion
RCJ 6 Y1)
Electrode gap:
0.5 mm
1) not available in Brazil
Other Special Accessories
Fuel System
1 Safety glasses
All position diaphragm carburetor with
integral fuel pump
Fuel tank capacity:
Fuel mix:
52
440 cc (0.44 l)
see chapter on
"Fuel"
–
STIHL ElastoStart (starter rope with
grip)
The power tool comes standard with:
1 Shoulder strap
1 Combination wrench
Contact your STIHL dealer for more
information on these and other special
accessories.
See also notes on special accessories in
the instruction manual of the attachment
you are using.
KA 85 R
English
Users of this machine may only carry out
the maintenance and service work
described in this user manual. All other
repairs must be carried out by a
servicing dealer.
STIHL recommends that you have
servicing and repair work carried out
exclusively by an authorized STIHL
servicing dealer. STIHL dealers are
regularly given the opportunity to attend
training courses and are supplied with
the necessary technical information.
When repairing the machine, only use
replacement parts which have been
approved by STIHL for this power tool or
are technically identical. Only use highquality replacement parts in order to
avoid the risk of accidents and damage
to the machine.
Disposal
Observe all country-specific waste
disposal rules and regulations.
000BA073 KN
Maintenance and Repairs
STIHL products must not be thrown in
the garbage can. Take the product,
accessories and packaging to an
approved disposal site for environmentfriendly recycling.
Contact your STIHL servicing dealer for
the latest information on waste disposal.
STIHL recommends the use of original
STIHL replacement parts.
Original STIHL parts can be identified by
the STIHL part number, the {
logo and the STIHL parts symbol K
(the symbol may appear alone on small
parts).
KA 85 R
53
0458-513-8721-A
spanisch / englisch
E G
www.stihl.com
*04585138721A*
0458-513-8721-A