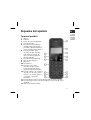
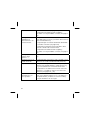
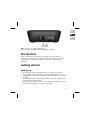
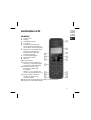
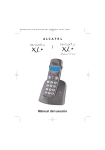
1
83073 ES EN DE Final Cover.FH11 Fri Dec 10 10:15:27 2010 Seite 1 C M Y CM MY CY CMY K Teléfono DECT con 3 terminales móviles y contestador automático DECT Phone with 3 handsets and answering machine DECT Telefon mit 3 Mobilteilen und Anrufbeantworter IIIa/03/11 MEDION® LIFE® E63032 (MD 83073) Medion Service Center Visonic S.A. c/ Miguel Faraday, 6 Parque Empresarial "La Carpetania", N-IV Km. 13 28906 Getafe, Madrid España Hotline: 902196437 · Fax: 914604772 E-Mail: [email protected] www.medion.es Manual de Instrucciones Instruction Manual Bedienungsanleitung Índice ES Paquete de suministro .................................................................. 4 Instrucciones de seguridad ........................................................... 5 No permita que los niños toquen aparatos eléctricos ............................... 5 Zonas con riesgo de explosión ................................................................. 5 Adaptador de red ..................................................................................... 5 Coloque el aparato de forma segura ........................................................ 6 Mantenga la toma de corriente accesible ................................................. 6 Tormenta/No utilizar ................................................................................ 7 Manejo seguro de las baterías .................................................................. 7 No haga nunca reparaciones por su cuenta ............................................. 8 Esquema del aparato .................................................................... 9 Terminal portátil ...................................................................................... 9 Estación base ......................................................................................... 10 Función ECO ................................................................................ 11 Preparación ................................................................................ 11 Colocación ............................................................................................. 11 Introducir la batería en el terminal móvil ................................................ 13 Conectar la pieza de red en la estación base .......................................... 14 Conectar la pieza de red en la estación cargador .................................... 14 Cargar la batería .................................................................................... 15 Conexión de la estación base a la red telefónica ..................................... 16 La pantalla .................................................................................. 17 Indicador normal ................................................................................... 17 Otras indicaciones en la pantalla ............................................................ 18 Efectuar llamadas ....................................................................... 20 Funciones básicas................................................................................... 20 Funciones adicionales ............................................................................ 22 Hablar por teléfono con varios interlocutores ......................................... 26 Ajuste del teléfonomedianteel menú .......................................... 28 Navegación por el menú ........................................................................ 28 Menú de Lista de llamadas .......................................................... 29 Guardar número .................................................................................... 29 1 EN DE Borrar ..................................................................................................... 29 Borrar todos ........................................................................................... 29 Detalles .................................................................................................. 29 Menú Listín telefónico ................................................................ 30 Entrada nueva ........................................................................................ 30 Ver ......................................................................................................... 31 Guardados ............................................................................................. 31 Borrar ..................................................................................................... 32 Borrar todos ........................................................................................... 32 Estado del LT .......................................................................................... 32 Configuraciones del menú de base ............................................. 32 Sonido de llamada ................................................................................. 32 Volumen del sonido de llamada ............................................................. 32 Dar de baja el terminal móvil ................................................................. 33 Tipo de marcación. ................................................................................ 33 Tiempo de flash ..................................................................................... 34 Modificar el PIN ...................................................................................... 34 Configuración del TM ................................................................. 35 Despertador ........................................................................................... 35 Sonido de llamada ................................................................................. 35 Tonos ..................................................................................................... 36 Idioma ................................................................................................... 36 Nombre del TM...................................................................................... 37 Pantalla del TM ...................................................................................... 37 Respuesta automática ............................................................................ 37 Fecha y hora........................................................................................... 37 Seleccionar la base ................................................................................. 38 Registrar..................................................................................... 38 Restablecer ................................................................................. 39 Contestador automático (Menú) ................................................ 39 Escuchar mensajes ................................................................................. 39 Borrar todos ........................................................................................... 41 Notas ..................................................................................................... 41 Encender/Apagar el contestador ............................................................ 41 Configuración del contestador ............................................................... 42 2 Utilizar el contestador automático desde la estación base ......... 45 Activar y desactivar ................................................................................ 45 Indicaciones de la estación base ............................................................. 46 Escuchar mensajes ................................................................................. 47 Borrar mensajes ..................................................................................... 50 En caso de problemas ................................................................. 51 Ajustes de fábrica ....................................................................... 53 Ajustes de fábrica en el terminal móvil ................................................... 53 Ajustes de fábrica de la estación base ..................................................... 53 Otros ajustes de fábrica .......................................................................... 54 Limpieza ..................................................................................... 54 Eliminación ................................................................................. 55 Especificaciones técnicas ............................................................ 56 Información de conformidad.................................................................. 56 3 ES EN DE Paquete de suministro ¡ATENCIÓN! No permita que los niños pequeños jueguen con el plástico. ¡Existe peligro de asfixia! Retire la totalidad del material de embalaje, incluidas las láminas plásticas que hay sobre las pantallas de la estación base y de los portátiles. Cuando desembale la caja, asegúrese de que están incluidos los siguientes artículos: 3x Terminal portátil 1x Estación base 2x Adaptador de red 1x Cable de teléfono 6 x pilas recargables (batería) 1,2 V/600 mAh Tipo NiMH, tamaño AAA, HR03 Instrucciones de funcionamiento y documentos de garantía 4 Instrucciones de seguridad ES Acerca de las presentes instrucciones Antes de la puesta en marcha del aparato, lea atentamente las presentes instrucciones. Preste atención a las advertencias que aparecen en el propio aparato y en las instrucciones de funcionamiento. Mantenga siempre a su alcance las instrucciones de funcionamiento. Si vende o cede el aparato a otra persona, entréguele sin falta también las presentes instrucciones y el certificado de garantía. No permita que los niños toquen aparatos eléctricos Los niños desconocen los peligros que pueden surgir del uso de aparatos eléctricos. No deje que los niños usen los aparatos eléctricos sin vigilancia. Las baterías pueden representar un peligro de muerte si se tragan. Mantenga por ello el terminal móvil y las baterías fuera del alcance de los niños pequeños. En caso de ingestión accidental de una batería, hay que avisar inmediatamente a un médico. Mantenga también los embalajes alejados de los niños. Hay peligro de asfixia. Zonas con riesgo de explosión No emplee nunca el terminal móvil en un entorno con riesgo de explosión, p.ej. en un taller de pintura, o si se emite gas en el entorno. Adaptador de red Utilice únicamente el adaptador de red del paquete de entrega. Los adaptadores sólo pueden ser utilizados en lugares secos. 5 EN DE Coloque el aparato de forma segura Coloque la estación base o la estación de carga sobre una superficie firme y nivelada. Coloque la estación base o la estación de carga protegida para que no caiga. No puede haber ninguna fuente de calor (como calefacciones) en contacto con la estación base, la estación de carga ni el terminal móvil. Los aparatos no deben exponerse a la luz solar directa. El contacto con humedad, agua o salpicaduras debe ser evitado. Los aparatos no están pensados para ser utilizados en ambientes de alta humedad del aire (como en baños). No coloque la estación base o la estación de carga cerca de otros aparatos eléctricos (como televisores u hornos microondas). No coloque la estación base o la estación de carga cerca de fuegos abiertos (como velas encendidas). Si el aparato es trasladado de un lugar frío a un lugar caliente, espere un rato antes de conectarlo a la red. El agua condensada que se forma podría dañar el aparato. Cuando el aparato haya alcanzado la temperatura ambiental, se lo podrá poner en funcionamiento sin ningún peligro. Mantenga la toma de corriente accesible 6 Conecte la estación base solamente en una toma de corriente adecuada bien accesible (230 V ~ 50 Hz) y cercana al lugar de emplazamiento. La toma de corriente debe estar bien accesible para poder desenchufar el equipo sin problemas. Tire del adaptador tomándolo por el enchufe, en lugar de tirar del cable. No doble o aplaste el cable de red. No coloque nunca el terminal móvil sin la tapa del compartimento de pilas en la estación base. Tormenta/No utilizar ES En caso de ausencia prolongada o de tormenta, desconecte de la estación base el adaptador de red y el cable del teléfono. Si no se utiliza durante un tiempo prolongado retire sin falta las baterías del terminal móvil para evitar que las baterías derramen líquidos tóxicos. Las baterías que han derramado líquidos pueden dañar el terminal móvil. Manejo seguro de las baterías Para el terminal móvil, necesita pilas recargables (batería). Para ello, observe las siguientes indicaciones: Mantenga las baterías alejadas de los niños. No arroje las baterías al fuego, no las cortocircuite y no las abra. Utilice solamente baterías del mismo tipo. Si utiliza baterías de otro tipo, hay peligro de explosión. Al introducir las pilas, preste atención a la polaridad (+/–). Si no utiliza el aparato durante un largo tiempo, retire la batería. ¡Retire inmediatamente del aparato las baterías gastadas! ¡Existe un alto peligro de derrame! No exponga las baterías a condiciones extremas. ¡No coloque el aparato, por ejemplo, encima de un radiador! ¡Existe un alto peligro de derrame! Retire inmediatamente del aparato las baterías que derramen líquido. Limpie los contactos antes de introducir baterías nuevas. ¡Existe peligro de causticación por el ácido de las pilas! ¡En caso de que se hubiera derramado ácido de la pila, evite en todo caso que el líquido entre en contacto con la piel, los ojos y las mucosas! El líquido que sale de las baterías puede causar erupción cutánea. Si el ácido hubiera entrado en contacto con la piel, enjuague inmediatamente las zonas afectadas con abundante agua limpia y acuda a un médico sin demora. 7 EN DE No haga nunca reparaciones por su cuenta 8 En caso de haber desperfectos en el adaptador de red, en el cable de conexión o en la estación base, desenchúfelo inmediatamente. No intente en ningún caso abrir y/o arreglar usted mismo los aparatos. Existe el peligro de recibir una descarga eléctrica. En caso de mal funcionamiento del aparato, diríjase al Medion Service Center o a otro taller especializado. Si el cable de conexión está dañado, el fabricante o su servicio de postventa, o una persona similarmente cualificada, deberá sustituirlo a fin de evitar accidentes. Esquema del aparato ES EN Terminal portátil 1 2 3 4 5 6 7 8 9 10 11 12 13 14 15 DE Altavoz Pantalla Teclas de control arriba/abajo Tecla de borrado Tecla de escucha finalizar la llamada; Pulsar más tiempo: encender y apagar el terminal móvil; tecla de control derecha Tecla almohadilla: para introducir el signo #; pulsar más tiempo en estado de reposo enciende y apaga la señal de llamada. Tecla R: Tecla de rellamada Abrir el listín telefónico Micrófono Tecla altavoz Tecla de control: para introducir el signo *; para activar el bloque de teclas, mantener esta tecla pulsada Teclado numérico 0 - 9: Para la introducción de cifras y letras cifras 2, 4, 5, 6: Teclas para el control del contestador automático Tecla de idioma: seleccionar el idioma; elegir el número deseado Tecla de menú: seleccionar las entradas/opciones; tecla de control izquierda Altavoz (en la parte trasera) 9 Estación base 1 2 3 4 5 6 7 8 9 10 Altavoz Pantalla: Muestra información sobre el contestador automático Inicia la reproducción de mensajes , detener la reproducción Tecla de borrado: Borra los mensajes del contestador automático Tecla con./desc.: Contestador automático encendido o apagado Tecla para avanzar y retroceder: Salta al mensaje anterior o posterior Bajar/aumentar el volumen de la estación base Indicador de carga con contactos: para la carga del terminal móvil Tecla paging: Activa la señal de llamada del terminal móvil ES EN DE 10 Toma para el cable del adaptador de red 11 Toma para el cable de teléfono (clavija modular RJ11) Función ECO La función de modo ECO permite el funcionamiento con bajas radiaciones durante las llamadas. La reducción de las radiaciones depende de la distancia del receptor a la base. La función está configurada y activada de forma permanente. Preparación Colocación Coloque la estación base y la estación de carga sobre una superficie firme y nivelada. Algunos barnices agresivos pueden dañar el pie de goma de la estación base y de la estación de carga. Coloque las estaciones sobre una base. Coloque la estación base y la estación de carga a una altura práctica para trabajar y asegúrela de las posibles caídas. Coloque la estación base y la estación de carga cerca de un enchufe y de una toma de conexión telefónica. Coloque la estación de carga cerca de un enchufe. 11 12 Evite el contacto del aparato con humedad o líquidos. No coloque la estación base ni la estación de carga cerca de aparatos eléctricos (como televisores). Introducir la batería en el terminal móvil ES Para el terminal móvil se entregan dos pilas recargables (baterías) 1,2 V/600 mAh tipo NiMH, tamaño AAA. EN DE ¡ATENCIÓN! Utilice en los terminales móviles sólo baterías de hidruro de metal de níquel del tipo suministrado NiMH). La garantía del aparato pierde su validez si se introducen otras baterías. Los terminales móviles podrían dañarse. Empuje hacia abajo la tapa del compartimento para las baterías en la parte trasera del terminal móvil. Ponga dos baterías en cada mando respetando la polaridad indicada en el compartimento de baterías. Vuelva a colocar la tapa del compartimento de las pilas y ciérrela deslizándola. 13 Conectar la pieza de red en la estación base ¡ATENCIÓN! Para la conexión de la pieza de base, utilice únicamente el adaptador de red para la estación base, modelo núm.: S005CV060060. En la pieza de red se encuentra el indicador del tipo con los datos correspondientes. Conecte el enchufe del cable del adaptador de red con la conexión derecha en la parte inferior de la estación base. Asegure la clavija para que no se caiga, pasando el cable por detrás de la fijación del cable. Conecte el enchufe del adaptador de red a un enchufe de fácil acceso. Conectar la pieza de red en la estación cargador ¡ATENCIÓN! Para la conexión de la pieza de base, utilice únicamente el adaptador de red para la estación base, modelo núm.: S002CV0600030. En la pieza de red se encuentra el indicador del tipo con los datos correspondientes. Conecte el enchufe del cable del adaptador de red con la conexión derecha en la parte inferior de la estación cargador. Asegure la clavija para que no se caiga, pasando el cable por detrás de la fijación del cable. Conecte el enchufe del adaptador de red a un enchufe de fácil acceso. 14 ES Cargar la batería ¡ATENCIÓN! C onecte la estación base a la red telefónica solamente cuando el terminal móvil se ha cargado completamente. En caso contrario, la batería no llegará a su rendimiento completo. El tiempo de carga es de aprox. 14 horas. No interrumpa el proceso de carga porque, de hacerlo, puede reducir el rendimiento de la batería permanentemente. No coloque el terminal móvil sin la tapa del compartimento de batería en la estación base o de carga. Puede dejar constantemente el terminal móvil en la estación base o de carga. Así garantiza usted que se mantenga el nivel de carga máximo. La capacidad de las baterías alcanza para 10 horas en conversación o 100 horas en espera. A continuación se deben volver a cargar las baterías. 15 EN DE Cargar la batería en la estación base Mientras la batería se recarga, no realice ninguna llamada telefónica con el terminal móvil. Por tanto para conectar la estación base a la red telefónica espere hasta que se haya cargado completamente el terminal móvil. Coloque el terminal móvil en el indicador de carga de la estación base y deje que la batería se recargue. Una señal acústica avisa de que el terminal móvil está correctamente colocado en el cargador. En la pantalla aparecerá el símbolo de la batería en la parte superior derecha, una vez que la batería esté recargada. Conexión de la estación base a la red telefónica ¡ATENCIÓN! C onecte la estación base a la red telefónica solamente cuando el terminal móvil se ha cargado completamente. En caso contrario, la batería no llegará a su rendimiento completo. Conecte el enchufe occidental del cable telefónico que se entrega en el conector izquierdo en la parte inferior de la estación base. Introduzca la otra clavija del cable telefónico en la toma telefónica que hay en la pared. 16 La pantalla ES EN Indicador normal En la configuración original, la pantalla se muestra de la siguiente manera: DE Indicador de cobertura Estado de la batería Nombre del terminal móvil Número del terminal móvil Abrir el menú principal Activar las funciones internas Idioma de la pantalla En la configuración original el idioma de la pantalla es el español. También se puede ajustar el idioma de la pantalla en inglés, español y alemán; véase 36. Indicador de pilas Cuando la batería se haya recargado por completo, aparecerá el símbolo de . la batería Cuando el terminal móvil se encuentre en la estación base o en la estación de carga, el símbolo de la batería parpadeará durante el proceso de recarga. Si la batería está descargada o casi descargada aparece el símbolo de batería y se debe colocar el terminal móvil en la estación base para que se pueda cargar la batería. 17 Otras indicaciones en la pantalla Son posibles también las siguientes indicaciones gráficas. 18 1 Apagado, si el terminal móvil se encuentra fuera de cobertura o si no está registrado. Parpadea con poca cobertura. 2 Encendido, cuando la transferencia entre la estación base y el terminal móvil está activa. Parpadea cuando se detiene la llamada interna. 3 Señala que hay una llamada activa. 4 Muestra que la función manos libres está activa. 5 Encendido cuando el contestador automático está encendido. Parpadea cuando hay nuevos mensajes. 6 Encendido cuando el despertador está encendido. Parpadea cuando la alarma está activa. 7 Encendido cuando aparece un nuevo mensaje visual. 8 Encendido cuando la señal de llamada está apagada. 9 Señala la recarga completa de la batería Señala una carga baja de la batería 10 El bloqueo de teclas está activado. ES 11 Muestra si hay otros signos detrás del texto mostrado. C EN 12 Pulsar la correspondiente tecla de función para borrar el último signo, poner fin a la alarma, encender o apagar la función de Silencia durante una conversación. DE 13 Pulsar la correspondiente tecla de función para volver a la anterior selección del menú. IN 14 En modo normal, pulsar la correspondiente tecla de función para activar a una llamada interna. 15 Pasar hacia arriba y hacia abajo, llamar a alguien de la agencia telefónica, llamar a alguien de la lista de llamadas emitidas, llamar a alguien de la lista de llamadas recibidas. 16 Encendido cuando hay un nuevo mensaje TAM. OK MEN 17 Solicita que se pulse la tecla de función correspondiente para confirmar una selección. 18 Solicita que se pulse la tecla de función correspondiente para mostrar otras opciones del menú. 19 Indica si hay otros signos antes del texto mostrado. 20 Teclas numéricas 19 Efectuar llamadas Funciones básicas Encender y apagar el terminal móvil Si el terminal móvil no está colocado en la estación base se puede apagarlo. Para apagar el terminal móvil mantenga pulsada la tecla auricular durante unos segundos. El visor de pantalla se cierra y el terminal móvil se apaga. Para volver a encender el terminal móvil, pulse brevemente la tecla auricular. Un momento más tarde vuelven a aparecer las indicaciones estándar en la pantalla. También se puede conectar el terminal móvil, volviendo a colocarlo en la estación base. Aceptar llamadas Al entrar una llamada, se oye el timbre. En la pantalla aparece el símbolo de auricular y el número de llamada entrante o el número de identificación de otro terminal móvil conectado. ADVERTENCIA Estas indicaciones del número pueden variar o no estar disponibles según la compañía telefónica y el tipo de conexión que tenga. 20 Para aceptar una llamada cuando el terminal móvil está en el cargador, siga los siguientes pasos: Levante el terminal móvil del cargador y pulse la tecla de manos libres para encender el teléfono en el modo manos libres. Para aceptar la llamada cuando el terminal móvil no está en el cargador, pulse la tecla de llamada. ADVERTENCIA Puede ajustar el terminal móvil de modo que haya que pulsar siempre la tecla de llamada para aceptar una llamada (ver página 37). Modificación del volumen del auricular Durante la conversación pulse la tecla de flecha o . En la pantalla aparece la indicación VOLUMEN con cinco niveles. Seleccione con las teclas de flecha o uno de los cinco niveles. Al finalizar la conversación el nivel ajustado se hará efectivo. Terminar la conversación Para finalizar una llamada pulse la tecla de auricular o coloque el terminal móvil en su cargador. Después de haber colgado se muestra la duración de la última conversación. Un momento más tarde, la pantalla cambia a la indicación normal. 21 ES EN DE Efectuar una llamada interna Puede llamar desde su terminal móvil a todos los demás de la misma estación base, sin pagar ninguna tarifa. . Pulse la tecla de control derecha para En la pantalla aparecerán todos los demás terminales móviles que hayan sido registrados en la estación base con otro número. Introduzca con ayuda de las teclas numéricas el número del terminal móvil al que desea llamar. Ahora se llamará al terminal móvil deseado. Para llamar a todos los terminales móviles registrados en la estación base, indique con ayuda de las teclas numéricas el último número en pantalla. Entonces se llamará a todos los terminales móviles. Con el terminal móvil con el que se establezca antes la llamada, se establecerá una llamada interna. Para finalizar la conversación pulse la tecla de auricular. Efectuar una llamada externa Levante el terminal móvil del cargador. Introduzca ahora con las teclas numéricas el número deseado. Pulse la tecla de conversación o la tecla de manos libres. El número se marcará. Funciones adicionales Marcar un número del listín Para crear el listín telefónico vea página 30. . Abra el listín telefónico con la tecla izquierda Seleccione al participante deseado con las teclas de flechas o o introduzca una letra con las teclas numéricas para buscar un participante (para más información sobre la introducción de signos con las teclas numéricas, consulte el apartado "Caracteres disponibles" en la página 31). 22 Confirme con la tecla de conversación o con la tecla de manos libres. Se seleccionará el número de participantes. Modo de manos libres (hablar libremente) En el modo de manos libres puede mantener una conversación sin necesidad de tener el auricular en la mano. Pulse la tecla de manos libres durante la conversación. En pantalla . aparecerá el símbolo de manos libres Ahora puede hablar por teléfono a través del altavoz del terminal móvil. Para ajustar el volumen, pulse en el modo de manos libres la tecla de o . En la pantalla aparece la indicación VOLUMEN con cinco flecha niveles. Seleccione con las teclas de flecha o uno de los cinco niveles. El nivel ajustado correspondiente está marcado y se activa. Para volver a cambiar al modo normal de teléfono, pulse de nuevo la tecla de manos libres. El símbolo de manos libres desaparece y se desconecta el altavoz. Tecla de rellamada La tecla R tiene una función cuando el teléfono está conectado a un dispositivo telefónico o si quiere utilizar características especiales de su red telefónica. Las aplicaciones típicas de la tecla R son, por ejemplo, llamada en espera, solicitud de aclaración, intercambio, conferencias de tres participantes con al menos dos participantes exteriores. La tecla R interrumpe la conexión de línea durante unos milisegundos. La duración de la interrupción se ajusta con la función tiempo de flash. Mediante esta interrupción se indica a la centralita que con los siguientes tonos en el procedimiento de marcación multifrecuencia se trata de comandos para la centralita. No obstante, rogamos que observe que estas funciones son realizadas por su compañía telefónica (no por el teléfono). Consulte a su operador de red qué funciones se pueden realizar con la tecla R. Infórmese en su proveedor de las funciones accesibles con la tecla R. 23 ES EN DE Bloqueo de las teclas Para evitar que se marque un número accidentalmente al llevar el terminal móvil consigo, puede activar el bloqueo de teclado. Esto no es posible durante una conversación. Mantenga pulsada la tecla de la estrella * hasta que se muestre el símbolo del candado en la pantalla. Para volver a desactivar el bloqueo de teclas, mantenga pulsada de nuevo la tecla de la estrella * hasta que desaparezca el símbolo del candado de la pantalla. También se puede seguir aceptando llamadas. Desconectar el timbre Para apagar el sonido, mantenga pulsada la tecla almohadilla # hasta que en la pantalla. aparezca el símbolo Para volver a activar el sonido, mantenga pulsada la tecla almohadilla # en la pantalla. hasta que desaparezca el símbolo Silenciar el teléfono Para silenciar el teléfono, pulse durante una conversación la tecla derecha de función (C). En pantalla aparece MUDO. El interlocutor ya no le oirá. Para poner fin a la función de silencio, pulse de nuevo la tecla derecha de función C. Indicación del número de teléfono Se puede ver en la pantalla el número de teléfono del abonado que llama, si Usted mismo ha solicitado a la Telekom la función CLIP y si el abonado que llama también dispone de una conexión telefónica con la función CLIP y no ha bloqueado la identificación de su número. Dependiendo de su operador de red Usted también podrá bloquear la identificación de su número. Si lo desea, consulte a su operador de red qué tendrá que hacer. 24 Lista de llamadas ES Las llamadas externas se guardarán ahora en la lista de llamadas, – si el contestador automático no las registra; – si el teléfono de quien llama dispone de la opción de rendimiento CLIP (debe verse el número de quien llama en la pantalla). Al recibir la llamada, aparece el número de quien llama en la pantalla. Si este número corresponde a uno de los nombres y tonos de llamada del listín telefónico, aparecerá el nombre correspondiente en la pantalla y sonará el tono de llamada guardado. Si no se comunica ningún número de llamada, aparecerá PRIVADO en la pantalla. En la pantalla aparece el símbolo para llamadas perdidas si se han memorizado nuevas entradas en la lista de llamadas. Si, por ejemplo, aparece una nueva llamada entrante, aparece en la pantalla 3 LLAM NUEV. En la lista de llamadas se pueden memorizar hasta 10 entradas. . Pulse en estado de reposo la tecla de flecha Si no hay ninguna llamada guardada, aparecerán en la pantalla VACÍO. Si entran nuevas llamadas, con las teclas de función izquierdas tendrá las siguientes posibilidades: AGR DIRECT: Se puede guardar el número en la agenda junto con un nombre. ELIMINAR: borra la entrada seleccionada de la lista de llamadas. ELIMON TODO: borra los números de todas las llamadas de la lista de llamadas. DETALLES: Aparecen la indicación del número, la hora y la fecha. Seleccione la opción deseada y pulse la tecla de control derecha (OK). 25 EN DE Rellamada En la lista de rellamada se guardan los últimos 5 números (de un máximo de 24 dígitos) que haya marcado. . Pulse la tecla de flechas En la pantalla, se mostrará el último número seleccionado. Si no hay ningún número guardado, en la pantalla aparecerá VACÍO. o . Seleccione el número deseado con las teclas de flecha Para seleccionar este número, pulse la tecla de conversación o la tecla de manos libres. Si confirma con la tecla de control izquierda, tiene las siguientes posibilidades: AGR DIRECT: Se puede guardar el número en la agenda junto con un nombre. ELIMINAR: borra las entradas seleccionadas de la lista de rellamada. ELIMON TODO: borra todos los números de la lista de rellamada. Seleccione la opción deseada y pulse la tecla de control izquierda (OK). Hablar por teléfono con varios interlocutores ADVERTENCIA Las siguientes funciones solamente están disponibles si por lo menos un terminal móvil adicional, compatible con GAP, está registrado en la estación base. Desviar llamadas Se puede aceptar una llamada y a continuación desviarla a un terminal móvil adicional, compatible con GAP, de la misma estación base. Pulse durante la conversación la tecla de control izquierda y seleccione o la entrada INTERCOM. Confirme a con la tecla de flecha continuación con la tecla de función derecha (OK). En la pantalla aparecerán los números registrados en el terminal móvil de la estación base. En la pantalla se muestran todos los demás terminales móviles que hayan sido registrados en la estación base con sus correspondientes números. 26 Introduzca con ayuda de las teclas numéricas el número del terminal móvil al que desea llamar. Ahora se llamará al terminal móvil deseado. Si la persona que tenga el otro terminal móvil acepta la llamada puede mantener con ella una conversación interna. Para desviar la llamada pulse la tecla de auricular o coloque su terminal móvil en el cargador. La persona que llama está conectada ahora con la persona del otro terminal móvil. Realizar una conferencia telefónica Si un segundo terminal móvil recibe la conversación como se indica arriba, puede realizar una conferencia telefónica. Una conferencia telefónica es posible entre un participante externo y dos internos. Para una llamada externa a otro terminal móvil y espera hasta que el participante del otro terminal móvil reciba la conversación. Pulse la tecla de estrella. En la pantalla aparecerá CONFERENCIA. Ahora están conectados todos los participantes en la conversación. Cada participante puede desconectarse de la conferencia telefónica, pulsando la tecla de auricular (colgar). Los otros interlocutores pueden seguir entonces con la conferencia telefónica. El participante que ha empezado la conferencia puede terminar la conferencia, pulsando la tecla de auricular (colgar). Se interrumpirá ahora la conexión a todos los participantes. Llamar al portátil Si desea llamar al terminal móvil o si desea buscarlo, pulse la tecla de llamada de la estación base. En los terminales móviles se activa una señal de llamada y aparece la indicación PAGING. Interrumpa la señal de llamada con la tecla de auricular. 27 ES EN DE Ajuste del teléfonomedianteel menú En el menú puede acceder a diversas funciones del teléfono y también realizar ajustes. En modo normal, abra la tecla de función izquierda del menú principal con las siguientes entradas: Navegación por el menú Seleccionar el punto de menú Utilice las teclas de flechas o para seleccionar un punto del menú. Abra el punto del menú con la tecla izquierda de función (OK). La mayor parte de los puntos del menú contienen submenús en forma de lista. o , para seleccionar un punto de menú Utilice las teclas de flecha de una lista. Con la tecla derecha de función vuelve un paso o un nivel hacia atrás. Teclas de función A la izquierda y derecha en la línea inferior de la pantalla aparecen comandos variables que dependen del menú actual y de la edición actual. Con las teclas de función, puede activar el comando visible. Cambiar al modo de teléfono Para volver directamente al modo normal de teléfono pulse la tecla de auricular. 28 Menú de Lista de llamadas ES Seleccione la entrada LISTA LLAM y pulse la tecla izquierda de control (OK). Si no hay guardada ninguna llamada, en la pantalla aparecerá el indicador VACÍO. o una Si entran nuevas llamadas, seleccione con las teclas de flecha llamada de la lista. Pulse la tecla izquierda de función (OK) para seleccionar las siguientes opciones para una entrada: Guardar número Puede guardar el número seleccionado en el listín telefónico con un nombre asociado. Para guardarlo, lea las instrucciones en "Menú Listín telefónico", "Nueva entrada" en la página 30. Borrar Borre la entrada seleccionada de la lista de llamadas. Borrar todos Borre todos los números de la lista de llamadas. Confirme la pregunta a continuación CONFIR con la tecla izquierda de función (OK) para borrar todos los números de la lista de llamadas. Detalles Mostrar identificación de llamadas, hora y fecha de una entrada. Si un número de teléfono tiene más de 12 posiciones, puede mostrar las cifras que queden con las teclas derecha e izquierda de función. 29 EN DE Menú Listín telefónico Seleccione la entrada DIRECTORIO y pulse la tecla izquierda de control (OK). Si no hay ninguna entrada guardada, en la pantalla aparecerá el indicativo VACÍO. o una entrada en la lista. Pulse Seleccione con las teclas de flecha la tecla izquierda de función (OK) para seleccionar las siguientes opciones: Entrada nueva Aquí puede guardar un nuevo número en el listín telefónico: Confirme la entrada con la tecla izquierda de función. Aparece la entrada NOMBRE. Indique con las cifras numéricas los nombres de los participantes cuyos números desee guardar. Cada nombre puede tener un máximo de 12 posiciones. Pulse para ello varias veces una tecla numérica hasta que aparezca el caracter deseado en la pantalla (ver tabla "Caracteres disponibles" en la página 31). Con la tecla derecha de función (C) puede borrar el último caracter. Pulse la tecla izquierda de función (OK) para guardar la entrada del nombre. Aparece la entrada NÚMERO. Introduzca con las teclas numéricas el número de teléfono del participante. El número puede tener un máximo de 20 cifras. Pulse la tecla izquierda de función (OK) para guardar el número. Aparece la entrada MELODÍA1. o una de las diez melodías Seleccione con las teclas de flechas posibles con las que desea ordenar al participante. Pulse la tecla izquierda de función (OK) para guardar el número. Se escuchará un breve sonido. Habrá guardado entonces la nueva entrada y se mostrará en la pantalla. 30 Caracteres disponibles ES La siguiente tabla muestra los caracteres disponibles que puede utilizar en las entradas del listín telefónico: EN Tecla Caracter 1 [Espacio] - 1 2 ABC2 3 DEF3 4 GHI4 5 JKL5 6 MNO6 7 PQRS7 8 TUV8 9 WXYZ9 0 0 DE * # Ver Mostrar el nombre, número y melodía de una entrada. Guardados Modificar el nombre, número o melodía de la entrada seleccionada actualmente. Para modificar la entrada, siga las instrucciones descritas en el apartado "Nueva entrada" en la página 30. 31 Borrar Borra la entrada seleccionada en el listín telefónico. Borrar todos Borra todos los números de teléfono del listín telefónico. Confirme la pregunta a continuación CONFIR con la tecla izquierda de función (OK) para borrar todos los números de teléfono. Estado del LT Muestra la memoria ocupada y disponible del listín telefónico. Configuraciones del menú de base Sonido de llamada Seleccione una melodía para el tono de llamada de la estación base y confirme su selección con la tecla izquierda de función (OK). Volumen del sonido de llamada Seleccione un valor del volumen (1-5) para el tono de llamada de la estación base y confirme la configuración con la tecla izquierda de función (OK). 32 Dar de baja el terminal móvil ES Indique a continuación con las teclas numéricas el PIN válido del teléfono (que en el momento de la entrega del aparato es 0000) y confírmelo con la tecla izquierda de función (OK). Seleccione entonces un terminal móvil al que desee dar de baja de la estación base. ADVERTENCIA El terminal móvil utilizado en ese momento no puede ser dado de baja de la estación base. Confirme su selección con la tecla izquierda de función (OK). El terminal móvil ha sido ahora dado de baja y debe ser dado de alta de nuevo si desea utilizarlo otra vez en la estación base. Tipo de marcación. Aquí se puede ajustar su teléfono al tipo de marcación de su operador de red. Puede seleccionar entre marcación por tonos o por pulsos. De fábrica está establecida TONO. Esta es hoy en día el tipo de marcación más empleado. En caso de algunos equipos telefónicos más antiguos se necesitará la marcación por pulsos. Consulte a su operador de red qué tipo de marcación es necesario en su conexión. Seleccione TONO o PULSO como tipo de marcación y confirme la selección con la tecla izquierda de función (OK). 33 EN DE Tiempo de flash Con esta función puede adaptar su teléfono a las definiciones previas de su operador de red o su centralita privada. Seleccione una de las siguientes configuraciones para el tiempo de Flash: 100 ms LARGO MEDIA 250 ms CORTO 600 ms ADVERTENCIA Consulte a su operador de red o lea en las instrucciones de funcionamiento de su centralita qué ajuste es necesario en su conexión. Modificar el PIN Aquí puede asignar un nuevo PIN para la estación base y el terminal móvil. Indique el PIN válido del sistema (el valor de fábrica es 0000) y confírmelo con la tecla izquierda de función (OK). Indique un PIN nuevo de cuatro posiciones y confírmelo con la tecla izquierda de función (OK). Indique de nuevo el PIN como confirmación y confirme con la tecla izquierda de función (OK). El PIN de la estación base se habrá modificado. 34 ES Configuración del TM EN Despertador DE ADVERTENCIA Para la correcta utilización del despertador, debe configurar en primer lugar la hora siguiendo las instrucciones indicadas en la sección "Fecha y hora" de la página 37. Seleccione la entrada APAGADO para apagar el despertador. Seleccione la entrada ENCENDIDO para encender el despertador y confirme su selección con la tecla izquierda de función (OK). Se mostrará la hora del despertador. Indique con las teclas numéricas la hora en la que quiere que suene el despertador siguiendo el formato HH:MM y confirme la selección con la tecla izquierda de función (OK). Aparecerá el indicador REPET ALARMA (función repetición). Confirme con la tecla izquierda de función (OK). Seleccione la entrada ENCENDIDO para activar el tiempo de repetición y confirme la selección con la tecla izquierda de función (OK). Tras apagarse la señal del despertador, se volverá a encender el despertador pasados siete minutos. Si no desea utilizar la función de repetición, ponga esta entrada en APAGADO. Cuando el despertador está encendido, aparecerá en pantalla el símbolo . Sonido de llamada Interna Seleccione un sonido de llamada para las llamadas internas y confirme su elección con la tecla izquierda de función (OK). 35 Externa Seleccione un sonido de llamada para las llamadas externas y confirme su elección con la tecla izquierda de función (OK). Volumen de llamada. Seleccione un valor para el volumen (1-5) del sonido de llamada del terminal móvil y confirme la configuración con la tecla izquierda de función (OK). Tonos Tono de teclado Seleccione APAGADO o ENCENDIDO para apagar o encender el sonido del teclado y confirme la configuración con la tecla izquierda de función (OK). Batería vacía Seleccione APAGADO o ENCENDIDO para apagar o encender la señal en caso de que la batería esté baja y confirme la configuración con la tecla izquierda de función (OK). Cobertura Seleccione APAGADO o ENCENDIDO para apagar o encender la señal para llegar a la máxima cobertura y confirme la configuración con la tecla izquierda de función (OK). Idioma Seleccione DEUTSCH, ENGLISH o ESPANOL como idioma el menú y confirme la configuración con la tecla izquierda de función (OK). 36 Nombre del TM ES Aquí puede introducir un nombre con las teclas numéricas para el terminal móvil que será mostrado en el modo normal en la pantalla. Confirme la configuración con la tecla izquierda de función (OK). EN DE Pantalla del TM Seleccione si desea que en la pantalla aparezca en el modo normal el nombre del terminal móvil (RENOM AURIC) o la hora (HORA). Confirme la configuración con la tecla izquierda de función (OK). Respuesta automática Seleccione la opción ENCENDIDO para que la llamada entrante sea respondida cuando tome el terminal móvil que se encuentre en la estación base o en la estación de carga. Seleccione la opción APAGADO para que, tras tomar el terminal móvil de la estación base o de la estación de carga, deba pulsar la tecla de conversación antes de poder responder a una llamada. Confirme la configuración con la tecla izquierda de función (OK). Fecha y hora Formato de fecha Seleccione un formato para indicar la fecha (DD-MM-AA o MM-DD-AA) y confirme la configuración con la tecla izquierda de función (OK). Formato de hora Seleccione un formato para indicar la hora (24 HR o 12 HR) y confirme la configuración con la tecla izquierda de función (OK). 37 Ajuste de la hora Indique con las teclas numéricas la hora exacta en formato HH:MM y confirme la configuración con la tecla izquierda de función (OK). Ajuste de la fecha Indique con las teclas numéricas la fecha exacta en formato HH:MM y confirme la configuración con la tecla izquierda de función (OK). Seleccionar la base Para aumentar la zona de cobertura del terminal móvil puede registrarlo en hasta cuatro estaciones base. Así puede construir una “estructura de colmena” de estaciones base en su zona de cobertura. Si dispone de varias estaciones base, seleccione aquí la base deseada y confirme la configuración con la tecla izquierda de función (OK). En la pantalla aparecerá brevemente el indicativo BÚSQUEDA y a continuación BASE, una vez encontrada la estación base seleccionada. Registrar A la salida de fábrica, el terminal móvil ya está registrado en la estación base. De no ser así, registre el terminal móvil como sigue: Pulse durante unos cinco segundos la tecla PAGE en la estación base hasta escuchar una señal sonora. Seleccione el menú Registrar y confirme la configuración con la tecla izquierda de función (OK). Indique un PIN telefónico válido (el valor de fábrica es 0000) y confirme la configuración con la tecla izquierda de función (OK). En la pantalla aparece brevemente el indicativo BÚSQUEDA y a continuación se oye una señal sonora una vez que se encuentre la estación base. 38 ES Restablecer Si hay dificultades frecuentes, vuelva a establecer el teléfono en los valores de fábrica siguiendo los pasos que se indican a continuación: Indique un PIN telefónico válido (el valor de fábrica es 0000) y confirme la configuración con la tecla izquierda de función (OK). Confirme a continuación la pregunta CONFIR con la tecla izquierda de función (OK). ADVERTENCIA Al volver a los valores de fábrica, se mantienen las listas de llamadas y las entradas del listín telefónico. Contestador automático (Menú) Con el contestador automático puede grabar las llamadas entrantes o transmitir un mensaje a quien llama durante su ausencia. El contestador automático añade automáticamente a todos los mensajes la fecha y la hora. Para ello debe usted ajustar la fecha y la hora para poder aprovechar correctamente el contestador automático. Si no ha ajustado la fecha y la hora en la pantalla de la estación base aparece "00". Las indicaciones de fecha y hora incluidas en los mensajes serán en este caso erróneas. Ajuste la fecha y la hora en el terminal móvil. Escuchar mensajes Se reproducirá el nuevo mensaje y aparecerá en la pantalla la hora y fecha del mensaje. En caso de mensajes nuevos que aún no hayan sido escuchados, aparecerá abajo en la pantalla. Cuando se haya escuchado el mensaje, una estrella la estrella desaparece. Con las teclas de flecha o puede seleccionar un mensaje y confirmar con la tecla izquierda de función (OK). Si no hay ningún mensaje, aparecerá el indicador 00--00 00--00 en la pantalla. 39 EN DE Pulse la tecla izquierda de función (MENU) para mostrar las siguientes funciones de reproducción: REPRODUCIR/DETENER Iniciar/interrumpir la reproducción SIGUIENTE reproducir el siguiente mensaje ANTERIOR reproducir el mensaje anterior ELIMINAR borrar un mensaje También puede controlar las funciones de reproducción con las teclas numéricas en una de los aparatos de mano o en un aparato exterior: Tecla 5 interrumpir Tecla 4 reproducir el siguiente mensaje Tecla 6 reproducir el mensaje anterior Tecla 2 borrar un mensaje ADVERTENCIA Si en la pantalla del terminal móvil aparece el mensaje "No disponible", significa que el contestador automático está siendo utilizado por otra persona en ese momento. Para finalizar la reproducción, pulse la tecla de auricular. Escuchar los mensajes desde otra conexión telefónica Puede también escuchar los mensajes de su contestador automático desde otra conexión, como p. ej. desde un teléfono móvil o una cabina telefónica. Proceda de la siguiente manera: Seleccione el número de teléfono de su conexión. Al conectarse su contestador automático pulse la tecla del asterisco en el teléfono. Ahora introduzca su PIN de consulta a distancia con las teclas numéricas. Si introduce tres veces un PIN de consulta a distancia equivocado, se interrumpirá la conexión. 40 Tiene las siguientes funciones a su disposición: Tecla 5 interrumpir Tecla 4 reproducir el siguiente mensaje Tecla 6 reproducir el mensaje anterior Tecla 2 borrar un mensaje ES EN DE ADVERTENCIA Para utilizar la consulta a distancia desde un aparato externo, consulte el manual de utilización del fabricante correspondiente. Borrar todos Confirme la pregunta CONFIR con la tecla izquierda de función (OK) para borrar todos los mensajes que haya en el contestador automático. En la pantalla aparecerá brevemente el indicador VACÍO. Notas Puede escribir en el terminal móvil una nota que será reproducida para otros participantes como si fuera un mensaje. Pulse la tecla izquierda de función (OK) para comenzar la grabación. En la pantalla aparece GRABACIÓN. Pulse la tecla izquierda de función (OK) de nuevo para poner fin a la grabación y guardarla. Pulse la tecla derecha de función (C) para poner fin a la grabación sin guardarla. La nueva grabación se guarda y puede ser reproducida en la entrada del menú REP MANSAJE. Encender/Apagar el contestador Aquí puede encender y apagar el contestador automático con un terminal móvil. Confirme la configuración con la tecla izquierda de función (OK). 41 Configuración del contestador Modo Contestar Configure aquí cuándo debe activarse en contestador: CONT/GRAB: el contestador automático contesta la llamada y graba el mensaje; SOLO CONT: el contestador automático contesta la llamada sin grabar un mensaje. Idioma del contestador Configure aquí el idioma para los mensajes estándar del contestador automático en ALEMÁN o INGLÉS. Confirme la configuración con la tecla izquierda de función (OK). Anuncios Seleccione una de las siguientes entradas para reproducir y crear los diferentes textos de los anuncios. CON GRABACIÓN Aquí puede reproducir el texto para los anuncios con la posterior grabación o grabar uno nuevo. REPRODUCIR: Reproducir el texto del anuncio actual GRABACIÓN: Grabar un nuevo anuncio Pulse la tecla izquierda de función (OK) para comenzar la grabación. En la pantalla aparece GRABACIÓN. Pulse la tecla izquierda de función (OK) de nuevo para poner fin a la grabación y guardarla. Pulse la tecla derecha de función (C) para poner fin a la grabación sin guardarla. La nueva grabación se guarda y puede ser reproducida en la entrada del menú REP MANSAJE. 42 SIN GRABACIÓN Aquí puede reproducir el texto para los anuncios sin la posterior grabación o grabar uno nuevo. REPRODUCIR: Reproducir el texto del anuncio actual GRABACIÓN: Grabar un nuevo anuncio Para grabar un nuevo texto de anuncio siga los pasos descritos en el apartado anterior. Dilación de respuesta del contestador Puede determinar el número de señales de llamada tras el cual se conecta el contestador. Puede elegir entre 2, 4, 6 y 8 señales de llamada y el "MODO ECO". Seleccione en el menú "CONFIG" la entrada "DELAY". Seleccione el número deseado de las señales de llamada o el MODO ECO y confirme con "OK". MODO ECO En el modo de ahorro se puede evitar gastos de conexión si se escucha el contestador automático desde el exterior. En el modo de ahorro, el contestador automático se conecta en caso de la PRIMERA llamada después de cuatro señales de llamada. Con cada llamada siguiente, el contestador automático ya se conecta a la primera señal de llamada. Para escuchar y ajustar sus mensajes personales desde el exterior, lea también el capítulo Escuchar los mensajes desde otra conexión telefónica en la página 47. Para comprobar si existen nuevos mensajes proceda como sigue: Llame a su conexión desde el exterior. Si se han grabado nuevos mensajes el contestador se conecta después de la primera señal de llamada. Si oye usted la segunda señal de llamada significa que no se han grabado nuevos mensajes. En tal caso vuelva a colgar inmediatamente. El contestador automático se conectaría después de la quinta señal de llamada. 43 ES EN DE Tiempo de grabación Fije aquí el tiempo de grabación para mensajes en ILIMITADO, 60 SEGUNDOS, 120 SEGUNDOS y 180 SEGUNDOS. Consulta a distancia Se puede activar la consulta a distancia para escuchar desde otro teléfono los mensajes grabados. Fije la consulta a distancia en ENCENDIDO o APAGADO y confirme con la tecla izquierda de función (OK). Compresión Los archivos de un mensaje pueden comprimirse para que ocupen menos espacio en la memoria. Una mayor compresión tendrá como resultado un archivo más pequeño pero menor calidad de reproducción. Fije la compresión en ALTA, MEDIA o BAJA y confirme con la tecla izquierda de función (OK). Escuchar también Con la función "CONTROL LLA." Puede escuchar una llamada sin interrumpir la grabación del mensaje en el contestador. Esta función es muy útil, por ejemplo, si quiere saber antes quién es la persona que llama. Puede aceptar también una llamada cuando el contestador la haya grabado. Fije la función en ENCENDIDO o APAGADO y confirme con la tecla izquierda de función (OK). Escuchar en la estación base Para escuchar una llamada mientras se graba, pulse las teclas de volumen + o – hasta que escuche a la persona que llama. Escuchar en el terminal móvil Si se graba un mensaje, en la pantalla del terminal móvil aparece la entrada "CONTROL LLA.". Para escuchar una llamada mientras se graba, pulse la tecla izquierda de función (OK). 44 Aceptar llamada tras escuchar Para aceptar la llamada pulse la tecla de llamada del terminal móvil. Ahora puede hablar con su interlocutor y se finalizará la grabación del contestador automático. ES EN DE Modificar el PIN El PIN del contestador automático evita que una persona no deseada consulte los mensajes a distancia. El PIN está fijado de fábrica "0000". Este PIN no es igual al PIN del sistema. Introduzca el PIN actual a distancia y confirme con la tecla izquierda de función (OK). A continuación introduzca el PIN nuevo, de cuatro dígitos. Después de la confirmación se le pedirá que repita la entrada. Confirme también aquí con la tecla izquierda de función (OK). Utilizar el contestador automático desde la estación base Activar y desactivar Para encender y apagar el contestador automático, pulse el botón de encendido y apagado de la estación base. Cuando el contestador está apagado, aparece en la pantalla: "--" o el número de mensajes nuevos. Si el contestador automático está activado, en la pantalla aparece la cantidad de los mensajes guardados; en estado de suministro: "00" 45 Indicaciones de la estación base En la pantalla de la estación base se muestran informaciones importantes sobre el estado de su contestador automático. Indicación Significado vacío La base no está correctamente conectada a la corriente eléctrica. –– El contestador automático está desconectado. 00 No hay ningún mensaje XX Parpadea cuando hay un mensaje nuevo. Se enciende cuando hay mensajes nuevos. "XX": Número de mensajes nuevos/guardados XX/FF Parpadean alternativamente "XX" y "FF". Hay "XX" mensajes nuevos y la memoria está llena. Parpadea sólo "FF". La memoria está llena y no pueden grabarse más mensajes nuevos. --/XX Parpadean alternativamente "XX" y "--". La hora no está fijada y hay "XX" mensajes nuevos. Parpadea sólo "--". La hora no se ha fijado y no hay ningún mensaje nuevo. YY "YY" mensajes nuevos guardados. A1/A2 El texto del anuncio será reproducido. A1: Texto del anuncio con grabación posterior A2: Sólo texto del anuncio XX/An Parpadean alternativamente "XX" y "AN". El mensaje "XX" está siendo grabado. LA Parpadea si el contestador está siendo utilizado por un terminal móvil. LX Nivel de volumen entre 1 y 8 46 Escuchar mensajes ES El contestador automático distingue entre los mensajes ya escuchados ("antiguos") y los que aún no se han escuchado ("Mensajes nuevos"). Si se han grabado nuevos mensajes en el contestador automático, en la pantalla aparece el símbolo para el contestador automático y "Nuevos mensajes". En la pantalla de la estación base parpadea el número de los mensajes grabados. Al escuchar los mensajes siempre se reproducen primero los nuevos. EN DE Escuchar mensajes en la estación base Para escuchar los mensajes pulse la tecla PLAY de la estación base. Se reproducirán los mensajes grabados. Para poner fin a la reproducción, pulse a su vez la tecla PLAY. Se finaliza la reproducción. Para saltar un mensaje pulse la tecla de salto "Siguiente mensaje". Para volver a oír un mensaje o para escuchar el mensaje anterior pulse la tecla "Mensaje anterior". Para modificar el volumen durante la reproducción pulse las teclas + o – de la estación base. Escuchar mensajes desde el terminal móvil Para saber cómo escuchar mensajes desde el terminal móvil, lea el apartado "Escuchar mensajes" en la página 39. Escuchar los mensajes desde otra conexión telefónica Puede también escuchar los mensajes de su contestador automático desde otra conexión, como p. ej. desde un teléfono móvil o una cabina telefónica. Proceda de la siguiente manera: Seleccione el número de teléfono de su conexión. Al conectarse su contestador automático pulse la tecla del asterisco en el teléfono. Ahora introduzca su PIN de consulta a distancia con las teclas numéricas. 47 Si introduce tres veces un PIN de consulta a distancia equivocado, se interrumpirá la conexión. Tiene las siguientes funciones a su disposición: Tecla 5 interrumpir Tecla 4 reproducir el siguiente mensaje Tecla 6 reproducir el mensaje anterior Tecla 2 borrar un mensaje ADVERTENCIA Para utilizar la consulta a distancia desde un aparato externo, consulte el manual de utilización del fabricante correspondiente. ADVERTENCIA Si no realiza ninguna entrada en 15 segundos se interrumpe automáticamente la conexión. Si no han entrado nuevas llamadas se puede evitar el coste por la consulta, si conmuta el contestador automático al modo de ahorro (ver capítulo "MODO ECO", en la 43). Para operar el contestador automático utilice las teclas numéricas del teléfono. ADVERTENCIA Para utilizar la consulta a distancia desde un aparato externo, consulte el manual de utilización del fabricante correspondiente. 48 Tecla ES Función Mientras la reproducción está detenida Durante la reproducción 2 Borrar el mensaje actual 4 Repetir el mensaje actual; EN DE Pulsar dos veces para cambiar al mensaje anterior. 5 Hacer una pausa en la reproducción 6 Reproducir el mensaje siguiente 7 Encender el contestador automático 8 Hacer una pausa en la reproducción 9 Apagar el contestador automático * Introducir el PIN a distancia Activar el contestador automático desde una conexión externa También puede conectar el contestador automático desde una conexión telefónica externa. Marque su número de teléfono. Espere hasta la décima señal de llamada. Introduzca el código de cuatro dígitos. El contestador automático está activado. Si existe un nuevo mensaje, ahora se reproducirá. 49 Borrar mensajes Ahora se pueden borrar los mensajes que ya se han escuchado. Borrar mensajes en la estación base Para borrar al mismo tiempo todos los mensajes proceda como sigue: Finalice la reproducción con la tecla Stop. Mantenga pulsada la tecla "Borrar" en la estación base hasta escuchar un sonido. Todos los mensajes se borrarán entonces. Borrar los mensajes desde el terminal móvil. Para saber cómo borrar mensajes desde el terminal móvil, lea el apartado "Escuchar mensajes" en la página 39. 50 En caso de problemas ES Si se produce una avería en el aparato compruebe primero si puede solucionarlo Usted mismo con ayuda del siguiente resumen. En ningún caso trate de arreglar Usted mismo el aparato. Si fuera necesario reparar el aparato, diríjase a nuestro centro de postventa o a cualquier otro taller especializado. EN Ante cualquier problema Compruebe si los cables de la red y el teléfono están enchufados correctamente (ver página 11 y 16). Compruebe primero el teléfono en otra toma telefónica. Compruebe en el indicador de batería si la batería está cargada. Compruebe si el terminal móvil está registrado correctamente (ver página 38). Compruebe si el terminal móvil está dentro de la zona de cobertura de la estación base. No aparece nada en la pantalla del terminal móvil Compruebe si el terminal móvil está conectado correctamente (ver página 20). No hay señal de tono Compruebe si la estación base está correctamente conectada (ver página 11 y 16). Compruebe si las baterías están cargadas y colocadas con las polaridades correctas (ver página 13). Compruebe si el terminal móvil está conectado, cargado, correctamente registrado y dentro de la zona de cobertura de la estación base. En la pantalla del terminal móvil aparece "SIN SENAL"!" Compruebe si la estación base está correctamente conectada (ver página 11 y 16). Compruebe si el terminal móvil está dentro de la zona de cobertura de la estación base. Compruebe si el terminal móvil está registrado en la 51 DE estación base deseada (ver página 20). Compruebe si las baterías están cargadas y colocadas con las polaridades correctas (ver página 13). No hay timbre de llamada en el terminal móvil o en la estación base Compruebe si la estación base está correctamente conectada (ver Colocación y Conexión de la estación base a la red telefónica). Compruebe que el volumen del timbre de llamada no esté desconectado (ver página 24). Compruebe si el terminal móvil está dentro de la zona de cobertura de la estación base. Compruebe si las baterías están cargadas y colocadas con las polaridades correctas (ver página 13). En la pantalla de la estación base aparece " –". El contestador automático está desconectado ver 41). Su interlocutor no le puede entender Compruebe que el micrófono esté conectado y que la función sin sonido esté desactivada (véase 24). No pueden llamarle Compruebe si ha pulsado la tecla de respuesta, si aparece en la pantalla el dibujo “Telefonhörer??” y si oye una señal de tono al levantar el auricular. Compruebe si otro teléfono funciona en esa toma telefónica o si su teléfono funciona en otra toma telefónica (ver página 11 y 16). Se producen interferencias con otros aparatos 52 Compruebe si la estación base está directamente junto a otro aparato eléctrico (p. ej. otro teléfono o un aparato de fax, un televisor o un microondas). Coloque el teléfono en otro lugar. Ajustes de fábrica ES Ajustes de fábrica en el terminal móvil EN Ajuste Opciones Configuración de fábrica Sonidos de llamada externa 10 sonidos de llamada: 5 x normal, 5 x polifónico Melodía 6 Sonidos de llamada interna 10 sonidos de llamada: 5 x normal, 5 x polifónico Melodía 5 Volumen del sonido de llamada 5 niveles y desactivado Nivel 3 Volumen del auricular Volumen en 5 niveles Nivel de volumen 5 Bloqueo de teclas Activado/desactivado Desactivada Autorespuesta Activado/desactivado Activado Tonos de teclado Activado/desactivado Activado Idioma Español / Alemán / Inglés/ Español Ajustes de fábrica de la estación base Ajuste Opciones Configuración de fábrica Melodías 5 melodías diferentes Melodía 1 Volumen del sonido de llamada 5 niveles y desactivado Nivel 3 Tipo de marcación Por pulsos/por tonos Marcación por tonos PIN del sistema – 0000 Prioridad del terminal portátil Todos/un terminal portátil Todos 53 DE Otros ajustes de fábrica Ajuste Opciones Configuración de fábrica Alarma de nuevos mensajes en el contestador Activado/desactivado Activado Número de tonos de llamada antes de conectarse el contestador. 2 / 4 / 6 / 8 tonos de llamada o modo de ahorro 6 Limpieza Antes de limpiar el aparato, desconéctelo de la red. Para limpiarlo, emplee un paño seco y suave. Evite emplear detergentes químicos y productos de limpieza, puesto que podrían dañar la superficie y/o las inscripciones del equipo. 54 Eliminación ES Embalaje Su teléfono DECT está embalado para protegerlo contra eventuales daños durante el transporte. Los embalajes son materias primas y son reciclables o pueden ser entregados al circuito de reciclaje. Aparato No tire bajo ningún concepto el teléfono DECT al final de su vida útil a la basura doméstica normal. Infórmese sobre las posibilidades de las que dispone para eliminarlo de forma respetuosa con el medio ambiente. Pilas No tire las pilas usadas a la basura doméstica. Las pilas deben ser depositadas en un punto de recogida para pilas usadas. 55 EN DE Especificaciones técnicas Medidas de la estación base sin el terminal móvil ca. 150 x 112 x 45 mm (A x L x A) Medidas del terminal móvil ca. 46 x 26 x 153 mm (A x L x A) Batería para terminal móvil 1,2 V/600 mAh Tipo NiMH, tamaño AAA Estándar DECT/GAP aprox. 300 m alcance Adaptador de red Estación base Entrada: 100-240 V ~ 50/60 Hz 600 mA, 3,6 VA Salida: 6 V Model: TenPao S005CV0600060 Adaptador de red Cargador Entrada: 100-240 V ~ 50/60 Hz 300 mA, 1,8 VA Salida: 6 V Model: Tenpao S002CV0600030 Tiempo de carga aprox. 16 horas en caso de descarga completa Duración en espera aprox. 100 horas Duración en conversación aprox. 10 horas ¡Reservado el derecho a realizar modificaciones técnicas! Información de conformidad Estos aparatos cumplen con la directiva europea sobre equipos radioeléctricos y equipos terminales de telecomunicación (R&TTE 1999/5/EG). Esta declaración de conformidad se encuentra en Internet bajo: http://www.medion.com/conformity 56 Contents ES Package contents.......................................................................... 4 Safety instructions ........................................................................ 5 Keeping electrical equipment out of reach of children ............................. 5 Potentially explosive areas ........................................................................ 5 Mains adapter .......................................................................................... 5 Setting up the appliance safely ................................................................ 6 Accessibility of mains power socket .......................................................... 6 Thunder storms/Non-use ......................................................................... 7 Handling the rechargeable batteries safely ............................................... 7 Correct repair procedure .......................................................................... 8 Overview of the appliance ............................................................ 9 Handset ................................................................................................... 9 Base station ............................................................................................ 10 ECO function ............................................................................... 11 Getting started ........................................................................... 11 Setting up .............................................................................................. 11 Inserting batteries into the handset ........................................................ 13 Connect the power supply to the base station ....................................... 14 Connect the power supply to the charging station ................................ 14 Charging the battery .............................................................................. 15 Connecting the base station to the telephone network .......................... 16 The display ................................................................................. 17 Normal display ....................................................................................... 17 Other indicators on the display .............................................................. 18 Telephone Calls .......................................................................... 20 Basic functions ....................................................................................... 20 Additional functions ............................................................................... 22 Making calls with several callers ............................................................. 26 Setting the telephone via the menu ........................................... 28 Navigating in the menu ......................................................................... 28 Menu call list .............................................................................. 29 Store numbers ....................................................................................... 29 1 EN DE Delete .................................................................................................... 29 Delete all ................................................................................................ 29 Details .................................................................................................... 29 Menu Directory ........................................................................... 30 New Entry .............................................................................................. 30 Display ................................................................................................... 31 Edit ........................................................................................................ 31 Delete .................................................................................................... 32 Delete all ................................................................................................ 32 DIR-Status .............................................................................................. 32 Menu Base Settings ..................................................................... 32 Ring tone ............................................................................................... 32 Ring tone volume................................................................................... 32 Deregister handset ................................................................................. 33 Dialling mode ........................................................................................ 33 Flash time .............................................................................................. 34 Change PIN ............................................................................................ 34 ECO mode ............................................................................................. 34 HS Settings ................................................................................. 35 Alarm ..................................................................................................... 35 Ring Tone .............................................................................................. 35 Tones ..................................................................................................... 36 Language ............................................................................................... 36 HS Name ................................................................................................ 36 HS Display.............................................................................................. 37 Auto-Answer .......................................................................................... 37 Date & Time........................................................................................... 37 Select base ............................................................................................. 38 Register ...................................................................................... 38 Resetting .................................................................................... 38 Answering Machine (Menu)........................................................ 39 Listen to messages ................................................................................. 39 Delete all ................................................................................................ 40 Memo .................................................................................................... 41 Answering machine on/off ..................................................................... 41 2 Configure answering machine ............................................................... 41 Operate the answering machine on the base station .................. 45 Switching on and off .............................................................................. 45 Displays on the base station ................................................................... 46 Playing back messages ........................................................................... 47 Deleting messages ................................................................................. 50 Troubleshooting ......................................................................... 51 Factory settings .......................................................................... 53 Factory settings on the handset .............................................................. 53 Factory settings on the base station........................................................ 53 Further factory settings .......................................................................... 54 Cleaning ..................................................................................... 54 Disposal ...................................................................................... 54 Technical specifications .............................................................. 55 Declaration of Conformity ...................................................................... 55 3 ES EN DE Package contents CAUTION! Do not let children play with the plastic film. There is a risk of suffocation! Remove all packaging materials including the film on the displays of the base station and the handset. Unpack the unit and ensure that the following parts are included: 3x Handset 1x Base station 2x Power supply for the base station 1x Telephone cable 6 x rechargable batteries 1,2 V/600 mAh Typ NiMH, size AAA, HR03 Operating instructions and warranty documents 4 ES Safety instructions About these instructions Please read these instructions carefully before using the appliance. Note the warnings on the appliance and in the operating instructions Always keep the operating instructions close to hand. If you sell the appliance or give it away, make sure you also hand over these instructions and the guarantee slip. Keeping electrical equipment out of reach of children Children are not aware of the dangers associated with using electrical equipment. Children should therefore always be supervised when using electrical equipment. Rechargeable batteries can be fatal if swallowed. For this reason, keep the handset, the batteries or the rechargeable battery block out of reach of small children. If a rechargeable battery is swallowed, please obtain immediate medical assistance. Keep plastic packaging out of reach of children. It may cause suffocation. Potentially explosive areas Never use the handset in a potentially hazardous environment, e.g. in a paint shop or in the vicinity of a gas leak. Mains adapter Only use the supplied power supply. Only use power supplies in dry rooms. 5 EN DE Setting up the appliance safely Place the base station and charging unit on a stable, level surface. Make sure to set up the base station and charging unit so that it is protected from falling down. Do not place the base station and handset near heat sources (e.g. radiators) that could affect the base station and handset. Do not expose the appliances to direct sunlight. Contact with moisture, water and splashes must be avoided. The appliance is not suitable for use in rooms that are very humid (e.g. bathroom). Do not place the base station close to other electrical equipment (e.g. television or microwaveoven). Do not place the base station and charging unit close to open sources of fire (e.g. burning candles). Do not connect the device immediately to the power supply if the unit has been moved from a cold to a warm room. The ensuing condensation could damage the device. The device can be operated as soon as it reaches room temperature. Accessibility of mains power socket 6 Connect the base station to an easily accessible power outlet (230 V ~ 50 Hz) that is close to where you have set up the appliance. Keep the power outlet free of obstructions so that the plug can be pulled out easily. To disconnect the power supply from the mains, always pull on the plug rather than on the cable. Do not bend or crush the mains cable. Never put the handset back in the base station without the battery cover. ES Thunder storms/Non-use Pull the mains plug and telephone cable from the base station if you will be away for a long period of time or if there is a thunder storm. For non-use, always remove the rechargeable batteries from the handset to prevent leakage. Leaked batteries can damage the handset. Handling the rechargeable batteries safely You will need rechargeable batteries for the handset. Please note the following: Keep children away from the rechargeable batteries. Do not throw rechargeable batteries into a fire, do not short-circuit them and do not dismantle them. Only use rechargeable batteries of the same type. Do not use different types, there is a danger of explosion! Please note the polarity (+/-) when inserting the battery. Remove the batteries if the device will not be used for long periods. Remove exhausted rechargeable batteries from the appliance immediately! There is an increased risk of leakage. Do not expose rechargeable batteries to extreme conditions; for example, do not place the appliance on top of radiators! There is an increased risk of leakage. In the event of leakage, remove the rechargeable batteries from the appliance immediately. Clean the contacts before inserting new rechargeable batteries. There is a risk of skin irritations from battery acid! If battery acid has leaked out, it is essential to avoid contact with the skin, eyes and mucous membranes! Leaked battery fluid can cause skin rash. If the acid does come into contact with skin, immediately rinse the affected areas with plenty of clear water and consult a doctor immediately. 7 EN DE Correct repair procedure 8 If the mains adapter, cable or base station is damaged, detach the plug from the power supply immediately. Never try to open and/or repair the appliances yourself. There is a risk of electric shock. In the event of a fault please contact the Medion Service Centre or an approved repair specialist. If the mains cable is damaged, it must be replaced by the manufacturer or the manufacturer’s customer service department or a similarly qualified person in order to prevent exposure to danger. ES Overview of the appliance EN Handset 1 2 3 4 5 6 7 8 9 10 11 12 13 14 15 DE Loudspeaker Display Control keys up/down Delete key Call key: Terminate call; press longer to turn handset on/off; right control key Hash hey: press for #; pressing down longer while idle will switch ring tone on or off. R-Key: Recall key Open directory Microphone Handsfree button Star key: press for *; press longer to activate the key lock Number keys 0 to 9: enter numbers and letters Numbers 2, 4, 5, 6: Keys to control the answering machine Call key: Accept the call; dial the selected number Menu key: Select entries/options; left control key Loudspeaker (on the back side) 9 Base station 1 2 3 4 5 6 7 8 9 10 Loudspeaker DIsplay: Shows information on the answering machine Begins playback of messages, to stop playback Delete key: Deletes messages on the answering machine On/Off key: Enable or disable answering machine Jump back/forward: Jumps to the previous/next message Raise/lower the volume for the base station Charging cradle with contacts: to charge the handset Paging key: Triggers ringing on handset ES EN DE 10 Connection for mains adapter lead 11 Connection for telephone cable (Western jack RJ11) ECO function The Eco Mode Function enables a low radiation operation during a conversation. The reduction of radiation depends on the distance of the mobile part from the base. The function is pre-set and continually activated. Getting started Setting up Place the base station and charging unit on a stable, level surface. Some aggressive furniture paints can weaken the appliance's and charging unit's rubber feet. If necessary, place the devices on a suitable underlay. Set up the base station and charging unit at a practical working height and secure it from falling down. Set up the base station close to a power outlet and a telephone socket. Set up the charging unit close to a power outlet. 11 12 Prevent the appliances from coming into contact with moisture or liquids. Do not place the base station and charging unit close to other electrical equipment (e.g. televisions). ES Inserting batteries into the handset EN Two rechargeable batteries are required for each handset 1,2 V/600 mAh type NiMH, size AAA (included). DE CAUTION! Only use nickel metal hydride rechargeable batteries of the supplied type (NiMH) in the handset. The appliance warranty will expire if you insert any other type of rechargeable battery. The handset could be damaged. Slide down the battery cover on the back of the handset. Insert two batteries into each handset; note the polarity shown in the battery compartment. Place the battery cover back on the battery compartment and slide it shut. 13 Connect the power supply to the base station CAUTION! To connect the base station, only use the base station mains adapter, model no.: S005CV060060. A unit label is on the mains adapter with the relevant details. Connect the plug of the mains adapter lead to the right connection at the bottom of the base station. Secure the plug from falling out by routing the cable behind the cable clamp. Plug the mains plug of the mains adapter into an easily accessible mains socket. Connect the power supply to the charging station CAUTION! To connect the base station, only use the base station mains adapter, model no.: S002CV0600030. A unit label is on the mains adapter with the relevant details. Connect the plug of the mains adapter lead to the connection at the bottom of the charging station. Secure the plug from falling out by routing the cable behind the cable clamp. Plug the mains plug of the mains adapter into an easily accessible mains socket. 14 Charging the battery ES CAUTION! Only connect the base station to the telephone network after the handset has been completely charged. Otherwise the rechargeable batteries will not achieve their full capacity. The charging time is 14 hours. Do not interrupt the charging process, otherwise the capacity of the rechargeable batteries can be permanently reduced. Never put the handset back in the base station/charging unit without the battery cover. You can leave the handset in the base station/charging unit. This ensures a maximum charging condition. The capacity of the rechargeable battery will last for 10 hours of calls, or 100 standby hours. The rechargeable battery will then have to be recharged after that time. 15 EN DE Charging the rechargeable batteries in the base station You cannot make calls with the handset while the rechargeable batteries are being charged. For that reason, only connect the base station to the telephone network after the handset has been completely charged. Place the handset in the charging cradle of the base station and charge the rechargeable battery. A beep indicates that the handset has been correctly placed in the cradle. The battery symbol in the top right of the display indicates that the rechargeable battery is being charged. Connecting the base station to the telephone network CAUTION! Only connect the base station to the telephone network after the handset has been completely charged. Otherwise the rechargeable batteries will not achieve their full capacity. Insert the Western jack of the supplied telephone cable in the left jack at the bottom of the base station. Insert the other plug on the telephone cable to the telephone wall socket. 16 ES The display EN Normal display DE When delivered, the display will show the following: Rang indicator Battery status Name of handset Number of handset Open main menu Activates internal functions Display language On delivery, the display language is German. You can set the display language to English and Turkish; seepage 36. Rechargeable battery indicator With a fully charged battery, the battery symbol will be shown. When the handset is set into the base station, the battery symbol flashed while charging. When the rechargeable battery is empty, or almost empty, the rechargeable will appear and the handset must be placed in the base battery symbol ( station so that the rechargeable battery can be charged. 17 Other indicators on the display The following graphical displays are possible. 18 1 Off if the handset if out of range or not registered. Flashes for low range. 2 On if there is a transmission between the base staton and handset. Flashes at an incoming internal call. 3 Indicates an active call. 4 Indicated an active hands-free connection. 5 On if the answering machine is switched on. Flashes for new messages. 6 On then the alarm time is set. Flashes when the alarm is active. 7 On if there is a new VisualMessage. 8 On if the ring tone is switched off. 9 Indicates a fully charged battery indicates a low charged battery 10 Key lock is activated. C ES 11 Indicates if there are further characters behind the displayed text. EN 12 Press the relevant function button to delete the last character, end the alarm, switch mute on/off during a call. DE 13 Press the relevant function button to return to the previous menu selection. IN 14 Press the relevant function button in standby mode to make an internal call. 15 Scroll up and down, open directory, open phone number list, open calling list 16 On if there is a TAM message. OK MEN 17 Requests you to press the relevant function button to confirm a selection. 18 Requests you to press the relevant function button to show other menu options. 19 Indicates if there are further characters before the displayed text. 20 Display numbers 19 Telephone Calls Basic functions Switching the handset on and off You can switch off the handset if it is not in the base station. To switch off the handset, keep the call key pressed down for a few seconds. The display extinguishes and the handset is now switched off. To switch the handset back on, briefly press the call key. After a short moment, the standard display appears on the display again. You can also switch the handset back on by replacing it in the base station. Answering the telephone When there is an incoming call, you will hear a ring. In the display you will see a receiver symbol and the phone number of the caller or the identification number of another connected handset. NOTE The phone number display may vary depending on the network provider and the type of telephone extension, or be unavailable. 20 To accept a call when the handset is in the charge cradle, proceed as follows: Lift the handset out of the charge cradle or press the loudspeaker key to switch the telephone to handsfree mode. To accept a call when the handset is not in the charge cradle, press the talk key. ES EN DE NOTE You can set the handset so that you must always press the talk key to accept incoming calls (see page 37). Changing the earpiece volume During a call, press the or arrow key. The indicator "VOLUME" with five levels will appear on the display. Use the or arrow keys to select one of the five levels. When the call is ended, the level that was set will be accepted. Ending a call To end a call press the call key or replace the handset in the charging cradle. After you have hung up, the duration of the last call is displayed. After a brief moment, the display will switch to the normal display. 21 Making internal calls You can make calls from your handset to all other handsets of the same base station without having to pay a fee. ". Press the right control key for " All other handsets that are registered with the base station will be shown on the display with the appropriate number. Dial the number of the handset, that you would like to call. The desired handset will now be called. To call all handsets registered with the base station, enter the last number in the display. All handsets are called now. An internal call is set up with the handset that first answers the call. To end the call, press the call key. Making external calls Take the handset out of the cradle. Enter the relevant telephone number with the alphanumeric keypad. Press the talk key or the loudspeaker key. The number will be dialled. Additional functions Selecting from the directory To set up the directory, see page 29. key. Open the directory with the left Select the desired subscriber using the or arrow buttons or use the number keys to enter a letter to search for the name of a subscriber (on entering characters via the number keys please refer to page 30). Confirm by pressing the call or handsfree key. The subscriber’s number will be dialled. 22 Handsfree mode ES In the handsfree mode you can make calls without having to hold the handset. During the call press the loudspeaker button. The handsfree symbol will appear on the display. You can now make calls over the handset loudspeaker. or arrow key in the handsfree To adjust the volume, press the mode. The indicator "VOLUME" with five levels will appear on the display. or arrow keys to select one of the five levels. The Use the correspondingly set level is highlighted and will be accepted. To return to normal telephone mode press the handsfree key again. The handsfree symbol disappears and the loudspeaker is switched off. Recall key The R-key has a function if your telephone is connected to a switchboard or if you want to use special features on your telephone network. Typical applications for the R key are, e.g. call waiting, recall, brokering, three-way conference with at least two external subscribers. The R key interrupts the line connection for a few milliseconds. The duration of the interruption is set using the Flash Time function. This interruption signals the exchange that the following sounds in multi-frequency selection procedures are commands to the exchange. Please note, however, that this function is implemented by your telephone provider (not by the telephone itself). Enquire of your network provider which functions you may execute with the R key. Also ask for the exact key combinations for the various R key functions (e.g.: "Accept call waiting", "Reject call waiting", "Switch back and forth between two connections", etc.). 23 EN DE Key lock To prevent accidental dialling when you are carrying the handset with you, you can activate the keypad lock. This is not possible during a call. Keep the * button pressed until key lock symbol appears on the display. To deactivate the keypad lock, keep the * key pressed down until the symbol for the keypad lock disappears. You can also continue receiving calls. Switching off the ring tone To switch off the ring tone, press and hold down the hash key # until the note icon is shown on the screen. To switch on the ring tone again, press and hold down the hash key # note icon disappears from the screen. until the Muting the telephone To mute the telephone press the right function key (C) during a call. MUTE appears on the display. The caller is now unable to hear you. To end muting, press the right function key C again. Caller identity function You can see the telephone number of a caller on the display if you have requested the CLIP function with your service provider and if the caller also possesses a telephone extension with CLIP function and hasn't suppressed his telephone number. Depending on your network provider, you can also suppress your telephone number. If that is what you want, then please enquire of your network provider on how to proceed. 24 Call list ES External calls are only saved in the call list if - the answering machine does not pick up; - the caller’s telephone has the CLIP function (the caller's number is displayed). The display will show the caller’s number when a call is received. If this number is assigned to a name and ring tone in the telephone’s address book the relevant name is shown on the screen and the assigned ring tone is played. If no number is transmitted ANONYM-CALL is shown on the screen. The symbol for missed calls appears on the display when there are new entries stored in the call list. If there were e.g. 3 missed calls the screen indicates 3 NEW MSG.. Up to 10 entries can be recorded in the call list. Calls in the idle state. If there are no calls stored Press the arrow key in memory, EMPTY will appear on the display. If new calls have been received, you have the following possibilities with the left function key: SAVE NUMBER: You can store the telephone numbers to a name in the directory. DELETE: Deletes the selected entry from the call list. DELETE ALL: deletes all entries from the call list. DETAILS: Caller identity function, time and date are displayed. Select the desired option and press the right control key (OK). 25 EN DE Redial The last 5 telephone numbers (with a maximum of 24 digits) that you dialled are stored in the redial list. . Press the up arrow key The last number dialled is displayed. If there are no telephone numbers stored in memory, EMPTY will appear on the display. or arrow keys. Select the desired telephone number with the To select this telephone number, press the talk key or loudspeaker key. If you confirm with the left control key, you have still more possibilities: SAVE NUMBER: You can store the telephone numbers to a name in the directory. DELETE: Deletes the selected entry from the redial list. DELETE ALL: Deletes all of the telephone numbers from the redial list. Select the desired option and press the left control key (OK). Making calls with several callers NOTE The following functions are only available if at least one additional, GAP-enabled handset is registered with the base station. Transferring calls You can accept a call and then transfer it to an additional, GAP-enabled handset on the same base station. or arrow key During a call press the left control key and use the to select the INTERNAL entry. Then press the right control key (OK) to confirm. On the display, the numbers are displayed on the handsets registered with your base station. All other handsets that are registered with the base station will be shown on the display with the relevant numbers. Dial the number of the handset, that you would like to call. 26 The desired handset will now be called. If the person at the other handset accepts the call, you can hold an internal conversation with that person. To transfer the call, press the call key or place the handset in the charge cradle. The caller is now connected to the person with the other handset. ES EN DE Holding a conference call If a second handset accepts the call as described above, you can hold a conference call. A conference call between one external and two internal subscribers is possible. Transfer the external call to another handset and wait until the subscriber accepts the call on the other handset. Press the * key. CONFERENCE appears in the display. Now all subscribers are included in the call. Every party can leave the conference call by simply pressing the call key (hanging up). The other callers can continue to hold the conference call. The party who started the conference can also end the conference by pressing the call key (hanging up). The connections to all partners is then ended. Paging the handset If you page the handset from the base station, or if you are looking for the handset, then press the paging key at the base station. This triggers a ringing signal from the handset, and "PAGING" appears on the display. Stop the ringing signal with the call key. 27 Setting the telephone via the menu Using the menu lets you call up various functions of the telephone as well as make some settings. In normal mode the left function button opens the main menu with the following entries: Navigating in the menu Selecting a menu option Use the arrow keys or to select a menu option. Open the menu option with the left control key (OK). Most of the menu options contain further sub-menus in list form. or arrow keys to select a menu option in a list. Use the The right control key takes you back respectively one step or one level. Function buttons Alternating commands that depend on the current menu or current process appear on the left and right in the bottom display line. Use the control keys to activate each visible command. Switching to telephone mode To return to the normal telephone mode, press the call key. 28 ES Menu call list EN Select the CALL LIST entry and press the left control key OK). If there are no calls stored in memory, EMPTY will appear on the display. or arrow keys to select an If new calls have been received use the entry in the list. Press the left function key (OK) to select the following options for an entry: DE Store numbers You can store the selected telephone number to a name in the directory. Read more about saving in "Address book menu", "New entry" on page 30. Delete Deletes the selected entry from the call list. Delete all Deletes all entries from the call list. Then confirm the subsequent CONFIRM query by pressing the left function button (OK) to delete all numbers from the call list. Details Caller identity function, time and date are displayed for an entry. If a telephone number has more than 12 characters you can display the remaining characters using the left and right function buttons. 29 Menu Directory Select the DIRECTORY entry and press the left control key OK. If there are no entries stored in memory, EMPTY will appear on the display. or keys. Press You can select an entry in the list by pressing the the left function key (OK) to enter the following options: New Entry You can save a new number in the address book as follows: Confirm the entry with the left function key. The screen displays NAME. Enter the name of the subscriber whose number you want to save with the number keys. The name may have up to 12 characters. To do so press a number key repeatedly until the desired character is shown on the screen You can delete the last character with the right function button (C). Press the left function key (OK) to save the name. The NUMBER entry appears. Enter the subscriber’s telephone number with the keypad. The number may have up to 20 characters. Press the left function key (OK) to store the numer. The screen displays MELODY1. or arrow keys to select one of 10 possible melodies to be Use the assigned to the subscriber. Press the left function key (OK) to save the number. A short beep sounds. Then the new entry is saved and displayed on the screen. 30 ES Available characters The following table shows the available characters you can use for directory entries. EN Key Character DE 1 [Space] - 1 2 ABC2 3 DEF3 4 GHI4 5 JKL5 6 MNO6 7 PQRS7 8 TUV8 9 WXYZ9 0 0 * # Display Display an entry’s name, number and melody. Edit Edit the name, number or melody of the entry currently selected. To edit the entry follow the instructions under "new entry" on Page 30. 31 Delete Deletes the selected entry from the directory. Delete all Deletes all entries from the directory. Confirm the request CONFIRM with the left function key (OK) to delete phone numbers. DIR-Status Displays the occupied/available memory spaces in the telephone book. Menu Base Settings Ring tone Select a melody for the base station’s ring tone and confirm your selection with the left function button (OK). Ring tone volume Select a volume (1-5) for the base station’s ring tone and confirm your selection with the left function button (OK). 32 ES Deregister handset Initially enter with the number keys the valid phone PIN (factory setting is 0000) and confirm with the left function key (OK). Then select a handset that you want to deregister from the base station. NOTE The handset you are currently using can not be deregistered from the base station. Confirm your entry with the left function key (OK). The handset has now been deregistered and must be re-registered if it is to be used again on the base station. Dialling mode Here you can adapt your telephone to the dialling mode of your network provider. You can choose between tone dialling and pulse dialling. The factory setting is TONE. That is the most common dialling mode today. Pulse dialling can be necessary for some older telephone systems. Enquire of your network provider which dialling mode is required for your connection. If you want to change the dialling mode, select TONE or PULSE and confirm your choice with the left function key (OK). 33 EN DE Flash time Here you can adapt your telephone to the specifications of your network provider or your PABX. Select one of the following settings for flash times: LONG 100 ms MEDIUM 250 ms SHORT 600 ms NOTE Enquire of your network provider which settings are required for your connection or read the operating instructions of your telephone system. Change PIN You can assign a new PIN for the base station and handsets here. Enter the valid system PIN (factory setting is 0000) and confirm with the left function key (OK). Enter a new, 4-digits PIN number and confirm with the left function key (OK). Confirm the PIN by entering it again and press the left function key (OK). The PIN for the base station has now been changed. ECO mode The ECO Mode setting enables low emission operation when the handset is placed in the base. The transmitting power is reduced to a minimum. Select the ON or OFF setting for the ECO mode and confirm your selection with the left function button (OK). In the OFF setting the transmission output has a slightly higher range. Use this setting to improve reception if the transmission conditions are poor. 34 ES HS Settings EN Alarm DE NOTE You must set the clock time to correctly use the alarm, as described in "Date & Time" on page 37. Select ON to switch off the alarm. Select the OFF entry to switch on the alarm and confirm your selection with the left function button (OK). The alarm time is displayed. Enter the desired alarm time in the HH:MM format with the number keys and confirm your selection with the left function button (OK). The SNOOZE message is displayed. Confirm with the left function key (OK). Select the ON entry to activate the snooze time and confirm your selection with the left function button (OK). After switching off the alarm it switches on again after 7 minutes. If you do not want a snooze time set this entry to OFF. When the alarm is switched on the is shown on the screen. Ring Tone Internal Select the ring tone for internal calls and confirm the entry by pressing the function key (OK). External Select a ring tone for external calls and confirm your selection with the left function button (OK). 35 Volume Select a volume (1-5) for the handset’s ring tone and confirm your selection with the left function button (OK). Tones Keypad tone Select the ON or OFF entry to switch the keypad sounds on or off and confirm your selection with the left function button (OK). Battery empty Select the ON or OFF entry to switch the signal for low battery charge on or off and confirm your selection with the left function button (OK). Range Select the ON or OFF entry to switch the signal for reaching the maximum range on or off and confirm your selection with the left function button (OK). Language Select DEUTSCH, ENGLISH or ESPANOL as the menu language and confirm your netry by pressing the left function key (OK). HS Name You can enter a name for the handset here using the number keys; this is then displayed in standby mode. Confirm the setting with the left function key (OK). 36 HS Display ES Select whether the handset’s name (HS-NAME) or the time (TIME) should be displayed on the screen in standby mode. Confirm the setting with the left function key (OK). EN DE Auto-Answer Select the ON setting so that an incoming call is answered when you remove the handset from the base station/charging cradle. Select the OFF setting if you want to first press the call button to answer the call after removing the handset from the base station/charging cradle. Confirm the setting with the left function key (OK). Date & Time Date format Select a format for the date indicator (DD:MM:YY or MM:DD:YY) and confirm your selection with the left function button (OK). Time format Select a format for the date indicator (24 HOUR or 12 HOUR) and confirm your selection with the left function button (OK). Set time Enter the precise time in the HH:MM format with the number keys and confirm your selection with the left function button (OK). Set date Enter the right date in the DD:MM format with the number keys and confirm your selection with the left function button (OK). 37 Select base To increase the reception range of the handset, you can register it with up to four base stations. This lets you set up a "honeycomb structure" of base stations in your reception range. If there are several base stations select the desired base station and confirm your selection with the left function button (OK). The screen briefly displays SEARCH BASE and then BASE FOUND when the selected base station has been found. Register On delivery the handset is already registered to the base station. If this is not the case register the handset as follows: Keep pressed the button PAGE for 5 seconds on the base station until you hear a signal tone. Select the register menu and confirm with the left function button (OK). Enter the valid phone PIN (factory setting is 0000) and confirm with the left function key (OK). The screen briefly displays SEARCH BASE and then a brief beep sounds when the selected base station has been found. Resetting You can reset the telephone if it has serious faults as follows: Enter the valid phone PIN (factory setting is 0000) and confirm with the left function key (OK). Confirm the subsequent CONFIRM query with the left control key (OK). NOTE When restoring to factory settings, call lists and directory entries is retained. 38 Answering Machine (Menu) ES Use the answering machine to record incoming messages during your absence or to leave a message for a caller. The answering machine will automatically add the date and time to every message. You must therefore set the date and time in order to use the answering machine properly. If you do not set the date and time, "00" will appear on the display of the base station. The date and time for the messages will all be incorrect in this case. Set the date and time at the handset. EN DE Listen to messages The latest message will be played back and the display shows the time and date of the message. is shown at For new messages that you have not yet listened to a star the bottom of the screen. Once you have listened to the new message the star disappears. and arrow keys to select a message and confirm with the Use the left function key (OK). If there are no messages, the display will show 00--00 00--00. Press the left function key (MENU) to display the following playback functions: PLAYBACK/STOP Start/stop playback NEXT playback next message BACK playback previous message DELETE Delete message You can also control the playback functions with the number keys on one of the handsets or with an alien device: Key 5 pause Key 4 playback next message Key 6 playback previous message Key 2 Delete message 39 NOTE If the display of the handset shows "Not Available", then the answering machine is being used by another person. To end the playback, press the call key. Playing back messages from a different telephone extension You can playback the messages on your answering machine from a different extension, such as a mobile phone or a telephone booth. Proceed as follows: Dial the telephone number of your extension. If your answering machine is switched on, press the asterisk key on the telephone. Enter your remote enquiry PIN now with the keypad. If you entered the remote enquiry PIN incorrect three times, the connection will be terminated. The following functions are available: Key 5 pause Key 4 playback next message Key 6 playback previous message Key 2 Delete message NOTE To use the remote enquiry of an alien machine please consult the manual of the respective manufacturer. Delete all Confirm the request CONFIRM with the left function key (OK) to delete all messages on the answering machine. The display will show EMPTY briefly. 40 Memo ES With your handset you can record a memo which other users can play back like a message. Press the left function key (OK) to start the record. In the display appears RECORD. Press the left function key (OK) again to finish recording and store the recording. Press the right function key (OK) to finish recording without storing the recording. A new recording is being stored and can be played back in the menu entry PLAYBACK MSGS. Answering machine on/off Here you can enable or disable the answering machine on the handset. Confirm the setting with the left function key (OK). Configure answering machine Answering mode You can set here how the answering machine should behave: WITH REC.: The answering machine will respond to the call and record messages; WITHOUT REC.: The answering machine will respond to the call without recording a message. Answering machine language Select the language for the answering machine’s standard message as ESPANOL or ENGLISH here. Confirm the setting with the left function key (OK). 41 EN DE Outgoing messages Select one of the two following entries to play and create various outgoing messages. With Rec. You can play or record the text for outgoing messages with subsequent recording here. PLAYBACK: Play the current outgoing message. RECORD: Record a new outgoing message Press the left function key (OK) to start the record. In the display appears RECORD. Press the left function key (OK) again to finish recording and store the recording. Press the right function key (C) to end the recording without saving it. The new recording is saved and can be played via the MESS. PLAYBACK menu entry. Without Rec. You can play or record the text for outgoing messages without subsequent recording here. PLAYBACK: Play the current outgoing message. RECORD: Record a new outgoing message To record a new outgoing message, proceed as described in the section above. 42 ES Answering delay You can set the number of ringing signals after which the answering machine is activated. You can choose between 2, 4, 6 and 8 ringing signals and the "ECONOMY MODE". In the "SETTINGS" menu select the "DELAY" entry. Select the desired number of ringing signals or the ECONOMY MODE and confirm with "OK". Economy mode In the economy mode, you can avoid connection fees when playing back your answering machine from outside. In the economy mode, the answering machine switches on after four ringing signals for the FIRST caller. For every call after that, the answering machine switches on after the first ringing signal. To listen to and set your personal messages from outside, read the chapter Playing back messages from a different telephone extension on page 48. To check if you have new messages, proceed as follows: Call your connection from the outside. If new messages have been recorded, the answering machine will switch on after the first ringing signal. If you hear a second ringing signal, then this means that no new messages have been recorded for you. In this case, hang up immediately. Otherwise, the answering machine would switch on after the fifth ringing signal. Time of recording Set the recording time for messages to UNLIMITED, 60 SEC, 120 SEC and 180 SEC. 43 EN DE Remote enquiry You can activate the remote enquiry to listen to recorded messages from a different telephone. Set the remote enquiry ON or OFF and confirm with the left function key (OK). Compression The file for a recorded message can be compressed so that it takes up less space. Higher compression produces a smaller file with lower recording quality. Set the compression to HIGH, MEDIUM or LOW and confirm with the left function key (OK). Monitoring With the "MONITORING" function you can listen to a call without interrupting the message being recorded on the answering machine. This function is helpful, e.g. when you first want to hear who the caller is. You can also take a call when the answering machine is already recording. Set the function ON or OFF and confirm with the left function key (OK). Monitoring at the base station To monitor a call, press the + or – volume key until you can hear the caller. Monitoring at the handset While a recording is taking place, the "MONITOR" entry appears on the display of the handset. To monitor the call, press the right function key (OK). Accepting the call after monitoring To accept the call press the talk key on the handset. You can now talk to the caller and the answering machine recording stops. 44 ES Change PIN The PIN prevents the use of the remote enquiry of your answering machines by strangers. The default setting for the PIN is "0000". This PIN is not identical with the system PIN. Enter the current remote enquiry PIN number and confirm with the left function key (OK). Now enter the new four-digit PIN. After confirming you are prompted to repeat the entry. Also confirm with the left function key (OK). Operate the answering machine on the base station Switching on and off To switch the answering machine on or off, press the On/Off button on the base station. When the answering machine is switched off, the display will show: "– – ", possibly alternating with the number of new messages. When the answering machine is switched on, the display will show the number of stored messages; in the factory settings: "00". 45 EN DE Displays on the base station The display of the base station shows important information about the status of your answering machine. Displa Explanation y empty The base station is not connected properly to the mains. –– The answering machine is switched off. 00 No new messages XX Flashes, it there are new messages. On, if there are no new messages. "XX": Number of new/stored messages XX/FF "XX" and "FF" flash in succession. There are "XX" new messages and the memory is full. Only "FF" is flashing. The memory is full and it is not possible to record any new messages. --/XX "XX" and "--" flash in succession. The clock has not been set and there are "XX" new messages. Only "--" is flashing. The clock has not been set and there are no new messages. YY "YY" old messages saved A1/A2 The outgoing message is being played. A1: Outgoing message with subsequent recording A2: Only outgoing message XX/An "XX" and "AN" flash in succession. Message "XX" is currently being recorded. 46 LA Flashes when the answering machine is being used by a handset. ES LX Current volume value from 1-8 EN DE Playing back messages The answering machine differentiates between already played back ("old") messages and messages that have not been played back yet ("new messages"). If new messages were recorded on the answering machine, the symbol for the answering machine and "New Message" will appear on the display. The number of recorded messages will flash on display on the base station. If you play back the messages, the new messages will always be played back first. Playback messages on the base station To play back messages, press the PLAY button at the base station. The recorded messages will now be played back. To stop the playback, press the PLAY button. Playback is now ended. To skip a message, press the "Next Message" jump key. To play back a message again, or to play back the previous message, press the "Previous Message" key. To change the volume during playback, press the + or – keys on the base station. Playing back messages from the handset To learn how to playback messages from the handset, please read chapter "Listen to messages" on page 39. 47 Playing back messages from a different telephone extension You can playback the messages on your answering machine from a different extension, such as a mobile phone or a telephone booth. Proceed as follows: Dial the telephone number of your extension. If your answering machine is switched on, press the asterisk key on the telephone. Enter your remote enquiry PIN now with the keypad. If you entered the remote enquiry PIN incorrect three times, the connection will be terminated. The following functions are available: Key 5 pause Key 4 playback next message Key 6 playback previous message Key 2 Delete message NOTE To use the remote enquiry of an alien machine please consult the manual of the respective manufacturer. NOTE If you do not make any entries for 15 seconds the connection will be interrupted automatically. If no new calls were received, you can avoid the fees for the enquiry if the answering machine is set to economy mode (see chapter "Economy mode", on page 43.) To operate the answering machine, use the number keys on the telephone. NOTE To use the remote enquiry of an alien machine please consult the manual of the respective manufacturer. 48 Key ES Function During paused playback During playback EN 2 Delete current message DE 4 Repeat current message Press twice to Jump to the previous message 5 To stop playback 6 Play back next message 7 Enable answering machine 8 To stop playback 9 Enabling and disabling answering machine * Remote enquiry Entering the PIN Switching on the answering machine from an external extension You can also switch on the answering machine from an external telephone extension. Dial your telephone number. Wait until after the 10th ringing signal. Enter the four-digit code. The answering machine is switched on. If there is a new message, it is played back now. 49 Deleting messages You can only delete messages that you have already played back. Deleting messages on the base station To delete all message, proceed as follows: End the playback with the stop button. Keep the "Delete" button on the base station pressed until you hear a signal tone. All messages have been deleted. Deleting messages with the handset To learn how to delete messages from the handset, please read chapter "Listen to messages" on page 39. 50 ES Troubleshooting For appliance errors, please check first if you can eliminate the error yourself with the help of the following overview. Never try to repair the appliances yourself. Contact our service centre or other qualified personnel if a repair is necessary. For all problems Check if the mains and telephone cables are plugged in correctly (see page 11 and page 16). Check the telephone at a different telephone socket. Check the battery indicator to see if the rechargeable battery is charged. Check if the handset is correctly registered (see page 38). Check if the handset is within the range of the base station. The display on the handset is blank. Check if the handset is switched on (see page 20). No dialing tone Check if the base station is connected correctly (see page 11 and page 16). Check if the rechargeable batteries are charged and inserted with correct polarity (see page 13). Check if the handset is switched on, charged, correctly registered and within the range of the base station. The display on the handset shows "RANGE". Check if the base station is connected correctly (see page 11 and page 16). Check if the handset is within the range of the base station. Check if the handset is registered with the desired base station (see page 20). Check if the rechargeable batteries are charged and 51 EN DE inserted with correct polarity (see page 13). No ring tone on handset or base station Check if the base station is connected correctly (see Setting up and Connecting the base station to the telephone network). Check if the volume of the ring tone was switched off (see page 24). Check if the handset is within the range of the base station. Check if the rechargeable batteries are charged and inserted with correct polarity (see page 13). "– –" appears in the base station display. Answering machine is switched off (see 41. The caller cannot understand you Check if the microphone is switched on and if muting is switched off (see page 24). You cannot be called Check if you pressed the talk key, if the "telephone receiver" symbol is shown on the display and if you hear a dialing tone when you pick up. Check if another telephone works on the telephone socket or if your telephone works on a different telephone socket (see page 11, and 16). There is interference with other appliances. 52 Check if the base station is located directly next to another electrical appliance (e.g. other telephone or fax machine, television or microwave oven). Set up the telephone in a different location. ES Factory settings EN Factory settings on the handset DE Setting Options Factory Setting External ring tones 10 ring tones, 5 normal, 5 polyphone Melody 6 Internal ring tones 10 ring tones, 5 normal, 5 polyphone Melody 5 Ring tone volume 5 levels and off Level 3 Receiver volume Volume in 5 levels Volume Level 5 Key protection On/Off Off Auto-reply On/Off On Keypad tones On/Off On Language Spanish / German / English Spanish Factory settings on the base station Setting Options Factory Setting ring tones 5 different ring tones Melody 1 Ring tone volume 5 levels and off Level 3 Dialling mode Pulse dialling/Tone dialling Tone dialling System PIN – 0000 Handset priority All/One handset All 53 Further factory settings Setting Options Factory Setting Alarm for new messages on answering machine On/Off On Number of ring tones before the answering machine is switched on. 2 / 4 / 6 / 9 ring tones or economy mode 6 Cleaning Before cleaning, remove the mains adapter from the mains socket. Use a dry, soft cloth. Avoid the use of chemical solutions and cleaning products because these may damage the appliance surface and/or markings. Disposal Packaging Your DECT telephone has been packaged to protect it against damage in transit. The packaging constituents are raw materials and can be reused or recycled. Appliance At the end of its lifetime, do not dispose of the DECT telephone in household rubbish. Enquire about the options for environmentally friendly disposal. Batteries Do not dispose of used batteries in household rubbish. Batteries should be taken to a collection point for used batteries. 54 ES Technical specifications Dimensions base station without handset appr. 150 x 112 x 45 cm (W x D x H) Dimensions handset appr. 46 x 26 x 153 cm (W x D x H) Rechargeable batteries for handsets Standard 1,2 V/600 mAh Typ NiMH, size AAA EN DE DECT/GAP Approx. 300 m range Mains adapter Base station Input: 100-240 V ~ 50/60 Hz 600mA, 3.6 VA Output:6 V Model TenPao S005CV0600060 Mains adaptors Charging stations Input: 100-240 V ~ 50/60 Hz 300 mA, 1.8 VA Output: 6 V Model: TenPao S002CV0600030 Charging time Approx. 16 hours for complete discharge Standby mode Approx. 100 hours Talk time Approx. 10 hours Subject to technical modifications. Declaration of Conformity The devices comply with the European guidelines for radio equipment and telecommunications equipment (Radio Telecommunications Equipment Directive 1999/5/EU). The certificate of conformity is posted on the Internet at: http://www.medion.com/conformity 55 56 Inhaltsverzeichnis ES Lieferumfang ................................................................................ 4 Sicherheitshinweise ...................................................................... 5 Elektrische Geräte nicht in Kinderhände ................................................... 5 Explosionsgefährdete Bereiche ................................................................. 5 Netzteil .................................................................................................... 5 Das Gerät sicher aufstellen ....................................................................... 6 Netzanschluss zugänglich lassen .............................................................. 6 Gewitter/Nichtgebrauch .......................................................................... 7 Sicher mit Akkus umgehen ....................................................................... 7 Niemals selbst reparieren ......................................................................... 8 Geräteübersicht ............................................................................ 9 Mobilteil .................................................................................................. 9 Basisstation ............................................................................................ 10 ECO Funktion .............................................................................. 11 Vorbereitung .............................................................................. 11 Aufstellen ............................................................................................... 11 Akkus in die Mobilteile einlegen ............................................................. 13 Netzteil an die Basisstation anschließen.................................................. 14 Netzteil an die Ladestation anschließen .................................................. 14 Akku laden ............................................................................................. 15 Basisstation an das Telefonnetz anschließen........................................... 16 Das Display ................................................................................. 17 Normalanzeige....................................................................................... 17 Weitere Anzeigen im Display .................................................................. 18 Telefonieren ............................................................................... 20 Grundfunktionen ................................................................................... 20 Weitere Funktionen ................................................................................ 22 Mit mehreren Gesprächspartnern telefonieren ....................................... 26 Telefon über Menü einstellen ..................................................... 28 Im Menü navigieren ............................................................................... 28 Menü Anrufliste .......................................................................... 29 Nr. speichern ......................................................................................... 29 1 EN DE Löschen ................................................................................................. 29 Alle löschen............................................................................................ 29 Details .................................................................................................... 29 Menü Telefonbuch ...................................................................... 30 Eintrag neu ............................................................................................ 30 Ansehen ................................................................................................. 31 Ändern ................................................................................................... 31 Löschen ................................................................................................. 32 Alle löschen............................................................................................ 32 TB-Status................................................................................................ 32 Menü Basis-Einstellungen ........................................................... 32 Tonruf .................................................................................................... 32 Tonruflautst ........................................................................................... 32 MT abmelden ........................................................................................ 33 Wahlverfahr. .......................................................................................... 33 Flash-Zeit ............................................................................................... 34 Pin ändern ............................................................................................. 34 MT Einstellungen ........................................................................ 35 Wecker ................................................................................................... 35 Rufton .................................................................................................... 35 Töne ...................................................................................................... 36 Sprache .................................................................................................. 36 MT-Name ............................................................................................... 36 MT-Display ............................................................................................ 37 Auto-Antwort ......................................................................................... 37 Datum & Zeit ......................................................................................... 37 Basis wählen .......................................................................................... 38 Anmelden ................................................................................... 38 Rücksetzen ................................................................................. 38 Anrufbeantworter (Menü) ......................................................... 39 Nachr. Hören ......................................................................................... 39 Alle Löschen ........................................................................................... 41 Memo .................................................................................................... 41 AB EIN/AUS ............................................................................................ 41 AB EINST. ............................................................................................... 41 2 Anrufbeantworter von der Basisstation aus bedienen ............... 45 Aus- und Einschalten .............................................................................. 45 Anzeigen an der Basisstation .................................................................. 46 Nachrichten abhören ............................................................................. 47 Nachrichten löschen .............................................................................. 50 Wenn Störungen auftreten ......................................................... 51 Werkseinstellungen .................................................................... 53 Werkseinstellungen am Mobilteil ........................................................... 53 Werkseinstellungen an der Basisstation .................................................. 53 Weitere Werkseinstellungen ................................................................... 54 Reinigung ................................................................................... 54 Entsorgung ................................................................................. 54 Technische Daten ....................................................................... 55 Konformitätsinformation ........................................................................ 55 3 ES EN DE Lieferumfang ACHTUNG! Lassen Sie kleine Kinder nicht mit Folie spielen. Es besteht Erstickungsgefahr! Entfernen Sie sämtliches Verpackungsmaterial, auch die Folien auf den Displays der Basisstation und der Mobilteile. Vergewissern Sie sich beim Auspacken, dass folgende Teile mitgeliefert wurden: 3x Mobilteil 1x Basisstation 2x Ladestation 3x Netzteil 1x Telefonkabel 6 x wieder aufladbare Batterien (Akkus) 1,2 V/600 mAh Typ NiMH, Größe AAA, HR03 Bedienungsanleitung und Garantiedokumente 4 Sicherheitshinweise ES Zu dieser Anleitung Lesen Sie vor Inbetriebnahme die Anleitung aufmerksam durch. Beachten Sie die Warnungen auf dem Gerät und in der Bedienungsanleitung. Bewahren Sie die Bedienungsanleitung immer in Reichweite auf. Wenn Sie das Gerät verkaufen oder weitergeben, händigen Sie unbedingt auch diese Anleitung und den Garantieschein aus. Elektrische Geräte nicht in Kinderhände Kinder erkennen nicht die Gefahren, die beim Umgang mit Elektrogeräten entstehen können. Lassen Sie Kinder deshalb niemals unbeaufsichtigt elektrische Geräte benutzen. Akkus können bei Verschlucken lebensgefährlich sein. Bewahren Sie deshalb das Mobilteil die Akkus oder den Akkublock für Kleinkinder unerreichbar auf. Wurde ein Akku verschluckt, muss sofort medizinische Hilfe in Anspruch genommen werden. Halten Sie auch die Verpackungsfolien von Kindern fern. Es besteht Erstickungsgefahr. Explosionsgefährdete Bereiche Verwenden Sie das Mobilteil niemals in explosionsgefährdeter Umgebung, z. B. in einer Lackiererei, oder wenn in der Umgebung Gas austritt. Netzteil Verwenden Sie nur die mitgelieferten Netzteile. Die Netzteile dürfen nur in trockenen Räumen verwendet werden. 5 EN DE Das Gerät sicher aufstellen Stellen Sie die Basisstation bzw. Ladestation auf eine feste, ebene Oberfläche. Stellen Sie die Basisstation bzw. Ladestation gegen Herunterfallen geschützt auf. Es dürfen keine direkten Wärmequellen (z. B. Heizungen) auf Basisstation, Ladestation und Mobilteil wirken. Es darf kein direktes Sonnenlicht auf die Geräte treffen. Der Kontakt mit Feuchtigkeit, Wasser oder Spritzwasser muss vermieden werden. Die Geräte sind nicht für die Benutzung in Räumen mit hoher Luftfeuchtigkeit geeignet (z. B. Badezimmer). Stellen Sie die Basisstation bzw. Ladestation nicht in unmittelbarer Nähe von anderen Elektrogeräten (z. B. Fernseher oder Mikrowellengerät) auf. Stellen Sie die Basisstation bzw. Ladestation nicht in unmittelbare Nähe von offenen Brandquellen (z. B. brennende Kerzen). Warten Sie mit dem Anschluss des Netzteils, wenn das Gerät von einem kalten in einen warmen Raum gebracht wird. Das dabei entstehende Kondenswasser kann das Gerät unter Umständen zerstören. Wenn das Gerät Zimmertemperatur erreicht hat, kann es gefahrlos in Betrieb genommen werden. Netzanschluss zugänglich lassen 6 Schließen Sie die Basisstation nur an eine gut erreichbare Steckdose (230 V ~ 50 Hz) an, die sich in der Nähe des Aufstellortes befindet. Lassen Sie die Steckdose freizugänglich, damit der Stecker ungehindert abgezogen werden kann. Ziehen Sie das Netzteil stets am Stecker aus der Steckdose, ziehen Sie nicht am Kabel. Knicken oder quetschen Sie das Netzkabel nicht. Stellen Sie das Mobilteil nie ohne Batteriefachdeckel in die Basisstation. Gewitter/Nichtgebrauch ES Bei längerer Abwesenheit oder bei Gewitter ziehen Sie den Netzadapter und das Telefonkabel von der Basisstation ab. Nehmen Sie bei längerem Nichtgebrauch auch unbedingt die Akkus aus dem Mobilteil, um ein Auslaufen der Akkus zu vermeiden. Ausgelaufene Akkus können das Mobilteil beschädigen. Sicher mit Akkus umgehen Für das Mobilteil benötigen Sie wiederaufladbare Batterien (Akkus). Beachten Sie hierzu folgende Hinweise: Halten Sie Akkus von Kindern fern. Werfen Sie die Akkus nicht ins Feuer, schließen Sie sie nicht kurz und nehmen Sie sie nicht auseinander. Setzen Sie nur Akkus des gleichen Typs ein. Verwenden Sie keine unterschiedlichen Typen, es besteht Explosionsgefahr. Beachten Sie beim Einlegen der Akkus die Polarität (+/–). Wenn Sie das Gerät längere Zeit nicht verwenden, nehmen Sie die Akkus heraus. Entfernen Sie erschöpfte Akkus umgehend aus dem Gerät! Es besteht erhöhte Auslaufgefahr! Setzen Sie die Akkus keinen extremen Bedingungen aus; stellen Sie das Gerät z. B. nicht auf Heizkörpern ab! Es besteht erhöhte Auslaufgefahr! Nehmen Sie ausgelaufene Akkus sofort aus dem Gerät. Reinigen Sie die Kontakte, bevor Sie neue Akkus einlegen. Es besteht Verätzungsgefahr durch Batteriesäure! Sollte Batteriesäure ausgelaufen sein, vermeiden Sie unbedingt den Kontakt mit Haut, Augen und Schleimhäuten! Ausgelaufene Batterieflüssigkeit kann Hautausschlag verursachen. Falls die Säure doch mit Haut in Kontakt gekommen ist, spülen Sie die betroffenen Stellen sofort mit reichlich klarem Wasser und suchen Sie umgehend einen Arzt auf. 7 EN DE Niemals selbst reparieren 8 Ziehen Sie bei Beschädigungen der Netzadapter, der Anschlussleitungen oder der Basisstation sofort den Netzadapter aus der Steckdose. Versuchen Sie auf keinen Fall, die Geräte selber zu öffnen und/oder zu reparieren. Es besteht die Gefahr eines elektrischen Schlags. Wenden Sie sich im Störungsfall an das Medion Service Center oder eine andere geeignete Fachwerkstatt. Wenn die Anschlussleitung dieses Geräts beschädigt wird, muss sie durch den Hersteller oder seinen Kundendienst oder eine ähnlich qualifizierte Person ersetzt werden, um Gefährdungen zu vermeiden. Geräteübersicht ES EN Mobilteil 1 2 3 4 5 6 7 8 9 10 11 12 13 14 15 DE Lautsprecher Display Steuertasten auf/ab Löschtaste Hörertaste Anruf beenden; Länger drücken: Mobilteil ein/ausschalten; rechte Steuertaste Raute-Taste: zur Eingabe des #Zeichens; langer Druck im Ruhezustand schaltet das Anrufsignal ein/aus. R-Taste: Rückfragetaste Telefonbuch öffnen Mikrofon Freisprechtaste Stern-Taste: zur Eingabe des *Zeichens; um die Tastensperre zu aktivieren gedrückt halten Zifferntasten 0 bis 9: Zur Eingabe von Ziffern und Buchstaben Ziffern 2, 4, 5, 6: Tasten zum Steuern des Anrufbeantworters Gesprächstaste: Gespräch annehmen; gewünschte Nummer wählen Menü-Taste: Einträge/Optionen wählen; linke Steuertaste Lautsprecher (auf der Rückseite) 9 Basisstation 1 2 3 4 5 6 7 8 9 10 Lautsprecher Display: Zeigt Informationen zum Anrufbeantworter an Startet die Wiedergabe von Nachrichten, Wiedergabe anhalten Löschtaste: Löscht Nachrichten auf dem Anrufbeantworter Ein-/Aus-Taste: Anrufbeantworter ein oder ausschalten Sprungtaste rückwärts/vorwärts: Springt zur vorigen/nächsten Nachricht Lautstärke für Basisstation senken/erhöhen Ladeschale mit Kontakten: zum Laden des Mobilteils Pagingtaste: Löst Rufsignal am Mobilteil aus ES EN DE 10 Anschluss für das Netzadapterkabel 11 Anschluss für das Telefonkabel (RJ11 Stecker) ECO Funktion Die Funktion ECO Mode ermöglicht einen strahlungsarmen Betrieb während eines Gesprächs. Die Strahlungsreduzierung hängt von der Entfernung des Mobilteils zur Basis ab. Die Funktion ist voreingestellt und dauerhaft aktiviert. Vorbereitung Aufstellen Stellen Sie Basisstation und Ladestation auf eine ebene, feste Oberfläche. Einige aggressive Möbellacke können die Gummifüße der Basisstation und der Ladestation angreifen. Stellen Sie die Stationen ggf. auf eine Unterlage. Stellen Sie Basisstation und Ladestation in einer praktischen Arbeitshöhe und gegen Herunterfallen gesichert auf. Stellen Sie die Basisstation in der Nähe einer Steckdose und einer Telefonanschluss-Dose auf. Stellen Sie die Ladestation in der Nähe einer Steckdose auf. 11 12 Vermeiden Sie den Kontakt der Geräte mit Feuchtigkeit oder Flüssigkeiten. Stellen Sie Basisstation und Ladestation nicht in unmittelbare Nähe anderer Elektrogeräte (z. B. Fernsehern). Akkus in die Mobilteile einlegen ES Für die Mobilteile werden 2 wiederaufladbare Batterien (Akkus) 1,2 V/600 mAh Typ NiMH, Größe AAA mitgeliefert. EN DE ACHTUNG! Benutzen Sie im Mobilteil nur Nickel-Metallhydrid-Akkus des mitgelieferten Typs (NiMH). Die Garantie des Geräts erlischt, wenn Sie andere Akkus einlegen. Das Mobilteil könnte beschädigt werden. Schieben Sie den Batteriefachdeckel auf der Rückseite des Mobilteils nach unten ab. Setzen Sie je Mobilteil zwei Akkus unter Beachtung der im Batteriefach angegebenen Polarität ein. Setzen Sie den Batteriefachdeckel wieder auf das Batteriefach und schieben Sie ihn zu. 13 Netzteil an die Basisstation anschließen ACHTUNG! Verwenden Sie zum Anschluss des Basisteils nur den Netzadapter für die Basisstation, Modell Nr.: S005CV0600060. Auf dem Netzteil befindet sich ein Typenschild mit den entsprechenden Angaben. Verbinden Sie den Stecker des Netzadapterkabels mit dem rechten Anschluss an der Unterseite der Basisstation. Sichern Sie den Stecker gegen Herausfallen, indem Sie das Kabel hinter der Kabelhalterung herführen. Stecken Sie den Netzstecker des Netzadapters in eine leicht zugängliche Netzsteckdose. Netzteil an die Ladestation anschließen ACHTUNG! Verwenden Sie zum Anschluss nur den Netzadapter für die Ladestation, Modell Nr.: S002CV0600030. Auf dem Netzteil befindet sich ein Typenschild mit den entsprechenden Angaben. Verbinden Sie den Stecker des Netzadapterkabels mit dem Anschluss an der Unterseite der Ladestation. Sichern Sie den Stecker gegen Herausfallen, indem Sie das Kabel hinter der Kabelhalterung herführen. Stecken Sie den Netzstecker des Netzadapters in eine leicht zugängliche Netzsteckdose. 14 Akku laden ES ACHTUNG! Schließen Sie die Basisstation erst ans Telefonnetz an, wenn das Mobilteil vollständig aufgeladen ist. Ansonsten erreicht der Akku nicht seine volle Leistung. Die Ladezeit beträgt ca.14 Stunden. Unterbrechen Sie den Ladevorgang nicht, da sonst die Leistung des Akkus dauerhaft verringert werden kann. Stellen Sie das Mobilteil nie ohne Batteriefachdeckel in die Basis- bzw. Ladestation. Sie können das Mobilteil ständig in der Basis- bzw. Ladestation belassen. So sichern Sie den maximalen Ladezustand. Die Leistung des Akkus reicht für 10 Stunden Gespräch oder 100 Stunden Bereitschaftsbetrieb aus. Anschließend muss der Akku neu aufgeladen werden. 15 EN DE Akku in der Basisstation laden Während der Akku aufgeladen wird, können Sie mit dem Mobilteil noch nicht telefonieren. Schließen Sie die Basisstation deshalb erst nach dem vollständigen Aufladen des Mobilteils an das Telefonnetz an. Setzen Sie das Mobilteil in die Ladeschale der Basisstation und laden Sie den Akku. Ein Piepton signalisiert, dass das Mobilteil richtig in der Schale sitzt. Im Display erscheint oben rechts das Batteriesymbol, wenn der Akku geladen wird. Basisstation an das Telefonnetz anschließen ACHTUNG! Schließen Sie die Basisstation erst ans Telefonnetz an, wenn das Mobilteil vollständig aufgeladen ist. Ansonsten erreicht der Akku nicht seine volle Leistung. Stecken Sie den Western-Stecker des mitgelieferten Telefonkabels in die linke Buchse auf der Unterseite der Basisstation. Stecken Sie den anderen Stecker des Telefonkabels in die Telefonsteckdose in der Wand. 16 Das Display ES EN Normalanzeige DE Im Auslieferungszustand stellt sich das Display folgendermaßen dar: Reichweitenanzeige Batteriestatus Name des Mobilteils Nummer des Mobilteils Hauptmenü öffnen Interne Funktionen aufrufen Displaysprache Im Auslieferungszustand ist die Displaysprache deutsch. Sie können die Displaysprache auch auf Englisch und Türkisch einstellen; siehe Seite 36. Akkuanzeige Bei voll geladenem Akku erscheint das Akkusymbol . Wenn sich das Mobilteil in der Basisstation oder Ladestation befindet, blinkt das Akkusymbol während des Ladevorgangs. und das Wenn der Akku leer oder fast leer ist, erscheint das Akkusymbol Mobilteil muss in die Basisstation gestellt werden, damit der Akku geladen werden kann. 17 Weitere Anzeigen im Display Folgende weitere grafische Anzeigen sind möglich. 1 Aus, wenn das Mobilteil außer Reichweite oder nicht angemeldet ist. Blinkt bei geringer Reichweite. 2 An, wenn die Übertragung zwischen Basisstation und Mobilteil aktiv ist. Blinkt bei eingehendem internen Anruf. 3 Signalisiert, dass ein Anruf aktiv ist. 4 Zeigt an, dass die Freisprechfunktion aktiv ist. 5 An, wenn Anrufbeantworter eingeschaltet ist. Blinkt bei neuer Nachricht. 6 An, wenn eine Weckzeit eingestellt ist. Blinkt wenn der Alarm aktiv ist. 7 An, wenn eine neue VisualMessage vorliegt. 8 An, wenn das Anrufsignal ausgeschaltet ist. 9 Signalisiert volle Batterieladung Signalisiert niedrige Batterieladung 10 Tastensperre ist aktiviert. 18 C 11 Zeigt an, wenn sich weitere Zeichen hinter dem angezeigten Text befinden. ES 12 Die entsprechende Funktionstaste drücken, um das letzte Zeichen zu löschen, den Alarm zu beenden, die Stummschaltung während eines Gesprächs ein/ausschalten. EN DE 13 Die entsprechende Funktionstaste drücken, um zur vorherigen Menüauswahl zurückzukehren. IN 14 Im Normalzustand die entsprechende Funktionstaste drücken, um einen internen Anruf zu tätigen. 15 Nach oben und unten blättern, Telefonbuch aufrufen, Rufnummernliste aufrufen, Anruferliste aufrufen 16 An, wenn eine neue TAM Nachricht vorliegt. OK MEN 17 Fordert auf, die entsprechende Funktionstaste zu drücken, um eine Auswahl zu bestätigen. 18 Fordert auf, die entsprechende Funktionstaste zu drücken, um weitere Menüoptionen anzuzeigen. 19 Zeigt an, wenn sich weitere Zeichen vor dem angezeigten Text befinden. 20 Displayziffern 19 Telefonieren Grundfunktionen Mobilteil ein- und ausschalten Wenn das Mobilteil nicht in der Basisstation steht, können Sie es ausschalten. Um das Mobilteil auszuschalten, halten Sie die Hörertaste für einige Sekunden gedrückt. Die Displayanzeige erlischt und das Mobilteil ist nun abgeschaltet. Um das Mobilteil wieder einzuschalten drücken Sie die Hörertaste kurz. Nach kurzer Zeit ist die Standardanzeige wieder im Display zu sehen. Sie können das Mobilteil auch einschalten, indem Sie es zurück in die Basisstation stellen. Anruf entgegennehmen Wenn ein Anruf eingeht, hören Sie den Rufton. Im Display wird das Hörersymbol angezeigt und die Rufnummer des Anrufers oder die KennNummer eines anderen angeschlossenen Mobilteils. HINWEIS Diese Rufnummernanzeige kann nach Netzanbieter und Art des Telefonanschlusses abweichen oder nicht verfügbar sein. 20 Um einen Anruf entgegen zu nehmen, wenn das Mobilteil in der Ladeschale steht, gehen Sie wie folgt vor: Heben Sie das Mobilteil aus der Ladeschale oder drücken Sie die Freisprech-Taste, um das Telefon in den FreisprechModus zu schalten. Um den Anruf entgegen zu nehmen, wenn das Mobilteil nicht in der Ladeschale steht, drücken Sie die Gesprächstaste. HINWEIS Sie können das Mobilteil so einstellen, dass Sie zum Entgegennehmen eines Anrufs immer die Gesprächstaste drücken müssen (siehe Seite 37). Hörerlautstärke ändern Drücken Sie während eines Gesprächs die Pfeiltaste oder . Im Display erscheint die Anzeige LAUTSTAERKE mit fünf Stufen. Wählen Sie mit den Pfeiltasten oder eine der fünf Stufen. Nach beenden des Gesprächs wird die eingestellte Stufe übernommen. Gespräch beenden Um einen Anruf zu beenden, drücken Sie die Hörer-Taste oder stellen das Mobilteil in die Ladeschale. Nachdem Sie aufgelegt haben, wird die Dauer des letzten Gesprächs angezeigt. Nach kurzer Zeit wechselt das Display zur Normalanzeige. 21 ES EN DE Internen Anruf tätigen Sie können von Ihrem Mobilteil alle anderen Mobilteile derselben Basisstation anrufen, ohne Gebühren zu bezahlen. . Drücken Sie die rechte Steuertaste für Im Display werden alle anderen Mobilteile, die an der Basisstation registriert sind, mit der entsprechenden Nummer angezeigt. Geben Sie mit den Zifferntasten die Nummer des Mobilteils ein, welches Sie anrufen wollen. Das gewünschte Mobilteil wird jetzt gerufen. Um alle an der Basisstation angemeldeten Mobilteile anzurufen, geben Sie mit den Zifferntasten die letzte Nummer im Display ein. Alle Mobilteile werden jetzt gerufen. Mit dem Mobilteil, welches zuerst den Anruf annimmt, wird ein internes Gespräch hergestellt. Um das Gespräch zu beenden, drücken Sie die Hörertaste. Externen Anruf tätigen Nehmen Sie das Mobilteil aus der Ladeschale. Geben Sie jetzt die gewünschte Rufnummer mit den Zifferntasten ein. Drücken Sie die Gesprächstaste oder die Freisprech-Taste. Die Nummer wird gewählt. Weitere Funktionen Aus dem Telefonbuch wählen Zur Einrichtung des Telefonbuchs siehe Seite 30. . Öffnen Sie das Telefonbuch mit der Taste Wählen Sie den gewünschten Teilnehmer mit den Pfeiltasten oder aus oder geben Sie mit den Zifferntasten einen Buchstaben ein, um einen Teilnehmernamen zu suchen (Zur Zeicheneingabe über die Zifferntasten lesen Sie bitte weiter unter "Verfügbare Zeichen" auf Seite 31). 22 Bestätigen Sie mit der Gesprächstaste oder der Freisprechtaste. Die Nummer des Teilnehmers wird gewählt. ES Freisprechmodus (Frei sprechen) Im Freisprechmodus können Sie telefonieren, ohne das Mobilteil in der Hand halten zu müssen. Drücken Sie während des Gesprächs die Freisprechtaste. Im Display . erscheint das Freisprechsymbol Sie können jetzt über den Lautsprecher am Mobilteil telefonieren. Um die Lautstärke anzupassen, drücken Sie im Freisprechmodus die oder . Im Display erscheint die Anzeige LAUTSTAERKE mit Pfeiltaste fünf Stufen. Wählen Sie mit den Pfeiltasten oder eine der fünf Stufen. Die jeweils eingestellte Stufe ist markiert und wird übernommen. Um wieder in den normalen Telefonmodus zu wechseln, drücken Sie erneut die Freisprechtaste. Das Freisprechsymbol erlischt und der Lautsprecher wird ausgeschaltet. Rückfragetaste Die R-Taste hat eine Funktion, wenn Ihr Telefon an eine Telefonanlage angeschlossen ist oder wenn Sie besondere Leistungsmerkmale in Ihrem Telefonnetz nutzen möchten. Typische Anwendungen für die R-Taste sind z. B. Anklopfen, Rückfragen, Makeln, Dreierkonferenz mit mindestens zwei externen Teilnehmern. Die R-Taste unterbricht die Leitungsverbindung für einige Millisekunden. Die Länge der Unterbrechung wird mit der Funktion Flash-Zeit eingestellt. Durch diese Unterbrechung wird der Vermittlungsstelle signalisiert, dass es sich bei den folgenden Tönen im Mehrfrequenzwahl-Verfahren um Kommandos an die Vermittlungsstelle handelt. Bitte beachten Sie jedoch, dass diese Funktionen von Ihrem Telefonanbieter (nicht vom Telefon) realisiert werden. Erkundigen Sie sich bei Ihrem Netzbetreiber, welche Funktionen Sie mit der R-Taste ausführen können. Fragen Sie auch nach den genauen Tastenkombinationen für die verschiedenen R-Tasten-Funktionen (z. 23 EN DE B.: "Anklopfenden annehmen", "Anklopfenden abweisen", "Zwischen zwei Verbindungen hin- und herschalten" etc). Tastensperre Um ein versehentliches Wählen zu verhindern, wenn Sie das Mobilteil bei sich tragen, können Sie die Tastensperre einschalten. Dies ist nicht während eines Gesprächs möglich. Halten Sie die Stern-Taste * gedrückt, bis das Schlosssymbol im Display angezeigt wird. Um die Tastensperre wieder auszuschalten, halten Sie wiederum die Stern-Taste * gedrückt, bis das Schlosssymbol im Display erlischt. Sie können auch weiterhin Anrufe entgegennehmen. Rufton ausschalten Um den Rufton auszuschalten, drücken und halten Sie die Raute-Taste # im Display angezeigt wird. bis das Notensymbol Um den Rufton wieder einzuschalten, drücken und halten Sie die Rauteim Display erlischt. Taste # bis das Notensymbol Telefon stummschalten Um das Telefon stumm zu schalten, drücken Sie während eines Gesprächs die rechte Funktionstaste (C). Im Display wird STUMM angezeigt. Der Gesprächspartner kann Sie jetzt nicht mehr hören. Um die Stummschaltung zu beenden, drücken Sie wieder die rechte Funktionstaste C. Rufnummernanzeige Sie können im Display die Rufnummer eines Anrufers sehen, wenn Sie selbst bei der Telekom die CLIP-Funktion beauftragt haben und der Anrufer ebenfalls über einen Telefonanschluss mit CLIP-Funktion verfügt und er seine Rufnummer nicht unterdrückt. 24 Abhängig von Ihrem Netzbetreiber können Sie ebenfalls Ihre Telefonnummer unterdrücken. Falls Sie dies wünschen, erkundigen Sie sich bitte bei Ihrem Netzbetreiber, wie Sie dazu verfahren müssen. Anrufliste ES EN DE Externe Anrufe werden nur dann in die Anrufliste gespeichert, – wenn der Anrufbeantworter nicht aufnimmt; – wenn das Telefon des Anrufers über das Leistungsmerkmal CLIP verfügt (die Nummer des Anrufers im Display zu sehen ist). Bei Anruf erscheint die Nummer des Anrufers im Display. Ist dieser Nummer ein Name und Rufton im Telefonbuch des Telefons zugeordnet, so erscheint der entsprechende Name im Display und der zugeordnete Rufton ertönt. Wird keine Rufnummer übermittelt, erscheint ANONYM-ANRUF im Display. Im Display erscheint das Symbol für entgangene Anrufe, wenn neue Einträge in der Anrufliste gespeichert sind. Wenn z. B. 3 neue entgangene Anrufe vorliegen, erscheint im Display 3 NEUE ANR.. Es können bis zu 10 Einträge in die Anrufliste aufgenommen werden. . Drücken Sie im Ruhezustand die Pfeiltaste Wenn keine Anrufe gespeichert sind, wird im Display LEER angezeigt. Wenn neue Anrufe eingegangen sind, erhalten Sie über die linke Funktionstaste folgende Möglichkeiten: NR. SPEICHERN: Sie können die Rufnummer unter einem Namen im Telefonbuch speichern. LOESCHEN: löscht den ausgewählten Eintrag aus der Anrufliste. ALLE LOESCHEN: löscht alle Rufnummern der Anrufliste. DETAILS: Rufnummeranzeige, Zeitangabe und Datum werden angezeigt. Wählen Sie die gewünschte Option und drücken Sie die rechte Steuertaste (OK). 25 Wahlwiederholung In der Wahlwiederholungs-Liste sind die letzten 5 Rufnummern (mit maximal 24 Stellen) gespeichert, die Sie gewählt haben. . Drücken Sie die Pfeiltaste Im Display wird die letzte gewählte Rufnummer angezeigt. Wenn keine Rufnummern gespeichert sind, wird im Display LEER angezeigt. oder . Wählen Sie die gewünschte Rufnummer mit den Pfeiltasten Um diese Rufnummer zu wählen, drücken Sie die Gesprächstaste oder die Freisprech-Taste. Wenn Sie mit der linken Steuertaste bestätigen, haben Sie noch weitere Möglichkeiten: NR. SPEICHERN: Sie können die Rufnummer unter einem Namen im Telefonbuch speichern. LOESCHEN: löscht den ausgewählten Eintrag aus der Wahlwiederholungs-Liste. ALLE LOESCHEN: löscht alle Rufnummern der WahlwiederholungsListe. Wählen Sie die gewünschte Option und drücken Sie die linke Steuertaste (OK). Mit mehreren Gesprächspartnern telefonieren HINWEIS Die folgenden Funktionen sind nur verfügbar, wenn mindestens ein zusätzliches, GAP-fähiges Mobilteil an der Basisstation angemeldet ist. Anrufe weiter vermitteln Sie können ein Gespräch entgegennehmen und danach an ein zusätzliches, GAP-fähiges Mobilteil derselben Basisstation weiter vermitteln. Drücken Sie während des Gesprächs die linke Steuertaste und wählen mit oder den Eintrag INTERN aus. Bestätigen Sie den Pfeiltasten anschließend mit der rechten Funktionstaste (OK). Im Display werden die Nummern der an Ihrer Basisstation angemeldeten 26 Mobilteile angezeigt. Im Display werden alle anderen Mobilteile, die an der Basisstation registriert sind, mit der entsprechenden Nummer angezeigt. Geben Sie mit den Zifferntasten die Nummer des Mobilteils ein, welches Sie anrufen wollen. Das gewünschte Mobilteil wird jetzt gerufen. Wenn die Person am anderen Mobilteil das Gespräch entgegen nimmt, können Sie mit dieser ein internes Gespräch führen. Um das Gespräch zu vermitteln, drücken Sie die Hörer-Taste oder stellen Ihr Mobilteil in die Ladeschale. Der Anrufer ist jetzt mit der Person am anderen Mobilteil verbunden. Telefonkonferenz führen Wenn ein zweites Mobilteil das Gespräch wie oben beschrieben entgegennimmt, können Sie eine Telefonkonferenz führen. Eine Telefonkonferenz ist zwischen einem externen und zwei internen Teilnehmern möglich. Vermitteln Sie den externen Anruf an ein anderes Mobilteil weiter und warten Sie, bis der Teilnehmer am anderen Mobilteil das Gespräch entgegennimmt. Drücken Sie die Stern-Taste. Im Display erscheint KONFERENZ. Jetzt sind alle Teilnehmer in das Gespräch einbezogen. Jeder einzelne Teilnehmer kann sich von der Telefonkonferenz trennen, indem er die Hörertaste drückt (auflegt). Die anderen Gesprächsteilnehmer können dann die Telefonkonferenz weiter führen. Derjenige Teilnehmer, der die Konferenz begonnen hat, kann die Konferenz beenden, indem er die Hörertaste drückt (auflegt). Die Verbindungen zu allen Partnern werden dann beendet. Mobilteil rufen Wenn Sie das Mobilteil von der Basisstation rufen oder es suchen wollen, drücken Sie die Ruftaste an der Basisstation. An den Mobilteilen wird ein Rufsignal ausgelöst und es erscheint die Anzeige PAGING. Stoppen Sie das Rufsignal mit der Hörertaste. 27 ES EN DE Telefon über Menü einstellen Sie können im Menü verschiedene Funktionen des Telefons aufrufen sowie Einstellungen vornehmen. Im Normalzustand öffnet die linke Funktionstaste das Hauptmenü mit den folgenden Einträgen: Im Menü navigieren Menüpunkt anwählen Benutzen Sie die Pfeiltasten oder , um einen Menüpunkt anzuwählen. Öffnen Sie den Menüpunkt mit der linken Funktionstaste (OK). Die meisten Menüpunkte enthalten weitere Untermenüs in Listenform. oder , um einen Menüpunkt in einer Benutzen Sie die Pfeiltasten Liste anzuwählen. Mit der rechten Funktionstaste kommen Sie jeweils einen Schritt oder eine Ebene zurück. Funktionstasten Links und rechts in der untersten Displayzeile erscheinen wechselnde Befehle, die vom aktuellen Menü oder der aktuellen Bearbeitung abhängig sind. Mit den Funktionstasten aktivieren Sie den jeweils sichtbaren Befehl. ln den Telefonmodus wechseln Um direkt in den normalen Telefonmodus zurück zu gelangen, drücken Sie die Hörertaste. 28 Menü Anrufliste ES Wählen Sie den Eintrag ANRUFLISTE und drücken Sie die linke Steuertaste (OK). Wenn keine Anrufe gespeichert ist erscheint im Display LEER. Wenn neue Anrufe eingegangen sind, wählen Sie mit den Pfeiltasten oder einen Anruf in der Liste aus. Drücken Sie die linke Funktionstaste (OK), um die folgenden Optionen zu einem Eintrag auszuwählen: Nr. speichern Sie können die ausgewählte Rufnummer unter einem Namen im Telefonbuch speichern. Zum Speichern lesen Sie weiter unter "Menü Telefonbuch", "Eintrag neu" auf Seite 30. Löschen Löscht den ausgewählten Eintrag aus der Anrufliste. Alle löschen Löscht alle Rufnummern der Anrufliste. Bestätigen Sie die anschließende Abfrage BESTAETIG. mit der linken Funktionstaste (OK), um alle Nummern aus der Anrufliste zu löschen. Details Rufnummeranzeige, Zeitangabe und Datum zu einem Eintrag anzeigen. Wenn eine Telefonnummer mehr als 12 Zeichen lang ist, können Sie mit der rechten und linken Funktionstaste die verbleibenden Ziffern anzeigen. 29 EN DE Menü Telefonbuch Wählen Sie den Eintrag TELEFONBUCH und drücken Sie die linke Steuertaste (OK). Wenn keine Einträge gespeichert sind, wird im Display LEER angezeigt. oder einen Eintrag in der Liste aus. Wählen Sie mit den Pfeiltasten Drücken Sie die linke Funktionstaste (OK), um die folgenden Optionen auszuwählen: Eintrag neu Hier können Sie eine neue Nummer im Telefonbuch speichern: Bestätigen Sie den Eintrag mit der linken Funktionstaste. Es erscheint der Eintrag NAME. Geben Sie mit den Zifferntasten den Namen des Teilnehmers ein, dessen Nummer Sie speichern wollen. Der Name darf bis zu 12 Zeichen lang sein. Drücken Sie dazu ggf. mehrmals eine Zifferntaste, bis das benötigte Zeichen im Display erscheint (siehe Tabelle "Verfügbare Zeichen" auf Seite 31). Mit der rechten Funktionstaste (C) löschen Sie das letzte Zeichen. Drücken Sie die linke Funktionstaste (OK), um die Namenseingabe zu speichern Es erscheint der Eintrag NUMMER. Geben Sie mit den Zifferntasten Telefonnummer des Teilnehmers ein. Die Nummer darf bis zu 20 Ziffern lang sein. Drücken Sie die linke Funktionstaste (OK), um die Nummer zu speichern. Es erscheint der Eintrag MELODIE1. oder eine von 10 möglichen Wählen Sie mit den Pfeiltasten Melodien aus, die dem Teilnehmer zugeordnet werden soll. Drücken Sie die linke Funktionstaste (OK), um die Nummer zu speichern. Es ertönt ein kurzer Hinweiston. Danach ist der neue Eintrag gespeichert und wird im Display angezeigt. 30 Verfügbare Zeichen ES Die folgende Tabelle zeigt die verfügbaren Zeichen, die Sie für Telefonbucheinträge verwenden können: EN Taste Zeichen 1 [Leerzeichen] - 1 2 ABC2 3 DEF3 4 GHI4 5 JKL5 6 MNO6 7 PQRS7 8 TUV8 9 WXYZ9 0 0 DE * # Ansehen Name, Nummer und Melodie zu einem Eintrag anzeigen. Ändern Name, Nummer oder Melodie des aktuell ausgewählten Eintrags ändern. Zum Ändern des Eintrags gehen Sie bitte vor wie unter "Eintrag neu" auf Seite 30 beschrieben. 31 Löschen Löscht den ausgewählten Eintrag aus dem Telefonbuch. Alle löschen Löscht alle Rufnummern aus dem Telefonbuch. Bestätigen Sie die anschließende Abfrage BESTAETIG. mit der linken Funktionstaste (OK), um alle Rufnummern zu löschen. TB-Status Zeigt die belegten/verfügbaren Speicherplätze im Telefonbuch an. Menü Basis-Einstellungen Tonruf Wählen Sie eine Melodie für den Rufton der Basisstation aus und bestätigen Sie Ihre Auswahl mit der linken Funktionstaste (OK). Tonruflautst Wählen Sie einen Lautstärkewert (1-5) für den Rufton der Basisstation aus und bestätigen Sie die Einstellung mit der linken Funktionstaste (OK). 32 MT abmelden ES Geben Sie zunächst mit den Zifferntasten den gültigen Telefon-PIN (bei Auslieferung 0000) ein und bestätigen Sie mit der linken Funktionstaste (OK). Wählen Sie dann ein Mobilteil aus, dass Sie von der Basisstation abmelden wollen. HINWEIS Das aktuell verwendete Mobilteil kann nicht von der Basisstation abgemeldet werden. Bestätigen Sie Ihre Auswahl mit der linken Funktionstaste (OK). Das Mobilteil ist nun abgemeldet und muss für eine erneute Verwendung an der Basisstation wieder angemeldet werden. Wahlverfahr. Hier können Sie Ihr Telefon an das Wahlverfahren Ihres Netzbetreibers anpassen. Sie können zwischen Tonwahl und Impulswahl auswählen. Die Werkseinstellung ist TONWAHL. Dies ist das heutzutage gebräuchliche Wahlverfahren. Die Impulswahl kann bei einigen älteren Telefonanlagen notwendig sein. Erkundigen Sie sich bei Ihrem Netzbetreiber, welches Wahlverfahren an Ihrem Anschluss erforderlich ist. Wählen Sie TONWAHL oder IMPULSWAHL als Wahlverfahren aus und bestätigen Sie Ihre Auswahl mit der linken Funktionstaste (OK). 33 EN DE Flash-Zeit Hier können Sie Ihr Telefon an die Vorgaben Ihres Netzbetreibers oder Ihrer Nebenstellenanlage anpassen. Wählen Sie eine der folgenden Einstellungen für die Flash-Zeit: 100 ms LANG MITTEL 250 ms KURZ 600 ms HINWEIS Fragen Sie Ihren Netzbetreiber oder lesen Sie in der Bedienungsanleitung Ihrer Telefonanlage, welche Einstellung an Ihrem Anschluss erforderlich ist. Pin ändern Hier können Sie eine neue PIN für Basisstation und Mobilteile vergeben. Geben Sie die gültige System-PIN (bei Auslieferung 0000) ein und bestätigen Sie mit der linken Funktionstaste (OK). Geben Sie nun eine neue, vierstellige PIN ein und bestätigen Sie mit der linken Funktionstaste (OK). Geben Sie die PIN zur Bestätigung noch einmal ein und bestätigen Sie mit der linken Funktionstaste (OK). Die PIN für die Basisstation ist nun geändert. 34 MT Einstellungen ES EN Wecker DE HINWEIS Für die richtige Verwendung des Weckers muss zuvor die Uhrzeit eingestellt werden wie unter "Datum & Zeit" auf Seite 37 beschrieben. Wählen Sie den Eintrag AUS, um den Wecker auszuschalten. Wählen Sie den Eintrag EIN, um den Wecker einzuschalten und bestätigen Sie Ihre Auswahl mit der linken Funktionstaste (OK). Die Weckzeit wird angezeigt. Geben Sie mit den Zifferntasten die gewünschte Weckzeit im Format HH:MM ein und bestätigen Sie Ihre Auswahl mit der linken Funktionstaste (OK). Die Anzeige SNOOZE (Schlummerfunktion) erscheint. Bestätigen Sie mit der linken Funktionstaste (OK). Wählen Sie den Eintrag EIN, um die Schlummerzeit zu aktivieren und bestätigen Sie Ihre Auswahl mit der linken Funktionstaste (OK). Nach Ausschalten des Wecksignals schaltet sich der Wecker nun nach 7 Minuten wieder ein. Wenn Sie keine Schlummerzeit wünschen, stellen Sie diesen Eintrag auf AUS. Bei eingeschaltetem Wecker erscheint das Symbol im Display. Rufton Intern Wählen Sie einen Rufton für interne Anrufe aus und bestätigen Sie Ihre Auswahl mit der linken Funktionstaste (OK). 35 Extern Wählen Sie einen Rufton für externe Anrufe aus und bestätigen Sie Ihre Auswahl mit der linken Funktionstaste (OK). Ruflautst. Wählen Sie einen Lautstärkewert (1-5) für den Rufton des Mobilteils aus und bestätigen Sie die Einstellung mit der linken Funktionstaste (OK). Töne Tastenton Wählen Sie AUS oder EIN, um die Tastentöne aus- oder einzuschalten und bestätigen Sie die Einstellung mit der linken Funktionstaste (OK). Akku leer Wählen Sie AUS oder EIN, um das Signal für niedrige Akkuleistung ausoder einzuschalten und bestätigen Sie die Einstellung mit der linken Funktionstaste (OK). Reichweite Wählen Sie AUS oder EIN, um das Signal für das Erreichen der maximalen Reichweite aus- oder einzuschalten und bestätigen Sie die Einstellung mit der linken Funktionstaste (OK). Sprache Wählen Sie DEUTSCH, ENGLISH oder ESPAÑOL als Menüsprache aus und bestätigen Sie die Einstellung mit der linken Funktionstaste (OK). MT-Name Hier können Sie mit den Zifferntasten einen Namen für das Mobilteil eingeben, der im Normalzustand im Display angezeigt werden soll. 36 Bestätigen Sie die Einstellung mit der linken Funktionstaste (OK). ES MT-Display EN Wählen Sie aus, ob der Mobilteilname (MT-NAME) oder die Uhrzeit (ZEIT) im Normalzustand im Display angezeigt werden soll. Bestätigen Sie die Einstellung mit der linken Funktionstaste (OK). DE Auto-Antwort Wählen Sie die Einstellung EIN, damit ein eingehender Anruf entgegengenommen wird, wenn Sie das Mobilteil aus der Basisstation/Ladeschale nehmen. Wählen Sie die Einstellung AUS, damit nach Entnehmen des Mobilteils aus der Basisstation/Ladeschale zunächst die Gesprächstaste gedrückt werden muss, um einen Anruf entgegen zu nehmen. Bestätigen Sie die Einstellung mit der linken Funktionstaste (OK). Datum & Zeit Datumsformat Wählen Sie ein Format für die Datumsanzeige (TT:MM:JJ oder MM:TT:JJ) und bestätigen Sie die Einstellung mit der linken Funktionstaste (OK). Zeitformat Wählen Sie ein Format für die Uhrzeitanzeige (24 STUNDEN oder 12 STUNDEN) und bestätigen Sie die Einstellung mit der linken Funktionstaste (OK). Zeit einst. Geben Sie mit den Zifferntasten die genaue Uhrzeit im Format HH:MM ein und bestätigen Sie die Einstellung mit der linken Funktionstaste (OK). 37 Datum einst. Geben Sie mit den Zifferntasten das richtige Datum im Format HH:MM ein und bestätigen Sie die Einstellung mit der linken Funktionstaste (OK). Basis wählen Um den Empfangsbereich des Mobilteils zu erhöhen, können Sie es an bis zu vier Basisstationen registrieren. So bauen Sie eine "Wabenstruktur" mit Basisstationen in Ihrem Empfangsbereich auf. Wenn mehrere Basisstationen vorhanden sind, wählen Sie hier die gewünschte Basis und bestätigen Sie Ihre Auswahl mit der linken Funktionstaste (OK). Im Display erscheint kurz die Anzeige SUCHE BASIS und danach BASIS GEF., wenn die ausgewählte Basisstation gefunden wurde. Anmelden Das Mobilteil ist im Auslieferungszustand bereits an der Basisstation angemeldet. Sollte dies nicht der Fall sein, melden Sie das Mobilteil hier an: Drücken Sie für etwa 5 Sekunden lang die Taste PAGE an der Basisstation, bis ein Signalton zu hören ist. Wählen Sie das Menü Anmelden aus und bestätigen Sie mit der linken Funktionstaste (OK). Geben Sie den gültigen Telefon-PIN (bei Auslieferung 0000) ein und bestätigen Sie mit der linken Funktionstaste (OK). Im Display erscheint kurz die Anzeige SUCHE BASIS und danach ist ein kurzer Signalton zu hören, wenn die ausgewählte Basisstation gefunden wurde. Rücksetzen Um bei erheblichen Störungen das Telefon wieder auf die Werkseinstellung zurückzusetzen, gehen Sie folgendermaßen vor: Geben Sie den gültigen Telefon-PIN (bei Auslieferung 0000) ein und bestätigen Sie mit der linken Funktionstaste (OK). Bestätigen Sie die anschließende Abfrage BESTAETIG. mit der linken Funktionstaste (OK). 38 HINWEIS Beim Zurücksetzen auf die Werkseinstellung bleiben Anruflisten und Telefonbucheinträge erhalten! Anrufbeantworter (Menü) ES EN DE Mit dem Anrufbeantworter können Sie in Ihrer Abwesenheit eingehende Anrufe aufzeichnen oder dem Anrufer eine Nachricht übermitteln. Der Anrufbeantworter fügt jeder Nachricht automatisch das Datum und die Uhrzeit hinzu. Daher müssen Sie Datum und Uhrzeit einstellen, um den Anrufbeantworter richtig nutzen zu können. Wenn Sie Datum und Uhrzeit nicht eingestellt haben, erscheint im Display der Basisstation "00". Die Angaben von Datum und Uhrzeit bei den Nachrichten sind in diesem Fall falsch. Stellen sie Datum und Uhrzeit am Mobilteil ein. Nachr. Hören Die neueste Nachricht wird wiedergeben und im Display erscheinen Uhrzeit und Datum der Nachricht. unten im Bei neuen, ungehörten Nachrichten erscheint ein Stern Display. Wenn die neue Nachricht abgehört wurde, erlischt der Stern wieder. oder wählen Sie eine Nachricht aus und Mit den Pfeiltasten bestätigen Sie mit der linken Funktionstaste (OK). Liegen keine Nachrichten vor, erscheint die Anzeige 00--00 00--00 im Display. Drücken Sie die linke Funktionstaste (MENU), um folgende Wiedergabefunktionen anzuzeigen: Wiedergabe starten/unterbrechen ANHOEREN/STOP WEITER nächste Nachricht wiedergeben vorherige Nachricht wiedergeben ZURUECK LOESCHEN Nachricht löschen Sie können die Wiedergabefunktionen auch über die Zifferntasten an einem der Handgeräte oder einem Fremdgeräte steuern: Taste 5 unterbrechen 39 Taste 4 Taste 6 Taste 2 nächste Nachricht wiedergeben vorherige Nachricht wiedergeben Nachricht löschen HINWEIS Wenn das Display Ihres Mobilteiles "Nicht verfuegbar" anzeigt, wird der Anrufbeantworter gerade von einer anderen Person benutzt. Um die Wiedergabe zu beenden, drücken Sie die Hörertaste. Nachrichten von einem anderen Telefonanschluss aus abhören Sie können die Nachrichten auf Ihrem Anrufbeantworter auch von einem anderen Anschluss, wie z. B. einem Mobiltelefon oder einer Telefonzelle, abhören. Gehen Sie dazu wie folgt vor: Wählen Sie die Rufnummer Ihres Anschlusses. Wenn Ihr Anrufbeantworter eingeschaltet wird, drücken Sie die SternTaste am Telefon. Geben Sie jetzt Ihre Fernabfrage-PIN mit den Zifferntasten ein. Wenn Sie den Fernabfrage-PIN dreimal hintereinander falsch eingegeben haben, wird die Verbindung getrennt. Folgende Funktionen stehen Ihnen zur Verfügung: Taste 5 unterbrechen Taste 4 nächste Nachricht wiedergeben Taste 6 vorherige Nachricht wiedergeben Taste 2 Nachricht löschen HINWEIS Um die Fernabfragung über ein Fremdgerät zu nutzen, konsultieren Sie bitte die Bedienungsanleitung des entsprechenden Herstellers. 40 Alle Löschen ES Bestätigen Sie die Abfrage BESTAETIG. mit der linken Funktionstaste (OK), um alle Nachrichten auf dem Anrufbeantworter zu löschen. Im Display erscheint kurz die Anzeige LEER. EN DE Memo Sie können mit Ihrem Mobilteil eine Sprachnotiz aufzeichnen, die dann von anderen Teilnehmern wie eine Nachricht wiedergegeben werden kann. Drücken Sie die linke Funktionstaste (OK), um die Aufnahme zu starten. Im Display erscheint AUFNEHMEN. Drücken Sie die linke Funktionstaste (OK) erneut, um die Aufnahme zu beenden und zu speichern. Drücken Sie die rechte Funktionstaste (C), um die Aufnahme zu beenden ohne sie zu speichern. Die neue Aufnahme ist gespeichert und kann über den Menüeintrag NACHR. HOEREN wiedergegeben werden. AB EIN/AUS Hier können Sie den Anrufbeantworter über das Mobilteil ein- und ausschalten. Bestätigen Sie die Einstellung mit der linken Funktionstaste (OK). AB EINST. Antwortmodus Stellen Sie hier ein, wie sich der Anrufbeantworter einschalten soll: MIT AUFZ.: der Anrufbeantworter beantwortet den Anruf und zeichnet Nachrichten auf; OHNE AUFZ.: der Anrufbeantworter beantwortet den Anruf, ohne eine Nachricht aufzuzeichnen. 41 AB-Sprache Stellen Sie hier die Sprache für die Standardansagen des Anrufbeantworters auf ESPANOL oder ENGLISH ein. Bestätigen Sie die Einstellung mit der linken Funktionstaste (OK). Ansagen Wählen Sie einen der folgenden beiden Einträge, um die verschiedenen Ansagetexte wiederzugeben und zu erstellen. MIT AUFZ. Hier können Sie den Text für Ansagen mit anschließender Aufzeichnung wiedergeben oder einen neuen aufnehmen. ANHOEREN: Den aktuellen Ansagetext wiedergeben AUFZEICHNEN: Einen neuen Ansagetext aufnehmen Drücken Sie die linke Funktionstaste (OK), um die Aufnahme zu starten. Im Display erscheint AUFNEHMEN. Drücken Sie die linke Funktionstaste (OK) erneut, um die Aufnahme zu beenden und zu speichern. Drücken Sie die rechte Funktionstaste (C), um die Aufnahme zu beenden ohne sie zu speichern. Die neue Aufnahme ist gespeichert und kann über den Menüeintrag NACHR. HOEREN wiedergegeben werden. OHNE AUFZ. Hier können Sie den Text für Ansagen ohne anschließende Aufzeichnung wiedergeben oder einen neuen aufnehmen. ANHOEREN: Den aktuellen Ansagetext wiedergeben AUFZEICHNEN: Einen neuen Ansagetext aufnehmen Verfahren Sie zur Aufnahme eines neuen Ansagetextes wie im oberen Abschnitt beschrieben. 42 Antw.Verz. ES Sie können die Anzahl der Rufsignale einstellen, nach denen der Anrufbeantworter eingeschaltet wird. Sie können zwischen 2, 4, 6 und 8 Rufsignalen und dem "SPARMODUS" wählen. Wählen Sie im Menü "EINSTELLUNGEN" den Eintrag "VERZOEGERUNG" an. Wählen Sie die gewünschte Anzahl der Rufsignale oder den SPARMODUS und bestätigen Sie mit "OK". EN DE SPARMODUS Im Sparmodus können Sie beim Abhören des Anrufbeantworters von außen, Verbindungskosten vermeiden. Im Sparmodus schaltet sich der Anrufbeantworter beim ERSTEN-Anrufer nach vier Rufsignalen ein. Bei jedem weiteren Anruf, schaltet sich der Anrufbeantworter schon beim ersten Rufsignal ein. Um Ihre persönlichen Nachrichten von außerhalb abzuhören und einzustellen, lesen Sie auch das Kapitel "Nachrichten von einem anderen Telefonanschluss aus abhören" auf Seite 47. Um zu prüfen, ob neue Nachrichten vorhanden sind, gehen Sie wie folgt vor: Rufen Sie Ihren Anschluss von außerhalb an. Wenn neue Nachrichten aufgezeichnet wurden, schaltet sich der Anrufbeantworter nach dem ersten Rufsignal ein. Wenn Sie das zweite Rufsignal hören, bedeutet das, dass keine neuen Nachrichten für Sie aufgezeichnet wurden. Legen Sie in diesem Fall sofort auf. Der Anrufbeantworter würde nach dem fünften Rufsignal einschalten. Aufnahmezeit Stellen Sie hier die Aufnahmezeit für Nachrichten auf UNBEGRENZT, 60 SEK, 120 SEK und 180 SEK ein. Fernabfrage Sie können die Fernabfrage aktivieren, um aufgezeichnete Gespräche von einem anderen Telefon aus anzuhören. 43 Stellen Sie die Fernabfrage auf EIN oder AUS bestätigen Sie mit der linken Funktionstaste (OK). Kompression Die Datei einer aufgezeichneten Nachricht kann komprimiert werden, damit sie weniger Speicher in Anspruch nimmt. Eine höhere Kompression bewirkt eine kleinere Datei, bei niedrigerer Aufnahmequalität. Stellen Sie die Kompression auf HOCH, MITTEL oder NIEDRIG und bestätigen Sie mit der linken Funktionstaste (OK). Mithören Mit der Funktion "MITHOEREN" können Sie einen Anruf mithören, ohne die Aufzeichnung der Nachricht auf dem Anrufbeantworter zu unterbrechen. Diese Funktion ist z. B. hilfreich, wenn Sie zuerst hören wollen, wer der Anrufer ist. Sie können auch einen Anruf entgegennehmen, wenn der Anrufbeantworter bereits aufzeichnet. Stellen Sie die Funktion auf EIN oder AUS und bestätigen Sie mit der linken Funktionstaste (OK). An der Basisstation mithören Um einen Anruf mitzuhören, drücken Sie die Lautstärketaste + oder –, bis Sie den Anrufer hören können. Am Mobilteil mithören Wenn eine Aufnahme aufgezeichnet wird, erscheint im Display des Mobilteils der Eintrag "MITHOEREN". Um einen Anruf mitzuhören, drücken Sie die linke Funktionstaste (OK). Anruf nach Mithören entgegennehmen Um den Anruf entgegenzunehmen, drücken Sie die Gesprächstaste am Mobilteil. Sie können jetzt mit dem Anrufer sprechen und die Aufzeichnung am Anrufbeantworter wird beendet. 44 PIN ändern ES Die PIN des Anrufbeantworters verhindert die Fernabfrage Ihres Anrufbeantworters durch fremde Personen. Werkseitig ist die PIN auf "0000" eingestellt. Diese PIN ist nicht mit der System-PIN identisch. Geben Sie die aktuelle Fernabfrage-PIN ein und bestätigen Sie mit der linken Funktionstaste (OK). Geben Sie dann die vierstellige neue PIN ein. Nach der Bestätigung werden Sie aufgefordert, die Eingabe zu wiederholen. Bestätigen Sie auch hier mit der linken Funktionstaste (OK). Anrufbeantworter von der Basisstation aus bedienen Aus- und Einschalten Um den Anrufbeantworter ein- oder auszuschalten, drücken Sie den Ein/Ausschalter an der Basisstation. Bei ausgeschaltetem Anrufbeantworter zeigt das Display: "--", ggf. abwechselnd mit der Anzahl neuer Nachrichten. Bei eingeschaltetem Anrufbeantworter zeigt das Display die Anzahl der gespeicherten Nachrichten; im Auslieferungszustand: "00". 45 EN DE Anzeigen an der Basisstation Im Display der Basisstation werden wichtige Informationen zum Status Ihres Anrufbeantworters angezeigt. Anzeige Bedeutung leer Das Basisteil ist nicht richtig an das Stromnetz angeschlossen. –– Der Anrufbeantworter ist ausgeschaltet. 00 Es liegen keine Nachrichten vor XX Blinkt, wenn neue Nachrichten vorliegen. An, wenn keine neuen Nachrichten vorliegen. "XX": Anzahl der neuen/gespeicherten Nachrichten XX/FF Es blinken abwechselnd "XX" und "FF". Es liegen "XX" neue Nachrichten vor und der Speicher ist voll. Es blinkt nur "FF". Der Speicher ist voll und es können keine neuen Nachrichten mehr aufgenommen werden. --/XX Es blinken abwechselnd "XX" und "--". Die Uhrzeit ist nicht eingestellt und es liegen "XX" neue Nachrichten vor. Es blinkt nur "--". Die Uhrzeit ist nicht eingestellt und es liegen keine neuen Nachrichten vor. YY "YY" alte Nachrichten gespeichert. A1/A2 Der Ansagetext wird gerade wiedergegeben. A1: Ansagetext mit anschließender Aufnahme A2: Nur Ansagetext XX/An Es blinken abwechselnd "XX" und "AN". Nachricht "XX" wird gerade aufgenommen. LA Blinkt, wenn der Anrufbeantworter von einem Mobilteil bedient wird. LX Aktueller Lautstärkewert von 1-8 46 Nachrichten abhören ES Der Anrufbeantworter unterscheidet zwischen bereits abgehörten ("alten") Nachrichten und Nachrichten, die noch nicht abgehört wurden ("neue Nachrichten"). Wenn auf dem Anrufbeantworter neue Nachrichten aufgezeichnet sind, erscheint im Display das Symbol für den Anrufbeantworter und "Neue Nachricht". Im Display der Basisstation blinkt die Anzahl der gespeicherten Nachrichten. Wenn Sie Nachrichten abhören, werden immer zuerst die neuen Nachrichten wiedergegeben. Nachrichten an der Basisstation abhören Um Nachrichten abzuhören, drücken Sie die Taste PLAY an der Basisstation. Die aufgezeichneten Nachrichten werden jetzt wiedergegeben. Um die Wiedergabe zu beenden, drücken Sie wiederum die PLAY-Taste. Die Wiedergabe wird beendet. Um eine Nachricht zu überspringen, drücken Sie die Sprungtaste "nächste Nachricht". Um eine Nachricht erneut abzuhören oder die vorherige Nachricht abzuhören, drücken Sie die Taste Sprungtaste "vorherige Nachricht". Um die Lautstärke während der Wiedergabe zu ändern, drücken Sie die Tasten + oder - an der Basisstation. Nachrichten vom Mobilteil abhören Um zu erfahren, wie Sie Nachrichten vom Mobilteil aus abhören können, lesen Sie bitte unter "Nachr. Hören" auf Seite 39. Nachrichten von einem anderen Telefonanschluss aus abhören Sie können die Nachrichten auf Ihrem Anrufbeantworter auch von einem anderen Anschluss, wie z. B. einem Mobiltelefon oder einer Telefonzelle, abhören. 47 EN DE Gehen Sie dazu wie folgt vor: Wählen Sie die Rufnummer Ihres Anschlusses. Wenn Ihr Anrufbeantworter eingeschaltet wird, drücken Sie die SternTaste am Telefon. Geben Sie jetzt Ihre Fernabfrage-PIN mit den Zifferntasten ein. Wenn Sie den Fernabfrage-PIN dreimal hintereinander falsch eingegeben haben, wird die Verbindung getrennt. Folgende Funktionen stehen Ihnen zur Verfügung: Taste 5 unterbrechen Taste 4 nächste Nachricht wiedergeben Taste 6 vorherige Nachricht wiedergeben Taste 2 Nachricht löschen HINWEIS Um die Fernabfragung über ein Fremdgerät zu nutzen, konsultieren Sie bitte die Bedienungsanleitung des entsprechenden Herstellers. HINWEIS Wenn Sie 15 Sekunden lang keine Eingabe machen, wird die Verbindung automatisch unterbrochen. Wenn keine neuen Anrufe eingegangen sind, können Sie die Gebühren für die Abfrage vermeiden, wenn der Anrufbeantworter in den Sparmodus geschaltet ist (siehe Abschnitt "SPARMODUS" auf Seite 43). Um den Anrufbeantworter zu bedienen, benutzen Sie die Zifferntasten des Telefons. HINWEIS Um die Fernabfragung über ein Fremdgerät zu nutzen, konsultieren Sie bitte die Bedienungsanleitung des entsprechenden Herstellers. 48 Taste ES Funktion Während angehaltener Wiedergabe Während der Wiedergabe EN 2 Aktuelle Nachricht löschen DE 4 Aktuelle Nachricht wiederholen; Zweimal drücken, um zur vorherigen Nachricht zu wechseln. 5 Wiedergabe anhalten 6 Nächste Nachricht wiedergeben 7 Anrufbeantworter einschalten 8 Wiedergabe anhalten 9 Anrufbeantworter ausschalten * Fernabfrage PIN eingeben Anrufbeantworter von einem externen Anschluss einschalten Sie können den Anrufbeantworter auch von einem externen Telefonanschluss einschalten. Wählen Sie Ihre Rufnummer. Warten Sie bis zum 10. Rufsignal ab. Geben Sie den vierstelligen Code ein. Der Anrufbeantworter wird eingeschaltet. Liegt eine neue Nachricht vor, wird sie jetzt wiedergegeben. 49 Nachrichten löschen Sie können nur Nachrichten löschen, die Sie bereits abgehört haben. Nachrichten an der Basisstation löschen Um alle Nachrichten zu löschen, gehen Sie wie folgt vor: Beenden Sie die Wiedergabe mit der Stopp-Taste. Halten Sie die Taste "Löschen" an der Basisstation gedrückt, bis ein Signalton zu hören ist. Alle Nachrichten sind jetzt gelöscht. Nachrichten vom Mobilteil aus löschen Um zu erfahren, wie Sie Nachrichten vom Mobilteil aus löschen können, lesen Sie bitte unter "Nachr. Hören" auf Seite 39. 50 Wenn Störungen auftreten ES Bei einer Störung des Geräts prüfen Sie bitte zunächst, ob Sie das Problem mit Hilfe der folgenden Übersicht selbst beheben können. Versuchen Sie auf keinen Fall, die Geräte selbst zu reparieren. Wenn eine Reparatur notwendig ist, wenden Sie sich bitte an unser Service Center oder eine andere geeignete Fachwerkstatt. EN Bei allen Problemen Überprüfen Sie, ob Netz- und Telefonkabel richtig eingesteckt sind (siehe Seite 11 und Seite 16). Überprüfen Sie das Telefon zunächst an einer anderen Telefonsteckdose. Überprüfen Sie mit der Batterieanzeige, ob der Akku geladen ist. Überprüfen Sie, ob das Mobilteil richtig registriert ist (siehe Seite 38). Überprüfen Sie, ob sich das Mobilteil in Reichweite der Basisstation befindet. Keine Anzeige im Display des Mobilteils Überprüfen Sie, ob das Mobilteil eingeschaltet ist (siehe Seite 20). Kein Freizeichen Überprüfen Sie, ob die Basisstation richtig angeschlossen ist (siehe Seite 11 und Seite 16). Überprüfen Sie, ob die Akkus geladen und polrichtig eingelegt sind (siehe Seite 13). Überprüfen Sie, ob das Mobilteil eingeschaltet, geladen, richtig registriert und in Reichweite der Basisstation ist. Im Display des Mobilteils wird "REICHWEITE"!" angezeigt Überprüfen Sie, ob die Basisstation richtig angeschlossen ist (siehe Seite 11 und Seite 16). Überprüfen Sie, ob sich das Mobilteil in Reichweite der Basisstation befindet. Überprüfen Sie, ob das Mobilteil an der gewünschten Basisstation angemeldet ist (siehe 51 DE Seite 20). Überprüfen Sie, ob die Akkus geladen und polrichtig eingelegt sind (siehe Seite 13). Kein Rufton an Mobilteil oder Basisstation Überprüfen Sie, ob die Basisstation richtig angeschlossen ist (siehe Aufstellen, und Basisstation an das Telefonnetz anschließen). Überprüfen Sie, ob die Lautstärke des Ruftons nicht abgeschaltet ist (siehe Seite 24). Überprüfen Sie, ob sich das Mobilteil in Reichweite der Basisstation befindet. Überprüfen Sie, ob die Akkus geladen und polrichtig eingelegt sind (siehe Seite 13). Im Display der Basisstation erscheint "– –" Anrufbeantworter ist ausgeschaltet (siehe 41). Ihr Gesprächspartner kann Sie nicht verstehen Überprüfen Sie, ob das Mikrophon eingeschaltet ist und die Stummschaltung ausgeschaltet ist (siehe Seite 24). Sie können nicht angerufen werden Überprüfen Sie, ob Sie auf die Sprechtaste gedrückt haben, ob das Zeichen "Telefonhörer" im Display angezeigt wird und ob Sie beim Abheben ein Freizeichen hören. Überprüfen Sie, ob ein anderes Telefon an der Telefonsteckdose funktioniert oder ob Ihr Telefon in einer anderen Telefonsteckdose funktioniert (siehe Seite 11 und Seite 16). Es gibt Interferenzen mit anderen Geräten 52 Überprüfen Sie, ob sich die Basisstation direkt neben einem anderen elektrischen Gerät befindet (z. B. anderes Telefon oder Faxgerät, Fernseher oder Mikrowelle). Stellen Sie das Telefon an einem anderen Ort auf. Werkseinstellungen ES EN Werkseinstellungen am Mobilteil Einstellung Optionen Werkseinstellung Ruftöne extern 10 Ruftöne; 5 x normal, 5 x polyphon Melodie 6 Ruftöne intern 10 Ruftöne; 5 x normal, 5 x polyphon Melodie 5 Rufton-Lautstärke 5 Stufen und aus Stufe 5 Hörer-Lautstärke Lautstärke in 5 Stufen Lautstärke Stufe 5 Tastenschutz Ein/Aus Aus Autoantwort Ein/Aus Ein Tastaturtöne Ein/Aus Ein Sprache Spanisch/ Deutsch / Englisch Spanisch DE Werkseinstellungen an der Basisstation Einstellung Optionen Werkseinstellung Ruftöne 5 versch. Ruftöne Melodie 1 Rufton-Lautstärke 5 Stufen und aus Stufe 3 Wahlverfahren Impulswahl/Tonwahl Tonwahl System-PIN – 0000 Priorität Mobilteil Alle/Ein Mobilteil Alle 53 Weitere Werkseinstellungen Einstellung Optionen Werkseinstellung Alarm bei neuen Nachrichten auf Anrufbeantworter Ein/Aus Ein Zahl der Ruftöne, bevor der Anrufbeantworter eingeschaltet wird. 2 / 4 / 6 / 8 Ruftöne oder Sparmodus 6 Reinigung Vor der Reinigung ziehen Sie bitte den Netzadapter aus der Steckdose. Für die Reinigung verwenden Sie ein trockenes, weiches Tuch. Vermeiden Sie den Gebrauch von chemischen Lösungs- und Reinigungsmitteln, weil diese die Oberfläche und/oder Beschriftungen des Geräts beschädigen können. Entsorgung Verpackung Ihr DECT-Telefon befindet sich zum Schutz vor Transportschäden in einer Verpackung. Verpackungen sind Rohmaterialien und können wiederverwertet oder dem Recycling-Kreislauf zugeführt werden. Gerät Werfen Sie das DECT-Telefon am Ende seiner Lebenszeit keinesfalls in den normalen Hausmüll. Erkundigen Sie sich nach Möglichkeiten einer umweltgerechten Entsorgung. Batterien Verbrauchte Batterien gehören nicht in den Hausmüll. Die Batterien müssen bei einer Sammelstelle für Altbatterien abgegeben werden. 54 Technische Daten ES Abmessungen Basisstation ohne Mobilteil ca. 150 x 112 x 45 mm (B x T x H) EN Abmessungen Mobilteil ca. 46 x 26 x 153 mm (B x T x H) DE Akkus für Mobilteile 1,2 V/600 mAh Typ NiMH, Größe AAA Standard DECT/GAP ca. 300 m Reichweite Netzteil Basisstation Eingang: 100-240 V ~ 50/60 Hz 600 mA, 3,6 VA Ausgang: 6 V Modell: TenPao S005CV0600060 Netzteile Ladestationen Eingang: 100-240 V ~ 50/60 Hz 300 mA, 1,8 VA Ausgang: 6 V Modell: TenPao S002CV0600030 Ladezeit ca. 16 Stunden bei vollständiger Entladung Bereitschaftszustand ca. 100 Stunden Gesprächsdauer ca. 10 Stunden Technische Änderungen vorbehalten! Konformitätsinformation Die Geräte entsprechen der europäischen Richtlinie für Funkanlagen und Telekommunikationseinrichtungen (R&TTE 1999/5/EG). Die Konformitätserklärung finden Sie im Internet unter: http//www.medion.com/conformity 55 56 83073 ES EN DE Final Cover.FH11 Fri Dec 10 10:15:27 2010 Seite 1 C M Y CM MY CY CMY K Teléfono DECT con 3 terminales móviles y contestador automático DECT Phone with 3 handsets and answering machine DECT Telefon mit 3 Mobilteilen und Anrufbeantworter IIIa/03/11 MEDION® LIFE® E63032 (MD 83073) Medion Service Center Visonic S.A. c/ Miguel Faraday, 6 Parque Empresarial "La Carpetania", N-IV Km. 13 28906 Getafe, Madrid España Hotline: 902196437 · Fax: 914604772 E-Mail: [email protected] www.medion.es Manual de Instrucciones Instruction Manual Bedienungsanleitung