1
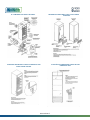
INTRODUCCIÓN INTRODUCTION INSTALACIÓN Place the unit in a dry and properly ventilated area. Do not block the front and back grills. To minimize noise and vibration, adjust the height of the legs, so the unit is level. Locate the unit away from heat sources, flammable products and direct sunlight. Do not locate the unit close to walls, to allow air circulation required by the refrigeration system. Keep distance from wall of 4” at least. For models CA-550, CA-570, CA-700 and CA-1300 only: Those equipments are designed for 75°F / 60% RH ambient. Locate the unit away from air currents, air condition system or fans. For models VV-15BT and VV-16 BTF: Install the 2 back handles to facilitate installation and movement of the unit, by securing the two brackets to the back of the upright freezer. For models VV-9BTF, VV-10BTF, VV-15BT, and VV-16BTF: Adjust the height of the leveling legs, until the front rollers are slightly raised from the floor and the upright freezer is properly level. ELECTRIC CONNECTION Una vez instalado el equipo en el lugar definitivo y, si ha sido trasladado cuidadosamente, espere a los menos una hora antes de conectarlo al suministro eléctrico. Nuestros modelos funcionan con una de las siguientes alimentaciones eléctricas: 115X-60Hz, 220V-50Hz o 220V-60Hz. Verifique que el suministro eléctrico disponible corresponda al voltaje de su equipo Mimet. Los equipos están provistos de 3m de cordón eléctrico de alimentación. Considere esta medida al instalar el equipo y no use extensiones de cable. Para su seguridad personal y protección del equipo, verifique la existencia de conexión a tierra en la red eléctrica. Si tiene dudas solicite la asistencia de un electricista autorizado. ADVERTENCIA: No conecte el equipo a una conexión hembra compartida con otros artefactos eléctricos. La conexión eléctrica debe ser individual para cada equipo. Si el cordón de alimentación es dañado, sustitúyalo y no intente repararlo. Once the equipment is installed in its final location, wait at least one hour prior to plugging the unit to the electric outlet. These units are designed to operate under one of the following electrical power: 115V-60Hz, 220V-50Hz o 220V-60Hz. Check the electrical characteristics for each unit and the outlet voltage rating prior to plugging the unit. All units are supplied with 10 ft. of electric cord. Never use an extension cord. For your safety and protection of the unit, insure that the electrical circuit offers the proper ground circuit. Contact a certified electrician for any electrical changes. WARNING: Do not connect the unit to a female plug or share plugs with other appliances. Each unit must have a dedicated electrical outlet. If the electrical cord is damaged, insure that it is replaced by a plug with identical electrical characteristics. START PUESTA EN MARCHA You have received a durable and quality unit. To maximize the usage of your unit follow, the instructions. If you have any questions contact you supplier for additional information. INSTALLATION Ubique el equipo en un lugar bien ventilado y seco. No bloquee las celosías. Ajuste los patines regulables para que el equipo quede nivelado sobre la superficie. De esta forma reducirá ruidos y vibraciones. No instale el equipo cerca de fuentes de calor, productos inflamables o exposición directa a rayos solares. No ubique el equipo muy cerca de paredes para permitir la normal circulación del aire que requiere el sistema de refrigeración. Conserve una distancia mínima de 10cm entre el respaldo y el muro. Sólo en modelos CA-550, CA-590, CA-700 y CA-1300: Estos equipos están diseñados para ambientes de 25°C / 60%HR. No exponga el equipo a corrientes de aire, ventiladores o inyección de aire acondicionado. Sólo modelos VV-15BT y VV-16BTF: Para facilitar su traslado instale las dos manillas traseras fijándolas al gabinete con los dos tornillos. Sólo modelos VV-9BTF, VV-10BTF, VV-15BT, VV-16BTF y VV-17BTF: Regule la altura de tal manera que los rodillos queden levemente separados del piso y la vitrina nivelada. CONEXIÓN ELÉCTRICA Usted ha adquirido un equipo que es garantía de calidad y duración. Para que obtenga el máximo rendimiento, siga nuestras indicaciones y en caso de duda, solicite instrucciones de uso a su vendedor. Una vez conectado el equipo y antes de cargarlo con productos, es necesario que funcione, a lo menos 1 hora, tanto por primera vez como después de detenciones por limpieza u otro motivo. Ajuste la temperatura del gabinete con el termostato, teniendo presente que "1" corresponde a la temperatura más alta (menos frío); "7" a la temperatura más alta (más frío) y "0" al termostato en OFF (desconectado). Se recomienda la posición “5” (ver fig.1). En modelos VV-2, 3 , 5, 8, 19, 38, 66 y 70, el interruptor de la iluminación se encuentra a un costado del termostato (ver fig.1). En Modelos CA-550 y CA-590, el interruptor de iluminación se encuentra en el respaldo del equipo, para el caso de los modelos CA-700 y CA-1300, este se encuentra por el lado frontal superior izquierdo del equipo y para la serie VV-9, 10, 15, 16 y 17BTF, este se encuentra por el frente del equipo, a un costado del control de temperatura. En Coolers, no cargue el equipo con productos calientes, déjelos enfriar hasta llegar a la temperatura ambiente. www.mimet.cl Once the unit is plugged into the electrical outlet and prior to being loaded with product, it is important to let the unit run for at least one hour. This should also apply when the unit is being cleaned or serviced. Adjust the thermostat considering "1', is the warmest position, "7" is the coldest position and ”O" indicates the off position. Position “5” it’s recommended for coolers and “6” for freezers (see fig. 1). For models VV-2, 3, 5, 8, 19, 38, 66 and 70, the light switch is located next to the thermostat (see fig. 1). In models CA-550 and CA-590, the switch is in the back side of the equipment, for models CA-700 and CA-1300, it’s located by the top front, left side of the unit finally for models VV-9, 10, 15, 16 and 17BTF, it’s located in the front of the unit, next to the digital controller. For Coolers, do not load the cabinet with warm products, wait until the product reaches the ambient temperature. The low temperature equipments are designed to keep pre-frozen products. When the unit is loaded with products, maintain the proper clearance