1
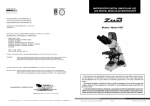
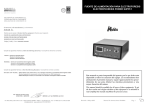
MICRÓTOMOS
MICROTOMES
Modelo / Model 501
Este manual es parte inseparable del aparato por lo que debe estar
disponible a todos los usuarios del equipo. Le recomendamos leer
atentamente el presente manual y seguir rigurosamente los procedimientos de uso para obtener las máximas prestaciones y una
mayor duración del mismo.
This manual should be available for all users of these equipments. To get
the best results and a higher duration of this equipment it is advisable to
read carefully this manual and follow the processes of use.
Revisión 1 Marzo-06
Manual de instrucciones 50501000
Pág. 1
ENGLISH
CASTELLANO
To get the best results and a higher duration of this equipment it is essential to follow
the processes of use.
Note: All the processes of use mentioned below will not have any value unless you keep
a continued and careful maintenance.
Gracias por haber adquirido este equipo. Deseamos sinceramente que disfrute del
micrótomo de mano Nahita 501. Le recomendamos que cuide el equipo conforme a lo
expuesto en este manual.
Nahita desarrolla sus productos según las directrices del marcado CE y haciendo hincapié en la ergonomía y seguridad del usuario. La calidad de los materiales empleados
en la fabricación y el correcto proceder le permitirán disfrutar del equipo por muchos
años.
El uso incorrecto o indebido del equipo puede dar lugar a cortes y heridas. Lea el punto
de Instrucciones de uso y Mantenimiento, donde se recogen aspectos de seguridad.
4. MAINTENANCE AND CLEANING
Please follow the processes of use of this manual.
This manual should be available for all users of this equipment.
Always use original components and supplies. Other devices can be similar but they
can damage the equipment.
Never try to repair the hand microtome by yourself, since you will lose the warranty
and may provoke injuries to the people that usually handle the hand microtome.
In the event of breakdown please contact your distributor to overhaul through Nahita
Technical Assistance Department.
Cleaning
Never use scourers or substances that can grate for cleaning metallic parts such as stainless steel, aluminium, coatings, etc. as they damage the hand microtome and produce an
early ageing of the equipment.
Use a fluff-free cloth dampened with soaped water that does not contain abrasives.
ATTENTION!!
IF EQUIPMENTS ARE NOT PROPERLY CLEAN AND DISINFECTED THEY
WOULD NOT BE ALLOWED TO REPAIR BY OUR TECHNICAL SERVICE.
LEA DETALLADAMENTE ESTE MANUAL DE INSTRUCCIONES ANTES DE
OPERAR CON ESTE EQUIPO CON EL FIN DE OBTENER LAS MÁXIMAS PRESTACIONES Y UNA MAYOR DURACIÓN DEL MISMO.
Tenga especialmente presente lo siguiente:
Este manual es parte inseparable del micrótomo de mano Nahita 501, por lo que debe
estar disponible para todos los usuarios del equipo.
Debe manipularse siempre con cuidado evitando los golpes y caídas de objetos pesados
o punzantes.
Nunca desmonte el equipo para repararlo usted mismo, además de perder la garantía
podría producir un funcionamiento deficiente de todo el equipo, así como daños a las personas que lo manipulan.
Cualquier duda puede ser aclarada por su distribuidor. Usted puede también mandarnos sus dudas o sugerencias a la siguiente dirección de correo del Servicio Técnico ([email protected]).
Este equipo está amparado por la Ley de garantías y bienes de consumo (10/2003).
No se consideran en garantía las revisiones del equipo.
La manipulación del equipo por personal no autorizado provocará la pérdida total de
la garantía.
Los accesorios, así como la pérdida de los mismos, no están cubiertos por dicha garantía. Tampoco estarán cubiertos por el periodo de garantía las piezas en su desgaste por uso
natural.
Asegúrese de guardar la factura de compra para tener derecho de reclamación o prestación de la garantía. En caso de enviar el equipo al Servicio Técnico adjuntar factura o
copia de la misma como documento de garantía.
El fabricante se reserva los derechos a posibles modificaciones y mejoras sobre este
manual y equipo.
¡ATENCIÓN!
NO SE ADMITIRA NINGUN APARATO PARA REPARAR QUE NO
ESTE DEBIDAMENTE LIMPIO Y DESINFECTADO.
INDICE DE IDIOMAS
Castellano
Inglés
Page 10
Instruction manual 50501000
Version 1 March-06
Revisión 1 Marzo-06
3-6
7-10
Manual de instrucciones 50501000
Pág. 3
CASTELLANO
ENGLISH
Please check that all the accessories are enclosed with the equipment:
INDICE DE CONTENIDOS
- 2 glass stages
- Razor
1. APLICACIONES DEL INSTRUMENTO
2. DESCRIPCIÓN
3. INSTRUCCIONES DE USO
4. MANTENIMIENTO Y LIMPIEZA
4
4
5
6
- Warranty certificate
- User manual
We will not accept any equipment in return period unless it comes in its original wrapping.
Instructions of use
Fit the glass stage on the microtome wide flat platform. If the glass stage does not fit,
1. APLICACIONES DEL INSTRUMENTO
El micrótomo de mano constituye la forma más simple de micrótomo en la que la muestra se coloca en un hueco central, se eleva haciendo girar un tornillo y se corta manualmente con una cuchilla. Está diseñado para realizar cortes de material fresco o incluido en
parafina hasta un grosor mínimo de 10 m y resulta un instrumento ideal para la realización de prácticas de introducción a la biología e histología en la enseñanza secundaria,
como por ejemplo el estudio de la estructura de tallo, hojas y raíces.
2. DESCRIPCIÓN
1
2
1.1. Hueco central
1.2. Plataforma plana
1.3. Tornillo lateral
1.4. Mando micrométrico inferior
3
turn it until it does. If the glass stage is loose on the platform, you can hold it with silicone to avoid it moving.
Open the microtome as wide as it can go by rotating the screw on the side. You can see
the clamp open or close by looking inside the cylindric central hole.
Put the sample you want to cut into the hole and tighten it securely with the clamp by
rotating the screw.
Note: The microtome can hold specimens up to 1 cm of diameter and sometimes, a
carrot or other material can be used to support the specimen if it is necesary.
Take the razor and slice off any excess of specimen by cutting against the flat platform
until the sample is flush with the glass stage. Attention!: For your own safety always move
the razor blade away from you.
Turn the knurled micrometric knob at the bottom of the microtome so the sample rises
to just above the top of the microtome. The knob is graduated in 10 m (0.01mm) steps and
advances 500 m (0.50mm) for each complete turn. The thinest section which can be obtained with the hand microtome is 10 m-thin.
Take the razor blade and cut again, just like before, to obtain a thin section of the specimen.
Apply a drop of water to the center of a clean microscope slide and put the thin slice on
top of the water. Cover the section with a cover glass and it is ready to see under the
microscope.
Note: Most of the times the cut should be stained to observe the different structures
under the microscope.
4
El micrótomo de mano Nahita se acompaña de 2 platinas de vidrio, una navaja y 10
cuchillas. Todos estos componentes se suministran en una caja de madera para su correcta conservación.
Pág. 4
Manual de instrucciones 50501000
Revisión 1 Marzo-06
Version 1 March-06
Instruction manual 50501000
Page 9
ENGLISH
INDEX OF CONTENTS
3. INSTRUCCIONES DE USO
1. USES OF THE INSTRUMENT
2. DESCRIPTION
3. INSTRUCTIONS OF USE
4. MAINTENANCE AND CLEANING
8
8
8
10
1. USES OF THE INSTRUMENT
This is the simplest form of microtome in which the specimen is placed in the central
well, raised by a screw and cut with a hand-held knife. This hand microtome is suitable
for slicing thin sections of paraffin embedded or fresh tissues down to 10 m thin. It is ideal
for introductory biology and for histology work and is also very useful in high school
practices to show for example stem, leaf or root structure.
2. DESCRIPTION
Inspección preliminar
Desembale el micrótomo de mano, retire todas las protecciones y asegúrese de que no
presenta ningún daño debido al transporte. De ser así, comuníquelo inmediatamente a su
transportista o suministrador para que pueda hacer las debidas reclamaciones en el plazo
establecido.
Guarde el embalaje, ya que siempre se deben realizar las devoluciones en su embalaje
original con todos los accesorios suministrados.
Compruebe los accesorios que usted debe recibir junto al equipo:
- Certificado de garantía
- 2 platinas de vidrio
- Manual de instrucciones
- Navaja
No aceptaremos ningún equipo en periodo de devolución sin que vaya en su embalaje
original.
Instrucciones de uso
1
2
1.1. Central hole
1.2. Flat platform
1.3. Lateral screw
1.4. Micrometric knob
3
4
Nahita hand microtome is also supplied with 2 glass stages, a razor and 10 cutting blades. All these components are supplied in a wooden box for storage.
3. INSTRUCTIONS OF USE
Preliminary inspection
Unwrap the hand microtome, take off all the protective items and make sure that it does
not present any damage because of the shipment. In case the hand microtome presents
any damage tell it immediately to your transport agent or dealer so that they can make
the claims in the correct time limit.
Please keep the original wrapping; you will always need it for returns enclosed with all
the accessories supplied.
Page 8
CASTELLANO
Instruction manual 50501000
Version 1 March-06
Coloque una platina de vidrio sobre la plataforma ancha y plana del micrótomo. Si la
platina no encaja, gírela poco a poco hasta que lo haga. En caso de que la platina una vez
colocada quede demasiado floja, puede sujetarla con un poco de silicona para evitar que
se mueva.
Girando el tornillo lateral, abra al máximo la pinza de sujeción del micrótomo. Mirando
en el interior del hueco central podrá ver el movimiento de la pinza debido al giro del tornillo.
Coloque la muestra que desea cortar dentro del hueco central y girando el tornillo lateral sujétela firmemente con la pinza. Nota: El micrótomo puede alojar muestras de hasta
un máximo de 1 cm de diámetro y si es necesario, puede utilizarse una zanahoria u otro
material para sujetar mejor la muestra.
Coja la navaja, apóyela de plano sobre la platina de vidrio y suprima el exceso de muestra hasta que quede enrasada con la platina. Atención!: Para su propia seguridad, mueva
siempre la navaja en dirección contraria a usted.
Gire el mando micrométrico inferior del micrótomo para que la muestra se eleve y
asome ligeramente sobre la superficie de la platina. El mando está graduado en pasos de
10 m (0,01 mm) y en un giro completo hace avanzar la muestra un total de 500 m
(0.50mm). Por tanto, el corte más fino que se puede obtener con el micrótomo de mano es
de 10 m.
Coja de nuevo la navaja, colóquela de la forma anteriormente indicada y realice un corte
oblicuo con un movimiento continuo y suave para obtener una fina sección de la muestra.
Aplique una gota de agua en el centro de un portaobjetos limpio, coloque en ella el corte
recién obtenido y cúbralo con un cubreobjetos. Ya tiene la preparación lista para ser observada al microscopio.
Nota: En la mayoría de ocasiones, el corte deberá ser teñido para poder observar las distintas estructuras al microscopio.
Revisión 1 Marzo-06
Manual de instrucciones 50501000
Pág. 5
CASTELLANO
4. MANTENIMIENTO Y LIMPIEZA
Para un adecuado funcionamiento del micrótomo de mano es necesario seguir algunas
recomendaciones.
Nota: Todas las normas de utilización citadas anteriormente carecerán de valor si no se
realiza una continua labor de mantenimiento.
Siga las instrucciones y advertencias relativas a este manual.
Tenga este manual siempre a mano para que cualquier persona pueda consultarlo.
Utilice siempre componentes y repuestos originales. Puede ser que otros dispositivos
sean parecidos, pero su empleo puede dañar el equipo.
No intente repararlo usted mismo; además de perder la garantía puede causar daños en
el funcionamiento general del micrótomo de mano, así como lesiones a las personas que
utilizan habitualmente el micrótomo de mano.
En caso de avería diríjase a su proveedor para la reparación través del Servicio Técnico
de Nahita.
Limpieza
Para la limpieza de las partes metálicas, acero inoxidable, aluminio, pinturas, etc nunca
utilice estropajos o productos que puedan rallar, ya que deterioran el micrótomo de mano,
limitando la vida útil del equipo.
Para la limpieza del equipo recomendamos se utilice un trapo libre de pelusa humedecido con agua jabonosa que no contenga productos abrasivos.
¡ATENCIÓN!
NO SE ADMITIRA NINGUN APARATO PARA REPARAR QUE NO
ESTE DEBIDAMENTE LIMPIO Y DESINFECTADO.
ENGLISH
Thank you for choosing this equipment. We sincerely wish that you enjoy your Nahita
hand microtome 501. We highly recommend looking after this equipment according to
what is stated in this manual.
Nahita develops its products according to the CE marking regulations as well as
emphasizing the ergonomics and security for its user. The correct using of the equipment
and its good quality will permit you to enjoy this equipment for years.
The improper use of the equipment can cause cuts and injuries. Please read the points
of Instructions of use and Maintenance, where we expose the security notes.
TO GET THE BEST RESULTS AND A HIGHER DURATION OF THE EQUIPMENT IT IS ADVISABLE TO READ THOROUGHLY THIS MANUAL BEFORE
OPERATING WITH THE EQUIPMENT.
Please bear in mind the following:
This manual is inseparable from the Nahita hand microtome 501, so it should be available for all the users of this equipment.
You should carefully handle the hand microtome avoiding knocks and free fall of heavy
/ sharp objects on it.
Never dismantle the different pieces of the hand microtome to repair it yourself, since
it could produce a defective use of the whole equipment and a loss of the product
warranty, as well as injuries on people that handle the hand microtome.
If you have any doubt about functioning do not hesitate in contacting your wholesaler.
You can also tell us any doubts or suggestions you have by contacting Nahita Technical
Assistance Department by email to [email protected].
This equipment is protected under the Warranties and consumer goods regulation
(10/2003).
Overhaul is not covered by the hand microtome warranty.
Operations made by non-qualified staff will automatically produce a loss of the hand
microtome warranty.
Accessories (including their loss), are not covered by the product's warranty. The
warranty neither covers piece's deterioration due to the course of time.
Please make sure you keep the invoice, either for having the right to claim or asking for
warranty coverage. In case you have to send the equipment to Nahita Technical Assistance
Department you should enclose the original invoice or a copy as guarantee.
Manufacturer reserves the right to modify or improve the manual or equipment.
ATTENTION!!
IF EQUIPMENTS ARE NOT PROPERLY CLEAN AND DISINFECTED THEY
WOULD NOT BE ALLOWED TO REPAIR BY OUR TECHNICAL SERVICE.
INDEX OF LANGUAGES
3-6
7-10
Spanish
English
Pág. 6
Manual de instrucciones 50501000
Revisión 1 Marzo-06
Version 1 March-06
Instruction manual 50501000
Page 7