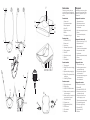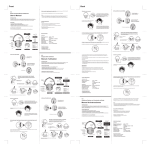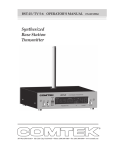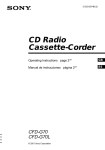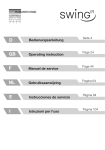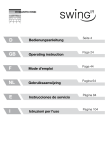
1
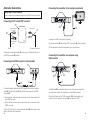
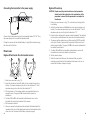
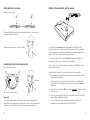
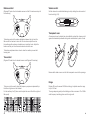
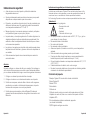
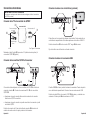
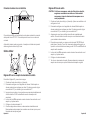
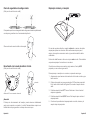
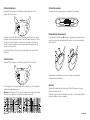
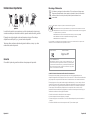
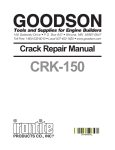
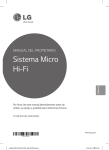
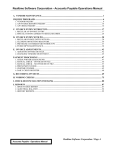
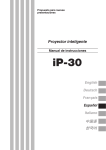
DIGIMAX RF TV Listening System Operating instructions Instrucciones de servicio www.ClearTVAudio.com Page 7 Página 27 Model: __________________________________ Owner name: __________________________________ Date purchased __________________________________ Distributor name: __________________________________ Phone number: __________________________________ 17 2 21 18 1 4 6 7 21 19 20 2 2 3 3 4 4 11 32 10 30 14 15 16 12 8 Vista general de los auriculares: 1 Regulador del volumen 2 Adaptadores para altavoces 3 Compartimento de la batería 4 Led de estado 5 Botón de emparejamiento (conectar) 6Balance 7 Ajuste del sonido a izquierda y derecha Overview transmitter: 17 Charging cradle 18 Charge LED for receiver in charging cradle 19 Replacement battery charging bay 20 Charge LED for replacement battery charging bay 21 Transmitting LED indicator 22 23 24 25 26 27 13 Overview headset: 1 Volume control 2 Loud speaker ear adapters 3 Battery compartment 4 Status LED 5 Pairing button (connect) 6Balance 7 Tone adjustment left / right Overview neckloop: 8 On/Off switch (On / Off) 9 Volume control 10 Induction loop 11 Breakaway safety connection 12 Battery compartment 13 Status LED 14 Pairing button (connect) 15 Balance 16 Tone adjustment 3 9 Vista general These operating instructions allow you to fold out the first 2 pages. These pages show images of the Digimax RF with identification by numbers. 5 28 Quick overview 29 31 Overview accessories: 22 Power supply connection 23 USB connection 24 AUDIO, MIC / USB selector switch 25 Female connector for connection to a sound source (green) 26 Female connector for connection to a microphone (black) – optional 27 Pairing button (connect) 28 Transparent cover 29 Digital optical cable (Toslink) 30 S/PDIF converter 31 L/R audio cable 32 Microphone Puede desplegar las dos primeras páginas de este manual de instrucciones. En estas páginas hay las imágenes del Digimax RF con numeración. Vista general de el lazo de anillo: 8 Interruptor de enc./ apag. (On / Off) 9 Regulador del volumen 10 Bucle de inducción 11 Protección contra estrangulamiento 12 Compartimento de la batería 13 Led de estado 14 Botón de emparejamiento (conectar) 15 Balance 16 Ajuste del sonido Vista general del emisor: 17 Compartimento de carga 18 Led de carga para receptor en el compartimento de carga 19 Compartimento de carga para la batería de sustitución 20 Led compartimento de carga para la batería de sustitución 21 Enviar led de estado Vista general de accesorios: 22 Conexión para cable de red 23 Conexión USB 24 Conmutador AUDIO, MIC / USB 25 Casquillo para la conexión a una fuente de sonido (verde) 26 Casquillo para la conexión a un micrófono (negro) – opcional 27 Botón de emparejamiento (conectar) 28 El revestimiento transparente 29 Cable óptico digital (Toslink) 30 Convertidor S/PDIF 31 Cable de sonido I/D 32 Micrófono Table of contents Quick overview Page Overview headphone Overview neckloop Overview transmitter Overview accessories Safety information Package Contents Set up / connections Preferred connections Connecting the transmitter to an RCA female jack Connecting the transmitter to a headphone jack Alternative connections Connecting the TV to the S/PDIF converter Connecting the S/PDIF converter to the transmitter Connecting the transmitter to the microphone (optional) Connecting the transmitter to the USB connector Connecting the transmitter to the power supply 6 6 6 6 6 8 9 10 11 11 11 12 12 12 13 13 14 How to use 14 Cleaning and care 21 Important information 22 Digimax RF with under the chin headset receiver 14 Digimax RF neckloop 15 Safety lock in the neckloop 16 Listening with the 3.5 mm stereo output 16 Pairing of the transmitter and the receiver 17 Balance control 18 Tone control 18 Volume control 19 Transparent cover 19 Range19 Battery charging 20 Cleaning the transmitter and the receiver Cleaning the silicone ear adapters Replacing the silicone ear adapters 21 21 21 Warranty22 Environmental information/disposal 23 Troubleshooting24 Technical Data 26 7 Safety information • Before you begin operating this device, read these instructions carefully and completely. • Please retain these operating instructions to ensure that they are accessible at any time for other users. • This device is designed for operation in dry interior spaces, with a room temperature of 50° F to 95° F / 10° C to 35 °C. • Please handle the device and accessories carefully and install them only in low-dust and clean locations. • Clean the transmitter and the receiver regularly. For hygienic reasons, the soft silicone ear adapters should be cleaned regularly. Please replace as necessary with the soft silicone ear adapters, offered as special accessories. • Paints and furniture polishes can degrade the rubber feet of the transmitter and therefore they may cause surface damage to your furniture. • To power the transmitter, use only the provided power supply. Caution: The receiver volume can be set to a high level. Please comply with the following information to protect your ears or the ears of persons with normal hearing, especially children, from hearing damage due to high volume levels. 1. Set the volume at a low level before you put the receiver on. 2. During use, adjust the volume to a level comfortable to you. 3. Before using the Digimax RF neckloop with a heart pacemaker, please contact your physician or the manufacturer of the pacemaker to ensure that the pacemaker is not subjected to interference. 4. If you use other medical devices, please use the Digimax RF only when adhering to the safety information/safety directives of your physician or the manufacturer. Safety information for the lithium polymer battery The battery used in Digimax RF is a lithium polymer battery, which was produced in accordance with the most current provisions and safety regulations. The battery can be damaged when misused or if not used according to the specifications; in this case Ear Technology Corporation accepts no liability. Warning! The following risks exist in extreme cases: – Overheating – Fire – Explosion – Smoke and gas • • • • • • • • • • Do not heat the battery above 158° F / 70° C, e.g., through sun radiation or by casting it into fire. Do not subject the battery to moisture. Do not short circuit the battery Do not disassemble or deform the battery. Store device/battery in a cool and dry place at room temperature. Use only the provided charger for the battery. Recharge the battery in the device regularly by placing the receiver in the transmitter cradle when not in use. Charge the battery only at ambient temperatures of 50° F to 104° F / 10° C to 40° C. Do not recharge the battery if the device is clearly damaged. Please return defective device or devices with worn out batteries to your retailer. Package contents 1 Digimax RF receiver: under the chin headset receiver or neckloop 1 Digimax RF transmitter 1 battery AP12A 1 screwdriver 1 power supply 1 audio connection cable with 3.5 mm stereo jack 1 audio adapter 3.5 mm to a 1/4” stereo jack 1 RCA adapter 1 pair of additional silicone ear adapters small (with under the chin headset receiver) 8 1 S/PDIF digital " analog audio converter 9 Congratulations on the purchase of your Digimax RF system. You have purchased a reliable state-of-the-art device. Please review these operating instructions carefully to ensure that you set up the device correctly and that you are familiar with all functions of the device. DC 12V Turn off the sound source before connecting the transmitter. USB AUDIO USB MIC CONNECT AUDIO MIC 28 Plug the provided audio connection cable 28 into the green “Audio” female connector 25 of the transmitter. Several options exist to connect the Digimax RF to a sound source (e.g. TV, computer, etc.). Please check the output connection options of your sound source. – RCA female connector – Headphone connection )))) AUDIO USB MIC CONNECT AUDIO OUT L R AUDIO MIC 28 29 Plug the RCA plugs into the RCA connection of your sound source. • Ensure that the white connection is connected to the white connection of your sound source. • Ensure that the red connection is connected to the red connection of your sound source. If your TV has RCA audio outputs, the included S/PDIF converter is not necessary. Connecting the transmitter to a headphone jack – External microphone – USB connection (e.g. computer) – S/PDIF digital output –when using digital to analog converter (DAC). If your TV has RCA audio outputs, the included S/PDIF converter is not necessary. 10 USB Connect the adapter cable with the RCA plugs 29 to the audio connection cable 28. 25 Connecting the transmitter to an RCA female jack DC 12V Set up / connections Preferred Connections 28 Plug the audio connection cable 28 into the headphone jack of your sound source. You may need to use the 1/4” (6.5 mm) headphone plug adapter (included) to connect to your sound source. Set the volume of your sound source to a comfortable level. 11 Alternative Connections Connecting the transmitter to the microphone (optional) IMPORTANT: S/PDIF converter If your TV does not have analog audio outputs, use the S/PDIF converter (included). Connecting the TV to the S/PDIF converter 30 S/PDIF converter Digital coaxial cable L/R audio cable (not included) 29 26 31 32 Use only the A-4967-0 microphone (included). Digital optical cable Plug the microphone 32 into the black “MIC” connection 26 of the transmitter. (Toslink) From TV To Digimax RF transmitter Using the provided Toslink cable 29, connect your TV (optical audio out) to the S/PDIF converter 30 (optical). Connecting the S/PDIF converter to the transmitter Affix the microphone over the loudspeaker of your sound source. Connecting the transmitter to a computer using USB connector 30 DC 12V L USB AUDIO USB MIC R CONNECT AUDIO MIC 24 23 28 31 Connect the adapter cable with the RCA plugs 31 to the audio connection cable 28. Plug the RCA plugs 31 into the RCA connections of the S/PDIF converter 30. • Ensure that the white connection is connected to the white connection of your S/PDIF converter. 33 The USB cable 33 is not included with your unit. It can be purchased from your electronics retailer. The transmitter has a mini USB connection. Plug the USB cable into the “USB” connection 23 of the transmitter and connect it to your computer. The switch 24 must be set to “USB”. • Ensure that the red connection is connected to the red connection of the S/PDIF converter. Plug the 3.5 mm jack of the audio connection cable 28 into the green audio input on the back of the transmitter. 12 13 Connecting the transmitter to the power supply Connect the provided power supply to the transmitter labeled “DC12V”. Plug the power supply into a non-switched electrical outlet. Charge the receiver with the installed battery for eight (8) hours before using the device for the first time. How to use Digimax RF with under the chin headset receiver 1. Switch your sound,rce on (e.g. TV). 2. Adjust the volume level control 1 initially to a low volume to protect your hearing. The volume increases when you turn the dial toward “5” and it decreases when you turn the dial in the direction of “0”. 3. Put the headset on. The headset switches on automatically when you spread the arms. The green LED 4 indicates that the receiver is switched on. 4. The blue LED bar 21 in the transmitter is illuminated as soon as the transmitter has contact and transmits to the receiver. 5. Set the desired volume 1. 6. When you remove the headphones they will switch off automatically. We recommend that you put the headphones back into the transmitter cradle when not in use, to ensure that the battery is always charged. 14 Digimax RF neckloop CAUTION: People using this product who have a heart pacemaker, should contact their physician or the manufacturer of the pacemaker to ensure that the pacemaker is not subject to interference. 1. Switch your sound source on (e.g. TV), and switch your hearing aids to t-coil setting. 2. Adjust the volume level control 9 initially to a low volume to protect your hearing. The volume increases when you turn the dial toward “5” and it decreases when you turn the dial in the direction of “0”. 3. Ensure that the neckloop lock has been closed completely. The neckloop lock is used to comfortably wear the device and to minimize accidents. 4. The receiver will be switched on and off by using the ON/OFF switch 8 on the back. Caution: Always switch the receiver off after use to avoid discharging the battery. The green LED 13 on the receiver indicates that the receiver is switched on. 5. The blue LED bar 21 on the transmitter is illuminated as soon as the transmitter has contact and transmits to the receiver. 6. Set the desired volume. 7. Switch the receiver off after use. We recommend that you put the neckloop receiver back into the transmitter cradle when not in use, to ensure that the battery is always charged. 15 Pairing of the transmitter and the receiver Safety lock in the neckloop (Neckloop version only) Please ensure that the safety lock is completely closed in the neckloop to guarantee proper functioning. If you want to add additional receivers (headsets or neckloops) to the transmitter, then the new receivers must first be paired with the transmitter. This is required to ensure that the transmitter and receivers recognize each other and that they can transmit the e ncrypted data. Please ensure the receiver is worn correctly. This is only required once for each additional receiver. A maximum of 4 headsets or neckloops can be paired with a transmitter. Listening with the 3.5 mm stereo output If the receiver does not find a transmitter, then the red LED 4 blinks and no signal will be received. (Neckloop version only) Please follow the instruction to pair the receiver with the transmitter: BAL L R + + L 1. Ensure that the transmitter is connected to an electrical outlet and that it is provided with electricity. CONNECT TONE earphones R 3.5 mm stereo output connector Important! The overall operating time of the receiver can be reduced significantly depending on the accessories connected to the output. We recommend the purchase of an additional battery to guarantee longer operating time. 16 2. Put the receiver on and ensure that it is switched on– the green LED should glow. For the Digimax RF neckloop version switch the neckloop receiver on. 3. Press the “Connect” button 27 briefly at the transmitter. The blue LED bar starts flashing. 4. Press the “Connect” button briefly at the headset receiver 5 or neckloop receiver 14 to complete the pairing. 5. Once the pairing has been completed, the blue LED bar on the transmitter and the receiver status LED stop flashing. 17 Balance control (Digimax RF under the chin headset receiver and the 3.5 mm stereo output of the neckloop.) BAL L R + + L Volume control Set the volume to a comfortable listening level by rotating the volume control from low to high (0-5). CONNECT TONE R Transparent cover 2 3 3 4 4 The balance adjustment does not work when the neckloop is used with hearing aids. 2 The balance controls the volume distribution between the right and the left ear with the head set or when the 3.5 mm stereo output is used on the neckloop with earphones, headphones or induction hooks. Adjust the balance so that you have the same volume level in both ears. A transparent cover (included) may be installed to protect the volume control against unintended adjustments and against contamination by dust or fluids. Tone control (Digimax RF under the chin headset receiver and Digimax RF neckloop) Remove both rubber covers and click the transparent cover into the openings. Range The tone control is used to adjust the frequency response independently in the left and right ears on the headset. Digimax RF uses the newest 2.4GHz technology. In optimal cases the range is up to 145 feet. For the neckloop, the (R) tone control adjusts the sound of both the right and left equally. The range depends greatly on the building and the environment. The 2.4GHz radio frequency technology also works through walls. 18 19 Battery charging Once the battery is fully charged, it can be used for up to six (6) hours. The red LED 4/13 starts flashing once the battery is almost empty. The battery should now be charged or exchanged. The operating time is dependent on the listening volume. Cleaning and care Cleaning the transmitter and the receiver If the device becomes dusty or dirty, you can clean it with a soft, clean and damp cloth. Please disconnect the transmitter from the power supply before cleaning. Cleaning the silicone ear adapters 18 After use, put the receiver into the charging cradle of the transmitter, without applying pressure. Ensure that the receiver is placed correctly. If the receiver is charging, the red LED 18 at the left side of the receiver is illuminated. The LED 18 is illuminated green as soon as the battery in the receiver is charged. For first time operation, it is recommended that the battery be charged for eight (8) hours. 19 20 An additional battery can be charged in the transmitter. Additional batteries are available through your Digimax RF distributor. You can remove the ear adapters from the fixture. Clean the ear adapters with mild soapy water. Dry the ear adapters thoroughly and reattach them. Replacing the silicone ear adapters The hypoallergenic silicone ear adapters should be replaced if they become worn or damaged. New silicone adapters can be ordered from your Digimax RF distributor. The additional battery can be plugged into the side charging bay 19. Please ensure that the sloped side points upward and that you insert it without applying too much force. The LED 20 is illuminated red when the battery is charging. If the LED 20 is green, it is ready for use. We recommend that you exchange the battery in the receiver with the optional spare battery in the transmitter weekly. This ensures that the batteries are used regularly and that they achieve a maximum service life. All batteries lose their capacity over time. This is characterized by a shorter usage time. 20 21 Important information Chemical solvents Product damage caused by improper handling as well as damage due to contamination are excluded from the warranty. This device is not protected against moisture. Do not place objects that are filled with fluids on or near the device, e.g. vases. Open fire sources such as burning candles, should not be placed on or near the transmitter. Warranty Refer to the warranty card included in the product package. Recycling/disposal Help us protect the environment. Please take the time to properly dispose of your equipment including the battery. Additional information about recycling of this product can be obtained from your community waste disposal service. This devices adheres to the requirements of the following EU directives: – 1999/5/EG R&TTE directive – 2002/95/EG RoHS directive – 2002/96/EG WEEE directive – 2004/108/EG EMV directive – 2006/95/EG low voltage directive The conformity of the a.m. directives is confirmed by the CE mark on the device. CE conformity declarations are available on the Internet. Trade Name Model Number Digimax RF FCC ID: U94SWING1212 This device complies with Part 15 of the FCC Rules. Operation is subject to the following two conditions: (1) this device may not cause harmful interference, and (2) this device must accept any interference received, including interference that may cause undesired operation. Federal Communication Commission Interference Statement This equipment has been tested and found to comply with the limits for a Class B digital device, pursuant to Part 15 of the FCC Rules. These limits are designed to provide reasonable protection against harmful interference in a residential installation. This equipment generates, uses and can radiate radio frequency energy and, if not installed and used in accordance with the instructions, may cause harmful interference to radio communications. However, there is no guarantee that interference will not occur in a particular installation. If this equipment does cause harmful interference to radio or television reception, which can be determined by turning the equipment off and on, the user is encouraged to try to correct the interference by one of the following measures: •Reorient or relocate the receiving antenna. •Increase the separation between the equipment and receiver. •Connect the equipment into an outlet on a circuit different from that to which the receiver is connected. •Consult the dealer or an experienced radio/TV technician for help. 22 23 Troubleshooting Symptoms Cause Resolution Symptoms Cause Resolution Receiver charging control lamp is not illuminated, despite the fact that the receiver is inserted in the charging station. No contact between battery in the receiver and the charging station in transmitter. Make sure the receiver is in the proper orientation in the transmitter charging cradle. The sound transmission is blurred or distorted. Receiver is too far away from transmitter. Move receiver closer to the transmitter. No battery inserted into the receiver. Insert battery in receiver. The battery energy is almost totally consumed. Charge battery or insert fully charged battery. Receiver does not work – no sound transmission. The transmitter is not connected or not connected correctly to the TV set or the stereo system. Check the cable and the plug connection between the transmitter and the TV or stereo device. Use the operating instructions of the TV or stereo device to check whether the headphone output is correctly connected. The sound transmission is interrupted for a short time and works well afterwards Receiver is too far away from transmitter. The environment (e.g. walls) distort the reception. Move the receiver closer to the transmitter. Battery will only work for a short time. Battery is not completely charged or defective and therefore no longer operational. Charge battery or insert fully charged or new battery. Charge control lamps do not illuminate – despite battery inserted into the charge station of the transmitter. No power to transmitter. Check that the power supply is connected to the electrical outlet and the transmitter. Also check that the electrical outlet is working and that no fuse or breaker was triggered. No contact between battery and charging station in transmitter. Insert the batteries correctly and completely into transmitter. TV set or stereo system is not switched on. 24 Pairing was lost. Re-pair transmitter and receiver. (see pg. 17) Receiver is not switched on. (Digimax RF neckloop) Switch the receiver on by using the ON/OFF switch on the back of the neckloop receiver. No battery in receiver. Insert battery in receiver. Battery in receiver is not charged. Charge battery or insert fully charged battery. 25 Technical Data ÍndicePágina Modulation process Stereo (not with neckloop) Carrier frequency: 2.4 GHz Tone frequency transmission range: 20 – 20,000 Hz Distortion factor: <1% Signal/interference ratio: > 90 dB Working range: 32° F – 131° F / 0° C – 55° C Under the chin headset receiver: Operating hours: approximately 6 h Maximum volume: approximately 125 dB Weight: approximately 2.04 oz. / 58 g Transmitter: Power consumption: approximately 4.5 VA Power supply: 12 VDC Power supply: 110–120 Volt 50–60 Hz Weight: approximately 1.51 oz. / 43 g Vista general 6 Indicaciones de seguridad Contenido del paquete Establecer / conexiónes 28 29 30 31 Vista general de los auriculares Vista general de el lazo de anillo Vista general del emisor Vista general de accesorios Conexiónes preferida Conectar el emisor a un casquillo RCA Conectar el emisor en la conexión de los auriculares Conexiónes alternativas Conexión de la TV al convertidor de S/PDIF Conexión del convertidor S/PDIF al transmisor Conectar el emisor con el micrófono (opcional) Conectar el emisor en la conexión USB Conectar el emisor a la red eléctrica 31 31 32 32 32 33 33 34 Cómo utilizar 34 Limpieza y cuidado 41 Indicaciones importantes 42 Causas a las averías y ayuda Datos técnicos 44 46 Digimax RF con un receptor de banda de la barbilla 34 Digimax RF lazo de anillo 35 Cierre de seguridad en la eslinga remota 36 Escuchando con la sauda de estéreo 3.5 mm 36 Emparejar el emisor y el receptor 37 Control de balance 38 Control de tono 38 Control de volumen 39 Revestimiento transparente 39 Alcance39 Cargar batería 40 Limpiar el emisor y el receptor Limpiar los adaptadores de silicona Sustitución de los adaptadores de silicona Garantía Reciclage / Eliminación 26 6 6 6 6 41 41 41 42 43 Español 27 Indicaciones de seguridad • Antes de poner en servicio el aparato y utilizarlo, lea detenida e íntegramente este manual. • Guarde cuidadosamente este manual de instrucciones para que esté disponible en cualquier momento para otros usuarios. • El aparato y, en particular, el aparato de red, han sido concebidos para utilizarse en interiores secos. Se garantiza el perfecto funcionamiento a una temperatura ambiente de 10 °C a 35 °C. • Maneje el aparato y los accesorios siempre con cuidado y colóquelos en lo posible en lugares con poco polvo y limpios. • Limpie el emisor y el receptor regularmente. Por motivos higiénicos, los adaptadores blandos de silicona deben limpiarse regularmente. Para sustituirlos, utilice los adaptadores blandos de silicona que se ofrecen en los accesorios especiales. • Las pinturas y los agentes para el pulido de los muebles pueden atacar las patas de caucho del emisor y provocar daños en las superficies de sus muebles. • Utilice únicamente el aparato de red suministrado para suministrar corriente al emisor. Atención: Se puede configurar un volumen más alto en su receptor. Para proteger su oído o el oído de otras personas con audición normal de lesiones auditivas por un volumen demasiado alto, tenga en cuenta las siguientes indicaciones: 1. Configure un volumen bajo antes de utilizar el receptor. 2. Configure el volumen a un nivel adecuado mientras usa el aparato. 3. Si utiliza un marcapasos, antes de utilizar el lazo de anillo, asegúrese, consultando a su médico o al fabricante del marcapasos, de que las funciones del marcapasos no se verán perjudicadas. 4. Si utiliza otros aparatos médicos, utilice el Digimax RF solamente siguiendo las indicaciones/directivas de seguridad de su médico o del fabricante. Español 28 Indicaciones de seguridad para la batería de polímero de litio La batería que se utiliza para el Digimax RF es una batería de polímero de litio fabricada conforme a los reglamentos y normas de seguridad más actuales. En caso de mal uso o un uso indebido, la batería puede resultar dañada; Ear Technology Corporation rechaza cualquier responsabilidad en dichos casos. ¡Advertencia! En casos extremos, hay peligro de: – Generación de calor – Incendio – Explosión – Formación de humo o gas • • • • • • • • • • No deje que la batería se caliente a más de 158° F / 70° C, p. ej. por los rayos solares ni la arroje al fuego. No someta la batería a la humedad. No cortocircuite la batería. No desmonte ni deforme la batería. Almacene el aparato / la batería en un sitio frío y seco a temperatura ambiente. Utilice únicamente los cargadores previstos para la batería. Si se deja de utilizar durante largo tiempo, recargue regularmente la batería del aparato (cada 6 meses durante aprox. 1 hora). Cargue la batería solamente en un temperatura ambiente de 50° F / 10° C a 104° F / 40° C. Si detecta defectos en la batería, no la vuelva a cargar. Devuelva los aparatos defectuosos o los aparatos con baterías gastadas únicamente a su distribuidor especializado. Contenido del paquete 1 Receptor Digimax RF: lazo de anillo o banda de la barbilla 1 Emisor Digimax RF 1 Batería AP12A 1 Destornillador 1 Cable de red 1 Cable de conexión audio con conector de trinquete estéreo de 3,5mm 1 Adaptador de audio de 3,5mm en un conector de trinquete de 6,3mm 1 Adaptador RCA 1 Par de adaptadores de silicona adicionales, pequeños (con banda de la barbilla) 1 S/PDIF digital a analógico convertidor Español 29 Le felicitamos por haber adquirido los auriculares Digimax RF. Ha escogido un aparato moderno y fiable. Lea atentamente este manual de instrucciones para poder poner en servicio el aparato adecuadamente y familiarizarse con todas las opciones del aparato. Apague la fuente de sonido antes de conectar el emisor. DC 12V USB AUDIO USB MIC CONNECT AUDIO MIC 28 Enchufe el cable de conexión de audio suministrado 28 en el casquillo de conexión “audio” verde 25 del emisor. Tiene diversas posibilidades de conectar el Digimax RF con la fuente de sonido ( p. ej. televisor, ordenador, etc.) Compruebe qué posibilidades de conexión posee su fuente de sonido. – Casquillo RCA – Conexión de los auriculares )))) AUDIO USB MIC CONNECT AUDIO OUT L R AUDIO MIC 28 29 Enchufe el enchufe RCA en la conexión RCA de su fuente de sonido. • Preste atención a que la conexión blanca también esté conectada en la conexión blanca de la fuente de sonido. • Preste atención a que la conexión roja también esté conectada en la conexión roja de la fuente de sonido. Si su televisor tiene salidas RCA de audio, incluido el S/PDIF convertidor no es necesario. Conectar el emisor en la conexión de los auriculares – Micrófono externo – Conexión USB (p. ej. ordenador) – S/PDIF salida digital (cuando se usa la caja del adaptador A--4963-0) Español 30 USB Conecte el cable del adaptador con los enchufes RCA 29 en el cable de conexión audio 28. 25 Conectar el emisor a un casquillo RCA DC 12V Establecer / conexiónes Conexiónes preferida 28 Enchufe el cable de conexión de audio 28 en la conexión de los auriculares de su fuente de sonido. Es posible que necesitara un 1/4" (6.5 mm) adaptador de clavija de los aurículares para conectar a la fuente de sonido. Ajuste el volumen de la fuente de sonido a un nivel cómodo. Español 31 Conexiónes alternativas Conectar el emisor con el micrófono (opcional) IMPORTANTE: S/PDIF convertidor Si su televisor no dispone de salidas de audio analogicas, utilice el convertidor de S/PDIF (incluido). Conexión de la TV al convertidor de S/PDIF 30 Convertidor S/PDIF Cable coaxial digital (no incluido) 29 Cable de sonido I/D 26 31 32 El micrófono no forma parte del volumen de suministro. Puede adquirirlo en su distribuidor especializado. Solo debe emplearse el micrófono A-4967-0. Cable óptico digital (Toslink) Enchufe el micrófono 32 en la conexión “MIC” negra 26 del emisor. de TV Para Digimax RF transmisor Mediante el cable Toslink 29, conecte su TV (salida de audio optica) al convertidor S/PDIF 30 (optica). Conexión del convertidor S/PDIF al transmisor Fije el micrófono en el altavoz de su fuente de sonido. Conectar el emisor en la conexión USB 30 DC 12V L USB AUDIO USB MIC R CONNECT AUDIO MIC 28 31 Conecte el cable adaptador con las conexiónes de RCA 31 a el cable de conexión de audio 28. Conecte los conectores RCA 31 a el convertidor S/PDIF 30. • Asegúrese de que la conexión blanco está conectado a la conexión blanca de su S/PDIF convertidor. 24 23 33 El cable USB 33 no forma parte del volumen de suministro. Puede adquirirlo en su distribuidor especializado. El emisor tiene una miniconexión USB. Enchufe el cable USB en la conexión “USB” 23 del emisor y conéctelo a su ordenador. El interruptor 24 debe colocarse a “USB”. • Asegúrese de que la conexión roja está conectado a la conexión roja del convertidor S/PDIF. Enchufe el conector de 3,5 mm del cable de conexión 28 de audio a la entrada de audio verde en la parte posterior del transmisor. Español 32 Español 33 Conectar el emisor a la red eléctrica Conecte el aparato de red suministrado con el emisor mediante la conexión del aparato de red “DC12V”. Conecte el aparato de red con una toma de corriente. Antes de la primera puesta en servicio, el receptor con batería incorporada debe cargarse durante ocho (8) horas. Cómo utilizar Digimax RF lazo de anillo CAUTION: Si utiliza un marcapasos, antes de utilizar el lazo de anillo, asegúrese, consultando a su médico o al fabricante del marcapasos, de que las funciones del marcapasos no se verán perjudicadas. 1. Conecte su fuente de sonido (p. ej. televisor). Ajustar sus audiofonos a la configuracion t-coil. 2. Previamente configure con el regulador de volumen 9 del receptor un volumen reducido para proteger sus oídos. El volumen aumenta al girar en sentido del “5” y se reduce al girar en sentido del “0”. 3. Asegúrese de que el cierre del lazo de anillo esté completamente cerrado. El cierre del lazo de anillo sirve para una cómoda colocación y para minimizar los accidentes. 4. El receptor se enciende y se apaga con el interruptor ON/OFF 8 en la parte trasera. Atención: Tras el uso, desconecte siempre el receptor, ya que de lo contrario la batería se descarga sola. El LED verde 13 indica el receptor está conectado. 5. La barra led azul 21 se enciende cuando el emisor tiene contacto con el receptor y el primero emite. 6. Configure el volumen deseado. 7. Tras el uso, desconecte el receptor. Recomendamos dejar siempre el receptor en el emisor para que así la batería esté siempre cargada. Digimax RF con un receptor de banda de la barbilla Para utilizar Digimax RF, proceda como sigue: 1. Conecte su fuente de sonido (p. ej. televisor). 2. Previamente configure con el regulador de volumen 1 del receptor un volumen reducido para proteger sus oídos. El volumen aumenta al girar en sentido del “5” y se reduce al girar en sentido del “0”. 3. Incorpore los auriculares. Los auriculares se encienden automáticamente al abrir el estribo. El LED verde 4 indica cuando el receptor está conectado. 4. La barra led azul 21 se enciende cuando el emisor tiene contacto con el receptor y el primero emite. 5. Configure el volumen deseado 1. 6. Cuando cuelgue los auriculares, se desconectan automáticamente. Recomendamos dejar siempre los auriculares en el emisor para que así la batería esté siempre cargada. Español 34 Español 35 Cierre de seguridad en la eslinga remota Emparejar el emisor y el receptor (Solo para la versión lazo de anillo) Compruebe que el cierre de seguridad de la eslinga remota esté completamente cerrado para garantizar así un funcionamiento perfecto. Observe el modo correcto de llevar el receptor. En caso de que desee añadir un receptor adicional a un emisor, este debe emparejarse primero con el emisor. Esto resulta necesario para que el emisor y el receptor se reconozcan entre sí y puedan transmitir los datos codificados. Esta acción debe llevarse a cabo una vez para cada auricular. Como máximo se pueden emparejar 4 auriculares con un emisor. Escuchando con la sauda de estéreo 3.5 mm Cuando los auriculares no encuentran ningún emisor, el led rojo 4/13 parpadea y no se recibe ninguna señal. (Solo para la versión lazo de anillo) Para emparejar un receptor con un emisor, se procede como sigue: BAL L R + + 1. Asegúrese de que el emisor está conectado a la toma de corriente y que tiene corriente. L CONNECT TONE auricules R estéreo de 3.5 mm connector de sauda ¡Atención! El tiempo de funcionamiento del receptor puede reducirse notablemente según qué accesorio se conecte a la salida. Recomendamos comprar una batería adicional para garantizar un tiempo de servicio mayor. Español 36 2. Coloque el receptor para que se encienda–el LED verde se encenderá. En la versión lazo de anillo de Digimax RF, conecte el receptor lazo de anillo. 3. Pulse brevemente la tecla 27 "Connect" del emisor. La barra led azul empieza a parpadear. 4. Pulse brevemente la tecla 5/14 "Connect" del receptor para concluir el emparejamiento. 5. Cuando se haya realizado el emparejamiento con éxito, el emisor y el receptor dejan de parpadear. Español 37 Control de volumen Control de balance (Digimax RF con receptor de la barbilla y salida estéreo de 3,5 mm Digimax RF lazo de anillo) L R + + L CONNECT TONE R El balance controla la distribución del volumen entre la derecha y la oreja izquierda con los aurculares cuando o cuando la salida estéreo de 3,5 mm se utiliza en el lazo del anillo con auriculares, auriculares o ganchos de inucción. Ajuste el equilibrio de modo que usted tiene el mismo nivel de volumen en ambos oídos. Revestimiento transparente El revestimiento transparente 28 protege al regulador del volumen contra un ajuste no intencionado del regulador del volumen y contra la suciedad de polvo o líquidos. El ajuste del balance no funciona cuando se utiliza el lazo del anillo con audífonos. 3 2 3 2 BAL Configure un volumen agradable con el regulador del volumen. 4 4 Control de tono (Digimax RF con receptor de la barbilla y Digimax RF lazo de anillo) Retire ambos revestimientos de caucho y encaje el revestimiento transparente en las aberturas. Con la regulación del sonido puede ajustar el sonido a su oído a izquierda y derecha independientemente. Atención: En el Digimax RF lazo de anillo puede ajustar el sonido en el lazo de anillo con el regulador de sonido para el lado derecho (R). Español 38 Alcance Digimax RF emplea la última tecnología 2,4GHz. El alcance en el mejor de los casos alcanza 45m. El alcance depende mucho del edificio y el entorno. La tecnología 2,4GHz funciona también a través de paredes. Español 39 Cargar batería Cuando la batería está totalmente cargada, esta puede utilizarse como máximo hasta seis (6) horas. Cuando la batería está casi vacía, el led rojo 4/13 empieza a parpadear. Entonces debe cargarse o cambiarse la batería. El tiempo de funcionamiento depende del volumen que haya configurado. Limpieza y cuidado Limpiar el emisor y el receptor En caso de suciedad, debe limpiar el aparato ligeramente con un paño limpio, humedo y suave. Desenchufe el emisor de la corriente eléctrica antes de empezar a limpiarlo. Limpiar los adaptadores de silicona 18 Coloque el receptor tras el uso sin presionar demasiado en la bandeja de carga del receptor. Preste atención a que el receptor esté colocado correctamente. Cuando el receptor está cargado, el led rojo 18 a la izquierda del receptor se enciende. Una vez se ha cargado la batería del receptor, el led 18 se pone de color verde. Para la primera operación, se recomienda que la batería sea cargada durante ocho (8) horas. 19 20 Se puede cargar una batería adicional en el emisor. Puede adquirir baterías adicionales en su distribuidor especializado. La batería adicional se puede insertar en el compartimento de carga lateral 19. Preste atención a que el lado fresado señale hacia arriba y no inserte la batería con demasiada fuerza. Si el led 20 se pone de color rojo, la batería se está cargando, si el led 20 se pone de color verde, la batería ya puede utilizarse. Puede sacar el adaptador del soporte tirando de él hacia abajo. Limpie los adaptadores con agua jabonosa. Seque bien los adaptadores y vuelva a colocarlos en los soportes. Sustitución de los adaptadores de silicona Los adaptadores de silicona neutros a la piel deben sustituirse si están muy sucios. Adaptadores de reemplazo de silicona se pueden comprar a través de su distribuidor de Digimax RF. Recomendamos sustituir la batería del receptor y la batería de reserva opcional del emisor semanalmente. De este modo las baterías se utilizan regularmente y alcanzan su vida útil máxima. Todas las baterías pierde su capacidad con el tiempo. Esto se nota si el tiempo de uso es más corto. Español 40 Español 41 Indicaciones importantes Solventes químicos Reciclage / Eliminación Ayúdenos a proteger el medio ambiente. Por favor tómase el tiempo para disponer adecuadamente de su equipo incluyendo la batería. Informacíon adicional sobre el reciclaje de este producto puede obtener de su comunidad. Este aparato cumple los requisitos de las directivas EU siguientes. –1 999/5/CE Directiva sobre equipos radioeléctricos y equipos terminales de telecomunicación Los daños al producto, provocados por un trato inadecuado, así como por averías causadas por suciedad incrustada, quedan excluidos de la garantía. –2 002/95/CE Directiva sobre restricciones a la utilización de determinadas sustancias peligrosas en aparatos eléctricos y electrónicos El aparato no está protegido contra salpicaduras de agua. No coloque objetos llenos de líquido, p. ej. jarrones sobre el aparato. – 2004/108/CE Directiva sobre compatibilidad electromagnética (CEM) Tampoco deben colocarse fuentes de ignición abiertas, como p. ej. velas encendidas, sobre el aparato. –2 002/96/CE Directiva sobre residuos de aparatos eléctricos y electrónicos (RAEE) – 2006/95/CE Directiva de baja tensión La conformidad con las directivas arriba nombradas se confirma con el símbolo de CE en el aparato. Las declaraciones de conformidad CE están disponibles en Internet. Nombre Comercial Garantía Consulte la tarjeta de garantía incluida en el empaque del producto. Numero de modelo Digimax RF FCC ID: U94SWING1212 Este dispositivo cumple con la Parte 15 de las Reglas del FCC. La operación está sujeta a las siguientes dos contidions: (1) este dispositivo no puede causar interferencia dañina, y (2) este dispositivo debe aceptar cualquier interferencia recibida, incluidas las interferencias que puedan provocar un funcionamiento no deseado. Comisión Federal de Comunicaciones Declaración de interferencia Este equipo ha sido probado y ha demostrado cumplir con los límites establecidos para los dispositivos digitales de Clase B, según la Parte 15 de las normas FCC. Estos límitos están diseñados para proporcionar una protección razonable contra las interferencias en una instalación residencial. Este equipo genera, utiliza y puede irradiar energía de radiofrecuencia y, si no se instala y utiliza de acuerdo con las instrucciones, puede causar interferencias perjudiciales en las comunicaciones por radio. Sin embargo, no hay garantía que la interferencia no ocurrirá en una instalación en particular. Si este equipo causa interferencias perjudiciales en la recepción de radio o television, lo que puede determinarse encendiéndolo y apagándolo, se recomienda al usuario que intente corregir la interferencia mediante una de las siguientes medidas: •Cambiar la orientación o ubicación de la antena receptora. •Aumente la separación entre el quipment y el receptor. •Conectar el equipo a un tomacorriente en un circuito diferente de aquel al que está conectado el receptor. •Consulte al distribuidor oa un técnico experto en radio / TV para obtener ayuda. Español 42 Español 43 Causas a las averías y ayuda Síntoma Causa Ayuda Síntoma Causa Ayuda La luz de control de carga del receptor no se enciende; a pesar de que e receptor utilizado está en la estación de carga. No hay contacto entre la batería y el receptor de la estación de carga del emisor. Asegúrese de que el receptor está en la orientacion apropiada en la estacion de carga. El receptor está demasiado alejado del emisor. Coloque el receptor más cerca del emisor. No hay ninguna batería en el receptor. Coloque la batería en el receptor. La transmisión del sonido está deformada, no es clara o tiene interferencias. El receptor no funciona; no hay transmisión de sonido. El emisor no esta conectado o no lo está correctamente en el televisor o en el estéreo. Compruebe el cable y las conexiones entre el emisor y el televisor o el estéreo. Compruebe con ayuda del manual de instrucciones del televisor o el estéreo, si la salida de los auriculares se ha conectado correctamente. La energía de la batería está casi agotada. Cargue la batería o inserte una batería totalmente cargada. La transmisión del sonido se interrumpe brevemente y luego vuelve a funcionar El receptor está demasiado alejado del emisor. El entorno (p. ej. paredes) merma la recepción. Aproxímese al emisor con el receptor. La energía de la batería solo dura poco tiempo. La batería no se ha cargado por completo o es defectuosa, por tanto, ya no puede seguir utilizándose. Cargue la batería o sustitúyala por una batería totalmente cargada o nueva totalmente cargada. Las luces de control de carga no se encienden, a pesar de que las baterías utilizadas están en las estaciones de carga del emisor. El emisor no recibe corriente del aparato de red. Compruebe si la fuente de alimentación está conectada a la toma de corriente. Compruebe que la toma de corriente funciona. También puedes ver el interruptor automático or el fusible. No hay contacto entre la batería y la estación de carga del emisor. Coloque adecuada y completamente la batería en el emisor. El televisor o el estéreo no está conectado. Español 44 Se ha perdido el emparejamiento. Vuelva a emparejar el emisor y el receptor El receptor no está encendido. (Digimax RF lazo de anillo) Encienda el receptor con el interruptor ON/OFF en la parte posterior del aparato. (Digimax RF lazo de anillo) No hay batería en el receptor. Coloque la batería en el receptor. La batería del receptor no está cargada. Cargue la batería o inserte una batería totalmente cargada. Español 45 Datos técnicos Procedimiento de modulación: estéreo (no con lazo de anillo) Frecuencia portadora: 2,4 GHz Intervalo de transmisión de la frecuencia del sonido: 20 – 20.000 Hz Coeficiente de distorsión no lineal <1% Relación señal/ruido: > 90 dB Área de funcionamiento: 32° F – 131° F / 0° C – 55° C Receptor del auricular tipo estetoscopio: Tiempo de funcionamiento: aproximadamente 6 horas Volumen máximo: aproximadamente 125 dB Peso: aproximadamente 2.04 oz. / 58 g Emisor: Potencia de consumo: aproximadamente 4,5 VA Suministro eléctrico: 12 voltios CC Suministro eléctrico, aparato de red: 110-120 voltaje 50-60 Hz Peso: aproximadamente 1.51 oz. / 43 g Español 46 DIGIMAX RF TV Listening System 1-888-327-1299 [email protected] www.ClearTVAudio.com P.O. Box 1516 Johnson City, TN 37605-1516 ©ETC CTA_DIG_INST_1212