1
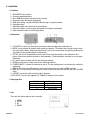
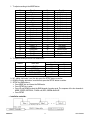
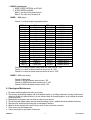
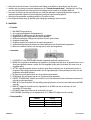
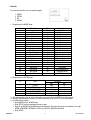
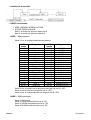
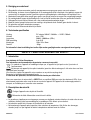
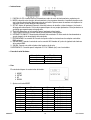
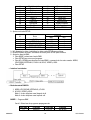
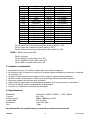
VDPLTC – DMX CONTROLLER FOR VDPLT1
1. Introduction
To all residents of the European Union
Important environmental information about this product
This symbol on the device or the package indicates that disposal of the device after its lifecycle could harm
the environment.
Do not dispose of the unit (or batteries) as unsorted municipal waste; it should be taken to a specialised
company for recycling.
This device should be returned to your distributor or to a local recycling service.
Respect the local environmental rules.
If in doubt, contact your local waste disposal authorities.
Thank you for buying the VDPLTC! This is a DMX controlled LED tube controller. Please read the manual thoroughly
before bringing this device into service. If the device was damaged in transit, don't install or use it and contact your
dealer.
2. Safety Instructions
Keep this device away from rain and moisture.
Unplug the mains lead before opening the housing.
• Damage caused by disregard of certain guidelines in this manual is not covered by the warranty and the dealer
will not accept responsibility for any ensuing defects or problems.
• A qualified technician should install and service this device.
• Do not switch the device on immediately after it has been exposed to changes in temperature. Protect the device
against damage by leaving it switched off until it has reached room temperature.
• This device falls under protection class I. It is therefore essential that the device be earthed. Have a qualified
person carry out the electric connection.
• Make sure that the available voltage does not exceed the voltage stated in the specifications of this manual.
• Do not crimp the power cord and protect it against damage. Have an authorised dealer replace it if necessary.
• Disconnect the device from the mains to clean it or when it is not in use. Handle the power cord by the plug only.
• Note that damage caused by user modifications to the device is not covered by the warranty.
• Keep the device away from children and unauthorised users.
3. General Guidelines
• This device is designed for professional use on stage, in discos, theatres, etc. The VDPLTC should only be used
indoors with an alternating current of max. 230VAC / 50Hz.
• Do not shake the device. Avoid brute force when installing or operating the device.
• Select a location where the device is protected against extreme heat (see “Technical Specifications”), dust and
moisture. Respect a minimum distance of 0.5m between the device’s light output and any illuminated surface.
• Familiarise yourself with the functions of the device before actually using it. Do not allow operation by unqualified
people. Any damage that may occur will most probably be due to unprofessional use of the device.
• Use the original packaging if the device is to be transported.
• All modifications of the device are forbidden for safety reasons.
VDPLTC
1
VELLEMAN
4. Installation
• Functions:
1.
2.
3.
4.
5.
6.
7.
8.
9.
With DMX512 input function
38 pre-programmed patterns
Up to 4000 tubes can be connected to the controller
Auto mode scans all patterns automatically
RGB colour mixing, controlled by DMX (dimmer trough red, green and blue)
Adjustable strobe
Adjustable speed and interval time for most patterns
Auto save function, saves the last working mode for all patterns individually
Solid aluminium holders for wall fixing included.
• Instructions:
1. LCD DISPLAY: shows you all necessary information about working mode, parameters etc.
2. MODE: used to choose the desired working mode and patterns. The display shows another function every
time you push the button. Keep the button pressed if you want to browse faster through all possible modes.
(see further for the possible options to choose from)
3. SET UP: used to set the parameter (interval, speed, flash and tube quantity) of the selected mode or
pattern. Almost every pattern can have its own parameters. These parameters are saved for every pattern
individually.
4. UP: used to choose a higher value for the selected parameter.
5. DOWN: used to choose a lower value for the selected parameter.
6. POWER ON/OFF: to switch the controller on and off. The last working mode is saved when the controller is
switched of.
7. DMX IN: The 3-pin male XLR-connector receives instructions from any universal DMX-controller.
8. DMX OUT: The 3-pin female XLR-connector is used to connect the controller with the next unit in the DMX
chain.
9. OUTPUT: connect this cable to the first tube in the chain.
10. DC INPUT: to connect the supplied 12V / 500mA DC adapter to the controller.
• Data signal line:
Data line
1
2
3
Function
GND
B female signal
A male signal
• Use:
There are four function buttons on the controller:
1.
2.
3.
4.
VDPLTC
MODE
SETUP
UP
DOWN
2
VELLEMAN
1. To adjust according to the MODE button:
Nr
1
2
3
4
5
6
7
8
9
10
11
12
13
14
15
16
17
18
19
20
21
22
Function
Blackout
Red
Green
Yellow
Blue
Purple
Cyan
White
Fast change
Slow flow 1
Fast slow 1
Fast slow 2
Black run 1
Roll chase
Roll colour
Colour ¼
Colour 1 ¼
Colour ½
Colour flash
B & W flow
R & G flow
G & B flow
Nr
23
24
25
26
27
28
29
30
31
32
33
34
35
36
37
38
39
40
41
42
43
44
Function
R & B flow
R & G chase 1
R & G chase 2
R & B chase 1
R & B chase 2
R & W chase 1
R & W chase 2
B & G chase 1
B & G chase 2
W & G chase 1
W & G chase 2
Rainbow chase 1
Rainbow chase 2
Rainbow chase 3
Rainbow chase 4
Rainbow chase 8
Auto mode
Test mode
Address mode
Factory settings
Graph. mode
DMX512 mode
2. To adjust according to the SETUP mode button:
Number
Show data
1
2
3
4
5
FLASH
INTERVAL
RUN SPEED
TUBE QUANTITY
DMX ADDRESS
Illustration
Max
100
100
100
Over 4000
255
Min
0
0
0
1
1
3. UP: adding data button / reset the data; press the SETUP button to confirm.
4. DOWN: reducing data button / reset the data; press the SETUP button to confirm.
5. SETUP the DMX address:
• Press MODE key and choose the DMX mode.
• Press SETUP key to enter.
• Press UP and DOWN to select the DMX-channel of moving mode. The sequence of the four channels is
MODE, SPEED, INTERVAL, FLASH or 0, RED, GREEN and BLUE.
• Press SETUP
• Installation controller:
VDPLTC
3
VELLEMAN
• DMX512 control mode:
1. MODE, SPEED, INTERVAL and FLASH
2. 0, RED, GREEN and BLUE.
Mode 1: the value of first channel over 0.
Mode 2: The value of first channel is 0.
MODE 1 – DMX pattern
Channel 1: to select the pre-programmed patterns
DMX value
1-5
6-11
12-17
18-23
24-29
30-35
36-41
42-47
48-53
54-59
60-65
66-71
72-77
78-83
84-89
90-95
96-101
102-107
108-113
Pattern
Blackout
Red
Green
Yellow
Blue
Purple
Cyan
White
Fast change
Slow flow 1
Fast slow 1
Fast slow 2
Black run 1
Roll chase
Roll colour
Colour ¼
Colour 1 ¼
Colour ½
Colour flash
DMX value
114-119
120-125
126-131
132-137
138-143
144-149
150-155
156-161
162-167
168-173
174-179
180-185
186-191
192-197
198-203
204-209
210-215
216-221
222-255
Pattern
B & W flow
R & G flow
G & B flow
R & B flow
R & G chase 1
R & G chase 2
R & B chase 1
R & B chase 2
R & W chase 1
R & W chase 2
B & G chase 1
B & G chase 2
W & G chase 1
W & G chase 2
Rainbow chase 1
Rainbow chase 2
Rainbow chase 3
Rainbow chase 4
Rainbow chase 8
Channel 2: to select the speed of the pattern from slow to fast (0 – 255).
Channel 3: to select the interval time from slow to fast (0 – 255).
Channel 4: to select the strobe function from slow to fast (0 – 255).
MODE 2 – RGB colour mixing
Channel 1: No function
Channel 2: RED with dimmer function from 0 - 255
Channel 3: GREEN with dimmer function from 0 – 255
Channel 4: BLUE with dimmer function from 0 - 255
5. Cleaning and Maintenance
1. All screws should be tightened and free of corrosion.
2. The housing, the mounting supports and the installation location (e.g. ceiling, suspension, trussing) should not be
deformed, modified or tampered with e.g. do not drill extra holes in mounting supports, do not change the location
of the connections …
3. Mechanically moving parts must not show any signs of wear and tear.
4. The electric power supply cables must not show any damage. Have a qualified technician maintain the device.
5. Disconnect the device from the mains prior to maintenance activities.
6. Wipe the device regularly with a moist, lint-free cloth. Do not use alcohol or solvents.
7. There are no user-serviceable parts.
8. Contact your dealer for spare parts if necessary.
VDPLTC
4
VELLEMAN
6. Technical Specifications
Power Supply
Power Consumption
Life time
DMX connection
Dimensions
Total Weight
DC adapter 230VAC / 50-60Hz → 12VDC / 500mA
max. 1.5W
50000 - 100000 hours for the LEDs.
3-pin XLR
180 x 125 x 49mm
360gr.
The information in this manual is subject to change without prior notice.
VDPLTC – DMX CONTROLLER FOR VDPLT1
1. Inleiding
Aan alle ingezetenen van de Europese Unie
Belangrijke milieu-informatie betreffende dit product
Dit symbool op het toestel of de verpakking geeft aan dat, als het na zijn levenscyclus wordt weggeworpen,
dit toestel schade kan toebrengen aan het milieu.
Gooi dit toestel (en eventuele batterijen) niet bij het gewone huishoudelijke afval; het moet bij een
gespecialiseerd bedrijf terechtkomen voor recyclage.
U moet dit toestel naar uw verdeler of naar een lokaal recyclagepunt brengen.
Respecteer de plaatselijke milieuwetgeving.
Heeft u vragen, contacteer dan de plaatselijke autoriteiten inzake verwijdering.
Dank u voor uw aankoop! De VDPLTC is een DMX-gestuurde controller voor LED buis. Lees deze handleiding
grondig voor u het toestel in gebruik neemt. Werd het toestel beschadigd tijdens het transport, installeer het dan niet
en raadpleeg uw dealer.
2. Veiligheidsvoorschriften
Bescherm dit toestel tegen regen en vochtigheid.
Verzeker u ervan dat het toestel niet aangesloten is op een stroombron alvorens het te openen.
• De garantie geldt niet voor schade door het negeren van bepaalde richtlijnen in deze handleiding en uw dealer zal
de verantwoordelijkheid afwijzen voor defecten of problemen die hier rechtstreeks verband mee houden.
• Laat dit toestel installeren en onderhouden door een geschoolde technicus.
• Om beschadiging te vermijden, zet u het toestel best niet aan onmiddellijk nadat het werd blootgesteld aan
temperatuurschommelingen. Wacht tot het toestel op kamertemperatuur gekomen is.
• Dit toestel valt onder beschermingsklasse I, wat wil zeggen dat het toestel geaard moet zijn. Een geschoolde
technicus moet de elektrische aansluiting verzorgen.
• De beschikbare netspanning mag niet hoger zijn dan de spanning in de specificaties achteraan de handleiding.
• De voedingskabel mag niet omgeplooid of beschadigd zijn. Laat uw dealer zo nodig een nieuwe kabel plaatsen.
• Trek de stekker uit het stopcontact (trek niet aan de kabel!) voordat u het toestel reinigt en als u het niet gebruikt.
• Schade door wijzigingen die de gebruiker heeft aangebracht aan het toestel vallen niet onder de garantie.
• Hou dit toestel uit de buurt van kinderen en onbevoegden.
3. Algemene richtlijnen
• Dit toestel is ontworpen voor professioneel gebruik op podia, in disco's, enz. U mag dit toestel enkel binnenshuis
gebruiken en aan sluiten op een wisselspanning van maximum 230VAC / 50Hz.
VDPLTC
5
VELLEMAN
• Schud het toestel niet dooreen. Vermijd brute kracht tijdens de installatie en de bediening van dit toestel.
• Installeer het toestel weg van extreme temperaturen (zie “Technische specificaties”), vochtigheid en stof. Zorg
voor een minimumafstand van 0.5m tussen de lichtuitgang van het toestel en het belichte oppervlak.
• Leer eerst de functies van het toestel kennen voor u het gaat gebruiken. Ongeschoolde personen mogen dit
toestel niet gebruiken. Meestal is beschadiging het gevolg van onprofessioneel gebruik.
• Gebruik de oorspronkelijke verpakking wanneer u het toestel vervoert.
• Om veiligheidsredenen mag de gebruiker geen wijzigingen aanbrengen aan het toestel.
4. Installatie
• Functies:
1.
2.
3.
4.
5.
6.
7.
8.
9.
Met DMX512 ingangsfunctie
38 voorgeprogrammeerde effectprogramma’s
Mogelijkheid om 4000 buizen aan de controller te koppelen
Automatische mode scant automatisch alle programma’s
RGB kleurenmenging, DMX-gestuurd (dimmer via rood, groen, blauw)
Regelbare stroboscoop
Regelbare snelheid en interval voor de meeste programma’s
Automatische bewaarfunctie, bewaart de laatste werkmode voor alle individuele programma’s
Massieve aluminium houders voor montage aan de muur zijn meegeleverd
• Instructies:
1. LCD DISPLAY: toont u alle nodige informatie aangaande werkmode, parameters enz.
2. MODE: kies de gewenste werkmode en programma’s. De display toont elke keer de gekozen functie. Houd
deze knop ingedrukt wanneer u sneller door alle mogelijke modes wenst te bladeren (zie verder voor de
mogelijke opties).
3. SET UP: regel de parameter (interval, snelheid, aantal flitsen en buizen) van de geselecteerde mode of
programma. Bijna elk programma beschikt over zijn eigen parameters. Deze parameters worden voor elk
programma afzonderlijk bewaard.
4. UP knop: kies een hogere waarde voor de geselecteerde parameter.
5. DOWN knop: kies een lagere waarde voor de geselecteerde parameter.
6. ON/OFF SCHAKELAAR: schakelt de controller in en uit. De laatste werkmode wordt bewaard wanneer de
controller wordt uitgeschakeld.
7. DMX IN: De 3-pin mannelijke XLR aansluiting ontvangt instructies van om het even welke universele DMX
controller.
8. DMX UIT: Koppel de controller aan de volgende buis in de DMX serie aan de hand van de 3-pin
vrouwelijke XLR aansluiting.
9. UITGANG: koppel deze kabel aan de eerste buis in de serie.
10. DC INGANG: aansluiting voor de meegeleverde 12V / 500mA DC adapter met de controller.
• Data signaallijn:
VDPLTC
Datalijn
1
2
3
Functie
Aarding
B vrouwelijk signaal
A mannelijk signaal
6
VELLEMAN
• Gebruik:
De controller beschikt over vier functieknoppen:
1.
2.
3.
4.
MODE
SETUP
UP
DOWN
1. Regeling met de MODE knop:
N°
1
2
3
4
5
6
7
8
9
10
11
12
13
14
15
16
17
18
19
20
21
22
Functie
Black-out
Rood
Groen
Geel
Blauw
Purper
Cyaan
Wit
Snelle verandering
Slow flow 1
Snel Traag 1
Snel Traag 2
Black run 1
Roll chase
Roll kleur
Kleur ¼
Kleur 1 ¼
Kleur ½
Kleur flash
B & W flow
R & G flow
G & B flow
N°
23
24
25
26
27
28
29
30
31
32
33
34
35
36
37
38
39
40
41
42
43
44
Functie
R & B flow
R & G chase 1
R & G chase 2
R & B chase 1
R & B chase 2
R & W chase 1
R & W chase 2
B & G chase 1
B & G chase 2
W & G chase 1
W & G chase 2
Regenboog chase 1
Regenboog chase 2
Regenboog chase 3
Regenboog chase 4
Regenboog chase 8
Auto mode
Test mode
Adresmode
Standaardinstelling
Grafische mode
DMX512 mode
2. Regeling met de SETUP knop:
N°
Data
1
2
3
4
5
FLASH
INTERVAL
RUN SNELHEID
AANTAL BUIZEN
DMX ADRES
Illustratie
Max
100
100
100
Meer dan 4000
255
Min
0
0
0
1
1
3. UP: vermeerdering van de data / herinstellen van de data; druk op SETUP om te bevestigen.
4. DOWN: vermindering van de data / de data herinstellen; druk op SETUP om te bevestigen.
5. Het DMX adres regelen:
• Druk MODE en kies de DMX mode.
• Druk SETUP om het programma binnen te gaan.
• Druk UP en DOWN om het DMX kanaal te selecteren. De sequentie van de vier kanalen is als volgt:
MODE, SNELHEID, INTERVAL, FLASH of 0, ROOD, GROEN en BLAUW.
• Druk SETUP
VDPLTC
7
VELLEMAN
• Installatie van de controller:
• DMX512 aanstuurmode:
1. MODE, SNELHEID, INTERVAL en FLASH
2. 0, ROOD, GROEN en BLAUW.
Mode 1: de waarde van het eerste kanaal over 0.
Mode 2: de waarde van het eerste kanaal is 0.
MODE 1 – DMX programma
Kanaal 1: kies de voorgeprogrammeerde programma’s
DMX
waarde
1-5
6-11
12-17
18-23
24-29
30-35
36-41
42-47
48-53
54-59
60-65
66-71
72-77
78-83
84-89
90-95
96-101
102-107
108-113
Programma
DMX
waarde
114-119
120-125
126-131
132-137
138-143
144-149
150-155
156-161
162-167
168-173
174-179
180-185
186-191
192-197
198-203
204-209
210-215
216-221
222-255
Black-out
Rood
Groen
Geel
Blauw
Purper
Cyaan
Wit
Snelle verandering
Slow flow 1
Snel Traag 1
Snel Traag 2
Black run 1
Roll chase
Roll kleur
Kleur ¼
Kleur 1 ¼
Kleur ½
Kleur flash
Programma
B & W flow
R & G flow
G & B flow
R & B flow
R & G chase 1
R & G chase 2
R & B chase 1
R & B chase 2
R & W chase 1
R & W chase 2
B & G chase 1
B & G chase 2
W & G chase 1
W & G chase 2
Regenboog chase 1
Regenboog chase 2
Regenboog chase 3
Regenboog chase 4
Regenboog chase 8
Kanaal 2: kies de snelheid van het programma van traag naar snel (0 – 255).
Kanaal 3: kies het interval van traag naar snel (0 – 255).
Kanaal 4: kies de stroboscoopfunctie van traag naar snel (0 – 255).
MODE 2 – RGB kleurmenging
Kanaal 1: Geen functie
Kanaal 2: ROOD met dimmerfunctie van 0 - 255
Kanaal 3: GROEN met dimmerfunctie van 0 – 255
Kanaal 4: BLAUW met dimmerfunctie van 0 - 255
VDPLTC
8
VELLEMAN
5. Reiniging en onderhoud
1. Alle gebruikte schroeven moeten goed zijn aangespannen en mogen geen sporen van roest vertonen.
2. De behuizing, de lenzen, de montagebeugels en de montageplaats (bvb. het plafond of het gebinte) mogen niet
vervormd zijn of aangepast worden (geen extra gaten in montagebeugels, aansluitingen niet verplaatsen etc.)
3. Mechanisch bewegende delen mogen geen sporen van slijtage vertonen en mogen niet onregelmatig bewegen.
4. De voedingskabels mogen niet beschadigd zijn. Laat het toestel onderhouden door een geschoolde technicus.
5. Ontkoppel het toestel van het lichtnet voor u aan onderhoudswerkzaamheden begint.
6. Maak het toestel geregeld schoon met een vochtige, niet pluizende doek. Gebruik geen alcohol of solvent.
7. De gebruiker mag geen onderdelen vervangen.
8. Bestel eventuele reserveonderdelen bij uw dealer.
6. Technische specificaties
Voeding
Verbruik
Levensduur
DMX aansluiting
Afmetingen
Gewicht
DC adapter 230VAC / 50-60Hz → 12VDC / 500mA
max. 1.5W
50000 - 100000 uur (LEDs).
3-pin XLR
180 x 125 x 49mm
360gr.
De informatie in deze handleiding kan te allen tijde worden gewijzigd zonder voorafgaande kennisgeving.
VDPLTC – DMX CONTROLLER FOR VDPLT1
1. Introduction
Aux résidents de l'Union Européenne
Des informations environnementales importantes concernant ce produit
Ce symbole sur l'appareil ou l'emballage indique que, si l'appareil est jeté après sa vie, il peut nuire à
l'environnement.
Ne jetez pas cet appareil (et des piles éventuelles) parmi les déchets ménagers; il doit arriver chez une firme
spécialisée pour recyclage.
Vous êtes tenu à porter cet appareil à votre revendeur ou un point de recyclage local.
Respectez la législation environnementale locale.
Si vous avez des questions, contactez les autorités locales pour élimination.
Nous vous remercions de votre achat! Le VDPLTC est un contrôleur DMX pour votre tube lumineux à LEDs. Lisez
attentivement la présente notice avant la mise en service de l'appareil. Si l’appareil a été endommagé pendant le
transport, ne l'installez pas et consultez votre revendeur.
2. Prescriptions de sécurité
Protégez l'appareil contre la pluie et l'humidité.
Débranchez le câble d'alimentation avant d'ouvrir le boîtier.
• La garantie ne s'applique pas aux dommages survenus en négligeant certaines directives de cette notice et votre
revendeur déclinera toute responsabilité pour les problèmes et les défauts qui en résultent.
• Un technicien qualifié doit s'occuper de l'installation et de l’entretien.
• Ne branchez pas l'appareil après exposition à des variations de température. Afin d’éviter des dommages,
attendez jusqu’à ce que l'appareil ait atteint la température ambiante avant de l'utiliser.
VDPLTC
9
VELLEMAN
• Cet appareil ressort à la classe de protection I, ce qui implique que l'appareil doit être mis à la terre. Un technicien
qualifié doit établir la connexion électrique.
• La tension réseau ne peut pas dépasser la tension mentionnée dans les spécifications à la fin de cette notice.
• Le câble d'alimentation ne peut pas être replissé ou endommagé. Demandez à votre revendeur de renouveler le
câble d'alimentation si nécessaire.
• Débranchez l’appareil s’il n’est pas utilisé ou pour le nettoyer. Tirez la fiche pour débrancher l'appareil; non pas le câble.
• Les dommages occasionnés par des modifications à l'appareil par le client, ne tombent pas sous la garantie.
• Gardez votre VDPLTC hors de la portée de personnes non qualifiées et de jeunes enfants.
3. Directives générales
• Cet appareil a été développé pour usage professionnel dans des discothèques, des théâtres, etc. Employez cet
appareil à l'intérieur et branchez-le à une source de courant CA de max. 230VCA / 50Hz.
• Evitez de secouer l'appareil et traitez l'appareil avec circonspection pendant l'installation et l'opération.
• Choisissez un endroit où l’appareil est protégé contre la poussière, l’humidité et des températures extrêmes (voir
“Spécifications techniques”). Respectez une distance minimum de 0.5m entre la sortie lumière de l’appareil et
la surface illuminée.
• Familiarisez-vous avec le fonctionnement de l'appareil avant de l’utiliser. Ne permettez pas aux personnes non
qualifiées d'opérer cet appareil. La plupart des dégâts sont causés par un usage non professionnel.
• Transportez l'appareil dans son emballage originel.
• Toute modification de l’appareil est interdite pour des raisons de sécurité.
4. Installation
• Fonctions:
1.
2.
3.
4.
5.
6.
7.
8.
Avec fonction d’entrée DMX512
38 programmes effets préprogrammés
Possibilité de connexion de 4000 tubes lumineux avec le contrôleur
Le mode automatique balaye automatiquement tous les programmes
Mixage de couleurs RGB, contrôlé par DMX (gradation via rouge, vert, bleu)
Stroboscope réglable
Vitesse et intervalle réglables pour la plupart des programmes
Fonction de sauvegarde automatique, sauvegarde le dernier mode de travail pour chaque programme
individuel
9. Supports en aluminium massif pour montage mural inclus
• Instructions:
1. AFFICHEUR LCD: montre toutes les informations concernant le mode de travail, paramètres etc.
2. MODE: choix entre le mode de travail et les programmes souhaités. L’afficheur montre la fonction choisie à
chaque manipulation. Maintenez enfoncez cette touche si vous souhaitez feuilleter dans les différents
modes plus rapidement (voir ci-dessous pour les options).
3. SET UP: Réglage du paramètre (intervalle, vitesse, nombre de flashs et tubes lumineux) du mode ou du
programme sélectionné. Quasiment chaque programme dispose de ses propres paramètres. Ces
paramètres seront mémorisés séparément pour chaque programme.
4. Touche UP: Choisissez une valeur supérieure pour le paramètre sélectionné.
5. Touche DOWN: Choisissez une valeur inférieure pour le paramètre sélectionné.
6. INTRRUPTEUR ON/OFF: Dés/activation d contrôleur. Le dernier mode de travail est mémorisé après la
désactivation du contrôleur.
VDPLTC
10
VELLEMAN
7. ENTREE DMX: La connexion XLR mâle à 3 broches reçoit les instructions de n’importe quel contrôleur
DMX universel.
8. SORTIE DMX: Reliez le contrôleur au tube lumineux qui suit dans la chaîne DMX à l’aide de la connexion
XLR femelle à 3 broches.
9. SORTIE: Reliez ce câble au premier tube lumineux de la série.
10. ENTREE CC: Connexion pour l’adaptateur CC 12V / 500mA fourni avec le contrôleur.
• Ligne du signal de données:
Ligne de données
1
2
3
Fonction
Mise à la terre
B signal femelle
A signal mâle
• Emploi:
Le contrôleur dispose de quatre touches de fonction:
1.
2.
3.
4.
MODE
SETUP
UP
DOWN
1. Réglage à l’aide de la touche MODE:
N°
1
2
3
4
5
6
7
8
9
10
11
12
13
14
15
16
17
18
19
20
21
22
VDPLTC
Fonction
Black-out
Rouge
Vert
Jaune
Bleu
Pourpre
Cyan
Blanc
Changement rapide
Slow flow 1
Rapide Lent 1
Rapide Lent 2
Black run 1
Roll chase
Roll couleur
Couleur ¼
Couleur 1 ¼
Couleur ½
Flash couleur
B & W flow
R & G flow
G & B flow
N°
23
24
25
26
27
28
29
30
31
32
33
34
35
36
37
38
39
40
41
42
43
44
11
Fonction
R & B flow
R & G chase 1
R & G chase 2
R & B chase 1
R & B chase 2
R & W chase 1
R & W chase 2
B & G chase 1
B & G chase 2
W & G chase 1
W & G chase 2
Chase arc-en-ciel 1
Chase arc-en-ciel 2
Chase arc-en-ciel 3
Chase arc-en-ciel 4
Chase arc-en-ciel 8
Auto mode
Test mode
Mode adresse
Réglage par défaut
Mode graphique
DMX512 mode
VELLEMAN
2. Réglage à l’aide de la touche SETUP:
N°
Données
1
2
3
4
5
FLASH
INTERVALLE
VITESSE RUN
NOMBRE DE TUBES
ADRESSE DMX
Illustration
Max
100
100
100
Plus de 4000
255
Min
0
0
0
1
1
3. UP: Augmentation des données / remise à zéro des données; enfoncez SETUP pour confirmer.
4. DOWN: Diminution des données / remise à zéro des données; enfoncez SETUP pour confirmer.
5. Réglage de l’adresse DMX:
• Enfoncez MODE et choisissez le mode DMX.
• Enfoncez SETUP pour entrer dans le programme.
• Enfoncez UP et DOWN pour sélectionner le canal DMX. La séquence des quatre canaux: MODE,
VITESSE, INTERVALLE, FLASH ou 0, ROUGE, VERT et BLEU.
• Enfoncez SETUP
• Installation du contrôleur:
• Mode ce contrôle DMX512:
1. MODE, VITESSE, INTERVALLE et FLASH
2. 0, ROUGE, VERT et BLEU.
Mode 1: la valeur du premier canal après 0.
Mode 2: la valeur du premier canal égale à 0.
MODE 1 – Programme DMX
Canal 1: Choix des programmes préprogrammés
Valeur
DMX
1-5
6-11
12-17
18-23
24-29
30-35
36-41
42-47
48-53
54-59
60-65
66-71
VDPLTC
Programme
Valeur
DMX
114-119
120-125
126-131
132-137
138-143
144-149
150-155
156-161
162-167
168-173
174-179
180-185
Black-out
Rouge
Vert
Jaune
Bleu
Pourpre
Cyan
Blanc
Changement rapide
Slow flow 1
Rapide Lent 1
Rapide Lent 2
12
Programme
B & W flow
R & G flow
G & B flow
R & B flow
R & G chase 1
R & G chase 2
R & B chase 1
R & B chase 2
R & W chase 1
R & W chase 2
B & G chase 1
B & G chase 2
VELLEMAN
72-77
78-83
84-89
90-95
96-101
102-107
108-113
Black run 1
Roll chase
Roll couleur
Couleur ¼
Couleur 1 ¼
Couleur ½
Flash couleur
186-191
192-197
198-203
204-209
210-215
216-221
222-255
W & G chase 1
W & G chase 2
Chase arc-en-ciel 1
Chase arc-en-ciel 2
Chase arc-en-ciel 3
Chase arc-en-ciel 4
Chase arc-en-ciel 8
Canal 2: Choix de la vitesse du programme de lent à rapide (0 – 255).
Canal 3: Choix de l’intervalle de lent à rapide (0 – 255).
Canal 4: Chois de la fonction stroboscope de lent à rapide (0 – 255).
MODE 2 – Mixage de couleurs RGB
Canal 1: Pas de fonction
Canal 2: ROUGE avec fonction de gradation de 0 - 255
Canal 3: VERT avec fonction de gradation de 0 – 255
Canal 4: BLEU avec fonction de gradation 0 - 255
5. Nettoyage et entretien
1. Serrez les écrous et les vis et vérifiez qu'ils ne rouillent pas.
2. Le boîtier, les lentilles, les supports de montage et la construction portante ne peuvent pas être déformés,
adaptés ou bricolés p.ex. pas de trous additionnels dans un support, ne pas déplacer les connexions etc.
3. Les parties mécaniques mobiles ne peuvent pas être usées ou bouger de manière irrégulière.
4. Les câbles d'alimentation ne peuvent pas être endommagés. Un technicien qualifié doit entretenir l’appareil.
5. Débranchez l'appareil avant de le nettoyer.
6. Essuyez l'appareil régulièrement avec un chiffon humide non pelucheux. Evitez l'usage d'alcool et de solvants.
7. Il n’y a pas de parties maintenables par l’utilisateur.
8. Commandez des pièces de rechange éventuelles chez votre revendeur.
6. Spécifications techniques
Alimentation
Consommation
Durée de vie
Connexion DMX
Dimensions
Poids
adaptateur CC 230VCA / 50-60Hz → 12VCC / 500mA
max. 1.5W
50000 - 100000 heures (LEDs).
XLR à 3 broches
180 x 125 x 49mm
360gr.
Toutes les informations présentées dans cette notice peuvent être modifiées sans notification préalable.
VDPLTC – CONTROLADOR DMX PARA VDLPT1
1. Introducción
A los ciudadanos de la Unión Europea
Importantes informaciones sobre el medio ambiente concerniente este producto
Este símbolo en este aparato o el embalaje indica que, si tira las muestras inservibles, podrían dañar el
medio ambiente.
No tire este aparato (ni las pilas eventuales) en la basura doméstica; debe ir a una empresa especializada
en reciclaje. Devuelva este aparato a su distribuidor o a la unidad de reciclaje local.
Respete las leyes locales en relación con el medio ambiente.
Si tiene dudas, contacte con las autoridades locales para eliminación.
VDPLTC
13
VELLEMAN
¡Gracias por haber comprado el VDPLTC! Es un controlador DMX para el tubo luminoso con LEDs. Lea
cuidadosamente las instrucciones del manual antes de usarlo. Verifique si el aparato ha sufrido algún daño en el
transporte antes de la puesta en marcha. Si es el caso, no conecte el aparato a la red y póngase en contacto con su
distribuidor.
2. Instrucciones de seguridad
No exponga este equipo a lluvia o humedad
Desconecte el cable de alimentación de la red antes de abrir la caja.
• Daños causados por descuido de las instrucciones de seguridad de este manual invalidarán su garantía y su
distribuidor no será responsable de ningún daño ni de otros problemas resultantes.
• La instalación y el mantenimiento deben ser realizados por personal especializado.
• No conecte el aparato si ha estado expuesto a grandes cambios de temperatura. Espere hasta que el aparato
llegue a la temperatura ambiente.
• Este aparato pertenece a la clase de protección I. Por lo tanto, es esencial que el aparato esté puesto a tierra. La
conexión eléctrica debe llevarla a cabo un técnico cualificado.
• Asegúrese de que la tensión de red no sea mayor que la tensión indicada en las especificaciones.
• No aplaste el cable de alimentación y protéjalo contra posibles daños causados por algún tipo de superficie
afilada. Si es necesario, pida a su distribuidor reemplazar el cable de alimentación.
• Desconecte siempre el aparato si no va a usarlo durante un largo período de tiempo o antes de limpiarlo. Tire
siempre del enchufe para desconectar el cable de red, nunca del propio cable.
• Los daños causados por modificaciones no autorizadas, no están cubiertos por la garantía.
• Mantenga el VDPLTC lejos del alcance de personas no capacitadas y niños.
3. Normas generales
• Este aparato ha sido diseñado para uso profesional en una discoteca, un teatro, etc. Utilice este aparato en
interiores y conéctelo a una fuente de corriente CA de máx. 230VCA / 50Hz.
• No agite el aparato. Evite usar excesiva fuerza durante la instalación y la reparación.
• Seleccione un lugar de montaje donde el aparato no esté expuesto al polvo, la humedad y temperaturas
extremas (véase “Especificaciones”). Respete una distancia mín. de 0.5m entre la salida de luz y el área
iluminada.
• Familiarícese con el funcionamiento del aparato. Sólo personas cualificadas pueden manejar este aparato. La
mayoría de los daños son causados por un uso inadecuado.
• Transporte el aparato en su embalaje original.
• Por razones de seguridad, las modificaciones no autorizadas del aparato están prohibidas.
4. Instalación
• Funciones:
1.
2.
3.
4.
5.
6.
7.
8.
9.
VDPLTC
Con función de entrada DMX512
38 programas con efectos preprogramados
Es posible conectar 4000 tubos luminosos al controlador
El modo automático explora automáticamente todos los programas
Mezcla de colores RGB, controlado par DMX (regulación del dimmer por rojo, verde, azul)
Estroboscopio regulable
Velocidad e intervalo regulables para la mayoría de los programas
Función de guarda automático, guarda el último modo de funcionamiento para cada programa individual
Soportes de aluminio masivo por montaje mural incl.
14
VELLEMAN
• Instrucciones:
1. PANTALLA LCD: visualiza todas las informaciones sobre el modo de funcionamiento, parámetros etc.
2. MODO: selección entre el modo de funcionamiento y los programas deseados. La pantalla visualiza cada
vez la función seleccionada. Mantenga pulsada esta tecla si quiere avanzar de manera más rápida en los
diferentes modos (véase abajo para las opciones).
3. SET UP: Ajuste del parámetro (intervalo, velocidad, número de destellos y tubos luminosos), del modo o
del programa seleccionado. Casi cada programa dispone de sus propios parámetros. Estos parámetros se
guardarán por separado para cada programa.
4. Tecla UP: Seleccione un valor superior para el parámetro seleccionado.
5. Tecla DOWN: Seleccione un valor inferior para el parámetro seleccionado.
6. INTRRUPTOR ON/OFF: Desactivación/activación del controlador. El último modo de funcionamiento se
guarda después de la desactivación del controlador.
7. ENTRADA DMX: La conexión XLR macho de 3 polos recibe las instrucciones de cualquier controlador
DMX universal.
8. SALIDA DMX: Conecte el controlador con la conexión XLR hembra de 3 polos al siguiente tubo luminoso
de la cadena DMX.
9. SALIDA: Conecte este cable al primer tubo luminoso de la serie.
10. ENTRADA CC: Conexión para el adaptador CC 12V / 500mA (incl.) con el controlador.
• Línea de la señal de datos:
Línea de datos
1
2
3
Función
Puesta a tierra
Señal B hembra
Señal A macho
• Uso:
El controlador dispone de cuatro teclas de función:
1.
2.
3.
4.
MODE
SETUP
UP
DOWN
1. Ajuste con la tecla MODE:
N°
1
2
3
4
5
6
7
8
9
10
11
VDPLTC
Función
Black-out
Rojo
Verde
Amarillo
Azul
Violeta
Cian
Blanco
Cambio rápido
Slow flow 1
Rápido Lento 1
N°
23
24
25
26
27
28
29
30
31
32
33
15
Función
R & B flow
R & G chase 1
R & G chase 2
R & B chase 1
R & B chase 2
R & W chase 1
R & W chase 2
B & G chase 1
B & G chase 2
W & G chase 1
W & G chase 2
VELLEMAN
12
13
14
15
16
17
18
19
20
21
22
Rápido Lento 2
Black run 1
Roll chase
Roll color
Color ¼
Color 1 ¼
Color ½
Flash color
B & W flow
R & G flow
G & B flow
34
35
36
37
38
39
40
41
42
43
44
Chase arco iris 1
Chase arco iris 2
Chase arco iris 3
Chase arco iris 4
Chase arco iris 8
Modo Auto
Modo Test
Modo dirección
Ajuste por defecto
Modo gráfico
Modo DMX512
2. Ajuste con la tecla SETUP:
N°
Datos
1
2
3
4
5
FLASH
INTERVALO
VELOCIDAD RUN
NÚMERO DE TUBOS
DIRECCIÓN DMX
Ilustración
Máx.
Mín.
100
0
100
0
100
0
Más de 4000
1
255
1
3. UP: Aumentar los datos / reinicializar los datos; pulse SETUP para confirmar.
4. DOWN: Disminuir los datos / reinicializar los datos; pulse SETUP para confirmar.
5. Ajustar la dirección DMX:
• Pulse MODE y seleccione el modo DMX.
• Pulse SETUP para entrar en el programa.
• Pulse UP y DOWN para seleccionar el canal DMX. La secuencia de los cuatro canales: MODO,
VELOCIDAD, INTERVALO, FLASH ó 0, ROJO, VERDE y AZUL.
• Pulse SETUP
• Instalar el controlador:
• Modo de control DMX512:
1. MODO, VELOCIDAD, INTERVALO y FLASH
2. 0, ROJO, VERDE y AZUL.
Modo 1: el valor del primer canal después de 0.
Modo 2: el valor del primer canal equivale a 0.
MODE 1 – Programa DMX
Canal 1: Seleccionar los programas preprogramados
Valor DMX
1-5
VDPLTC
Programa
Black-out
Valor DMX
114-119
16
Programa
B & W flow
VELLEMAN
6-11
12-17
18-23
24-29
30-35
36-41
42-47
48-53
54-59
60-65
66-71
72-77
78-83
84-89
90-95
96-101
102-107
108-113
Rojo
Verde
Amarillo
Azul
Violeta
Cian
Blanco
Cambio rápido
Slow flow 1
Rápido Lento 1
Rápido Lento 2
Black run 1
Roll chase
Roll color
Color ¼
Color 1 ¼
Color ½
Flash color
120-125
126-131
132-137
138-143
144-149
150-155
156-161
162-167
168-173
174-179
180-185
186-191
192-197
198-203
204-209
210-215
216-221
222-255
R & G flow
G & B flow
R & B flow
R & G chase 1
R & G chase 2
R & B chase 1
R & B chase 2
R & W chase 1
R & W chase 2
B & G chase 1
B & G chase 2
W & G chase 1
W & G chase 2
Chase arco iris 1
Chase arco iris 2
Chase arco iris 3
Chase arco iris 4
Chase arco iris 8
Canal 2: Seleccionar la velocidad del programa de lento a rápido (0 – 255).
Canal 3: Seleccionar el intervalo de lento a rápido (0 – 255).
Canal 4: Seleccionar la función estroboscopio de lento a rápido (0 – 255).
MODE 2 – Mezcla de los colores RGB
Canal 1: sin función
Canal 2: ROJO con función dimmer de 0 - 255
Canal 3: VERDE con función dimmer de 0 – 255
Canal 4: AZUL con función dimmer de 0 - 255
5. Limpieza y mantenimiento
1. Apriete bien las tuercas y los tornillos y verifique que no hay señales de oxidación.
2. No modifique la caja, los soportes y las ópticas p.ej. no taladre agujeros adicionales en un soporte o no modifique
las conexiones, etc.
3. Las partes móviles no pueden mostrar ningún rastro de desgaste y deben estar bien equilibradas.
4. No dañe los cables de alimentación. Contacte con un técnico especializado para instalar el aparato.
5. Desconecte el aparato de toda fuente antes de limpiarlo.
6. Limpie el aparato regularmente con un paño húmedo sin pelusas. Evite el uso de alcohol y de disolventes.
7. El usuario no habrá de efectuar el mantenimiento de ninguna pieza.
8. Contacte con su distribuidor si necesita piezas de recambio.
6. Especificaciones
Alimentación
Consumo
Duración de vida
Conexión DMX
Dimensiones
Peso
adaptador CC 230VCA / 50-60Hz → 12VCC / 500mA
máx. 1.5W
50000 - 100000 horas (LEDs).
XLR de 3 polos
180 x 125 x 49mm
360gr.
Se pueden modificar las especificaciones y el contenido de este manual sin previo aviso.
VDPLTC
17
VELLEMAN
VDPLTC – DMX-STEUERGERÄT FÜR VDPLT1
1. Einführung
An alle Einwohner der Europäischen Union
Wichtige Umweltinformationen über dieses Produkt
Dieses Symbol auf dem Produkt oder der Verpackung zeigt an, dass die Entsorgung dieses Produktes nach
seinem Lebenszyklus der Umwelt Schaden zufügen kann.
Entsorgen Sie die Einheit (oder verwendeten Batterien) nicht als unsortiertes Hausmüll; die Einheit oder
verwendeten Batterien müssen von einer spezialisierten Firma zwecks Recycling entsorgt werden.
Diese Einheit muss an den Händler oder ein örtliches Recycling-Unternehmen retourniert werden.
Respektieren Sie die örtlichen Umweltvorschriften.
Falls Zweifel bestehen, wenden Sie sich für Entsorgungsrichtlinien an Ihre örtliche Behörde.
Danke für Ihren Ankauf! Das VDPLTC ist ein DMX-Steuergerät für die VDPLT1 LED-Röhre. Bitte lesen Sie vor
Inbetriebnahme diese Bedienungsanleitung sorgfältig durch. Überprüfen Sie, ob Transportschäden vorliegen. Sollte
dies der Fall sein, verwenden Sie das Gerät nicht und wenden Sie sich an Ihren Händler.
2. Sicherheitsvorschriften
Seien Sie vorsichtig bei der Installation: Fassen Sie keine stromführenden Kabel an, um einen
lebensgefährlichen elektrischen Schlag zu vermeiden.
Trennen Sie das Gerät vor Öffnen des Gehäuses vom Netz.
• Bei Schäden, die durch Nichtbeachtung der Bedienungsanleitung verursacht werden, erlischt der
Garantieanspruch. Für daraus resultierende Folgeschäden übernimmt der Hersteller keine Haftung.
• Installation und Wartung sind einer autorisierten Fachkraft vorbehalten.
• Nehmen Sie das Gerät erst in Betrieb, nachdem es von einem kalten in einen warmen Raum gebracht wurde.
Lassen Sie das Gerät solange ausgeschaltet, bis es die Zimmertemperatur erreicht hat.
• Der Aufbau des Gerätes entspricht der Schutzklasse I. Gemäß den Vorschriften muss das Gerät geerdet sein.
Der elektrische Anschluss darf nur von einer Fachkraft durchgeführt werden.
• Vergewissern Sie sich, dass die anzuschließende Netzspannung nicht höher ist als die Netzspannung
beschrieben in dieser Bedienungsanleitung.
• Achten Sie darauf, dass die Netzleitung nicht gequetscht oder durch scharfe Kanten beschädigt werden kann. Bei
Beschädigungen soll eine Fachkraft das Kabel ersetzen.
• Trennen Sie das Gerät bei Nichtbenutzung und vor jeder Reinigung vom Netz. Fassen Sie dazu den Netzstecker
an der Grifffläche an und ziehen Sie nie an der Netzleitung.
• Beachten Sie, dass Schäden, die durch manuelle Veränderungen an diesem Gerät verursacht werden, nicht
unter den Garantieanspruch fallen.
• Halten Sie Kinder und Unbefugte vom Gerät fern.
3. Allgemeine Richtlinien
• Dieses Gerät ist eine Lichtsteuerung für den professionellen Einsatz auf Bühnen, in Discotheken, Theater, usw.
Das Gerät ist nur für den Anschluss an einen AC-Strom von max. 230Vac/50Hz zugelassen und wurde
ausschließlich zur Verwendung in Innenräumen konzipiert.
• Vermeiden Sie Erschütterungen. Vermeiden Sie rohe Gewalt während der Installation und Bedienung des
Gerätes.
• Achten Sie bei der Wahl des Installationsortes darauf, dass das Gerät keinem Staub, keiner Feuchtigkeit und
extremen Temperaturen ausgesetzt wird. Sorgen Sie für einen Abstand von minimal 50cm zwischen dem Gerät
und einer beleuchteten Oberfläche.
VDPLTC
18
VELLEMAN
• Nehmen Sie das Gerät erst in Betrieb, nachdem Sie sich mit seinen Funktionen vertraut gemacht haben. Lassen
Sie das Gerät nicht von Personen bedienen, die sich nicht mit dem Gerät auskennen. Meist ist die Beschädigung
des Gerätes das Ergebnis von unfachmännischer Bedienung.
• Verwenden Sie die Originalverpackung, wenn das Gerät transportiert werden soll.
• Eigenmächtige Veränderungen sind aus Sicherheitsgründen verboten.
4. Installation
• Funktionen:
1.
2.
3.
4.
5.
6.
7.
8.
9.
Mit DMX-512 Eingangsfunktion
38 vorprogrammierte Effektprogramme
Möglichkeit zum Anschließen von 4000 Röhren an das Steuergerät.
Automatischer Modus tastet automatisch alle Programme ab.
RGB-Farbmischung, DMX-gesteuert (Dimmer über rot, grün, blau)
Regelbares Stroboskop
Regelbare Geschwindigkeit und regelbares Intervall für die meisten Programme
Automatische Speicherfunktion, speichert den letzten Modus für alle individuellen Programme
Massive Aluhalterungen zur Montage an der Wand sind mitgeliefert.
• Anweisungen:
1. LCD-DISPLAY: zeigt alle notwendigen Informationen bezüglich Arbeitsmodus, Parameter usw.
2. MODUS: wählen Sie den gewünschten Arbeitsmodus und Programme. Das Display zeigt jedes Mal die
gewählte Funktion. Halten Sie diese Taste gedrückt wenn Sie schneller alle möglichen Modi durchblättern
wollen (siehe weiter für die Möglichkeiten).
3. SET UP (Konfiguration): regeln Sie den Parameter (Intervall, Geschwindigkeit, Anzahl der Blitze und
Röhren) des selektierten Modus oder Programms. Fast jedes Programm verfügt über seine eigenen
Parameter. Diese Parameter werden für jedes Programm separat gespeichert.
4. UP-Taste: wählen Sie einen höheren Wert für den gewählten Parameter.
5. DOWN-Taste: wählen Sie einen niedrigeren Wert für den gewählten Parameter.
6. ON/OFF-SCHALTER: schaltet das Steuergerät ein und aus. Der letzte Arbeitsmodus wird gespeichert
wenn das Steuergerät ausgeschaltet wird.
7. DMX-EINGANG: der 3-polige XLR-Anschluss empfängt Befehle von egal welchem DMXUniversalsteuergerät.
8. DMX-AUSGANG: Schließen Sie das Steuergerät mit der 3-poligen XLR-Buchse an die nächste Röhre in
der Reihe an.
9. AUSGANG: schließen Sie dieses Kabel an die erste Röhre in der Reihe an.
10. DC-EINGANG: Anschluss für den mitgelieferten 12V / 500mA DC-Adapter.
• Datensignal
Datenreihe
1
2
3
Funktion
Erdung
B "female" Signal
A "male" Signal
• Anwendung:
Das Steuergerät verfügt über 4 Funktionstasten:
VDPLTC
19
VELLEMAN
1.
2.
3.
4.
MODUS
SETUP (Konfiguration)
UP
DOWN
1. Regelung mit der MODUS-Taste
N°
1
2
3
4
5
6
7
8
9
10
11
12
13
14
15
16
17
18
19
20
21
22
Funktion
Black-Out
rot
grün
gelb
blau
purpurn
zyan
weiß
schnelle Änderung
"Slow Flow" 1
schnell langsam 1
schnell langsam 2
"Black Run" 1
"Roll Chase"
Roll Farbe
Farbe ¼
Farbe 1 ¼
Farbe ½
Farbenflash
"B & W Flow"
"R & G Flow"
"G & B Flow"
N°
23
24
25
26
27
28
29
30
31
32
33
34
35
36
37
38
39
40
41
42
43
44
Funktion
R & B "Flow"
R & G "Chase" 1
R & G "Chase" 2
R & B "Chase" 1
R & B "Chase" 2
R & W "Chase" 1
R & W "Chase" 2
B & G "Chase" 1
B & G "Chase" 2
W & G "Chase" 1
W & G "Chase" 2
"Regenbogen-Chase" 1
"Regenbogen-Chase" 2
"Regenbogen-Chase" 3
"Regenbogen-Chase" 4
"Regenbogen-Chase" 8
Auto-Modus
Test –Modus
Adressenmodus
Standardeinstelling
grafischer Modus
DMX512-Modus
2. Regelung mit der SETUP-Taste
N°
Daten
1
2
3
4
5
FLASH
INTERVALL
RUN GESCHWINDIGKEIT
RÖHRENANZAHL
DMX-ADRESSE
Abbildung
Max.
100
100
100
über 4000
255
Min.
0
0
0
1
1
3. UP: Erhöhung der Daten / erneut einstellen der Daten; drücken Sie SETUP zum Bestätigen.
4. DOWN: Daten reduzieren / Daten erneut einstellen; drücken Sie SETUP zum Bestätigen.
5. DMX-Adresse einstellen:
• Drücken Sie MODE und wählen Sie den DMX-Modus.
• Drücken Sie SETUP um das Programm zu öffnen.
• Drücken Sie UP und DOWN um den DMX-Kanal zu wählen. Die Sequenz der 4 Kanäle ist wie folgt:
MODUS, GESCHWINDIGKEIT, INTERVALL, FLASH oder 0, ROT, GRÜN und BLAU
• Drücken Sie SETUP
VDPLTC
20
VELLEMAN
• Installation des Steuergerätes
• DMX512-Steuermodus:
1. MODUS, GESCHWINDIGKEIT, INTERVALL und FLASH
2. 0, ROT, GRÜN und BLAU.
Modus 1: der Wert des ersten Kanals über 0.
Mode 2: der Wert des ersten Kanals ist 0.
MODE 1 – DMX-Programm
Kanal 1: wählen Sie die vorprogrammierten Programme
DMX-Wert
1-5
6-11
12-17
18-23
24-29
30-35
36-41
42-47
48-53
54-59
60-65
66-71
72-77
78-83
84-89
90-95
96-101
102-107
108-113
Programm
Black-Out
rot
grün
gelb
blau
purpurn
zyan
weiß
schnelle Änderung
langsamer "Flow"
schnell langsam 1
schnell langsam 2
"Black Run" 1
"Roll Chase"
"Roll Farbe"
Farbe ¼
Farbe 1 ¼
Farbe ½
"Farbe Flash"
DMX-Wert
114-119
120-125
126-131
132-137
138-143
144-149
150-155
156-161
162-167
168-173
174-179
180-185
186-191
192-197
198-203
204-209
210-215
216-221
222-255
Programm
B & W "Flow"
R & G "Flow"
G & B "Flow"
R & B "Flow"
R & G "Chase" 1
R & G "Chase" 2
R & B "Chase" 1
R & B "Chase" 2
R & W "Chase" 1
R & W "Chase" 2
B & G "Chase" 1
B & G "Chase" 2
W & G "Chase" 1
W & G "Chase" 2
"Regenbogen-Chase" 1
"Regenbogen-Chase" 2
"Regenbogen-Chase" 3
"Regenbogen-Chase" 4
"Regenbogen-Chase" 8
Kanal 2: wählen Sie die Geschwindigkeit des Programms langsam > schnell (0 – 255).
Kanal 3: wählen Sie das Intervall langsam > schnell (0 – 255).
Kanal 4: wählen Sie die Stroboskopfunktion von langsam > schnell (0 – 255).
MODUS 2 – RGB-Farbmischung
Kanal 1: keine Funktion
Kanal 2: ROT mit Dimmerfunktion von 0 - 255
Kanal 3: GRÜN mit Dimmerfunktion von 0 – 255
Kanal 4: BLAU mit Dimmerfunktion von 0 - 255
VDPLTC
21
VELLEMAN
5. Reinigung & Wartung
1. Verwendete Schrauben müssen fest angespannt werden und dürfen keine Rostspuren zeigen.
2. Das Gehäuse, die Linsen, die Montagebügel und der Montageort (z.B. Decke oder Gebinde) dürfen nicht angepasst
werden, z.B. bohren Sie keine zusätzlichen Löcher in Montagebügel, verändern Sie die Anschlüsse nicht, usw.
3. Mechanische bewegende Teile dürfen keine Spuren von Verschleiß aufweisen.
4. Sorgen Sie dafür, dass die Netzkabel nicht beschädigt sind. Lassen Sie das Gerät von einer Fachkraft warten.
5. Trennen Sie das Gerät vom Netz ehe Sie mit den Servicearbeiten anfangen.
6. Verwenden Sie zur Reinigung ein feuchtes Tuch. Verwenden Sie auf keinen Fall Alkohol oder irgendwelche
Lösungsmittel.
7. Die Teile dürfen nicht eigenmächtig ersetzt werden.
8. Bestellen Sie eventuelle Ersatzteile bei Ihrem Fachhändler.
6. Technische Daten
Stromversorgung
Stromaufnahme
Lebensdauer
DMX-Anschluss
Abmessungen
Gewicht
DC-Adapter 230VAC / 50-60Hz → 12VDC / 500mA
max. 1.5W
50000 - 100000 Stunden (LEDs).
3-poliger XLR-Anschluss
180 x 125 x 49mm
360g.
Alle Änderungen vorbehalten.
VDPLTC
22
VELLEMAN