1
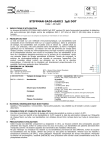
DIASpot Neptune
Gastritis IgG
KAPDTIFPCAN
DIAsource ImmunoAssays S.A. - Rue du Bosquet, 2 - B-1348 Louvain-la-Neuve - Belgium
: 130422/2
DIASpot Neptune Gastritis IgG
en
KAPDTIFPCAN
PROTOCOL : 02
IN VITRO DIAGNOSTIC
DIAsource ImmunoAssays SA - Rue du Bosquet 2, B-1348 Louvain-la-Neuve, Belgium - Tel: +32 10 84 99 11 - Fax : +32 10 84 99 90
INTENDED USE
1.
DIASpot Neptune Gastritis IgG is an Immunodot kit intended for the detection in human sera of IgG autoantibodies against the Intrinsic Factor and
the PCA antigen.
More information on the source/type of antigens is available via technical support department at [email protected]
PRINCIPLE OF THE TEST
2.
This kit is intended to be performed on the Neptune Instrument. The test is based on the principle of an Enzyme Immunoassay. The test strips are
composed of a membrane fixed on a specific plastic support. During the automated test procedure, the Neptune instrument sequentially incubates
the strips in the wells of ready-to-use reagent cartridges. Briefly: the strips are first incubated with diluted patients’ sera. Human antibodies, if
present, bind to the corresponding specific antigen(s) on the membrane. Unbound or excess antibodies are removed by washing. Upon further
incubation into AP-conjugated goat antibodies against human IgG, the enzyme conjugate binds to the antigen-antibody complexes. After removal of
excess conjugate by washing, the strips are finally incubated into a substrate solution. Enzyme activity, if present, leads to the development of
purple dots on the membrane pads. The intensity of the coloration is directly proportional to the amount of antibody present in the sample.
3.
KIT CONTENTS
Abbreviations in alphabetic order:
AP = Alkaline Phosphatase; BCIP = Bromo-Chloro-Indolyl-Phosphate; KCl = Potassium Chloride; MgCl2 = Magnesium Chloride;
MIT = MethylIsoThiazolone; NaCl = Sodium Chloride; NaN3: Sodium Azide; NBT = NitroBlue Tetrazolium; TBS = Tris Buffer Saline
STRIP
Dot strips
3 x 8 units on plastic supports
breakable individually; sealed in aluminium pouch
STRIP
CARTRIDGE
4 Dots on each:
1 positive control (C+)
2 antigens
1 negative control (C-)
Cartridge
24 units having each 7 compartments; sealed with aluminium
film:
CART
DIL
BUF
WASH
SOLN
Ab
AP
SUB
Other material
Diluent buffer
st
I position, 1 x 1,4 ml (yellow)
contains
H2O • TBS • NaCl • Tween • Preservative (MIT) •
:
Dye • Antifoam emulsion
Wash buffer
nd
rd
th
th
II , III ,IV and VI position, 4 x 1,4 ml (colourless)
contains
H2O • TBS • NaCl • Tween • Preservative (MIT) •
:
Antifoam emulsion
Conjugate
th
V position, 1 x 1,4 ml (red)
contains
H2O • TBS • NaCl • KCl • MgCL2 • AP-conjugated
:
goat anti-human IgG • Stabilizer • Preservative
(MIT)• Dye • Antifoam emulsion
Substrate
th
VII position, 1 x 1,4 ml (pale yellow solution)
contains
H2O • NaN3 (0.05 %) • MgCL2 • TBS • NBT • BCIP •
:
Stabilizer • Antifoam emulsion
Absorbent paper (for drying of tips pt 9.1.16), sealed Together
with Dot strips in aluminium pouch
4.
COMPULSORY MATERIAL
Neptune Instrument
MATERIAL REQUIRED BUT NOT PROVIDED
5.
Micropipettes / Laboratory gloves
Catalogue nr: KAPDTIFPCAN
PI number : 1701303/en
Revision nr : 130422/1
6.
STORAGE AND STABILITY
The test kit must be stored at a temperature between +2°C to +8°C. Do not freeze.
After initial opening of the kit, unused reagent cartridges must be stored at 2-8°C protected from (sun)light preferably inside the original kit box
Unused strips have to be placed back into the provided pouches, sealed and stored at 2-8°C preferably inside the original kit box.
When stored properly, all test kit components are stable until the indicated expiry date.
SAFETY PRECAUTIONS
7.
All reagents are for in vitro diagnostic and professional use only. The test kit should be processed by trained technical staff only.
The kit contains potentially hazardous components, thus contact with skin, eyes or mucosae has to be avoided.
Patient samples shall be handled with care as being a potential infection hazard.
Waste disposal: Patient samples and incubated test strips should be handled as infectious waste. Other reagents do not need to be collected
separately, unless stated otherwise in official regulations.
DIAsource ImmunoAssays S.A. and its authorized distributors shall not be liable for damages indirectly or consequentially brought about by
changing or modifying the procedure indicated.
In any case, GLP should be applied with all general and individual regulations to the use of this kit.
SAMPLE COLLECTION, HANDLING AND STORAGE
8.
Blood samples can be collected in dry tubes or in tubes containing EDTA, heparin or citrate. After separation serum or plasma samples can
generally be stored at 2-8°C for up to three days. Long term storage requires freezing at -20°C. Avoid repeated freezing/thawing cycles. After
freezing always agitate samples before use to ensure homogeneity.
ASSAY PROCEDURE
9.
BASIC INFORMATION, HANDLING AND TIPS:
TEST PROCESS principle:
After manual loading of the strips and reagent cartridges, the incubation and washing steps of the procedure are automatically processed by the
Neptune instrument which ensures an efficient circulation of fluids over the strips by continuously agitating them up and down in the wells of readyto-use reagent cartridges. The whole test procedure is run at room temperature.
STRIPS description:
The reactive (front) side of the strips is coated with antigens
which appear as faint blue dots. This coloration ensures that
all antigens have been correctly spotted onto the membrane.
The coloration disappears during the processing of the test.
This front side also displays a strip number and a 2dimensional square barcode for traceability of the strips after
removal from the Neptune instrument at the end of the test.
The non-reactive (back) side of the strips displays both
alphanumeric and bar-coded information for identification of the
strip type and lot number by the Neptune instrument.
The strips must be manually inserted into the dedicated clamp before starting the automated process (see Test Preparation hereafter, pt 9.1.4).
During this operation, avoid touching the membrane zone of the strips with fingers. Always wear laboratory gloves and use the plastic parts (strip
support) for handling or manipulation.
REAGENT CARTRIDGES description: (see image on page 1)
The reagent cartridges are composed of 7 different wells filled with ready-to-use reagents. The cartridges are sealed (and reagent wells are
hermetically separated) with an aluminium foil which has to be removed before starting the test. Once opened, manipulate the cartridges with care
in order to avoid reagent spilling and contamination from well to well.
The rear (back) side of the cartridges is labelled with both alphanumeric and bar-coded information for identification of the cartridge type and lot
number by the Neptune instrument.
The cartridges must be manually loaded onto the dedicated cartridge holder before starting the automated process (see Test Preparation hereafter,
pt 9.1.10). The front and rear (back) sides of the cartridges have, respectively, a bottom triangular and two (bottom + top) square plastic edges for
secure position and orientation into the holder.
STRIPS/CARTRIDGES associations
The strips and cartridges of a same test kit share the same lot number and are dedicated to be associated in lot-specific pairs. Do not associate, in
a same pair, a strip and a cartridge with different lot numbers as this will be detected as an invalid setting by the Neptune instrument and will stop
the process.
As far as each strip/cartridge pair is valid, the Neptune instrument can process strips/cartridges associations of different kits; However, only kits
having the same protocol number (same incubation time and sequence) can be processed together in one same run (please refer to the protocol
number indicated under the kit reference at the top of first page).
9.1 Test preparation
Allow all kit components to equilibrate at room temperature (+18°C to +25°C) before use.
A working list (either edited from Neptune quantification software, or external) should always be prepared for easy loading and correct
association of strips, cartridges and patient samples.
Make sure that the cartridge holder is fixed in its emplacement in the Neptune instrument.
Make sure that the Neptune Instrument is plugged in.
The following steps sequence summarizes the loading and preparation of the Neptune instrument, test strips, reagent cartridges and patient
samples before starting the test. For detailed information or in case of any problem met at one of the following steps, please refer to the Manual of
Use of the Neptune instrument.
1. Switch ON the Neptune instrument and wait a few seconds until the date and time are displayed on the touch screen.
2. Confirm the correct Date and Time by pressing
on the touch screen (in case of first use or for reset, refer to the manual of use of the
Neptune instrument) → “Initialize?” is displayed on the screen.
3. Confirm Initialization by pressing
on the touch screen → the horizontal arm of the instrument automatically moves forward to a central (standby) position → “Load strips (24”) is displayed on the screen
4. (Do not set nor confirm the number of strips at this step). Remove the clamp from its emplacement on the arm by gently pulling it upwards and
load the strips to be tested: handle the clamp with numbered side facing up (open position) and insert the strips, also with numbered (reactive)
Catalogue nr: KAPDTIFPCAN
PI number : 1701303/en
Revision nr : 130422/1
side facing up, by slipping the upper plastic part (tongue) into the dedicated holes of the clamp. Apply a gentle pressure to ensure that the
plastic tongue has reached the bottom end of the hole.
Notes:
- Always start loading into position 1 of the clamp (left side) and do not leave empty spaces between the strips!
- After complete loading, check visually the vertical, horizontal and lateral alignment of the strips. Any obvious misalignment should be
corrected by unloading the strip(s) from the clamp and loading them again.
Replace the clamp in its emplacement on the arm by gently pushing it downwards
Set the number of loaded strips using the up and down arrows on the touch screen.
Confirm the number of loaded strips by pressing
on the touch screen → the horizontal arm automatically moves backward to stand over the
alignment holes of the cartridge holder → “Check alignment” is displayed on the screen.
Use the “JOG” function on the screen to check the correct alignment of the strips: maintain a gentle pressure on the down arrow on the touch
screen until the bottom of the strips enters into the alignment holes of the cartridge holder. If correctly aligned, the strips will not touch the
outlines of the holes.
Note: in case of misalignment (contact of the strips with the cartridge holder), please refer to the Manual of Use of the Neptune instrument).
Confirm the correct alignment of the strips by pressing on the touch screen → the Neptune instrument lowers the strips completely into the
alignment holes and reads the barcodes of the strips → after complete barcode reading, “Load reagent” is displayed on the touch screen.
Note: in case of failure to read one or more strip(s) barcode(s) (flashing LED at the unread position), please refer to the Manual of Use of the
Neptune instrument.
Unseal the reagent cartridges and insert them under their respective strips in the dedicated notches of the cartridge holder.
Confirm complete loading by pressing on the touch screen → the Neptune instrument reads the cartridges barcodes and checks the correct
association with the strips → after complete barcode reading, the number of strips (validated strips/cartridges associations) is displayed on the
screen.
Note: in case of failure to read one or more cartridge(s) barcode(s), or in case of detection of a wrong strip/cartridge association (flashing LED
at the corresponding position), please refer to the Manual of Use of the Neptune instrument.
Confirm the number of strips by pressing on the touch screen → the protocol number identified on the barcodes is displayed on the screen
(Protocol ID xx.).
Confirm the protocol number by pressing on the touch screen → “Please close cover.” is displayed on the screen.
Close the cover of the Neptune instrument and confirm closing by pressing on the touch screen → the Neptune instrument proceeds to a first
nd
washing (pre-treatment) step by incubating the strips into the 2 well of the cartridges (processing time: 1 minute) → At the end of the wetting
step, “Please open cover.” is displayed on the screen.
Open the cover of the Neptune instrument and confirm opening by pressing on the touch screen → the horizontal arm automatically moves
forward to the front of the instrument and swings the strips to an oblique position → “Dry strips” is displayed on the screen.
Dry the strips by gently applying absorbent paper onto the basis of the bottom small cavity (sample loading hole).
Confirm drying by pressing on the touch screen → “Apply samples” is displayed on the screen.
Apply samples by pipeting 10 µl of patient serum/plasma into the bottom sample loading holes of the strips.
Confirm samples’ loading by pressing on the touch screen → “Please close cover” is displayed on the screen.
Close the cover of the Neptune instrument and confirm closing by pressing on the touch screen → the Neptune starts the test automatically
by proceeding the following steps sequence (Protocol 02):
5.
6.
7.
8.
9.
10.
11.
12.
13.
14.
15.
16.
17.
18.
19.
20.
9.2 Test processing
Step
01.
02.
03.
04.
05.
06.
07.
08.
09.
10.
Description
st
The strips are incubated into the 1 well of the cartridge (Diluent Buffer). Upon contact with the liquid in the wells
and agitation, the pre-loaded patients’ samples (see 9.1.18) are released from the small cavity at the bottom of the
strips and are diluted in the buffer.
nd
The clamp moves forward and the strips are incubated into the 2 well of the cartridge (Wash Buffer)
rd
The clamp moves forward and the strips are incubated into the 3 well of the cartridge (Wash Buffer)
th
The clamp moves forward and the strips are incubated into the 6 well of the cartridge (Wash Buffer)
th
The clamp moves backwards and the strips are incubated into the 5 well of the cartridge (Conjugate)
th
The clamp moves backwards and the strips are incubated into the 4 well of the cartridge (Wash Buffer)
rd
The clamp moves backwards and the strips are incubated into the 3 well of the cartridge (Wash Buffer)
nd
The clamp moves backwards and the strips are incubated into the 2 well of the cartridge (Wash Buffer)
th
The clamp moves forward and the strips are incubated into the 7 well of the cartridge (Substrate)
th
The clamp moves backwards and the strips are incubated into the 6 well of the cartridge (Wash Buffer)
Processing time
30 min
2 min
2 min
2 min
10 min
2 min
2 min
2 min
10 min
2 min
After completion of the process, the clamp moves to a central (stand-by) position in the Neptune Instrument to allow easy manipulation of the clamp.
The instrument beeps and ”Finished test” is displayed on the screen.
Gently apply absorbent paper onto the basis of the strips to remove liquid from the bottom small cavity (sample loading hole) and allow the strips to
dry for 10 minutes before interpretation of the results.
In case of use of the Neptune Scanner for help of results interpretation, please leave the processed strips attached to the clamp.
TEST DATA REGISTRATION
The test protocol can be downloaded by pressing the USB stick symbol and following the indications on the screen (Insert USB → Writing USB →
Remove USB). This step is not obligatory but is highly recommended for traceability and regulatory matters
10.
RESULTS INTERPRETATION
A visual evaluation of the results can be performed, however the use of the Neptune quantification software and Neptune scanner system is
generally recommended for more precise and semi-quantitative interpretation. More information on Neptune quantification software is available via
your distributor or via our website www.diasource.be
10.1 Visual interpretation:
Remove the clamp from the Neptune instrument and unload the strips from the clamp.
1.
2.
Place the strips with reactive face up onto the marked fields of the Neptune Interpretation Template provided with the kit. This will indicate the
respective positions of the different controls and antigens on the membrane.
The first upper Dot (Positive control) must be positive for all patients.
3.
Only a clearly coloured positive Control Dot ensures your results are valid and operation was correct and/or kit components were not degraded.
If the first upper Dot is not coloured, the test has failed and cannot be interpreted further.
Catalogue nr: KAPDTIFPCAN
PI number : 1701303/en
Revision nr : 130422/1
Compare the specific antigen Dots to the Negative Control Dot (which always is the last bottom dot).
The colour intensity of the Antigen Dots is directly proportional to the titer of the specific antibody in the patient sample.
The colour intensity of the Negative Control dot may vary depending on the sample characteristics. If the sample is free of interfering
substances the Negative Control dot may be even close to uncoloured. In contrast, a highly coloured Negative Control dot indicates a high rate
of unspecific binding in the sample.
POSITIVE RESULT:
A sample is positive for a specific antibody if the colour intensity of the corresponding Antigen Dot is higher than the
intensity of the Negative Control Dot.
NEGATIVE RESULT:
A sample is negative for a specific antibody if the colour intensity of corresponding Antigen Dot is lower than or equal
to the intensity of the Negative Control Dot.
10.2 Use of Neptune quantification software and scanner system
1. Remove the clamp from the Neptune instrument. Leave the processed strips attached to the clamp.
2. Insert the clamp, the reactive side of the strips facing down, into the dedicated emplacement in the cover of the Neptune scanner.
3. Start scanning the strips using the Neptune quantification software.
For detailed information about the Neptune Scanner and Neptune quantification software please refer to the Manual of Use of your Neptune
quantification software
11. TEST PERFORMANCES
11.1 Reproducibility
Reference control samples were tested for each antibody in statistically relevant repetitions in a same run or over several runs for the calculation of
intra- and inter-assay variation, respectively. In every case the intensity of the Dots were within the specified range and standard deviations were
less than 10 %
Detailed analytical data are available upon request.
4.
11.2 Sensitivity and Specificity
Characterized samples (confirmed positive or negative for specific antibodies by reference methodologies) were assayed following the test
instructions. Reaction intensities were evaluated using the Neptune quantification software. Sensitivity and Specificity were calculated from ROC
analysis at the cut-off values automatically measured by the Neptune quantification software.
12. TEST LIMITATIONS
A clinical diagnosis should not be made on the basis of a single in vitro diagnostic method only. A complete clinical investigation, as well as other
laboratory test results, should be considered to state a diagnosis, since no technique used alone can rule out the possibility of false-positive or
false-negative results. In this respect, more particularly an indirect Immunofluorescence test, when applicable, should be performed in parallel with
the determination of autoantibodies by DIASpot Neptune, as Immunofluorescence is often considered as a gold reference screening technique in
autoimmunity.
Revision date : 2013-04-22
Catalogue nr: KAPDTIFPCAN
PI number : 1701303/en
Revision nr : 130422/1
es
DIASpot Neptune Gastritis IgG
KAPDTIFPCAN
PROTOCOL : 02
IN VITRO DIAGNOSTIC
DIAsource ImmunoAssays SA - Rue du Bosquet 2, B-1348 Louvain-la-Neuve, Belgium - Tel: +32 10 84 99 11 - Fax : +32 10 84 99 90
1.
DIASpot Neptune Gastritis IgG es un kit de inmunodot destinado a la detección de antígenos en suero humano de anticuerpos IgG contra
Intrinsic Factor y PCA antigeno.
Mas información sobre la fuente/tipo de antígenos utilizados esta disponible a través de su distribuidor o a través nuestro Departamento de soporte técnico :
[email protected].
2.
PRINCIPIO DEL ENSAYO
Este kit esta diseñado para utilizarlo en el instrumento Neptune. Este test esta basado en el principio del Enzimoinmunoensayo. Las tiras
del ensayo se componen de una membrana fijada a un suporte específico de plástico. Durante el procedimiento del ensayo automatizado
el instrumento Neptune secuencialmente incuba las tiras en los pocillos de los cartuchos con los reactivos listos para su uso. Brevemente:
Las tiras son incubadas primero con sueros de pacientes diluidos. Los anticuerpos humanos, si están presentes, se enlazan a los
antígenos específicos correspondientes en la membrana. Los anticuerpos no enlazados o en exceso se eliminan mediante lavado. Después
de una incubación adicional en anticuerpos de cabra conjugados con AP contra IgG humana el conjugado enzimático se une a los
complejos antígeno-anticuerpos. Después de eliminar el exceso de conjugado, por lavado, las tiras son incubadas finalmente en solución
de sustrato. La actividad enzimática, si esta presente, desarrolla unos puntos de color púrpura en los pocillos de la membrana. La
intensidad de la coloración es directamente proporcional a la cantidad de anticuerpo presente en la muestra.
3.
CONTENIDO DEL KIT
Abreviaciones en orden alfanumérico:
AP = Fosfatasa Alcalina; BCIP = Fosfato de Bromo-Cloro-Indolil-Phosphate; KCl = Cloruro de potasio; MgCl2 = Cloruro de Magnesio;
MIT = MetilIsoTiazolona; NaCl = Cloruro Sodico; NaN3: Azida sodica; NBT = Nitroazul Tetrazolio; TBS = Tris Buffer Salino
3 x 8 unidades en soporte plástico
Separables individualmente; sellados en aluminio
STRIP
4
1
2
1
CART
DIL
CARTUCHO
Dots en cada:
control positivo (C+)
antígenos
control negativo (C-)
24 unidades con 7 compartimientos; sellados con
aluminio:
BUF
1ª position, 1 x 1,4 ml (amarillo)
contiene:
WASH
TIRA
SOLN
H2O • TBS • NaCl • Tween • Conservante (MIT) •
Dye • Antiespumante de emulsión
2ª, 3ª,4ª y 6ª posición, 4 x 1,4 ml (incoloro)
contiene:
H2O • TBS • NaCl • Tween • Conservante (MIT) •
Antiespumante de emulsión
ª
Ab
AP
5 posición, 1 x 1,4 ml (rojo)
contiene:
SUB
Otros
materiales
material
4.
MATERIAL
H2O • TBS • NaCl • KCl • MgCL2 • AP-conjugado
anti-humano de cabra IgG • Estabilizante •
Conservante (MIT)• Dye • Antiespumante de
emulsión
7ª posición, 1 x 1,4 ml (solución Amarillo palido)
contiene:
H2O • NaN3 (0.05 %) • MgCL2 • TBS • NBT • BCIP
• EStabilizante • Antiespumante de emulsión
Papel absorbente (para secar las tiras pt 9.1.16),
junto con las tiras de sellado Dot en bolsa de
alumínio
OBLIGATORIO
Instrumento Neptune
5.
MATERIAL NECESARIO PERO NO SUMINISTRADO
Micropipetas / Guantes de Laboratorio
6.
ALMACENAJE Y ESTABILIDAD
El kit debe ser almacenado a una temperatura entre +2ºC y +8ºC. No congelar.
Después de abrir el kit los cartuchos no utilizados deben de almacenarse a 2-8ºC protegidos de la luz, preferiblemente dentro de la caja
original.
Las tiras no utilizadas deben de guardarse en las bolsas suministradas selladas y almacenarlas a 2-8ºC preferiblemente dentro de la caja
original.
Cuando se almacena adecuadamente, todos los componentes son estables hasta la fecha de caducidad indicada.
7.
MEDIDAS DE SEGURIDAD
Todos los reactivos son para uso en diagnostico in vitro y profesional. El equipo de prueba debe ser procesado solo por personal técnico
cualificado.
El kit contiene componentes potencialmente peligrosos, por lo tanto debe de evitarse el contacto con piel, ojos y mucosas.
Los componentes de sangre humana utilizados en este kit han sido testados por métodos aprobados por la CEE y/ó la FDA dando
negativo a HBsAg, anti-HCV, anti-HIV-1 y 2. No se conoce ningún método que asegure que los derivados de la sangre humana no
transmitan hepatitis, SIDA ó otras infecciones. Por lo tanto el manejo de los reactivos y muestras se hará de acuerdo con los
procedimientos de seguridad locales.
Las muestras de paciente deben de ser manejadas con cuidado por existir un peligro potencial de infección.
Catalogue nr: KAPDTIFPCAN
PI number : 1701303/es
Revision nr : 130422/1
Eliminación de residuos: Las muestras de pacientes y las tiras utilizadas deben de tratarse como desechos infecciosos. Otros reactivos no
deben de recogerse por separado a no ser que lo indiquen los reglamentos oficiales.
DIAsource ImmunoAssays S.A. y sus Distribuidores autorizados no se hacen responsables de los daños indirectamente provocados por el
cambio o modificación del procedimiento.
En cualquier caso, el GLP se debe aplicar todas las normas generales y particulares para el uso de éste kit.
8.
RECOGIDA DE MUESTRAS, MANEJO Y ALMACENAJE
Las muestras de sangre pueden recogerse en tubos secos o tubos con EDTA, heparina o citrato. Después de la separación las muestras
de suero o plasma se pueden guardar a2-8ºC durante tres días. Para periodos más largos deben ser congeladas a -20ºC. Evitar congelar
y descongelar varias veces. Después de descongelar agitar las muestras antes de ser utilizadas para asegurar su homogeneidad.
9.
PROCEDIMIENTO
INFORMACIÓN BÁSICA, MANEJO Y CONSEJOS:
Principio del ensayo:
Después de la carga manual de las tiras y los cartuchos de reactivos, la incubación y los pasos de lavado se procesan automáticamente
por el instrumento Neptune el cual asegura la circulación eficiente de los fluidos sobre las tiras por un agitación de arriba hacia abajo en
los pocillos de los cartuchos de reactive. El procedimiento se realiza a temperatura ambiente.
TIRAS descripción:
Parte reactiva (parte frontal) los antígenos recubren
las tiras las cuales presentan unos puntos azulados
débiles. Esta coloración asegura que los antígenos han
sido impregnados en la membrana La coloración
desaparece durante el procedimiento. La parte frontal
también muestra el número de la tira y el código de
barras 2-dimensional cuadrado para la rastreabilidad de
las tiras después de retirar las tiras del instrumento
Neptune al final del ensayo.
Parte no-reactiva (reverso) de las tiras muestra
información alfanumérica y código de barras para la
identificación del tipo de tira y número de lote por parte del
instrumento Neptune.
Las tiras deben de ser insertadas manualmente en la abrazadera antes de iniciarse (ver preparación de la prueba pt 9.1.4).Durante esta
operación no toque la zona de la membrana de las tiras con los dedos. Utilizar siempre guantes y utilizar las partes de plástico (soporte
de la tira) para el manejo o manipulación.
CARTUCHOS DE REACTIVO descripción: (ver imagen en pagina 1)
Los cartuchos de reactivo se componen de 7 diferentes pocillos rellenos de reactivos listos para su uso. Los cartuchos van sellados (todos
los pocillos están herméticamente separados) con aluminio que se puede retirar antes de iniciar el test. Una vez abiertos, manejar los
cartuchos con cuidado con el fin de evitar el derrame y la contaminación de pocillo a pocillo.
La parte posterior de los cartuchos están etiquetadas con información alfanumérica y un código de barras para la identificación del tipo de
cartucho y número de lote por parte del instrumento Neptune.
Los cartuchos pueden ser cargado manualmente en la posición asignada para cartuchos antes de iniciar el proceso automatizado (ver la
preparación del test, pt 9.1.10). La parte frontal y posterior de los cartuchos tienen, respectivamente, un fondo triangular y dos (inferior
y superior) cuadrados de plástico para asegurar la posición y orientación dentro de su soporte.
TIRAS/CARTUCHOS asociaciones
Las tiras y cartuchos del mismo kit comparten el mismo número de lote y se dedican a ser utilizados en pares de los mismos números de
lotes asociados. En caso de no asociación, una tira y un cartucho de diferente número de lote es detectado por el instrumento Neptune
como invalido y se para el proceso.
En el momento en cada pareja de tira/cartucho es válida, el instrumento Neptune puede procesar diferentes kits a la vez; sin embargo
solo se pueden procesar a la vez kits que tengan el mismo número de protocolo (incubación y secuencia de ensayo) (observar el número
de protocolo indicado debajo de la referencia del kit en la primera pagina de las instrucciones de uso).
9.1 Preparación del ensayo
Conseguir que todos los componentes del kit estén a temperatura ambiente (+18ºC a 25ºC) antes de ser utilizados.
La lista de trabajo (obtenida desde el software para cuantificación Neptune o externa) debería de prepararse con el fin de
facilitar la carga correcta de las tiras y los cartuchos asociadas a sus muestras.
Asegurarse que el cartucho se coloca correctamente en su posición del instrumento Neptune
Asegurarse que el instrumento Neptune esta conectado
Los siguientes pasos resumen la secuencia de los pasos de carga y preparación del instrumento Neptune, tiras de test, cartuchos de
reactivos y muestras de paciente antes de iniciar el test. Para información más detallada o en caso de cualquier problema e uno de los
siguientes pasos consultar el Manual de Usuario del instrumento Neptune.
1. Conectar el instrumento Neptune Instrument y esperar unos segundos hasta que la fecha y la hora aparezcan en la pantalla táctil.
2. Confirmar la fecha y hora correctas presionando
en la pantalla táctil (la primera vez o para resetear, consultar el Manual de
Usuario del Neptune Instrument) → “Inicializar?” aparece en la pantalla.
3. Confirmar inicialización presionando
en la pantalla táctil → el brazo horizontal se mueve hacia la posición central automáticamente
(posición de reposo) → “Cargar tiras (24”) aparece en la pantalla
4. (No confirmar el número de tiras en éste paso). Retire la abrazadera del brazo tirando hacia arriba y cargue las tiras que se van a
utilizar: manejar la pinza con la cara numerada hacia arriba (posición abierta) y cargar las tiras, también con la numeración (reactivo)
hacia arriba, por deslizamiento de la parte superior de plástico (lengua)en los orificios de la abrazadera. Presionar suavemente para
asegurar que la lengüeta de plástico ha alcanzado el extremo inferior del agujero
Notas:
- Colocar las tiras a partir de la posición 1 de la abrazadera (parte izquierda) y no dejar espacios entre las tiras!
- Después de cargar las tiras comprobar el alineamiento vertical, horizontal y lateral de las tiras. Cualquier mal alineamiento debe
de ser corregido antes de colocar la abrazadera en el brazo.
5. Vuelva a colocar la abrazadera en su emplazamiento presionando suavemente hacia abajo.
6. Indicar el número de tiras cargadas utilizando la flecha hacia arriba o hacia abajo en la pantalla táctil
7. Confirmar el número de tiras cargadas presionando
en la pantalla táctil → El brazo horizontal se mueve automáticamente y se
posiciona sobre los orificios de alineación de los cartuchos → “Chequear alineamiento” aparece en la pantalla.
8. Utilice la función “Paso a paso” para comprobar la perfecta alineación de las tiras: presionar suavemente la flecha hacia abajo hasta
que las tiras entren en el orificio de los cartuchos. Si el alineamiento es correcto las tiras no deben de tocar las paredes de los orificios.
Nota: en caso de mal alineamiento (roce de las tiras con el orificio del cartucho), remitirse al Manual de Usuario del instrumento
Neptune Instrument.
Catalogue nr: KAPDTIFPCAN
PI number : 1701303/es
Revision nr : 130422/1
9. Confirmar el alineamiento correcto de las tiras presionando en la pantalla táctil →El instrumento Neptune Instrument introduce las
tiras en los orificios de alineamiento y lee los códigos de barras de las tiras → después de leer los códigos de barras, aparece “Cargar
reactivos” en la pantalla táctil.
Nota: en caso de fallo en la lectura de una o más tiras (una LED intermitente marcara la posición no leída), remitirse al Manual de
Usuario del instrumento Neptune Instrument.
10. Desprecintar los cartuchos de reactivo e insertarlos con el código de barras hacia dentro en las respectivas muescas destinadas a
soportar los cartuchos.
11. Confirmar la carga presionando en la pantalla táctil → El instrumento Neptune Instrument lee los códigos de barras de los cartuchos
y chequea la correcta asociación con las tiras → después de la lectura de los códigos de barras el número de tiras aparece en pantalla
(tiras validadas/cartuchos asociados).
Nota: en caso de fallo en la lectura de uno o mas cartuchos o detección errónea de asociación tira/cartucho (la LED correspondiente
parpadeara) remitirse al Manual de Usuario del Instrumento Neptune Instrument.
12. Confirmar el número de tiras presionando en la pantalla táctil → el número de protocolo identificado en el código de barras aparece
en la pantalla (ID Protocolo: xx.).
13. Confirmar el número de protocolo presionando en la pantalla táctil → “Por favor, cerrar la tapa” aparece en la pantalla.
14. Cerrar la tapa del instrumento Neptune Instrument y confirmar que se ha cerrado presionando
en la pantalla táctil → El
instrumento procede a efectuar el primer lavado (pre-tratamiento) incubando las tiras en el 2nd pocillo de los cartuchos (1 minuto) →
al final del paso de hidratación, “Por favor, abrir la tapa” aparece en la pantalla.
15. Abrir la tapa del instrumento Neptune Instrument y confirmar presionando en la pantalla táctil → el brazo horizontal se mueve
automáticamente hacia el frente del instrumento y colocando las tiras de forma oblicua → “Secar tiras” aparece en la pantalla.
16. Secar las tiras con un papel absorbente suavemente en la parte inferior de las tiras (orificio donde se dispensa la muestra).
17. Confirmar el secado presionando en la pantalla táctil → “Aplicar muestras” aparece en la pantalla.
18. Dispensar las muestras pipeteando 10 µl de suero/plasma de paciente en el orificio inferior de las tiras.
19. Confirmar las carga de las muestras presionando en la pantalla táctil → “Por favor, cerrar la tapa” aparece en pantalla.
20. Cerrar la tapa del instrumento Neptune Instrument y confirmar que se ha cerrado presionando en la pantalla táctil → El Neptune
Instrument empezara automáticamente el proceso según la secuencia de pasos (Protocolo 02):
9.2 Procedimiento
Paso
Descripción
Tiempo
empleado
02.
03.
04.
Las tiras son incubadas en el 1st pocillo del cartucho (Tampón de dilución). Al entrar en contacto con el
liquido de los y la agitación, las muestras de los pacientes pocillos (ver 9.1.18) se liberan de la parte inferior
de la tira y se diluyen en el tampón.
El brazo se mueve hacia adelante y las tiras son incubadas en el 2nd pocillo del cartucho (Tampón de lavado)
El brazo se mueve hacia adelante y las tiras son incubadas en el 3rd pocillo del cartucho (Tampón de lavado)
El brazo se mueve hacia adelante y las tiras son incubadas en el 6th pocillo del cartucho ( Tampón de lavado)
05.
06.
07.
08.
El
El
El
El
09.
10.
El brazo se mueve hacia adelante y las tiras son incubadas en el 7th pocillo del cartucho (Sustrato)
El brazo se mueve hacia atrás y las tiras son incubadas en el 6th pocillo del cartucho (Tampón de lavado)
01.
brazo
brazo
brazo
brazo
30 min
2 min
2 min
2 min
se mueve hacia atrás y las tiras son incubadas en el 5th pocillo del cartucho (Conjugado)
de mueve hacia atrás y las tiras son incubadas en el 4th pocillo del cartucho (Tampón de lavado)
de mueve hacia atrás y las tiras son incubadas en el 3rd pocillo del cartucho (Tampón de lavado)
se mueve hacia atrás y las tiras son incubadas en el 2nd pocillo del cartucho (Tampón de lavado)
10
2
2
2
min
min
min
min
10 min
2 min
Después de completado el proceso, el brazo se mueve hasta la posición central (reposo) del instrumento Neptune para permitir la fácil
manejo de la pinza. El instrumento emite un pitido y ”Test finalizado” aparece en pantalla.
Aplicar suavemente papel absorbente en la parte inferior de las tiras (cavidad donde se a dispensado la muestra) y dejar secar las tiras
durante 10 minutos antes de interpretar los resultados.
En caso de utilizar el Neptune escáner para ayudar en la interpretación de resultados, dejar las tiras procesadas en la pinza.
REGISTRO DE DATOS
El protocolo del test se puede descargar pulsando el símbolo de una memoria USB y siguiendo las indicaciones de la pantalla (Insertar
USB → Escribir USB → Retirar USB). Este paso no es obligatorio pero recomendable para la trazabilidad asuntos regulatorios.
10.NTERPRETACIÓN DE RESULTADOS
Se puede realizar la interpretación visual de resultados, sin embargo el uso del software para cuantificación Neptune y del escáner se
recomienda para una mejor y precisa interpretación semi-cuantitativa.
Mas información sobre software para cuantificación Neptune es ta disponible a través del distribuidor local o a través nuestro Departamento de soporte
técnico : [email protected].
10.1 Interpretación visual:
1. Quitar la pinza del instrumento Neptune y extraer las tiras de la pinza.
2.
3.
4.
Poner las tiras con la parte de reactive hacia arriba sobre los campos marcados en la plantilla de interpretación incluida en el kit.
Esto indicara las respectivas posiciones de los diferentes controles y antígenos de la membrana.
El primer Dot (Control Positivo) debe ser positivo para todos los pacientes.
Solo una coloración claramente positive del Control Dot asegura que los resultados son validos y le funcionamiento del ensayo ha
sido correcto y/o los reactivos no sean degradado. Si el punto superior no se ha coloreado, el ensayo ha fallado y no se pueden
interpretar los resultados.
Comparar los Dots de los antígenos específicos con el Dot del Control Negativo (que siempre ocupa la posición inferior del dot).
La intensidad del color de los Dots de los antígenos es directamente proporcional al titulo del anticuerpo específico en la muestra del
paciente.
La intensidad del color del Control Negativo puede varias en función de las características de la muestra. Si la muestra no contiene
sustancias que interfieran al Control Negativo, el dot puede ser incluso incoloro. Por otro lado, una coloración alta del Control
Negativo indica un alto enlace no específico en la muestra.
RESULTADO POSITIVO:
Una muestra es positive para un anticuerpo especifico si la intensidad del color del Dot del antígeno
correspondiente es más alta que la intensidad del Dot del Control Negativo.
RESULTADO NEGATIVO:
Una muestra es negativa para un anticuerpo específico si la intensidad del color del Dot del antígeno
correspondiente es más baja o igual que la intensidad del Dot del Control Negativo.
Catalogue nr: KAPDTIFPCAN
PI number : 1701303/es
Revision nr : 130422/1
10.2 Uso del Software y sistema de escaneo
1. Retirar la pinza del instrumento Neptune. Dejar las tiras procesadas unidas a la pinza.
2. Introducir la pinza, la parte reactiva de las tiras hacia abajo, en la ranura de la tapa del Neptune escáner.
3. Iniciar el escaneo de las tiras utilizando el software para cuantificación Neptune.
Para información detallada sobre el Neptune escáner y Software para cuantificación Neptune consultas el Manual de Usuario y el software
para cuantificación Neptune.
11.CARACTERISITCAS DEL TEST
11.1 Reproductibilidad
Las muestras de control de Referencia fueron testadas para cada anticuerpo en repeticiones estadísticamente relevantes en el mismo
ensayo o en varios ensayos para el cálculo de la variación intra e inter ensayo respectivamente. En todos los casos la intensidad de los
Dots estaban dentro del intervalo y las desviaciones estándar fueron inferiores al 10%.
Los datos analíticos están disponibles previa petición.
11.2 Sensibilidad y Especificidad
Muestras caracterizadas (confirmadas positivas o negativas a anticuerpos específicos por métodos de referencia) fueron ensayadas
siguiendo las instrucciones del test. La intensidad de la reacción fue evaluada utilizando el software para cuantificación Neptune. La
Sensibilidad y la Especificidad fueron calculadas a partir de análisis ROC y los valores de corte fueron medidos automáticamente por el
software para cuantificación Neptune.
12. LIMITACIONES DEL TEST
El Diagnostico clínico no debe realizarse en base a un solo método de diagnóstico in vitro. Una investigación clínica completa, asi como
otros resultados de test de laboratorio, deberían de considerarse como estado del diagnostico, ya que ninguna técnica por si sola puede
descartar la posibilidad de resultados falsos positivos o falsos negativos. En este sentido, mas concretamente, una prueba de
inmunofluorescencia indirecta, en su caso, se debe de realizar en paralelo con la determinación de auto anticuerpos por DIASpot Neptune,
ya que la inmunofluorescencia es considerada el método de referencia y de rastreo en autoinmunidad.
Última revisión : 13-04-22
Catalogue nr: KAPDTIFPCAN
PI number : 1701303/es
Revision nr : 130422/1
P.I. Number : 1701000
Used symbols
Consult instructions for use
Storage temperature
Use by
Batch code
Catalogue number
Control
In vitro diagnostic medical device
Manufacturer
Contains sufficient for <n> tests
WASH
SOLN
CAL
0
CAL
N
CONTROL
CONC
Wash solution concentrated
Zero calibrator
Calibrator #
N
Control #
Tracer
Ag
125I
Ab
125I
Ag
125I
CONC
Tracer concentrated
Ab
125I
CONC
Tracer concentrated
INC
BUF
Tracer
Tubes
Incubation buffer
Acetonitrile
ACETONITRILE
Serum
SERUM
DIL
SPE
Specimen diluent
DIL
BUF
Dilution buffer
ANTISERUM
Antiserum
IMMUNOADSORBENT
Immunoadsorbent
DIL
CAL
Calibrator diluent
REC
SOLN
Reconstitution solution
Polyethylene glycol
PEG
EXTR
SOLN
Extraction solution
ELU
SOLN
Elution solution
Bond Elut Silica cartridges
GEL
PRE
Pre-treatment solution
SOLN
NEUTR
Neutralization solution
SOLN
TRACEUR
Tracer buffer
BUF
Microtiterplate
HRP Conjugate
Ab
HRP
Ag
HRP
Ab
HRP
CONC
HRP Conjugate concentrate
Ag
HRP
CONC
HRP Conjugate concentrate
CONJ
BUF
CHROM
TMB
CHROM
TMB
HRP Conjugate
Conjugate buffer
CONC
Chromogenic TMB concentrate
Chromogenic TMB solution
Substrate buffer
SUB
BUF
STOP
SOLN
Stop solution
INC
SER
Incubation serum
Buffer
BUF
Ab
AP
SUB
PNPP
AP Conjugate
Substrate PNPP
BIOT
CONJ
CONC
Biotin conjugate concentrate
AVID
HRP
CONC
Avidine HRP concentrate
ASS
BUF
Assay buffer
Ab
BIOT
Biotin conjugate
Specific Antibody
Ab
SAV
HRP
CONC
2nd Ab
ACID
Streptavidin HRP concentrate
Non-specific binding
NSB
2nd Antibody
Acidification Buffer
BUF
Distributor
DIST
Incubation trays
TRAY
PMSF solution
PMSF
Protect from light
Dot Strip
STRIP
Substrate
SUB
EXTR
SOLN
CONC
Extraction Buffer Concentrate
Cartridge
CART
SAV
HRP
WASH
SOLN
Streptavidin HRP
Wash buffer
Revision nr 130319
P.I. Number : 1701000
Revision nr 130319
Símbolos utilisados
Consultar las instrucciones de uso
Limitación de temperatura
Fecha de caducidad
Codigo de lote
Número de catálogo
Control
Producto sanitario para diagnóstico in vitro
Fabricante
Contenido suficiente para <n> ensayos
WASH
CAL
SOLN
0
CONC
CAL
Calibrador #
N
CONTROL
Solución de lavado concentrada
Calibrador cero
0
N
Control #
Trazador
Ag
125I
Ab
125I
Ag
125I
CONC
Trazador concentrada
Ab
125I
CONC
Trazador concentrada
INC
BUF
Trazador
Tubos
Tampón de incubación
Acetonitrilo
ACETONITRILE
Suero
SERUM
DIL
SPE
Diluyente de Muestra
DIL
BUF
Tampón de dilución
ANTISERUM
Antisuero
IMMUNOADSORBENT
Inmunoadsorbente
DIL
CAL
Diluyente de calibrador
REC
SOLN
Solución de Reconstitución
Glicol Polietileno
PEG
EXTR
SOLN
Solución de extracción
ELU
SOLN
Solución de elución
Cartuchos Bond Elut Silica
GEL
PRE
Solución de Pre-tratamiento
SOLN
NEUTR
Solución de Neutralización
SOLN
TRACEUR
Tampón de trazador
BUF
Placa de microvaloración
HRP Conjugado
Ab
HRP
Ag
HRP
Ab
HRP
CONC
HRP Conjugado concentrada
Ag
HRP
CONC
HRP Conjugado concentrada
CONJ
BUF
CHROM
TMB
CHROM
TMB
HRP Conjugado
Tampón de Conjugado
CONC
Cromógena TMB concentrada
Solución Cromógena TMB
SUB
BUF
Tampón de sustrato
STOP
SOLN
Solución de Parada
INC
SER
Suero de Incubación
Tampón
BUF
Ab
AP
SUB
PNPP
AP Conjugado
Sustrato PNPP
BIOT
CONJ
CONC
Concentrado de conjugado de biotina
AVID
HRP
CONC
Concentrado avidina-HRP
ASS
BUF
Tampón de ensayo
Ab
BIOT
Conjugado de biotina
Anticuerpo específico
Ab
SAV
HRP
CONC
2nd Ab
ACID
Estreptavidina-HRP Concentrado
Unión no específica
NSB
Segundo anticuerpo
Tampón de Acidificación
BUF
Distribuidor
DIST
Bandejas de incubación
TRAY
Solución de PMSF
PMSF
Proteger de la luz
Tries Dot
STRIP
Sustrato
SUB
EXTR
SOLN
CONC
Concentrado de tampón de extracción
Cartucho
CART
SAV
HRP
WASH
SOLN
Estreptavidina HRP
Tampón de lavado