1
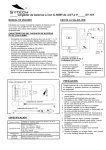
User manual
WALLMOUNT-DESKTOP ID TELEPHONE
MODEL: SY-1481
1
GENERAL INTRODUCTION
Thank you for purchasing the new Caller ID telephone SYTECH SY-1481. Please read the manual carefully for
proper use. Preserve manual for future references
SAFETY INSTRUCTION
When using your Sytech telephone, please follow these basic safety precautions to reduce the risk of fire,
electric shock or injury to persons.
1. Read and understand all instructions.
2. Follow all warnings and instructions marked on the products.
3. Unplug this product from the wall outlet before cleaning. Do not use liquid cleaners or aerosol cleaners.
Use a damp cloth for cleaning.
4. Do not use this product near water (for example, near a bath tub, kitchen sink or swimming pool).
5. Do not place this product on an unstable cart, stand, or table. The product may fall causing serious
damage to itself.
6. Never spill liquids on the product.
7. To reduce the risk of electric shock, do not disassemble this product. If service or repair work is required,
contact Sytech Hotline Service Centre for a proper solution.
8. Do not use the telephone to report a gas leak in the vicinity of the leak.
FEATURES
¾
FSK/DTMF system compatible, FSK auto-adjust real time
¾
Records 38 incoming and 5 outgoing numbers which can be reviewed, called back and deleted
¾
2-digit PABX code can be set
¾
5-digit local area code can be set and auto-filter local area code
¾
5 levels LCD contrast adjustable
¾
Music on hold
¾
Pulse and Tone dialing mode selectable
¾
Ring volume HI/LO for selection
¾
Handset volume HI/LO for selection
¾
Flash, Pause, Redial functions
¾
LCD backlight function
¾
Incoming ringing LED indicator
¾
Desk/wall mountable
2
LOCATION DESCRIPTION
3
OPERATING INSTRUCION
GETTING STARTED
Input 3 AAA batteries into the batteries compartment according to the correct polarity. The LCD will display
year, month, date and time.
Connect the line plugs into your phone line jack and the other end into the wall jack.
Insert the handset coil cord into the phone jack at the bottom.
RECEIVING CALLS
1.
When a call comes in, the telephone rings and the LCD displays the ID number of the call, the date, time,
incoming number and NEW icon.
2.
If the same number has come twice or more and has not been checked, the LCD displays REP icon.
3.
The OUT icon is displayed when reviewing the outgoing number.
When the incoming memory is full, the latest incoming number will always replace the oldest number.
NOTE: For the phone to display incoming numbers and other information, you must have an active
Caller ID subscription with your local telephone operator company.
Receiving a call from the handset
1. Pick up the handset and talk to the other end
2. After finished, return the handset to the base.
NOTE
Generally telecom transmits the incoming message between the first ring and the second ring. So please
answer the phone after the second ring.
Making a call from the Handset
1. Pick up the handset;
2. While hearing the dialing tone, dial the desired number. The LCD will auto-time the conversation after 6
seconds;
3. After finished, return the handset to the base.
Redialing function
When the number dialed is busy, press the [REDIAL] key to dial the same number once more.
REVIEWING, CALLING BACK AND DELETING INCOMING CALL
The phone can record up to 38 Incoming calls. When more than 38 incoming calls have been received, the
earliest one will be replaced. When receiving a FSK or DTMF phone call, the unit will auto-detect it and the
LCD will display the phone number along with the calling date & time and a serial number.
For repeated incoming calls, the LCD will display “REP”.
For a non identified incoming number, the LCD will display “…P…”
For an error incoming message, the LCD will display “…E…”
When the incoming call is from an area without a Caller ID service, the LCD will display “…O…”
4
The current date and time will be updated by the FSK Caller ID signal while the year setting remains
unchanged. DTMF Caller ID signal will not change the date and time setting as it only contains the caller’s
number.
Reviewing Incoming Call
In on-hook or off-hook state, press [▲] or [▼] key to review the incoming calls. The LCD will display …END…
when all records are checked.
NOTE: Press and hold [▲] or [▼] key for 3 seconds to quickly check the incoming calls.
Calling Back Incoming Call
Calling back a local area call: The unit auto-filters a local area code. Review the desired number and press
[BACK] or [REDIAL] key to dial back the number displayed on the LCD display, then pick up the handset to
start the conversation. If the line is busy, press the [REDIAL] key to dial out the number once again.
Calling back a long distance call:
If the LCD displays a number which is long distance call, press the [BACK] or [REDIAL] key two times. The
unit will auto-add “0” and will dial out the number displayed on the LCD. Pick up the handset to start the
conversation. If the line is busy, press the [REDIAL] key to dial out the number once again.
Deleting an Incoming Call
1. Review the desired incoming number
2. Press the [DEL] key to delete the number. The LCD will display the next number.
NOTE: Press the [DEL] key for 3 seconds for deleting all the incoming calls.
REVIEWING, CALLING BACK AND DELETING OUTGOING CALL
The phone can record up to 5 outgoing calls, sequence number and conversation time. You may review, call
back and delete outgoing calls. When more than 5 outgoing calls have been dialed, the earliest one will be
replaced. When you review an outgoing call, the LCD will not display the real date and time, but only the
conversation time.
Reviewing outgoing Call
1. In on-hook or off-hook state
2. Press the [OUT] key. The LCD will display the last dialed numbers.
3. Press the [OUT] key continuously. The LCD will display …END… when all records are checked.
Dial back outgoing Call
1. In on-hook state or off-hook state.
2. Press the [OUT] key to check the desired number.
3. Press the [BACK] key to dial the number automatically. Pick up the handset to start the conversation. If the
line is busy, press the [REDIAL] key to dial out the number once again.
Deleting an outgoing Call
1. Review the desired outgoing number
2. Press the [DEL] key to erase the number. The LCD will display the next number.
5
NOTE: Press the [DEL] key for 3 seconds for deleting all the outgoing calls.
SETTING MENU
SETTING DATE AND TIME
1. In on-hook state, press the [SET] key. The LCD will display SET 1 DATE
2. Press the [SET] key for the last two digits of year to flash.
3. Press [▲] or [▼] key to edit the year and then press the [SET] key to confirm. Use the same method to set
the month, date, hour and minute.
The unit will save the settings and quit after 12 seconds.
NOTE:
Scope: Month: 1-12
Date: 1-31
Hour:00-23
Minute:00-59
SETTING LOCAL AREA CODE
1. In on-hook state, press the [SET] key and then press the [▲] key. The LCD will display SET 2 CODE
2. Press the [SET] key again. The LCD will display CODE- - - - 3. Press the [▲] or [▼] keys to set the first digit of the local area code;
4. Press the [SET] key to confirm and enter the second digit setting. Use the same method to set the last 4
digits.
5. The unit will save the settings and quit after 12 seconds.
NOTE: If the local area code contains only 4 digits, the last digit can be left as “-”.
After having set the local area code, the unit will auto-filter the area code when incoming calls are received.
SETTING PABX CODE
1. In on hook state, press the [SET] key
2. Press the [▲] key twice. The LCD will display SET 3 PCODE.
3. Press the [SET] key to confirm. The LCD will display PCODE-4. The first “-“ flashes and indicates to set the first code.
5. Press [▲] or [▼] key to set the first code, and then press the [SET] key to confirm and to advance to the
next one.
6. The unit will save the settings and quit after 12 seconds.
NOTE:
If the PABX code contains only one digit, the second digit can be left as“-“.
When the PABX code is set, the unit will automatically add the PABX code when dialing back incoming calls
containing more than 6 digits.
SETTING AUTO IP
This function is not available for European countries, please keep it as default and do not set it.
SETTING DIALING MODE
1
At on hook state, press [SET] key
2
Press [▲] key four times, LCD displays SET 5 P-T
3
Press [SET] to confirm, LCD displays TONE
4
Press [▲] or [▼] key to select PULSE or TONE
5
Press [SET] to confirm.
6
Unit will save and quit after 12 seconds.
6
FLASH AND PAUSE FUNCTION
The flash time is 100ms. The flash function is available and will work in PABX.
Press the [PAUSE] key to insert a 3.6s pause interval.
HOLD MUSIC FUNCTION
During a conversation, press the [HOLD] key to enter the hold mode. Hold music will be heard.
In hold mode:
Press the [HOLD] key to release the hold mode and continue to talk over the handset.
SETTING THE HANDSET VOLUME
Pick up the handset and press the [VOL] key to adjust the handset volume to High or Low.
SETTING UP THE RINGING VOLUME
The SY-1481 includes two levels for the volume ring control: HI & LO can be selected. If you wish to adjust to
Low, switch the ring button located at the bottom of the unit to LO position. The HI level will increase your
telephone ring bell.
SETTING THE LCD CONTRAST
In off-hook state, press the [BRI] key continuously to adjust the LCD contrast. You can chose up to 5 different
levels contrast.
LCD BACKLIGHT FUNCTION
The backlight is turned on when receiving an incoming call, dialing, pressing any key or in MUSIC HOLD mode.
The backlight will turn off automatically when the telephone is left idle for 6 seconds.
Note: If batteries are not loaded or discharged, the backlight LCD display function will not work.
WALL MOUNTABLE
The SY-1481 telephone can be used as wall mounted or as desktop
NOTES
Please unplug the telephone line when installing or replacing new batteries.
MAINTENANCE
The unit must be placed in a dry and clean place to avoid the damage of the inner parts.
Use a damp cloth for cleaning. Do not use liquid cleaners or aerosol cleaners.
If the unit has troubleshooting, do not disassemble this product. Please contact Sytech Hotline Service Center
for any repair or exchange of the product.
7
TROUBLE SHOOTING
? No voice
+ Check if the handset is well connected to the base unit. Check the telephone line.
? Battery rust or leak
+ Clean the inner battery compartment. Replace the batteries.
? Noise
+ Check if the circuit is damaged (Contact the Sytech Service center)
+ Check if the connector is moist or rust (Change the connector)
? No Tone
+ Check the line cord is correctly connected to the wall jack.
+ Check that the cradle on the handset is not blocked.
? Ring once then disconnect when receive a call. Dialing function is available
+ Check if connector is in a moist environment.
Check if there are too many extensions used together or the quality of the extension lines are not good
enough (Change the bad extensions)
? LCD becomes dim
+ Check if the LCD contrast is properly set and that the batteries are new (Adjust the LCD contrast; if the LCD
is still dim, replace the batteries.)
? Most of the functions failed
+ Check if the batteries are worn out. (Replace the batteries.)
If the batteries are new but the functions still fail to work, remove the batteries, unplug the lines and reinstall
the telephone after 10 minutes.
NOTE: Due to continuous product development, all features and specifications are subject to change without
prior notice
Technical Specifications:
. Telephone connection: Appliance designed for connection to an analogue telephone line class TRT3
(telecommunications network voltage) as defined by standard NF EN 60950
. Caution, the network voltage is classified as a hazard according to the criteria of this standard.
. Operating temperature: from 5º to 40º.
8
ENVIRONMENT
This symbol means that your inoperative electronic appliance must be collected separately and not mixed
with the household waste. The European Union has implemented a specific collection and recycling
systems for which procedures are responsible.
This appliance has been designed and manufactured with high quality materials and components that can
be recycled and reused. Electrical and electronic appliances are liable to contain parts that are
necessary in order for the system to work properly but which can become a health and environment
hazard if they are not handled or disposed of in the proper way. Consequently, please do not throw out
your inoperative appliance with the household waste.
If you re the owner of the appliance, you must deposit it at the appropriate local collection point or leave
it with the vendor when buying a new appliance.
If you are a professional user, please follow your supplier’s instructions.
If the appliance is rented to you or left in your care, please contact your service provider.
! please help us protect the environment in which we live.
9
RECOMMENDED MODEL OF DECLARATION OF
COMPLIANCE
Directive 2004/108/EC on Electromagnetic Compatibility
Directive 2006/95/EC on Low Voltage Safety (LVD)
DECLARATION OF COMPLIANCE
SATYATRADE S.L
Polígono Industrial "La Raya".
P.A.E. II
CAMARMADEESTERUELAS
28816.- Madrid, Spain
Tax Reg. No.: B 83254763
Tel: 91 886 53 21
Fax: 91 886 42 85
Representative:
Ajeet Nebhwani Utamchandani
Sole Administrator
We declare under our sole responsibility the compliance of the product:
SYTECH brand telephone, model SY-1481, manufactured by the company SATYATRADE S.L. in China
to which this declaration refers, with the standard(s) and other regulatory document(s):
- EN 55022: 2006.
- EN 55024: 1998+A1:2001+A2:2003
- EN 60950-1:2006
according to the provisions of
- Directive 2004/108/EC of the European Parliament and the Council of 15 December 2004, transposed
to Spanish legislation by Royal Decree 1580/2006 of 22 December 2007, and,
- Council Directive 73/23/CEE of 19 February 1973, transposed to Spanish legislation by Royal Decree
7/1988 of 8 January and Royal Decree 154/1995 of 3 February, included with subsequent modifications
in Directive 2006/95/EC of the European Parliament and the Council of 12 December 2006.
In Camarma de Esteruelas, Madrid, Spain, on 30 September 2010.
Signed: Ajeet Nebhwani Utamchandani
Sole Administrator
10
Manual de usuario
TELÉFONO DE PARED-ESCRITORIO
MODELO: SY-1481
1
INTRODUCCIÓN GENERAL
Gracias por comprar el teléfono SYTECH SY-1481. Lea el manual atentamente para utilizar el
aparato adecuadamente. Guarde este manual para futuras consultas.
INSTRUCCIONES DE SEGURIDAD
Cuando utilice su teléfono Sytech, siga estás precauciones de seguridad básicas para reducir el
riesgo de incendio, electroshock o lesiones a personas.
1. Lea y comprenda todas las instrucciones.
2. Siga todas las advertencias e instrucciones marcadas en los productos.
3. Desconecte este producto de la toma de corriente antes de limpiarlo. No utilice limpiadores
líquidos o en aerosol. Utilice un paño suave para limpiar.
4. No utilice este producto cerca del agua (por ejemplo, cerca de una bañera, fregadero o
piscina).
5. No coloque este producto sobre una mesa, estante o soporte no estable. El producto se
puede caer, dañándose gravemente.
6. Nunca vierta líquidos sobre el producto.
7. Para reducir el riesgo de electroshock, no desmonte el aparato. Si es necesaria una
reparación, contacte con la Línea del Centro de Reparaciones de Sytech para que lo
solucionen.
8. No utilice el teléfono para informar una fuga de gas cerca de la fuga.
CARACTERÍSTICAS
¾
Compatible con el sistema FSK/DTMF, FSK auto-ajustable en tiempo real
¾
Guarda 38 números entrantes y 5 salientes que se pueden revisar, volver a llamar y borrar.
¾
Se puede configurar un código PABX de 2 dígitos.
¾
Se puede configurar un código de área local de 5 dígitos y filtrar el código de área local.
¾
5 niveles de contraste de LCD ajustables
¾
Música en espera
¾
Se puede seleccionar el modo de marcación por Pulsos y por Tono
¾
Selección de volumen de llamada HI/LO
¾
Selección de volumen de llamada HI/LO del auricular
¾
Funciones de parpadeo, pausa y rellamada
¾
Función de luz de fondo en la LCD
¾
Indicador LED de llamada entrante
¾
Para escritorio /pared
2
DESCRIPCIÓN Y VISTAS
LCD
ABAJO
VOL
PARPADEO
ARRIBA
BRI
HOLD
TECLADO NUMÉRICO
DEL
SET
PAUSA
TIMBRE
OUT
BACK
REDIAL
TIMBRE (HI-LO)
3
INSTRUCCIONES DE USO
COMIENZO
Introduzca 3 pilas de tipo AAA en el compartimento para pilas respetando la polaridad. La LCD mostrará el
año, mes, fecha y hora.
Conecte la toma de línea a su clavija de línea de teléfono y el otro extremo a la clavija de la pared.
Introduzca el cable en espiral del auricular en la clavija de teléfono de la parte inferior.
RECIBIR LLAMADAS
1.
Cuando se recibe una llamada, el teléfono suena y la LCD muestra la secuencia de número de llamada,
la fecha, hora, número entrante y el icono de NEW.
2.
Si el mismo número ha llamado dos o más veces y no se ha comprobado, la LCD muestra el icono REP.
3.
El icono OUT se muestra cuando se revisan números salientes.
Cuando la memoria de llamadas entrantes está llena, el último número entrante siempre reemplaza al
número más antiguo.
NOTA: Para que el teléfono muestre los números entrantes y otras informaciones, debe tener una
suscripción de ID de llamador activa con su operadora de telefonía local.
Recibir llamadas desde el aparato
1. Descuelgue el auricular y hable a su interlocutor
2. Cuando termine, devuelva el auricular a la base.
NOTA
Generalmente, la telecomunicación transmite el mensaje entrante entre el primer y el segundo tono. Así que,
por favor, responda al teléfono tras el segundo tono.
Realizar una llamada desde el aparato
1. Descuelgue el auricular;
2. Cuando escuche la señal de llamada, marque el número deseado. La LCD contará la conversación
automáticamente tras 6 segundos;
3. Cuando termine, devuelva el auricular a la base.
Función de rellamada
Cuando el número marcado esté ocupado, presione el botón [REDIAL] para volver a marcar el mismo número
una vez más.
REVISAR, DEVOLVER Y BORRAR UNA LLAMADA ENTRANTE
El teléfono puede grabar hasta 38 llamadas entrantes. Cuando se han recibido más de 38 llamadas entrantes,
se reemplaza la primera. Cuando se reciben llamadas de teléfono FSK o DTMF, la unidad las detecta
automáticamente y la LCD muestra el número de teléfono junto con la fecha y hora de llamada y un número
de serie.
Para las llamadas entrantes repetidas, la LCD muestra “REP”.
Para números entrantes no identificados, la LCD muestra “…P…”
4
Para mensajes entrantes de error, la LCD muestra "...E..."
Cuando la llamada entrante proviene de un área sin servicio de ID de llamador, la LCD muestra “…O…”
La fecha y hora actual serán actualizadas por la señal de ID de Llamador FSK mientras que la configuración
del año permanece sin cambios. La señal de ID de Llamador DTMF no cambiará la configuración de fecha y
hora, ya que sólo contiene el número de la llamada.
Revisar llamadas entrantes
Con el teléfono colgado o descolgado, presione el botón [▲] o [▼] para revisar las llamadas entrantes. La
LCD mostrará …END… cuando se hayan comprobado todos los registros.
NOTA: Mantenga presionado el botón [▲] o [▼] durante 3 segundos para comprobar rápidamente las
llamadas entrantes.
Devolver una llamada entrante
Devolver una llamada de área local: La unidad filtra automáticamente el código de área local. Revise el
número deseado y presione el botón [BACK] o [REDIAL] para marcar el número mostrado en la pantalla LCD,
después descuelgue el auricular para comenzar la conversación. Si la línea está ocupada, presione el botón
[REDIAL] para volver a marcar el número una vez más.
Devolver una llamada de larga distancia:
Si la LCD muestra un número perteneciente a una llamada a larga distancia, presione el botón [BACK] o
[REDIAL] dos veces.
La unidad añadirá automáticamente un “0” y marcará el número mostrado en la LCD.
Descuelgue el auricular para comenzar la conversación. Si la línea está ocupada, presione el botón [REDIAL]
para volver a marcar el número una vez más.
Borrar una llamada entrante
1. Revise el número entrante deseado
2. Presione el botón [DEL] para borrar el número. La LCD mostrará el número siguiente.
NOTA: Presione el botón [DEL] durante 3 segundos para borrar todos los mensajes entrantes.
REVISAR, DEVOLVER Y BORRAR UNA LLAMADA SALIENTE
El teléfono puede guardar hasta 5 mensajes salientes, números de secuencia y tiempos de conversación.
Puede revisar, volver a llamar y borrar las llamadas salientes. Cuando se han marcado más de 5 llamadas
salientes, se reemplaza la primera. Cuando revisa una llamada saliente, la LCD no mostrará la fecha y hora
real, sino sólo el tiempo de conversación.
Revisar una llamada saliente
1. Con el teléfono colgado o descolgado
2. Presione el botón [OUT]. La LCD mostrará los últimos números marcados.
3. Presione el botón [OUT] de forma continuada. La LCD mostrará …END… cuando se hayan comprobado
todos los registros.
Volver a llamar una llamada saliente
1. Con el teléfono colgado o descolgado.
2. Presione el botón [OUT] para comprobar el número deseado.
3. Presione el botón [BACK] para marcar el número automáticamente. Descuelgue el auricular para
5
comenzar la conversación. Si la línea está ocupada, presione el botón [REDIAL] para volver a marcar el
número una vez más.
Borrar una llamada saliente
1. Revise el número saliente deseado
2. Presione el botón [DEL] para borrar el número. La LCD mostrará el número siguiente.
NOTA: Presione el botón [DEL] durante 3 segundos para borrar todos los mensajes salientes.
MENÚ DE CONFIGURACIÓN
CONFIGURAR LA FECHA Y HORA
1. Con el teléfono colgado, presione el botón [SET]. La LCD mostrará SET 1 DATE
2. Presione el botón [SET] para que parpadeen los dos últimos dígitos del año.
3. Presione el botón [▲] o [▼] para editar el año y después presione el botón [SET] para confirmar. Utilice el
mismo método para establecer el mes, el día, la hora y los minutos.
La unidad guardará la configuración y saldrá de la misma tras 12 segundos.
NOTA:
Modo: Mes: 1-12
Día: 1-31
Hora: 00-23
Minuto: 00-59
CONFIGURAR EL CÓDIGO DE ÁREA LOCAL
1. Con el teléfono colgado, presione el botón [SET] y, después, presione el botón [▲]. La LCD mostrará SET
2 CODE
2. Vuelva a presionar el botón [SET]. La LCD mostrará CODE- - - - 3. Presione el botón [▲] o [▼] para configurar el primer dígito del código de área local;
4. Presione el botón [SET] para confirmar e introducir el segundo dígito.
Utilice el mismo método para
establecer los 4 últimos dígitos.
5. La unidad guardará la configuración y saldrá de la misma tras 12 segundos.
NOTA: Si el código de área local sólo contiene 4 dígitos, se pueden dejar los últimos dígitos en "-".
Tras configurar el código de área local, la unidad filtrará automáticamente el código de área local cuando se
reciban llamadas entrantes.
CONFIGURAR EL CÓDIGO PABX
1. Con el teléfono colgado, presione el botón [SET]
2. Presione el botón [▲] dos veces. La LCD mostrará SET 3 PCODE
3. Presione el botón [SET] para confirmar. La LCD mostrará PCODE-4. El primer “-“ parpadea e indica que se configure el primer código.
5. Presione el botón [▲] o [▼] para configurar el primer código, y después presione el botón [SET] para
confirmar y avanzar al siguiente.
6. La unidad guardará la configuración y saldrá de la misma tras 12 segundos.
NOTA:
Si el código PABX solo contiene un dígito, el segundo dígito se puede dejan en “-“.
Cuando se configure el código PABX, la unidad añadirá automáticamente el código PABX cuando se
devuelvan llamadas entrantes que contengan más de 6 dígitos.
6
CONFIGURAR LA IP AUTOMÁTICA (esta función no está disponible)
CONFIGURAR EL MODO DE MARCACIÓN
1
Con el teléfono colgado, presione el botón [SET]
2
Presione el botón [▲] cuatro veces, la LCD muestra SET 5 P-T
3
Presione [SET] para confirmar, la LCD muestra TONE
4
Presione el botón [▲] o [▼] para seleccionar PULSE o TONE
5
Presione [SET] para confirmar.
6
La unidad guardará la configuración y saldrá de la misma tras 12 segundos.
FUNCIÓN DE PARPADEO Y PAUSA
El tiempo de parpadeo es de 100ms, la función de parpadeo está disponible con PABX especial.
Presione el botón [PAUSE] para conseguir un intervalo de pausa de 3,6s tras presionar uno o más dígitos.
FUNCIÓN DE MÚSICA EN ESPERA
Durante una conversación, presione el botón [HOLD] para entrar en el modo de espera. Se escuchará la
música de espera.
En modo de espera:
Presione el botón [HOLD] para salir del modo de espera y continuar hablando por el auricular.
CONFIGURAR EL VOLUMEN DEL AURICULAR
Descuelgue el auricular y presione el botón [VOL] para ajustar el volumen del auricular a Alto o Bajo.
CONFIGURAR EL VOLUMEN DE LLAMADA
El SY-1481 incluye dos niveles para el control de volumen de llamada: Se puede seleccionar HI y LO. Si no
desea ser molestado, coloque el botón de llamada situado en la parte inferior de la unidad en la posición LO.
El nivel HI activará el timbre de su teléfono.
CONFIGURAR EL CONTRASTE DE LA LCD
Con el teléfono descolgado, presione el botón [BRI] de forma continuada para ajustar el contraste de la LCD.
Tiene 5 niveles diferentes de contraste.
FUNCIÓN DE LUZ DE FONDO EN LA LCD
La luz de fondo se enciende cuando se recibe una llamada entrante, al marcar, presionar cualquier botón o en
el modo de MÚSICA EN ESPERA. La luz de fondo se apaga automáticamente cuando se deja el teléfono
inactivo durante 6 segundos.
Nota: Si no se cargan o se agotan las pilas, la función de luz de fondo no funcionará.
MONTAJE EN PARED
El teléfono SY-1481 se puede utilizar montado en pared o sobre escritorio.
7
NOTAS
Por favor, desconecte la línea de teléfono cuando instale o cambie las pilas.
MANTENIMIENTO
La unidad se debe colocar en un lugar seco y limpio para evitar dañar las partes interiores.
Utilice un paño suave para limpiar. No utilice limpiadores líquidos o en aerosol.
Si la unidad tiene algún problema, no desmonte este producto. Por favor, contacte con la línea de atención del
Centro de Servicio de Sytech para reparar o reemplazar el producto.
RESOLUCIÓN DE PROBLEMAS
? Sin voz
+ Compruebe si el auricular está bien conectado al aparato. Compruebe la línea de teléfono.
? Sólo recibe
+ Compruebe si el interruptor P/T está bien configurado (Coloque el interruptor en la posición adecuada.)
? Pilas oxidadas o con fugas
+ Cambie las pilas.
? Ruido
+ Compruebe si el circuito está dañado (Contacte con el centro de Servicio)
+ Compruebe si el conector está húmedo u oxidado (Cambie el conector)
? Sin tono
+ Compruebe si el cable de línea está conectado correctamente a la clavija de pared.
+ Compruebe que el soporte del aparato no está bloqueado.
? Suena una vez y se desconecta cuando recibe una llamada. La función de marcación está disponible
+ Compruebe si el conector está en un entorno húmedo.
Compruebe si se están utilizando demasiadas extensiones a la vez o si la calidad de las líneas de extensión
no es suficientemente buena (Cambie las extensiones en mal estado)
? La LCD se oscurece
+ Compruebe si el contraste de la LCD está bien configurado y que las pilas son nuevas (Ajuste el contraste
de la LCD; si la LCD sigue oscura, cambie las pilas.)
? Fallan la mayoría de las funciones
+ Compruebe que las pilas no se han agotado. (Cambie las pilas.)
Si las pilas son nuevas pero las funciones siguen fallando, quite las pilas, desconecte las líneas y vuelva a
instalar el teléfono tras 10 minutos.
NOTA: Debido al continuo desarrollo del producto, todas las características y especificaciones están sujetas
a cambios sin notificación previa.
8
9