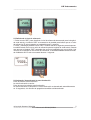
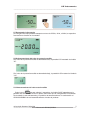
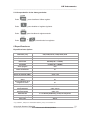
1
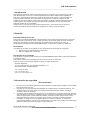
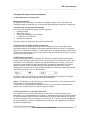
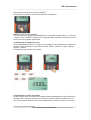
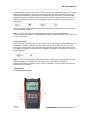
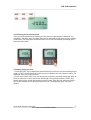
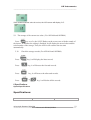
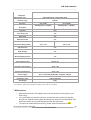
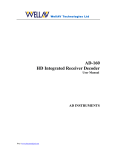
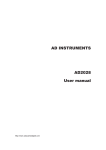
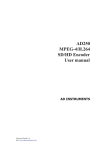
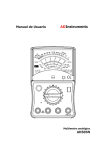
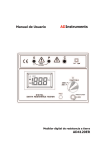
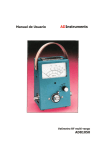
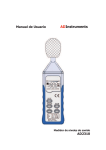
Manual de Usuario ADInstruments Medidor de potencia para fibra óptica AD2A04 AD Instruments _____________________________________________________________________ CONTENIDOS 1 Introducción 2 Garantía 2.1 Garantía limitada de 1 año 2.2 Exclusiones 2.3 Devolución de un producto 2.4 Contacto 3 Información de seguridad 4 Preparación para el funcionamiento 4.1 Desembalando el instrumento 4.2 Baterías descargadas 4.3 Funcionamiento con tensión alterna AC 5 Funcionamiento 5.1 Pantalla y controles 5.2 Encendido y apagado del instrumento 5.3 Configurando la longitud de onda 5.4 Cambiando el modo de medida 5.5 Configurando el nivel de referencia 5.6 Encendiendo y apagando la retro-iluminación de la pantalla 5.7 Detectando la frecuencia 5.8 Sobrepasamiento del valor de potencia medido 5.9. Almacenamiento del valor actual medido 5.10 Comprobación de los datos guardados 6 Especificaciones 7 Mantenimiento ©Copyright Abacanto Digital SA. Manual de usuario AD2A04/AD2B04 2 AD Instruments _____________________________________________________________________ 1 Introducción Este equipo de medida de potencia para fibra óptica tiene un tamaño como la palma de una mano y está diseñado para su uso con una fuente óptica láser para realizar medidas de las pérdidas de potencia en cables de fibra óptica. Este equipo de AD Instruments es ligero y está controlado por microprocesador. Utilizando en su fabricación componentes de montaje en superficie de alta calidad, las conexiones ópticas al instrumento se realizan mediante el interfaz universal situado en la parte superior de la unidad. El instrumento dispone de 6 longitudes de onda de trabajo para satisfacer totalmente sus necesidades. Puede usarse en cualquier proyecto de telecomunicaciones y otras situaciones en las que se necesite la medida de la potencia óptica de longitudes de onda cercanas al infrarrojo. 2 Garantía Garantía limitada de un año Este producto de AD INSTRUMENTS está garantizado contra componentes defectuosos y errores de montaje durante un período de un año a partir de la fecha de envío del equipo al cliente. Cualquier equipo que esté defectuoso dentro del período de garantía deberá devolverse al centro de mantenimiento autorizado por AD INSTRUMENTS para su reparación, reemplazo y calibración. Exclusiones La garantía de su equipo no se aplicará en caso de defectos que provengan de lo siguiente: ᇏ Reparaciones o modificaciones no autorizadas ᇏ Mal uso, negligencias o accidentes Devolución de un producto Para devolver un producto puede contactar con AD INSTRUMENTS para obtener información adicional si resulta necesario. Para poderle ayudar mejor, especifique por favor las razones de su devolución. Todos los envíos y devoluciones deberán enviarse a la siguiente dirección: Abacanto Digital SA Ctra. de Fuencarral Km. 15,700 Edificio EUROPA I 1º 1ª 28108 Alcobendas - MADRID (Spain) Tel.: +34 91 661 3037 Fax.: +34 91 661 4917 http://www.abacantodigital.com 3 Información de seguridad ¡Precauciones! ² ² ² ² No mire nunca a las salidas ópticas de una fibra mientras el equipo esté encendido. El haz invisible láser puede dañar sus ojos. No ponga en corto los terminales del adaptador de corriente alterna / cargador de baterías. Una corriente eléctrica excesiva puede causar daños personales debidos a vapores, descargas eléctricas o daños en el equipo. Conecte el cable de alimentación eléctrica AC en el enchufe de la pared adecuadamente. Mientras esté insertando el conector AC, asegúrese de que no hay polvo ni suciedad en los terminales y que ambos enchufes están convenientemente aislados. Una mala conexión puede causar humos, descargas eléctricas o daños en el equipo que se pueden convertirse en daños personales. No trabaje con el equipo cerca de objetos calientes, en entornos calientes, en atmósferas polvorientas/húmedas o cuando se vea condensación en el equipo. Esto puede producir descargas eléctricas, malfuncionamiento del equipo o bajo rendimiento. ©Copyright Abacanto Digital SA. Manual de usuario AD2A04/AD2B04 3 AD Instruments _____________________________________________________________________ 4 Preparación para el funcionamiento 4.1 Desembalando el instrumento Material de embalaje Le sugerimos que mantenga el material de embalaje original. El uso del material de embalaje original le garantiza que el instrumento queda protegido durante su transporte. Comprobando el contenido del embalaje Los accesorios estándar del equipo son los siguientes: Ø Unidad principal Ø Manual de usuario Ø Informe de comprobación de calidad Ø 2 * baterías 1.2-volt Ni-MH Ø Estuche de transporte Accesorio opcional: Adaptador para corriente alterna AC Comprobación de daños durante el transporte Después de abrir el embalaje del instrumento, compruebe que no ha sufrido daños apreciables durante el transporte. Esto puede particularmente ser cierto si el embalaje exterior se ve claramente dañado. Si existe algún daño, no intente manejar el instrumento o repararlo sin autorización. Hacer esto puede causar aún más daños al equipo y puede hacer que pierda la garantía. 4.2 Baterías descargadas En la pantalla puede verse un indicador que muestra la carga de batería que queda. Existen cuatro posibles indicaciones, llena, con dos barras, con una barra y vacía. Si el indicador de vacía parpadea, significa que está prácticamente sin carga, y es en ese momento cuando deberá recargar las baterías conectando el adaptador de corriente alterna al equipo. Si las baterías admiten poca carga transcurrido mucho tiempo, sustitúyalas con otras nuevas. Para sustituir las baterías, desmonte la placa de la parte trasera del instrumento con un destornillador. Cuando la carga de las baterías sea demasiado pequeña para suministrar la energía necesaria, el instrumento se apagará de forma automática. Notas: 1 El indicador de alimentación por corriente alterna AC no se muestra cuando la alimentación se realiza mediante baterías. 2 Para eliminar la posibilidad de pérdidas de ácido, quite por favor las baterías si no piensa usar el equipo durante un período largo de tiempo. 4.3 Funcionamiento con tensión alterna AC Si el instrumento se usa principalmente en un único sitio, como por ejemplo en un laboratorio o en un departamento de pruebas, el adaptador/cargador de corriente alterna AC puede utilizarse para alimentar el instrumento en lugar de usar baterías. En la parte superior del equipo existe un conector de entrada DC en el que se conecta el adaptador de corriente alterna. Cuando el adaptador está enchufado, en la pantalla se muestra el símbolo correspondiente. ©Copyright Abacanto Digital SA. Manual de usuario AD2A04/AD2B04 4 AD Instruments _____________________________________________________________________ Notas: 1 La alimentación se suministra por el adaptador de AC incluso si las baterías están colocadas. El indicador de batería no se muestra en la pantalla cuando el adaptador de AC está conectado. 2 Asegúrese de que la tensión de funcionamiento del adaptador / cargador AC es la misma que la de la línea. 5 Funcionamiento 5.1 Pantalla y controles 5.1.1 Teclado El teclado del AD2A04/AD2B04 se usa para acceder a un amplio rango de funciones del instrumento. Funciones de Medida No. Tecla Función 1 Enciende/apaga el instrumento. Una pulsación prolongada mientras se enciende, activa el instrumento si la función de auto-apagado. 2 Selecciona la longitud de onda de la medida en secuencia de 1310nm, 1490nm, 1550nm, 1625nm, 850nm, y 1300nm. Manteniendo la tecla pulsada más de dos segundos, si la fuente está en modo Twin, se detecta la longitud de onda recibida, y aparecerá la indicación TWIN en la pantalla. ©Copyright Abacanto Digital SA. Manual de usuario AD2A04/AD2B04 5 AD Instruments _____________________________________________________________________ 3 Conmuta la unidad de medida entre dB y mw. 4 Una pulsación prolongada de 2 segundos almacena el valor actual de la medida; una pulsación breve muestra el registro 5 Una breve pulsación muestra el nivel de referencia previo de la longitud de onda del test actual. Una pulsación prolongada define un nuevo nivel de referencia de la longitud de onda del test actual. Activa/desactiva la retro-iluminación. 6 5.1.2 Conectores 5.1.3 Pantalla 5.2 Encendido y apagado del instrumento Pulse brevemente la tecla “ON/OFF”. El instrumento se enciende, y la retro-iluminación se activa. Comprueba la capacidad de la batería si falla. ©Copyright Abacanto Digital SA. Manual de usuario AD2A04/AD2B04 6 AD Instruments _____________________________________________________________________ Pulse brevemente de nuevo la tecla “ON/OFF”. El instrumento se apaga, ya la retro-iluminación se desactiva. Notas: Función de auto-apagado 1. El instrumento se apaga automáticamente si no se pulsa ninguna tecla en 10 minutos. 2. Pulse la tecla “ON/OFF” durante unos 2 segundos para encender el instrumento con la función de auto-apagado desactivada. 5.3 Definiendo la longitud de onda Pulse repetidamente la tecla “λ” hasta que la longitud de onda deseada se muestre en la pantalla. Puede seleccionar seis posibles valores: 850nm, 1300nm, 1310nm, 1490nm, 1550nm, 1625nm. El instrumento por defecto usa 1310nm. 5.4 Cambiando el modo de medida Puede escoger entre tres modos de medida pulsando repetidamente la tecla “dBm/mW”, dB, dBm, watt. Cuando el resultado se muestra en watios, existen dos opciones, μw y mw. El instrumento decidirá cual usar automáticamente conforme al valor en sí mismo. ©Copyright Abacanto Digital SA. Manual de usuario AD2A04/AD2B04 7 AD Instruments _____________________________________________________________________ 5.5 Definiendo el nivel de referencia 1. Pulse la tecla “REF” para visualizar el nivel de referencia almacenado para la longitud de onda actual y el símbolo “REF” se mostrará en la pantalla para indicar que es un valor de referencia. El valor mostrado se mostrará durante 1 segundo. 2. Pulse y mantenga pulsada la tecla “REF” durante más de 2 segundos para almacenar la medida actual como nuevo valor de referencia para la longitud de onda actual. Durante este proceso el símbolo “REF” parpadea dos veces en la pantalla y se oye un pitido. Una vez que se ha definido el nuevo nivel de referencia, el AD2A04/AD2B04 cambia al modo de medida de dB. El valor se mostrará durante 1 segundo. 5.6 Activando / desactivando la retro-iluminación Pulse la tecla de retro-iluminación. La retro-iluminación se activa. Pulse de nuevo la tecla de retro-iluminación. La retro-iluminación se desactiva. La retro-iluminación se desactivará automáticamente en 10 segundos, si la función de apagado automática está desactivada. ©Copyright Abacanto Digital SA. Manual de usuario AD2A04/AD2B04 8 AD Instruments _____________________________________________________________________ 5.7 Detectando la frecuencia Si la longitud de onda probada transporta un tono de 270Hz, 1kHz, o 2kHz, la respectiva frecuencia se visualiza en la pantalla. 5.8 Sobrepasamiento del valor de potencia medido Si el valor de la potencia medida es demasiado alto, la pantalla LCD mostrará el símbolo “HI”. Si el valor de la potencia medida es demasiado bajo, la pantalla LCD mostrará el símbolo “LO”. 5.9 Almacenamiento del valor actual medido Pulse la tecla durante más de 2 segundos, el símbolo SAVE parpadea en la pantalla una vez mientras suena un pitido. Esto indica que la configuración ha finalizado. Se mostrará el valor almacenado y la posición de almacenamiento. A continuación el AD2A04/AD2B04 volverá automáticamente al modo de pruebas. ©Copyright Abacanto Digital SA. Manual de usuario AD2A04/AD2B04 9 AD Instruments _____________________________________________________________________ 5.10 Comprobación de los datos guardados Pulse , para visualizar el último registro. Pulse , para visualizar el registro siguiente. Pulse , para visualizar el registro anterior. Pulse , borrará todos los registros. 6 Especificaciones Especificaciones ópticas Longitudes de onda calibradas (nm) 850/1300/1310 /1490/1550/1625 Tipo de detector InGaAs Precisión ± 5%±1nW; Resolución 0.01dB@-60 a +10dBm; Linealidad 0.1dB@-70 a -60dBm Auto apagado ±5% Retro-iluminación Sí Valor de referencia Sí Rango de medida (dBm) -70 to +10 Interfaz USB Sí Almacenamiento de datos Sí Reconocimiento de la longitud de onda Sí Detección de tonos (Hz) 270,1K,2K Temperatura de funcionamiento Temperatura de almacenamiento -10 a +50 ºC -20 a +70 Alimentación 2 * Ni-MH AA(2500mAh); 6V AC/DC adaptador Dimensiones (mm) 160L*76W*45H Peso neto 200 gr @ 1550nm, CW,23±3ºC Humedad relativa ≤70%, con conector FC. ©Copyright Abacanto Digital SA. Manual de usuario AD2A04/AD2B04 10 AD Instruments _____________________________________________________________________ 7 Mantenimiento ᇏ Desconecte el adaptador AC y cubra el instrumento con su funda protectora de polvo una vez que acabe de usarlo. ᇏ Mantenga limpios tanto el conector como el instrumento de polvo. Se recomienda el uso de toallitas especiales para la limpieza de ópticas y alcohol isopropílico. Tenga mucho cuidado de de introducir agua o detergente en el interior del instrumento. ᇏ Para garantizar la precisión de la medida, se recomienda que envíe el instrumento una vez al año, al servicio técnico autorizado de Abacanto Digital SA. NOTA: Las especificaciones, términos y condiciones están sujetas a cambios sin previo aviso. ©Copyright 2009 AD INSTRUMENTS. Reservados todos los derechos. AD INSTRUMENTS y su logo son marcas registradas de Abacanto Digital SA. ©Copyright Abacanto Digital SA. Manual de usuario AD2A04/AD2B04 11 AD Instruments _____________________________________________________________________ User's Guide to the AD2A/B04 Optical Power Meter CONTENTS PAGE 1 Introduction 2 Warranty 2.1 Three Years Limited Warranty 2.2 Exclusions 2.3 Returning Product 2.4 Contacting us 3 Safety Information 4 Preparing for Operation 4.1 Unpacking the instrument 4.2 Discharged batteries 4.3 AC operation 5 Operation 5.1 Display and controls 5.2 Turning the instrument on and off 5.3 Setting the wavelength 5.4 Switching measurement mode 5.5 Setting reference level 5.6 Switching backlighting of the LCD on and off 5.7 Frequency detecting 5.8 The overflow of the measured power value 5.9. The storage of the current test value( For AD2A04 and AD2B04) 5.10 Check the storage records( For AD2A04 and AD2B04) 6 Specifications 7 Maintenance 1 Introduction The AD series are full featured palm sized optical power meters designed for use with an optical laser source to perform optical loss measurements on optical fiber cables. The AD series are lightweight and are controlled by microprocessor. Utilizing state-of-the-art SMT in its manufacture, optical connections to the AD are made via the universal adapter interface on the top of the unit. The instrument has 6 working wavelengths to totally satisfy your needs. It can be extensively used in telecommunication projects and other situations where optical power of wavelengths close to infrared ray needs to be measured. 2 Warranty Three Years Limited Warranty AD INSTRUMENTS products are warranted against the defective components and workmanship for a period of three years from the date of delivery to the original customer. Any product found to be defective within the warranty period would be returned to AD INSTRUMENTS authorized service center for repair, replacement and calibration. Exclusions The warranty on your equipment shall not apply to defects resulting from the following: ©Copyright Abacanto Digital SA. Manual de usuario AD2A04/AD2B04 12 AD Instruments _____________________________________________________________________ ᇏ ᇏ Unauthorized repair or modification Misuse, negligence, or accident Returning Product To return product, you may contact AD INSTRUMENTS to obtain additional information if necessary. To serve you better, please specify the reasons for the return. All delivery and mails should be sent to the following address: AD INSTRUMENTS Customer Service Ctra. de Fuencarral Km. 15,700 Edificio EUROPA I 1º 1ª 28108 Alcobendas - MADRID (Spain) Tel.: +34 91 661 3037 Fax.: +34 91 661 4917 http://www.abacantodigital.com 3 Safety Information Warnings! ² ² ² ² Never look directly into optical outputs or a fiber while the equipment is on. Invisible laser beam may damage your eyes. Do not short-circuit the terminal of AC adapter / charger and the batteries. Excessive electrical current may cause personal injury due to fumes, electric shock or equipment damage. Connect AC power cord with the equipment and wall socket properly. While inserting the AC plug, make sure there is no dust or dirt on the terminals and both plugs are fully seated. Incomplete engagement may cause fuming, electric shock or equipment damage and may result in personal injury. Do not operate the equipment near hot objects, in hot environments, in dusty/ humid atmosphere or when condensation is present on the equipment. This may result in electric shock, product malfunction or poor performance. 4 Preparing for Operation 4.1 Unpacking the instrument Packing material We suggest that you keep the original packing material. Using the original packing material is your guarantee of protecting the instrument during transit. Checking the package contents The standard accessories of AD are as follows: Ø Main Unit Ø User’s Guide Ø Quality Check Report Ø 2*1.2-volt Ni-MH Batteries Ø Carrying Case Optional accessories: AC Adapter Checking for damage in transit After unpacking the instrument, check to see whether it was damaged in transit. This is particularly likely if the outer casing is clearly damaged. If there is damage, do not attempt to operate the instrument or to repair it without authorization. Doing so can cause further damage and you may lose your warranty qualification. 4.2 Discharged batteries There is a battery indicator on the screen to show the remaining charge. There are four ©Copyright Abacanto Digital SA. Manual de usuario AD2A04/AD2B04 13 AD Instruments _____________________________________________________________________ possibilities the indicator may show, full, with 2 blacks, with 1 black and empty. If an empty battery indicator flashes it means the power is almost out, and that is when you should recharge the batteries by connect the AC adapter with the instrument. If the discharged batteries get to their limitations after long-time use, please replace it with a new one. To replace the batteries, please remove the battery plate on the back of instrument with a screwdriver. When the battery charge is extremely low to supply the necessary power, the instrument will automatically switch off. Note: 1 The AC indicator is not displayed when power is supplied by batteries. 2 To eliminate the possibility of acid leakage, please take out the batteries if the unit is not used for a long time. 4.3 AC operation If the instrument is mainly used at one location, e.g. in a laboratory or test department, the AC Adapter / Charger Unit can be used to power it instead of batteries. There is a DC input jack on the top side of the AD instrument casing into which the output cable of the AC adapter is plugged. And when the AC adapter is plugged in, the indicator on the LCD will be displayed. Note: 1 Power is supplied by the AC adapter even if batteries or cells are fitted. And the battery indicator is not displayed on the screen when AC adapter is plugged. 2 Make sure that the operating voltage of the AC Adapter / Charger Unit is the same as the local AC line voltage. 5 Operation 5.1 Display and controls ©Copyright Abacanto Digital SA. Manual de usuario AD2A04/AD2B04 14 AD Instruments _____________________________________________________________________ 5.1.1 Keypad The AD keypad is used to access a wide range of instrument functions. Measurement Functions No. Key Function 1 Switches instrument on / off. Long keypress while powering on to activate the instrument without Auto-off function. 2 Selects measurement wavelength in sequence of 1310nm, 1490nm, 1550nm, 1625nm, 850nm, and 1300nm. 3 Switches measurement unit between dB and mw. 4 Long keypress for 2s to store the current test value; short keypress to display the record. 5 Short keypress to display previous reference level of present test wavelength. Long keypress to set a new reference level of present test wavelength. Switches backlighting on / off. 6 5.1.2 Back 5.1.3 LCD ©Copyright Abacanto Digital SA. Manual de usuario AD2A04/AD2B04 15 AD Instruments _____________________________________________________________________ 5.2 Turning the instrument on and off Press the “ON/OFF” key briefly. The instrument powers on, and backlighting switches on. Please check the battery capacity if it fails. Press the “ON/OFF” key briefly again. The instrument powers off, and backlighting switches off. Note: Auto-off function 1. The instrument powers off automatically if no keypress in 10 minutes. 2. Press the “ON/OFF” key for about 2 seconds to power the instrument with “Auto-off” function deactivated. 5.3 Setting the wavelength Press the “λ” key repeatedly until the desired wavelength is displayed. You can select from six possible wavelengths: 850nm, 1300nm, 1310nm, 1490nm, 1550nm, 1625nm. The instrument defaults to 1310nm. ©Copyright Abacanto Digital SA. Manual de usuario AD2A04/AD2B04 16 AD Instruments _____________________________________________________________________ 5.4 Switching measurement mode There are three measurement modes you can choose by pressing the “dBm/mW” key repeatedly, dB, dBm, watt. And when the result is displayed in watt, there are two options, μw and mw. The instrument will decide which one to use automatically according to the numerical value itself. 5.5 Setting reference level 1. Press the “REF” key to display the stored reference level for the current wavelength and a sign of “REF” will be displayed on the screen to indicate that it is a reference value. The displayed value only lasts 1 second. 2. Press and hold the “REF” key over 2 seconds to store the presently measured value as the new reference level for the current wavelength. During the process the “REF” sign flashes twice on the screen and buzzer sound is heard. Once the new reference level is set, the AD switches to the dB measurement mode. The displayed value only lasts 1 second. ©Copyright Abacanto Digital SA. Manual de usuario AD2A04/AD2B04 17 AD Instruments _____________________________________________________________________ 5.6 Switching backlighting of the LCD on and off Press the backlighting key. Backlighting switches on. Press the backlighting key again. Backlighting switches off. The back-light will switch off automatically in 10 seconds, if "Auto-off" function switched off. 5.7 Frequency detecting If the tested wavelength is carrying a tone of 270Hz, 1kHz, or 2kHz, the respective frequency indicates on the screen. 5.8 The Overflow of the Measured Power Value If the measured power value is too high, the LCD screen will display “HI”. ©Copyright Abacanto Digital SA. Manual de usuario AD2A04/AD2B04 18 AD Instruments _____________________________________________________________________ If the measured power value is too low, the LCD screen will display “LO”. 5.9 The storage of the current test value ( For AD2A04 and AD2B04) Press key over 2s, the SAVE flashes on the screen once with the sounds of the buzzer. It indicates the setting is finished. It will display the stored value and the serial number of the storage. Then, the AD2A will return to the test state automatically. 5.10 Press Check the storage records( For AD2A04 and AD2B04) key, it will display the latest record. Press Press key, it will browse the forward records. key, it will browse the afterward records. Press key, it will delete all the records. 6 Specifications Optical Specifications Specifications: AD2A04 ©Copyright Abacanto Digital SA. Manual de usuario AD2A04/AD2B04 AD2B04 19 AD Instruments _____________________________________________________________________ Calibrated Wavelength (nm) 850/1300/1310 /1490/1550/1625 Detector Type Accuracy Resolution InGaAs ± 5%±1nW; ± 5%±10nW 0.01dB@-60 to +10dBm; 0.01dB@-40 to +26dBm; 0.1dB@-70 to -60dBm 0.1dB@-50 to -40dBm Linearity ±5% Auto Power Off Yes Back Light Yes Reference Value Yes Measuring Range(dBm) -70 to +10 -50 to +26 USB Interface Yes Data Storage Yes Wavelength Recognize Yes Tone Detection (Hz) 270,1K,2K Operating Temperature -10 to +50 Storage Temperature -20 to +70 Power Supply 2pcs * Ni-MH AA(2500mAh); 6V AC/DC adaptor Dimension (mm) 160L*76W*45H Net Weight 270g @ 1550nm, CW,23±3?⅐ Relative Humidity ≤70%, with FC connector. 7 Maintenance ᇏ Please disconnect the AC adapter and cover the protective dust cap once you finish using. ᇏ It is a good idea to clean the connector and the instrument when they get dirty through use. Optical cleaning pads and anhydrous alcohol is recommended. And please be careful not to get the detergent inside the instrument. ᇏ To ensure the measurement accuracy, please send the instrument to AD ©Copyright Abacanto Digital SA. Manual de usuario AD2A04/AD2B04 20 AD Instruments _____________________________________________________________________ INSTRUMENTS Service Center for calibration once a year. NOTE: Specifications, terms and conditions are subject to change without notice. ©Copyright 2006 AD INSTRUMENTS. All rights reserved. AD INSTRUMENTS and its logo are trademarks of AD INSTRUMENTS. Printed in China. ©Copyright Abacanto Digital SA. Manual de usuario AD2A04/AD2B04 21