1
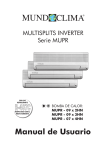
EN
Owner's manual
Thank you very much for purchasing our air conditioner, please read this owner's manual carefully before
using your air conditioner.
Owner's manual
EN
CONTENT
1.IMPORTANT SAFETY INFORMATION....................................................................................................2
2.HINTS FOR ECONOMICAL OPERATIONS.............................................................................................3
3.AIR CONDITIONER OPERATIONS & PERFORMANCE.........................................................................3
4.PARTS NAMES
4.1.CASETTE TYPE........................................................................................................................4
4.2.CASETTE TYPE........................................................................................................................5
4.3.ONE-WAY CASETTE TYPE......................................................................................................6
4.4.HIGH STATIC PRESSURE PARVIS SPLIT................................................................................7
4.5.DUCT AND CEILLING TPYE....................................................................................................8
4.6.SLIM DUCT TYPE.....................................................................................................................9
4.7.DUCT AND CEILING TYPE....................................................................................................10
4.8.SLIM DUCT WITH AIR INLET BOX TYPE..............................................................................11
4.9.CEILING AND FLOOR TYPE..................................................................................................12
4.10.CEILING AND FLOOR TYPE................................................................................................13
4.11.CEILING AND FLOOR TYPE................................................................................................14
5.INSTALLATION......................................................................................................................................15
6.MAINTENANCE.....................................................................................................................................15
7.CHECKS BEFORE OPERATION...........................................................................................................16
8.ADJUST AIR FLOW DIRECTION..........................................................................................................17
9.TEMPORARY OPERATIONS.................................................................................................................17
10.TROUBLE AND CAUSES....................................................................................................................18
11.REMOTE CONTROLLER.....................................................................................................................19
Owner's manual
EN
1. IMPORTANT SAFETY
INFORMATION
CAUTION
Do not attempt to install this unit by yourself. This
unit requires installation by qualified persons.
DANGER
Do not attempt to service the unit yourself. This
unit has no user serviceable components.
Opening or removing the cover will expose you to
dangerous voltage. Tuning off the power supply
will not prevent potential electric shock.
WARNING
To prevent electric shock, turn off the power or
disconnect the power supply plug before
beginning any cleaning or other routine
maintenance. Follow the directions for cleaning in
the Owner's Manual.
DANGER
Never put hands or objects into the Air Outlet of
indoor or outdoor units. These units are installed
with a fan running at high speed.
To touch the moving fan will cause serious injury.
WARNING
Do not use liquid cleaners or aerosol cleaners,
use a soft and dry cloth for cleaning the unit. To
avoid electric shock, never attempt to clean the
units by sprinkling water.
DANGER
To avoid the risk of serious electrical shock, never
sprinkle or spill water or liquids on unit.
CAUTION
Do not use caustic household drain cleaners in the
unit. Drain cleaners can quickly destroy the unit
components (drain pan and heat exchanger coil
etc).
WARNING
Ventilate the room regularly while the air
conditioner is in use, especially if there is also a
gas appliance in use in this room, failure to follow
these directions may result in a loss of oxygen in
the room.
NOTE
For proper performance, operate the unit in
temperature and humidity ranges indicated in this
owner's manual. If the unit is operated beyond
these conditions, it may cause malfunctions of the
unit or dew dripping from the unit.
2
Owner's manual
EN
2.HINTS FOR ECONOMICAL
OPERATION
3.AIR CONDITIONER OPERATIONS
AND PERFORMANCE
The following should be noticed to ensure an
economical operation. (Refer to corresponding
chapter for details)
• Adjust the air flow direction properly to avoid
winding toward your body.
• Adjust the room temperature properly to get a
comfortable situation and to avoid supercooling
and superheat.
• In cooling, close the curtains to avoid direct
sunlight.
• To keep cool or warmair in the room, never open
doors or windows more often than necessary.
• Set the timer for the desired operating time.
• Never put obstructions near the air outlet or the
air inlet. Or it will cause lower efficiency, even a
sudden stop.
• If you don't plan to use the unit for a long time,
please disconnect power and remove the batteries
from the remote controller. When the power switch
is connected, some energy will be consumed,
even if the air conditioner isn't in operation. So
please disconnect the power to save energy. And
please switch the power on 12 hours before you
restart the unit to ensure a smooth operation.
• Aclogged air filter will reduce cooling or heating
efficiency, please clean it once two weeks.
Three-minute protection feature
Aprotection feature prevents the air conditioner
from being activated for approximately 3 minutes
when it restarts immediately after operation.
Power failure
Power failure during operation will stop the unit
completely.
The OPERATION lamp on the indoor unit will start
flashing when power is restored.
To restart operation, push the ON/OFF button on
the remote controller.
Lightning or a car wireless telephone operating
nearby may cause the unit to malfunction.
Disconnect the unit with the power and then
connect the unit with the power again. Push the
ON/OFF button on the remote controller to restart
operation.
AIR CONDITIONER OPERATING CONDITIONS
For proper performance, run the air conditioner
under the following temperature conditions:
COOLING OPERATION:
Outdoor temperature: 21 to 43°C
Room temperature: 17 to 32°C
CAUTION
Room relative humidity less than 80%. If the air
conditioner operates in excess of this figure, the
surface of the air conditioner may attract
condensation.
HEATING OPERATION:
Outdoor temperature: -5 to 24°C
Room temperature: 0 to 30°C
DRY OPERATION:
Outdoor temperature: 11 to 43°C
Room temperature: 17 to 30°C
If air conditioner is used beyond the above
conditions, safety protection features may come
into operation.
3
Owner's manual
EN
4.PARTS NAMES
The air conditioner consists of the indoor unit, the
outdoor unit, the connecting pipe and the remote
controller.
4.1.Cassette Type
DISPLAY
NAMES AND FUNCTIONS
ATTENTION
This chart is based on 24000Btu/h type. So, a few
differences may exist on the outlook and functions
from yours.
a
b
c
d
e
f
g
h
i
j
k
l
m
n
o
p
q
r
4
Indoor unit
Outdoor unit
Remote controller
Air-in
Air-out
Air-outlet
Air flow louver (at air outlet)
Connecting pipe
Drain hose
Air inlet (with air filter in it)
Drain pump (drain water from indoor unit)
Temporary button
Operation lamp
Timer indicator
Info window
Frost indicator
Alarm indicator
Infrared signal reciver
Owner's manual
EN
4.PARTS NAMES
4.2.Cassette Type (HF model)
DISPLAY
ATTENTION
This chart is based on 24000Btu/h type. So, a few
differences may exist on the outlook and functions
from yours.
NAMES AND FUNCTIONS
1
2
3
4
5
6
7
8
9
10
11
12
13
14
15
5
Indoor unit
Outdoor unit
Remote controller
Air-outlet
Vertical louver
Connecting pipe
Drain hose
Air inlet
Drain pump
Infrared signal reciver
Manual button
Run lamp
Timer indicator
Defrost indicator
Alarm indicator
Owner's manual
EN
4. PARTS NAMES
4.3.One-way Casette Type
INDOOR UNIT
1
2
3
4
5
Outlet louver
Inlet
Filter
Diplay panel
Remote Controller
UNIDAD EXTERIOR
6
7
8
9
10
Refrigerant connecting,
drain hose pipe
Electric wiring
Trap
Air outlet
Air inlet
DISPLAY
11
12
14
15
16
6
Manual button
Run lamp
TIMER indicator
Alarm indicator
DEF. indicator
Owner's manual
EN
4.PARTS NAMES
4.4.High-static Pressure Parvis Split
Type
DISPLAY
ATTENTION
This chart is based on 24000Btu/h type. So, a few
differences may exist on the outlook and functions
from yours.
NAMES AND FUNCTIONS
a
b
c
d
e
f
g
h
i
j
k
l
m
n
o
p
7
Indoor unit
Outdoor unit
Remote controller
Air-inlet
Air-out
Air-outlet
Heat exchanger
Connecting pipe
Drain hose
E-box
Infrared signal reciver
Temporary button
Operation lamp
PRE-DEF indicator
Timer indicator
Alarm indicator
Owner's manual
EN
4.PARTS NAMES
4.5.Duct and Ceiling Type
DISPLAY
ATTENTION
This chart is based on 24000Btu/h type. So, a few
differences may exist on the outlook and functions
from yours.
NAMES AND FUNCTIONS
a
b
c
d
e
f
g
h
i
j
k
l
m
n
o
p
8
Indoor unit
Outdoor unit
Remote controller
Air-inlet
Air-out
Air-outlet
Heat exchanger
Connecting pipe
Drain hose
E-box
Infrared signal reciver
Temporary button
Operation lamp
PRE-DEF indicator
Timer indicator
Alarm indicator
Owner's manual
EN
4.PARTS NAMES
4.6.Slim Duct Type
DISPLAY
ATTENTION
This chart is based on 24000Btu/h type. So, a few
differences may exist on the outlook and functions
from yours.
NAMES AND FUNCTIONS
a
b
c
d
e
f
g/h
i
j
k
l
m
n
o
p
9
Indoor unit
Outdoor unit
Remote controller
Air-inlet
Air-out
Air-outlet
Connecting pipe
Drain hose
E-box
Infrared signal reciver
Temporary button
Operation lamp
PRE-DEF indicator
Timer indicator
Alarm indicator
Owner's manual
EN
4.PARTS NAMES
4.7.Duct and Ceiling Type
DISPLAY
ATTENTION
This chart is based on 24000Btu/h type. So, a few
differences may exist on the outlook and functions
from yours.
NAMES AND FUNCTIONS
a
b
c
d
e
f
g
h
i
j
k
l
m
n
o
10
Indoor unit
Outdoor unit
Remote controller
Air-inlet
Air low louver
Connecting pipe
Drain hose
E-box
Air-out
Infrared signal reciver
Temporary button
Operation lamp
Timer indicator
FAN-DEF indicator
Alarm indicator
Owner's manual
EN
4.PARTS NAMES
4.8.Slim Duct with air inlet box Type
DISPLAY
ATTENTION
This chart is based on 24000Btu/h type. So, a few
differences may exist on the outlook and functions
from yours.
NAMES AND FUNCTIONS
a
b
c
d
e
f
g
h
i
j
k
l
m
n
o
p
11
Indoor unit
Outdoor unit
Remote controller
Air-outlet
Air-out
Air-inlet
Heat exchanger
Connecting pipe
Drain hose
E-box
Infrared signal reciver
Temporary button
Operation lamp
PRE-DEF indicator
Timer indicator
Alarm indicator
Owner's manual
EN
4.PARTS NAMES
4.9.Ceiling & Floor Type
(For Vertical Discharge Air Conditioner)
DISPLAY
NAMES AND FUNCTIONS
ATTENTION
The chart based on one model of our product is
for reference only, which may be different from
the unit you purchased.
a
b
c
d
e
f
g
h
i
j
k
l
m
n
o
p
12
Indoor unit
Outdoor unit
Remote controller
Air-inlet
Air flow louver
Connecting pipe
Drain hose
Air-inlet
Installation part
FAN-DEF indicator
Infrared signal reciver
Operation lamp
Timer indicator
Alarm indicator
Temporary button
Air-out
Owner's manual
EN
4.PARTS NAMES
4.10.Ceiling & Floor Type
DISPLAY
NAMES AND FUNCTIONS
The chart based on one model of our product is
for reference only, which may be different from
the unit you purchased.
a
b
c
d
e
f
g
h
i
j
k
l
m
n
o
p
13
Indoor unit
Outdoor unit
Remote controller
Air-inlet
Air flow louver
Connecting pipe
Drain hose
Air-inlet
Installation part
FAN-DEF indicator
Infrared signal reciver
Operation lamp
Timer indicator
Alarm indicator
Temporary button
Air-out
Owner's manual
EN
4.PARTS NAMES
4.11.Ceiling & Floor Type
NAMES AND FUNCTIONS
ATTENTION
The chart based on one model of our product is
for reference only, which may be different from
the unit you purchased.
a
b
c
d
e
f
g
h
i
j
k
l
m
n
o
p
14
Indoor unit
Outdoor unit
Remote controller
Air-inlet
Air flow louver
Connecting pipe
Drain hose
Air-inlet
Installation part
FAN-DEF indicator
Infrared signal reciver
Operation lamp
Timer indicator
Alarm indicator
Temporary button
Air-out
Owner's manual
EN
5.INSTALLATION
6.MAINTENANCE
LOCATION
• During cooling operation, the air conditioner will
dry the roomair, so please fix a pipe to drain all the
water away from the air conditioner.
• Please let the indoor unit more than one metre
away from the TV set and the radio in order to
avoid the picture and noise interference.
• Powerful radio transmitters or any other devices
radiating high frequency radio waves can cause
the air conditioner to malfunction. Please consult
the dealer where you purchased the air
conditioner before installing it.
• Don't fix the unit in the dangerous region with
combustible gas or volatile matter.
• If the air conditioner operates in an atmosphere
containing oils (machine oil), salt (near a coastal
area), sulfide gas (near a hot spring), etc., such
substances may lead to failure of the air
conditioner.
WARNING
Before you clean the air conditioner, be sure to
disconnect the power supply plug.
CLEANING THE INDOOR UNIT AND REMOTE
CONTROLLER
CAUTION
• Use a dry cloth to wipe the indoor unit and
remote controller.
• A cloth dampened with cold water may be used
on the indoor unit if it is very dirty.
• Never use a damp cloth on the remote controller.
• Do not use a chemically-treted duster for wiping
or leave such material on the unit for long,
because it may damage or fade the surface of the
unit.
• Do not use benzine, thinner, polishing powder, or
similar solvents for cleaning. These may cause the
plastic surface to crack or deform.
Be careful of noise or vibrations
• Please fix the unit in the stable place to avoid the
noise or vibrations.
• The noise near the air outlet of the outdoor unit
may enter the air exit.
• Locate the outdoor unit where noise emitted by it
or hot air fromits air outlet will cause no nuisance
to your neighbours.
• If the air conditioner sounds abnormal during
operation, contact the dealer where you
purchased the air conditioner.
If you do not plan to use the unit for at least 1
month.
(1) Operate the fan for about half a day to dry the
inside of the unit.
(2) Stop the air conditioner and disconnect power.
(3) Remove the batteries from the remote
controller.
WIRE
• To avoid the electric shock, please link the air
conditioner with the ground. The plug in the air
conditioner has joined the ground wiring, please
don't change it freely.
• The power socket is used as the air conditioner
specially.
• Don't pull the power wiring hard. When linking
the air conditioner with the ground, observe the
local rulers.
• If necessary, use the power fuse or the circuit,
breaker or the corresponding scale ampere.
If you want to change the power wiring, please
contact the centre service of the local MD electric
appliance.
RELOCATION
If you move out or if it is desired to relocate the air
conditioner, consult your dealer, because special
skills to with draw Freon, purge air and perform
other operations are required.
15
Owner's manual
EN
DUCT AND CEILING TYPE
1.Open the air-in grill
Push the grill switches towards the middle
simultaneously as indicated in follow figure sketch.
Then pull down the air-in grill.
7.CHECKS BEFORE OPERATION
CAUTION
• Check that the wiring is not broken off or
disconnected.
• Check that the air filter is installed. (Some airconditioners haven't air filters.)
• Check that the outdoor unit air outlet or inlet is
not blocked.
CAUTION
The control box cables ,which are originally
connected with the main body electrical
terminators must be pulled off before doing as
indicated above.
Before you clean the air conditioner, be sure to
disconnect the power supply plug.
CLEANING THE AIR FILTER
The air filter can prevent the dust or other
particulate fromgoing inside. In case of blockage
of the filter, the working efficiency of the air
conditioner may greatly decrease.Therefore, the
filter must be cleaned once two weeks during long
time usage. If the air conditioner is positioned in a
dust place, the cleaning frequency of the air filter
must be increased.
If the accumulated dust is too heavy to be cleaned
please replace the filter with a new one
(replaceable air filter is an optional fitting).
2. Take out the air-in grill.
3. Dismantle the air filter
4. Clean the air filter (Vacuumcleaner or pure
water may be used to clean the air filter. If the dust
accumulation is too heavy , please use soft brush
and mild detergent to clean it and dry out in cool
place).
Fig. 1
The air-in side should face up when using vacuum
cleaner. (See Fig. 1)
CASSETTE TYPE
1.Open the air-in grill
Push the grill switches towards the middle
simultaneously as indicated in sketch A. Then pull
down the air-in grill.
Fig. 2
The air-in side should face down when using
water. (See Fig. 2)
CAUTION
The control box cables ,which are originally
connected with the main body electrical
terminators must be pulled off before doing as
indicated above.
CAUTION
Do not dry out the air filter under direct sunshine
or with fire.
5. Re-install the air filter
6. Install and close the air-in grill in the reverse
order of step 1 and 2 and connect the control box
cables to the corresponding terminators of the
main body.
2. Take out the air-in grill (together with the air filter
shown in Sketch B)
Pull the air-in grill down at 45° and lift it up to take
out the grill.
3. Dismantle the air filter
4. Clean the air filter(Vacuum cleaner or pure
water may be used to clean. If the dust accumulation is too heavy, please use soft brush and mild
detergent to clean it and dry out in cool place).
NOTE
High-static Pressure Parvis Split Type has no air
filter.
16
Owner's manual
EN
8.ADJUSTING AIR FLOWDIRECTION
9.TEMPORARY OPERATIONS
CASSETTE TYPE
While the unit is in operation, you can adjust the
air flow louver to change the flow direction and
naturalize the roomtemperature evenly. Thus you
can enjoy it more comfortably.
1. Set the desired air flow direction.
Push the SWING button to adjust the louver to the
desired position and push this button again to
maintain the louver at this position.
2. Adjust the air flow direction automatically.
Push the SWING button, the louver will swing
automatically.
Temporary
Button
Adjust it up and down
While this function is set, the swing fan of indoor
unit runs; otherwise, the swing fan doesn't run. The
swing scale of every side is 30°. When the air
conditioner isn't in operation (including when
"TIMER ON" is set), the SWING button will be
disabled.
This function is used to operate the unit
temporarily in case you misplace the remote
controller or its batteries are exhausted. Two
modes including AUTO and mandatory COOL can
be selected through the TEMPORARY BUTTON
on the air inlet grill control box of the indoor unit.
Once you push this button, the air conditioner will
run in such order: AUTO, mandatory COOL, OFF,
and back to AUTO.
DUCT AND CEILING TYPE
The following is how to adjust air flow direction
when air outlet part (separately saled) is used with
the indoor unit.
1. AUTO
The OPERATION lamp is lit, and the air
conditioner will run under AUTO mode. The remote
controller operation is enabled to operate
according to the received signal.
Cooling
To effectively cool the whole room, please set the
louver so that the air can come out horizontally.
2. mandatory COOL
The OPERATION lamp flashes, the air conditioner
will turn to AUTO after it is enforced to cool with a
wind speed of HIGH for 30 minutes. The remote
controller operation is disabled.
3. OFF
The OPERATION lamp goes off. The air
conditioner is OFF while the remote controller
operation is enabled.
Heating
To effectively heat the bottomof the room.
Please set the louver so that the air can come out
downwards.
NOTE
Only take the cassette type as example.
17
Owner's manual
EN
When dry operation is selected, the air conditioner
automatically select the fan speed. The fan speed
can be selected during "COOL", "FAN ONLY", and
"HEAT"
10.TROUBLES AND CAUSES
Before you ask for servicing or repairs, check the
following points.
The Transmission Indicator " " Never Comes
On
Symptoms: The remote control signal is not
transmitted even when the ON/OFF button is
pushed.
Causes: Check whether the batteries in the
remote controller are exhausted.
Reason and Disposal: The remote control signal
is not transmitted, because the power supply is off.
RECHECK
Inoperative
The power fuse is blown or the circuit breaker has
been tripped.
The batteries in the remote controller are
exhausted.
The timer is set.
Does not cool or heat well
The air inlet or outlet of the outdoor unit is blocked.
Doors or windows are open.
The air filter is clogged with dust.
The louver is not at the correct position.
The fan speed is set to low.
The temperature setting is too high or too low.
The Display Never Comes On
Symptoms: The TEMP. indicator does not come
on.
Causes: Check whether the MODE indicated on
the display is "FAN ONLY".
Reason: The temperature cannot be set during
fan only operation.
THESE ARE NOT FAILURES
Roomair is smelly
A bad odor comes from the air conditioner.
Smells impregnated in the wall, carpet, furniture,
clothing, or furs, are coming out. A white mist
of chilled air or water is generated fromthe outdoor
unit.
The Display Goes Off
Symptoms: The indication on the display
disappears after a lapse of time.
The ON TIMER indicators go off after a lapse of
certain time.
Causes: Check whether the timer operation has
come to an end when the OFF TIMER is indicated
on the display.
Check whether the timer operation is started when
the ON TIMER is indicated on the display.
Reason: The air conditioner operation stops since
the set time elapsed.
When the time set to start the air conditioner is
reached, the air conditioner will automatically
start and the appropriate indicator will go off.
CAUTION
If any of the following conditions occur, stop the air
conditioner immediately, set to off the power
switch, and contact the dealer:
• The indicator lamps flash rapidly (five times per
second), you disconnect the unit with the power
and then connect the unit with the power again
after two or three minutes but the lamps still flash.
Switch operations are erratic.
• The fuse is blown frequently or the circuit breaker
is tripped frequently.
• Foreign matter or water has fallen inside the air
conditioner.
• Any other unusual condition is observed.
The Signal Receiving Tone does Not Sound
Symptoms: No receiving tone sounds from the
indoor unit even when the ON/OFF button is
pushed.
Buttons on the remote controller don't work.
Causes: Check whether the signal transmitter of
the remote controller is properly directed to the
receiver of the indoor unit when the ON/OFF
button is pushed.
Disposal: Direct the signal transmitter of the
remote controller to the receiver of the indoor unit,
and then repeatly push the ON/OFF button twice.
Press Reset button.
Setting Change is Impossible
Symptoms: The fan speed can not be changed.
Causes: Check whether the MODE indicated on
the display is "AUTO"
Check whether the MODE indicated on the display
is "DRY"
Reason and Disposal: When the automatic mode
is selected, the air conditioner automatically
selects the fan speed.
18
Owner's manual
EN
11. Remote
Controller
CONTENTS
PRECAUTIONS
INDICATORS AND FUNCTIONS
BUTTONS AND THEIR FUNCTIONS
OPERATION INSTRUCTIONS
NOTE
1.The outline figure on cover is for reference only,
which may differ from what you purchased.
2. Make sure to read chapter PRECAUTIONS
before you operate the air conditioner.
3. This manual is available for model R05/BG.
4. R05/BGE can be applicable for cool only type
and cool&heat type air conditioners.
19
Owner's manual
EN
PRECAUTIONS
INDICATORS AND FUNCTIONS
• Curtain, door or the like objects will prevent the
remote signal from being received by air
conditioner.
• Do not get the interior of remote controller wet. It
is forbidden to expose it to direct sunlight or locate
it in the place with high temp.
• Malfunction may occur if infrared signal receiver
on air conditioner is exposed to sunlight. Please
shelter the signal receiver fromsunlight with
curtain.
• Please remove the nearby electronic device for
they may affect the performance of remote
controller. If necessary, contact the local Midea
service centre or technical support centre.
• Do not put the used or different batteries into the
remote controller, otherwise remote controller will
fail to send signal.
• Please remove the batteries before long period
unused, otherwise the remote controller may be
damaged.
• If pressing the button reset the remote controller,
which indicates low battery, please replace the
batteries.
• If no receiving sound is heard fromindoor unit or
on remote controller does not flash, please
replace the batteries.
• Effective transmitting distance of remote
controller is 8m, please aimthe signal sending part
to the receiver on air conditioner.
1.TEMP: Display the set temperature. Adjust
temperature via and . No display in this area if
the unit is on FAN mode.
2.TRANSMITTING DISPLAY: The icon will flash
once when the signal is sent by remote controller.
3.ON/FF: Icon is displayed when the remote
controller is turned on, or vice versa.
4.RUNNING MODE: Press MODE to display
current running mode. AUTO, COOL, DRY, HEAT
and FAN can be selected. (HEAT function is invalid
for cool only type unit.)
5.TIME: Display the current set time. Press
CLOCK for 5s, icon indicating hour will flash.
Press this button again, icon indicating minute will
flash. And are used to adjust the figure. Setting or
modification is effective only by pressing OK
button to make confirmation.
6.LOCK: The icon will be lightened or off when
pressing LOCK. In locked state, all the buttons are
ineffective except button LOCK.
7.Time ON/OFF: In the state of time ON, icon ON
will be lightened, which is the same to the state of
time OFF.
Setting timer ON and OFF simultaneously, both
icons ON and OFF are displayed.
MODEL AND SPECIFICATION
8.FAN SPEED: Press FAN SPEED to display the
current wind speed. AUTO, LOW, MED and HIGH
can be selected. The default state is high fan
speed for the unit without medium fan speed.
Model: R05/BGE
Rated voltage: 3.0V (2 pieces of LR03 7# batteries)
Min voltage for sending signal of CPU: 2.4V
Effective receiving distance: 8m - 11m
Operation condition: -5~60°C
9.ECONOMIC OPERATION: This icon will be
lightened or off when pressing ECO button.
NOTE
All the above icons will be displayed only when the
remote controller is electrified for the first time or
reset.
20
Owner's manual
EN
BUTTONS AND THEIR FUNCTIONS
6.AIR DIRECTION: Activate swing function of air
deflector. Once pressing, air deflector will turn 6°C
For normal operation and better cooling and
heating effect, deflector will not turn to the degree
which is the state of deflector when the unit is
turned off. (Only available when remote controller
is used with corresponding unit.)
7.HORIZ SWING: Activate or turn off horizontal
swing function. (Only available when remote
controller is used with corresponding unit.)
8.VERT SWING: Activate or turn off vertical swing
function. (Only available when remote controller is
used with corresponding unit.)
9.CLOCK: Display the current time. (12:00 is
displayed when resetting or electrifying for the first
time.) Press CLOCK for 5s, icon indicating hour
will flash with 0.5s. Press it again, icon indicating
minute will flash with 0.5s. and are used to
adjust the figure. Setting or modification is
effective only by pressing OK button to make
confirmation.
10.TIME ON: For time ON setting. Once pressing
this button, the time will increase by 0.5 hour.
When the set time exceeds 10 hours, pressing the
button will increase the time by 1 hour. Adjusting
the figure to 0.00 will cancel time ON setting.
11.TIME OFF: For time OFF setting. Once
pressing this button, the time will increase by 0.5
hour. When the set time exceeds 10 hours,
pressing the button will increase the time by 1
hour. Adjust the figure to 0.00 will cancel time ON
setting.
12. RESET (inner located): Press this button with
a needle of 1mm to cancel the current setting and
reset remote controller.
1.MODE: Once pressing, running mode will be
selected in the following sequence: AUTO-COOLDRY-HEAT-FAN
13.LOCK (inner located): Press this button with a
needle of 1mm to lock or unlock current setting
14.OK: Used to confirm the time setting and
modification.
2.FAN SPEED: Fan speed will be selected in
following sequence once pressing this button:
AUTO-LOW-MED-HIGH
15.COOL/HEAT (inner located): Press this button
with a needle of 1mm to shift mode between
COOL only and COOL&HEAT. During setting,
back light will be lightened. Factory default mode
is COOL &HEAT.
3.ADJUST: Decrease the set temp. Keeping
pressing will decrease the temp with 1° per 0.5s.
4.ADJUST: Increase the set temp. Keeping
pressing will increase the temp with 1° per 0.5s.
16. ECO: Activate or turn off economic operation
mode. It is suggested to turn on this function when
sleeping. (Only available when remote controller is
used with corresponding unit.)
5.ON/OFF: For turning on or turning off the air
conditioner.
21
Owner's manual
EN
OPERATION INSTRUCTIONS
TIME ON OPERAITON
1. Press TIME ON, icon SET, HOUR and ON are
lightened.
2. Press TIME ON again and adjust the time.
3. Keep pressing this button, the time will increase
by 0.5 hour. When the set time exceeds 10 hours,
pressing the button will increase the time by 1
hour.
4. 0.5s after setting, remote controller will send
TIME ON command to the unit.
INSTALL AND REPLACE BATTERIES
Install 2 pieces of 7# alkaline batteries.
Slide the cover to install batteries and make sure
to place them in right pole.
AUTO OPERATION
Switch on the power and running indicator light on
indoor unit flashes.
1. Press MODE to select AUTO.
2. Adjust temp via and . Generally the range is
17° ~ 30°C .
3. Press ON/OFF and running indicator light on
indoor unit is lightened. Air conditioner will work on
AUTO mode and fan speed is AUTO which is non
adjustable.
4. ECOis effective on AUTO operation.
TIME OFF OPERATION
1. Press TIME OFF, icon SET, HOUR and OFF are
lightened.
2. Press TIME OFF again and adjust the time.
3. Keep pressing this button, the time will increase
by 0.5 hour. When the set time exceeds 10 hours,
pressing the button will increase the time by 1
hour.
4. 0.5s after setting, remote controller will send
COOL/HEAT/FAN OPERATION
1. Press MODE to select COOL, HEAT or FAN.
2. Adjust temp via and . Generally the range is
17° ~ 30°C .
3. Press FAN SPEED to select AUTO, LOW, MED
or HIGH.
4. Press ON/OFF and running indicator light on
indoor unit is lightened. Air conditioner will work on
the set mode. Stop operation via ON/OFF.
SET TIME ON AND TIME OFF
SIMULTANEOUSLY
1. Set TIME ON according to procedures 1 and 2
specified in.
TIME ON OPERATION
2. Set TIME OFF as the procedures 1 and 2
specified in
NOTE
On FAN mode, temp is non adjustable and ECO is
ineffective. Procedure 2 is omitted.
TIME OFF OPERATION
3. If both the set time of TIME ON and TIME OFF
not exceed 10 hours, time OFF operation will
activated 0.5 hour later than time ON operation. If
both the set time of TIME ON and TIME OFF
exceed 10 hours, time OFF operation will be
activated 1 hour later than time ON operation.
4. 0.5s after setting, remote controller will send
TIME ON command to the unit.
DRY OPERATION
1. Press MODE to select DRY.
2. Adjust temp via and . Generally the range is
17° ~ 30°C .
3. Press ON/OFF and running indicator light on
indoor unit is lightened. Air conditioner will work on
DRY mode. Turn off the unit via ON/OFF.
4. On DRY mode, ECO and FAN SPEED are
unavailable.
MODIFICATION OF TIMER OPERATION
Press corresponding button and readjust the time
of time ON and time OFF. Adjust the time figure to
0.00 to cancel the timer operation.
TIMER OPERATION
TIME ON and TIMEOFF are used to turn on and
turn off the unit at the set time respectively.
NOTE
The time set in timer operation is the relative figure
based on the clock on remote controller. Adjusting
clock is unavailable when TIME ON or TIME OFF
is activated.
22
Owner's manual
EN
23
Owner's manual
EN
24
Owner's manual
EN
25
Owner's manual
EN
26
Owner's manual
EN
27
Owner's manual
EN
28
EN
Owner's Manual
®
SALVADOR ESCODA S.A.
BARCELONA
Head Office:
Provença, 392, pl 1 & 2
08025 BARCELONA
Export Department:
[email protected]
Tel. + 34 93 446 27 81
Fax + 34 93 446 27 96
ES
Manual del Usuario
Muchas gracias por adquirir nuestro acondicionador de aire; lea detenidamente este manual del usuario antes de
empezar a utilizar su aire acondicionado.
Manual del usuario
ES
ÍNDICE
1.PRECAUCIONES.....................................................................................................................................2
2.FUNCIONAMIENTO Y CARACTERÍSTICAS DEL AIRE ACONDICIONADO..........................................3
3.DESCRIPCIÓN Y FUNCIONES
3.1.TIPO CASETTE.........................................................................................................................4
3.2.TIPO CASETTE.........................................................................................................................5
3.3.TIPO CASETTE 1 VÍA...............................................................................................................6
3.4. TIPO SPLIT CONDUCTO.........................................................................................................7
3.5. TIPO CONDUCTO ...................................................................................................................8
3.6.TIPO TECHO-SUELO................................................................................................................9
3.7.TIPO TECHO-SUELO..............................................................................................................10
4. INSTALACIÓN.......................................................................................................................................11
5. MANTENIMIENTO.................................................................................................................................11
6. LIMPIEZA TIPO CONDUCTO TECHO..................................................................................................12
7. MANDO POR CABLE............................................................................................................................13
8. AVERÍAS Y CAUSAS.............................................................................................................................19
9. MANDO A distancia...............................................................................................................................20
Manual del usuario
ES
1.PRECAUCIONES
CUIDADO
No intente instalar el aparato personalmente. Esta
unidad debe ser instalada por un profesional.
PELIGRO
No intente reparar el aparato personalmente. Esta
unidad no tiene componentes que pueda revisar
el usuario. Si abre o retira la cubierta, se expondrá
a una tensión peligrosa. La desconexión de la
alimentación eléctrica no anula por completo el
riesgo de descarga.
ATENCIÓN
Para evitar descargas eléctricas, apague el
interruptor o desenchufe la unidad de la red antes
de empezar cualquier operación de limpieza o
mantenimiento de rutina. Siga las indicaciones de
limpieza que aparecen en el Manual del usuario.
ATENCIÓN
No limpie la unidad con líquidos ni aerosoles de
limpieza; utilice sólo un paño suave y seco. Para
evitar descargas eléctricas, no intente jamás
limpiar la unidad rociándola con agua.
PELIGRO
No ponga nunca las manos ni ningún objeto en la
salida de aire de las unidades interior o exterior.
Estas unidades llevan un ventilador que funciona
a gran velocidad. Si toca un ventilador en
funcionamiento, puede sufrir lesiones graves.
CUIDADO
No utilice productos desatascadores cáusticos.
Podría dañar sus componentes (bandeja de
desagüe, serpentín del intercambiador de calor,
etc.).
PELIGRO
Para evitar el riesgo de descargas eléctricas, no
deje caer agua o líquidos sobre la unidad.
ATENCIÓN
Mientras el acondicionador esté funcionando,
ventile la habitación con regularidad,
especialmente si además hay en ella algún
electrodoméstico que funcione con gas. Si no lo
hace, puede producirse escasez de oxígeno.
NOTA
Para un rendimiento adecuado, haga funcionar la
unidad dentro de los márgenes de temperatura y
humedad indicados en el manual del usuario.
Fuera de esos márgenes funcionará mal y se
formará agua de condensación.
2
Manual del usuario
ES
para una seguridad absoluta de los usuarios, es
conveniente efectuar las operaciones de
mantenimiento de rutina después de haber
desconectado la corriente.
1.COMPROBACIONES Y
PRECAUCIONES
Lea con detenimiento el manual del usuario antes
de usar el equipo y estudie los puntos
importantes. Si tiene alguna dificultad, consulte al
concesionario local. El acondicionador está
diseñado para proporcionar un ambiente
confortable. Solamente se destina a este uso, de
acuerdo con el manual.
2.FUNCIONAMIENTO Y
CARACTERÍSTICAS DEL
ACONDICIONADOR DE AIRE
Función de protección de tres minutos
Esta función evita que el aparato de aire
acondicionado sea activado durante unos 3 min.
cuando se pone en marcha inmediatamente
después de haber estado funcionando.
1. Comprobaciones antes de la puesta en marcha:
• Compruebe que la toma de tierra no está rota ni
desconectada.
• Compruebe que el filtro de aire está bien
colocado.
• Si lleva mucho tiempo sin usar la unidad, limpie
el filtro de aire antes de volver a usarla. En
régimen de uso continuado, limpie el filtro de aire
por lo menos una vez cada dos semanas.
Fallo del suministro eléctrico
Un fallo del suministro eléctrico provocará la
parada total de la unidad. El indicador de
funcionamiento de la unidad interior comenzará a
parpadear cuando se restablezca el suministro
eléctrico. Para reiniciar la operación, pulse el
botón ON/OFF del mando a distancia.
Los relámpagos o la presencia de teléfonos
inalámbricos de coche en las cercanías pueden
provocar fallos de funcionamiento de la unidad.
Desconecte el enchufe de la unidad y después
vuelva a conectarlo. Pulse el botón ON/OFF del
mando a distancia para reiniciar la operación.
2. Precauciones de seguridad:
• No moje la ud. interior ni el mando a distancia.
Se pueden producir descargas eléctricas o
incendios.
• No ponga ni utilice cerca del acondicionador
gases o líquidos inflamables, tales como
pegamentos, pinturas o gasolina.
• No toque el deflector mientras esté funcionando.
Podría pillarse los dedos o romper los
componentes que lo accionan.
• Si salta el fusible, no lo sustituya por uno
inadecuado. Sustituir el fusible por un hilo de latón
o de hierro puede ocasionar daños en el
acondicionador o un incendio.
• No meta ninguna varilla por la entrada o la
salida. Cuando las palas del ventilador giran a
gran velocidad, es muy peligroso que golpeen con
algo.
• No retire la cubierta del ventilador de la unidad
exterior. Es peligroso que funcione a alta
velocidad al aire.
• No encienda ni apague la unidad con el
interruptor de la red; hágalo con el botón ON/OFF
del mando a distancia.
• Evite que los niños jueguen con la unidad.
• No efectúe por sí mismo ninguna reparación de
la unidad. Acuda al personal técnico oficial.
• Desconecte el interruptor de la red antes de
limpiar la malla del filtro y el cuerpo de la
máquina. Aunque cuando se cambia y se limpia la
malla del filtro o se limpia el cuerpo de la máquina
con un paño seco normalmente se cuenta con
una doble protección contra descargas eléctricas,
Para un rendimiento correcto, haga funcionar el
acondicionador dentro de las siguientes
condiciones de temperatura:
REFRIGERACIÓN:
Temperatura exterior: Entre 21 y 43°C
Temperatura de la habitación: Entre 17 y 32°C
CUIDADO
La humedad relativa debe ser inferior al 80%.
Por encima de este valor puede formarse
condensación en la superficie del aparato.
CALEFACCIÓN (no aplicable para el modelo de sólo frío)
Temperatura exterior: entre -5 y 24°C
Temperatura de la habitación: entre 0 y 30°C
DESHUMIDIFICACIÓN
Temperatura exterior: entre 11 y 43°C
Temperatura de la habitación: entre 17 y 30°C
3
Manual del usuario
ES
3. DESCRIPCIÓN Y FUNCIONES
3.1.Tipo Casette
h
Display
NOMBRES Y FUNCIONES
AVISO
La tabla está basada en un modelo de
24000 Btu/h. Por tanto, podrían existir algunas
diferencias en el aspecto y en las funciones
respecto de su aparato.
a
b
c
d
e
f
g
h
i
j
k
l
m
n
o
p
q
r
4
Unidad interior
Unidad exterior
Mando a distancia
Entrada de aire
Salida de aire
Salida de aire
Lama de salida de aire
Tubo frigorifico
Tubo de desagüe
Entrada de aire (con filtro)
Bomba drenaje (ud. interior)
Botón programación
Indicador funcionamiento
Indicador temporizador
Información
Indicador desescarche
Indicador de alarma
Receptor de señal infrarojos
Manual del usuario
ES
3. DESCRIPCIÓN Y FUNCIONES
3.2.Tipo Casette (modelo HF)
Display
Entrada
Salida
AVISO
La tabla está basada en un modelo de
24000 Btu/h. Por tanto, podrían existir algunas
diferencias en el aspecto y en las funciones
respecto de su aparato.
NOMBRES Y FUNCIONES
1
2
3
4
5
6
7
8
9
10
11
12
13
14
15
5
Unidad interior
Unidad exterior
Mando a distancia
Salida de aire
Tubo de conexión
Tubo de descarga
Entrada de aire
Receptor de infrarojos
Botón manual
Indicador de funcionamiento
Indicador temporizador
Indicador de descarcha (mod. frío-calor)
Indicador de alarma
Manual del usuario
ES
3. DESCRIPCIÓN Y FUNCIONES
NOMBRES Y FUNCIONES
3.3.Tipo Casette 1 vía
UNIDAD INTERIOR
1
2
3
4
5
Lama de salida
Entrada
Filtro
Display
Mando a distancia
UNIDAD EXTERIOR
Entrada
Entrada
6
7
8
9
10
Conexión del refrigerante,
tubo de descarga
Cableado eléctrico
Sifón
Salida de aire
Entrada de aire (lateral y trasera)
Salida
DISPLAY
11
12
14
15
16
6
Tecla manual
Indicador funcionamiento
Indicador temporizador
Indicador alarma
Indicador DEF.
Manual del usuario
ES
3. DESCRIPCIÓN Y FUNCIONES
3.4.Tipo Split Conducto Alta Presión
Display
AVISO
La tabla está basada en un modelo de
24000 Btu/h. Por tanto, podrían existir algunas
diferencias en el aspecto y en las funciones
respecto de su aparato.
NOMBRES Y FUNCIONES
a
b
c
d
e
f
g
h
i
j
k
l
m
n
o
p
7
Unidad interior
Unidad exterior
Mando a distancia
Entrada de aire
Salida de aire
Salida de aire
Intercambiador de calor
Tubo frigorífico
Tubo de desagüe
PCB
Receptor de infrarojos
Botón temporizador
Indicador de funcionamiento
Indicador temporizador
Indicador PRE-DEF
Indicador de alarma
Manual del usuario
ES
3. DESCRIPCIÓN Y FUNCIONES
3.5.Tipo Conducto
Display
AVISO
El esquema está basado en un modelo de
24000 Btu/h. Por tanto, podrían existir algunas
diferencias en el aspecto y en las funciones
respecto de su aparato.
NOMBRES Y FUNCIONES
a
b
c
d
e
f
g/h
i
j
k
l
m
n
o
p
8
Unidad interior
Unidad exterior
Mando a distancia
Entrada de aire
Salida de aire
Salida de aire
Tubo frigorifico
Tubo de desagüe
PCB
Receptor de infrarojos
Botón temporizador
Indicador de funcionamiento
Indicador temporizador
Indicador PRE-DEF
Indicador de alarma
Manual del usuario
ES
3. DESCRIPCIÓN Y FUNCIONES
3.6.Tipo Techo-Suelo
Display
AVISO
El esquema está basado en un modelo de
referencia. Por tanto, podrían existir algunas
diferencias en el aspecto y en las funciones
respecto de su aparato.
NOMBRES Y FUNCIONES
a
b
c
d
e
f
g
h
i
j
k
l
m
n
o
p
9
Unidad interior
Unidad exterior
Mando a distancia
Entrada de aire
Lama
Tubo de frigorifico
Tubo de desagüe
Entrada de aire
Zona de instalación
FAN/DEF indicador
Receptor de infrarojos
Indicador de funcionamiento
Indicador temporizador
Indicador alarma
Botón temporizador
Salida de aire
Manual del usuario
ES
3. DESCRIPCIÓN Y FUNCIONES
3.7.Tipo Techo-Suelo
Display
NOMBRES Y FUNCIONES
AVISO
El esquema está basado en un modelo de
referencia. Por tanto, podrían existir algunas
diferencias en el aspecto y en las funciones
respecto de su aparato.
a
b
c
d
e
f
g
h
i
j
k
l
m
n
o
p
10
Unidad interior
Unidad exterior
Mando a distancia
Entrada de aire
Lama
Tubo frigorifico
Tubo de desagüe
Entrada de aire
Zona de instalación
FAN/DEF indicador
Receptor de infrarojos
Indicador de funcionamiento
Indicador temporizador
Indicador alarma
Botón temporizador
Salida de aire
Manual del usuario
ES
4.INSTALACIÓN
5. MANTENIMIENTO
EMPLAZAMIENTO
• Cuando funciona en frío, el aparato seca el aire
de la habitación. Se debe instalar un tubo para
drenar todo el agua lejos del propio aparato.
• La ud.interior debe situarse a más de un metro
de distancia del televisor o aparato de radio para
evitar ruidos e interferencias en las imágenes.
• Los transmisores de radio potentes o aparatos
que emitan ondas de radio de alta frecuencia
pueden provocar fallos. Antes de instalar el
aparato de aire acondicionado, consulte su
distribuidor.
• No instale la unidad en zonas peligrosas con gas
combustible o sustancias volátiles.
• Si el acondicionador de aire funciona en una
atmósfera que contenga aceite (de máquinas), sal
(en zonas costeras), gas sulfuroso (cerca de una
fuente aguas termales), etc.,podría dar lugar a
fallos del aparato.
ATENCIÓN
Antes de limpiar el acondicionador, asegúrese de
desconectar el enchufe de la red.
LIMPIEZA DE LA UNIDAD INTERIOR
Y DEL MANDO A DISTANCIA
IMPORTANTE
• Limpie la unidad interior y el mando a distancia
con un paño seco. Si la unidad interior está muy
sucia, impregne el paño en agua fría. No utilice
nunca un paño húmedo para el mando a
distancia.
• No utilice un paño tratado con productos
químicos ni lo deje sobre la unidad durante mucho
tiempo, ya que puede estropear el acabado de la
superficie.
• No utilice gasolina, disolvente, polvos de pulir o
similares para limpiar el aparato. Pueden agrietar
o deformar las superficies de plástico.
Si no piensa utilizar la unidad durante más de un
mes:
(1) Haga funcionar el ventilador durante medio día
para secar el interior de la unidad.
(2) Pare la unidad y desconéctela de la red.
(3) Quite las pilas del mando a distancia.
Tenga cuidado con el ruido y las vibraciones
• Instale la unidad en un lugar estable para evitar
ruido y vibraciones.
• El ruido cerca de la salida de aire de la unidad
exterior puede entrar por la toma de aire.
• Sitúe la unidad exterior donde el ruido o el aire
caliente no ocasione molestias a los vecinos.
• Si el aire acondicionado hace un ruido anormal,
póngase en contacto con su distribuidor.
COMPROBACIONES ANTES
DE LA PUESTA EN MARCHA
IMPORTANTE
• Asegúrese de que los cables no están rotos o
desconectados.
• Compruebe si está instalado el filtro de aire.
(Algunos acondicionadores no tienen filtro de aire.)
• Compruebe que no están obstruidas la salida o
la entrada de la unidad exterior.
Antes de limpiar el acondicionador, asegúrese de
desconectar el enchufe de la red.
CABLE
• Para evitar descargas eléctricas, conecte a tierra
el aire acondicionado. El enchufe del aparato de
aire acondicionado lleva cable de tierra. Por favor
no lo cambie.
• El enchufe de alimentación se usa como el
aparato de aire acondicionado especialmente.
• No tire con fuerza del cable de alimentación.
• Cuando ponga a tierra el acondicionador de aire,
cumpla las normativas locales.
• Si es necesario, use el fusible o el
magnototérmico correspondiente en amperios.
• Si desea cambiar el cable de alimentación, por
favor póngase en contacto un centro de servicio
autorizado.
LIMPIEZA DEL FILTRO DE AIRE
• El filtro de aire impide la entrada de polvo y
partículas. Si se obstruye, puede disminuir
considerablemente el rendimiento del
acondicionador. Por lo tanto, hay que limpiarlo una
vez cada dos semanas cuando la unidad se usa
durante mucho tiempo seguido.
• En lugares polvorientos hay que aumentar la
frecuencia de limpieza del filtro.
• Si el polvo acumulado es difícil de limpiar,
cambie el filtro por uno nuevo (el filtro de repuesto
es un accesorio opcional).
CAMBIO DE EMPLAZAMIENTO
Si cambia de domicilio o si desea cambiar el
emplazamiento del aparato de aire acondicionado,
consulte con su distribuidor, ya que se necesitan
conocimientos especiales para retirar el freón,
purgar el aire y realizar otras operaciones.
11
Manual del usuario
ES
AJUSTE DE LA DIRECCIÓN
DEL FLUJO DE AIRE
TIPO CONDUCTO Y TECHO
6. LIMPIEZA
TIPO CONDUCTO Y TECHO
1. Abra la rejilla de entrada de aire
Empuje las presillas hacia el centro
simultáneamente, tal como se indica en la figura.
Después, abra la rejilla.
A continuación se explica cómo se ajusta la
dirección del flujo de aire cuando la rejilla de
impulsión no forma parte del suministro.
PRECAUCIÓN
Antes de realizar esta operación, se deben
desconectar los cables de la caja de control, que
están conectados originalmente a los terminales
eléctricos del cuerpo principal.
Frio
Para enfriar eficazmente toda la habitación,
coloque las lamas de modo que el aire pueda salir
horizontalmente.
Presilla
Abrir
2. Saque la rejilla de entrada de aire.
3. Desmonte el filtro de aire
4. Limpie el filtro de aire (puede usar una
aspiradora o agua pura. Si se ha acumulado
demasiado polvo, utilice un cepillo blando y un
detergente suave para limpiar. Ponga el filtro a
secar en un lugar fresco).
Cuando se use una aspiradora, el lado de entrada
de aire debe mirar hacia arriba.(Vea la Fig. 1)
Calor
Para calentar eficazmente la habitación, coloque
las lamas de modo que el aire puede salir hacia
abajo.
Figura 1
Cuando se utilice agua, el lado de entrada de aire
deberá mirar hacia abajo. (Vea la Fig. 2)
Figura 2
PRECAUCIÓN
No seque el filtro de aire a la luz directa del sol ni
utilizando un fuego.
5. Reinstale el filtro de aire
6. Instale y cierre la rejilla de entrada de aire en
orden inverso a los pasos 1 y 2, y conecte los
cables de la caja de control a los terminales
correspondientes del cuerpo principal.
NOTA
El modelo split caudal de alta presión estática no
tiene filtro de aire.
12
Manual del usuario
ES
7.MANDO POR CABLE (opcional)
NOMBRE Y FUNCIÓN DE LOS INDICADORES
DEL MANDO POR CABLE
*Este es un accesorio opcional, si desea adquirirlo
contacte con su distribuidor
13
Manual del usuario
ES
7. MANDO POR CABLE
Y FUNCIONES
BOTÓN DE MODO
Para seleccionar el modo de funcionamiento
del aparato de aire acondicionado.
BOTÓN DE VELOCIDAD DEL VENTILADOR
Para seleccionar la velocidad del ventilador.
BOTÓN OSCILACIÓN
Pulse el botón si desea oscilación de aire.
Vuelva a pulsarlo si desea detener la oscilación.
BOTÓN TEMP.
Pulse el botón o para ajustar la temperatura.
El rango de temperatura es entre 17 y 30°C.
BOTÓN DE AJUSTE DEL RELOJ
Para ajustar la hora del reloj o la hora de inicio
y parada.
BOTÓN REARME
Al pulsar el botón REARME, se cancelan todos
los ajustes actuales y se comienza desde el
principio. En el reloj, parpadearán los dos puntos
(0:00). El modo muestra AUTO, la velocidad del
ventilador indica AUTO y el indicador de
temperatura muestra AUTO.
BOTÓN DE BLOQUEO
Al pulsar el botón BLOQUEO, se bloquean todos
los ajustes actuales y el mando no acepta
ninguna operación excepto la del propio botón de
BLOQUEO. Use el modo de bloqueo cuando
quiera evitar que el ajuste se cambie
accidentalmente. Vuelva a pulsar el botón
BLOQUEO cuando desee cancelar el modo de
bloqueo.
BOTÓN CANCELAR
Pulse este botón para cancelar Timer ON y OFF.
BOTÓN ON/OFF
Para conectar el mando por cable. Pulse de
nuevo para apagarlo.
TESTIGO ON/OFF
Indica si el aparato está funcionando o no.
14
Manual del usuario
ES
7. NOMBRES DEL RECEPTOR DE
SEÑALES DEL MANDO POR CABLE
Conexión a la placa principal
del cuadro eléctrico
de la unidad interior
Conexión al mando por cable
Indicador alarma
Receptor de señal
Piloto de funcionamiento
Indicador descongelación/precalentamiento
Botón de funcionamiento manual
Indicador temporizador
ESTADO INICIAL DEL MANDO POR CABLE
Cuando el mando se conecta por primera vez, se
iluminan los símbolos de la pantalla LCD durante
2 segundos. Después cambia automáticamente a
RELOJ 0:00; “:” parpadea. El MODO es AUTO, la
VELOCIDAD DEL VENTILADOR es AUTO, la
TEMP. indicada es 24°.
del ventilador indicará AUTO, y esta velocidad no
se controlará automáticamente.
2.PARO
Botón ON/OFF
Vuelva a pulsar este botón para detener el aparato
de aire acondicionado. Se apaga el indicador
FUNCIONAMIENTO
AJUSTE DE LA DIRECCIÓN
DEL FLUJO DE AIRE
Mientras la unidad está funcionando, puede
ajustar las lamas de flujo de aire para cambiar su
dirección y obtener una temperatura ambiente
uniforme. De este modo mejorará el confort.
1. Ajuste la dirección de flujo de aire deseada.
Pulse el botón OSCILACIÓN para ajustar las
lamas a la posición deseada y vuelva a pulsarla
para mantenerlas en esta posición.
2. Para ajustar la dirección del flujo de aire
automáticamente.
Pulse el botón OSCILACIÓN. Las lamas oscilarán
automáticamente.
Mientras está ajustada esta función, funciona el
ventilador de oscilación de la unidad interior. De lo
contrario, este ventilador está parado. La escala
de oscilación de cada lado es de 30°. Cuando el
aparato de aire acondicionado no está
funcionando (incluso cuando está ajustado
“TIMER ON”), el botón OSCILACIÓN estará
desactivado.
FRIO / SECADO / CALOR / SÓLO VENTILADOR
1.ARRANQUE
• Botón de selección de modo (MODO)
Seleccione el modo “FRÍO”, “SECADO”, “CALOR”
o “SÓLO VENTILADOR”.
• Botón de temperatura (TEMP)
Ajuste la temperatura deseada pulsado el botón o
.
Frío: 17 a 30°C
Secado: 17 a 30°C
Calor: 17 a 30°C
SÓLO VENTILADOR: no se muestra la
temperatura. El botón TEMP está desactivado.
• Botón de velocidad del ventilador (VELOCIDAD
DEL VENTILADOR) Seleccione cualquier
velocidad del ventilador entre “AUTO”, “BAJA”,
“MED” y “ALTA”.
• Pulse el botón, la velocidad del ventilador
cambiará según lo indicado arriba.
En el modo de SECADO no se puede seleccionar
la velocidad del ventilador. Esta velocidad estará
siempre en AUTO.
FUNCIONAMIENTO AUTOMÁTICO
1. ARRANQUE
• Botón de selección de modo (MODO)
Seleccione “AUTO”.
• Botón de temperatura (TEMP)
Ajuste la temperatura deseada: entre 21 y 28°C
• Botón ON/OFF
Se ilumina el testigo FUNCIONAMIENTO del
panel. El modo de funcionamiento se selecciona
entre FRÍO, CALOR o SÓLO VENTILADOR, de
acuerdo con la diferencia entre la temperatura
ambiente y la temperatura ajustada. La velocidad
NOTA
Algunos aparatos de aire acondicionado no tienen
la velocidad MEDIA del ventilador.
• Botón de confirmar (SET)
Pulse el botón para confirmar el ajusta actual.
2. PARO
• Botón ON/OFF
Vuelva a pulsar este botón para detener el aparato
de aire acondicionado. Se apaga el indicador
FUNCIONAMIENTO.
15
Manual del usuario
ES
AJUSTE DEL RELOJ
Antes de poner en marcha el aparato, ajuste el
reloj del mando por cable siguiendo el
procedimiento que se explica en esta sección.
El indicador de reloj del mando mostrará la hora
con independencia de que el aparato esté
funcionando o no.
AJUSTE INICIAL
Cuando se conecta el mando por cable, el
indicador de reloj muestra “0:00” y los dos puntos
parpadean.
1. Botón de ajuste de hora (AJUSTE DE HORA)
• Pulse este botón para ajustar la hora.
Adelante. Atrás.
• Cada vez que se pulsa el botón, se avanza o
retrocede un minuto, dependiendo del lado
pulsado. Si mantiene pulsado el botón, el número
cambiará de 30 en 30 minutos.
2. Botón de confirmar (SET)
Al pulsar el botón SET, la hora deja de parpadear
y el reloj se pone en funcionamiento.
3. Cambio del ajuste del reloj
Pulse el botón RELOJ en el compartimento de
pilas. Los dos puntos comenzarán a parpadear.
Para ajustar una nueva hora, siga los pasos 1 y 2
del ajuste inicial del reloj.
• El reloj tiene un precisión de 10 segundos por
día.
FUNCIONAMIENTO CON TEMPORIZADOR
1. Botón TIME ON/OFF
• Pulse el botón TIME ON/OFF de la forma
deseada. El ajuste actual del temporizador se
muestra junto con el indicador TIME ON/OFF.
Parpadearán los dos puntos.
2. Botón de ajuste de la hora (AJUSTE DE HORA)
• Pulse el botón para ajustar la hora deseada.
Adelante.
Atrás.
• Cada vez que se pulsa el botón, la hora avanza
o retrocede 10 minutos, dependiendo del lado
pulsado. Si mantiene pulsado el botón, el número
cambiará de 30 en 30 minutos.
Cuando active TIME ON o TIME OFF, pulse el
botón SET. Los dos puntos (:) dejarán de
parpadear y el reloj comenzará a funcionar. Los
dos puntos del INDICADOR TRANSMISIÓN
parpadearán, sonará la unidad interior y el
aparato se pondrá en marcha y se detendrá de
acuerdo con la hora ajustada.
3. Botón de cancelar (CANCELAR)
Pulse el botón CANCELAR para cancelar el ajuste
del temporizador.
• Cambio de ajuste
Realice los pasos 1, 2 y 3 para cambiar el ajuste.
PRECAUCIÓN:
La electricidad estática u otros factores (en caso
de voltaje extremadamente alto) puede hacer
que se reinicialice el reloj del mando. Si se
inicializa el mando (parpadean los dos puntos en
0:00), vuelva a ajustar el reloj antes de poner en
marcha el aparato.
PRECAUCIÓN
El tiempo de funcionamiento efectivo ajustado con
el mando está limitado a 24 horas.
El temporizador no funcionará si TIME ON y OFF
se ajustan a la misma hora.
16
Manual del usuario
ES
EJEMPLO DE AJUSTE DEL
TEMPORIZADOR
TEMPORIZADOR
COMBINADO (ajuste de los
temporizadores ON y OFF
simultáneamente)
Timer OFF - Timer ON
(Marcha - Paro - Marcha)
Esta función es útil cuando
se desea que el aparato se
detenga después de acostarse y se ponga en
marcha por la mañana al levantarse o al regresar
a casa.
TEMPORIZADOR OFF
(Marcha - Paro)
Esta función es muy útil
cuando el usuario se
acuesta. El aparato se
detendrá automáticamente
a la hora ajustada.
EJEMPLO
Para detener el aparato a las 23:00 p.m.
• Pulse el botón TIME OFF. Se muestra la última
hora ajustada y parpadean los dos puntos en
espera de confirmación.
• Use el botón AJUSTE DE HORA para mostrar
“23:00” en el indicador TIMER OFF del mando.
• Pulse el botón SET. Los dos puntos dejan de
parpadear y el ajuste está finalizado.
EJEMPLO
Para que el aparato se detenga a las 23:00 y se
ponga en marcha por la mañana a las 6:00.
• Pulse el botón TIME OFF. Se muestra la última
hora ajustada y parpadean los dos puntos en
espera de confirmación.
• Use el botón AJUSTAR HORA para mostrar
“23:00” en el indicador TIME OFF.
• Pulse el botón TIME ON. Se muestra la última
hora ajustada y parpadean los dos puntos en
espera de confirmación.
• Use el botón AJUSTAR HORA para mostrar
“6:00” en el indicador TIME ON.
• Pulse el botón SET. Los dos puntos dejan de
parpadear y el ajuste está finalizado.
TIMER ON
(Paro - Marcha)
La función Timer ON es
útil para despertarse por la
mañana o cuando se
regresa a casa. El aparato
de aire acondicionado se
pondrá en marcha
automáticamente a la hora
ajustada.
TIME ON - TIME OFF
(Paro - Marcha - Paro)
Puede usar este ajuste
para que el aparato se
ponga en marcha al
despertarse y se
detenga cuando salga
de casa.
EJEMPLO
Para que el aparato se ponga en marcha a las
6:00.
• Pulse el botón TIME ON. Se muestra la última
hora ajustada y parpadean los dos puntos en
espera de confirmación.
• Use el botón AJUSTAR HORA para mostrar
“6:00” en el indicador TIME ON del mando.
• Pulse el botón SET. Los dos puntos dejan de
parpadear y el ajuste está finalizado.
EJEMPLO
Para que el aparato se ponga en marcha a las
6:00 y se detenga a las 8:00.
• Pulse el botón TIME ON. Se muestra la última
hora ajustada y parpadean los dos puntos en
espera de confirmación.
• Use el botón AJUSTAR HORA para mostrar
“6:00” en el indicador TIME ON del mando.
• Pulse el botón TIME OFF. Se muestra la última
hora ajustada y parpadean los dos puntos en
espera de confirmación.
• Use el botón AJUSTAR HORA para mostrar
“8:00” en el indicador TIME OFF.
• Pulse el botón SET. Los dos puntos dejan de
parpadear y el ajuste está finalizado.
17
Manual del usuario
ES
2. Significado del indicador de modo:
BOTÓN DE REARME Y BLOQUEO
1. Use un objeto pequeño con punta para activar
el botón REARME.
Al pulsar el botón REARME, se cancelan todos
los ajustes actuales y se comienza desde el
principio. En el reloj, parpadeará el icono de 0:00
y “:”. El modo muestra AUTO, la velocidad del
ventilador indica AUTO y el indicador de
temperatura muestra “24”.
2. Use un objeto pequeño con punta para activar
el botón BLOQUEO.
Al pulsar el botón BLOQUEO, se bloquean todos
los ajustes actuales en el mando a distancia y no
se acepta ninguna operación salvo la del propio
botón de bloqueo. Use el modo de bloqueo
cuando desee evitar que se cambien los ajustes
accidentalmente.
Vuelva a pulsar el botón BLOQUEO para cancelar
el modo de bloqueo.
Modo:
La lámpara está apagada. También está
apagado el ventilador en el LCD
Significado:
El aparato no está funcionando.
Modo:
La lámpara está apagado. El ventilador en el
LCD está iluminado
Significado:
Fallo de funcionamiento del aparato de aire
acondicionado
Modo:
La lámpara está apagado. El LCD también está
apagado
Significado:
El mando no está conectado correctamente a la
alimentación de la unidad.
FUNCIONAMIENTO TEMPORAL
Esta función se emplea para hacer funcionar la
unidad temporalmente si el mando por cable no
se puede usar o para probar el aparato de aire
acondicionado.
Cuando se selecciona el modo TEMPORAL, el
aparato funcionará en FRÍO (ALTO). El
funcionamiento no guarda relación con la
temperatura interior. En esta condición, el mando
está desactivado y sólo se puede usar para
cancelar la función TEMPORAL.
Modo:
La lámpara de modo parpadea
Significado:
En espera de señal o fallo de funcionamiento
Modo:
La lámpara de modo está iluminada
Significado:
El aparato está funcionando
EXPLICACIÓN ADICIONAL
Está disponible un mando por cable para
unidades frío y calor por defecto. Su función de
velocidad media del ventilador se puede ajustar
con el interruptor (SW1) del panel principal del
mando, como se muestra a continuación:
INDICADORES DEL MANDO POR CABLE
Y SU SIGNIFICADO
1. Significado de los indicadores LCD:
PARPADEO El mando está transmitiendo
la señal al aparato de aire acondicionado.
1 ON
2 ON
ILUMINADO El aparato está funcionando.
APAGADO El aparato está parado.
Velocidad media
ventilador frío y calor
1 ON Velocidad media
2 OFF ventilador sólo frío
ILUMINADO El mando está en el modo
BLOQUEO.
APAGADO El mando es en el modo
DESBLOQUEO.
1 OFF Sin velocidad media
2 ON ventilador frío y calor
1 OFF Sin velocidad media
2 OFF ventilador sólo frío
El usuario puede ajustarlo de acuerdo con el
modelo y sus preferencias. Es necesario reiniciar
después del ajuste.
18
Manual del usuario
ES
8. AVERÍAS Y CAUSAS
Antes de llamar al servicio técnico, compruebe los
puntos siguientes:
VUELVA A COMPROBAR
No funciona
• El fusible de alimentación está fundido o ha
saltado el disyuntor.
• Se han agotado las pilas del mando a distancia.
• Se ha activado el programador.
No enfría ni calienta bien
• Están obstruidas la entrada o la salida de aire de
la unidad exterior.
• Están abiertas las puertas o ventanas.
• El filtro de aire está saturado de polvo.
• El deflector no está en la posición correcta.
• La velocidad del ventilador es muy baja.
• La temperatura es muy alta o muy baja.
Estas situaciones no son averías
El aire de la habitación huele mal.
Sale mal olor del acondicionador.
• Están saliendo olores impregnados en la pared,
la moqueta, los muebles, las cortinas,
etc. En la unidad exterior se produce un vapor
blanco de agua o aire enfriado.
IMPORTANTE
Si se produce alguna de las situaciones
siguientes, apague inmediatamente el
acondicionador, desconecte el interruptor de la
red y llame al concesionario.
• Los pilotos indicadores parpadean muy deprisa
(cinco veces por segundo); si
desconecta la unidad de la red y la vuelve a
conectar pasados dos o tres minutos, los
pilotos siguen parpadeando.
• Las operaciones de puesta en marcha y parada
son erráticas.
• El fusible se funde o el disyuntor salta con
mucha frecuencia.
• Han caído agua o materias extrañas dentro del
acondicionador.
• Se observa cualquier otra condición inusual.
ES IMPOSIBLE MODIFICAR LOS VALORES
SELECCIONADOS
Síntomas: No puede modificarse la velocidad del
ventilador
Comprobaciones: Compruebe si el modo
indicado en el panel es “AUTO”
Compruebe si el modo en el panel es “DRY”
19
Manual del usuario - Mando a distancia
ES
9. Mando
a distancia
CONTENIDO
Precauciones
Modelo y especificaciones
Indicadores y sus funciones
Funciones
Instrucciones de funcionamiento
NOTA
1. El dibujo es sólo una referencia y puede
diferir del mando que usted ha adquirido
2. Lea el apartado de PRECAUCIONES antes
de poner en marcha el aire acondicionado.
3. Este manual es para los modelos R05/BG
4. El R05/BGE se puede usar para modelos
sólo frío y frío y calor.
20
Manual del usuario - Mando a distancia
ES
PRECAUCIONES
INDICADORES Y FUNCIONES
• Objetos como cortinas o puertas pueden impedir
que el aire acondicionado reciba la señal del
mando a distancia
• No moje la unidad interior ni el mando a
distancia. No exponga el mando a la luz solar
directa, ni lo coloque en lugares con altas
temperaturas.
• Si expone la unidad interior o el mando a la luz
solar esto puede provocar el mal funcionamiento
de los aparatos.
• Los aparatos electrónicos que se encuentren
cerca del aire acondicionado pueden afectar el
funcionamiento del mando a distancia.
• No ponga pilas usadas o distintas dentro del
mando, porque estropearlo.
• Si no va a usar el mando durante un largo
periodo de tiempo, saque las pilas.
• Si se enciende el indicador de batería baja,
cambie las pilas.
• Si no se oye la señal de recepción de la unidad
interior o el LED del mando a distancia no
parpadea. Cambie las pilas.
• La distancia máxima de transmisión del mando a
distancia son 8m. Apunte al receptor de la unidad
interior cuando use el mando.
1.TEMP: Muestra la temperatura ajustada. Ajuste
la temperatura mediante las teclas y . No
aparecerá nada en esta área si la unidad está en
modo Ventilador.
2.PANTALLA: El icono parpadeará una vez
cuando la señal haya sido enviada por el mando a
distancia.
3.ON/OFF: El icono se enciende cuando conecta
o desconecta la unidad.
4.Modo de funcionamiento: Pulse MODE para ver
en qué modo está la unidad.
5.TIEMPO: Muestra el tiempo ajustado. Pulse
RELOJ durante 5s. y el icono indicando la hora
6.BLOQUEO: El icono se iluminará cuando active
la función de bloqueo y el resto de funciones
quedarán inefectivas.
7.TIME ON/OFF: Cuando la unidad está en modo
TIME ON, el icono ON se encenderá y pasará lo
mismo con el icono TIME OFF. SI ajusta ambos
modos a la vez, se iluminarán los dos.
8.Velocidad del ventilador: Cuando pulse la tecla
verá la velocidad actual del ventilador. Podrá
seleccionar los modos AUTO-LOW-MED-HIGH.
EL modo ajustado de fábrica es alta velocidad.
MODELO Y ESPECIFICACIONES
Modelo: R05/BGE
Tensión: 3.0V
Tensión mín. para envío de la señal de la CPU: 2.4V
Distancia de recepción efectiva: 8-11 metros.
Condiciones de funcionamiento: -5 +60°C
9.Funcionamiento económico: Este icono se
encenderá o apagará cuando pulse la tecla ECO.
NOTA
Todos los iconos anteriores se mostrarán sólo
cuando el mando a distancia se conecte por
primera vez o cuando haga un reset.
21
Manual del usuario - Mando a distancia
ES
FUNCIONES
4.AJUSTE : Aumenta la temperatura ajustada.
Manteniendo esta tecla pulsada la temperatura
aumentará 1° cada 0.5 s.
5.ON/OFF: Para encender o apagar el aire
acondicionado.
6.DIRECCIÓN DEL AIRE: Activa la función swing
o el deflector de aire. Una vez pulsado, el deflector
de aire girará 6°.
7.SWING HORIZONTAL: Activa la función de
swing horizontal
8.SWING VERT: Activa la función de swing
vertical.
9.RELOJ: Muestra la hora (cuando resetea o
conecta la unidad por primera vez, aparece 12.00)
Pulse el reloj durante 5s. El icono de la hora
parpadeará durante 0.5s. Vuélvalo a pulsar y el
icono de los minutos parpadeará. Las teclas y
sirven para ajustar los valores. Los ajustes sólo
se hacen efectivos cuando pulsa la tecla de
confirmación (OK)
10.TIME ON: Para poner en marcha el arranque
automático. Una vez haya pulsado esta tecla el
tiempo aumentará en 0.5 horas. Cuando el tiempo
ajustado exceda las 10 horas, si pulsa el botón el
tiempo aumentará en una hora. SI ajusta el tiempo
a 0.00 el arranque automático quedará cancelado.
11.TIME OFF: Para poner en marcha la
desconexión automática. Una vez haya pulsado
esta tecla el tiempo aumentará en 0.5 horas.
Cuando el tiempo ajustado exceda las 10 horas, si
pulsa el botón el tiempo aumentará en una hora.
SI ajusta el tiempo a 0.00 la desconexión
automática quedará cancelada.
12.RESET: (dentro del mando) Pulse este botón
con una aguja de 1mm para cancelar el ajuste
actual y resetear el mando a distancia.
13.BLOQUEO: (dentro del mando) Pulse este
botón con una aguja de 1mm para bloquear o
desbloquear los ajustes actuales.
1.MODO: Cuando lo pulse, podrá seleccionar los
siguientes modos sucesivamente: AUTO - COOL DRY - HEAT - FAN
14.OK: Confirma los ajustes.
2.VELOCIDAD DEL VENTILADOR: La velocidad
del ventilador se seleccionará en la siguiente
secuencia una vez pulse la tecla: AUTO - LOW
(baja) - MED - HIGH (alta)
15.FRÍO-CALOR: (dentro del mando) Pulse este
botón con una aguja de 1mm para cambiar de
modo sólo frío a modo frío y calor. Durante los
ajuste, se encenderá una luz trasera. El modo
ajustado de fábrica es frío y calor.
3.AJUSTE : Disminuye la temperatura ajustada.
Si mantiene la tecla pulsada la temperatura
disminuirá 1° cada 0.5s.
16.ECO: Activa el modo de funcionamiento
económico. Se recomienda usar este modo
cuando está durmiendo.
22
Manual del usuario - Mando a distancia
ES
INSTRUCCIONES DE
FUNCIONAMIENTO
2.Pulse la tecla TIME ON de nuevo y ajuste el
tiempo.
3.SI mantiene la tecla de ajuste pulsada, el tiempo
irá aumentando en 0.5 horas. Cunado el tiempo
ajustado exceda las 10 horas, pulsando esta tecla
el tiempo aumentará de hora en hora.
4.0.5 segundos después de haber realizado los
ajustes, el mando a distancia emitirá la señal de
TIME ON.
Coloque las pilas
Instale dos pilas alcalinas.
Asegúrese de colocar los polos correctamente
FUNCIONAMIENTO AUTOMÁTICO
Conecte la unidad y el indicador de
funcionamiento de la unidad interior parpadeará.
1.Pulse la tecla MODE para seleccionar el
automático
2.Ajuste la temperatura con las teclas y
Generalmente, el rango va de 17°C a 30°C.
3.Pulse las teclas ON/OFF para que se encienda
el indicador de funcionamiento. El aire
acondicionado funcionará en modo automático.
No podrá ajustar la velocidad del ventilador.
4.El modo ECO es efectivo cuando la máquina
trabaja en AUTO.
FUNCIONAMIENTO APAGADO:
1.Pulse la tecla TIME OFF y luego el icono SET.
Se encenderán los indicadores HOUR y OFF
2.Pulse la tecla TIME OFF de nuevo y ajuste el
tiempo.
3.SI mantiene la tecla de ajuste pulsada, el tiempo
irá aumentando en 0.5 horas. Cunado el tiempo
ajustado exceda las 10 horas, pulsando esta tecla
el tiempo aumentará de hora en hora.
0.5 segundos después de haber realizado los
ajustes, el mando a distancia emitirá la señal de
TIME OFF.
Modos FRÍO/CALOR/VENTILADOR
1.Pulse la tecla MODE para seleccionar Frío,
Calor o Ventilador
2.Ajuste la temperatura a través de las teclas y
. Normalmente el rango va de 17°C a 30°C
3.Pulse la tecla Velocidad del ventilador para
seleccionar AUTO, LOW, MED o HIGH.
4.Pulse la tecla ON/OFF y se encenderá el
indicador de funcionamiento en la unidad interior.
El aire acondicionado funcionará con el modo
ajustado. Pare la unidad con la tecla ON/OFF
Ajuste el TIME ON y el TIME OFF
simultáneamente
1.Ajuste el TIME ON según los procedimientos 1 y
2 especificados en el capítulo: FUNCION
TEMPORIZADOR
2.Ajuste el TIME OFF según los procedimientos 1
y 2 especificados en el capítulo FUNCION
TEMPORIZADOR
3.Si la conexión y desconexión del temporizador
no exceden las 10 horas, la desconexión se
activará 0.5 horas después de la conexión. Si el
tiempo entre los dos sobrepasa las 10 horas, la
desconexión se activará una hora después de la
conexión.
4.0,5 segundos después de haber realizado los
ajustes, el mando a distancia enviará el comando
TIME ON a la unidad.
NOTA
En el modelo ventilador la temperatura no se
puede ajustar y el modo ECO es inefectivo.
MODO SECADO:
1.Pulse la tecla MODE para seleccionar la opción
DRY
2.Ajuste la temperatura con las flechas hacia
arriba y hacia abajo. Normalmente el rango va de
17° a 30°
3.Pulse la tecla ON/OFF y el indicador de
funcionamiento se encenderá. El modo DRY
estará activo.
En modo DRY, la velocidad del ventilador y el
ECO no están disponibles.
Modificación de los ajustes de tiempo
Pulse la tecla correspondiente y reajuste el tiempo
de la conexión y el tiempo de la desconexión.
Ajuste el tiempo a 0.00 para cancelar la
programación.
NOTA
El tiempo ajustado en el temporizador
corresponde a un número relativo basado en el
reloj del mando a distancia. No se puede ajustar el
reloj cuando el TIME ON o el TIME OFF están
activados.
TEMPORIZADOR
Funcionamiento encendido:
1.Pulse la tecla TIME ON y luego el icono SET. Se
encenderán los indicadores HOUR y ON
23
Manual del usuario - Mando a distancia
ES
24
ES
Manual de usuario
®
SALVADOR ESCODA S.A.
BARCELONA - Central Ventas:
Provença, 392, plantas 1 y 2 - 08025 BARCELONA
Tel. 93 446 27 80 - Fax 93 456 90 32
[email protected]
www.salvadorescoda.com
BARCELONA - T. BCN Centro:
Rosselló, 430-432 bjs.
08025 Barcelona
Tel. 93 446 20 25
Fax 93 446 21 91
ALMERÍA - Delegación:
c/. Carrera del Doctoral, 22
ALMERÍA
Próxima apertura
Marzo 2007
MADRID 1 - Delegación:
Av. de Castilla, 26 naves 10-11
28830 S. Fernando de Henares
Tel. 91 675 12 29
Fax 91 675 12 82
SEVILLA 1 - Delegación:
Joaquín S. de la Maza, PICA
p. 170, m. 6-7-8. CP 41007
Tel. 95 499 97 49
Fax 95 499 99 14
BADALONA - T. BCN Norte:
Industria 608-612
08918 Badalona
Tel. 93 460 75 56
Fax 93 460 75 71
CÁDIZ - Delegación:
Pol. El Portal, c/. Sudáfrica s/nº
P. E. Mª Eugenia, 1. 11408 Jerez
Tel. 956 35 37 85
Fax 956 35 37 89
MADRID 2 - Delegación:
Fragua, 8 - Pol. Ind. Cantueña
28944 Fuenlabrada (Madrid)
Tel. 91 642 35 50
Fax 91 642 35 55
SEVILLA 2 - Delegación:
PIBO, Av. Valencina p. 124-125
41110 Bollullos Mitación
Tel. 95 577 69 33
Fax 95 577 69 35
HOSPITALET - Tienda BCN Sur:
Av. Mare de Déu de Bellvitge, 246-252 08907 L'Hospitalet Ll.
Tel. 93 377 16 75
Fax 93 377 72 12
CASTELLÓN - Delegación:
Av. Enrique Gimeno, 24
Pol. C. Transporte. CP 12006
Tel. 96 424 72 11
Fax 96 424 72 03
MADRID 3 - Tienda:
Av. Emperatriz Isabel, 19
28019 Madrid
Tel. 91 469 14 52
Fax 91 469 10 36
TARRAGONA - Delegación:
c/. del Ferro, 18-20
Pol. Riu Clar. 43006 Tarragona
Tel. 977 20 64 57
Fax 977 20 64 58
BARBERÀ - Tienda Vallès:
Marconi, 23
08210 Barberà del Vallès
Tel. 93 718 68 26
Fax 93 729 24 66
CÓRDOBA - Delegación:
Juan Bautista Escudero, 219 C
Pol. Las Quemadas. CP 14014
Tel. 957 32 27 30
Fax 957 32 26 26
MÁLAGA - Delegación:
c/. Brasilia, 16 - Pol. El Viso
29006 Málaga
Tel. 952 04 04 08
Fax 952 04 15 70
VALENCIA 1 - Delegación:
Río Eresma, s/n.º
46026 Valencia
Tel. 96 395 62 64
Fax 96 395 62 74
MATARÓ - Tienda Maresme:
Polígono Ind. Plà d'en Boet
Carrasco i Formiguera, 29-35
08302 Mataró
Tel. 93 798 59 83
GIRONA - Delegación:
c/. Alacant, 47 nave B
Pol. Can Xirgú - 17005 Girona
Tel. 972 40 64 65
Fax 972 40 64 70
MURCIA 1 - Delegación:
Cuatro Caminos, 56
30007 Murcia
Tel. 968 23 65 28
Fax 968 20 43 91
VALENCIA 2 - Delegación:
P. I. nº 7, c/.Brosquil, n. III-IV
46540 El Puig (Valencia)
Tel. 96 147 90 75
Fax 96 147 90 52
ALBACETE - Delegación:
Pol. Campollano, D, p. 8-10
02007 Albacete
Tel. 967 19 21 79
Fax 967 19 22 46
GRANADA - Delegación:
Pol. Juncaril, c/. Lanjarón, 10
18220 Albolote (Granada)
Tel. 958 49 10 50
Fax 958 49 10 51
MURCIA 2 - Delegación:
Pol. Oeste, Principal, p. 21/10
30169 San Ginés (Murcia)
Tel. 968 88 90 02
Fax 968 88 90 41
VALENCIA 3 - Delegación:
Parque Empresarial Tactica
c/. 2A, nº 10. 46980 Paterna
Tel. 96 134 52 47
Fax 96 134 52 48
ALICANTE 1 - Delegación:
Artes Gráficas, 10-12
03008 Alicante
Tel. 96 511 23 42
Fax 96 511 57 34
JAÉN - Delegación:
Pol. Olivares, Cazalilla, p. 527
23009 Jaén
Tel. 953 28 03 01
Fax 953 28 03 46
PALMA DE MALLORCA - Del.:
c/. Gremi de Boneters
Pol. Son Castelló - CP 07009
Tel. 971 43 27 62
Fax 971 43 65 35
ZARAGOZA - Delegación:
Polígono Argualas, nave 51
50012 Zaragoza
Tel. 976 35 67 00
Fax 976 35 88 12
ALICANTE 2 - Delegación:
c/. Metal·lurgia, Pol. Les Galgues
03750 Pedreguer (Alicante)
Tel. 96 645 67 55
Fax 96 645 70 14
LLEIDA - Delegación:
Pol. Segrià, N-230, km 7,4
25123 Torrefarrera (Lleida)
Tel. 973 75 06 90
Fax 973 75 06 95
REUS - Delegación:
Víctor Català, 46
43206 Reus (Tarragona)
Tel. 977 32 85 68
Fax 977 32 85 61
REPRESENTACIONES:
985 36 21 28
Asturias
924 33 07 18
Mérida
Pontevedra 986 86 07 76