Transcript
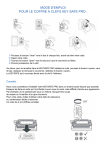
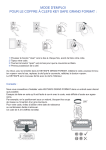
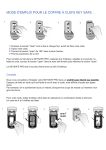
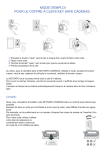
A battery is provided with your KeySafe™ and must be inserted into the
back of the time display.
1. Turn the KeySafe™ over and remove
the round battery cover on the back
of the time display by turning in the
direction of the arrow.
2. Snap the battery into place so that
the (+) sign is facing up and replace
the cover. Note: It is very important
to keep the battery cover clean and the O-ring seal in place in the
battery chamber to protect the battery from dirt and water damage.
You will see ten numbered buttons
with arrows. These numbers
correspond to the numbered
buttons on the front of the KeySafe™.
▲ indicates that the button
is not selected
▼ indicates that the button
is selected as part
of the combination
II. Setting the Clock
Use the Clock Set button on the back of the time display to set the clock
in your KeySafe™ . You may have to use a pen or other tool to press the
Clock Set button. Press the button to activate each section of the time and
date fields, and then use the scroll buttons
to select the value. The active field
Number of Day of the
Accesses Week/Year Month
Day
will flash when activated by the
Clock Set button.
■
■
■
■
■
■
Key
Access
first press activates the Hour
second press activates the Minutes
Clock
third press activates the Year
Change
fourth press activates the Month Access
fifth press activates the Day
sixth press sets the date and time
you’ve selected
Mins
Hrs
Scroll
Up
Scroll
Down
III. Setting the Combination
On the front of the KeySafe™ there
are ten buttons numbered 1 through
0, as well as RESET and OPEN buttons.
There is no preset combination
in your KeySafe™ ; select your
own combination and keep
it in a safe place. For best results,
select between four and seven
numbers for your combination
and do not use number combinations
that can be easily guessed. Each
number can only be used once
and the order does not matter.
Plastic
Card
Release
Tab
Key Holder
4. Using the screwdriver
tip on the plastic card,
apply light pressure
to rotate the arrows
on the buttons you’ve
Numbered Buttons
selected for your
With Arrows
combination a half-turn
to the downward position until it snaps into place. Caution: The arrows
must either point up or down, with downward arrows representing the
numbers in your combination. If any arrow is pointing left, right, or is
not fully seated when turned downward, the combination will not work.
Improperly setting the combination is not covered under the warranty.
5. Return the plastic card to the bracket for future use.
IV. Mounting the Bracket
When choosing a location to mount the KeySafe™ bracket, make sure to
leave enough room above the bracket to allow the KeySafe™ to slide upward
when it is removed from the bracket.
1. Place the bracket in the desired
location and drive in the top
screw until it is just slightly loose.
2. Use a level to adjust the bracket
to ensure that it is mounted vertically.
3. Drive the second screw through
the bottom hole in the bracket.
4. Tighten both screws to secure
the bracket into place.
Para comenzar
1. Saque el portallaves de la caja
KeySafe™ presionando el botón
RESET, y luego el botón OPEN.
hale el portallaves desde la parte
inferior de la caja KeySafe™.
2. Quite el soporte. Presione la ceja
Release (liberar) del soporte
y deslice la caja KeySafe™ hacia
arriba hasta que quede libre
del soporte.
3. Quite la tarjeta de plástico
unida al soporte.
I. Inserción de la Batería
Con su caja de llaves KeySafe™ se proporciona una batería, y la debe
insertar en la parte posterior de la pantalla de la hora.
1. Voltee la caja KeySafe™ y quite
la cubierta redonda de la cámara
de la batería, que se encuentra
en la parte posterior de la pantalla
de la hora, girándola en dirección
de la flecha.
2. Coloque la batería en su lugar
de manera que el signo (+) quede
orientado hacia arriba y vuelva a colocar la cubierta. Nota: Es muy
importante mantener limpia la cubierta de la cámara de la batería
y el sello de junta tórica en su lugar en la cámara de la batería para
proteger la batería contra la suciedad y los daños que puede causar
el agua.
II. Ajuste del Reloj
Use el botón Clock Set (ajuste del reloj) que se encuentra en la parte
posterior de la pantalla de la hora para ajustar el reloj de su caja
KeySafe™. Le recomendamos que use un bolígrafo u otra herramienta
para presionar el botón Clock Set. Presione el botón para activar cada
sección de los campos de la hora y fecha, y luego use los botones de
despliegue para seleccionar el valor. El campo activo destellará cuando se
active con el botón Clock Set.
Número de
■
■
■
■
■
Día de la
accesos semana/año Mes
Dia
La primera pulsación activa
la hora
La segunda pulsación activa Acceso
a la llave
los minutos
Minutos
La tercera pulsación activa Acceso
para
el año
cambio
Hora
del reloj
La cuarta pulsación activa
el mes
Despliegue Despliegue
hacia abajo
La quinta pulsación activa el día
La sexta pulsación activa la fecha y la hora que usted ha seleccionado
III. Ajuste de la Combinación
En el frente de la caja Keysafe™ hay diez botones numerados del
1 al 0, así como los botones RESET (restablecer) y OPEN (abrir). Su caja
Keysafe™ no tiene una combinación preestablecida; seleccione su propia
combinación y consérvela en un lugar seguro. A fin de obtener mejores
resultados, seleccione entre cuatro y siete números para su combinación
y no use combinaciones de números que se puedan adivinar fácilmente.
Sólo se puede usar una sola vez cada número y el orden no importa.
45 mm
45 mm
Verá diez botones numerados con
flechas. Estos números corresponden
a los botones numerados en la parte
frontal de la caja KeySafe™.
▲ indica que el botón no
está seleccionado
▼ indica que el botón fue
seleccionado como parte
de la combinación
III. Viewing the Access Log
To remove the KeySafe™ from the bracket:
The KeySafe™ time display stores the date and time of up to nine access
events, with number 1 reflecting the most recent. To view the access log,
press the up or down scroll buttons. If the key container was opened, the
access will display the
. If the clock was changed, the
will
be displayed. Note: The clock access will display the time that the clock
was adjusted.
1. Open the KeySafe™ and remove the key holder
(see Using Your Digital KeySafe™, Step I).
2. Enter your combination.
3. Press the Release button on the bottom
of the bracket and slide the KeySafe™
upward until it is free of the bracket.
Numbered
Using Your Digital KeySafe™
I. Opening/Closing the KeySafe™
To open your KeySafe™ and remove
the key holder:
1. Press the RESET button.
2. Enter your combination by pressing the
numbered buttons.
3. Press and release the OPEN button.
4. Pull down on the key holder, grasping
it from the sides.
GE Security, Inc. warrants that this product will be free of defects in
material and workmanship for one year from the date of purchase.
This warranty is limited to repair or replacement at GE Security’s option.
This warranty does not cover forgotten or incorrectly set combinations.
Damage caused by modification, abuse or misuse is not covered.
To close the KeySafe™, simply insert the
key holder back into the bottom chamber
and snap it closed.
Key Holder
Middle
slot
4. Usando la punta de
un destornillador
en la tarjeta de plástico,
aplique una presión
ligera para hacer girar
las flechas en los botones
que haya seleccionado
para su combinación
botones numerados con
flechas
media vuelta a la posición
hacia abajo hasta que se conecte en su lugar.
Precaución: Las flechas deben estar apuntando hacia arriba o hacia
abajo, y las flechas hacia abajo representan los números de su
combinación. Si cualquiera de las flechas está apuntando hacia la
izquierda, derecha, o si no está completamente asentada cuando se
gira hacia abajo, la combinación no funcionará. El ajuste inadecuado
de la combinación no está cubierto por la garantía.
5. Vuelva la tarjeta plástica al soporte para el uso futuro.
Para colocar una llave
en el portallave KeySafe™:
1. Abra la caja KeySafe™ y saque
el portallave (vea la sección Uso de
su Caja KeySafe™ Digital, paso 1).
2. Alinee las ranuras de la parte
posterior de la caja KeySafe™
con las lengüetas de la parte frontal del soporte.
3. Introduzca su combinación usando los botones numerados y luego
presione y mantenga presionado el botón OPEN mientras desliza la
caja KeySafe™ hacia abajo, hasta que quede en su lugar emitiendo un
clic. Nota: Hay un perno de código ubicado en el soporte que evita que
la caja KeySafe™ se deslice completamente hasta su lugar a menos
que se introduzca la combinación correcta. Esto evita que la caja
KeySafe™ sea montada antes de que se
introduzca correctamente la combinación.
Cuando seleccione un lugar para montar el soporte de la caja KeySafe™,
asegúrese de dejar suficiente espacio sobre el soporte como para permitir
que la caja KeySafe™ se deslice hacia arriba cuando se separe del soporte.
1. Coloque el soporte en el lugar deseado e introduzca el tornillo superior
hasta que quede ligeramente suelto.
2. Use un nivel para ajustar el soporte y asegurarse de que quede
1. Abra la caja KeySafe™ y saque el
botones
numerados
portallave (vea la sección Uso de
su Caja KeySafe™ Digital, paso 1).
2. Introduzca su combinación.
3. Presione el botón Release de la parte
inferior del soporte y deslice la caja KeySafe™
hacia arriba hasta que quede libre del soporte.
Uso de su Caja KeySafe™ Digital
I. Apertura y Cierre de la Caja KeySafe™
45 mm
45 mm
1. Presione el botón RESET.
2. Introduzca su combinación presionando
los botones numerados.
3. Presione y libere el botón OPEN.
4. Hale el portallaves sujetándolo de los lados.
Para cerrar la caja KeySafe™, simplemente
introduzca el portallaves otra vez en la cámara
inferior y ciérrelo.
45 mm
La pile, fournie avec le KeySafe™, doit être insérée à l’arrière de l’affichage.
1. Retournez le KeySafe™ et retirez
le volet rond du compartiment
de la pile au dos de l’affichage
de l’heure en tournant dans
le sens de la flèche.
2. Mettez la pile en place pour
que le signe (+) soit tourné vers
le haut et remettez le volet en
place. Remarque : Il est très important de maintenir propre
le volet du compartiment de la pile et le joint torique en place
dans le compartiment pour protéger la pile des saletés et de l’eau.
▲ indique que le bouton n’est
pas sélectionné
▼ indique que le bouton est
sélectionné dans le cadre
de la combinaison
II. Réglage de L’horloge
Utilisez le bouton Clock Set à l’arrière de l’affichage de l’heure pour régler
l’horloge du KeySafe™ . Vous pouvez utiliser un stylo ou un autre instrument
pour appuyer sur le bouton Clock Set. Appuyez sur le bouton pour activer
chaque section des champs d’heure et de date, puis utilisez les boutons de
défilement pour sélectionner la valeur. Le champ activé clignote dès qu’il
est activé par le bouton Clock Set.
Nombre
Jour de la
■
■
■
■
■
■
TM
1. Abra la caja KeySafe™ para
sacar el portallave.
2. Use un destornillador con
cabeza Phillips para quitar
el tornillo y la arandela que
se encuentran en la ranura
media del portallaves.
3. Alinee la llave con el
portallaves de manera que
la cabeza de la llave quede
al ras de la ranura media del
portallaves y el extremo de
la llave se extienda hacia
afuera del portallaves.
portallaves
45 mm
II. Fixation de la Clé sur le Porte-Clé
45 mm
fente
centrale
Pour attacher une clé au porte-clé du KeySafe™ :
Digital Keysafe
Keysafe digital
Keysafe numérique
TM
1. Ouvrez le KeySafe™ pour retirer le porte-clé.
2. Utilisez un tournevis cruciforme pour
retirer la vis et la rondelle de la fente
centrale du porte-clé
3. Alignez la clé sur le porte-clé
de sorte que la tête de la clé
soit contre la fente centrale
du porte-clé et que son bout dépasse du porte-clé. Important :
Assurez-vous que le bout de la clé dépasse suffisamment du porte-clé
pour qu’elle puisse s’insérer à fond dans le bouton de porte ou la
serrure que vous utilisez.
4. Fixez la clé au porte-clé en insérant la vis
cruciforme et la rondelle fournies dans
la tête de la clé jusque dans le collier
coulissant dans la fente centrale du porte-clé.
Serrez avec un tournevis.
TM
TM
Model Nos. 001847, 001862,
001864, 001882, 001884, 001886,
001911, 001913, 001915
ranura
media
Importante: Asegúrese de
que el extremo de la llave se
extienda lo suficientemente
hacia afuera del portallaves
como para poder insertarla
completamente en la perilla
o candado que usted esté
usando.
4. Asegure la llave en el
portallaves insertando el
tornillo Phillips con la arandela
que se proporcionan a través
de la cabeza de la llave hasta
el collar deslizante en la
ranura media del portallaves.
Apriete con un destornillador.
Pour refermer le KeySafe™, réinsérez simplement
le porte-clé dans le compartiment du bas et refermez.
KeySafe™.
2. Retirez le support. Appuyez sur
la languette Release du support
et remontez le KeySafe™ jusqu’à
ce qu’il soit dégagé de son support.
3. Retirez la carte en plastique
attachée au support.
Vous verrez dix boutons numérotés
avec des flèches. Ces chiffres
correspondent aux boutons numérotés
sur l’avant du KeySafe™.
d’accès semaine/année Mois Jour
Une première pression
active les heures
Accès
Une deuxième pression
à la clé
active les minutes
Minutes
Accès pour
Une troisième pression
réglage de
active les années
l’horloge
Heures
Une quatrième pression
active les mois
Vers le haut Vers le bas
Une cinquième pression
active les jours
Une sixième pression valide la date et l’heure que vous
avez sélectionnées
Sur l’avant du KeySafe™, vous verrez dix boutons de 1 à 0, de même que
les boutons RESET et OPEN. Le KeySafe™ ne contient aucune combinaison
prédéfinie ; sélectionnez votre propre combinaison et gardez-la en lieu sûr.
Pour les meilleurs résultats, sélectionnez entre 4 et 7 chiffres pour votre
combinaison et n’utilisez pas de combinaisons pouvant être facilement
devinées. Chaque chiffre peut être utilisé une seule fois et l’ordre des
chiffres est sans importance.
AccessPoint
VI.Desmontaje de la Caja Keysafe™ del Soporte
Para desmontar la caja KeySafe™ del soporte:
Para abrir su caja KeySafe™ y sacar el portallaves:
IV. Montaje del Soporte
I. Insertion de la Pile
III. Définition de la Combinaison
This warranty gives you specific legal rights and you may also have other
rights which vary based on your place of residence. To obtain repair or
replacement information under the terms of this warranty, return the
product and proof of purchase along with owner’s name and address,
postage prepaid to: GE Security, Inc., Supra, 4001 Fairview Industrial Drive
SE, Salem, OR 97302.
II. Colocación de la Llave en el
Portallave
Para colocar la caja KeySafe™
en el soporte:
la tarjeta
de plástic
Esta garantía le otorga derechos legales específicos y usted también
podría tener otros derechos que varían según su lugar de residencia. Para
obtener información de reparación o reemplazo bajo los términos de esta
garantía, devuelva el producto y un comprobante de compra, junto con el
nombre y la dirección del propietario, con franqueo prepagado, a: GE
Security, Inc., Supra, 4001 Fairview Industrial Drive SE, Salem, OR 97302,
EE.UU.
Mise en route
1. Retirez le porte-clé du KeySafe™ en appuyant sur le bouton RESET,
puis sur le bouton OPEN. Tirez le porte-clé vers le bas, par le fond du
V. Colocación de la Caja KeySafe™
en el Soporte
portallaves
GE SECURITY NO HACE NINGUNA OTRA GARANTÍA EXPRESA O IMPLÍCITA
DE COMERCIABILIDAD O IDONEIDAD PARA UN PROPÓSITO EN
PARTICULAR. EN NINGÚN CASO SERÁ GE SECURITY RESPONSABLE POR
PÉRDIDA DE USO, LUCRO CESANTE, ROBO, DAÑOS A LA PROPIEDAD, Y
DAÑOS ESPECIALES, INCIDENTALES O CONSECUENCIALES. ALGUNOS
ESTADOS NO PERMITEN LIMITACIONES CON RESPECTO A LA DURACIÓN DE
UNA GARANTÍA IMPLÍCITA Y/O NO PERMITEN LA EXCLUSIÓN DE DAÑOS
CONSECUENCIALES, POR LO QUE LAS LIMITACIONES ANTERIORES
PODRÍAN NO APLICARSE A SU CASO EN PARTICULAR.
GE SECURITY MAKES NO OTHER WARRANTY EXPRESS OR IMPLIED OF
MERCHANTABILITY OR FITNESS FOR A PARTICULAR PURPOSE. IN NO EVENT
SHALL GE SECURITY BE LIABLE FOR LOSS OF USE, LOST PROFITS, THEFT,
PROPERTY DAMAGE, SPECIAL, INCIDENTAL OR CONSEQUENTIAL DAMAGES.
SOME STATES DO NOT ALLOW LIMITATIONS ON HOW LONG AN IMPLIED
WARRANTY LASTS AND/OR DO NOT ALLOW EXCLUSION OF CONSEQUENTIAL
DAMAGES, SO ABOVE LIMITATIONS MAY NOT APPLY TO YOU.
montado verticalmente.
3. Introduzca el segundo tornillo a
través del orificio inferior del soporte.
4. Apriete ambos tornillos para
asegurar el soporte en su lugar.
la ceja
liberar
GARANTÍA LIMITADA DE 1 AÑO
GE Security, Inc. garantiza que este producto estará libre de defectos en
los materiales y mano de obra durante un año a partir de la fecha de
compra. Esta garantía está limitada a la reparación o al reemplazo, a
opción de GE Security. Esta garantía no cubre combinaciones olvidadas o
configuradas incorrectamente. No se cubren los daños causados por
modificación, abuso o uso indebido.
1-YEAR LIMITED WARRANTY
1. Open the KeySafe™ to remove the key holder.
2. Use a Phillips head screwdriver to remove
the screw and washer in the middle slot
of the key holder.
3. Align the key with the key holder
so that the head of the key is flush
against the middle slot on the
holder and the end of the key
la tarjeta
de plástico
Este dispositivo se ha probado y cumple con la Parte 15b de las reglas
de la FCC. La operación está sujeta a las siguientes dos condiciones:
(1) este dispositivo no puede causar interferencia dañina, y (2) este
dispositivo debe aceptar cualquier interferencia recibida, inclusive
interferencia que pueda causar una operación indeseable.
This device has been tested and complies with Part 15b of the FCC Rules.
Operation is subject to the following two conditions: (1) this device may
not cause harmful interference, and (2) this device must accept any
interference received, including interference that may cause undesired
operation.
Buttons
To attach a key to the KeySafe™ key holder:
To attach the KeySafe™ to the bracket:
1. Open the KeySafe™ and remove
VI.Removing the KeySafe™ from the Bracket
II. Attaching the Key to the Key Holder
V. Attaching the KeySafe™
to the Bracket
1. Remove the key holder from the KeySafe™ by pressing the RESET
■
Screwdriver
Tip on
Plastic
Card
extends outward from the holder.
Important: Make sure the end of the key
extends out far enough from the key holder so
that it will insert completely into the doorknob
or lock that you are using.
4. Secure the key to the key holder by inserting
the provided Phillips screw with washer through
the head of the key into the sliding collar in the
middle slot of the holder. Tighten with a screwdriver.
370 mm
I. Inserting the Battery
III. Visualización del Registro de Acceso
La pantalla de la hora de la caja KeySafe™ almacena la fecha y la hora de
hasta nueve eventos de acceso, siendo el número 1 el evento más reciente.
Para ver el registro de acceso, presione los botones de despliegue hacia
arriba o hacia abajo. Si la caja de la llave fue abierta, el acceso se exhibirá
como
. Si se cambió el reloj, se exhibirá
. Nota: El acceso del
reloj exhibirá la hora en la que se ajustó el reloj.
the key holder (see Using Your Digital KeySafe™, Step I).
2. Align the slots on the back of the KeySafe™ with the tabs on front of
the bracket.
3. Enter your combination using the numbered buttons then press and
hold the OPEN button while sliding the KeySafe™ downward, until it
clicks into place. Note: There is a code pin located on the bracket that
prevents the KeySafe™ from sliding completely into place unless the
correct combination has been entered. This prevents the KeySafe™
from being mounted before the combination is entered correctly.
185 mm
button, followed by the OPEN button. Pull down on the key holder
from the bottom of the KeySafe™.
2. Remove the bracket. Press the Release tab on the bracket and slide
the KeySafe™ upward until it is free of the bracket.
3. Remove the plastic card attached to the bracket.
185 mm
Getting Started
IV. Fixation du Support
Lorsque vous choisirez un
emplacement d’installation
pour le support du KeySafe™,
veillez à laisser un espace suffisant
au-dessus du support pour permettre
le glissement vers le haut du KeySafe™
lors de son retrait du support.
1. Placez le support à l’emplacement
indiqué et serrez la vis supérieure
Cette garantie vous donne des droits spécifiques. Vous pourrez bénéficier
d’autres droits, variables selon votre lieu de résidence. Pour obtenir une
réparation ou un remplacement dans le cadre de cette garantie, retournez
le produit et son justificatif d’achat accompagnés de vos nom et adresse,
avec affranchissement, à : GE Security, Inc., Supra, 4001 Fairview
Industrial Drive SE, Salem, OR 97302, États-Unis.
la languette
Release
porte-clé
Pour fixer le KeySafe™ à son support :
1. Ouvrez le KeySafe™ et retirez le porte-clé (cf. Mode d’emploi du
KeySafe™ numérique, étape 1).
2. Alignez les fentes sur l’arrière du KeySafe™ sur les languettes à l’avant
du support.
3. Entrez votre combinaison sur les boutons numérotés, puis appuyez
sans relâche sur le bouton OPEN tout en glissant le KeySafe™ vers le
bas, jusqu’à ce qu’il s’enclenche en position. Remarque : Une butée
située à l’arrière du support empêche le KeySafe™ de glisser
complètement en position tant que la combinaison correcte n’a pas
été saisie. Cette sécurité empêche la fixation du KeySafe™ avant
l’entrée correcte de la combinaison.
VI.Retrait du Keysafe™ de son Support
Pour retirer le KeySafe™ de son support :
1. Ouvrez le KeySafe™ et retirez le porte-clé
(cf. Mode d’emploi du KeySafe™ numérique,
étape 1).
boutons
numérotés
2. Entrez votre combinaison.
3. Appuyez sur le bouton Release en bas
du support et remontez le KeySafe™
jusqu’à ce qu’il soit dégagé
son support.
Mode d’emploi du KeySafe™
numérique
I. Ouverture/Fermeture du Keysafe™
Pour ouvrir le KeySafe™ et retirer le porte-clé :
1. Appuyez sur le bouton RESET.
2. Entrez votre combinaison en appuyant
sur les boutons numérotés.
3. Appuyez brièvement sur le bouton OPEN.
4. Tirez le porte-clé vers le bas, en le saisissant
par les côtés.
B
L
U
E
M
O
O
N
porte-clé
This proof is for client review. Please proofread and review art for accuracy. In
addition, this document should be reviewed by client's legal department.
Grammar, spelling, punctuation and content are the responsibility of the client.
Carefully review this document and mark any changes or revisions on this proof
and return to Blue Moon Design Group, Inc. Blue Moon Design Group, Inc., is not
liable for errors found, after final client approval, in films or printed materials.
CLIENT
SIGNATURE:
Process Cyan
01847 trilingual instructions insert
FONT FAMILIES: GE Inspira, Univers, Futura
© 2004 GE Security
GE Infrastructure
Security
Supra Division
Salem, Oregon 97302
www.ge-security.com
SUGGESTED MATERIALS
GRAPHICS INSERT: 24LB. TEXT
III. Affichage du Journal D’accès
L’affichage de l’heure du KeySafe™ enregistre la date et l’heure des neuf
derniers accès, le numéro 1 reflétant le plus récent. Pour afficher le journal
d’accès, appuyez sur les boutons de défilement vers le haut ou vers le bas.
Si le compartiment de la clé à été ouvert, le journal d’accès indique
.
Si l’horloge a été modifiée,
s’affiche. Remarque : L’accès à l’horloge
affiche l’heure à laquelle l’horloge a été réglée.
GE Security, Inc. garantit que ce produit sera dépourvu de vices de
matériau et de défauts de fabrication pendant un an à partir de la date
d’achat. Cette garantie est limitée aux réparations ou au remplacement
au choix de GE Security. Cette garantie ne couvre pas les combinaisons
oubliées ou mal réglées. Les dommages causés par une modification ou
un usage abusif ou impropre ne sont pas couverts.
GE SECURITY NE DONNE AUCUNE AUTRE GARANTIE, EXPRESSE OU TACITE
DE QUALITÉ COMMERCIALE OU D’ADAPTATION À UN BUT PARTICULIER. GE
SECURITY NE POURRA EN AUCUN CAS ÊTRE RESPONSABLE DE LA PERTE
LE AVE YOUR KE Y BEHIND!
45 mm
la carte
en plastic
D’UTILISATION OU DE BÉNÉFICES, D’UN VOL, DE DÉGÂTS MATÉRIELS OU
DE DOMMAGES SPÉCIAUX, INDIRECTS OU CONSÉCUTIFS. CERTAINS ÉTATS
N’AUTORISANT PAS LES LIMITATIONS SUR LA DURÉE D’UNE GARANTIE
TACITE ET/OU L’EXCLUSION DES DOMMAGES CONSÉCUTIFS, IL EST
POSSIBLE QUE LES LIMITATIONS CI-DESSUS NE VOUS CONCERNE PAS.
GARANTIE LIMITÉE 1 AN
10094197P1
V. Fixation du Keysafe à son Support
la carte
4. Appuyez légèrement sur la carte
en plastic
en plastique avec un tournevis
pour donner un demi-tour vers
le bas aux flèches des boutons
que vous avez sélectionnés
pour votre combinaison,
jusqu’à enclenchement
en position. Attention :
Les flèches doivent
pointer vers le haut
ou vers le bas, les
flèches vers le bas
représentant les chiffres
boutons numérotés
avec des flèches
de votre combinaison.
Si une flèche pointe vers
la gauche, la droite ou qu’elle
est mal enclenchée lorsqu’elle est tournée vers le bas, la combinaison
ne fonctionnera pas. La définition incorrecte de la combinaison n’est
pas couverte par la garantie.
5. Renvoyez la carte en plastique à son
upport pour le futur usage.
Suite à des tests, cet appareil s’est avéré conforme à la Partie 15b des
règlements de la FCC. Son fonctionnement est sujet aux deux conditions
suivantes : (1) cet appareil ne pourra pas causer d’interférences nuisibles
et (2) cet appareil doit accepter toute interférence reçue, y compris les
interférences susceptibles de causer un fonctionnement indésirable.
Instructions
Instrucciones
Instructions
pour lui laisser juste un peu de jeu.
2. Utilisez un niveau pour ajuster le support et garantir qu’il est bien
fixé à la verticale.
3. Insérez la seconde vis dans l’orifice inférieur du support.
4. Serrez les deux vis pour fixer le support en place.
360 mm