1
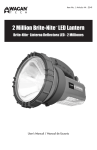
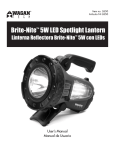
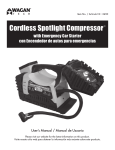
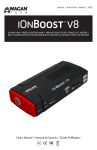
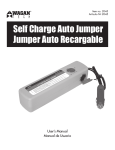
Item # / Artículo #2404
3 Million Brite-Nite Spotlight Lantern
Brite-Nite Linterna Reflectora 3 Millones
User’s Manual
Manual de Usuario
3 Million Brite-Nite™ Spotlight Lantern by Wagan Tech®
Lantern Power Switch
Spotlight Power Switch
User’s Manual—Read before using this equipment
Thank you for purchasing the 3 Million Brite-Nite™ Spotlight Lantern by Wagan Tech ®. With
normal care and proper treatment, it will provide years of reliable service. It is important to read
all operating instructions carefully before use and keep this user’s manual for future reference.
INTRODUCTION
This spotlight-lantern is useful for accomplishing a variety of activities. It has a stand that can
be used to aim the spotlight beam in a convenient position. In the field, it serves as a powerful
spotlight. At the campground, the lantern feature is very useful as a bright, steady, reading light.
During tire changes at night, the lantern can light the area while the red, flashing Emergency
Light warns motorists to avoid the area. Two chargers are included allowing for either DC charge
from a cigarette lighter socket or AC charge from any wall outlet.
Halogen Spotlight
FEATURES
• Bright spotlight beam is visible up to one mile.
• Fluorescent Lantern and Area Light operates from to 2-4 hours.
• User can select operation with one or two fluorescent tubes.
• Rechargeable 6 volt sealed lead-acid battery.
• Charge in vehicle from cigarette lighter socket (DC adapter included).
• Charge at home (AC adaptor included).
• Weather-resistant casing provides for outdoor and emergency use.
Retractable Stand
• Large handle for easy carrying.
• Red flashing emergency warning light.
• Spotlight power switch located right at finger tips, allowing for single-hand operation
while being carried.
• Red LED charging indicator lets the user know that charging power is connected.
Emergency Flare Light
Charging Jack
• Retractable wire stand allows the spotlight beam to be positioned in a variety
of angles.
SPECIFICATIONS
Fluorescent Lantern
(2 U-shaped tubes)
• Operating Voltage: 6 Volts DC
• Sealed Lead Acid Battery: 6V DC, 4.5 AH
• Quartz Halogen Bulb: 6 Volt 55 Watt H3
• Fluorescent Tubes (2): 7 Watt, U shape
• Dimensions: 11 in. x 7 in. x 7 in.
• Weight: 4.5 lbs
1
www.wagan.com
©2012 Wagan Corporation
All Rights Reserved.
Wagan Tech and wagan.com are trademarks used by Wagan Corporation.
2
3 Million Brite-Nite™ Spotlight Lantern by Wagan Tech®
GENERAL SAFETY PRECAUTIONS
RECHARGING THE UNIT
• Do not turn on light while charging the unit. Doing so will damage the unit and will void
your warranty.
• Turn OFF all lamp functions and allow unit to cool before storage.
Your spotlight is supplied with two charging adapters. One adapter is powered by standard
115 volts AC. This is the AC/DC Charging Adapter. The other charging adapter is the DC/DC
Charging Adapter. This adapter has a user-replaceable fuse in the DC plug that connects to a
cigarette lighter outlet (accessory outlet). Be sure to charge the unit completely before the first
use (charge for 24 hours). This step will prolong the life of the internal battery. Use the AC/DC
Charging Adapter for the first charge.
• Though durable and built to last, do not drop the unit excessively as this will greatly
reduce the life of the unit.
AC Charging
• As with all lead-acid cell batteries, when storing, be sure to recharge the battery fully
every 3-6 months to prolong the life of the battery.
• Though weather resistant, do not submerge the unit.
The AC/DC adapter provides a slow steady charge to the unit. Do not operate the lamp while
the AC/DC Charging Adapter is charging the lamp, you may damage the charging adapter and
discharge the lamp’s batteries. Charge for a maximum of sixteen hours; DO NOT overcharge.
• Lens becomes very hot during operation.
• Do not cover lens or reflector during operation.
1. Make sure that all switches are set to “O”, the off position.
• Do not shine directly into eyes.
• Switch off and allow it to cool before storage or maintenance.
2. Using the AC/DC adaptor, insert the DC end into the Charging Jack (next to the flare
light).
• When servicing always wear safety glasses when working with hardware.
3. Plug the AC end into a wall outlet.
• Use only supplied chargers.
4. The red Charging LED light will come on to indicate the lamp is charging.
• This unit is intended to be correctly orientated in a vertical or floor mount position.
OPERATING INSTRUCTIONS
This Spotlight Lantern is versatile and convenient to use. The large handle and rocker switch
placement allows for easy control of all lamp functions while carrying the unit. Two Rocker type
switches have three positions each and are marked I, O, and II. Always store the lamp with both
switches in the “O” position.
The two rocker switches and their functions are shown in the table below.
3
User’s Manual—Read before using this equipment
Switch Location/Function
Rocker Switch 1 (closest to
spotlight end)
Rocker switch 2
“O” Position Function
OFF
OFF
“I” Position Function
Spotlight ON
Single fluorescent tube ON
“II” Position Function
Flashing Red Emergency
Beacon
Two fluorescent tubes ON
www.wagan.com
DC Charging
Any 12 Volt DC power outlets, such as in vehicles, boats, and jump starters can charge this lamp
using the DC/DC Charging Adapter. For full charge, the power source must be from a vehicle
or boat DC outlet and the engine should be running. Charge for five hours maximum; DO NOT
overcharge.
1. Make sure that all switches are set to “O”, the off position.
2. Using the DC/DC charger, insert the DC end into the Charging Jack (next to the flare
light).
3. Plug the larger DC plug into the cigarette lighter outlet.
4. The red Charging LED light will come on to indicate the lamp is charging.
©2012 Wagan Corporation
All Rights Reserved.
Wagan Tech and wagan.com are trademarks used by Wagan Corporation.
4
3 Million Brite-Nite™ Spotlight Lantern by Wagan Tech®
User’s Manual—Read before using this equipment
MAINTENANCE
Fluorescent Bulb Replacement Procedure
User Replaceable Bulbs
The 3 million Brite-Nite Spotlight Lantern uses two standard 7W fluorescent bulbs. These may be
purchased at any local hardware store.
The 3 Million Brite-Nite Spotlight Lantern uses a 6V, 55 Watt H3 quartz-halogen bulb. If the
bulb burns out, you can purchase a replacement from most automotive supply stores. The
U-shaped fluorescent tubes have long life so should not need to replace them often. However,
the florescent tubes are available at stores that carry electrical supplies. These fluorescent tubes
are 7 watts each. Take one old tube with you when you purchase a new one. Be careful not to
break the tube.
Spotlight Bulb Replacement Procedure
1. Make sure all charging adapters are disconnected from the unit.
1. Follow the Spotlight Bulb Replacement Procedure to remove the reflector assembly.
2. Using a phillips screwdriver, unscrew the white fluorescent bulb assemblies’ retaining
screws.
3. Lift out the tube assembly—be careful not to break any wires or bulbs.
4. Gently pull out the old bulb and replace with the new fluorescent bulb.
5. After replacing the fluorescent bulb, replace the screws, reflector assembly, glass, and
bezel.
2. Make sure all switches are set to “O”, the off position.
DC Fuse Replacement
3. Rotate the bezel slightly counter clockwise to remove the bezel and lens.
The 4 ampere fuse in the DC plug protects the charging cord of the DC Adapter. If the Charging
Indicator on the Spotlight Lantern does not light up when the you are charging from a cigarette
lighter or accessory socket, the fuse in the DC plug may be blown. Check the fuse that is located
inside the DC plug.
4. Carefully remove the reflector assembly.
NOTE: The WHITE wire of the bulb connects to the Brite-Nite’s RED wire; the BLACK wire
connects to the reflector assembly. It is only necessary to disconnect the WHITE wire from
the RED wire.
To check or replace the fuse:
5. Disconnect the WHITE wire from the RED wire.
1. Unscrew the end cap of the DC plug (counter clockwise).
6. Carefully unhook the two wire spring ends from the reflector flange.
2. Remove spring, center contact, and fuse.
7. Lift and rotate the wire spring to release the bulb.
3. Check fuse with a continuity checker.
8. Carefully remove the bulb and set it aside.
4. If plug is blown, obtain a replacement fuse with same type and rating.
NOTE: The glass of the new bulb must not be touched with the bare hands. Finger grease
deposited on the glass will create hot spots on the bulb and decrease its life. If the bulb
glass is accidentally touched, it can be cleaned with a lint free cloth dampened with
alcohol.
5. Replace the fuse, spring, contact, and end cap.
9. Carefully remove the new bulb from its package without touching the bulb’s glass.
8. If the fuse was good, check the DC socket for proper operation.
10.Place the bulb in the reflector assembly flange.
11.Replace the wire spring and hook the ends onto the reflector flange.
12.Connect the WHITE wire to the RED wire.
13.Replace the reflector assembly, lens, and bezel.
6. Screw end cap clockwise until it is finger tight. Do not overtighten.
7. Check for proper operation of DC Charge Adapter.
DISPOSAL/RECYCLING
All electronic equipment contains materials that can damage the environment if not properly
disposed. All fluorescent lamps contain mercury. Make sure that the bulbs are not broken.
Contact your local authority for disposal or recycling instructions.
14.Make sure the bezel is secure to keep out dust and water.
15.Check for proper operation by turning ON the switch.
16.Recharge the battery as required.
5
www.wagan.com
Warranty Statment is located at the end of the booklet.
©2012 Wagan Corporation
All Rights Reserved.
Wagan Tech and wagan.com are trademarks used by Wagan Corporation.
6
Brite-Nite™ Linterna Reflectora 3 Millones de Wagan Tech®
Manual de Usuario—Leer antes de utilizar este equipo
Muchas gracias por comprar la Brite-Nite™ Linterna Reflectora 3 Millones de Wagan Tech ®. Esta
linterna le brindará años de servicio confiable si es tratada con el cuidado apropiado. Por favor
lea este manual de instrucciones antes de utilizar este producto.
Interruptor Linterna
INTRODUCCIÓN
Interruptor Reflectora/Luz de Emergencia
Esta linterna reflectora es muy útil para una gran variedad de actividades. Tiene un soporte
de alambre que se puede utilizar para dirigir el rayo de luz en una posición conveniente. En
el campo, sirve como un potente reflector. Acampando, esta linterna es muy útil como luz de
lectura. Cambiando neumáticos en la noche, puede iluminar el área. La linterna incluye dos
cargadores uno de corriente CA para cargarla en casa y uno CC para cargarla en el auto.
Bombilla de halógeno H3
CARACTERÍSTICAS
• El rayo de luz es visible hasta 1 milla (1.609 km) de distancia.
• Linterna fluorescente / Luz en el área opera de 2 - 4 horas.
• El usuario selecciona la operación de uno o dos tubos fluorescentes.
• Batería de ácido-plomo recargable incorporada de 6V.
• Recargable en vehículos con adaptador de auto (adaptador CC.) o en casa con
adaptador CA (ambos incluidos).
• Cargue en el hogar (adaptador CA incluido).
• Exterior resistente al agua, adecuado para emergencias y uso en exteriores.
• Asa grande para fácil transporte y uso.
Soporte Ajustable
• Luz de emergencia
• El interruptor de encendido está situado donde van las puntas de los dedos, lo que
permite realizar la operación con una sola mano mientras se lleva.
• Luz roja LED indicadora de carga que permite al usuario saber si la unidad que está
cargando esta conectada.
Luz de Emergencia
Enchufe para
el cargador
Linterna fluorescente
(2 tubos en forma de U)
• Un alambre retractable que permite que la luz de la linterna pueda ser posicionada en
varios ángulos
ESPECIFICACIONES
• Voltaje de Operación: 6 voltios CC
• Batería de plomo sellada: 6V CC, 4,5 AH
• Bombillo de Halógeno: 6 voltios 55 Watt H3 (300 lúmenes)
• Tubos fluorescentes (2) : en forma de U de 7 vatios
• Dimensiones (pulgadas): 11” x 7” x 7”
• Peso: 4.5 lbs
7
www.wagan.com
© Corporación Wagan 2012
Todos los derechos reservados.
Wagan Tech y wagan.com son marcas registradas de la Corporación Wagan.
8
Brite-Nite™ Linterna Reflectora 3 Millones de Wagan Tech®
SEGURIDAD Y PRECAUCIONES
RECARGANDO LA UNIDAD
• No encienda la luz mientras la unidad esté cargando. Si lo hace, podría dañar la
unidad y anular la garantía.
• Al igual que con todas las baterías de plomo-ácido, cuando se almacena, asegúrese
de recargar la batería por completo cada 3-6 meses para prolongar la vida útil de la
batería.
• Apague todas las funciones de la linterna y permita que la unidad se enfríe antes de
almacenar.
• A pesar de ser un producto resistente y duradero, evite que la unidad se caiga al suelo
porque se acortaría sensiblemente la vida útil de la unidad.
• Aunque sea impermeable, no sumerja la unidad en agua.
• El lente se calienta mucho cuando el aparato está en funcionamiento.
Su linterna se suministra con dos adaptadores de carga. Un adaptador funciona con energía
estándar CA de 115 voltios. Este es el adaptador de carga CA / CC. El otro adaptador de
carga es el adaptador de carga CC / CC. Asegúrese de cargar la unidad por completo antes
del primer uso. Este paso permitirá prolongar la vida de la batería interna. Utilice el adaptador
de carga CA / CC para la primera recarga. Cargue la batería durante 24 horas antes del
primer uso.
Recarga con Adaptador CA
El adaptador CA / CC ofrece una carga lenta constante a la unidad. No haga funcionar
la linterna, mientras que el adaptador de carga CA / CC esté recargando, puede dañar el
adaptador de carga y descargar las baterías de la linterna. Recargue por un máximo de
dieciséis horas, y no sobrecargue la unidad.
• No tape el lente o el reflector cuando el aparato esté en funcionamiento.
1. Asegúrese que todos los interruptores estén en la posición de apagado “O”
• No dirija directamente la luz a los ojos.
2. Usando el adaptador CA / CC, inserte el extremo del CC en el enchufe de carga
(junto a la luz de emergencia).
• Apague y deje que se enfríe antes de su almacenamiento o mantenimiento.
• Siempre que la utilice cuando trabaje con artículos de ferretería, lleve gafas de
seguridad.
• Utilice única y exclusivamente los cargadores que se le facilitan.
• Esta unidad está diseñada correctamente para ser usada de manera vertical o en un
piso en posición de montaje
INSTRUCCIONES DE USO
La Linterna Reflectora LED es versátil y fácil de usar. El asa grande y la posición del interruptor
permite un fácil control de todas las funciones de la linterna mientras transporta la unidad.
Hay dos interruptores. Un interruptor tiene dos posiciones, el otro tiene tres posiciones I, 0, y II.
Guarde siempre la linterna con ambos interruptores en la posición “O”.
Los dos interruptores y sus funciones se muestran en la tabla de abajo.
9
Manual de Usuario—Leer antes de utilizar este equipo
Ubicación del
interruptor/Función
Interruptor 1 (mas cercano al
extremo final de la linterna)
Interruptor 2
Función - Posición “O”
Apagado
Apagado
Función - Posición “I”
Linterna encendida
1 tubo fluorescente
encendido
Función - Posición “II”
Luz roja intermitente para
emergencias
2 tubos fluorescentes
encendidos
www.wagan.com
3. Enchufe el módulo de la pared en un enchufe CA
4. La luz roja LED se encenderá para indicar que la linterna está cargando
Recarga con Adaptador de Auto CC
Cualquier toma de corriente de 12 voltios CC, como en vehículos, embarcaciones, y
arrancadores pueden cargar esta linterna utilizando el adaptador CC / CC. Para una carga
completa, la fuente de alimentación debe ser el zócalo de accesorios (CC) de un vehículo
o barco y el motor debe estar en ejecución. Cargue durante cinco horas máximo, NO
sobrecargue.
1. Asegúrese que todos los interruptores estén en la posición de apagado “O”
2. Usando el adaptador CC / CC, inserte el extremo del CC en el enchufe de carga
(junto a la luz de emergencia).
3. Enchufe el conector más grande de CC en el enchufe del encendedor de cigarrillos
4. La luz roja LED se encenderá para indicar que la linterna está cargando.
© Corporación Wagan 2012
Todos los derechos reservados.
Wagan Tech y wagan.com son marcas registradas de la Corporación Wagan.
10
Brite-Nite™ Linterna Reflectora 3 Millones de Wagan Tech®
Manual de Usuario—Leer antes de utilizar este equipo
INSTRUCCIONES DE MANTENIMIENTO
Procedimiento para Reemplazar la Bombilla Fluorescente
Reemplazo de Bombillas
La Brite-Nite Linterna Reflectora 3 millones, utiliza dos bombillas fluorescents estándar de 7
vatios. Estos se pueden comprar en cualquier ferretería local.
La Brite-Nite Linterna Reflectora 3 Millones utiliza una bombilla halógena H3 cuarzo de 6
voltios, 55 vatios. Cuando se funda, acuda a una ferretería o a una tienda de automotor para
que se la cambien.Los tubos fluorescentes en forma de U tienen una larga vida por lo que no
debería ser necesario reemplazarlos con frecuencia. Sin embargo, los tubos fluorescentes están
disponibles en tiendas donde venden artículos eléctricos. Estos tubos fluorescentes son de 7
vatios cada uno. Lleve un tubo viejo con usted cuando compre uno nuevo. Tenga cuidado de no
romper el tubo.
Procedimiento para Reemplazar la Bombilla.
1. Asegúrese que todos los adaptadores de carga estén desconectados de la unidad.
1. Siga las instrucciones del Procedimiento para reemplazar la bombilla para extraer el
reflector ensamblado.
2. Con un destornillador Phillips, afloje los tornillos de la bombilla fluorescente blanca de
retención.
3. Levante el ensamblaje del tubo-tenga cuidado de no romper los cables o bombillas.
4. Retire con cuidado la bombilla vieja y sustituyala por la nueva lámpara fluorescente.
5. Luego de sustituir la bombilla fluorescente, reemplace los tornillos, el reflector
ensamblado, cristal y el protector del lente.
2. Asegúrese que todos los interruptores estén la posición de apagado “O”.
Reemplazando el Fusible CC
3. Gire el protector del lente en sentido antihorario para remover el protector y el lente.
El fusible de 4 amperios en el enchufe de CC protege el cable de carga del adaptador CC. Si
el indicador de carga de la linterna no se enciende cuando está cargando desde el encendedor
de cigarrillos o zócalo de accesorios, puede que el fusible en el enchufe de CC se haya
fundido. Revise el fusible que se encuentra dentro del enchufe CC.
4. Retire con cuidado el reflector ensamblado.
NOTA: El cable BLANCO de la bombilla se conecta al cable ROJO de la linterna BriteNite, el cable NEGRO se conecta al reflector ensamblado. Sólo es necesario desconectar el
cable BLANCO del cable ROJO.
Para comprobar o cambiar el fusible:
5. Desconecte el cable BLANCO del cable ROJO.
1. Desatornille la tapa del extremo del enchufe CC (sentido antihorario).
6. Con cuidado, desenganche los dos resortes de los extremos del borde del reflector.
2. Retire el resorte, centro de contacto y el fusible.
7. Levante y gire el resorte de alambre para liberar la bombilla.
3. Controle el fusible con un comprobador de continuidad.
8. Retire la bombilla con cuidado y déjela a un lado.
4. Si el enchufe está fundido, obtenga un fusible de repuesto del mismo tipo y
clasificación.
NOTA: El cristal de la bombilla nueva no debe ser tocada con las manos. La grasa de
los dedos depositada en el cristal crea puntos calientes en la bombilla y reduce su vida
útil. Si tocó la bombilla de cristal accidentalmente, se puede limpiar con un paño de tela
humedecido con alcohol.
5. Reemplazar el fusible, el resorte, el contacto y la tapa.
6. Atornille la tapa hacia el lado derecho hasta que quede apretado. No apriete
demasiado.
9. Remueva cuidadosamente la bombilla del empaque sin tocar el cristal de la bombilla.
7. Comprobar el funcionamiento correcto del adaptador de carga CC.
10.Coloque la bombilla en el borde del reflector ensamblado.
8. Si el fusible está bien, compruebe que el enchufe CC funcione correctamente.
11.Vuelva a colocar el resorte de alambre y el gancho de los extremos en el borde del
reflector.
12.Conecte el cable BLANCO al cable ROJO.
13.Reemplace el reflector ensamblado, lente y protector de lente.
14.Asegúrese de que el protector de lente esté firme par que no le entre polvo o agua.
15.Compruebe que funcione correctamente encendiendo el interruptor.
DESECHO/RECICLAJE DE LA UNIDAD
Los aparatos electrónicos contienen materiales que pueden afectar al medio ambiente si no
se desechan correctamente. Todas las lámparas fluorescentes contienen mercurio. Asegúrese
de que las bombillas no están rotas. Póngase en contacto con su autoridad local para obtener
información o instrucciones para desechar o reciclar la unidad.
16.Recargar la batería cuando sea necesario.
11
www.wagan.com
© Corporación Wagan 2012
Todos los derechos reservados.
Wagan Tech y wagan.com son marcas registradas de la Corporación Wagan.
12
Garantía Limitada de la Corporación Wagan
La garantía de WAGAN Corp. está limitada sólo a los productos vendidos en los Estados
Unidos.
Todos los productos Wagan Tech deben registrarse dentro de los (30) días de compra para
activar la garantía. Para registrar su producto, visite http://tinyurl.com/waganwarranty.
Asegúrese de conservar el recibo original ya que será necesario cuando devuelva un
producto en garantía.
Duración de la garantía: Este producto está bajo garantía para el comprador original
durante el período de un (1) año a partir de la fecha de compra original, como libre de
defectos en el material y la mano de obra. WAGAN Corporation renuncia a cualquier
responsabilidad por daños consecuenciales. En ningún caso, WAGAN Corporation será
responsable por daños que superen la cantidad pagada por el producto al por menor.
WAGAN Corp. Limited Warranty
The WAGAN Corp warranty is limited to products sold only in the United States.
All Wagan Tech products must be registered within (30) days of purchase to
activate its warranty. To register your product, please visit http://tinyurl.com/
waganwarranty. Be sure to keep the original receipt as it will be required when
returning a product under the warranty.
Warranty Duration: This product is warranted to the original purchaser for a period
of one (1) Year from the original purchase date, to be free of defects in material
and workmanship. WAGAN Corporation disclaims any liability for consequential
damages. In no event will WAGAN Corporation be responsible for any amount of
damages beyond the amount paid for the product at retail.
Funcionamiento de la garantía: Durante el período de garantía de un (1) año antes
mencionado, un producto con defectos se reemplazará con un modelo similar cuando
el producto sea devuelto a WAGAN Corporation con el recibo original de la tienda. El
producto de reemplazo estará en garantía por el resto del período original de un (1) año
de garantía.
Warranty Performance: During the above one (1) Year warranty period, a product
with a defect will be replaced with a comparable model when the product is
returned to WAGAN Corporation with an original store receipt. The replacement
product will be in warranty for the balance of the original one (1) Year warranty
period.
Para devolver un artículo defectuoso, póngase en contacto con WAGAN Corporation al
(800) 231-5806 para obtener un número de autorización de mercadería devuelta (RMA#)
y las instrucciones correspondientes a la devolución. Cada artículo devuelto necesitará un
RMA# por separado. Después de haber recibido el RMA# y las instrucciones de devolución
por parte de WAGAN Corporation, siga las instrucciones y envíe el artículo con ENVÍO
PREPAGO, junto con la documentación solicitada, una explicación completa del problema,
su nombre, dirección y número telefónico para ponerse en contacto durante el día. WAGAN
Corporation, en forma opcional, decidirá reemplazar o reparar la pieza defectuosa.
To return a defective item, please contact WAGAN Corporation at (800) 2315806 to obtain a Returned Merchandise Authorization number (RMA#), and return
instructions. Each item returned will require a separate RMA#. After you have
received the RMA# and the return instructions from WAGAN Corporation, please
follow the instructions and send the item with PREPAID SHIPPING, along with all of
the required documentation, a complete explanation of the problem, your name,
address and daytime phone number. WAGAN Corporation will, at its option,
replace or repair the defective part.
Cuando se envía cualquier artículo defectuoso es NECESARIO un número de autorización
de mercadería devuelta (RMA#). WAGAN Corporation no es responsable por el/los
artículo(s) devuelto(s) sin un número oficial de autorización de mercadería devuelta. El/
los artículo(s) debe(n) ser devueltos con envío prepago. WAGAN Corporation no es
responsable por ningún costo de envío en que se incurra para la devolución de artículo(s)
a la empresa para su reparación o reemplazo. Esta garantía será nula si el producto fue
dañado por accidente, en el transporte, uso irracional, mal uso, negligencia, mantenimiento
inadecuado, uso comercial, reparaciones por personal no autorizado u otras causas que
no surjan de defectos en los materiales o la mano de obra. Esta garantía no se extiende a
ninguna unidad que haya sido utilizada violando las instrucciones escritas provistas.
A Returned Merchandise Authorization number (RMA#) is REQUIRED when
sending in any defective item. WAGAN Corporation is not responsible for any
item(s) returned without an official Returned Merchandise Authorization number.
The item(s) must be returned with prepaid shipping. WAGAN Corporation is not
responsible for any shipping charges incurred in returning the item(s) back to the
company for repair or replacement. This warranty is void if the product has been
damaged by accident, in shipment, unreasonable use, misuse, neglect, improper
service, commercial use, repairs by unauthorized personnel or other causes not
arising out of defects in materials or workmanship. This warranty does not extend
to any units which have been used in violation of written instructions furnished.
Responsabilidad legal de la garantía: Esta garantía reemplaza toda garantía expresa
o implícita y ningún representante o persona está autorizada a asumir ninguna otra
responsabilidad en relación con la venta de nuestros productos. No podrá haber reclamos
por defectos o fallas de funcionamiento o falla del producto bajo cualquier teoría de agravio,
contrato o derecho comercial, incluyendo pero no limitada a negligencia, negligencia grave,
responsabilidad objetiva, incumplimiento de la garantía e incumplimiento del contrato.
©2008 WAGAN Corp. REV2011
Warranty Disclaimers: This warranty is in lieu of all warranties expressed or
implied and no representative or person is authorized to assume any other liability
in connection with the sale of our products. There shall be no claims for defects
or failure of performance or product failure under any theory of tort, contract or
commercial law including, but not limited to negligence, gross negligence, strict
liability, breach of warranty and breach of contract.
©2008 WAGAN Corp. REV2011
31088 San Clemente Street
Hayward, CA 94544, U.S.A.
U.S. & Canada Toll Free: 1.800.231.5806
Tel: + 1.510.471.9221
[email protected]
www.wagan.com
©2012 Wagan Corporation
All Rights Reserved
Wagan Tech and wagan.com are trademarks used by Wagan Corporation
© Corporación Wagan 2012
Todos los derechos reservados
Wagan Tech y wagan.com son marcas registradas de la Corporación Wagan
REV20120223-ES