1
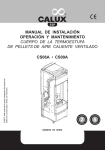
PRECAUCIÓN
RIESGO DE CHOQUE
ELÉCTRICO , NO ABRA
MANUAL DE INSTRUCCIONES
VENTILADOR DE PEDESTAL CON HUMIDIFICADOR DE 18”
AB-3954AUGA
Precaución: Para reducir el riesgo de choque eléctrico, no
retire la cubierta, no hay partes manipulables por el usuario al
interior de la unidad.
Refiera todo mantenimiento o
intervención técnica a personal técnico calificado.
Este símbolo indica la existencia de voltaje peligroso al
interior de esta unidad, que constituye un riesgo de choque
eléctrico.
Este símbolo indica que hay importantes instrucciones de
operación y mantenimiento en la literatura que acompaña a
esta unidad.
LÍNEAS DE SERVICIO AL CLIENTE PREMIER
Venezuela:
Colombia:
Panamá:
Sitio Web:
E-mail:
0800 – ELECTRIC (353-2874)
01-900-331-PEJC (7352)
300-5185
www.premiermundo.com
[email protected]
NOTA
Nos reservamos el derecho de modificar las especificaciones, características y/u operación de esta
unidad sin previo aviso, con el fin de continuar las mejoras y desarrollo del mismo.
ESTIMADO CLIENTE
Con el fin de que obtenga el mayor desempeño de su producto, por favor lea este manual de
instrucciones cuidadosamente antes de comenzar a utilizarlo, y guárdelo para su futura referencia.
Si necesita soporte adicional, no dude en escribir a: [email protected]
P-1
INFORMACIÓN
Lea cuidadosamente este manual de usuario antes de usar la unidad. Esta unidad fue diseñada para el
uso humano y con un consumo mínimo de energía, sin embargo, hace parte del grupo de aplicaciones
eléctricas. Siempre desconecte la unidad cuando no este en uso para aumentar su vida útil y reducir el
consumo de energía.
INSTRUCCIONES DE SEGURIDAD
•
•
•
•
•
•
•
•
Evite que los niños manipulen la unidad.
Antes de usar la unidad, verifique que el voltaje del área corresponda al voltaje indicado en la
lamina posterior de la unidad.
Apague la unidad antes de desconectarla.
Evite desconectar la unidad halando del cable de energía o con las manos mojadas, ya que esto
puede causar un choque eléctrico.
Revise periódicamente que el cable de poder se encuentre en perfecto estado.
No introduzca sus dedos u objetos a través de las rejillas de protección mientras la unidad se
encuentre en funcionamiento.
No coloque la unidad al lado de cortinas.
No use la unidad después de haberla desmontado.
MÉTODO DE INSTALACIÓN DEL VENTILADOR
Instalación de las piezas:
Antes de instalar, verifique que todas las partes se encuentren disponibles.
INSTALACIÓN DEL VENTILADOR (DIAGRAMA DE PARTES)
1.
2.
3.
4.
5.
Rejilla de protección frontal
Tornillo asegurador del aspa
Aspa del ventilador
Red de aro
Tornillo asegurador de la
rejilla
Cubierta de salida de
6. Rejilla de protección trasera
humidificador
7. Perilla
de
control
de
oscilación
8. Cubierta posterior
Tubo guia del
9. Palanca de elevación
humidificador
10. interruptor de control
Cubierta del
11. Tornillo asegurador
humidificador
12. Eje de electroplata
Tanque de agua
ajustable
del huminificador
13. Base pedestal
14. Bases
Perilla de
temporizador
Botones de
control
Entrada de
energia del
humidificador
Cable de energia
Conector
Soporte del huminificador
Cable de energia
Placa de base Interruptor maestro
del humidificador
Tubo de soporte
Unión del tubo de soporte
Bases y Base pedestal
Meson de tornillo
Rodamiento
Tornillo
P-2
P-3
INSTRUCCIONES DE MONTAJE
OPERACIÓN DEL CONTROL REMOTO DE LA UNIDAD
1. Verifique que se encuentran todas las piezas mencionadas anteriormente junto con la unidad.
2. Primero, coloque las dos uniones en los tubos de soporte, y luego inserte en los agujeros de la base
correspondientes, (Tal como la sección de instalación de los componentes de la base lo indica). Use
los tornillos con el mesón de tornillo para apretar los tubos de soporte. Finalmente los 4 rodamientos
deben ser instalados y alineados con los agujeros en la base, y apriételos con una llave especial, y
luego coloque la cubierta de base decorativa.
3. Saque la cabeza del ventilador (Esta parte se ha instalado antes de salir de fabrica), desatornille los
dos botones para ponerlos en el tubo de soporte instalado.
4. Saque el tornillo asegurador de la rejilla y apriete la rejilla trasera en la cabeza del ventilador.
5. Tome el aspa y apriétela con el tornillo asegurador del aspa en el eje del motor.
6. Finalmente, apriete la rejilla frontal, primero desatornille los tornillos de la red de aro un poco, alinee
el aro con la rejilla frontal y trasera y luego apriete el tornillo.
Esta unidad utiliza interruptor de tacto electrónico y temporizador, remplazando en interruptor tradicional
y el temporizador. Por otro lado, mantiene las funciones de un ventilador tradicional.
USO DEL TANQUE DE AGUA
Cubierta del
tanque de
agua
INSTRUCCIONES DEL HUMIDIFICADOR FRÍO
•
Este humidificador es usado principalmente en la parte inferior del ventilador, también es usado
separadamente.
1. En caso de encontrar piezas faltantes o dañadas al momento de recibir la unidad, por favor
comuníquese con su distribuidor.
2. Coloque el ventilador en un lugar estable y coloque el humidificador en la placa inferior del
ventilador. Evite ubicarlo en lugares donde quede expuesto a los rayos directos del sol o en lugares
demasiado húmedos.
3. Tome el tanque de agua del humidificador y voltéelo, luego abra la cubierta del tanque de agua y
agréguele agua limpia
4. Apriete la cubierta del tanque de agua después de haberlo llenado con agua. Limpie los bordes del
tanque de agua, retire cualquier exceso e instálelo bien.
5. Inserte el enchufe del humidificador en la parte posterior del ventilador y conéctelo luego a una
fuente de poder cuyo voltaje sea: AC 110V/60Hz. Encienda el interruptor de rocío, la luz indicadora
del humidificador se enciende y luego de 2 ó 5 segundo el rocío saldrá desde la boquilla del
humidificador.
6. El volumen del rocío puede ser ajustado. El volumen de rocío máximo es 380ml/H, este puede ser
ajustado de acuerdo al nivel de sequedad de su habitación.
7. Cuando no hay agua en el tanque de agua, el dispositivo de seguridad dentro puede apagar el
circuito del atomizador automáticamente, luego no saldrá rocío y la luz indicadora de agua se pondrá
roja. Si va a continuar usando la unidad, por favor apáguela y llene el tanque de agua nuevamente.
8. Es normal que haya un poco de niebla rebosando durante unos pocos segundos mientras el
humidificador esta funcionando.
P-4
MÉTODO DE OPERACIÓN
Después de conectar la unidad al tomacorriente, la luz indicadora se enciende y el ventilador queda en
modo de espera. Puede controlar la unidad a través de los botones del panel de control ó a través del
control remoto (Coloque dos baterías en el control remoto antes de usarlo).
1. “OFF” (Apagar): Presione este botón para apagar la unidad mientras esta se encuentre en
funcionamiento. Después de apagar la unidad, esta recordara los modos programados antes de ser
apagada (Temporizador y “Sleeping Wind” (Regulación de la disminución de viento) no podrán ser
recodados).
2. “ON/SPEED” (Encender/Velocidad): encienda la unidad y seleccione la velocidad de ventilación:
Baja, Media, Alta.
3. “WIND MODE” (Modo de viento): Elija el modo de viento: Normal, natural, “Sleep” (Regulación de la
disminución de viento).
SELECCIÓN CÍCLICA
1. Viento normal: la unidad funcionará a velocidad Baja, Media, Alta.
2. Viento natural: la unidad funcionará bajo estatus irregular, de acuerdo con el programa
preconfigurado, puede ser seleccionada la velocidad de viento Baja, Media, Alta. Es mas cómodo y
suave en el modo natural.
3. “Sleeping Wind” (Regulación de la disminución de viento): puede ser seleccionada la velocidad de
viento Baja, Media, Alta. El motor es controlado por un programa computarizado, entonces el
volumen del viento disminuirá suavemente cuando la temperatura baje.
PANEL DE CONTROL Y CONTROL REMOTO
Luz indicadora de temporizador
Luz indicadora de oscilación
Luz indicadora de humidificación
Luz indicadora de la velocidad del viento
Luz indicadora del modo de viento
Luz indicadora de encendido
Área de selección de función
Control Remoto
Ventilador Inteligente
1. Ajuste la velocidad de “Sleeping Wind” (Regulación de la disminución de viento) en Alta, la unidad
funcionara media hora en el modo de viento natural alto, cambia al modo de viento natural bajo,
P-5
luego cambia a medio por media hora, al final por el tiempo preconfigurado ó se apaga.
2. Ajuste la velocidad de “Sleeping Wind” (Regulación de la disminución de viento) en Media, la unidad
funcionara por media hora en modo de viento natural medio y luego cambia a modo de viento
natural bajo.
3. Ajuste la velocidad de “Sleeping Wind” (Regulación de la disminución de viento) en Baja, la unidad
funcionara en modo de viento natural bajo por tiempo preconfigurado o se apaga.
4. Temporizador: ajuste el tiempo de funcionamiento, 4 métodos de temporizador pueden ser
configurados de acuerdo a los diferentes modelos: 0.5, 1, 2, 4 Horas tiempo acumulativo. 0.5, 1, 2, 4
horas tiempo no acumulativo. 1, 2, 4, 8 horas tiempo no acumulativo. 1, 2 , 4 horas tiempo no
acumulativo. Cuando la unidad esta funcionando con el temporizador activado, LED mostrará el
tiempo que queda para que la unidad se apague.
5. Oscilación: cuando la unidad esta funcionando, presione el botón para activar el modo de oscilación.
Este botón queda inhabilitado cuando la unidad esta apagada.
6. Humidificador: el botón puede controlar el interruptor del humidificador y su funcionamiento no
interfiere en ningún momento con el funcionamiento de el ventilador.
El humidificador puede ser usado solo, conectándolo al tomacorriente.
PARÁMETROS TÉCNICOS
Modelo
AB-3954AUGA
Parámetros técnicos principales
Rango de voltaje
Potencia
AC110V/60Hz
88 Vatios
Volumen de niebla Máximo
380ml/h
Espacio
20m2
SOLUCIÓN DE PROBLEMAS DEL VENTILADOR
Problema
Posible causa
El ventilador no funciona
cuando es encendido
No hay una reacción
El ventilador no oscila pero
tiene viento
El ventilador no tiene
oscilación pero si funciona
Posible solución
1. asegúrese que el enchufe este
conectado correctamente al tomacorriente.
2. verifique que la unidad este encendida.
Verifique que el interruptor de oscilación se
encuentre activado.
SOLUCIÓN DE PROBLEMAS DEL HUMIDIFICADOR
Problema
La luz indicadora no enciende.
No hay viento y no hay rocío.
La luz indicadora se enciende.
Hay viento pero no hay rocío
P-6
Posible causa
1. no ha insertado el enchufe
correctamente en el tomacorriente.
2. no ha encendido la unidad
1. no hay agua en el tanque de
agua.
2. no ha activado la perilla de
temperatura automática.
3. no ha colocado la cubierta del
tanque bien.
La niebla (ó Rocío) Huele mal
Verifique si el tanque de agua o el
agua están limpios.
La luz indicadora se enciende,
pero no hay viento ni rocío.
Hay demasiada agua en el tanque.
La cantidad de rocío es muy
pequeña
El transductor esta obstruido con
polvo.
El agua esta sucia ó ha estado
demasiado tiempo en el tanque
Posible solución
1. inserte el enchufe de manera
correcta.
2. encienda la unidad
1. llene el tanque con agua.
2. active la perilla de temperatura
automática.
3. coloque la tapa del tanque de
agua correctamente.
Abra el tanque de agua por 12
horas en un lugar frío.
Limpie el tanque de agua y
llénelo nuevamente.
Vacíelo un poco y ajuste bien la
tapa.
Limpie el transductor
Cambie el agua por agua limpia
P-7
LIMPIEZA Y MANTENIMIENTO
•
•
•
Desconecte la unidad antes de limpiarla
La grasa o suciedad en el ventilador y las aspas, debe ser limpiada con un poco de detergente
suave y con un paño suave.
Ponga aceite para motor entre el motor y el soporte regularmente.
DIAGRAMA DE CIRCUITOS
El fusible de temperatura de esta unidad esta unido a las bobinas del motor. Si el fusible esta roto
por razones anormales, este debe ser reparado o remplazado por un agente de servicios
autorizado.
Diagrama de circuitos eléctricos del ventilador:
•
NOTA: si el cable de energía esta dañado este debe ser reemplazado de inmediato por un cable
flexible especial. Recuerde remitir cualquier reparación a personal de servicio técnico calificado, evite
hacerlo usted mismo.
Desmontar
Enchufe
y cable
Enchu AC110V
fe y
cable
AC110V
Diagrama de circuitos del humidificador frío:
Diagrama 1
•
•
•
•
•
Transductor A1
Diagrama 2
Primero, desmonte la unidad de acuerdo al diagrama 2 para limpiar la grasa y la suciedad y así
evitar que cambie de color o que se dañe.
Limpie con detergente y un paño suave.
Evite lavarla con agua directamente.
Evite el uso de productos fuertes tales como: tiner, tolueno, ácidos, aceites esenciales, químicos, ya
que esto puede dañar el acabado de la unidad.
Después de limpiar, manténgala en un lugar seco.
MANTENIMIENTO DEL HUMIDIFICADOR FRÍO
• Desconéctelo antes de limpiarlo.
Limpieza del tanque de agua (Una vez a la semana)
Si el tanque de agua esta sucio, límpielo con detergente y lávelo con agua limpia.
Limpieza del exterior del humidificador
• Use un paño suave y enjuáguelo con agua de 40 grados aproximadamente.
• Limpie el polvo y la cubierta cuidadosamente.
Notas:
• No toque el transductor con objetos puntiagudos, este solo debe ser limpiado con un paño suave
ligeramente humedecido.
• No use solventes o productos fuertes para limpiar la unidad.
• No use detergentes, con agua limpia es suficiente.
• No desmonte el fuselaje de la unidad o sus componentes.
• Mantenga el humidificador limpio
• Cuando la unidad no vaya a ser usada por un periodo de tiempo prolongado, por favor límpiela y
colóquela en un lugar seco.
P-8
Interruptor de boyas de agua de protección A2
Transformador
Interruptor de acondicionamiento de humedad A3
Enchufe 110V AC
Interruptor de
potencia A5
DC 38V
Fusible 1.5A
AC 12V
Ventilador pequeño
P-9
CAUTION
RISK OF ELECTRIC
SHOCK, DO NOT
OPEN
INSTRUCTION MANUAL
18”MIST FAN
AB-3954AUGA
Caution: To reduce the risk of electric shock do not open
this device, there are not serviceable parts for customers.
Please refer any maintenance or repair to qualified
personnel.
This sign means the existence of dangerous voltage at
the inside of the unit, which states a risk of electric shock.
This sign means that there are important instructions of
operation and handling in the manual that comes with this
device.
PREMIER CUSTOMER SERVICE
Venezuela:
Colombia:
Panama:
Website
E-mail:
0800 – ELECTRIC (353-2874)
01-900-331-PEJC (7352)
300-5185
www.premiermundo.com
[email protected]
NOTE
This unit may be submitted to changes in specifications, characteristics and/or operation without prior
notice to the user, in order to continue improving and developing its technology.
DEAR CUSTOMER
In order to achieve the best performance of your product, please read this instruction manual carefully
before using, and keep it for future reference.
If you need extra support, please write to [email protected]
P-1
FAN INSTALLATION METHOD
Use Information
Please read carefully the instruction manual before using this product. Tough this Anion
Humidifier Fan is humanized well-designed, independent humidifier consumes little power at
static work, it belongs to family-used electric product, please turn off the power and pull the plug
when it isn't working, that can save power consumption and extend useful time of the appliance.
CAUTIONS
Notice: No notice if the product changed.
Child or the disabled can't use the product personally.
Before using, please check if the
power supply is accorded with the
voltage label at the machine bottom.
Please cut off the power supply
before pulling the plug out. Don't pull
the plug with wet hand in order to
avoid getting an electric shock.
Before using, please check if the wire
and the plug are damaged. Don't fold
and pull the wire.
Don't put fingers or sharp things into
the fan guard when it is working.
Don't use the fan in such place where
the curtain may be drawn in.
(一) Parts Installation
Before installation, please check all parts by name if they are omission, It can be installed if all
parts ready
① FAN INSTALLATION (PARTS DIAGRAM)
1. Front Guard
2. Blade Fastening Screw
3. Fan Blade
4. Hoop Net
5. Guard Fastening Screw
6. Rear Guard
7. Oscillate Control Knob
8. Rear Shell
9. Lift Rod
10. Control Switch
11. Fastening Screw
12. Adjustable Electroplated
Shaft
13. Standing Base
14. Feet
Don't use before assembly.
Base installation
P-2
P-3
Instructions of assembly method
1.Open the fan of the packaging to examine the integrity of parts, as above diagram;
2.First, put the two gaskets into the support tubes, and then insert into the corresponding holes
of the base, (such as the A section of installing the base components shown) use the screw
with a screw meson to tighten the support tubes. Finally the
Four casters should be installed to the alignment holes at the base, tightening with a
special wrench, and then put on the decorative base cover
3.Take out of the Fan Head (this part has been installed before leaving the factory), unscrewed
two tightening button to put it into the installed support tube.
4.Take out of the Guard Fastening Screw and tighten the Rear Guard on
Clockwise in Fan Head;
5.Take the blade and tighten it with the Blade Fastening Screw by Counterclockwise
on the motor shaft;
6.Finally tighten the Front Guard, first unscrewed the screw of Hoop Net a little, align and
hoop the Front Guard and Rear Guard then tighten the screw,
Fan components are assembled completely.
Using of Water Tank Diagram as follows:
Instructions of Cool Humidifier
(1)This Humidifier is mainly used on the bottom of fan, also used separately.
(Humidifier of C section can't be used alone)
(2) Installation and Instructions of Humidifier
1.Open the packaging to check if the product components、appearance、power
cable are damaged or lacked of. If there is missing object or breakage, please
put them into the packaging as usual and send them to our company.
(Cool Humidifier of B,C section have been installed)
2.Put the Fan Main fuselage steadily and put the Humidifier on the Fan bottom plate, it should
be not placed on the sunlight and too damp places.
3.Take the Humidifier Water Tank and turn over, follow the “Adding water”
arrow to open the cover on Counterclockwise, add clean water. (Pure water be advised)
4.Tighten the Water Tank Cover by Clockwise after filling with water, wipe the
water droplets surrounded by water tank and install the Water Tank well. (Diagram 1)
P-4
5.Insert Humidifier plug into the socket on the back of Fan main fuselage connect the Fan to the
AC 110V/60HZ Power Supply, turn on the Spray switch, Humidifier instruct light turn green,
2~5 seconds later ,mist will be sprayed
from the mist nozzle, Humidifier starts to work.
6. Mist volume can be adjusted and maximum mist volume is 380ml/h, it can be set by your
room's dry level. (Diagram)
7.When there is no water in the water tank, the safe device inside can turn off the
atomization circuit automatically, then no mist spray out, lacking water indicator light
illuminate (red), if continue to use, please cut off the power and fill with water in the
water tank again.
8.It is normal that there is a little mist overflowing around within several minutes'
humidifier working.
Control Operation of Remote-Control Fan
This Fan is utilized Electronic Touch Switch and Timer, replacing traditional switch and
timer. Besides keep the functions of traditional fan normal wind and timer, also increase
function of nature wind and
sleeping wind and remote control.
Operation Methods:
On the condition of connecting power supply, power indicator light illuminate, fan is under
standby mode. Now controlling the fan with the control buttons
on fan panel and using remote controller. (Put two batteries in the remote
controller before using)
1.“OFF”: press this button to cut off the power when the fan is working, working
indicator light quenches, fan stop working and controlling electric circuit recover to
status mode and remember the working mode before shutdown. Press this button
again, fan will work as
the memory mode (Timer and sleeping wind can't be remembered)
2.“ON/SPEED”: Open the fan and select fan speed:Low-Medium-High…… Cyclic selection.
3.“WIND MODE”: Choose mode of wind, such as Normal Nature Sleep ……
Cyclic selection.
1)Normal wind: Unit will work at Low-Medium-High speed.
2)Nature wind: Unit will operate under irregular status according to pre-set program,
Wind speed can be selected Low-Medium-High.
It is more comfortable and mild under nature mode.
3).Sleeping wind: Wind speed can be selected Low-Medium-High;
Motor is controlled by computer program so wind volume will decline slowly as body
temperature declining
P-5
TECHNICAL PARAMETERS
Model
Timer indicator light
AB-3954AUGA
Swing indicator light
Humidifier indicator light
Power indicator light
Wind speed indicator light
Wind mode indicator light
Main technical parameters
Rated Voltage
Power
Max.mist
volume
Space
AC110V/60HZ
88W
380ml/h
20m2
Function selection area
Intelligent Fan
remote controller
Regular of declining as follows:
(1)Setting as High sleeping wind, unit will work half an hour at High nature wind, turn to
Low nature wind mode then turn to Medium for half an hour, at last
for pre-set time over or shutdown.
(2) Setting as Medium sleeping wind, unit will work half an hour at Medium nature wind, then
turn to Low nature wind.
(3) Setting as Low sleeping wind unit will work at Low nature wind mode for pre-set time
over or shutdown.
Simple troubleshooting
Problems
The fan
doesn't
Reasons
Without any
reaction
work when it's
started.
The fan
The fan can
doesn't swing work but not
but having
swing.
wind.
Handling ways
1.Whether the plug is inserted
into the socket or connected
well.
2.Whether switch is “ON”.
Whether the Oscillate switch
is “ON”.
4.“TIMER”: Setting working time, 4 kinds of timer methods can set according to different
model: 0.5, 1, 2, 4 hours cumulative time, 0.5, 1, 2, 4 hours Not cumulative time;1, 2, 4, 8
hours Not cumulative time,1, 2, 4hours
Not cumulative time. When fan is working on timer, LED will show the left time
for knowing how long the fan work.
5.“SWING”: When fan is working, press the button to engage auto swing.
It is out of work when fan is turned off.
6.“Humidifier”: The button can control humidifier switch and its action has nothing with fan
working condition. It can be use alone on connecting power supply.
P-6
P-7
Simple troubleshooting of Cool Humidifier
Problems
Indicator light
isn't light. No
wind, No mist
Reasons
Doesn't insert plug
well
Doesn't open
power switch
Handling ways
Insert plug well
Open power switch
Indicator light
illuminate
Having wind
No mist
No water in the
water tank
Doesn't open Auto
temperature knob
Doesn't press float
cover well
Fill with water in water
tank
Open Auto temperature
knob by clockwise
Press float cover well
CLEANING AND MAINTENANCE
▲ Unplug the unit before cleaning
▲ Any greasy dirt on the fan and fan blade should be cleaned with
clean and mild detergent and soft cloth.
! Before using every time, put some Engine oil between motor shaft and bearing.
Notice: If power cable is damaged, it must be changed with special flexible wire
or bought the special component from factory or maintenance department.
Disassembly
The mist is
smelly
Indicator light
illuminate
No wind
No mist
The amount of
mist is very
small
P-8
New product
Whether the water
tank or water is
cleaned
Open the water tank for
12 hours in the cool
place
Clean the water tank
and change the water
Too much water in
the water tank
Decrease some water
and tighten the cover.
Transducer is
clogged with dirty
Dirty water or
water is stayed
too long time in
water tank
Clean the transducer
Change the clean water
Diagram 2
Diagram 1
First, disassembly the fan to diagram
Clean the greasy dirt on the fan so as not to change the color or cause damages
1)Clean with detergent and soft cloth
2)Avoid flushing with water directly
3)Avoid cleaning with thinner ,toluene, acidity, kerosene, essentials oils, chemistry so as not to
change the color or cause damages.
After cleaning,keep it in the dry place
Maintenance of Cool Humidifier
unplug the unit before cleaning.
Cleaning of water tank (once a week)
If there is dirt in the water tank, clean it with
detergent and flush it with clean water
Cleaning of Humidifier outside:
Put the soft cloth rinsing under 40 degree water,
clear the dirt, the mist cover must be cleaned carefully.
Notices of cleaning:
1) It is not allow to touching transducer with sharp tools,
just cleaning with soft wet cloth.
2) Don't use the cloth with chemical solvents gasoline kerosene
polishing powder to wipe the fan appearance.
P-9
3) Don't use detergent randomly, clear water is perfect.
Avoid the water going in to cause malfunction.
4) Please don't disassembly the unit fuselage or components randomly.
Keep cleaning of Cool Humidifier:
When the unit is not used for a long time, clean it and put it in the packaging
and keep it in the dry place.
CIRCUIT DIAGRAM
Fan electric circuit diagram:
Temperature fuse of this product is attached on motor windings, if the fuse is broken by
abnormal reasons, sending it to Maintenance departments. It will be working after changing
it following the manual
No notice if the specification changed.
P-10