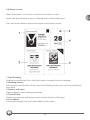
1
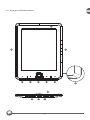
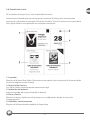
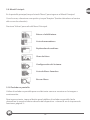
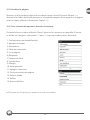
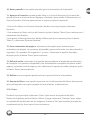
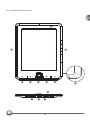
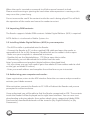
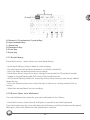
BIENVENID@ AL UNIVERSO UNUSUAL
Contenido
1. Precauciones
1
2. Introducción
2
3. Especificaciones de funcionamiento
5
4. Solución de problemas
20
1. Precauciones
- No cargue la batería si está dañada.
- Evite arrojar o golpear el dispositivo.
- No lo use en entornos extramadamente fríos, cálidos o húmedos por
tiempo prolongado. Evite exponerlo al sol.
- No utilice el dispositivo cerca de campos magnéticos o electrostáticos.
- Si el dispositivo se moja o salpica con cualquier líquido, apáguelo
inmediatamente y séquelo. Espere a que esté totalmente seco para volver
a encenderlo.
- Para limpiar el dispositivo, utilice un paño lévemente húmedo. Evite
usar alcohol o cualquier otro producto abrasivo.
- No intente reparar el dispositivo por su cuenta, esto anulará inmediatamente la validez de su garantía.
- Si al insertar una tarjeta MicroSD el dispositivo no responde, retírela e intente
nuevamente.
- No retire la tarjeta MicroSD ni apague el dispositivo mientras se están transfiriendo
datos. Hacerlo podría ocasionar daños de software y hardware.
- Asegúrese de que la tarjeta MicroSD esté desbloqueada antes de insertarla en el
dispositivo.
- Realice backups periódicos para evitar la pérdida de información ante
cualquier inconveniente con el dispositivo. Nvsbl Unusual Technology SL.
no se responsabiliza por la pérdida de datos.
RECICLAJE AMBIENTAL:
No tire nunca el equipo al contenedor de basura.
Pida información en su Ayuntamiento sobre las posibilidades para una correcta
eliminación que no afecte al medio ambiente. La caja de cartón, el plástico contenido
en el embalaje así como las piezas que forman parte del dispositivo, se pueden
reciclar conforme a la normativa vigente en España.
Cuando el equipo haya llegado al final de su vida útil, deberá ser llevado a los centros
de recogida previstos (p.e. Puntos Limpios municipales).
1
NOTA: El manual de usuario y el software del dispositivo pueden ser actualizados
en cualquier momento. Si por algún motivo el manual no coincide con el producto, por
favor considere al producto como estándar.
2. Introducción
2.1. Introducción.
Gracias por elegir nuestro eBook. Esta breve guía le permitirá conocer rápidamente
todas las funciones de su dispositivo nuevo. Léala atentamente antes de comenzar a
utilizarlo para poder disfrutar al máximo su potencial.
2
2.2. Vista general del dispositivo:
1
3
3
5
6
4
7
12
9
10
2
3
8
11
1. Pantalla e-ink 16 grises.
2. Botón de Encendido/Apagado: presione y mantenga por unos segundos
para encender, apagar o reiniciar el dispositivo.
3. Teclas para Avanzar/Retroceder página:
> Página siguiente
< Página anterior
4. Seleccionar/Aceptar: toque las flechas arriba, abajo, derecha e izquierda
para mover el cursor en la pantalla.
5. Inicio: toque para ir a la pantalla inicial.
6. Menú: toque para mostrar el menú de opciones en pantalla.
7. Volver: presione una vez para regresar a la pantalla anterior, presione y
mantenga para ir al menú inicial.
8. Teclado: presione para mostrar/ocultar el teclado.
9. Ranura para tarjeta MicroSD.
10. Conector Mini USB: para carga de batería y transferencia de datos.
11. Botón Reset (al dorso del dispositivo): Utilice un elemento punzante para
tocar el boton y restablecer el dispositivo a su configuración original de
fábrica (puede perder toda su información).
12. Luz indicadora de carga de la batería.
4
3. Especificaciones de funcionamiento.
3.1. Encender / Apagar el lector:
Presione y mantenga por 3 segundos el botón de Encendido/Apagado para iniciar el
lector. Tomará unos segundos para encenderse y que termine de cargar los
contenidos.
- Si por alguna razón el lector no se enciende, seguramente requiere una carga
completa de la batería.
Para apagar el dispositivo nuevamente, presione el botón de Encendido/Apagado
por 3 segundos nuevamente.
3.2 Carga de la batería:
Es necesario cargar la batería del lector antes de utilizarlo por primera vez o cuando
el nivel de batería sea bajo.
Para cargar el lector, utilice el conector MicroUSB ubicado en la parte inferior del
dispositivo (ver el plano en la sección anterior de este manual).
El proceso de carga es lógicamente más corto si el dispositivo se encuentra en
reposo, tomará aproximadamente unas 4 horas realizar una carga completa de la
batería.
El estado de la batería se muestra en la esquina superior derecha de la pantalla,
como a continuación:
Batería
Baja
Cargando
5
Carga
completa
3.3 Importar contenidos:
Desde un ordenador:
El lector puede almacenar ficheros transferidos por USB.
Para importar contenidos al lector (tanto ebooks como fotos), conéctelo a su
ordenador mediante el cable USB proporcionado.
Una vez conectado exitosamente al ordenador, el lector entrará en modo USB. Toda
operación será detenida y el dispositivo no podrá ser utilizado durante el proceso de
transferencia de archivos.
En su ordenador (PC, Mac o Linux), ubique la unidad correspondiente al lector y haga
doble click en ella para abrirla.
Arrastre archivos y administre los ficheros tal como lo haría con un disco externo USB
o pendrive.
Desde una tarjeta de memoria MicroSD:
Utilice una tarjeta de memoria MicroSD de hasta 16 GB de almacenamiento.
Inserte correctamente la tarjeta de memoria con los contactos metálicos apuntando
hacia abajo, tal como se ilustra a continuación. Empuje la tarjeta hacia adentro de la
ranura, oirá inmediatamente un click cuando la tarjeta quede bien sujeta en el lector.
Para removerla otra vez, será necesario que empuje brevemente la tarjeta hasta que
haga contacto con el fondo de la ranura para que sea expulsada.
NOTA: la tarjeta debe estar formateada en FAT o FAT 32.
6
Cuando la tarjeta es insertada o removida, tomará algunos segundos para cargar los
datos.
Evite insertar o retirar una tarjeta SD mientras otra operanción esta en curso. Esto
podría ocasionar que el sistema se congele. No remueva la tarjeta de memoria si está
ejecutando su contenido. Esto detendrá la operación y ocasionará que el dispositivo
se reinicie.
3.4 Importar contenidos DRM:
El lector soporta contenidos de tipo Adobe DRM. Requerirá tener instalado el
programa Adobe Digital Editions (ADE) en su ordenador para poder transferir este
tipo de archivos.
NOTA: Adobe es una marca registrada de Adobe Systems Inc.
3.5 Instalando Adobe Digital Editions en su ordenador:
- El programa ADE se encuentra precargado en el lector.
- Conecte el lector a su ordenador mediante el cable USB proporcionado y ejecute el
lector como si fuera una unidad de almacenamiento externo.
- Asegúrese de que su ordenador esté conectado a Internet antes de comenzar el
proceso de instalación.
- Haga doble click en el archivo “digitaleditions_172” para ejecutar el instalador.
- También puede descargarlo desde:
http://www.adobe.com/es/products/digital-editions/download
- Si es la primera vez que utiliza el servicio de Adobe, deberá crear una cuenta de
usuario en la web.
- Ingrese sus datos como se indica allí y complete la registración.
3.6 Autorizar su ordenador y el lector:
Una vez registrado, regrese a la ventana de ADE. Introduzca su usuario y contraseña
para acceder.
Después de la activación, con el lector conectado a su ordenador, ADE realizará la
detección del dispositivo y comenzará el proceso de autorización.
Completada la autorización del lector, este será reconocido por ADE y los contenidos
del lector se mostrarán en las ventanas ubicadas a la izquierda de la pantalla de su
ordenador.
7
Ahora puede empezar a descargar o comprar ebooks desde cualquier tienda de
libros digitales con soporte para Adobe DRM.
Los libros comprados se almacenarán en su ordenador dentro de la carpeta [Mis
Ediciones Digitales] Dentro de [Mis Documentos].
3.7 Transferir ebooks DRM al lector:
Desde el menú del programa ADE, haga click en [Todos los Documentos] En la
columna de la izquierda de la ventana.
Los documentos dentro de la carpeta [Mis Ediciones Digitales]. Serán enlistados
debajo, en la ventana izquierda.
Seleccione los elementos que desee transferir al lector, use la tecla <Shift> + <botón
izquierdo del ratón> para seleccionar varios títulos.
Arrastre y suelte los elementos seleccionados dentro de la unidad correspondiente
al lector, ubicada en la última fila de la columna izquierda.
NOTA: Cada cuenta de usuario ADE soporta hasta 6 dispositivos conectados, esto incluye
el dispositivo maestro (el lector) y los dispositivos esclavos (tarjeta de memoria MicroSD).
Cuando un dispositivo es restablecido a su configuración original de fábrica, su
contenido se borra (incluyendo los documentos DRM) y será necesario autorizarlo
nuevamente con su cuenta de usuario de ADE.
Si usted excede el numero de dispositivos autorizados en ADE, verá un mensaje de
advertencia. Usted puede solicitar una extensión de las autorizaciones desde aquí:
http://www.adobe.com/support/digitaleditions/
Requerirá el ingreso de sus datos de usuario del servicio.
8
3.8 Pantalla de inicio:
Al encender el dispositivo, verá la pantalla de inicio.
Seleccione el ebook que desee leer para comenzar. El elemento seleccionado
aparecerá subrayado en pantalla. Presione el botón “Inicio”, la tecla con el icono de la
casa, para volver a esta pantalla en cualquier momento.
1. Leyendo
Muestra el último libro leído. Seleccione esta opción para continuar la lectura desde
la misma página en que la dejó.
2. Historial de lectura
Los libros leídos recientemente aparecerán aquí.
3. Indicador de batería
Indica el estado de carga actual de la batería.
4. Hora y Fecha
Muestra la hora y fecha actual (pueden ser configuradas desde el menú de
Configuración).
5. Añadidos recientemente
Muestra el último ebook añadido al dispositivo.
9
3.9 Menú Principal:
En la pantalla principal, toque la tecla “Menú” para ingresar al Menú Principal.
Con el cursor, seleccione una opción y toque “Aceptar” (botón ubicado en el centro
del cursor de selección).
Presione “Volver” para salir del Menú Principal.
Entrar a la biblioteca.
Lista de marcadores.
Explorador de archivos.
Visor de fotos.
Configuración del sistema.
Lista de libros favoritos.
Buscar libros.
3.10 Teclado en pantalla:
Utilice el teclado en pantalla para escribir texto como se muestra en la imagen a
continuación.
Para ingresar texto, toque el botón para habilitar el teclado en pantalla (tecla
ubicada en la esquina inferior derecha del dispositivo - número 8 en el esquema de
funciones, página 3 -.
10
A. Números / puntuación / símbolos
B. Método de entrada de texto
C. Barra espaciadora
D. Suprimir
E. Enter / Aceptar
F. Hecho (guarda el teclado)
3.11 Biblioteca:
Desde el Menú Principal, seleccione “Biblioteca” .
- Escoja un libro para comenzar a leer.
- Use el cursor (Arriba/Abajo) para recorrer la lista de ebooks.
- Toque los botones Próxima Página / Página Anterior (ubicados a los costados del
dispositivo) para cambiar la página del ebook que está leyendo.
- Desde el menú Principal, seleccione Ver para cambiar el modo de visualización, hay
dos modos: lista / portada.
- Los formatos de texto soportados por el lector son: txt, pdf, epub, pdb, fb2, html, rtf
y mobi.
3.12 Buscar libros en la biblioteca:
Utilice la función de búsqueda para buscar el libro que desee en su biblioteca.
- Desde el Menú Principal pulse el botón MENÚ, seleccione “Buscar”. El sistema
mostrará la barra de búsqueda y el teclado.
- Escriba el nombre del libro que desea encontrar, utlilizando el cursor y la tecla
“Aceptar” para ingresar los caracteres. Una vez que haya concluído, toque “Hecho” en
el teclado para confirmar.
11
NOTA: después de escribir el nombre de un libro, también puede presionar el botón de teclado en el
lector para ocultar el teclado. Si hace esto, es necesario tocar “Aceptar” (botón ubicado en el centro del
cursor de selección), para iniciar la búsqueda.
3.13 Leer ebooks:
Los libros transferidos al lector serán guardados en el dispositivo. Los formatos de
texto soportados por el lector son txt, pdf, epub, pdb, fb2, html, rtf y mobi.
Desde la pantalla de inicio o la biblioteca, utilice los botones de selección para mover
el cursor en pantalla y elegir el libro que desea leer. Finalmente, toque “Aceptar” para
abrir el ebook y comenzar a leer.
La imágen a continuación muestra los elementos que verá en pantalla:
Nombre del
documento
Página Actual/
Total
Añadido a
Favoritos
12
Hora
Indicador de batería
Página Marcada
3.14 Cambiar la página:
Mientras está leyendo la página de un ebook, toque la tecla “Avanzar Página” (>),
ubicada a los lados del lector, para pasar a la próxima página. Para regresar a la página
anterior toque el botón “Retroceder Página” (<).
3.15 Usar el menú de opciones durante la lectura:
Durante la lectura, toque el botón “Menú” para ver las opciones en pantalla. El menú
se divide en 2 páginas, seleccione “<” para “>” para ver ambas partes del menú:
1. Configuración de decodificación
2. Agregar marcador
3. Marcadores
4. Tabla de contenidos
5. Ir a la página
6. Búsqueda
7. Tamaño de letra
8. Tipo de letra
9. Margen
10. Rotar pantalla
11. Agregar a favoritos
12. Pase automático de página
13. Refresh Mode
14. Reflow
15. Acerca del libro
NOTA: puede que las opciones no aparezcan en este mismo orden.
13
1. Configuración de decodificación: si aparecen caracteres ilegibles, deberá
seleccionar manualmente el esquema de decodificación correcto de la lista.
En el menú Configuración de decodificación, pulse los botones Arriba / Abajo para
seleccionar el esquema de decodificación apropiado.
2. Agregar marcador: seleccione esta opción para agregar la página que está
leyendo a la lista de marcadores. El icono del marcador aparecerá en la esquina
superior derecha de la pantalla indicando que la página ha sido marcada.
3. Marcadores: desde el menú de opciones, seleccione “Marcadores” para entrar a la
lista de páginas marcadas en el libro que está leyendo.
4. Tabla de contenidos: en el menú de opciones, seleccione la “Tabla de contenidos”
para mostrar el contenido del ebook que está leyendo.
5. Ir a página: puede dirigirse a una página determinada utilizando la opción Ir a
página. En este menú, escriba el número de la página que desea ver usando el teclado
en pantalla y pulse el botón “Enter”, a continuación pulse aceptar.
6. Búsqueda: desde el menú de opciones, seleccione “Buscar”, introduzca las palabras
que desee encontrar en el ebook y pulse el botón “Enter” del teclado en pantalla, a
continuación pulse aceptar.
7. Tamaño de letra: desde el menú de opciones, seleccione esta opción para ajustar
el tamaño de fuente. Hay 6 tamaños de fuente disponibles: pequeña, mediana, grande,
X-grande, XX-grande, XXX-grande.
Seleccione el tamaño de fuente que desee y pulse el botón “Enter” para confirmar.
8. Tipo de letra: seleccione esta opción para ajustar el tipo de letra del ebook que lee.
Las opciones disponibles son: serif, sans Serif.
Seleccione la opción deseada y después pulse el botón Enter para confirmar.
9. Margen: desde el menú de opciones, seleccione esta opción para fijar el margen de
la página. La opciones disponibles aquí son: pequeño, mediano, grande.
14
10. Rotar pantalla: esta opción permite girar la orientación de la pantalla.
11. Agregar a Favoritos: puede añadir libros a su lista de favoritos. En el menú de
opciones, mueva el cursor hasta “Agregar a Favoritos” para añadir el libro actual a su
lista de Favoritos. El icono aparecerá en la esquina superior izquierda.
- Para ver los libros en la lista de favoritos, desde el menú principal, seleccione
Favoritos.
- Para ordenar los libros en lista de Favoritos, pulse el botón ”Menú” para seleccionar el
método de clasificación.
- Para quitar el libro de Favoritos, desde el libro que desea remover, pulse el botón
“Menú” y seleccione “Eliminar favorito”,
12. Pase automático de página: seleccione esta opción para activar el pase
automático de página. Las opciones disponibles para esta función son: desactivado, 5
segundos, 15 segundos, 30 segundos, 1 minuto. Seleccione la opción deseada y
después pulse el botón “Enter” para confirmar.
13. Refresh mode: seleccione esta opción para establecer el modo de actualización
de la página. Las opciones disponibles son: actualización completa, actualizar cada 3
páginas, actualizar cada 5 páginas, salir. Seleccione la opción deseada y después pulse
el botón “Enter” para confirmar.
14. Reflow: con esta opción puede activar el ajuste de líneas a la pantalla.
15. Acerca del libro: esta opción le permite ver la información del libro o documento
que está leyendo, como por ejemplo el título, el autor, la editorial, etc.
3.16. Fotos:
Desde el menú principal, seleccione “Fotos” para entrar en la galería de fotos.
Dentro de la galería, pulse el botón “Menú” y luego seleccione “Ordenar” para elegir
un método de clasificación de las imágenes. Presione “Ver” para cambiar el modo de
visualización de las fotos entre lista o miniaturas.
15
Para desplazarse por los archivos y carpetas, utilice los botones “Arriba” / “Abajo”.
Pulse las teclas Página Anterior / Siguiente para cambiar de página.
Ver una foto:
En la galería de fotos, mover el cursor hasta la foto deseada, y luego presione el botón
“Enter” para verla en pantalla completa.
En el modo de pantalla completa, pulse las teclas Página Anterior / Siguiente para ver
la imagen anterior y siguiente.
Menú de opciones:
En el modo de pantalla completa, pulse el botón “Menú” para mostrar el menú de
opciones, pulse “Salir” del menú de opciones para cerrar.
Rotar una imagen:
Puede girar la imagen de acuerdo con su punto de vista. En el modo de pantalla
completa, pulse “Menú” y después ”Rotar”. Cada vez la opción “Rotar” sea pulsada, la
imagen girará 90 grados.
Zoom, acercar o alejar una imagen:
Para realizar un acercamiento en la foto, en el modo de pantalla completa, pulse Menú
y después “Zoom”. Podrá cambiar entre diferentes niveles de zoom.
Para volver al tamaño original de la imágen, pulse el botón “Volver” .
Presentación de diapositivas:
En el modo de pantalla completa, pulse “Menú” y después “Presentación” para
empezar.
En el menú desplegable, seleccione el tiempo de desplazamiento para ajustar la
duración de las diapositivas.
Para detener la presentación de diapositivas, pulse “Menú” y después “Detener
Presentación”.
16
Pulse el botón “Volver” para regresar a la lista de fotos.
Acerca de la imagen:
En el modo de pantalla completa, pulse “Menú” y después “Acerca de la imagen” para
ver la información sobre el nombre de la foto, sus dimensiones, el tipo de archivo, etc.
3.17 Explorador de archivos:
Desde el menú principal, seleccione “Explorador de archivos”.
Pulse los botones Arriba/Abajo para desplazarse por la lista de archivos.
Pulse la teclas Página anterior / siguiente para cambiar la página
Usando el menú de opciones:
En la pantalla de la lista de archivos, pulse el botón “Menú” para acceder al menú de
opciones disponibles.
Buscar archivos en el explorador de archivos:
En la lista de archivos, pulse “Menú” y luego “Búsqueda” para que aparezca el teclado
en pantalla. Escriba el nombre del libro usando los botones de dirección y el botón
“Aceptar” ubicado en el panel. Finalmente luego pulse el botón “Enter” en el teclado
para confirmar.
Borrar un archivo:
Desde el “Explorador de archivos”, seleccione los archivos que desee borrar
Pulse “Menú” y después “Borrar” para mostrar la opción de borrado, seleccione “Sí”
para confirmar la eliminación del archivo.
NOTA: es posible que tarde más tiempo en eliminar los archivos si son demasiados o si su
tamaño es grande.
17
3.18 Configuración:
Desde el menú principal, pulsando el botón menú, podrá acceder a las siguientes
configuraciones:
1 Configuración de energía
Esta opción le permite activar / desactivar el encendido o apagado automático y el
modo reposo. También es posible seleccionar el tiempo para la ejecución de estas
funciones.
2 Fecha y hora
Desde aquí es posible ajustar la fecha y la hora del dispositivo. Para hacerlo,
pulse los botones izquierda / derecha para mover el cursor entre opciones.
Para ajustar el valor deseado en cada caso, use los botones arriba / abajo.
3 Idioma del sistema
Establece el idioma del sistema.
Seleccione “Sí” para confirmar, seleccione la opción “No” para cancelar sin guardar las
modificaciones.
4 Formato de dispositivo
Formatea el dispositivo. Los datos y libros en el lector se borrarán completamente.
5 Configuración predeterminada
Esta opción restaura la configuración del lector a los valores predeterminados.
Se restablecerán todos los ajustes de fábrica y se borrarán todos los contenidos de
DRM y su información de activación. Usted deberá autorizar su lector nuevamente a
través de la web de Adobe Digital Editions una vez que el sistema sea restaurado.
6 Información del dispositivo
Esta opción permite ver información acerca del lector, como por ejemplo la versión
del firmware, el estado de la tarjeta de memoria interna / SD y así sucesivamente.
7 Información de autorización DRM
Muestra la información de autorización DRM para el dispositivo.
18
3.19 Manual de usuario
A través de esta opción, acceda en cualquier momento al manual de usuario del
lector.
3.20 Modo de encendido:
Seleccione que quiere que se muestre en pantalla cada vez que inicie el dispositivo.
3.21 Especificaciones técnicas:
6" 800 X 600 4:3
CPU ARM 9 + DSP
64 MB RAM
4 GB NAND
1500 mAh
Formatos soportados (eBook):
EPUB, PDF, TXT, FB2, PDB,DOC,DJVU
Formatos soportados (imagen): JPG, BMP, GIF, PNG
Tamaño: 166 x 124 x 9.2 mm.
Peso: 212 g. aprox.
19
4. Solución de Problemas.
El dispositivo no enciende.
- Puede estar agotada la carga de la batería,.
- Cargar el dispositivo utilizando el cable USB al menos durante una hora. Presione el
botón de ENCENDIDO (POWER).
- Si el eBook está conectado a un ordenador, desconectarlo y presionar POWER.
- Reinicie el dispositivo presionando el botón RESET.
- Podría ser necesaria una actualización del firmware a la última versión disponible en
la web.
La duración de la batería parece poca.
- Asegurar que las cargas de la batería que se realicen sean completas al 100%.
- La batería no ha sido cargada completamente. Cargar el dispositivo durante al menos
cinco horas.
- La temperatura ambiente es demasiado baja. el funcionamiento óptimo de la batería
es posible solo en temperaturas superiores a los 5 grados.
No es posible leer o abrir un eBook.
- Verificar que el formato del eBook sea compatible con el dispositivo.
El dispositivo no funciona durante la conexión USB.
- No es posible usar el dispositivo mientras está conectado a un ordenador para evitar
daños en la memoria interna o en la tarjeta MicroSD.
La tarjeta MicroSD no es detectada.
- Si después de insertar la tarjeta no hay respuesta, retirar e intentar nuevamente.
- No sacar la tarjeta durante la carga de datos para evitar daños permanentes en la
misma.
- Realizar un backup de la información y después formatear la tarjeta. Intentar
nuevamente la lectura de la misma.
- Verificar que la tarjeta sea de tipo MicroSD de hasta 32 GB de almacenamiento.
20
WELCOME TO THE UNUSUAL UNIVERSE
24
25
28
43
1. Precautions
- Do not charge the battery if it´s damaged.
- Avoid hitting or throwing the device.
- Do not use the device on extremely cold, hot or wet enviroments. Avoid exposing
the ebook reader to direct sunlight.
- Do not use the device near electromagnetic or electrostatic fields.
- If the device happens to be splashed with water or any liquid, turn it off immediately
and dry it with a cloth. Wait until it´s totally dry to turn it back on.
- Avoid using abrasive products such as alcohol to clean the device. Use only a wet
cloth.
- Do not try to repair the device by yourself, it will avoid the warranty provided.
- If MicroSD el dispositivo no responde, retírela e intente nuevamente.
- Do not eject the MicroSD or turn off the device during data processing, it could
cause software and hardware damages.
- Make sure that the MicroSD card is unlocked for thata writing before inserting it to
the device.
- Backup your data oftenly. Nvsbl Unusual Technology SL. is not responsible for any
lose of important data.
RECYCLE:
Do not thorugh this device or any of its parts to the garbage.
Ask at your local council about the possibilities for proper disposal without
compromising the environment. The cardboard box, the plastic contained in the
packaging as well as the component parts of the device can be recycled in
accordance with the laws of Spain.
When the equipment has reached the end of its useful life, it must be brought to
collection centers (eg municipal clean points).
24
Note: This manual and the device could be modified at any time without previous
notification. If by any chance this manual is not in correspondance with the device, please
consider the device as standar.
2. Product Introduction
2.1. Introduction.
Thank you for choosing our ebook. The following sections provide an overview of
your new device and its basic features. Please read everything carefully before
starting to use the product.
25
2.2. General view of the device:
1
3
3
5
6
4
7
12
9
10
2
26
8
11
1. E-ink screen with 16 shades of gray.
2. On / Off button: press and hold for some seconds to turn on / off or to
restart the device.
3. Next / Previous page:
> Turn to the next page
< Go back to the previous page
4. Select / Accept: touch up / Down / Left / Right keys to move the cursor on
screen.
5. Home: touch to go to the main screen.
6. Menu: touch to show the menu available on screen.
7. Back: press one time to go back to the previous screen or press and hold
to go to the main menu.
8. Keyboard: presione para mostrar / ocultar el teclado.
9. MicroSD card slot.
10. Mini USB port: use it to charge the battery of the device and for data
transfer.
11. Reset button (at the back of the device): use a thin and long item to
touch it and restablish the original device settings from factory (you can
loose all the data stored on the device).
12. Battery status indication light.
27
3. Operation
3.1. Power On and Off the Reader.
Press and hold the Power button for 3 seconds to turn
on reader.
- It may take a few moments for reader to turn on and
load the content.
3.2 Charging the battery of the reader:
-You need to charge the reader prior to using it for the first time or when battery
power is low.
- Charge the reader using the MicroUSB port located at the bottom of the device
(see the diagram on the previous section of this manual).
- Please turn the reader to standby mode to shorten the charging process.
It will take about 4 hours to fully charge the reader in standby mode .
- When the reader enters into standby mode, press the Power button to wake up the
reader.
- The battery status is displayed at the top right corner. The status is shown as below:
Low
Battery
Charging
28
Fully
Charged
3.3 Importing contents:
From Computer
The Reader supports USB Mass Storage Device function.
To import contents (ebooks, photo etc) into the reader, connect the reader to PC via
the supplied USB cable.
Upon successful connection to PC, the reader will enter USB mode and all operation
will be halted.
Go to [My Computer], double click on the reader’s disk to open.
Perform the file management operation as you do with any external USB device.
From memory card
This unit supports micro micro SD card up to 16GB.
Insert the card correctly with the contact pin facing downwards as illustrated below.
Pushing the card in, then you should hear a click when the reader is seated correctly.
You may damage the card and the reader if micro SD card is not inserted correctly.
To remove micro SD card, push the card once again until it contact the back of the
slot.
Note: the card must be formatted as FAT or FAT32.
29
When the card is inserted or removed, it will take several seconds to load.
Please avoid inserting or ejecting the card when other operation is running as this
may cause the system hang.
Do not remove the card if the content inside the card is being played. This will halt
the operation of the reader and cause the reader to restart.
3.4 Importing DRM contents:
The Reader supports Adobe DRM contents. Adobe Digital Editions (ADE) is required.
NOTA: Adobe is a trademark of Adobe Systems Inc.
3.5 Installing Adobe Digital Editions (ADE) in your computer:
- The ADE installer is preloaded into the Reader.
- Connect the Reader to PC via the supplied USB cable and open the reader as
removable disk. Go to [My Computer], double click on the reader’s disk to open.
- Make sure your computer is connected to internet
- Double click on the [digitaleditions_172] file to open the installer.
- Alternatively, you can download the installer from the web:
http://www.adobe.com/products/digital-editions/download.html
- For a first time user, you will need to get a free adobe ID from adobe website. click
on the [get an Adobe ID online].
- Enter your email address and complete the online form as per instructed.
3.6 Authorizing your computer and reader:
Upon registration, return to the ADE window. Enter the user name and password to
activate your Adobe account.
After activation, connect the Reader to PC. ADE will detect the Reader and you are
prompted to authorize device.
Once authorized, you will be able to find the Reader recognized in ADE. The contents
inside the Reader will be displayed on the right hand windows. You can now start
downloading or buying ebooks from online ebook stores supporting Adobe DRM.
Purchased or downloaded ebooks will be stored in [My Digital Editions] in [My
Documents].
30
3.7 Transferir DRM ebooks to the reader:
From ADE menu, click on [All Items] on the left hand column.
Items in [My Digital Editions] will be listed down in right window.
Select the desired item(s) to be transferred, <Shift> + <Left click> to select multiple
files.
Drag and drop the selected item(s) into the Reader’s Drive located on the last row of
the left side column.
NOTE: Each ADE ID supports only 6 devices, this includes the master device (the reader)
and the slave device ( micro SD card).
When the reader is restored to default settings, ALL DRM activation record and data
(including DRM books purchased) will be erased from the reader. You are required to
authorize the device with your ADE ID again.
To request for extension and reset of your ADE ID, go to
http://www.adobe.com/support/digitaleditions/
Then select [Submit a web case]. You´ll need to enter your ADE ID info.
31
3.8 Home screen:
When the reader is turned on, it will enter the Home screen.
Select the desired book to open. Selected item will be underlined.
Press the Home button anytime to return to the Home screen.
1. Now Reading
Display last read book. Press the Enter button to open the last read page.
2. Reading history
The recently read ebooks will be saved into Reading history, you can also read books
from here.
3. Battery Indicator
Indicate battery status during operation.
4. Time & Date
Display current time and date, you can set this from the [Settings].
5. Just added
This option displays the last book added to the reader.
32
3.9 Main menú:
On the home screen, press the Menu button to display the Main menu.
Press the Directional buttons to select the desired item, then press the Enter button
to enter.
To exit from Main menu, press the Return button to exit.
Enter into book library.
Enter into Bookmarks list.
Enter into File Explorer for advanced file
Management.
Enter into photo viewer.
Enter into system setting
Enter into Favourite book list.
Seach for the desired books in library.
3.10 On screen keyboard:
Use the onscreen keyboard as shown below to enter
text.
To enter text, press the keyboard button on the panel (number 8 on page 3). The
following is an illustration of the keyboard on screen:
33
A. Numeric / Punctuation/ Symbol key
B. Input method key
C. Space key
D. Backspace key
E. Enter key
F. Done key
3.11 Book Library:
From Main menu, select Library to enter book library.
- In the book library, select a book to start reading.
- Use the Directional-up/down button to scroll the e-book list.
- Press the Page up/down button to turn page.
- From Main menu, select View by to change view mode(List/Thumbnail mode).
- Supports txt, pdf, epub, pdb, fb2, html, rtf and mobi formats.
- On the book library, books are sorted by author, title, recently read, newly added,
favourite etc..
- Press the Menu button, then select Sort by to choose a sorting method (list or
covers).
- Select the desired book to start reading.
3.12 Buscar libros en la biblioteca:
Use search feature to search for your desired books in the library.
- From Main menu, select Search to display a search bar and the keyboard.
Type the book name by using the directional buttons and Enter button at the panel,
then press the Enter Button on the keyboard to confirm.
34
Note: After typing the book name, you can also press the Keyboard button to hide the
onscreen keyboard, then press the Enter button to start searching.
3.13 Reading ebooks:
Books transferred to Reader will be saved in the device.
Reader supports eBooks in txt, pdf, epub,pdb, fb2, html, rtf, mobi format.
From home screen or book library, use the Directional buttons to move the cursor to
select book and press the Enter button to open.
La imágen a continuación muestra los elementos que verá en pantalla:
Document
name
Current Page/
Total
Added to
Favorites
35
Time
Battery status
Bookmarked page
3.14 Page turning:
On reading page, press the Page down/Directional-Right button to turn to next page.
To turn to previous page, press Page up/Directional-Left button.
3.15 Using Option Menu in Reading
In reading page, press the Menu button to display the option menu screen. The
option menu will be divided into two pages. Press on “<” or “>” to turn page, options
available:
1. Decode settings
2. Add Bookmark
3. Bookmarks
4. Table of contents
5. Go to page
6. Search
7. Font size
8. Font type
9. Margin
10. Rotate Screen
11. Add to favorites
12. Auto flip
13. Refresh Mode
14. Reflow
15. About book
36
1. Decode settings: if garbled characters are displayed, you are required to manually
select the correct decode scheme from the list.
In the Decode Settings menu, press Directional-up/down button to select the
appropriate decode scheme.
2. Add Bookmark: from option menu, select Add Bookmark to add bookmark for the
current bookpage. And the icon will appear on the top right corner.
3. Bookmarks: from option menu, select Bookmarks to enter Bookmark List of the
current book.
4. Table of contents: from Option menu, select Table of contents to show the ebook’s
table of contents.
5. Go to page: You can jump to pages using the Go to Page option. In the Option
Menu, select Go to Page. In Go to Page menu, type page number by the onscreen
keyboard and press the Enter button on the onscreen keyboard, then press Go.
6. Search: from option menu, select Search to search for the desired words through
the current ebook.
Enter the the desired words and press the Enter button on the screen keyboard, then
press OK.
7. Font size: From option menu, select Font size to adjust font size.
There are 6 font sizes available: Small, Medium, Large, X-Large, XX-Large, XXX-Large.
Select the desired font size, then press Enter button to adjust the font size.
It will take several seconds for the fonts to be resized.
8. Font type: from option menu, select Font type to set the font type of the reading
ebook. Options available: Serif and Sans Serif.
Select the desired option, then press the Enter button to confirm.
37
9. Margin: From option menu, select Margin to set page margin. Options available:
Small, Media, Large. Select the desired option, then press the Enter button to confirm.
10. Rotate screen: from option menu, select Rotate screen to rotate the display
orientation To return to original orientation, press Return once again.
11. Add to Favourites: you can add books to your Favorite List. In Option menu, move
the cursor to Add to Favorites to add current book into Favorite List. The star icon will
appear on the top left corner.
- To view books in Favourite List, from Main menu, select Favourites.
- To sort books in Favourite list, press the Menu button to select sorting method.
- To remove book from Favorite, from reading page, press the Menu button and select
Delete Favorite from the Option Menu.
12. Auto flip: from option menu, select Auto Flip to set Auto Flip mode. The auto flip
duration available are: disabled, 5 Seconds, 15 Seconds, 30 Seconds, 1 Minute.
Select the desired option, then press the Enter button to confirm.
13. Refresh mode: from option menu, select Refresh mode to set refresh mode,
options available are: Full refresh, Refresh every 3 pages, Refresh every 5 pages, Exit.
Select the desired option, then press the Enter button to confirm.
14. Reflow: this option lets you adjust the text line width to the screen.
15. About book: From option menu, select About the book to display the book
information, such as book title, name, author, publisher etc.
3.16. Photos:
From Main menu, select Pictures, and enter into the Photo viewer.
In photo library, press the Menu button, then select Sort by to choose a sorting
method.press View by to set List mode/Thumbnail mode.
Use the Directional-up/down button to navigate through the files/folders.
Press the Page up/down button to turn page.
38
Viewing a photo:
In photo library, move the cursor to the desired photo, then press the Enter button on
the selected photo to view a full screen display.
In full screen mode, press the Directional buttons / Page up/down button to view
previous and next picture.
Using the option menu:
In full screen mode, press the Menu button to display the option menu; press Exit
from the option menu to close.
Rotate an image:
You can rotate the picture according to your view. In full screen mode, press Menu
and then Rotate. Each time you press the Rotate button, the picture will be rotated by
90 degrees.
Zoom in and out on a picture:
To zoom in picture, in full screen mode, press Menu > Zoom to change different zoom
level. To return to original size, press the Return button and resume normal operation.
Slideshow:
In full screen mode, press Menu Slideshow to start. From the drop down menu, select
slide time to adjust slideshow duration.
To stop slideshow, press Menu > Slideshow > Off.
Press Return button to return to photo list.
About the picture:
In full screen mode, press Menu > About picture to display the information about
photo name,dimension, file type.
39
3.17 File explorer:
From Main menu, select Explorer to enter file explorer.
Press the Directional-up/down button to scroll through the file list.
Press the Page up/down button to turn page.
Using the option menu:
On file list screen, press the Menu button to use the option menu.
Searching for the files in file explorer:
In file list, press Menu > Search to bring up the onscreen keyboard.
Type the book name by using the directional buttons and Enter button at the panel,
then press the Enter button on the keyboard to confirm.
Deleting a file:
From File Explorer, select the desired files to be deleted
Press Menu > Delete to display a deletion screen, select Yes to delete.
Note: it may take longer time to delete files with big file size and quantity.
40
3.18 Settings:
From the main menu, touch the button “Menu” to see the following options:
1. Power Settings:
To enable/disable auto power off/ sleep mode, also set the time for the auto power
off/sleep mode.
2. Date & Time:
To set the clock and date, time
Press the Directional-left/right button to move the cursor.
Press the Directional-up/down button to adjust the desired value.
3. System Language:
To set system language for the reader.
Select YES to confirm, select NO to cancel the setting.
4. Format Device:
Formats the device to delete the data in the reader.
5. Default Settings:
To restore the Reader’s settings to defaults.
All settings will be restored. All DRM contents and activation will be deleted. You are
required to authorize the reader again through ADE after system restored.
6. Device Information:
Displays product information about the reader, such as Firmware version, Internal/SD
card memory status and so on.
7. DRM Authorization information:
Displays DRM authorization information on the reader.
3.19. User manual:
Press to view the user manual of BK6008C ebook reader.
41
3.20 Power on setting: select what you prefer to see on screen when the device is
turned on.
3.21 Technical specifications
6" 800 X 600 4:3
CPU ARM 9 + DSP
64 MB RAM
4 GB NAND
1500 mAh
Supported eBook formats:
EPUB, PDF, TXT, FB2, PDB,DOC,DJVU
Supported image formats: JPG, BMP, GIF, PNG
Size: 166 x 124 x 9.2 mm.
Weight: 212 g. aprox.
42
4. Troubleshooting.
The device hang or cannot be switched on.
- If battery has been fully deplete the device will not have enough capacity to power
on.
- Charge the device using the USB cable at least for one hour. Press the POWER
button.
- If you have the eReader connected to the computer, please disconnect and press
the POWER button.
- Restart the device by pressing the Reset button.
- As last resource we recommend you to update the firmware with the last version
available in our website.
Battery capacity seems short.
- The battery was not used for a long time. Please charge the device completely.
- The battery is not fully charged. Please charge the device for at least 5 hours.
- The operating temperature is below 5oC. this is due to the characteristics of battery
and not a malfunction.
Cannot read/open an ebook.
- Check if the ebook format is supported by device.
The device cannot be operated during micro USB connection.
- The device cannot be operated while it is transferring data to a computer to
prevent any damage on reader internal memory or micro SD card.
MicroSD card is not detected.
- After inserted a micro SD card, if your device is has no response, please take out and
insert again.
- Do not remove micro SD card or turn off during data writing or reading to prevent
damage to data and your device.
- Backup your files and data before formatting the micro SD card. Please format the
micro SD card.
- Your eReader only can read micro SD cards up to 32 GB.
43
VISITE NUESTRA WEB Y DESCUBRA
LOS MEJORES ACCESORIOS PARA SU TABLET.
VISIT OUR WEBSITE AND DISCOVER THE BEST
ACCESORIES FOR YOUR DEVICE.
FUNDAS DE CUERO
LEATHER CASES
X-MINI
La marca de altavoces portátiles
número 1 en el mundo.
X-MINI
The worlds number one brand of
portable mini speakers.
Gracias por elegir Nuestros Productos ;)
THANKS FOR CHOOSING OUR PRODUCTS ;)
[email protected]
[email protected]
Para más información y soporte visite:
For more information and support, visit:
@Unusualtech
Unusualtech
www.unusual-tech.com