1
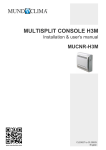
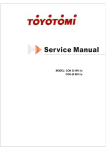
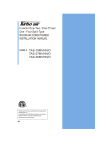
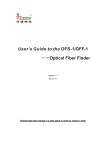
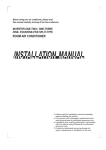
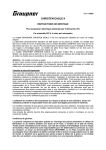
MANUAL DE USUARIO
Maquina de Consola Multi Inverter
MODELO : MUCNR-HLM
FUNCIONAMIENTO TEMPORIZADOR
Presione la tecla de TEMPORIZADOR ENCENDIDO y
TEMPORIZADOR APAGADO para configurar el autoapagado.
1. Configurar la hora de inicio
1.1 Presiona la tecla TEMPORIZADOR ENCENDIDO, después el
controlador remoto mostrará TEMPORIZADOR ENCENDIDO,
la última hora de inicio de funcionamiento y la letra “h” en la
pantalla. Después puede volver a configurar la hora de inicio
de funcionamiento.
1.2 Pulse la tecla de TEMPORIZADOR ENCENDIDO de nuevo
para configurar la hora de inicio deseada.
1.3 Después de configurar el TEMPORIZADOR ENCENDIDO,
habrá un retraso de medio segundo antes de que el
controlador remoto transmita la señal al aire acondicionado.
Después de unos 2 segundos, la letra “h” desaparecerá y la
temperatura configurada volverá a aparecer en la pantalla.
2. Configurar la hora de parada
2.1 Pulse la tecla TEMPORIZADOR APAGADO y el controlador
remoto mostrará TEMPORIZADOR APAGADO. Aparecerá la
última hora configurada y la letra “h” en la pantalla.
2.2 Pulse la tecla de TEMPORIZADOR APAGADO para configurar
la hora a la que quiere que la unidad se detenga.
2.3 Después de configurar TEMPORIZADOR APAGADO, habrá un
retraso de medio segundo antes de que el controlador
transmita la señal al aire acondicionado.
Después de unos 2 seg. la letra “h” desaparecerá y la
temperatura configurada volverá a aparecer en la pantalla
digital.
3. Configuración de hora de inicio y de parada
3.1 Pulse la tecla de TEMPORIZADOR ENCENDIDO. El
controlador remoto mostrará TEMPORIZADOR ENCENDIDO.
Aparecerá una “h” en la pantalla y la indicación del inicio del
funcionamiento. Ahora puede volver a ajustar la hora a la que
quiere que empiece a funcionar.
3.2 Pulse la tecla de TEMPORIZADOR ENCENDIDO de nuevo
para configurar la hora a la que quiere que empiece a
funcionar.
3.3 Pulse la tecla de TEMPORIZADOR APAGADO. El controlador
remoto mostrará TEMPORIZADOR APAGADO.
La última hora configurada para la parada del funcionamiento y
la letra “h” aparecerá en la pantalla. Ahora puede volver a
configurar la hora de apagado de la unidad.
3.4 Pulse la tecla TEMPORIZADOR APAGADO de nuevo para
ajustar la hora a la que quiere que detenga su funcionamiento.
3.5 Después de ajustar el TEMPORIZADOR, habrá medio segundo
de retraso antes de que el controlador remoto transmita la
señal al aire acondicionado.
Después de unos 2 seg. aproximadamente, la letra “h”
desaparece y el reajuste de temperatura reaparecerá en la
pantalla.
Cambio de TEMPORIZADOR
Para cambiar el TEMPORIZADOR a ENCENDIDO/APAGADO,
pulse la tecla correspondiente y reajuste la hora.
Para cancelar el TEMPORIZADOR, ponga el temporizador en 0:00
! NOTA
La hora de configuración es aproximada, ya que hay un ligero
retraso con respecto a la hora real.
Advertencia
1 Asegurese de que no hay obstáculos entre el controlador remoto
y el receptor de la unidad interior. De lo contrario el aire
acondicionado no funcionará.
2 Mantenga el controlador remoto alejado de cualquier líquido.
3 Proteja el controlador remoto de las temperaturas altas y de la
exposición a la radiación.
4 Mantenga el receptor interno fuera del alcance de la luz solar.
Podría causar averías en la unidad de aire acondicionado.
5 Mantenga el controlador remoto alejado de la IEM (Interferencia
Electromagnética) que provocan otros electrodomésticos.
6 Cuando cambie las pilas, no utilice pilas usadas u otra clase de
pilas. Puede causar averías al controlador remoto.
7 Si no usa el controlador remoto durante algunas semanas,
quítele las pilas. De lo contrario, puede haber goteos que dañen
el controlador remoto.
8 La vida media de las pilas con un uso normal debería ser de 6
meses aproximadamente.
9 Sustituya las pilas cuando no haya respuesta de la unidad
interior o si el indicador de transmisión falla al iluminarse.
10 No deseche las pilas como residuos municipales sin clasificar.
Es necesario recoger estos residuos por separado.
Especificaciones del controlador remoto
Modelo
R51D/E,R51D/CE
Voltaje calibrado
3.0V(Pilas Alcalinas secas LR03# 2)
Voltaje más bajo de
emisión de señal CPU
2.0V
Distancia de transmisión
8m (con voltaje 3.0, alcanza 11m)
Ambiente
。
-5C 60 C
~
Características de las teclas del controlador remoto
SET TEMPERATURE(OC)
AUTO
COOL
DRY
HEAT
2
FAN
HIGH
MED
LOW
TEMP.
8
1
MODE
3
4
9
ON/OFF FAN SPEED
10
SWING ECONOMIC TIMER ON
RESET LOCK
AIR
CLEAR
DIRECTION EAR
TIMER OFF
LED
DISPLAY POWERFUL
11
12
5
13
6
15
14
*
7
Fig. 1
NOTA:
* : Indica tecla opcional
*
*
1
Tecla TEMP
interior.
: Presione esta tecla para reducir la temperatura
Tecla TEMP
: Presiones esta tecla para aumentar la
temperatura interior.
3 Tecla de selección de MODO: Cada vez que presione la tecla, el
modo de funcionamiento cambia siguiendo la dirección de la flecha
2
AUTO
!
4
COOL
DRY
HEAT
FAN
NOTA: El modelo FRÍO sólo no tiene modo CALOR
Tecla de modo SWING: Pulse esta tecla para activar el modo
SWING de las aletas horizontales. Vuelva a pulsar para detenerlo.
Tecla REINICIO: Cuando pulse la tecla REINICIO, todos los
ajustes anteriores quedan cancelados y el control vuelven a
la configuración inicial.
6 Tecla de DIRECCIÓN DE AIRE: Presione esta tecla para cambiar
el ángulo de movimiento SWING de las aletas. El ángulo SWING
de las aletas es de 6º. Cuando está configurado de modo que
pueda afectar la refrigeración y calefacción del aire acondicionado,
cambiará automáticamente en la dirección swing. No aparecerá en
la pantalla ningún símbolo cuando pulse esta tecla
(especificación no válida para unidades sin esta función)
5
7
Tecla de LED: Pulse esta tecla para borrar el dígito que se muestra
en el aire acondicionado, pulse de nuevo para activarlo
(Especificación no disponible en unidades sin pantalla de LED).
8
Tecla de VELOCIDAD DEL VENTILADOR: Se usa para seleccionar
la velocidad del ventilador en 4 fases: AUTO, BAJA, Med, Alta.
Cada vez que presione la tecla el modo de velocidad cambia.
9 Tecla ENCENDIDO/APAGADO: Pulse esta tecla para poner en
funcionamiento y púlsela de nuevo para detener el funcionamiento.
10 TEMPORIZADOR ENCENDIDO: Presione esta tecla para iniciar
la secuencia. Cada vez que pulse, el tiempo configurado
aumentará en bloques de 30 minutos. Cuando la configuración
muestra 10:00 cada vez que pulse, el tiempo aumentará en
bloques de 60 minutos. Para cancelar este programa de
temporizador, ajuste la hora en 0:00.
11 Tecla REPOSO: Pulse esta tecla para poner el modo de ahorro
de energía. Pulse de nuevo para cancelar. Esta función solo puede
usarse en modo FRÍO, CALEFACCIÓN y AUTO para mantener la
temperatura que le resulte más cómoda.
!
NOTA:
Mientras la unidad este funcionando en modo REPOSO,
si pulsa cualquier otra tecla, el modo quedará cancelado.
Tecla TEMPORIZADOR: Presione esta tecla para iniciar la
secuencia de autoapagado.. Cada vez que pulse la tecla,
aumentará el tiempo en bloques de 30 minutos. Cuando haya
configurado 10:00, cada pulsación aumentará el tiempo en bloques
de 60 minutos.
Para cancelar el programa de temporizador, ajuste la hora en 0:00.
13 Tecla BLOQUEO: Cuando presione la tecla BLOQUEO todos los
ajustes quedarán bloqueados y el controlador remoto no acepta
ninguna operación excepto la de BLOQUEO. Pulse nuevamente
para cancelar el modo BLOQUEO.
14 Tecla TURBO: Presione esta botón para activar/cancelar la función
turbo que permite a la unidad alcanzar la temperatura establecida
en un periodo muy corto de tiempo. En el modo de refrigeración
la unidad sacará aire frío con una velocidad de ventilación muy
alta. En modo calefacción, válido cuando la unidad tiene PTC, el
PTC calentará el funcionamiento de la calefacción.
12
15
Tecla de AIRE LIMPIO (algunos modelos): Cuando presione este
botón, el ionizador o colector de polvo de plasma (según modelo)
recoge energía y contribuye a quitar el polen y las impurezas del
aire.
indicadores en pantalla
Display Panel
1
3
2
4
4
7
5
TIMER ON/ OFF
6
Fig. 2
1
Área de PANTALLA DIGITAL: Esta área mostrará la temperatura
configurada y, si está en modo TEMPORIZADOR, mostrará los
ajustes ENCENDIDO y APAGADO del TEMPORIZADOR. Si está
en modo VENTILADOR, no aparecerá nada.
2
Indicador de TRANSMISIÓN: Este indicador parpadea una vez
cuando el controlador remoto transmite señal a la unidad interior.
indicador ENCENDIDO/APAGADO: Este símbolo aparece
cuando la unidad se enciende y desaparece cuando la unidad se
apaga.
4 Indicador de MODO FUNCIONAMIENTO: cuando presione la
tecla MODO, aparece el modo de funcionamiento en uso (AUTO,
FRÍO, SECO, CALEFACCIÓN o VENTILADOR).
3
Indicador de BLOQUEO: se muestra BLOQUEO al pulsar la tecla
de BLOQUEO, Presione el botón de BLOQUEO para dejar la
pantalla libre.
6 Indicador TEMPORIZADOR PANTALLA: muestra la configuración
del TEMPORIZADOR. Es decir, si configura únicamente la hora
de comienzo del TEMPORIZADOR, aparecerá TEMPORIZADOR
ENCENDIDO. Si solo ha configurado la hora del apagado,
aparecerá TEMPORIZADOR APAGADO. Si se han configurado
ambas horas, aparecerá TEMPORIZ. APAGADO/ENCENDIDO
que indica tanto la hora de comienzo como la de finalización.
7 Indicador VELOCIDAD VENTILADOR: Presione la tecla
VELOCIDAD DEL VENTILADOR para elegir la configuración
deseada (Auto, Baja, Media o Alta), La opción elegida, calvo Auto,
se mostrará en la ventana LCD.
5
NOTA:
Los símbolos en la figura 2 son a modo de indicación. Durante el
funcionamiento real de la unidad, estos se muestran en la pantalla.
Funcionamiento del cont. remoto
Colocación o cambio de pilas.
The Remote Controller uses two alkaline dry batteries(LR03X2).
El controlador remoto usa dos pilas alcalinas (LR03X2)
1. Para colocar las pilas, deslice la tapa del compartimento de
pilas y colóquelas según la dirección de los polos mostrada en
el controlador remoto (+ y -).
2. Para cambiar las pilas usadas siga el mismo procedimiento
mencionado arriba.
FUNCIONAMIENTO AUTOMÁTICO
Conecte la alimentación eléctrica y la indicación de
FUNCIONAMIENTO empezará a parpadear. Después de 6
parpadeos, se apagará
1. Use la tecla MODO para seleccionar AUTO
2 Pulse la tecla TEMP para establecer la temperatura ambiente
deseada. La configuración de temperatura más agradable
oscila entre 21º y 28º C.
3 Pulse la tecla ENCENDIDO/APAGADO para poner en marcha
el aire acondicionado. Se enciende la luz de
FUNCIONAMIENTO en la pantalla. Automáticamente se
configura la velocidad del ventilador.
4 Pulse la tecla ENCENDIDO/APAGADO para parar el
funcionamiento de la unidad.
!
NOTA:
1. En el modo AUTO, naturalmente el aire acondicionado puede
variar entre FRÍO, VENTILADOR y CALEFACCIÓN según la
percepción de diferencia entre la temperatura real de la
habitación y la temperatura del controlador remoto.
2 Si el modo AUTO no le resulta cómodo, puede seleccionar
otro modo manualmente.
FUNCIONAMIENTO FRIO/CALOR y FUNCIONAMIENTO
VENTILADOR
1. Si el modo AUTO no resulta cómodo, puede cambiar la
configuración manualmente usando FRÍO, CALOR, o modo
VENTILADOR.
2 Pulse la tecla TEMP para configurar la temperatura deseada
de la habitación. Cuando esté en modo FRÍO, la configuración
más agradable es a partir de 21ºC. Cuando este en modo de
CALEFACCIÓN la configuración mas agradable es 28ºC o
menor.
3 Pulse VELOCIDAD DEL VENTILADOR para escoger el modo
AUTO, ALTA, MED o BAJA
4 Pulse la tecla ENCENDIDO/APAGADO, la luz de
funcionamiento se enciende y el aire acondicionado funciona
con la configuración deseada. Pulse la tecla
ENCENDIDO/APAGADO de nuevo para detener el
funcionamiento de la unidad.
!
NOTA:
El modo VENTILADOR no puede controlar la temperatura.
Mientras este en este modo, sólo podrá llevar a cabo los pasos
1, 3 y 4
FUNCIONAMIENTO SECO
1. Pulse la tecla MODO para seleccionar SECO.
2 Pulse la tecla TEMP para configurar la temperatura deseada,
de 21ºC a 28ºC.
3 Pulse la tecla ENCENDIDO/APAGADO, la luz de
FUNCIONAMIENTO se enciende y el aire acondicionado
empieza a funcionar en modo SECO con velocidad del
ventilador BAJA. Pulse la tecla de ENCENDIDO/APAGADO
nuevamente para detener el funcionamiento de la unidad.
!
NOTA:
Debido a la diferencia de temperatura de la unidad y la
temperatura interior del aire acondicionado cuando esta en modo
SECO, funcionará automáticamente muchas veces sin encender
el modo FRÍO o VENTILADOR.
OWNER’ S MANUAL
Consola Multi Inverter
MODEL : MUCNR-HLM
Remote Controller Specifications
Model
R51D/E,R51D/CE
Rated Voltage
3.0V(Alkaline dry batteries LR03×2)
Lowest Voltage of CPU
Emitting Signal
Reaching Distance
Signal Range
Environment
8m (when using 3.0 voltage,
it Gets 11m)
。
-5C 60 C
2.0V
~
Introduction of Function Buttons on the Remote Controller
1
2
SET TEMPERATURE(OC)
4
AUTO
COOL
DRY
HEAT
FAN
HIGH
MED
LOW
8
3
TEMP.
5
MODE
ON/OFF FAN SPEED
9
SWING ECONOMIC TIMER ON
RESET LOCKTIMER OFF
AIR DIRECTION
10
POWERFUL
11
6
12
7
13
Fig. 1
TIMER Operation
TIMER ON button can set the auto-on time of the unit.. TIMER
OFF button can set the auto-off time of the unit.
1. To set the starting time.
1.1 Push the TIMER ON button, then the remote controller shows
TIMER ON , the last set time for the starting operation and the
signal "h" will be shown on the DIGITAL DISPLAY area. You
are now ready to reset the time to START the operation.
1.2 Push the TIMER ON button again to set desired unit start
time.
1.3 After setting the TIMER ON ,there will be a one-half second
delay before the remote controller transmits the signal to
the air conditioner. Then, after approximately another 2
seconds, the signal "h" disappears and the set temperature
will re-appear on the digital display.
2. To set the stopping time.
2.1 Push the TIMER OFF button and the remote controller will
show TIMER OFF, the last set time for the stopping operation
and the signal "h" will be shown on the DIGITAL DISPLAY area.
You are now ready to reset the time of the STOP operation.
2.2 Push the TIMER OFF button again to set the time you want to
stop the operation.
2.3 After setting the TIMER OFF ,there will be a one-half second
delay before the remote controller transmits the signal to
the air conditioner. Then, after approximately another 2
seconds, the signal "h" disappears and the set temperature
will re-appear on the digital display.
3. Set the starting & stopping time
3.1 Push the TIMER ON button, the remote controller will show
TIMER ON, the last set time for START operation and
the signal "h" will be shown on the DIGITAL display area. You
are now ready to readjust the TIMER ON to start the operation.
3.2 Push the TIMER ON button again to set the time you want to
start the operation.
3.3 Push the TIMER OFF button, the remote controller will show
TIMER OFF, the last set time for STOP operation and
the signal "h" will be shown on the DIGITAL display area. You
are now ready to reset the time to STOP operation.
3.4 Push the TIMER OFF button again to set the time you want to
stop the operation.
3.5 After setting the TIMER, there will be a one-half second delay
before the remote controller transmits the signal to the Air
Conditioner. Then , after approximately another 2 seconds, the
set temperature will re-appear on the digital display .
Change the TIMER
To change the TIMER ON/OFF time, just press the corresponding
TIMER button and reset the time.
! NOTE
The setting time is relative time. That is the time set is based
on the delay of the current time.
Warning
1. Be sure there are no obstacles between the remote controller
and the receiver of indoor unit otherwise the air conditioner
will not work.
2. Keep the Remote Controller away from any liquids.
3. Protect the remote controller from the high temperatures and
exposure to radiation.
4. Keep the indoor receiver out of direct sunlight or the Air
Conditioner may malfunction.
5. Keep Remote Controller away from EMI(Electro-Magnetic
Interference) supplied by other household appliances.
6. When replacing batteries, do not use old batteries or a different
type battery. This may cause the remote control to malfunction.
7. If you do not use the remote controller for several weeks
remove the batteries. Otherwise battery leakage may damage
the remote controller.
8. The average battery life under normal use is about 6 months.
9. Replace the batteries when there is no answering beep from
the indoor unit or if the Transmission Indicator light fails to light.
1
TEMP Button
: Press the button to decrease the indoor
temperature setting.
2 TEMP Button
: Press the button to increase the indoor
3
temperature setting.
ON/OFF Button: Push this button to start the unit operation.
4
Push the button again to stop the unit operation.
MODE Select Button: Each time you push the button, a mode
is selected in a sequence that goes from AUTO、COOL、
DRY、HEAT and FAN, as the following figure indicates:
AUTO
COOL
DRY
HEAT
!
FAN
NOTE: COOL only model has no HEAT feature.
5
SWING Button: Push this button, the louver would swing up
6
and down automatically. Push again to stop it .
RESET Button: When the RESET button is pushed, all of
the current settings are cancelled and the control will return to
the initial settings.(Use a φ1mm little round stick to push the
7
button )
AIR DIRECTION Button: Push this button, the louver can be fixed
at a desired angle. The louver swing(upward or downward) to
a certain angle for each press. When the louver swing at an angle
which would affect the cooling and heating efficiency of the air
conditioner, it would automatically change the swing direction
8
(upward or downward).
FAN SPEED Button: This button is used for setting Fan Speed
in the sequence that goes from AUTO、LOW 、MED to HIGH,
then back to Auto.
9
TIMER ON Button: Press this button to preset the time ON(start
to operate). Each press will increase the time ON setting in 30
minutes increments. When the setting time displays 10:00, each
press will increase the time ON setting in 60 minutes increments.
10
11
To cancel the time ON program, simply adjust the time ON to 0:00.
ECONOMIC RUNNING Button: Press this button to go into the
Energy-Saving operation mode. Press the button again to cancel.
TIMER OFF Button: Press this button to preset the time OFF
(turn off the operation). Each press will increase the time OFF
setting in 30 minutes increments. When the setting time displays
10:00, each press will increase the time OFF setting in 60
minutes increments. To cancel the time OFF program, simply
adjust the time OFF to 0:00
12
LOCK Button: Push this button to lock in all the current
settings. To release settings, push again. (Use a φ1mm little
round stick to push this button )
13
POWERFUL Button: Press this button on cooling/heating mode
to go into powerful cooling (heating)operation.Press again to
cancel it.
Note: The unit will automatically revert back to the previous
operational mode after continuously operating under the
powerful cooling mode.
Names and Functions of indicators on Remote Controller
Display Panel
1
2
3
4
4
5
6
TIMER ON/ OFF
7
Fig. 2
1
DIGITAL DISPLAY area: This area will show the temperature
and, if in the TIMER mode, will show the ON and OFF settings
of the TIMER. It will automatically revert back to show the
temperature after 5 seconds. Under "FAN" operation mode,
nothing is shown in this area.
TRANSMISSION Indicator: This indicator flashes once when
remote controller transmits signals to the indoor unit.
3 ON/OFF Indicator: This symbol appears when the unit is turned
on by the remote controller, and disappears when the unit is
turned off.
4 OPERATION MODE Indicator: Shows the current operation
2
modes--"AUTO", "COOL", "DRY", "HEAT" and "FAN".
HEAT only available for heat pump model.
5
FAN SPEED Indicator: Press the FAN SPEED button to select
the desired fan speed setting (Auto-Low-Med-High). You selection
6
7
!
will be displayed in the LCD window except the Auto fan speed.
LOCK Indicator: This symbol appears when press the LOCK
button, and disappears when press it again.
TIMER ON/OFF Display: This display area shows the settings
of TIMER. That is, if only the starting time of operation is set, it
will display the TIMER ON. If only the turning off time of operation
is set, it will display the TIMER OFF. If both operations are set,
it will show TIMER ON/ OFF which indicates you have chosen
to set both the starting time and off time.
NOTE: All signs shown in the Fig.2 is for the purpose of clear
presentation. But during the actual operation only the relative functional items are shown on the display panel.
Operating the Remote Controller
Install/Replace Batteries
The Remote Controller uses two alkaline dry batteries(LR03X2).
1. To install the batteries, slide the back cover of the battery
compartment and install the batteries according the
direction (+and -)shown on the Remote Controller.
2. To replace the old batteries, use the same method as
mentioned above.
AUTOMATIC OPERATION
When the Air Conditioner is ready for use, switch on the
power and the OPERATION indicator lamp on the display panel
of the indoor unit starts flashing.
1. Use the MODE .select button to select AUTO.
2. Push the TEMP button to set the desired room temperature.
。
The most comfortable temperature setting are between 21 C
to 28oC.
3. Push the ON/OFF button to start the air conditioner. The OPERATION lamp on the display panel of the indoor unit lights. The
operating mode is AUTO FAN SPEED is automatically set
and there are no indicators shown on the display panel of the
remote controller.
4. Push the ON/OFF button again to stop the unit operation.
!
NOTE
1. In the AUTO mode, the air conditioner can logically choose
the mode of COOL, FAN , HEAT and DRY by sensing the
difference between the actual ambient room temperature and
the set temperature on the remote controller.
2. If the AUTO mode is not comfortable for you, the desired
mode can be selected manually.
COOL/ HEAT (Cooling only model without) and
FAN ONLY Operation
1. If the AUTO mode is not comfortable, you may manually override the settings by using COOL, HEAT or FAN ONLY modes.
2. Push the TEMP button to set the desired room temperature.
。
When in COOL mode, the most comfortable settings are 21 C
or above. When in HEAT mode, the most comfortable
。
settings are 28 C or below.
3. Push the FAN SPEED to select the FAN mode of AUTO, HIGH,
MED or LOW.
4. Push the ON/OFF button, the operation lamp lights and the air
conditioner start to operate as your settings. Push the ON/OFF
!
button again to stop this unit operation.
NOTE
The FAN ONLY mode can not be used to control the temperature.
While in this mode, only steps 1,3 and 4 may be performed.
DRY Operation
1. Push the MODE button to select DRY.
2. Push the TEMP button to set the desired temperature from
。
。
21 C to 28 C.
3. Push the ON/OFF button, the operation lamp lights and the air
conditioner start to operate in the DRY mode. FAN SPEED is
Low. Push the ON/OFF button again to stop this unit operation.
!
NOTE
Due to the difference of the set temperature of the unit and
the actual indoor temperature, the Air Conditioner when in
DRY mode will automatically operate many times without
running the COOL and FAN mode.
SALVADOR ESCODA S.A.
®
w w w. s a l va d o r e s c o d a . c o m
Provença, 392 pl.1 y 2 - 08025 Barcelona
Tel. 93 446 27 80 - Fax 93 456 90 32