Transcript
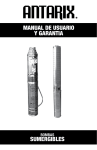
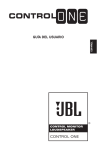
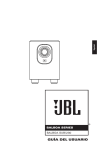
Spanish(Latin)
The "Ignore remaining ink gauge"
item in the Status and
Maintenance
cp 1160
The " Overriding the ink level
gauge" item in the Ink Delivery
System
○
○
○
○
○
○
○
○
officejet d series
1. ❈ Cuando se efectúe una recarga por primera vez luego de
que haya aparecido el mensaje “Sin tinta”:
q No haga la recarga a pesar de que haya aparecido el mensaje
“Sin tinta”; El procedimiento correcto es que ejecute el
comando “Cambiar el setup de la impresora (Multifunción y
todo en uno)” y luego continúe imprimiendo
❈ Nota : A pesar de que aparezca el mensaje “Sin tinta”, todavía
queda tinta en el cartucho y el cabezal.
w Para conocer los detalles de cómo ejecutar el comando
“Cambiar el setup de la impresora (Multifunción y todo en
uno)”, vea la guía de referencia de HP.
Ej)
Serie officejet d
El item “Ignore el nivel de tinta
remanente” en la parte de estado
y mantenimiento del cartucho.
cp 1160
El item “Desestime el nivel de tinta”
en el Sistema de Entrega de Tinta.
○
○
○
○
○
○
○
○
❈ Nota : Si ha extraviado la guía de referencia de HP, contacte
el servicio de soporte al cliente de HP.
e Cuando la tinta se haya acabado luego de imprimir en la manera
que se describe más arriba, proceda a realizar la recarga
siguiendo los procedimientos que se describen más abajo.
○
○
○
○
2. ❈ Cuando la tinta se ha agotado luego de seguir los
procedimientos descriptos más arriba, o cuando se
recargue un cartucho o un cabezal que ya habían sido
recargados observe lo siguiente:
◆ Precaución 1 : En cuanto se haya finalizado la ejecución del
comando “Cambiar el setup de la impresora (Multifunción y
todo en uno)”, se debe proceder a recargar tanto el cabezal
como el cartucho.
◆ Precaución 2 : Asegurese de mantener el siguiente orden en
el proceso de recarga “Recarga del cabezal ➔ Recarga
del cartucho ➔ Cambiar el setup de la impresora
(Multifunción y todo en uno)”.
Recarga del cabezal
Tal como se muestra en la figura, empuje la bolilla de metal que
se encuentra en la parte inferior del cabezal con la protuberancia
que se encuentra en la parte superior del dispositivo de recarga,
para que se haga un orificio de entrada de tinta.
Quite la tapa de la botella de tinta e inserte la aguja de recarga.
○
○
○
○
○
○
○
○
3. Inserte la aguja de recarga profundamente en el orificio de
entrada de tinta del cabezal, tal como se muestra en la figura.
Lentamente, inyecte 5 ml de tinta presionando el émbolo de la
botella de tinta. Luego, quite la botella del cartucho.
◆ Precaución 1: El volumen de tinta especificado es para un
cartucho completamente vacío.
◆ Precaución 2: Si se inyecta la tinta en demasiada cantidad o
demasiado rápido, puede volcarse o gotear.
4. Cierre completamente el orificio de entrada de tinta con la tapita
de goma que se le provee.
◆ Precaución : Si no cierra perfectamente el orificio de entrada de
tinta, puede perder tinta.
○
○
○
○
○
○
5. Tal como se muestra en la figura, introduzca el cabezal del
cartucho en el dispositivo de recarga, presione a fondo la parte
superior y cuando finalmente esté bien posicionado se escuchará
un click
6. Luego de dar vuelta el dispositivo de recarga, coloque la jeringa
de succión que se provee en el orificio de goma que está en la
parte superior de dicho dispositivo y lentamente extraiga aire
hasta que salgan 0,5 ml de tinta. Luego de esto quite la jeringa.
◆ Precaución: Para hacer esto, use la jeringa sin la aguja de recarga
y tenga especial cuidado que tanto el aire como la tinta que
saque no vuelvan a entrar al cartucho.
❈ Nota: Este procedimiento es para ajustar la presión interna en
el cartucho, y de esta manera mejorar la calidad de impresión.
○
○
○
○
7. Luego de dar vuelta nuevamente el dispositivo de recarga, quite
el cabezal del mismo y limpielo de cualquier exceso de tinta.
Luego instale el cartucho en la impresora.
❈ Nota : Si continúa saliendo tinta del cabezal luego de finalizar
con la recarga, repita el Paso 6. Si instalara el cartucho perdiendo
tinta, le puede ocasionar problemas de funcionamiento.
○
○
8. Recarga del cartucho
Ponga el cartucho apoyado sobre algunas hojas de papel suave.
Adhiera la etiqueta que se le provee sobre la etiqueta del
cartucho, prestando especial atención a la forma de la misma
para colocarla de la manera correcta.
○
○
○
○
○
○
○
○
○
○
○
○
○
○
○
○
○
○
10.Change Printer(multifunction and all-in-one) Setup
After installing the refilled head and cartridge in the printer, carry
out the Changing Printer (multifunction and all-in-one) Setup as
described in "Step 1".
Before using the printer, run the "Head Cleaning" process by
refering to the hp reference guide.
❈ Note : If the ink keeps on leaking from the nozzle after refilling or
the printout quality is not good enough, read the "Emergency
measures when problems occur after refilling" at the end of the
user manual and take the right steps.
○
○
○
9. Pierce the injection needle vertically to the ink injection inlet
position indicated on the figure until the sticker is penetrated.
Pull up the injection needle about 3mm backward, and slowly
inject 25 ml of ink for about 60 seconds by pressing the piston
of the ink container, then pull out the ink container. Clean the
excessive ink around the bottom of the cartridge, and install it in
the printer.
◆ Warning 1 : The ink volume specified above is for a completely
empty cartridge. If you inject ink too much or too quickly, it may
flow over or leak out.
◆ Warning 2 : When you install it with ink leaking, it may cause
printer to malfunction.
○
○
○
○
8. Cartridge Refill
Place the cartridge on a few sheets of tissue.
Attach the supplied injection inlet sticker on the label of the
cartridge cover while paying attention to the shape and direction.
○
○
○
7. After returning the refill clip to upright position, remove the head
and clean the excessive ink around the nozzle. Then install the
cartridge in the printer.
❈ Note : If the ink keeps on leaking from the nozzle after refilling,
repeat Step 6. When you install it with ink leaking, it may cause
printer to malfunction.
○
○
○
6. After turning the refill clip upside down, connect the supplied
syringe to the rubber hole of the refill clip, and slowly suck out
internal air until 0.5 ml of ink is filled in the syringe. Then pull out
the syringe.
◆ Warning : For the above step, do not connect the needle to the
syringe, and take special care that the withdrawn air and ink
does not flow back into the cartridge.
❈ Note : This procedure is for adjusting air pressure inside the
cartridge to improve print quality.
○
○
○
5. As shown in the figure, connect the head to the refill clip, and
push the upper part all the way in until it clicks into place.
○
○
4. Completely close the ink injection inlet with the supplied rubber
plug.
◆ Warning : If you do not close the ink injection inlet completely,
ink may leak out.
○
○
3. As shown in the figure, insert the injection needle deep into the
ink injection inlet on the head.
Then slowly inject 5 ml of ink by pressing the piston of the ink
container, and pull out the ink container.
◆ Warning : The ink volume specified above is for a completely
empty cartridge. If you inject ink too much or too quickly, it may
flow over or leak out.
○
○
○
Head Refill
As shown in the figure, push in the metal ball on the bottom of
the head with the projected part on the top of the refill clip to
create an ink injection inlet.
Open the cap of the ink container and connect the injection
needle.
○
○
2. ❈ When ink is exhausted after following the above
procedure or you refill the head and cartridge that
previously refilled :
◆ Warning 1 : Make sure to refill ink in order of "Head Refill ➔
Cartridge Refill ➔ Change Printer (multifunction and allin-one) Setup".
◆ Warning 2 : Once you have performed "change
printer(multifunction and all-in-one) setup", you must refill the
head as well as cartridge.
○
○
❈ Note : If you have lost your hp reference guide, contact hp
customer support center.
e When ink is exhausted after printing in the manner described
above, refill it by following the procedures described below.
○
○
○
○
○
Ex)
○
○
1. ❈ When refilling for the first time after "Out of Ink" message
has appeared:
q Do not refill even if "Out of Ink" message appears, but keep
printing after performing "Change Printer(multifunction and
all-in-one) Setup".
❈ Note : Even if "Out of Ink" message appears, actually there is
enough ink in the cartridge and head.
w For details on "Change printer (multifunction and all-in-one)
Setup", see hp reference guide.
○
English
○
an a e a recar a nktec
ZZZLQNWHFLEHULFDFRP
9. Perfore la etiqueta con la aguja de recarga, pasándola a través
del orificio de entrada de tinta que está indicado en la figura.
Luego, tire hacia atrás unos 3 mm la aguja de recarga e inyecte
25 ml de tinta lentamente utilizando en esta acción alrededor de
60 segundos presionando el émbolo de la botella de recarga.
Luego retire la botella de tinta. Limpie cualquier exceso de tinta
que pueda haber en la parte inferior del cartucho e instálelo en
la impresora.
◆ Precaución 1: El volumen de tinta especificado es para un
cartucho completamente vacío. Si se inyecta la tinta en
demasiada cantidad o demasiado rápido, puede volcarse o
gotear.
◆ Precaución 2 : Si instalara el cartucho perdiendo tinta, le puede
ocasionar problemas de funcionamiento.
10.Cambiar el Setup de la impresora (Multifunción y todo en uno)
Luego de que haya instalado el cabezal y el cartucho recargados
en la impresora, proceda a ejecutar el comando “Cambiar el
setup de la impresora (Multifunción y todo en uno)”, tal como se
describe en el Paso 1.
Antes de comenzar a usar la impresora haga correr una “limpieza
de cabezales” siguiendo los pasos que recomienda la guía de
referencia de hp.
❈ Nota : Si pierde tinta por los cabezales de impresión una vez
completada la recarga o la calidad de impresión no es buena,
lea las “Medidas de emergencia cuando ocurren problemas luego
de la recarga” en la parte final del manual del usuario, y siga sus
instrucciones paso a paso.
HPI-8611T