1
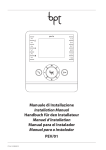
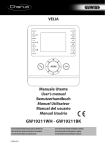
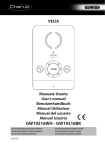
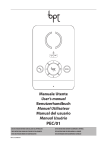
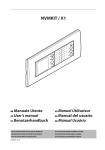
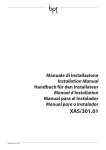
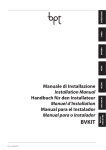
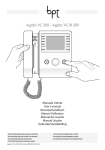
Manuale Utente
User’s manual
Benutzerhandbuch
Manuel Utilisateur
Manual del usuario
Manual Usuário
PEV/01
QUESTE ISTRUZIONI DEVONO ESSERE ALLEGATE ALL’APPARECCHIO
CETTES INSTRUCTIONS DOIVENT ACCOMPAGNER L’APPAREIL
THESE INSTRUCTIONS SHOULD BE ATTACHED TO THE APPARATUS
ESTAS INSTRUCCIONES SE DEBEN ANEXAR AL APARATO
DIESE ANLEITUNGEN MÜßEN JEDE GERÄT BEGLEITEN
ESTAS INSTRUÇÕES DEVEM ACOMPANHAR O APARELHO
08-02-12/24804041
IT
1÷8
EN
DE
ES
PT
Adjusting the ring
(high-medium-low)
Läutwerkeinstellung
(laut - mittel - leise)
Réglage sonnerie
(haut-moye-bas)
Regulación del timbre
(alto-medio-bajo)
Regulação dos sons
(alto-médio-baixo)
Luminosità 1
Brightness 1
Helligkeit 1
Luminosité 1
Luminosidad 1
Luminosidade 1
Saturazione colore 1
Saturation colour 1
Farb-Saturation 1
Saturation couleur 1
Saturación color 1
Saturação côr 1
Chiamata interni
Call receivers
Ruf Innensprechstellen
Appel des postes internes
Llamada internos
Chamada dos internos
Selezione interni da 5÷8
(LED verde)
Select receivers from 5÷8 Auswahl Innensprechstel- Sélection des postes inter- Selección internos de 5÷8 Seleção dos internos de 5 a
(green LED)
len von 5÷8 (grüne LED) nes de 5÷8 (LED verte)
(LED verde)
8 (LED verde)
Panico (LED rosso)
Panic (red LED)
Panik (LED rot)
Panique (LED rouge)
Pánico (LED rojo)
Pânico (LED vermelho)
Attivazione/Disattivazione Activating/De-activating Aktivierung/Abschaltung Activation/Désactivation Activación/Desactivación
comunicazione (LED blu) communication (blue LED) der Sprechstelle (LED blau) communication (LED bleu) comunicación (LED azul)
Activação/Desactivação
comunicação (LED azul)
Apriporta 2 (LED blu)
Door lock release 2
(blue LED)
Türöffner 2 (LED blau)
Abertura da porta 2
(LED azul)
Attivazione e selezione
posto esterno 3
Entry panel activation/
selection 3
Einschaltung und Auswahl Insertion et sélection poste Habilitación y selección
der Außenstation 3
extérieur 3
placa exterior 3
Inserção e selecção da
placa botoneira 3
Ausiliario 2/Chiamata
portiere (LED blu)
Auxiliary 2/Porter call
(blue LED)
Zusatz 2/Pförtnerruf
(LED blau)
Auxiliaire 2/Appel
concierge (LED bleu)
Auxiliar 2/Llamada
conserje (LED azul)
Auxiliare 2/Chamada
porteiro (LED azul)
Esclusione suoneria/Mute
(LED blu)
Disabling the ring/ Mute
(blue LED)
Läutwerkabschaltung/
Mute (LED blau)
Exclusion sonnerie/Mute
(LED bleu)
Inhabilitación del timbre/
Mute (LED azul)
Exclusão dos sons/Mute
(LED azul)
Ausiliario 1
Auxiliary 1
Zusatz 1
Auxiliaire 1
Auxiliar 1
Auxiliare 1 4
4
4
IT
1 La funzione è disponibile con video attivo.
2 In impianti predisposti per questa segnalazione,
durante una chiamata da posto esterno o in
autoinserimento, il LED accesso fisso indica che la
porta è aperta.
3 La funzione è disponibile solo quando la linea è
libera.
4 La funzione può essere disponibile anche quando
la comunicazione non è attiva se il sistema lo
permette.
FR
1 La fonction est disponible avec vidéo actif.
2�������������������������������������������������
Sur les installations prévues pour cette signalisation, durant un appel depuis poste externe ou
avec auto-insertion, la LED allumée de manière
fixe indique que la porte est ouverte.
3 La fonction n’est disponible que lorsque la ligne
est libre.
4 La fonction peut également être disponible lorsque la communication n’est pas active si le
système le permet.
2
FR
Regolazione suoneria
(alto-medio-basso)
4
Ouvre-porte 2 (LED bleu)
4
EN
1 The function is available with the video activated.
2 In systems designed to accommodate this signal,
during a call from an entry panel or in selfconnection, the LED lit permanently indicates that
the door is open.
3 The function is only available when the line is
free.
4 The function may also be available with communication is not activated, where the system
permits it.
ES
1 La función está disponible con vídeo activo.
2 En instalaciones preparadas para esta indicación,
durante una llamada desde placa exterior o en
autoactivación, el LED encendido fijo indica que
la puerta está abierta.
3 La función solo está disponible cuando la línea
está libre.
4 La función también puede estar disponible cuando la comunicación no está activa si el sistema lo
permite.
Abrepuerta 2 (LED azul)
4
DE
1 Die Funktion steht zur Verfügung, wenn der Bildschirm aktiviert ist.
2 Wenn die LED-Anzeige bei Anlagen, die über diese
Anzeige verfügen, während eines Anrufs von einer
Außenstation oder bei der automatischen Einschaltung aufleuchtet, bedeutet dies, dass die Tür offen ist.
3 Die Funktion steht nur zur Verfügung, wenn die
Kommunikation aktiviert ist.
4 Die Funktion kann auch dann zur Verfügung
stehen, wenn die Kommunikation nicht aktiviert
ist und das System es ermöglicht.
PT
1 A função está disponível com ecrã ativo.
2 Em sistemas preparados para esta sinalização,
durante uma chamada da placa botoneira ou
em auto-ativação, o LED acesso fixo indica que a
porta está aberta.
3 A função estará disponível somente quando a
linha estiver livre.
4 A função pode estar disponível mesmo quando
a comunicação não está ativa, se o sistema o
permitir.
IT Funzioni base - EN Standard functions básicas - PT Funções base
IT Rispondere ad una chiamata- EN Answer a callllamada- PT Atender uma chamada
DE
Freisprechbetrieb -
FR
Fonctions de base -
ES
Auf einen Anruf antworten -
FR
Répondre à un appel-
Responder a una
DE
ES
Funciones
IT
Rispondere ad una chiamata
EN
Answer a call
DE
Auf einen Anruf antworten
FR
Répondre à un appel
ES
Responder a una llamada
PT
Atender uma chamada
IT
Comunicazione attiva
EN
Communication active
DE
Aktive Kommunikation
FR
Communication active
ES
Comunicación activa
PT
Comunicação activa
IT
Interrompere l’audio con il posto esterno
EN
Interrupting the audio with the entry panel
DE
Unterbrechen des Audios mit Außenstation
FR
Interrompre l’audio avec le poste extérieur
ES
Cortar el audio con la placa exterior
PT
Interromper o áudio com a placa botoneira
IT
Apriporta del posto esterno visualizzato
EN
Entry panel door release displayed
DE
Türöffner der gezeigten Außenstation
FR
Ouvre-porte du poste extérieur visualisé
ES
Abrepuerta de la placa exterior visualizada
Abertura da porta da placa externa visualizada
PT
IT
Chiudere la comunicazione
EN
Ending communication
DE
Abstellen der Sprechverbindung
FR
Couper la communication
ES
Cortar la comunicación
PT
Fechar a comunicação
3
IT
PT
AutoinserimentoAuto-inserção
EN
Self-connection -
DE
x1
1
1
FR
Insertion automatique-
ES
2
Autoactivación-
IT
Premere il tasto
EN
Press the key
per attivare la comunicazione video con il posto esterno.
DE
Die Taste drücken
FR
Appuyer sur la touche
ES
Pulse el botón
para activar la comunicación vídeo con la placa exterior.
PT
Prima a tecla
para ativar a comunicação de vídeo com a placa botoneira.
to activate video communication with the entry panel.
, um die Video-Kommunikation mit der Außenstation zu aktivieren.
pour activer la communication vidéo avec le poste externe.
IT Con più posti esterni, premendo più volte il tasto
visualizzati in successione.
tutti i posti esterni video verranno
EN With more than one entry panel, press the key repeatedly
entry panels in sequence.
to display all the video
DE Sind mehrere Außenstationen vorhanden, so werden alle Außenstationen auf dem
Bildschirm nacheinander angezeigt, indem die Taste mehrmals gedrückt wird.
x2
1
Automatische Einschaltung -
FR Avec plusieurs postes externes, en appuyant plusieurs fois sur la touche
postes externes vidéo seront visualisés en succession.
ES Cuando hay varias placas exteriores, pulsando varias veces el botón
todas las placas exteriores de vídeo en sucesión.
2
PT Com várias placas botoneiras, premindo várias vezes a tecla
ras de vídeo serão visualizadas em sequência.
, tous les
se visualizarán
todas as placas botonei-
IT Per terminare premere due volte il tasto
o attendere la chiusura automatica della
comunicazione (max 60”)
EN To finish, press the key twice
or wait for communication to end automatically (max 60’’).
DE Um den Vorgang abzuschließen, zwei Mal die Taste
oder abwarten, bis die
Kommunikation automatisch beendet wird (max. 60 Sek.)
FR Pour terminer, appuyer deux fois sur la touche
ou attendre la fermeture automatique
de la communication (max 60”)
ES Para terminar pulse dos veces el botón
o espere a la interrupción automática de la
comunicación (máx. 60 seg.)
PT Para terminar, prima duas vezes a tecla
ou aguarde o fecho automático da
comunicação (máx. 60”)
x2
2
IT Funzioni disponibili durante una chiamata e autoinserimento - EN Functions available during a call and self-connection - DE
Funktionen, die während eines Anrufs und der automatischen Einschaltung zur Verfügung stehen - FR Fonctions disponibles durant
un appel et auto-insertion - ES Funciones disponibles durante una llamada y autoactivación - PT Funções disponíveis durante uma
chamada e auto-ativação
IT Attivazione comunicazione audio , apertura della porta del posto esterno selezionato
, e attivazione dei comandi ausiliari .In impianti predisposti per questa segnalazione, il LED accesso fisso indica che la porta è aperta .
EN Activation of audio communication , opening of the door of the selected entry panel
, and activation of the auxiliary controls . In systems designed to accommodate
this signal, the LED lit permanently indicates that the door is open .
DE Aktivierung Audio-Kommunikation , Öffnen der Tür von der ausgewählten Außenstation , und Aktivierung der Zusatzsteuerungen . Wenn die LED-Anzeige bei Anlagen, die über diese Anzeige verfügen, aufleuchtet, bedeutet dies, dass die Tür offen ist .
FR Activation de la communication audio , ouverture de la porte du poste externe
sélectionné et activation des commandes auxiliaires . Sur les installations prévues
pour cette signalisation, la LED allumée de manière fixe indique que la porte est ouverte .
ES Activación de la comunicación audio , apertura de la puerta de la placa exterior
seleccionada , y activación e los mandos auxiliares . En instalaciones preparadas
para esta indicación, el LED encendido fijo indica que la puerta está abierta .
PT Ativação da comunicação áudio , abertura da porta da placa botoneira selecionada
, e ativação dos comandos auxiliares . Em sistemas preparados para esta sinalização, o LED acesso fixo indica que a porta está aberta .
4
IT
ES
Esclusione Suoneria - EN Disabling the ring - DE Läutwerkabschaltung Deshabilitación del Timbre - PT Exclusão Campainha
FR
Exclusion de la Sonnerie
IT Per escludere la suoneria premere il pulsante
. Il LED relativo si accende. La suoneria sarà esclusa per qualsiasi tipo di chiamata; quindi la ricezione di una chiamata dal posto esterno attiva SOLO il video. Ripremere il pulsante per riattivare la suoneria
EN To disable the ring, press the button
. The relevant LED is lit The ring will be disabled for all call types; consequently, the
receipt of a call from the entry panel will ONLY activate the video. Press the button again to re-enable the ring.
DE Um das Läutwerk abzuschalten, die Taste
drücken. Die entsprechende LED leuchtet auf. Das Läutwerk ist für jede Art von
Anruf deaktiviert; Anrufe von der aktiven Außenstation können somit NUR über Video empfangen werden. Die Taste erneut
drücken, um das Läutwerk wieder zu aktivieren.
FR Pour exclure la sonnerie, appuyer sur le bouton
. La LED correspondante s’allume. La sonnerie sera exclue pour tout type
d’appel : par conséquent la réception d’un appel depuis le poste externe N’active QUE la vidéo. Appuyer de nouveau sur le bouton pour réactiver la sonnerie.
ES Para deshabilitar el timbre pulse el botón . El LED correspondiente se enciende. El timbre quedará deshabilitado para todo tipo de llamada; así pues, la recepción
de una llamada desde la placa exterior activa SOLO el vídeo. Vuelva a pulsar el botón para reactivar el timbre.
PT Para inibir a campainha prima o botão
. O LED correspondente acende-se. A campainha fica desabilitada para qualquer tipo de chamada; por isso a recepção
de uma chamada da placa botoneira ativa APENAS o ecrã. Prima novamente o botão para reativar a campainha
IT Funzione palleggio video - EN Video toggle function intercambio de vídeo - PT Função troca de ecrã
DE
Funktion Video-Übergabe -
FR
Fonction échange vidéo -
ES
Función
IT In caso di chiamata contemporanea su più derivati tutti squilleranno, ma il video verrà
attivato solo nei derivati configurati come “MASTER”. È comunque possibile trasferire la
visualizzazione su un derivato “SLAVE” premendo il tasto . Per entrare in comunicazione
audio con il posto esterno è sufficiente premere il tasto .
MASTER
SLAVE
EN In the case of a contemporary call on several receivers, they will all ring, but the video will
only be activated on the receivers configured as “MASTER”. It is nonetheless possible to transfer
the image to a “SLAVE” receiver by pressing the key . To open audio communication with
the entry panel, simply press the key .
DE Wenn ein Anruf gleichzeitig bei mehreren Sprechstellen eingeht, so klingeln zwar alle,
jedoch kann die Videoanzeige nur auf den Sprechstelle aktiviert werden, die als “MASTER”
konfiguriert sind. Um die Video-Anzeige trotzdem auf eine “SLAVE”-Sprechstelle zu
transferieren, die Taste drücken. Um die Audio-Kommunikation mit der Außenstation zu
aktivieren, die Taste drücken.
MASTER
SLAVE
FR En cas d’appel simultané sur plusieurs dérivés, tous sonneront, mais la vidéo ne sera
activée que sur les dérivés configurés comme “MASTER”. Il est dans tous les cas possible de
transférer la visualisation sur un dérivé “SLAVE” en appuyant sur la touche . Pour entrer en
communication audio avec le poste externe, il suffit d’appuyer sur la touche .
ES En caso de llamada simultánea en varios derivados, sonarán todos, pero el vídeo solo se
activará en los derivados configurados como “MASTER”. De todos modos, se puede transferir
la visualización a un derivado “SLAVE” pulsando el botón . Para establecer la comunicación
audio con la placa exterior basta con pulsar el botón
MASTER
SLAVE
PT Em caso de chamada contemporânea de vários derivados todos tocam, mas o ecrã só
é ativado nos derivados configurados como “MASTER”. No entanto, é possível transferir a
visualização para um derivado “SLAVE” premindo a tecla . Para entrar em comunicação
áudio com a placa botoneira é suficiente premir a tecla
5
IT
ES
IT
PT
Intercomunicazione - EN Intercommunication Intercomunicación - PT Intercomunicação
Chiamata agli interni Chamar os internos
EN
Call extensions -
DE
DE
Intercom-Funktion -
Innensprechstellen -
FR
FR
Intercommunication -
Appeler les postes intérieurs -
ES
Llamar a los internos
IT Per chiamare gli interni da 1 a 4 premere i pulsanti relativi; premere il pulsante
(LED acceso) per poter selezionare gli interni da 5 a 8.
EN Press the relative buttons to call extensions 1 to 4; press the button
select extensions 5 to 8.
(LED on) to
DE Um die Innensprechstellen 1 bis 4 anzurufen, die entsprechenden Tasten drücken;
zum Wählen der Innensprechstellen 5 bis 8 die Taste (LED eingeschaltet) drücken.
FR Pour appeler les postes intérieurs de 1 à 4, appuyer sur les boutons correspondants ;
appuyer sur le bouton (LED allumée) pour pouvoir sélectionner les intérieurs de 5 à 8.
ES Para llamar a los internos del 1 al 4 pulse los botones correspondientes; pulse el
botón (LED encendido) para poder seleccionar los internos del 5 al 8.
PT Para chamar os internos de 1 a 4 carregar os relativos botões; carregar o botão
(LED aceso) para poder seleccionar os internos de 5 a 8.
IT Dopo aver selezionato l’interno desiderato il derivato chiamante emetterà un tono
di linea libera, mentre il derivato chiamato squillerà con il tono scelto. Per attivare la
comunicazione audio è necessario premere il tasto del derivato chiamato.
EN After selecting the desired receiver, the caller will emit a line free tone, while the
receiver called will ring with the chosen tone. To activate audio communication, press
the key on the receiver.
PERLA 1
PERLA 1
PERLA 2
PERLA 2
PERLA 2
DE Nachdem die gewünschte Innensprechstelle ausgewählt ist, ertönt an der
anrufenden Sprechstelle ein Freiton, während an der angerufenen Sprechstelle der
ausgewählte Klingelton ertönt. Um die Audio-Kommunikation zu aktivieren, muss die
Taste der angerufenen Sprechstelle gedrückt werden.
FR Après avoir sélectionné l’interne souhaité, le dérivé appelant émettra une tonalité
de ligne libre, tandis que le dérivé appelé sonnera avec la tonalité choisie. Pour activer
la communication audio, il est nécessaire d’appuyer sur la touche du dérivé appelé.
ES Tras seleccionar el interno deseado, el derivado llamante emitirá un tono de línea
libre, mientras que el derivado llamado sonará con el tono elegido. Para activar la
comunicación audio se debe pulsar el botón del derivado llamado.
PERLA 1
PERLA 2
PERLA 2
PT Depois de selecionar o interno desejado, o derivado que chama emite um tom
de linha livre, enquanto o derivado chamado toca com o tom escolhido. Para ativar a
comunicação áudio é necessário premir a tecla do derivado chamado.
IT
Durante una conversazione fra interni una chiamata da posto esterno viene segnalata ai derivati da un beep ripetuto ogni 5”.
EN
During a conversation between receivers, a call from an entry panel is signalled to the receivers by a beep, which is repeated every 5”.
Ein während eines Gesprächs zwischen den Innensprechstellen eingehender Anruf von einer Außenstation wird an den Innensprechstellen mit einem wiederholten
Piepton von je 5 Sek. signalisiert.
DE
FR
Durant une conversation entre internes, un appel depuis poste externe est signalé aux dérivés par un bip répété toutes les 5”.
ES
Durante una conversación entre internos, si se produce una llamada desde placa exterior, se indica a los derivados mediante un pitido repetido cada 5 segundos.
PT
Durante uma conversa entre internos uma chamada proveniente da placa botoneira é sinalizada aos derivados por um bip repetido a cada 5”.
IT
L’accensione del LED verde per 2” e 3 beep successivi indicano che non è possibile effettuare chiamate perchè la linea è occupata.
EN
The green LED lighting up for 2” and 3 beeps in sequence indicate that calls cannot be made because the line is busy.
Das Aufleuchten der grünen LED für 2 Sek. und ein Piepton, der 3 Mal hintereinander ertönt, zeigen an, dass kein Gespräch geführt werden kann, da die Leitung
besetzt ist.
DE
FR
L’allumage de la LED verte pendant 2” et les 3 bips successifs indiquent qu’il est impossible d’effectuer des appels car la ligne est occupée.
ES
El encendido del LED verde durante 2 segundos y 3 pitidos consecutivos indican que no se pueden realizar llamadas porque la línea está ocupada.
PT
O acendimento do LED verde durante 2” e 3 bips sucessivos indicam que não é possível realizar chamadas, porque a linha está ocupada.
6
IT Trasferimento di chiamata Transferência de chamada
EN
Call transfer -
DE
Anrufumleitung -
FR
Transfert d’appel -
ES
Transferencia de llamada -
PT
IT Con una comunicazione attiva, selezionare l’interno al quale
si vuole trasferire la chiamata (il derivato chiamante emetterà un
tono di linea libera, mentre il derivato chiamato squillerà con il tono
scelto). Per attivare la comunicazione audio è necessario premere il
tasto del derivato chiamato.
PERLA 1
PERLA 2
Una volta stabilita la connessione audio con l’interno desiderato,
premere
per trasferire la chiamata. L’interno che riceve la
chiamata potrà ritrasferirla.
EN With an active communication, select the receiver you wish
to transfer the call to (the caller will emit a line free tone, while the
receiver called will ring with the chosen tone). To activate audio
communication, press the key on the receiver.
PERLA 1
PERLA 2
PERLA 2
Once the audio connection is established with the desired receiver,
press to transfer the call. The receiver of the call can transfer
it back.
DE Während das Gespräch aktiv bleibt, die Innensprechstelle
auswählen, an die der Anruf transferiert werden soll (an der anrufenden Sprechstelle ertönt ein Freiton, während an der angerufenen
Sprechstelle der ausgewählte Klingelton ertönt). Um die AudioKommunikation zu aktivieren, muss die Taste der angerufenen
Sprechstelle gedrückt werden.
PERLA 1
PERLA 1
PERLA 2
PERLA 2
PERLA 1
Nach Herstellung der Audio-Verbindung mit der gewünschten
Innensprechstelle, die Taste
drücken, um das Gespräch zu
transferieren. Das Gespräch kann dann auch von der angewählten
Innensprechstelle transferiert werden.
FR Avec une communication active, sélectionner l’interne auquel
on souhaite transférer l’appel (le dérivé appelant émettra une
tonalité de ligne libre, tandis que le dérivé appelé sonnera avec
la tonalité choisie). Pour activer la communication audio, il est
nécessaire d’appuyer sur la touche du dérivé appelé.
Une fois établie la connexion audio avec l’interne souhaité, appuyer
sur pour transférer l’appel. L’interne qui reçoit l’appel pourra
la retransférer.
ES Con una comunicación activa, seleccione el interno al que desea transferir la llamada (el derivado llamante emitirá un tono de línea libre, mientras que el derivado
llamado sonará con el tono elegido). Para activar la comunicación audio se debe pulsar el botón del derivado llamado.
Una vez establecida la conexión audio con el interno deseado, pulse
para transferir la llamada. El interno que recibe la llamada podrá volver a transferirla.
Com uma comunicação ativa, selecione o interno ao qual deseja transferir a chamada (o derivado que chama emite um tom de linha livre, enquanto o derivado
chamado toca com o tom escolhido). Para ativar a comunicação áudio é necessário premir a tecla do derivado chamado.
PT
Após ter estabelecido a conexão áudio com o interno desejado, prima
para transferir a chamada. O interno que recebe a chamada pode voltar a transferi-la.
7
IT Funzioni di Portineria- EN Porter Functions - DE Funktionen der Pförtnerzentrale Conciergerie - ES Funciones de Conserjería - PT Funções de Portaria
FR
Fonctions de
w
IT
Le funzioni descritte nel presente paragrafo sono disponibili solo in impianti dotati di postazione di portineria.
EN
The functions described in this paragraph are only available in systems featuring a porter station.
DE
Die in diesem Abschnitt beschriebenen Funktionen stehen nur bei Anlagen mit Pförtnerzentrale zur Verfügung.
FR
Les fonctions décrites dans le présent paragraphe ne sont disponibles que sur les installations équipées de poste de conciergerie.
ES
Las funciones descritas en este apartado solo están disponibles en instalaciones que incluyan puesto de conserjería.
PT
As funções descritas neste parágrafo estão disponíveis apenas em sistemas equipados com serviço de portaria.
IT Chiamata
call
n2 dal portiere porteiro
EN
Porter call -
DE
Pförtnerruf-
FR
call n2
Appel du concierge -
ES
Llamada del conserje-
IT
Premere il pulsante
EN
Press the button
DE
Zum Antworten die Taste
FR
Appuyer sur le bouton
ES
Pulse el botón
para responder.
PT
Prima o botão
para atender.
PT
Chamada do
per rispondere.
to answer.
drücken.
pour répondre.
IT Notifica di chiamata da portiere - EN Porter call notification - DE Rufmitteilung von der Pförtnerzentrale ES Aviso de llamada del conserje - PT Aviso de chamada do porteiro
concierge - CALL
ME
FR
Avis d’appel du
IT La notifica viene segnalata dall’accensione del LED Aux2 . Il led si
spegne quando si entra in comunicazione con il portiere.
CALL ME
EN The notification is signalled by the Aux2 LED lighting up . The LED is
turned off when communication with the porter is established.
DE Die Mitteilung wird durch das Aufleuchten der LED Aux2 signalisiert. Die LED erlischt, sobald eine Verbindung zum Pförtner hergestellt ist.
FR L’avis est signalé par l’allumage de la LED Aux2 . La led s’éteint
lorsque l’on entre en communication avec le concierge.
ES El aviso se indica con el encendido del LED Aux2 . El led se apaga
cuando se establece la comunicación con el conserje.
PT O aviso é sinalizado pelo acendimento do LED Aux2 . O led apaga-se
quando inicia a comunicação com o porteiro.
IT Richiesta di chiamata al portiere - EN Porter call request llamada al conserje- PT Pedido de chamada ao porteiro
DE
Pförtnerruf IT
call n2
8
FR
Demande d’appel au concierge -
Richiesta di chiamata al portiere
EN
Porter call request
DE
Pförtnerruf
FR
Demande d’appel au concierge
ES
Solicitud de llamada al conserje
PT
Pedido de chamada ao porteiro
ES
Solicitud de
IT
ES
Funzione del pulsante Panico - EN Function of the Panic button Función del botón Pánico - PT Função do botão Pânico
DE
Funktion der Paniktaste -
FR
Fonction du bouton Panique
IT Premere per almeno 1’’ il pulsante
fino alla ricezione della
segnalazione acustica (beep). Il LED rosso si accende alla conferma della
ricezione della segnalazione “Panico” da parte del portiere unitamente al
numero del chiamante; il LED del derivato interno rimarrà acceso fino a
quando il portiere non richiama l’utente. La segnalazione “Panico” ha la
priorità su tutte le chiamate.
EN Press the button
for at least 1’’ until the acoustic signal (beep) is
received. The red LED lights up on confirmation of receipt of the “Panic”
signal from the porter, together with the caller’s number; the LED of the
internal extension will remain on until the porter recalls the user. The
“Panic” signal has priority over all other calls.
PAnic 4
DE Die Taste
mindestens 1 Sek. lang gedrückt halten, bis ein
akustisches Signal ertönt (Piepton). Die rote LED leuchtet zur Bestätigung des Erhalts der Meldung “Panik” durch den auf, zusammen mit der Anzeige der Rufnummer;
die LED der Innensprechstelle bis zum Anruf des Pförtners eingeschaltet. Die Meldung “Panik” hat vor allen anderen Anrufen Vorrang.
FR Appuyer pendant au moins 1’’ sur le bouton
jusqu’à la réception du signal sonore (bip). Le LED rouge s’allume lors de la confirmation de la réception du signal
“Panique” de la part du concierge en même temps que le numéro de l’appelant; la LED du dérivé interne reste allumée jusqu’à ce que le concierge ne rappelle l’usager. La
signalisation de “Panique” a la priorité sur tous les appels.
ES Pulse durante al menos 1 segundo el botón
hasta recibir la indicación acústica (pitido). El LED rojo se enciende para confirmar la recepción de la indicación
“Pánico” por parte del conserje, junto con el número del llamante; el LED del derivado interno permanece encendido hasta que el conserje llama al usuario. La indicación de “Pánico” tiene prioridad sobre todas las llamadas.
PT Prima pelo menos 1’’ o botão
até receber a sinalização sonora (bip). O LED vermelho acende-se para confirmar a recepção da sinalização “Pânico” por parte
do porteiro juntamente com o número de quem fez a chamada; o LED do derivado interno permanece aceso até quando o porteiro chamar o utente. A sinalização
“Pânico” é prioritária sobre todas as chamadas.
IT Segnalazione di allarme de alarme
EN
Alarm signalling -
DE
Alarmierung -
FR
Signal d’alarme -
ES
Indicación de alarma -
PT
Sinalização
IT Nel caso sia stato collegato all’ingresso dedicato del derivato
un dispositivo di allarme, la sua attivazione provocherà l’invio di una
segnalazione di allarme al portiere e verrà notificata dal derivato tramite
segnalazione acustica intermittente per circa 10”.
ALARM
D
EN If an alarm device is connected to the dedicated receiver input, its
activation will cause an alarm signal to be sent to the porter and this signal will be notified by the receiver in the form of an intermittent acoustic
signal for approximately 10”.
DE Wird die am entsprechenden Anschluss der Sprechstelle angeschlossene Alarmvorrichtung ausgelöst, wird eine Alarmmeldung an die
Pförtnerzentrale abgesetzt, die durch ein intermittierendes akustisches
Signal von ca. 10 Sek. angezeigt wird.
FR Au cas où serait raccordé à l’entrée dédiée du dérivé un dispositif d’alarme, son activation provoquera l’envoi d’un signal d’alarme au concierge et sera communiquée par le dérivé moyennant signalisation sonore intermittent pendant environ 10”.
ES Si se ha conectado un dispositivo de alarma a la entrada dedicada del derivado, su activación provocará el envío de una indicación de alarma al conserje y será
notificada por el derivado mediante una indicación acústica intermitente durante unos 10 segundos.
PT Caso um dispositivo de alarme tenha sido ligado à entrada dedicada do derivado, a sua ativação provoca o envio de uma sinalização de alarme ao porteiro e será
avisado pelo derivado através de uma sinalização sonora intermitente, durante cerca de 10”.
9
w
Per la pulizia utilizzare solo panni morbidi ed asciutti oppure leggermente inumiditi con acqua; non
utilizzare alcun tipo di prodotto chimico.
Only use soft, dry or slightly damp cloths to clean the terminal; do not use any chemical products.
Für die Pflege nur weiche und trockene oder mit wenig Wasser angefeuchtete Tücher verwenden, keine
chemischen Produkte benutzen.
Pour le nettoyage, n’utiliser que des chiffons doux et secs ou légèrement imbibés d’eau; n’utiliser
aucun type de produit chimique.
Para la limpieza utilice solo paños suaves y secos, o ligeramente humedecidos en agua; no utilice ningún tipo de
producto químico.
Para a limpeza utilize apenas panos macios e secos ou ligeiramente humedecidos com água; não utilize
qualquer tipo de produto químico.
10
SMALTIMENTO
Assicurarsi che il materiale d’imballaggio non venga
disperso nell’ambiente, ma smaltito seguendo le
norme vigenti nel paese di utilizzo del prodotto.
Alla fine del ciclo di vita dell’apparecchio evitare che
lo stesso venga disperso nell’ambiente.
Lo smaltimento dell’apparecchiatura deve essere
effettuato rispettando le norme vigenti e privilegiando il riciclaggio delle sue parti costituenti.
Sui componenti, per cui è previsto lo smaltimento
con riciclaggio, sono riportati il simbolo e la sigla
del materiale.
DISPOSAL
Do not litter the environment with packing
material: make sure it is disposed of according to
the regulations in force in the country where the
product is used.
When the equipment reaches the end of its life
cycle, take measures to ensure it is not discarded in
the environment.
The equipment must be disposed of in compliance
with the regulations in force, recycling its component parts wherever possible.
Components that qualify as recyclable waste feature
the relevant symbol and the material’s abbreviation.
ENTSORGUNG
Vergewissern Sie sich, dass das
Verpackungsmaterial gemäß den Vorschriften des
Bestimmungslandes ordnungsgemäß und umweltgerecht entsorgt wird.
Das nicht mehr benutzbare Gerät ist umweltgerecht
zu entsorgen.
Die Entsorgung hat den geltenden Vorschriften zu
entsprechen und vorzugsweise das Recycling der
Geräteteile vorzusehen. Die wiederverwertbaren
Geräteteile sind mit einem Materials.
ELIMINATION
S’assurer que le matériel d’emballage n’est pas
abandonné dans la nature et qu’il est éliminé
conformément aux normes en vigueur dans le pays
d’utilisation du produit.
À la fin du cycle de vie de l’appareil, faire en sorte
qu’il ne soit pas abandonné dans la nature.
L’appareil doit être éliminé conformément aux
normes en vigueur et en privilégiant le recyclage
de ses pièces.
Le symbole et le sigle du matériau sont indiqués sur
les pièces pour lesquelles le recyclage est prévu.
ELIMINACION
Comprobar que no se tire al medioambiente el
material de embalaje, sino que sea eliminado
conforme a las normas vigentes en el país donde se
utilice el producto.
Al final del ciclo de vida del aparato evítese que
éste sea tirado al medioambiente.
La eliminación del aparato debe efectuarse conforme a las normas vigentes y privilegiando el reciclaje
de sus partes componentes.
En los componentes, para los cuales está prevista la
eliminación con reciclaje, se indican el símbolo y la
sigla del material.
ELIMINAÇÃO
Assegurar-se que o material da embalagem
não seja disperso no ambiente, mas eliminado
seguindo as normas vigentes no país de utilização
do produto.
Ao fim do ciclo de vida do aparelho evitar que o
mesmo seja disperso no ambiente.
A eliminação da aparelhagem deve ser efectuada
respeitando as normas vigentes e privilegiando a
reciclagem das suas partes constituintes.
Sobre os componentes, para os quais é previsto o
escoamento com reciclagem, estão reproduzidos o
símbolo e a sigla do material.
11
This device complies with the Part 15 of the FCC Rules. Operation is subject to the
following two conditions:
(1) this device may not cause harmful interference and
(2) this device must accept any interference received, including interference that
may cause undesired operation.
BPT S.p.A.
Via Cornia, 1
33079 Sesto al Reghena-PN-Italy
[email protected]