1
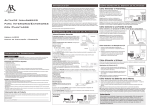
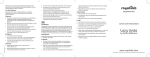
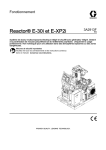
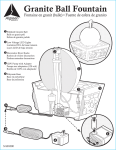
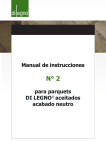
User’s Manual
Notice D’utilisation
Manual del Usario
SOLAR BIRD SPA
LIMITED WARRANTY:
THESE PRODUCTS ARE WARRANTED FROM DEFECTS IN WORKMANSHIP AND FUNCTIONALITY FOR A
PERIOD OF 1 YEAR. THIS WARRANTY DOES NOT APPLY IN THE EVENT OF MISUSE OR ABUSE OF THE
PRODUCT OR AS A RESULT OF UNAUTHORIZED REPAIRS OR ALTERATIONS. TO ADDRESS WARRANTY ISSUES,
PLEASE CONTACT INITIAL POINT OF PURCHASE.
GARANTIE LIMITÉE:
CES PRODUITS SONT GARANTIS CONTRE TOUTE DÉFAUT DE FABRICATION ET DE FONCTIONNEMENT
PENDANT 1 AN. CETTE GARANTIE N'EST PAS VALIDE EN CAS D'USAGE INAPPROPRIÉ OU ABUSIF DU
PRODUIT OU DE MODIFICATIONS OU RÉPARATIONS NON AUTORISÉES. POUR TOUTES QUESTIONS AU SUJET
DE LA GARANTIE, PRIÈRE DE CONTACTER LE POINT D'ACHAT ORIGINAL.
GARANTÍA LIMITADA :
ESTOS PRODUCTOS TIENEN UNA GARANTÍA DE UNO AÑO CONTRA DEFECTOS DE FABRICACIÓN Y
FUNCIONALIDAD. ESTA GARANTÍA NO SE APLICA EN CASO DE MALTRATO O USO INDEBIDO DEL
PRODUCTO O COMO RESULTADO DE REPARACIONES O MODIFICACIONES NO AUTORIZADAS. PARA
ABORDAR CUESTIONES RELACIONADAS CON LA GARANTÍA, COMUNÍQUESE CON EL PUNTO DE COMPRA
INICIAL. .
Montreal, Canada
[email protected]
Made in China
Fabriqué en Chine
Hecho en China
FONTAINE SOLAIRE POUR
OISEAUX
SPA SOLAR PARA AVES
CONTENTS & PRODUCT OVERVIEW
USER’S MANUAL
NOTE: ASSEMBLE FROM BASE TO TOP
The 4-in-1 Solar Bird Spa is a super feature to add to your garden
•
•
•
•
•
•
•
•
•
Durable polyresin plastic resembles cast iron.
Easy to assemble.
No wiring or electricity needed.
Solar panel charges in all daylight conditions.
Completely weatherproof. Won’t rust, corrode or rot.
Pagoda roof helps keep bird seed dry.
Includes hooks to add more feeding packs.
Planter is ideal for bedding plants or flowers.
Includes ground stakes to secure Solar Bird Spa to your lawn.
1. Solar Lamp
20. Hooks
2. Roof
3. Roof Bracket
5. Screws (small)
ASSEMBLY & START UP
NOTE: ASSEMBLE FROM BASE TO TOP
1. Set the base (18) on an even surface and screw the pole holder (17) to the base (18).
2. Set the plant pot (16) on top of the pole holder (17) and screw the pole (15) to the respective
holder (17).
3. Now assemble the water basin (12), the large bolt (14) & the steel washer (13), the interim
rod (10) and the rubber seal (11) as follows: the large bolt (14) is inserted through the steel
washer (13) first, then inserted through the opening from the bottom side of the water basin (12)
and securely screwed into position together with the rubber seal (11) and the interim rod (10),
which come down from above.
4. Screw the mounted water basin (12) onto the pole.
5. Screw the feeder base bracket (8) and the interim rod (10) together with the cross slotted large
screw (9).
6. Mount the feeder base (7) on the respective bracket (8) using three small cross slotted screws
(5). Ensure that the locating holes on the feeding base (7) are facing up.
7. Insert the feeding trough (4) into the locator hole situated in the middle of the feeder base (7).
8. Insert the 4 roof supports (6) into the corresponding locator holes on the feeder base (7) and
screw the roof bracket (3) into the roof supports (6) using 4 small cross slotted screws (5).
9. Finally, mount the roof (2) on the roof bracket (3) and insert the solar lamp (1) into the corresponding hole in the roof (2).
10. Add hooks (20) to roof to hang extra feeding packs.
You can now select a location for the Solar Bird Spa and secure it to the ground using the
included ground stakes.
TURNING ON THE SOLAR LAMP
In order to activate the solar lamp, remove the light from the roof and set the switch to ON. To
turn it off, set the switch to OFF.
Note: The product initially requires 8 hours of charging in direct sunlight for 8 hours of use at
night.
6. Roof Support
4. Feeding Trough
7. Feeder Base
5. Screws (small)
8. Feeder Base Bracket
9. Cross-Slotted
Screws (large)
10. Interim Rod
1. Solar Lamp
2. Roof
3. Roof Bracket
11. Rubber Seal
4. Feeding Trough
5. Screws (small) x 7
13. Steel
Washer
12. Water Basin
6. Roof Support x 4
7. Feeder Base
8. Feeder Base Bracket
14. Large
15. Pole
Bolt
9. Cross-Slotted Screw
10. Interim Rod
11. Rubber Seal
12. Water Basin
13. Steel Washer
CHANGING THE BATTERIES
Defective rechargeable batteries must be removed and disposed.
1. Battery type: 2 x Ni-MHAA 700 mAh 1.2V
2. Remove the lamp's lid by turning it counter-clockwise.
3. Remove the batteries.
4. When inserting the new rechargeable batteries, ensure that the polarity is correct.
5. Close the lid on the lamp and turn it clockwise until it locks into place.
16. Plant Pot
14. Large Bolt
15. Pole
16. Plant Pot
17. Pole Holder
17. Pole Holder
18. Base
19. Ground Stakes x 3
18. Base
20. Hooks x 2
MANUFACTURER DOES NOT SELL OR SUPPLY REPLACEMENT BATTERIES.
19. Ground Stakes
NOTICE D’UTILISATION
CONTENU ET APERÇU DU PRODUIT
NOTE : ASSEMBLER EN COMMENÇANT PAR LE BAS
Cette fontaine solaire pour oiseaux à quatre éléments est une belle acquisition pour votre jardin.
•
•
•
•
•
•
•
•
•
Construction en polyrésine simili fonte durable.
Facile à assembler.
Aucun câblage ou alimentation externe.
Panneau solaire se chargeant le jour sous toutes les conditions de lumière.
Parfaitement étanche. Aucune rouille, corrosion ou dégradation.
Un toit de pagode garde au sec les graines pour les oiseaux.
Crochets pour ajouter des blocs d’aliments.
Pot idéal pour plantes ou fleurs.
Pôles pour l’installation de la fontaine sur votre pelouse
1. Lampe solaire
20. Crochets
2. Toit
3. Support du toit
5. Vis Philips
(petites)
ASSEMBLAGE ET INSTALLATION
NOTE : ASSEMBLER EN COMMENÇANT PAR LE BAS
4. Mangeoire
6. Tiges du toit
1. Placer la base (18) sur une surface plane et viser le support de la tige (17) à la base (18).
2. Placer le pot à fleurs (16) sur le support de la tige (17) et viser la tige (15) à son support (17).
3. Assembler la fontaine (12), le gros boulon (14) et la rondelle d’acier (13), la tige intermédiaire (10) et le joint de caoutchouc (11) comme suit : insérer d’abord le gros boulon (14) dans la
rondelle d’acier (13), puis dans l’ouverture au fond de la fontaine (12) et viser fermement en
position avec le joint de caoutchouc (11) et la tige intermédiaire (10).
4. Viser la fontaine assemblée (12) sur la tige.
5. Viser ensemble le support de la base de la mangeoire (8) et la tige intermédiaire (10) au
moyen des grosses vis Philips (9).
6. Monter la base de la mangeoire (7) sur ses supports (8) utilisant les petites vis Philips (5).
S’assurer que les trous de centrage de la base de la mangeoire (7) pointent vers le haut.
7. Insérer la mangeoire (4) dans le trou situé au centre de la base de la mangeoire (7).
8. Insérer les quatre tiges du toit (6) dans les trous de centrage correspondants de la base de la
mangeoire (7) et viser le support du toit (3) dans les tiges du toit (6) utilisant quatre petites vis
Philips (5).
9. Finalement, monter le toit (2) sur son support (3) et insérer la lampe solaire (1) dans son compartiment sur le toit (2).
10. Ajouter les crochets (20) au toit pour suspendre des blocs d’aliments additionnels.
Choisir un emplacement pour la fontaine et la fixer au sol au moyen des pôles fournies.
UTILISATION DE LA LAMPE SOLAIRE
Pour utiliser la lampe solaire, retirer la lampe du toit et placer l’interrupteur à ON (MARCHE).
Pour l’éteindre, placer le commutateur à OFF (ARRÊT).
Note : L’appareil nécessite initialement une charge de 8 heures en plein soleil pour assurer 8
heures d’éclairage au cours de la nuit.
CHANGEMENT DE PILES
Les piles rechargeables défectueuses doivent être enlevées et éliminées de façon écologique.
1. Type de piles : 2 x Ni-MHAA, 700 mA/h, 1,2 volt
2. Retirer le couvercle de la lampe en le tournant dans la direction inverse à celle des aiguilles
d’une montre.
3. Retirer les piles.
4. Lors de l’insertion des nouvelles piles, respecter la polarité.
5. Fermer le couvercle de la lampe et le tourner dans la direction des aiguilles d’une montre pour
le verrouiller en place.
LE FABRICANT NE VEND PAS DE PILES.
5. Vis Philips
(petites)
7. Base de la mangeoire
8. Support de la base de
la mangeoire
9. Vis Philips
10. Tige
intermédiaire
1. Lampe solaire
2. Toit
3. Support du toit
4. Mangeoire
11. Joint de
caoutchouc
5. Vis Philips (petites) (7)
12. Fontaine
13.
Rondelle
d’acier
14. Gros
boulon
6. Tiges du toit (4)
7. Base de la mangeoire
8. Support de la base de
la mangeoire
15. Tige
9. Vis Philips
10. Tige intermédiaire
11. Joint de caoutchouc
12. Fontaine
13. Rondelle d’acier
16. Pot à fleurs
14. Gros boulon
15. Tige
16. Pot à fleurs
17. Support de la tige
17. Support de la tige
18. Base
18. Base
19. Pôles (3)
20. Crochets (2)
19. Pôles
MANUAL DEL USUARIO
CONTENIDO Y RESUMEN DEL PRODUCTO
NOTA: ARMAR DE LA BASE HACIA ARRIBA
1. Lámpara solar
El Spa Solar para Aves 4 en 1 es una magnífica adición a su jardín.
•
•
•
•
•
•
•
•
•
La duradera resina poliéster tiene el aspecto de hierro fundido.
Es fácil de armar.
No se necesitan conexiones ni electricidad.
El panel solar se carga en todas las condiciones de luz diurna.
Es totalmente impermeable. No se pudre, oxida, ni corroe.
El tejado de pagoda ayuda a mantener secas las semillas para las aves.
Incluye ganchos para poner más paquetes de alimento.
El tiesto es ideal para plantas o flores.
Incluye estacas para fijar al césped el Spa Solar para Aves.
20. Ganchos
2. Tejado
3. Soporte del tejado
5. Tornillos de
cruz (pequeños)
ENSAMBLADO Y MONTAJE
NOTA: ENSAMBLADO DE LA BASE HACIA ARRIBA
1. Coloque la base (18) en una superficie plana y atornille el soporte del poste (17) a la base
(18).
2. Coloque el tiesto para plantas (16) arriba del soporte del poste (17) y atornille el poste (15)
al soporte respectivo (17).
3. Ahora arme el cuenco para el agua (12), el perno grande (14) y la arandela de acero (13),
la varilla provisional (10) y el sello de goma (11) como se indica a continuación: el perno
grande (14) se inserta primero a través de la arandela de acero (13), después a través de la
abertura desde la parte de abajo del cuenco para el agua (12) y se atornilla en su lugar junto
con el sello de goma (11) y la varilla provisional (10), que entra de arriba hacia abajo.
4. Atornille el cuenco para el agua montado (12) en la varilla.
5. Atornille el soporte de la base del comedero (8) a la varilla provisional (10) con el tornillo de
cruz grande (9).
6. Monte la base del comedero (7) en el soporte respectivo (8) usando tres tornillos de cruz
pequeños (5). Asegúrese de que los orificios de ubicación en la base del comedero (7) estén
hacia arriba.
7. Inserte el comedero (4) en el orificio de ubicación situado en el medio de la base del
comedero (7).
8. Inserte los 4 soportes del tejado (6) en los orificios de ubicación correspondientes sobre la
base del comedero (7) y atornille el soporte del tejado (3) en los soportes del tejado (6) con 4
tornillos pequeños de cruz (5).
9. Finalmente, monte el tejado (2) en el soporte para el tejado (3) e inserte la lámpara solar (1)
en el orificio del tejado correspondiente (2).
10. Coloque ganchos (20) en el tejado para colgar paquetes adicionales de alimento.
6. Soporte del
tejado
4. Comedero
5. Tornillos de
cruz (pequeños)
7. Base del
comedero
8. Soporte de la base del
comedero
9. Tornillo de
cruz
10. Varilla
provisional
CÓMO CAMBIAR LAS BATERÍAS
Debe quitar y desechar las baterías recargables defectuosas.
1. Tipo de batería: 2 x Ni-MHAA 700 mAh 1.2V
2. Quite la tapa de la lámpara haciéndola girar en sentido contrario a las manecillas del reloj.
3. Saque las baterías.
4. Al poner las nuevas baterías recargables, asegúrese de colocar correctamente la polaridad.
5. Coloque la tapa de la lámpara y hágala girar en el sentido de las manecillas del reloj hasta
que quede bien cerrada.
EL FABRICANTE NO VENDE NI PROVEE BATERÍAS DE REPUESTO
2. Tejado
3. Soporte del tejado
11. Sello de
goma
13. Arandela
de acero
4. Comedero
5. Tornillos de cruz
12. Cuenco para
el agua
(pequeños) x 7
6. Soporte del tejado x 4
7. Base del comedero
Ahora puede seleccionar el lugar donde colocará el Spa Solar para Aves y fijarlo al suelo con
las estacas incluidas en el paquete.
CÓMO ENCENDER LA LÁMPARA SOLAR
Para activar la lámpara solar, quite la luz del tejado y coloque el interruptor en ON. Para apagarla, coloque el interruptor en OFF.
Nota: Debe cargar el producto inicialmente durante 8 horas a la luz directa del sol para que se
mantenga encendida 8 horas durante la noche.
1. Lámpara solar
8. Soporte de la base del
14. Perno
grande
15. Poste
comedero
9. Tornillo de cruz
10. Varilla provisional
11. Sello de goma
12. Cuenco para el agua
16. Tiesto para
plantas
13. Arandela de acero
14. Perno grande
15. Poste
16. Tiesto para plantas
17. Soporte para el
poste
17. Soporte para el poste
18. Base
19. Estacas para el suelo x 3
18. Base
20. Ganchos x 2
19. Estacas para el suelo