1
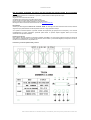
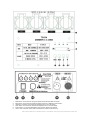
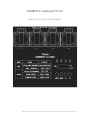
DIMMER 4 CANALES TR-D4
MANUAL DE USARIO / USER MANUAL
User manual Dimmer 4 canales TR-D4 | Triton Blue | Rev. Sep 2013 | www.triton-‐blue.com
CASTELLANO
Por su propia seguridad, por favor lea este manual del usuario antes de la conexión
inicial
Toda persona implicada en la instalación, operación y mantenimiento de este aparato tiene que:
Estar cualificado
Seguir las instrucciones de este manual.
Considere este manual como parte del producto total.
Conserve este manual durante toda la vida útil del producto.
Pasar el manual a cada sucesivo poseedor o el uso del producto
Descarga la última versión del manual del Internet en www.triton-blue.com
Introducción
Gracias por haber elegido un Dimmer de 4 canales TR-D4. Si usted sigue las instrucciones de este manual, estamos
seguros de que podrá disfrutar de este dispositivo durante un largo periodo de tiempo.
Si el aparato ha estado expuesto a grandes cambios de temperatura (por ejemplo tras el transporte), no lo enchufe
inmediatamente. El agua condesation producida podría dañar su aparato. Dejelo apagado hasta que se haya
alcanzado la temperatura ambiente.
Instrucciones de uso
Esta unidad le permite controlar la iluminación mediante señal DMX. Con esta equipo podemos sustituir los panels de
interruptores y reemplazarlos con este sencillo dimmer, fácil de utilizar y conmutación digital que incorpora el uso de un
formato con la información en la pantalla LCD.
Funciones y controles panel frontal y trasero
User manual Dimmer 4 canales TR-D4 | Triton Blue | Rev. Sep 2013 | www.triton-‐blue.com
1. Botón Modo: Este botón cambiará el modo de operación entre DMX y Chaser.
2. Botón Menú: Este botón activará las diferentes funciones en los modos DMX y Chase.
3. Up Botón: Este botón aumenta el valor mostrado en la pantalla LCD.
4. Down Botón: Este botón disminuye el valor mostrado en la pantalla LCD.
5. Potencia de salida: Conectores de salida. Tomas de salida 8.
6. LED Verde. Indicadores: Estos LEDs indican la actividad de los canales a los que pertenece el canal-.
7. Pantalla LCD: La pantalla multifunción se detallarán todos los chases y el programa que se refiere al modo de
funcionamiento actual.
8. Fusibles Canal: Cada uno de los cuatro canales está protegido por un fusible de 10A. Estos fusibles que evitan
sobrecargas y daños en el dimmer. Asegúrese de sustituir siempre con otro del mismo tipo fusible.
9. Interruptor de alimentación: Este interruptor controla las unidades de alimentación principal.
10. Cable de alimentación: Conecte este cable a una fuente de alimentación correspondiente.
11. Entrada DMX: Este conector acepta la señal de entrada DMX.
12. Salida DMX: Este conector envía la señal de entrada DMX al dispositivo DMX siguiente.
Modo de funcionamiento
La unidad cuenta con dos modos de funcionamiento diferentes. Esta unidad se puede utilizar como un programador de
cuatro canales o como dimmer regulador de voltaje 1, 2, o 4 DMX. Por favor, siga las instrucciones para operar la
unidad en el modo deseado.
Modo chase (programador)
Utilice este modo de funcionamiento sólo si usted está planeando sobre el uso del TR-D4 como un programador de
cuatro canales. Este dispositivo se ha construido con 16 programas, y puede seleccionar cualquiera de estos
programas o configurar el paquete para perseguir en una secuencia aleatoria de los 16 construidos en los programas
para un espectáculo de luces concreto. Usted puede controlar la velocidad a la que los programas se perseguirá.
1. Conecte sus efectos de iluminación a cualquiera de los ocho tomas de corriente.
2. Utilice el botón de modo para seleccionar el modo de programa: el modo Programa se indica con "PA", seguido de
los números 01 a 16. "PA" está programado. Si aparece "A" en la pantalla LCD está en modo DMX, "A" es sinónimo de
dirección.
3. Establecer que deseabas Chase patron: Una vez que haya seleccionado la función de programación utilizar el botón
Menú para seleccionar el chase. El patrón de persecución se representa en la pantalla LCD con "P" seguida de dos
números. Usted puede seleccionar cualquiera de los 16 programas internos para ejecutar en una sola vez.
4. Establecer que velocidad deseas en la cadena: En este punto es posible cambiar la velocidad de la cadena del
programa. En el modo de programa, pulsa sobre el botón MENU hasta que aparezca la "SP", seguido de dos números
en el LCD. A continuación, utilice los botones ARRIBA y ABAJO para ajustar la velocidad de la cadena. Un valor de 99
le dará la velocidad de la cadena más rápido (alrededor de 1/10th de un segundo). Un valor de 01 le dará la velocidad
de la cadena más lento (un paso cada 30 seg.).
5. Ahora puede cambiar la intensidad de la luz: Utilice el botón MENU para seleccionar "d" en la pantalla LCD. Use
ARRIBA y ABAJO para cambiar la intensidad de salida de luz. 00 se dará la salida más baja y 99 le dará la máxima
intensidad.
Modo DMX
Utilice este modo de funcionamiento sólo si va a utilizar el equipo como un dimmer DMX. Esta función le permite activar
y controlar la intensidad de DMX con el uso de un controlador DMX. Encendido, apagado y las funciones de regulación
se pueden realizar a través de este equipo. También puede configurar el regulador de voltaje para funcionar como un
canal DMX dimmer pack de 1, 2 o 4, lo que significa que puede combinar las funciones de salida.
Operación DMX:
1. Conecte un controlador DMX a su regulador de voltaje a través de los cables XLR de 3 pines.
2. Conecte su efecto de iluminación a cualquiera de las ocho tomas de corriente en la parte frontal del envase.
3. Decida si va a utilizar el paquete de dimmer como 1, 2 ó 4 canales. Esta función le permite:
A. Controlar la salida de las cuatro salidas con un canal DMX.
User manual Dimmer 4 canales TR-D4 | Triton Blue | Rev. Sep 2013 | www.triton-‐blue.com
B. Grupo de canales de salida de uno y dos canales de salidas de grupos de tres y cuatro. El primer grupo será
controlado por un canal DMX y el segundo grupo será controlada por otro canal DMX. Esto le da al equipo un valor
DMX de dos.
C. La configuración predeterminada es un canal DMX, cada canal es controlado por un canal DMX.
4. Para cambiar el modo de la función del canal Asegúrese de que está en modo DMX. Utilice el botón MENU para
seleccionar "CH" seguido de dos dígitos. A continuación, utilice las teclas ARRIBA y ABAJO teclas de flecha para
cambiar el valor de 01, 02, o 04. El regulador de voltaje se establece inicialmente como un conmutador de cuatro
canales DMX.
5. El dimmer está ajustado inicialmente para ser activado por una dirección DMX. Para cambiar esta configuración,
asegúrese que está en modo DMX. Utilice el botón MENU para seleccionar los ajustes de dirección, esto se indica con
una "A" en el primer carácter del LCD seguido de tres números. Utilice los botones de flecha ARRIBA y ABAJO para
seleccionar la dirección DMX deseada. Recuerde la dirección DMX le dice a su controlador DMX qué canal para activar
las funciones del equipo.
6. Una vez que ha configurado la dirección DMX del equipo asegúrese que las direcciones del controlador coincida con
el de la mesa de control.
7. Su TR-D4 ahora funcionará como dimmer DMX, es posible controlar la intensidad de salida de luz a través de su
controlador DMX. 0 dará ninguna salida y 100 le dará máxima potencia.
Reemplazo del fusible
Para sustituir el fusible de protección, utilice un destornillador plano para desenroscar el fusible. Saque el fusible y
sustituirlo por uno nuevo. Inserte el fusible en la ranura y apriete. Siempre reemplace con otro del mismo tipo fusible.
PRECAUCIÓN: Siempre desconecte las unidades de alimentación principal antes de realizar cualquier tipo de servicio
o el reemplazo del fusible.
Fuente de alimentación
Antes de enchufar la unidad asegurese de que el voltaje de la fuente en su área coincide con el voltaje que requiere el
TR-D4. La unidad está disponible en una versión de 120V y 240V. Debido voltaje de línea puede variar de lugar a
lugar, usted debe estar seguro de conectar la fuente de alimentación a una toma correcta antes de intentar operar con
su controlador.
Descripción del producto
El TR-D4 es un Dimmer Pack DMX de 1, 2 ó 4 canales. Este equipo puede servir como un programador autónomo o
como dimmer DMX. Cada canal dispone de dos conectores de salida de corriente para un total de ocho. Esta unidad
cuenta con conexión XLR hembra y macho para la compatibilidad DMX. Cada canal está equipado con un fusible para
cada canal, y una carga máxima de salida de 10A o 20A por canal total. Esta equipo TR-D4 tiene un diseño de la
carcasa que lo hace ideal para aplicaciones permanentes o móviles.
ENGLISH
For your own safety, please read this user manual carefully before you initially start-up.
Every person involved with the installation, operation and maintenance of this device has to:
Be qualified.
Follow the instructions of this manual.
Consider this manual to be part of the total product.
Keep this manual for the entire service life of the product.
Pass this manual on to every further owner or use of the product
Download the last version of the user manual from the internet in www.triton-blue.com
Introduction
Thank you for having chosen a 4 Channel dimer Pack. If you follow the instructions given in this manual, we are sure
that you will enjoy this device for a long period of time.
If the device has been exposed to drastic temperature fluctuation (eg. after transportation), do not switch it on
immediately. The arising condensation water might damage your device. Leave the switched off until it has reached
room temperature.
User instructions
This unit allow you to control special effect lighting, that normally could not be controlled, by a DMX controller. We have
eliminated confusing dip switches and replace them with an easy to use digital switching device that incorporates the
use of an easy to read LCD display.
Function, Frontpanel and Rear panel
User manual Dimmer 4 canales TR-D4 | Triton Blue | Rev. Sep 2013 | www.triton-‐blue.com
1.
2.
3.
4.
5.
6.
Mode Button: This button will change the operate mode between DMX and chaser.
Menu Button: This button will activate the different functions in DMX and chase modes.
Up Button: This button will increase the displayed value in the LCD display.
Down Button: This button will decrease the displayed value in the LCD display.
Power Output: 3-prong grounded Edison output sockets. 8total output sockets.
Green L.E.D. Indicators: These LEDs will indicate their relevant channel activity.
User manual Dimmer 4 canales TR-D4 | Triton Blue | Rev. Sep 2013 | www.triton-‐blue.com
7.
LCD Display: This multifunction display will detail all chase and program that pertains to the current operating
mode of the pack.
8. Channel Fuses: Each of the four channels is protected by a 10A fuse. These fuses prevent you from overloading
and damaging your pack. Be sure to always replace with the exact same type fuse.
9. Power Switch: This switch controls the units main power.
10. Power Cord: Plug this cord into a matching power supply for your area.
11. DMX Input: This connector accepts your DMX input signal.
12. DMX Output: This connector sends your DMX input signal through to the next DMX device.
Operation mode
The unit has two different operating modes. This unit can be used as a four channel chaser or as a 1, 2, or 4 channel
DMX dimmer pack. Please follow the instructions blow to operate the unit in your desired mode.
Chase mode
Use this operating mode only if you are planning on using your TR-D4 as a four channel chaser. This device has 16
built in programs, you may select any of these programs or set the pack to chase in a random sequence of all 16 built in
programs for a more dramatic light show. You may control the speed at which the programs will chase.
1.
2.
3.
4.
5.
Connect your lighting effects to the any of the eight power sockets on the pack
Use the mode button to select chase mode: Chase mode is indicated by “PA” followed by numbers 01-16. “PA” is
Programmed Applied. If “A” appears in the LCD display you are in DMX mode, “A” stands for address.
Set you desired chase pattern: Once you have selected the chase function use the Menu button to select your
desired chase. The chase pattern is represented in the LCD display by “P” followed by two numbers. You may
select any of the built in 16 programs to run at a single time.
Set you desired chase speed: At this point you may change the program chase speed. While in chase mode, tap
on the MENU button until the “SP” followed by two numbers is displayed in the LCD. Then use the UP and DOWN
buttons to adjust the chase speed. A value of 99 will give you the fastest chase speed (about 1/10th of a second).
A value of 01 will give you the slowest chase speed (one step every 30 sec.).
You may now change the light intensity: Use the MENU button to select “d” in the LCD. Use the UP and DOWN
arrow keys to change the light output intensity. 00 will give the lowest output and 99 will give you full intensity.
DMX mode
Use this operating mode only if you plan to use your pack as a DMX dimmer. This function will allow you to turn on and
control the intensity of non-DMX with the use of a DMX controller. On, off, and dimming functions can be performed
through this pack. You may also set your dimmer pack to function as a 1, 2, or 4 channel DMX dimmer pack, which
means you can combine the output functions.
DMX Operation:
1. Plug in a DMX controller to your dimmer pack via the 3-pin XLR cables.
2. Connect your lighting effect to any of the eight power sockets on the front of the pack.
3. Decide if you are going to use your dimmer pack as 1, 2, or 4 channels. This function allows you to:
A. Control the output to all four outlets with one DMX channel.
B. Group outlet channels one and two and group outlets channels three and four. The first group will be
controlled by one DMX channel and the second group will be controlled by another DMX channel. This gives
the pack a DMX value of two.
C. The default setting is a four channel DMX switcher, each channel is controlled by one DMX channel.
4.
To change the channel function mode be sure you are in DMX mode. Use the MENU button to select “CH”
followed by two digits. Then use the UP and DOWN arrow buttons to change the setting from 01, 02, or 04. Your
dimmer pack is initially set as a four channel DMX switcher.
5.
The dimmer pack is initially set to be activated by DMX address one. To change this setting be sure you are in
DMX mode. Use the MENU button to select the address settings, this will be indicated by an “A” in the first character of
the LCD followed by three numbers. Use the UP and DOWN arrow buttons to select your desired DMX address.
Remember the DMX address tells your DMX controller what channel to activate the pack’s functions.
6.
Once you have set the pack’s DMX address be sure your controller’s address matches that of the pack’s.
7.
Your pack will now operate as DMX dimmer, you may control the light output intensity through your DMX
controller. 0 will give no output and 100 will give you full output.
Fuse Replacement
To replace the protective fuse, use a flat head screwdriver to unscrew the fuse holder. Pull out the old fuse and replace
it with a new one. Insert the fuse back into slot and tighten. Always replace with the exact same type fuse remove
unless otherwise specified by an authorized our company service technician.
CAUTION: Always disconnect the units main power before performing any type of service or fuse replacement.
Power Supply
Before plugging your unit in be sure the source voltage in your area matches the required voltage for your TR-D4. The
unit is available in a 120V and 240V version. Because line voltage may vary from venue to venue, you should be sure to
plug your power supply into a matching wall outlet before attempting to operate you controller.
Product Description
User manual Dimmer 4 canales TR-D4 | Triton Blue | Rev. Sep 2013 | www.triton-‐blue.com
The TR-D4 is 1, 2, or 4 channel DMX Dimmer Pack. This pack can serve as a stand alone chaser or a DMX dimmer
pack. This pack is designed for zero-crossing circuitry which protects against inductive loads, so it is safe for use with all
lighting effects that include transformers such as pin spots. Each channel comes with two 3-prong Edison sockets inputs
for a total of eight. This unit features XLR female and male connection for DMX compatibility. Each channel is equipped
with a fuse for each channel, and a maximum output load of 10A per channel or 20A total. This revision of our popular
TR-D4 has a great new case design that makes it great for permanent or mobile applications.
User manual Dimmer 4 canales TR-D4 | Triton Blue | Rev. Sep 2013 | www.triton-‐blue.com