1
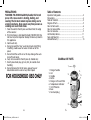
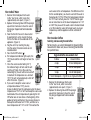
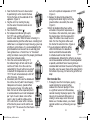
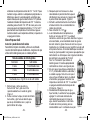
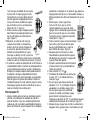
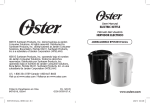
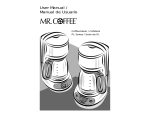
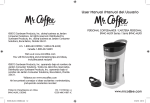
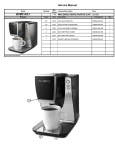
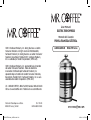
User Manual
ELECTRIC FRENCH PRESS
Manual del Usuario
PRENSA FRANCESA ELÉCTRICA
©2014 Sunbeam Products, Inc. doing business as Jarden
Consumer Solutions. All rights reserved. Distributed by
Sunbeam Products, Inc. doing business as Jarden Consumer
Solutions, Boca Raton, Florida 33431. Sunbeam Products,
Inc.is a subsidiary of Jarden Corporation (NYSE:JAH).
MODEL/MODELO
BVMC-FPK Series
©2014 Sunbeam Products, Inc. operando bajo el nombre
de Jarden Consumer Solutions. Todos los derechos
reservados. Distribuido por Sunbeam Products, Inc.
operando bajo el nombre de Jarden Consumer Solutions,
Boca Raton, Florida 33431. Sunbeam Products, Inc. es una
subsidiaria de Jarden Corporation (NYSE:JAH).
U.S. 1-800-MR COFFEE (1-800-672-6333) Canada 1-800-667-8623
Visit us at www.mrcoffee.com / Visítenos en www.mrcoffee.com
Printed in China/Impreso en China
BVMC-FPK Series_14ESM1
BVMC-FPK Series_14ESM1.indd 28-1
P.N. 174218
GCDS-MRC33310-JC
www.mrcoffee.com
3/20/14 10:27 AM
IMPORTANT SAFEGUARDS
When using electrical appliances, basic safety
precautions should always be followed to reduce the
risk of fire, electric shock, and/or injury to persons,
including the following:
1. Read all instructions before using.
2. Do not touch hot surfaces. Use handles or knobs.
3. To protect against electric shock, do not immerse
this appliance, in water or any other liquid.
4. Close adult supervision is necessary when this
appliance is used by or near children.
5. Unplug the power base or detachable cord
from the power outlet when not in use, before
repositioning and before cleaning. Allow to cool
before cleaning the appliance.
6. Do not operate any appliance with a damaged
cord or plug or after the appliance malfunctions,
or has been damaged in any manner. Return this
appliance only to the nearest authorized service
center for examination, repair or adjustment.
7. The use of accessory attachments not recommended
by Sunbeam may cause hazards or injuries.
8. Do not use outdoors.
9. Do not let cord hang over edge of table or
counter, or touch hot surfaces.
10. Do not place this appliance on or near a hot gas
or electric burner or in a heated oven.
11. Ensure that the french press is properly located
on the power base, or properly attached to the
detachable cord before switching on.
12. Remove the french press from power base or
unplug french press from wall outlet before
filling or pouring. Do not attempt to remove the
-2BVMC-FPK Series_14ESM1.indd 2-3
french press from the power base or unplug from
wall outlet until it is switched off, manually or
automatically.
13. Use the french press only with the power base or
detachable cord supplied and vice-versa.
14. Do not use appliance for other than intended use.
15.Use on a hard, flat level surface only, to avoid
interruption of air flow underneath the appliance.
16. Extreme caution must be used when handling or
moving french press and pouring from french press
containing boiling water or coffee.
17. Scalding may occur if the lid is removed during the
heating cycle.
18. A short power supply cord is provided to reduce
the hazards resulting from becoming entangled in or
tripping over a longer cord.
19. An extension cord may be purchased and used if
care is exercised in its use.
20. If an extension cord is used, the marked electrical
rating of the extension cord must be at least 15
amps and 120 volts. The extension cord should be
grounding type, 3-wire cord. The resulting extended
cord must be arranged so that it will not drape over
the counter top or table where it can be pulled on
by children or tripped over accidentally.
21.Do not switch on the appliance unless there is at
least 0.5 liters of water in it.
22. The water level in the appliance must not exceed the
“MAX” mark on the water level gauge.
SAVE THESE INSTRUCTIONS
-3-
3/20/14 10:27 AM
PRECAUTIONS:
WARNING: TO AVOID SCALDING, handle this french
press with care as water is heating, boiling, and
cooling. The lid must remain in place during use to
avoid steam burns. Keep spout away from persons as
scalding can result from steam.
1.Place the electric french press well back from the edge
of the counter.
2.This french press is intended for boiling WATER ONLY. Do
not heat any other liquid or attempt to cook any food in
this appliance.
3.Hand wash only.
4.Do not exceed the “Max” water level mark when filling.
Overfilling could cause hot water to boil out of the
spout.
5.Do not hold the switch on as this may damage the auto
shut-off mechanism.
6.Carry or move electric french press by handle only.
7.French press body may get very hot, be careful when
handling.
8.Do not immerse the french press, power base or
detachable cord in water or any other liquid.
FOR HOUSEHOLD USE ONLY
Table of Contents
Important Safeguards.......................................................... 2
Precautions......................................................................... 4
Table of Contents................................................................ 5
Diagram of Parts................................................................... 5
How to boil water............................................................... 6
How to make coffee........................................................... 7
How to make tea................................................................ 9
Anti boil-dry device........................................................... 11
Care and Cleaning............................................................. 11
Limited Warranty............................................................... 13
DIAGRAM OF PARTS
1.
1. Plunger handle
2.Lid
3.Handle
4.Kettle
5. Plunger with mesh filter
6. Temperature indicator
7. On/Off button
8.Base
9. Cord and plug
2.
BVMC-FPK Series_14ESM1.indd 4-5
3.
4.
6.
7.
8.
-4-
5.
9.
-53/20/14 10:27 AM
How to Boil Water
1. Remove the lid and pour fresh water
to the “max” level, which is one liter
(approximately one quart). (Figure 1)
2. Replace the brewing lid and lift the plunger
up and turn clockwise to have the axle of
the plunger clipped and hold underside
the lid.
Figure 1
3. Place the French Press on its base station
by positioning it so the stud on the base
fits into the hole on the underside of the
appliance. (Figure 2)
4. Plug the unit in by inserting the plug
into the socket. Extension cords are not
recommended.
5. Press the On/Off button ( ).
6. The temperature indicator lights up by the
195°F mark and the unit begins to heat the Figure 2
water.
7. Once the water reaches boiling 212°F,
the indicator begins to flash and the unit
switches off. Note: Once the water has
cooled slightly, the unit will turn on and off
to maintain the temperature at a constant
195°F. The unit will automatically switch off
after 25 minutes. (Figure 3)
8. If you want to keep the water warm at
Figure 3
a temperature below 195°F, you can
choose to directly heat the cold water up to the lower
temperature of 112°F or 160°F and keep the warm water
maintained at the set temperature by pressing the On/
Off button one or more times at the beginning of the
appliance being switched on. You can also choose to
heat up the cold water to 212°F first, and then set a
lower temperature of 112°F or 160°F to maintain the
-6BVMC-FPK Series_14ESM1.indd 6-7
warm water at the set temperature. The difference is that
for the second option, you have to wait until the water is
heated up to 212°F first. When the temperature indicator
for 195°F starts to flash, press the “On/Off” button again
one or more times to set the lower temperature to 112°F
or 160°F that you want the warm water to be maintained
at. At this mode the water will be kept warm at a lower
temperature, and the appliance will not switched off
itself.
How to Make Coffee
Selecting and Measuring Ground Coffee
For best results, use a level tablespoon for ground coffee
measurements. Make sure you use coarsely ground coffee
for a perfect brew.
Suggested Coffee Measurement chart
To Brew
Ground Coffee
6 cups
12 level tablespoons
4 cups
8 level tablespoons
2 cups
4 level tablespoons
(1 level tablespoon = 5 gm/0.34 oz of ground coffee)
1. Remove the lid and pour fresh water
to the “max” level, which is one liter
(approximately one quart). (Figure 1)
2. Replace the brewing lid and lift the plunger
up and turn clockwise to have the axle of
the plunger clipped and hold underside
the lid.
Figure 1
-73/20/14 10:27 AM
3. Place the French Press on its base station
by positioning it so the stud on the base
fits into the hole on the underside of the
appliance. (Figure 2)
4. Plug the unit in by inserting the plug
into the socket. Extension cords are not
recommended.
5. Press the On/Off button ( ).
6. The temperature indicator lights up by
Figure 2
the 195°F mark and the unit begins to
heat the water. Note: While the water is heating, it is
recommended to grind the coffee beans. Grinding fresh
coffee beans is an important step in brewing a great cup
of coffee in a French press. It is recommended that the
grind should be more coarse than an auto drip grind.
Some grinders have a “French Press” or “Percolator”
setting to indicate coarse grind. The proper grind should
look similar to bread crumbs.
7. Once the water reaches boiling 212°F,
the indicator begins to flash and the unit
switches off. Note: Once the water has
cooled slightly, the unit will turn on and off
to maintain the temperature at a constant
195°F. The unit will automatically switch off
after 25 minutes. (Figure 3)
8. Immediately after the water has boiled and
Figure 3
the unit has shut off, add 12 level heaping
tablespoons of coarsely- ground coffee)
for 32 ounces of water. Stir coffee gently.
Note: The taste of coffee is personal, but it
is recommended to use 2 level tablespoons
per “cup” of water (about a 5oz coffee
cup).It is best to add the coffee and to
stir it well into the water within 2 minutes
of the time the power switch and the red
light go “OFF”. This ensures that the infusion Figure 4
-8-
BVMC-FPK Series_14ESM1.indd 8-9
starts at the optimum temperature of 195°F.
(Figure 4)
9. Replace the brewing lid and push the
plunger handle down slightly so that the
ground coffee is covered by the water.
(Figure 5)
10.Rich, full-bodied coffee flavor will be
extracted at the perfect temperature in
five minutes. After extraction, slowly press
Figure 5
the plunger down into the carafe until it
stops. The coffee is now ready to serve.
Note: The finer the grinds coffee used
the shorter the extraction time. (Figure 6)
11.If you do not plan to drink the coffee
within 20-30 minutes it is desirable to
transfer and hold the brewed coffee
Figure 6
in a thermal carafe to retain its flavor
and temperature. Reheating the coffee by any means
can increase oxidation and result in flavor degradation
or possibly a mild burnt flavor. Coarser grinds are
recommended to minimize the amount of fine grinds in
the coffee. Also, be aware, there will be some grinds in
the bottom of your cup, it is best not to go for the last
drop!
How to make Tea
1. Thoroughly clean the French press, paying
careful attention to removing coffee
residues from the mesh plunger. If there
is a significant amount of coffee residue,
consider cleaning the plunger parts in the
top rack of an automatic dishwasher, or
soaking in some soapy water. Rinse well
before use. If residue remains, you should
consider another way of brewing your cup
of tea.
Figure 1
-93/20/14 10:27 AM
2. Remove the brewing lid and pour fresh water to the
“max” level, which is one liter (approximately one quart).
Add only the amount of water needed for the cups
of tea that are going to be poured as soon as the first
steep of tea is completed. (Figure 1)
3. Replace the brewing lid and lift the plunger
up and turn clockwise to have the axle of
the plunger clipped and hold underside
the lid. (Figure 2)
4. Place the French Press on its base station
by positioning it so the stud on the base
fits into the hole on the underside of the
appliance.
Figure 2
5. Plug the unit in by inserting the plug into
the socket. Extension cords are not recommended.
6. Press the On/Off button ( ).
7. The temperature indicator lights up by the 195°F mark
and the unit begins to heat the water.
8. Once the water reaches boiling (212°F),
the indicator begins to flash and the unit
switches off. Note: Once the water has
cooled slightly, the unit will turn on and off
to maintain the temperature at a constant
195°F. The unit will automatically switch off
after 25 minutes. (Figure 3)
9. After the water has boiled and the unit has Figure 3
shut off, Measure and add about 4 level
teaspoons of leaves for one quart of water
or proportionately less tea for a fractional
pot of water. Stir the leaves into the water
promptly so that the leaves can swell and
begin the steeping process. (Figure 7)
10.Replace the brewing lid and push the
plunger handle down slightly so that the
tea is covered by the water. The ideal
Figure 7
steeping time is about 4 minutes, but
-10-
BVMC-FPK Series_14ESM1.indd 10-11
herbal teas usually are steeped longer. Green teas
and partially fermented teas generally are steeped at
lower temperatures. You can let the hot water sit for
a few minutes to cool slightly before adding the tea.
Follow the recommendations of your tea provider. To
obtain a stronger tea use more tea but do not extend
the steeping time significantly unless you prefer tea
with an added tannin (slightly bitter) taste. The more
flavorful components of tea extract first and the tannin
related components come out with longer steeping time.
Alternatively if you wish to hold the tea hot for more than
20 minutes, consider transferring the tea to a vacuum
thermal carafe which will retain its heat and flavor for
several hours.
Anti boil-dry device
If you switch the appliance on without there being any
water in it or when the water level is too low, the anti boildry device will automatically switch it off. The appliance
can be switched on normally as soon as it is filled with a
sufficient amount of water.
CLEANING
When cleaning the appliance, you should pay attention to
the following:
• Remove the plug from the mains socket, and allow the
appliance to cool down completely before cleaning
it base, cord or plug in water, and no water must be
allowed to enter the appliance base.
• Clean the appliance and base by wiping with a damp
cloth. A little detergent can be added if the appliance is
heavily soiled.
• Do not use scouring pads, steel wool or any form of
strong solvents or abrasive cleaning agents to clean the
appliance, as they can damage the external surfaces of
the appliance.
-113/20/14 10:27 AM
• IMPORTANT! Allow the appliance to dry fully after
cleaning before using again.
• The appliance must not be used if the base or the
underside of the appliance is wet.
• Ensure the appliance is clean and dry before storage.
DESCALING
The lime content of ordinary tap water means lime scale
may gradually be deposited inside the appliance. This
lime scale may be loosened using acetic acid, vinegar, or
descaler, available in supermarkets, etc.
1. Mix 100 ml acetic acid with 300 ml cold water, 3 cups of
white vinegar and 3 cups water or follow the instructions
on the descaler packaging.
2. Pour the solution into the appliance and switch on using
the On/Off button.
3. Boil until the appliance switches off automatically.
4. Leave the solution in the appliance for approx. 10
minutes before emptying.
5. Empty the solution from the appliance. Remove any stain
remaining inside by rubbing with a damp cloth.
6.Fill the appliance with clean water. Place the appliance
on power base and bring to a boil, then discard water.
Repeat and the appliance will be ready to use.
-12BVMC-FPK Series_14ESM1.indd 12-13
WARRANTY INFORMATION
1-YEAR LIMITED WARRANTY
Sunbeam Products, Inc. doing business as Jarden Consumer
Solutions or if in Canada, Sunbeam Corporation (Canada)
Limited doing business as Jarden Consumer Solutions
(collectively “JCS”) warrants that for a period of one year
from the date of purchase, this product will be free from
defects in material and workmanship. JCS, at its option, will
repair or replace this product or any component of the
product found to be defective during the warranty period.
Replacement will be made with a new or remanufactured
product or component. If the product is no longer
available, replacement may be made with a similar product
of equal or greater value. This is your exclusive warranty. Do
NOT attempt to repair or adjust any electrical or mechanical
functions on this product. Doing so will void this warranty.
This warranty is valid for the original retail purchaser from
the date of initial retail purchase and is not transferable.
Keep the original sales receipt. Proof of purchase is
required to obtain warranty performance. JCS dealers,
service centers, or retail stores selling JCS products do not
have the right to alter, modify or any way change the terms
and conditions of this warranty.
This warranty does not cover normal wear of parts or
damage resulting from any of the following: negligent use or
misuse of the product, use on improper voltage or current,
use contrary to the operating instructions, disassembly, repair
or alteration by anyone other than JCS or an authorized JCS
service center. Further, the warranty does not cover: Acts of
God, such as fire, flood, hurricanes and tornadoes.
-133/20/14 10:27 AM
What are the limits on JCS’s Liability?
JCS shall not be liable for any incidental or consequential
damages caused by the breach of any express, implied or
statutory warranty or condition.
Except to the extent prohibited by applicable law, any
implied warranty or condition of merchantability or fitness
for a particular purpose is limited in duration to the
duration of the above warranty.
JCS disclaims all other warranties, conditions or
representations, express, implied, statutory or otherwise.
JCS shall not be liable for any damages of any kind resulting
from the purchase, use or misuse of, or inability to use
the product including incidental, special, consequential
or similar damages or loss of profits, or for any breach
of contract, fundamental or otherwise, or for any claim
brought against purchaser by any other party.
Some provinces, states or jurisdictions do not allow the
exclusion or limitation of incidental or consequential
damages or limitations on how long an implied warranty lasts,
so the above limitations or exclusion may not apply to you.
This warranty gives you specific legal rights, and you may
also have other rights that vary from province to province,
state to state or jurisdiction to jurisdiction.
In the U.S.A., this warranty is offered by Sunbeam Products,
Inc. doing business as Jarden Consumer Solutions located
in Boca Raton, Florida 33431. In Canada, this warranty
is offered by Sunbeam Corporation (Canada) Limited
doing business as Jarden Consumer Solutions, located at
20 B Hereford Street, Brampton, Ontario L6Y 0M1. If you
have any other problem or claim in connection with this
product, please write our Consumer Service Department.
PLEASE DO NOT RETURN THIS PRODUCT TO ANY OF THESE
ADDRESSES OR TO THE PLACE OF PURCHASE.
How to Obtain Warranty Service
In the U.S.A.
If you have any question regarding this warranty or would
like to obtain warranty service, please call 1-800-334-0759
and a convenient service center address will be provided
to you.
In Canada
If you have any question regarding this warranty or would
like to obtain warranty service, please call 1-800-667-8623
and a convenient service center address will be provided
to you.
-14BVMC-FPK Series_14ESM1.indd 14-15
-153/20/14 10:27 AM
PRECAUCIONES
IMPORTANTES
Cuando use algún artefacto eléctrico siempre deben
seguirse precauciones básicas de seguridad para
disminuir riesgos de incendio, descargas eléctricas yo
algunas lesiones a personas, incluyendo las siguientes:
1. Lea todas las instrucciones antes de usar la
máquina.
2. No toque las superficies calientes. Use los guantes
o agarraderas.
3. Para protegerse contra una descarga eléctrica,
no sumerja este artefacto en agua o en cualquier
otro líquido.
4. La supervisión de adultos cercana es necesaria
cuando se utilice cualquier artefacto por niños o
cerca de ellos.
5. Desenchufe la base de potencia o cable de
extensión del tomacorriente cuando no lo esté
utilizando, antes de cambiarlo de sitio y antes de
limpiarlo. Permita que se enfríe antes de limpiar el
artefacto.
6. No opere ningún artefacto con un cable
o enchufe dañado ni después de un mal
funcionamiento del artefacto, o si se ha dañado
de alguna manera. Devuelva este artefacto
solamente al centro de servicio autorizado más
cercano para examinarlo, repararlo o ajustarlo.
7. El uso de accesorios distintos a los recomendados
por Sunbeam podría ocasionar riesgos o lesiones.
8. No lo use a la intemperie.
-16BVMC-FPK Series_14ESM1.indd 16-17
9. No deje que el cable cuelgue sobre el borde de
la mesa o del mostrador o que toque superficies
calientes.
10. No coloque el artefacto sobre o cerca de una
hornilla caliente de gas o eléctrica, ni dentro de
un horno caliente.
11. Asegúrese de que la prensa francesa esté
correctamente situado sobre la base o
también conectado al cable conector antes de
encenderlo.
12. Retire la prensa francesa de la base o desconecte
la prensa francesa del tomacorriente antes
del llenado o vaciado. No intente quitar la
prensa francesa de la base o desenchufarlo
del tomacorriente de pared hasta que no esté
apagado, de forma manual o automática.
13. Utilice la prensa francesa sólo con la base o cable
conector suministrado y vice-versa.
14. No use el artefacto para otros fines que no sea el
concebido.
15.Úselo solamente sobre una superficie dura, plana
nivelada, para evitar la interrupción del flujo de
aire por debajo del artefacto.
16. Debe tener mucho cuidado al manipular o mover
la prensa francesa y también al verter de la prensa
francesa cuando contenga agua hirviendo o café.
17. Pueden ocurrir quemaduras si se quita la tapa
durante el ciclo de calentamiento.
18. Se ha provisto un cable de extensión corto a fin
de disminuir el riesgo de que dicho cable cauce
tropiezos o se enrede con otro cable más largo.
19. Un cable de extensión puede ser usado si se utiliza
con lasprecauciones adecuadas.
-173/20/14 10:27 AM
20. Si se usa un cable de extensión, la potencia eléctrica
marcada en el cable de extensión debe ser por
lo menos de 15 amps y 120 voltios. El cable de
extensión debe ser tipo conexión a tierra, de 3
hilos. El cable de extensión debe acomodarse de
formatal que no cuelgue de la mesa o mostrador,
para evitar serhalada por niños o causar tropiezos
accidentales.
21.No encienda el aparato a menos que haya por lo
menos 0,5 litros de agua dentro del mismo.
22. E l nivel del agua en el aparato no debe superar el
nivel “MAX” del indicador de nivel de agua.
5.No mantenga oprimido el interruptor de encendido ya
que esto puede dañar el mecanismo de auto-apagado.
6.Lleve o mueva la prensa francesa eléctrica solo por el asa.
7.La prensa francesa puede llegar a estar muy caliente,
tenga cuidado al manipularlo.
8.No sumerja la prensa francesa, la base o el cable
conector en agua o en ningún otro líquido.
ESTA UNIDAD ES SÓLO
PARA USO DOMÉSTICO
GUARDE ESTAS
INSTRUCCIONES
PRECAUCIONES:
CUIDADO: PARA EVITAR QUEMADURAS, manipule
esta prensa francesa con cuidado ya que el agua se
calienta, hierve y se enfria. La tapa debe permanecer
en su lugar durante el uso para evitar quemaduras de
vapor. Mantenga el pico alejado de las personas ya
que el vapor puede quemar.
1.Coloque la prensa francesa eléctrica bien hacia atrás
alejado del borde del mostrador.
2.Esta prensa francesa está destinado a hervir AGUA
SOLAMENTE. No caliente ningún otro líquido, ni intente
cocinar algún alimento en este aparato.
3.Sólo lave a mano.
4.No exceda la marca “Max” de nivel del agua al llenar.
Llenarla en exceso podría hacer que el agua haga
ebullición hacia afuera por el pico.
-18BVMC-FPK Series_14ESM1.indd 18-19
-193/20/14 10:27 AM
Tabla de Contenidos
Precauciones Importantes................................................. 16
Precauciones..................................................................... 18
Tabla de Contenidos......................................................... 20
Diagrama de las Partes....................................................... 20
Cómo hervir agua ............................................................. 21
Cómo preparar café ......................................................... 22
Cómo preparar té.............................................................. 24
Dispositivo de ebullición en seco...................................... 26
Cuidado y Limpieza........................................................... 26
Garantía Limitada.............................................................. 28
DIAGRAMA DE LAS PARTES
1.
1. Perilla del Émbolo
2.Tapa
3.Asa
4.Hervidor
5.Émbolo con filtro de
malla
6.Indicador de
temperatura
7.Botón de encendido /
apagado (On/Off)
8.Base
9. Cable y enchufe
2.
3.
4.
6.
7.
8.
-20BVMC-FPK Series_14ESM1.indd 20-21
5.
9.
Cómo Hervir Agua
1. Retire la tapa y vierta agua fresca
hasta el nivel “max”, que es un litro
(aproximadamente un cuarto de galón).
(Figura 1)
2. Vuelva a colocar la tapa y levante el émbolo
hacia arriba y gire hacia la derecha para
que el eje del émbolo calce y sujete la
Figura 1
parte inferior de la tapa.
3. Coloque la prensa francesa en su base
colocándolo en posición de forma que el
cilindro de la base encaje en el agujero de
la parte inferior del aparato. (Figura 2)
4. Enchufe la unidad insertando el enchufe en
el tomacorriente. No se recomiendan los
cables de extensión.
5. Pulse el botón On / Off ( ).
6. El indicador de temperatura se ilumina en
Figura 2
la marca de 195 °F y la unidad comienza a
calentar el agua.
7. Una vez que el agua llegue a ebullición en
212 °F, el indicador comienza a destellar y
la unidad se apaga. Nota: Una vez que el
agua se haya enfriado un poco, la unidad
se enciende y apaga para mantener una
temperatura constante de 195 °F. La unidad
se apagará automáticamente después de
Figura 3
25 minutos. (Figura 3)
8. Si desea mantener el agua caliente a una temperatura por
debajo de 195 °F, se puede elegir calentar directamente
el agua fría a una temperatura más baja de 112 °F o 160 °F
y mantener el agua caliente a esa temperatura, pulsando
el botón de encendido / apagado una o más veces al
comenzar el encendido del aparato. También puede elegir
calentar el agua fría a 212 °F primero y a continuación,
-213/20/14 10:27 AM
establecer una temperatura menor de 112 °F o 160 °F para
mantener el agua caliente a la temperatura programada. La
diferencia es que en la segunda opción, usted tiene que
esperar hasta que el agua se caliente hasta 212 °F primero.
Cuando el indicador de temperatura de 195 °F comienza
a destellar, pulse el botón “On / Off” de nuevo, una o más
veces para ajustar la temperatura inferior a 112 °F o 160 °F
para mantener esa temperatura. En esta forma el agua se
mantiene caliente a una temperatura inferior y el aparato no
se apaga por sí mismo.
Cómo Preparar Café
Selección y Medición de Café Molido
Para obtener mejores resultados, utilice una cucharada
rasa de café molido para las mediciones. Asegúrese de que
utiliza café molido grueso para un colado perfecto.
Tabla de Medidas de Café Sugeridas
Para Colar
Café Molido
6 tazas
12 cucharadas rasas
4 tazas
8 cucharadas rasas
2 tazas
4 cucharadas rasas
1 cucharada rasa = 5 gm/0.34 oz de café molido
1. Retire la tapa y vierta agua fresca
hasta el nivel “max”, que es un litro
(aproximadamente un cuarto de galón).
(Figura 1)
2. Vuelva a colocar la tapa y levante el émbolo
hacia arriba y gire hacia la derecha para
que el eje del émbolo calce y sujete la
parte inferior de la tapa.
-22BVMC-FPK Series_14ESM1.indd 22-23
Figura 1
3. Coloque la prensa francesa en su base
colocándolo en posición de forma que el
cilindro de la base encaje en el agujero de
la parte inferior del aparato. (Figura 2)
4. Enchufe la unidad insertando el enchufe en
el tomacorriente. No se recomiendan los
cables de extensión.
5. Pulse el botón On / Off ( ).
6. La luz indicadora de la temperatura se
Figura 2
ilumina en la marca de 195 °F y la unidad
comienza a calentar el agua. Nota: Mientras el agua se
está calentando, es recomendable moler los granos
de café. Moler los granos frescos de café es un paso
importante en el colado para una magnífica taza de café
en la prensa francesa. Es recomendable que cuando se
muela, los granos queden más gruesos que aquellos que
normalmente se utilizan para colar. Algunas moledoras
de café tienen una opción de “French
Press” or “Percolator” que indican un
molido grueso. El tamaño apropiado del
café molido es similar a las migas de pan.
7. Una vez que el agua llegue a ebullición en
212 °F, el indicador comienza a destellar y
la unidad se apaga. Nota: Una vez que el
agua se haya enfriado un poco, la unidad
se enciende y apaga para mantener una
Figura 3
temperatura constante de 195 °F. La unidad
se apagará automáticamente después de
25 minutos. (Figura 3)
8. Inmediatamente después que el agua
haya hervido y la unidad se haya apagado,
agregue 12 cucharadas colmadas de
café molido grueso para 32 onzas de
agua. Mezcle suavemente el café. Nota:
El sabor del café es personal, pero es
recomendable usar 2 cucharadas rasas por Figura 4
-23-
3/20/14 10:27 AM
“taza” de agua (alrededor de una taza de
5 oz de café). Es mejor agregar el café y
mezclarlo bien en el agua dentro de los 2
minutos siguientes al apagado de tanto la
luz roja como de la unidad. Esto asegura
que la infusión se inicia a la temperatura
óptima de 195 °F. (Figura 4)
9. Vuelva a colocar la tapa y empuje la perilla
del émbolo hacia abajo ligeramente para
Figura 5
que el café molido sea cubierto por el
agua. (Figura 5)
10.Riquísimo, un sabor de café con gran
cuerpo será extraído a la temperatura
perfecta en cinco minutos. Después de
la extracción, presione lentamente el
émbolo hacia abajo dentro de la jarra
Figura 6
hasta que se detenga. El café ya está listo
para servir. Nota: Mientras más fino sea el café molido
usado más corto es el tiempo de extracción. (Figura 6)
11.Si usted no va a beber el café dentro de 20-30 minutos es
recomendable transferir y mantener el café preparado en
una jarra térmica para conservar su sabor y temperatura.
Recalentar el café por cualquier medio puede aumentar
la oxidación y dar lugar a degradación del sabor o
posiblemente un leve sabor a quemado. Se recomienda
moler los granos más gruesos para reducir al mínimo la
cantidad de grumos en el café. Además, tenga en cuenta,
habrá algunas grumos de café en el fondo de su taza, lo
mejor es no beber hasta la última gota!
Cómo preparar Té
1. Limpie a fondo la prensa francesa, prestando especial
atención a la eliminación de residuos de café de la
malla del émbolo. Si hay una cantidad significativa de
residuos de café, considere la posibilidad de limpiar las
piezas del émbolo en la parte superior de un lavaplatos
-24BVMC-FPK Series_14ESM1.indd 24-25
automático o sumergirlas en un poco de agua jabonosa.
Enjuague bien antes de usar. Si aún quedan residuos, se
deberá considerar otra forma de elaboración de su taza
de té.
2. Retire la tapa y vierta el agua fresca
hasta el nivel “max”, que es un litro
(aproximadamente un cuarto de galón).
Agregue sólo la cantidad de agua necesaria
para las tazas de té que van a ser vertidas
tan pronto como se complete el paso de
remojo del té. (Figura 1)
3. Vuelva a colocar la tapa y levante el émbolo Figura 1
hacia arriba y gire hacia la derecha para
que el eje del émbolo calce y sujete la
parte inferior de la tapa. (Figura 2)
4. Coloque la prensa francesa en su base
colocándolo en posición de forma que el
cilindro de la base encaje en el agujero de
la parte inferior del aparato.
5. Enchufe la unidad insertando el enchufe en
el tomacorriente. No se recomiendan los
Figura 2
cables de extensión.
6. Pulse el botón On / Off ( ).
7. El indicador de temperatura se ilumina por
la marca 195 °F y la unidad comienza a
calentar el agua.
8. Una vez que el agua llegue a punto de
ebullición ( 212 °F), el indicador comienza
a parpadear y la unidad se apaga. Nota:
Una vez que el agua se haya enfriado
Figura 3
un poco, la unidad se enciende y apaga
para mantener la temperatura a una
temperatura constante de 195 °F. La unidad se apagará
automáticamente después de 25 minutos. (Figura 3)
9. Después de que el agua haya hervido y la unidad se ha
apagado, Mida y agregue unas 4 cucharaditas rasas de
-25-
3/20/14 10:27 AM
hojas para un cuarto de galón de agua o
proporcionalmente menos té para menor
cantidad de agua. Ponga las hojas en el
agua rápidamente de manera que las hojas
puedan remojarse y comenzar el proceso
de infusión. (Figura 7)
10.Vuelva a colocar la tapa y empuje la perilla
del émbolo suavemente hacia abajo
para que el té sea cubierto por el agua.
Figura 7
El tiempo ideal para la infusión es de
aproximadamente 4 minutos, pero los tés de hierbas
por lo general se llevan más tiempo. Los tés verdes y
tés parcialmente fermentados generalmente logran una
infusión a temperaturas más bajas. Puede dejar que el
agua caliente repose por unos minutos para enfriar un
poco antes de agregar el té. Siga las recomendaciones
de su proveedor de té. Para obtener un té más fuerte
use más de té, pero no extiende el tiempo de remojo
significativamente a menos que prefiera el té con un
sabor de tanino añadido (ligeramente amargo). Los
componentes con mayor sabor del té se extraen primero
y los componentes relacionados con el tanino salen con
un tiempo de reposo más largo. Alternativamente, si
desea mantener el té caliente por más de 20 minutos,
considere pasar el té a una jarra térmica que mantendrá
su calor y sabor durante varias horas.
• Retire el enchufe del tomacorriente y permita que el
aparato se enfríe completamente antes de limpiarle la
base, el cable o el enchufe, no se debe permitir que el
agua entre a la base del aparato.
• Limpie el aparato y la base frotando con un paño
húmedo. Un poco de detergente puede ser añadido si
el aparato está muy sucio.
• No use esponjas de alambre y ninguna forma de
solventes fuertes o productos de limpieza abrasivos para
limpiar el aparato, ya que pueden dañar la superficie
externa del aparato.
• IMPORTANTE! Deje que el aparato se seque por completo
después de la limpieza antes de volver a usarla.
• El aparato no debe ser utilizado si la base está mojada o
si el aparato está mojado por debajo.
• Asegúrese de que el aparato esté limpio y seco antes de
guardarlo.
DESCALCIFICACIÓN
Al limpiar el aparato, se debe prestar atención a lo siguiente:
El contenido de cal del agua del grifo significa que la cal
puede ser depositada gradualmente en el interior del aparato.
Esta cal se puede aflojar con ácido acético, vinagre o algún
descalcificador disponible en supermercados, etc.
1. Mezcle 100 ml de ácido acético con 300 ml de agua fría,
3 tazas de vinagre blanco y 3 tazas de agua o siga las
instrucciones en el envase del descalcificador.
2. Vierta la solución en el aparato y prenda con el botón
de encendido / apagado.
3. Hierva hasta que el aparato se apague automáticamente.
4. Deje la solución en el aparato durante 10 minutos
aproximadamente antes de vaciar.
5. Vacíe la solución del aparato. Quite cualquier mancha
restante de adentro frotando con un paño húmedo.
6.Llene el aparato con agua limpia. Coloque el aparato
sobre su base y lleve a ebullición, luego bote el agua.
Repita y el aparato estará listo para su uso.
-26-
-27-
Dispositivo de ebullición en seco
Si se prende el aparato sin que haya agua adentro o
cuando el nivel del agua es demasiado bajo, el dispositivo
de ebullición en seco automáticamente lo apagará. El
aparato se puede conectar normalmente tan pronto como
se llene con una cantidad suficiente de agua.
LIMPIEZA
BVMC-FPK Series_14ESM1.indd 26-27
3/20/14 10:27 AM
INFORMACIÓN DE GARANTÍA
Centro de Servicio autorizado por JCS. Asimismo, la
garantía no cubre actos fortuitos tales como incendios,
inundaciones, huracanes y tornados.
Sunbeam Products, Inc. operando bajo el nombre de
Jarden Consumer Solutions, o en Canadá, Sunbeam
Corporation (Canada) Limited operando bajo el nombre
de Jarden Consumer Solutions, (en forma conjunta, “JCS”),
garantiza que por un período de un año a partir de la
fecha de compra, este producto estará libre de defectos
de materiales y mano de obra. JCS, a su elección, reparará
o reemplazará este producto o cualquier componente
del mismo que presente defectos durante el período
de garantía. El reemplazo se realizará por un producto
o componente nuevo o reparado. Si el producto ya no
estuviera disponible, se lo reemplazará por un producto
similar de valor igual o superior. Ésta es su garantía
exclusiva. No intente reparar o ajustar ninguna función
eléctrica o mecánica de este producto. Al hacerlo elimínará
ésta garantía.
La garantía es válida para el comprador minorista original
a partir de la fecha de compra inicial y la misma no es
transferible. Conserve el recibo de compra original. Para
solicitar servicio en garantía se requiere presentar un recibo
de compra. Los agentes y centros de servicio de JCS o las
tiendas minoristas que venden productos de JCS no tienen
derecho a alterar, modificar ni cambiar de ningún otro
modo los términos y las condiciones de esta garantía.
Esta garantía no cubre el desgaste normal de las piezas
ni los daños que se produzcan como resultado de
uso negligente o mal uso del producto, uso de voltaje
incorrecto o corriente inapropiada, uso contrario a
las instrucciones operativas, y desarme, reparación o
alteración por parte de un tercero ajeno a JCS o a un
¿Cuál es el Límite de Responsabilidad de JCS?
GARANTÍA LIMITADA DE 1 AÑO
-28BVMC-FPK Series_14ESM1.indd 28-29
JCS no será responsable de daños incidentales o
emergentes causados por el incumplimiento de alguna
garantía o condición expresa, implícita o legal.
Excepto en la medida en que lo prohíba la ley aplicable,
cualquier garantía o condición implícita de comerciabilidad
o aptitud para un fin determinado se limita, en cuanto a su
duración, al plazo de la garantía antes mencionada.
JCS queda exenta de toda otra garantías, condiciones o
manifestaciones, expresa, implícita, legal o de cualquier
otra naturaleza.
JCS no será responsable de ningún tipo de daño que
resulte de la compra, uso o mal uso del producto, o
por la imposibilidad de usar el producto, incluidos los
daños incidentales, especiales, emergentes o similares,
o la pérdida de ganancias, ni de ningún incumplimiento
contractual, sea de una obligación esencial o de otra
naturaleza, ni de ningún reclamo iniciado contra el
comprador por un tercero.
Algunas provincias, estados o jurisdicciones no permiten
la exclusión o limitación de los daños incidentales o
emergentes ni las limitaciones a la duración de las garantías
implícitas, de modo que es posible que la exclusión o las
limitaciones antes mencionadas no se apliquen en su caso.
Esta garantía le otorga derechos legales específicos y es
posible que usted tenga otros derechos que varían de un
estado, provincia o jurisdicción a otro.
-293/20/14 10:27 AM
Cómo Solicitar el Servicio en Garantía
En los Estados Unidos
Si tiene alguna pregunta sobre esta garantía o desea
recibir servicio de garantía, llame al 1-800-334-0759 y podrá
obtener la dirección del centro de servicio que le resulte
más conveniente.
En Canadá
Si tiene alguna pregunta sobre esta garantía o desea recibir
servicio de garantía, llame al 1-800-667-8623 y podrá
obtener la dirección del centro de servicio que le resulte
más conveniente.
En los Estados Unidos, esta garantía es ofrecida por
Sunbeam Products, Inc. operando bajo el nombre de
Jarden Consumer Solutions, Boca Ratón, Florida 33431. En
Canadá, esta garantía es ofrecida por Sunbeam Corporation
(Canada) Limited operando bajo el nombre de Jarden
Consumer Solutions, 20 B Hereford Street, Brampton,
Ontario L6Y 0M1. Si usted tiene otro problema o reclamo
en conexión con este producto, por favor escriba al
Departamento de Servicio al Consumidor
POR FAVOR NO DEVUELVA ESTE PRODUCTO A NINGUNA
DE ESTAS DIRECCIONES NI AL LUGAR DE COMPRA.
-30BVMC-FPK Series_14ESM1.indd 30-31
3/20/14 10:27 AM