1
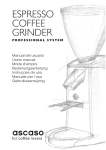
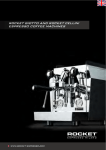
STEEL BAR UM2id OK 2012.FH11 Mon Jun 04 16:49:04 2012 Página 1 E Approvals: CM C LIS T E D US Manual del usuario F F O R P S Ascaso Factory SLU Energía, 39-41 Poligono Famadas 08940 Cornellá Barcelona Spain Tel. (34) 93 377 83 11 Fax. (34) 93 377 93 47 [email protected] www.ascaso.com E ascaso f a c t o r y E S S O C Technical specifications and models can change without notice. Las especificaciones técnicas y los modelos pueden cambiar sin notificación. Les Spécifications techniques et les modèles peuvent changer sans notification. Technische Spezifikationen und Modelle können ohne Ankündigung ändern. Especificações técnicas e modelos podem mudar sem aviso. Le Descrizioni tecnici ed i modelli possono cambiare senza notifica. E E M A 3105403 H I N ERTEK INT C ISO 9001 ascaso for coffee lovers STEEL BAR UM2id OK 2012.FH11 Mon Jun 04 16:49:04 2012 Página 2 Introducción ascaso Gracias por haber adquirido un producto ascaso. Con él podrá obtener el mejor café espresso y deliciosos cappuccinos. Su máquina de café ha sido diseñada y construida aplicando las últimas innovaciones tecnológicas, tanto en el ámbito informático como de ingeniería, por lo que el resultado es un producto de alta calidad, seguro y fiable. Introduction Thank you very much for purchasing an ascaso product. This machine makes the best espresso coffee and delicious cappuccinos. Your coffee machine has been designed and built using the latest technological computing and engineering innovations. It is therefore a high-quality, safe and reliable product. Introduction Reciclaje de su cafetera Las cafeteras pueden contener materiales reciclables. Contacte con su distribuidor o con el centro de reciclaje de su localidad. Disposal of your appliance Old appliances may contain materials which can be reclaimed or recycled. Please contact your distributor or your local waste collection centre . Mise au rebut de votre ancien appareil Les vieus appareils peuvent contenir des materieaux recyclables. Communiquez avec votre distributeur oú le centre de recyclage de votre localité. Verfügung von Ihren Geräten Verfügung von Ihren Geräten Alten Geräten kann Materialien enthalten, die zurückgewonnen werden können oder wiederverwertet werden kann. Bitte kontaktieren Sie Ihren Verteiler unsere Ihre örtlicheVerschwendungen Sammlung. A disposição de seu eletrodoméstico velho. Eletrodomésticos velhos podem conter materiais que podem ser exigido ou pode ser reciclado. Por favor contate seu distribuidor ou el seu centro local de coleção de desperdício. La disposizione del suo elettrodomestico vecchi Vecchi elettrodomestici possono contenere dei materiali che possono essere rivendicato o può essere riciclato. Per favore di contattare il suo distributore o il suo commerciante di centro di collezione di spreco Recycling van uw koffiezetapparaat Koffiezetapparaten kunnen herbruikbare materialen bevatten. Neem contact op met uw leverancier of met het inzamelingspunt voor recycling in uw woonplaats. Merci davoir acquis un produit ascaso. Avec lui vous pourrez obtenir le meilleur des cafés expresso et de délicieux cappuccinos. Votre machine à café a été conçue et fabriquée en appliquant les dernières innovations technologiques, tant en matière dinformatique que dingénierie. Le résultat est donc un produit de premier choix, sûr et fiable. Einleitung Wir beglückwünschen Sie zum Kauf dieses ascaso-Produkts. Mit diesem Kaffeeautomaten genießen Sie besten Espresso und feinsten Cappuccino! Dieser hochzuverlässige Kaffeeautomat wurde unter Anwendung der neuesten technologischen Erkenntnisse in Informatik und Gerätebau entwikkelt und erfüllt höchste Qualitäts- und, Sicherheitsstandards. Introdução Obrigado por ter adquirido um produto ascaso. Com ele poderá obter o melhor café expresso e deliciosos cappuccinos. A sua máquina de café foi idealizada e fabricada aplicando as mais recentes inovações tecnológicas, tanto no âmbito informático como de engenharia, pelo que o resultado é um produto de alta qualidade, seguro e fiável. Introduzione Grazie per avere acquistato un prodotto ascaso. Vi permetterà di preparare un ottimo espresso e deliziosi cappuccini. La vostra macchina da caffè è stata progettata e costruita con le ultime innovazioni tecnologiche, sia nellambito informatico che in quello ingegneristico: il risultato è quindi un prodotto di alta qualità, sicuro e affidabile. Inleiding Wij danken u voor de aankoop van dit ascaso-product. Met dit koffiezetapparaat kunt u de beste espresso en de lekkerste cappuccino's zetten. Uw koffiezetapparaat is ontworpen en ontwikkeld volgens de laatste technologische innovaties, zowel wat betreft informatica als techniek. Het resultaat is een hoogwaardig, veilig en betrouwbaar product. Página 3 ascaso Manual del usuario Indice 1. 2. 3. 4. 5. 6. 7. Características técnicas Esquema. Puesta en marcha Programación cantidad café Programación cajón cápsulas Preparación del café Preparación del cappuccino Preparación agua caliente 8. 9. 10. 11. 12. Mantenimiento y limpieza Seguridad Garantía Declaración conformidad CE Tabla de Consulta rápida 1. Características técnicas 230VAC - 50Hz Potencia (W) (A) 1200 + 1000 10 BAR 1GR modelo: ONE 1200 + 1200 10,5 BAR 2GR modelos: Pod / Kap / Kap Auto-exp. 1200 + 2000 14 1200 + 2400 16 BAR 1GR modelos: Pod / Kap / Kap Auto-exp. BAR 2GR modelo: ONE 120VAC - 60Hz Peso (Kg) Opcional Dimensiones Capacidad (l x h x p)* depósito(l) 400 440** x 450 x 540 25 Opcional 700 550*** x 450 x 540 34 0 Interruptor on/off general 12 Salida agua 00 Piloto on/off general 13 Superficie calienta-tazas 2 Tubo desagüe 14 Rejilla 3 Interruptor on/off caldera 15 Bandeja desagüe 4 Piloto función caldera (temperatura) 16 Cajón depósito 6 Piloto temperatura café 17 Tapa lateral 7 Manómetro presión caldera 18 Manguito 3/4 (sólo para conexión red) 8 Dosificación electrónica café S-L-XL 19 Flexo conexión red 9 Mando vapor. 20 Cubeta para desagüe opcional 10 Tubo salida vapor 21 Grupo cápsula 11 Mando agua 22 Cajón cápsulas usadas Avisos botonera 5 (Parpadeo 3botones) Falta de agua 17 10 11 10 18 (Parpadeo "S") Cajón cápsulas abierto 21 12 19 14 22 (Parpadeo "S y XL") Cajón cápsulas lleno Porta fijo (sólo monodosis) Carroceria de acero pintado epoxi y acero inox Grupos de café monodosis (intercambiador) Grupos de café molido (sistema prof.) Control automático de temperatura Caldera para vapor y agua caliente acero inox ( 4 l.) Llenado automático de la caldera 10 Manómetro presión de caldera Salidas independientes vapor y agua (Grifos profesionales) Calientatazas Presión máxima de red admitida: 1 MPa Presión mínima de red admitida: 0,1 MPa 16 13 9 * largo x alto x profundo (mm) Capacidad caldera vapor (todos los modelos): 4 Lt ** largo mod. KAP Auto-Expulsión *** largo modelos POD y KAP Auto-Expulsión COMPACTAS PF = Porta fijo. PM = Porta móvil. TR = Tronic. Características ascaso 2. Esquema. Puesta en marcha ESPAÑOL STEEL BAR UM2id OK 2012.FH11 Mon Jun 04 16:49:04 2012 (led encendido) Resistencia café funcionando 15 20 2 PROF 1GR 7 9 17 6 8 9 17 11 8 6 8 6 11 1 Café STEEL BAR 1 GR. STEEL BAR 2 GR. 10 2 Cafés PROF 2GR 7 7 12 7 12 1 Café 0 00 4 3 0 00 4 2 Cafés 3 3 ESPAÑOL ascaso El instalador deberá leer atentamente este manual antes de efectuar la puesta en marcha. El operador ha de ser una persona adulta y responsable. En caso de surgir cualquier tipo de anomalía contacte con su distribuidor. Puesta en marcha Comprobar que la tensión eléctrica es la misma que aparece en la placa de la máquina. l Máquina conectada a red, conec tar el tubo de desague 2 . Conectar la máquina a la toma de red mediante el flexo 19 y dejar el grifo de red abierto. l Máquina con depósito, llenar mini mo 3 litros de agua el depósito situado en la parte lateral 16 l Para ambos modelos Conectar la máquina a la red eléctrica y poner en marcha mediante los inte rruptores ON/OFF 0 y 3 . Se iluminarán los pilotos de café 00 y 6 . Después de 3-4 seg. se empezará a llenar la caldera automáticamente. Al finalizar el llenado se para la bomba y se ilumina el piloto 4 momento en que empieza a calentar la caldera Es normal que durante el proceso de llenado se pare la máquina y parpadea la botonera izquierda. Debe hacer un reset mediante el interruptor ON/OFF caldera 0 . La máquina continuará el proceso de llenado Una vez apagado el piloto 6 la máquina estará dispuesta para hacer café Para vapor y agua caliente, se apagará el piloto 4 , y el manómetro 7 indicará la presión de la caldera aprox. 1,5 bar. 4 Página 4 La caldera estará dispuesta para dis pensar agua y vapor. (aprox. 20 min.) Es normal que al inicio del servicio de vapor le salga por el tubo un poco de agua, por lo que recomendamos posi cione el tubo en la bandeja de desague. ! Atención Si por cualquier motivo no le llega agua a la caldera, parpadeará la botonera izquierda y dejará de funcionar la má quina. En ambos casos desconectar mediante el interruptor 0 y comprobar el abaste cimiento de agua manual o red, una vez restablecido el suministro, pulsar 0 para continuar. ! Recomendamos utilizar agua de mineralización débil. La calidad del agua afectará al sabor y calidad de su café, además de evitar averías en el futuro. Consulte nuestros filtros especia les anti-cal (opción) 3. Programación de la cantidad de café (TRONIC) Funciones de la botonera electrónica. S: café corto L: café largo XL:continuo (volver a pulsar para cortar dosis) Programación cantidad de café Con la máquina encendida pulsar durante 5 o 6 seg el pulsador de programación XL hasta que el led se encienda intermitentemente. Presionar el pulsador de Café Corto S. Se ilumina el led, al mismo tiempo que el led de programación XL cambia a fijo. Deje fluir el café. Una vez obtenida la cantidad deseada, pulse la tecla XL y espere hasta que deje de parpadear.. La máquina ya está programada. Para programar Café Largo L , repita la misma operación. Máquinas 2 grupos: Al programar el grupo izquierdo, automáticamente el derecho queda programado con los mismos parámetros. Luego, puede reprogramar solamente el derecho con nuevos parámetros. Si desea obtener café a voluntad (continuo), pulse la tecla XL. Cuando obtenga la cantidad deseada, pulse de nuevo para interrumpir la erogación. 4.Programacion centralita para contador capsulas -Parar máquina. -Presionar las teclas S-L-XL a la vez y conectar máquina -Se apaga botonera del grupo 2. -Dejar de presionar las teclas y desconectar máquina. -Volver a conectar y la máquina está preparada para contador (40 cápsulas por defecto). Para variar el valor del contador o desprogramar -Parar máquina. -Presionar las teclas S-XL a la vez y conectar máquina. -Se apagan botonera del grupo 2 y la tecla S del grupo 1. -En este momento presionar la tecla S para disminuir nº de cápsulas ó la tecla L para aumentar. En cada pulsación se ilumina una tecla con valor según la tabla siguiente: LED XL iluminado: 0 Apagando la máquina queda desprogramada LED L iluminado: 35 cápsulas LED XL y L iluminado: 40 cápsulas. ascaso LED S iluminado: 45 cápsulas LED S y XL iluminado: 50 cápsulas LED S y LED L iluminado: 55 cápsulas -Una vez seleccionado el valor deseado, apagar máquina. - Volver a conectar y la máquina está preparada con el nuevo valor progamado -Botonera de 5 teclas presionar S.-S..XL. 5. Preparación ESPAÑOL STEEL BAR UM2id OK 2012.FH11 Mon Jun 04 16:49:04 2012 del café Compruebe su sistema: (molido, monodosis ó cápsula) Molido Puede utilizar cualquier tipo de café. Para resultados óptimos, aconsejamos utilice mezclas preparadas para la elaboración de café espresso ya que el punto de molido será el adecuado. Si el café sale muy rápida o muy lentamente, hará falta cambiar el tipo de café por otro molido más fino o más grueso y experimentar con el prensado según nuestras preferencias. 1. Debe tener la máquina conectada. Coloque el portafiltro (con filtro) en el grupo. 2. Espere que el piloto 6 se apague (1,5 minutos aprox.). Esto indica que la cafetera ha alcanzado la temperatura idónea. Accione la tecla XL (salida de café continuo) de la botonera 8 y deje pasar agua por el grupo. Realice esta acción antes de hacer el café, eliminará residuos y equilibrará la temperatura para un óptimo servicio. 3. El cacillo debe quedar lleno 3/4 partes de su capacidad , una vez prensado (Ver dibujo 2). Dibujo 2 5 ESPAÑOL ascaso 4. Limpie los residuos de café que se hayan depositado en los bordes del cacillo para que el ajuste sea perfecto. 5. Introduzca el portafiltro en el grupo partiendo de su izquierda y girando hacia la derecha con la suficiente presión final.(Ver dibujo 3). Dibujo 3 6. Coloque las tazas o taza sobre la rejilla y accione la botonera 8 en la selección deseada (S/corto; L/largo; XL/continuo). La extracción perfecta de un espresso requiere de 20/25 segundos. Página 5 momento bajo presión. Cápsulas Puntos 1 y 2 como en apartado de café molido. Abra el cajón 21 . Coloque la cápsula y cierre el cajón hasta que note un click. Coloque la taza sobre la rejilla y pulse la opción deseada en la botonera 8 . La extracción perfecta requiere de 20/25 segundos. Cuando el cajón 22 tenga 50 cápsulas usadas, la máquina avisará parpadeando toda la botonera. Una vez vaciado y colocado de nuevo, volverá a su estado normal. Consejos generales: 1. El portafiltro siempre debe ir colocado en la máquina para que se mantenga caliente. En posición cerrado. 2. Colocar las tazas en el calienta tazas 13 . La temperatura (optima 40ºC/105ºF) mejorará nuestro espresso. Atención -Para obtener una óptima calidad en la extracción del café, use siempre el filtro adecuado para 1 ó 2 cafés Monodosis Puntos 1 y 2 como en apartado de café molido. Colocar pastilla en el portafiltro y girarlo suavemente a la derecha hasta su tope. No hacer fuerza. El cierre es suave. (Ver dibujo 4). Punto 6 y notas como en apartado anterior ! Atención: No saque o gire el portafiltro mientras está pasando el agua, ya que el aparato está en ese 6 Dibujo 4 3. El café continuará saliendo en pequeñas gotas unos segundos des pués de apagar el interruptor de café. 6. Preparación del cappuccino El verdadero "cappuccino" está com puesto por 25 mililitros de café es presso y 125 mililitros de leche fría montada con vapor, que pasará de los 3 ó 4 grados centígrados a los cerca de 55 grados centígra dos. La leche tiene que ser de vacuno y fresca con un contenido de proteínas sobre el 3,2 por ciento y el 3,5 por ciento de grasa, y montada -sólo la cantidad necesaria para una taza- en un recipiente de acero (jarra) para evitar la mezcla con otros olores o sabores. La densidad de la crema tiene que ser uniforme sin que exista una separación con el líquido, ni puede presentar orifi cios o burbujas. Preparación l El manómetro 7 indicará la presión de la caldera 1.2/1,5 bar. La caldera estará dispuesta para dispensar agua y vapor (aprox. 20/22 min.) l Gire el mando vapor 9 .Es normal que al inicio del servicio de vapor le salga por el tubo un poco de agua,por lo que recomendamos posicione el tubo en la bandeja de desagüe. l Introduzca el tubo 10 en la leche a calentar. Llene hasta 1/ 3 de la jarra . 1) TEXTURA: Obteniendo crema Para obtener la consistencia denomina da "terciopelo" , se debe situar el tubo cappuccinador justo por debajo de la superficie de la leche. Abrimos el mando vapor 9 y movemos el tubo 10 en diferentes ángulos (siempre bajo la superficie de la leche) hasta conseguir un efecto de emulsión gracias a la circulación del aire. Una vez texturada, el vo lumen de la le ascaso che puede ser del doble. Por favor, recuerde que debe mover la jarra y el tubo de vapor, siempre asegu rándose que trabaja en la zona más superficial de la leche. Tras esta operación , la leche está tex turada pero aún está fría. 2) TEMPERATURA: Calentando la leche Una vez obtenida la textura, sumergimos el tubo de vapor 10 en la jarra a más profundidad .Realizamos movimientos circulares para calentar la leche en todo su vo lumen hasta que alcance la tem peratura de seada. ESPAÑOL STEEL BAR UM2id OK 2012.FH11 Mon Jun 04 16:49:04 2012 ! Atención: texturar requiere trabajar bajo la superficie de la leche y calentar requiere trabajar a más profundidad Texturar Calentar Recuerde no calentar la leche a más de 75ºC. A partir de este temperatura la leche estará escaldada y perderá sus propiedades para el cappuccino. Una vez terminada la operación, gire el pomo 9 para cerrar la salida de vapor. Consejo: El espresso es extractado a 75-80ºC. La leche está texturada y caliente entre 7 ESPAÑOL ascaso 55ºC-70ºC. Es importante conservar estas temperaturas al servir, por lo que se deben calentar las tazas usando la zona calientazas de la cafetera . Si no es posible, caliente la taza con agua caliente antes de usarla. Una vez tenemos la leche caliente y texturada, ya estamos preparados para servirla en la taza, añadiéndola a nuestra base de espresso. Posibles problemas: La crema puede ser excesivamente fina y sin consistencia. 1) Uno de lo motivos puede ser que la leche ya se hubiera calentado con antelación. 2) Se ha calentado la leche demasiado ( el tubo de vapor se sitúa a más pro fundidad en la jarra y calienta la leche sin dejar circular el aire en la superficie) antes de haber conseguido la textura deseable. No hemos realizado co rrectamente el paso 1: TEXTURAR y no hemos dejado que el aire trabajara la leche. ! Atención: Si ha utilizado el servicio de vapor o agua durante un período largo sin interrupción y observa que le baja la presión de salida, espere unos instantes a que se recupere la caldera. La presión óptima es de 1 / 1,5 bar. ! Importante Después de cada uso es aconsejable hacer salir vapor durante 5 segundos para limpiar el conducto y evitar que se obture. Para limpiar los orificios de absorción (A) puede usar un clip. Asegurese de que el tubo esta libre de obstáculos. 8 A Página 6 7. Preparación agua caliente Ponga una taza o recipiente bajo la salida de agua 12 Accione el mando 11 para obtener agua. Girar el mando para cerrar la salida de agua, cuando haya obtenido la cantidad deseada. Consulte a su distribuidor. Recomendaciones de uso del Coffee washer : Cafés/dia >10 5-10 1-5 8. Mantenimiento y Limpieza ! Advertencia general: La limpieza y el mantenimiento se deben realizar cuando el aparato está frío y desconectado de la red eléctrica. No sumerja el aparato en agua. No apto para su limpieza en lavavajillas. 1- Limpieza externa : Para limpier el exterior de la máquina use alcohol de 96º o productos especificos para acero inoxidable. l Extraiga la bandeja periódicamente para limpiarla. l Si no se va a utilizar la máquina en largo tiempo, vacíe el depósito de agua. l Inmediatamente después del uso, limpie el tubo de vapor con un trapo húmedo. Para el interior, deje circular el agua. l Para limpiar el orificio cappuccinador, puede utilizar un palillo o clip. De está forma, el conducto quedará libre de obturaciones. 2-. Limpieza Interna : La limpieza y cuidado preventivo del sistema interno de su máquina es vital para obtener un expresso de óptima calidad. Para la limpieza interior del grupo de erogación, utilizar el producto ascaso coffee washer. Este producto es también útil para la descalcificación de la máquina. Una descalcificación regular de su cafetera, contribuirá a asegurar una excelente calidad del café y a prolongar la vida útil del aparato. Descalcificación ascaso Limpie la ducha con agua caliente y un jabón neutro.Tras su limpieza , insértela de nuevo, siguiendo la operación anterior a la inversa. ESPAÑOL STEEL BAR UM2id OK 2012.FH11 Mon Jun 04 16:49:04 2012 cada mes cada 2 meses cada 3 meses Para prevenir problemas de cal, también puede utilizar filtros de tratamiento del agua. No obstante , se recomienda realizar la operación de limpieza adecuada a su consumo. El uso de los filtros y el Coffee Washer le ayudarán a prolongar la vida de la cafetera en un estado óptimo. Limpieza del depósito de agua: Recomendamos no dejar café molido o monodosis en el porta. El café dejará residuos que afectarán a la limpieza de la cafetera y al sabor del café. Si eso ocurriera, deje pasar una carga de agua. 3-. Limpieza de portafiltros y duchas l Porta móvil : Lave el portafiltro con agua caliente y jabón neutro. Aclare abundantemente. Seque el porta con un paño suave. No lo introduzca en el lavavajillas. l Los cacillos, bandeja y depósito pueden ser lavados en la zona superior del lavavavjillas. Si lo hace manualmente, no olvide aclararlo con abundante agua. Seque con un paño suave. l Utilice un cepillo , pincel o similar para limpiar los restos de café de la ducha superior. ! Importante (porta móvil) La ducha superior sebe ser limpiada tras un funcionamiento de 80 a 100 cafés espresso. Para ello, debe realizar la siguiente operación : 9. Seguridad El aparato es sólo apto para ser instalado en lugares donde su uso y mantenimiento esté restringido al personal cualificado. No permitir que el aparato sea manipulado por niños o personas inexpertas. No intervenir para trabajos de limpieza o mantenimiento con la clavija enchufada. No desconectar la cafetera tirando 9 ESPAÑOL ascaso del cable de alimentación. Si el cable de alimentación esta dañado, debe ser sustituido por el fabricante, por su servicio post-venta o por personal cualificado similar con el fin de evitar peligro. Nunca poner en marcha un aparato defectuoso o con cable de alimentación en mal estado. No manipular el aparato con las manos o pies mojados o húmedos. Coloque la máquina sobre una superficie plana y estable, inaccesible a niños o animales y alejadas de superficies calientes (placas para cocinar ). No se debe sumergir en agua. En caso de avería o mal funcionamiento apagar el aparato y desenchufarlo de la red, no se debe intentar repararlo o intervenir directamente. Llamar a su servicio técnico. Este aparato no está destinado a ser usado por personas (incluído niños) cuyas capacidades físicas, sensoriales o mentales estén reducidas, o carezcan de experiencia o conocimiento, salvo si han tenido supervisión o instrucciones relativas al uso del aparato por una persona responsable de su seguridad. Los niños deberían ser supervisados para asegurar que no juegan con el aparato. Este aparato no ha sido diseñado para uso exterior. No utilizar este aparato si la temperatura ambiente es superior a 40ºC o inferior a 0ºC. No utilizar mangueras de conexión ya utilizadas, utilice siempre las suministradas con el aparato. El no respetar estas advertencias puede comprometer la seguridad tanto del aparato como del usuario. 10 Página 7 La garantía será la propia factura de compra. Consérvela. Tendrá que presentarla en el Servicio de Asistencia si surgiese alguna avería. Este aparato queda garantizado por el distribuidor, a partir de la fecha de compra contra cualquier defecto de fabricación o del material utilizado. El importe de los portes y embalajes que pudieran originarse, quedaran a cargo del usuario. Este garantía no tendrá validez si: 1. No dispone de la factura. 2. Hace un uso indebido de la máquina. 3. Se ha producido una acumulación de cal o falta de limpieza de la máquina. 4. El aparato ha sido desarmado por personal ajeno a la Red de Asistencia Técnica Oficial Ascaso. 11.Declaración conformidad CE de ASCASO FACTORY SLU declara que el producto que se refiere esta declaración Máquina de café espresso, es conforme a los requisitos de la Directiva de 14 de junio 1989 sobre la aproximación de las leyes de los Estados Miembros con relación a la maquinaria (89/392/CEE) sobre material eléctrico (73/23/CEE) y sobre compatibilidad electromagnética (89/396/CEE). GUARDE LAS INSTRUCCIONES ascaso 12. Tabla de consulta rápida 10.Garantía Posibles problemas Causas ¿Qué hacer? El café no está caliente. La cafetera no ha llegado a la temperatura justa. Accesorios fríos (taza, portafiltro). Esperar a que el piloto de encendido e s t é a p a g a d o . Ve r c o n s e j o s generales. Punto 4. El café sale muy deprisa. El molido es demasiado grueso, o bien y/o no está bien prensado. Cantidad de café molido insuficiente. Utilizar café para espresso. Experimentar con más o menos prensado. Llene hasta el borde del cacillo. El café no es cremoso. El molido es demasiado grueso. El café está poco prensado. El café está pasado o no es de buena calidad. Utilizar café para espresso. Experimentar con más o menos prensado. Cambiar tipo café. Utilice café fresco y recién molido. El café no sale o lo hace muy lentamente. No hay agua en el depósito o está mal colocado. Interruptor vapor accionado. El molido es muy fino o está demasiado prensado. El cacillo y/o ducha están obturados. Aparato con cal. Llenar depósito o colocarlo bien. Utilizar café para espresso. Experimentar con prensado. Limpiar cacillo y/o ducha. Limpiar el aparato. Ver punto 7. Hay mucha agua en el cacillo tras haber hecho el café. El café no se ha prensado correcta mente. Cantidad insuficiente de café en el cacillo. Prensar correctamente. Ver punto 4. Aumentar la cantidad de café en el cacillo. Ver punto 4 El café sale por los bordes del cacillo. Portafiltro no colocado correctamente. Restos de café molido en el borde del cacillo. La junta del cabezal está sucia. La junta del cabezal defectuosa. Seguir el procedimiento de ajuste de portafiltro. Punto 4. Limpiar el borde del cacillo de restos de café. Limpie la junta con un trapo húmedo. Llamar al servicio de asistencia. La leche no queda cremosa. Tubo de vapor embozado. Leche en mal estado. Leche caliente o tibia. Temperatura inadecuada Limpiar el tubo de vapor. Utilice leche fresca y fría (temperatura de nevera). La máquina hace mucho ruido. No hay agua en el depósito. El depósito está mal colocado. Toma de agua fuera del depósito. Problemas en la conexión de red. Café pasado o muy seco. ESPAÑOL STEEL BAR UM2id OK 2012.FH11 Mon Jun 04 16:49:04 2012 Llene el depósito de agua. Ajuste el depósito. Colocar tubo dentro del depósito. Comprobar que el grifo de red está abierto. Utilizar café fresco. *Con el sistema pastilla o monodosis, los problemas de molienda, cantidad de café y prensado, no existen. Para cualquier anomalía, consulte a su Servicio Técnico. 11 Página 8 ascaso Users Manual ascaso Index 1. 2. 3. 4. 5. 6. 7. Technical specifications Diagram Safety. Start-up Coffee size progaming Capsules drawer programing Preparation of coffee Preparation of cappuccino 8. Preparation of hot water 9. Maintenance and cleaning 10. Guarantee 11.Declaration of EC conformity 12.Quick consultation table 1. Technical specifications 230VAC - 50Hz BAR 1GR models: Pod / Kap / Kap Auto-eject. Power (W) (A) 1200 + 1000 10 120VAC - 60Hz Weight (Kg) Optional BAR 1GR model: ONE 1200 + 1200 10,5 BAR 2GR models: Pod / Kap / Kap Auto-eject. 1200 + 2000 14 BAR 2GR model: ONE 1200 + 2400 16 Dimensions Capacity (l x h x p)) Water Tank 400 440** x 450 x 540 25 Optional 700 550*** x 450 x 540 34 2. Diagram External body : Steel painted epoxi and stainless steel . Coffee Pod Groups (thermoblock) Coffee Ground Groups (professional system) Automatic temperature control Steam and hot water boiler. Stainless steel. Capacity : 4l Automatic filling up of boiler Boiler preassure manometer Independent steam/ water outlet (Professional taps) Cupwarmer Maximum pressure of network supported: 1 MPa Minimum pressure of network supported: 0,1 MPa 12 11 Water handle 0 On/Off general switch 12 Water pipe 00 On/off general pilot 13 Cupwarmer area 2 Wastepipe / tube 14 Grille 3 On/Off Boiler switch 15 Wastepipe tray 4 Boiler temperature pilot 16 Box water tank 6 Coffee temperature pilot 17 Side lid 7 Manometer (boiler preassure) 18 3/4 connection (for direct mains water input) 8 Electronic device (S-L-XL) 19 Water net connection 9 Steam handle 20 Optional tray for wastepipe 10 Steam pipe Keypad alerts 5 (3 buttons flashing) Lack of water 16 13 9 17 10 11 10 18 ("S" flashing) Capsules drawer open Capacity steam boiler (All models): 4 Lt * length x height x depth (mm) ** length model KAP Auto-Ejection *** length models POD & KAP Auto-Ejection COMPACT PF = Fixed filter. PM = Mobile filter TR = Tronic. 21 12 19 14 22 ("S y XL" flashing) Capsules drawer full Fixed filterholder (only Pod) Main Features ascaso ENGLISH STEEL BAR UM2id OK 2012.FH11 Mon Jun 04 16:49:04 2012 (led lit) Coffee resistance is working 15 20 2 PROF 1GR 9 17 6 8 9 17 11 8 6 8 6 7 11 1 Coffee 2 Coffees STEEL BAR 1 GR. 10 STEEL BAR 2 GR. 10 PROF 2GR 7 7 0 00 4 3 12 7 0 00 4 3 12 1 Coffee 2 Coffees 13 STEEL BAR UM2id OK 2012.FH11 Mon Jun 04 16:49:04 2012 Página 9 ascaso 3. Safety / Start up Important Safeguards The appliance must be only installed in places where its use and maintenance is restricted to qualified personnel. ENGLISH 1-. Read all instructions. 2-. Do not touch hot surfaces. Use han dles or knobs. 3-. To protect againts fire, electric shock and injury to persons do not immerse cord, plugs or (state specific part or parts in question) in water or other liquid. 4-. This appliance is not intended for use by persons (including children) with reduced physical, sensory or mental capabilities, or lack of experience and knowledge, unless they have been given supervision or instruction concerning use of the appliance by a person res ponsible for their safety 5-. Unplug from outlet when not in use and before cleaning. Allow to cool before putting on or taking off parts and before cleaning the appliance. 6-. If the power cord is damaged, it must be replaced by the manufacturer, its after-sales service or similar qualified personnel in order to avoid danger. 7-. Do not operate any appliance with a damaged cord or plug or after the appliance malfunctions, or has been damaged in any way. Return appliance to the nearest authorized service facility for examination, repair or adjustment. 8-. The use of accesory attachments not recommended by the manufacturer may result in fire, electric shock or injury to persons. 14 9-. Domestic use. Do not use outdoors (this item may be omitted if the products is specifically designed for outdoor use). 10-. Do not let cord hang over edge of table or counter or touch hot surfaces. 11-. Do not place on or near a hot gas or electric burner or in a heated oven. 12-. Always attach plug to appliance first, then plug cord into the wall outlet. To disconnect, turn any control to "off" then remove plug from wall outlet. 13-. Do not use appliance for other than intended use. 14-. Not use this appliance if ambient temperature exceeds 40 ºC or less than 0 ºC 15-. Do not use connecting hoses used and always use those supplied with the appliance. 16-. Save these instructions. Before setting the appliance going, the person installing should read this manual carefully. The operator should be a res ponsible adult. Children should be su pervised to ensure that they do not play with the appliance. In the event of any anomaly, contact your distributor Start up Check the electrical voltage is the same as the voltage displayed on the machine specifications label. fill the water tank (side area) 16 with water (min. 3 liters). The use of mineral water is recommended. Water quality affects the taste and quality of the coffee. 3) For both models : Plug it into the mains. Switch on the machine with swit ches 0 and 3 . The pilots 00 and 6 will light up. After 3-4 seg, the boiler fills up automa tically. Upon finalizing, the pump stopped and the pilot 4 was illuminated, this indicates the moment in which begins to heat the boiler. Is normal that during the filling up pro cess, the coffee machine stop and the left electronic device flashes. You must do a reset operation through the boiler switch On/off 0 . The coffee machine will continue the filling up process. When pilot 6 switch off, the coffee machine is ready for coffee use. For steam and hot water, the pilot 4 swich off and the manometer 7 will indicate 1,5 bar pressure of boiler. The boiler will be ready to serve steam and hot water ( 20 minutes, aprox.) Is normal that to the star in steam servi ce, the stam pipe leave water. Place the pipe on the wastepipe tray. ! is recommended. Water quality affects the taste and quality of the coffee, in addition to preventing future breakdowns 4. Programming the amount of coffee Electronic push-button control functions. S: small coffee L: large coffee XL: non-stop coffee (push button again to stop flow) Programming the amount of coffee . With the machine on, push the XL programming button for 5 or 6 seconds until the LED flashes.Push the S small coffee button. The LED will light up, at the same time the XL programming LED stops flashing. Let the coffee flow. Once you have the desired amount, push the XL button until the led stops blinking. The machine is now program med. To programme large coffee L, repeat the operation. Machines two groups: When program ming the left group, the right group is automatically programmed with the sa me parameters. Then, you can progra mming the right group with new settings (this not change the left settings). 1) Coffee machine (direct water net) : Connect the wastepipe tube 2 and connect the machine to direct mains water input with tube 19 . You must open the water tap. Important : if by any motive, not water arrives to the coffee machine boiler, the left electronic device will flash and the coffee machine will stop. Dis connect with the switch 0 and check the water supply ( direct water outlet or water tank). Once it re-established the water supply, switch on 0 . To personalise the amount of coffee (non-stop), push the XL button. Once you have the desired amount, push the button again to stop the flow of coffee. 2) Coffee machine with water tank : Note : The use of mineral water - Switch off the machine - Press keys S-L-XL all at once and switch ! ENGLISH ascaso 5. Programming switchboard for capsule counter 15 ENGLISH ascaso on machine - Group 2 button pad light goes out - Stop pressing keys and switch off ma chine - Switch on again, the machine is ready for the counter (default value 40 capsu les) To change counter value or unprogramme - Switch off the machine - Press keys S-L-XL all at once and switch on machine - Group 2 button pad light and the S key in group 1 go out - Press S key to reduce number of capsules or L key to increase. With each press a key lights up with a value as follows: LED XL lit: 0 Switching off unprogrammes machine LED L lit: 35 capsules LED XL and LED L lit: 40 capsules LED S lit: 45 capsules LED S and LED XL lit: 50 capsules LED S and LED L lit: 55 capsules - Select desired value and switch off machine - Switch on again, the machine is ready with new value programmed - On 5-key button pad, press S.-S..-XL 6. Preparation of coffee Please, check your system:ground,pod or capsule. Ground Any type of coffee may be used. For optimum results, we recommend using special "espresso" coffee blends as they provide a suitable grind. If the coffee comes out either very quickly or very slowly, the type of coffee should be changed for another finer or thicker grind and tamping of the coffee should be varied according to our recommendatio ns. 1-. Switch on the machine using the 16 Página 10 main switch 0/1 and place the filterholder (with the filter) into the group. 2-. Wait for the pilot light 6 to switch off (approx. 1.5 minutes). This means the coffee machine has reached the ideal temperature.Press coffee switch XL 8 (continuos coffee) and let water run out. Do this before making the coffee. This will remove residue and balance the temperature to create optimum wor king conditions. 3-. Fill the coffee filter basket (1 or two coffees according to requirements), The filter must be filled to 3/4 of its capacity, once pressed.(see picture ) ascaso 6-. Put the cups or cup on the grille and switch on the coffee switch 8 -S(Short)/L (large) -XL (Non-stop) the keypad. Once emptied and placed again , will return to normal on mode. It takes 20/25 seconds to make an es presso perfectly Careful: Do not remove or turn the filter holder while the water is passing through as the appliance is at low pres sure at this moment. Important: Tamped The best espresso result are obtained when the ground coffee is firmly tamped. Monodose Points 1 and 2 as in the section on ground coffee. Place the pod in the filter holder and turn it gently to the right as far as it will go. Do not exert force. Close gently.(see picture ) ! Notes: ENGLISH STEEL BAR UM2id OK 2012.FH11 Mon Jun 04 16:49:04 2012 1. The filter holder should always be placed in the machine so that it remains warm. Closed position. 2. Place the cups on the cup warmer 13 The right temperature (optimum 40ºC/105ºF) will improve the espresso 3. Coffee will continue to drip from the spouts for a moment after the coffee swich is turned off. 7 . Preparation of cappuccino 4.- Clean off the remains of coffee that have been deposited on the edges of the filter basket so that it fits perfectly. Espresso base : 25 ml espresso co ffee.Textured (frothed) & heated (ste amed) 5-. Place the filter holder into the group starting from the left and turning towards the right with enough pressure at the end. (see picture) Point 6 and notes as in the section on ground coffee. Capsule Open the drawer 21 . Place the capsule and close the drawer until the end. Place the cup on the tray and press the desired option on the keypad 8 . The perfect extraction requires 20/25 seconds. When the drawer 22 have 50 used cap sules , the machine will alert flashing Milk : 125 ml cold and fresh milk ( 3-4 ºC).When you heat your milk for a ca ppuccino it will be about: 55"C.Milk must be fresh with fat at 3,2-3,5 %. Fill the milk (only the right size por one cup.). You must use a stainless steel jug .Fill 1/3 with milk Creme : White color with brown border produced by the espresso base. The ideal density its uniform without bubbles. Preparation : The manometer 7 will indicate 1,2/1,5 bar. The boilerwill be ready to serve steam and hot water (2o minutes, aprox). 1) TEXTURE : making creme (Frothed milk). The milk texture that you need is descri 17 ascaso ENGLISH bed as velvet. Insert steam no zzle 10 into the centre milk just below the surfa ce of the milk. . Open steam valve. 9 Steam will come out of the nozzle and froth the milk. We change the angle slowly between the surface until you create a whirlpool effect (air circulation). Once textured, the milk volume will in crease (double size). Please , lift the jug progressively to make sure that the steam nozzle is always right below the surface of the milk. Once textured, the milk volume will increase. After the tex tured /frothed process, the milk is textu red but is cold. 2) TEMPERATURE : Heating milk (ste amed milk) Once you have the milk texture correct ( velvet effect), lower the steam wand 10 into the milk and complete the h e a t i n g step.Submerge nozzle (going sidewise) and keep it in that position finishing heating milk with circulating movements until the jug is too warm to touch or reach the required temperature. Página 11 Attention : For texturising you must work below the milk surface. For heating, you must work going to jug sidewise . Texture Temperature Please remember that milk should never be steamed over app. 75ºC (168ºF). Milk steamed to over this temperature is scalded and will lost its propierties for a perfect cappuccino. When you finish steam operation, turn off handle 9 . Advice : The espresso is extracted a temperature of approximately 90ºC. When you heat your milk it will be about 50-70ºC- You must heat the cups in your cupwarmer area. If not, heat the cups with ho water prior tu use. Once you have heated (steamed) and textured (frothed) milk, you are ready to serve in your cup, adding it in your es presso base. Troubles : Thin flat milk. 1) If milk has previously been steamed and stored in the refrigerator, we suggest adding some fresh milk in order to achie ve optimum foam. 2) Is the result of not introducing air into the milk as you heat it and not texture (froth) it. Attention: If you use steam or hot water for a long time ( without stop) you must wait a few seconds for the boiler obtain pressure. The optimun pressure is 1/1,5 bar 18 ascaso Important: We recom mend running steam through the wand for a few seconds (5'') after each use to clean and prevent clogging. To clean the absorption hole, you can use a toothpick or a pa perclip. This will ensure the tube is free of blockages. duct is also useful to prevent limescale buildup in the machine. Regular desca ling will contribute to ensuring top quality coffee and it will prolong the useful life of the machine.Consult your distributor. Coffee Washer use recommendations: Coffee/day A 8. Preparation of hot water 1-. Put a cup under the water pipe 12 2-. Turn On the handle 11 to obtain water.Do the opposite operation after having obtained the required water. 9. Maintenance and cleaning General warning: Cleaning and mainte nance should be done when the appliance is cold and disconnected from the mains. Do not immerse the appliance in water. It should not be cleaned in a dishwasher. 1-. Cleaning the outside: To clean the outside of the machine, use alcohol 96º or specific products for inox. Remove the tray regularly and clean If the machine is not to be used for some time, empty the water reservoir. Clean the steam tube with a damp cloth immediately after use. To clean the inside of the steam tube, allow the water to circulate. To clean the absorption hole, you can use a toothpick or a paperclip. This will ensure the tube is free of bloc kages. 2-. Internal cleaning: To obtain top quality espresso coffee it is vital to clean the inner workings of the machine. To clean the interior of the distribution unit, use Ascaso Coffee Washer. This pro >10 5-10 1-5 Descaling every month every 2 months every 3 months ENGLISH STEEL BAR UM2id OK 2012.FH11 Mon Jun 04 16:49:04 2012 To avoid limescale buildup, you can also use water treatment filters. However, it is advisable to clean the machine in accordance with con sumption. Using filters and Coffee Was her will help to maintain the coffee ma chine in optimum working condition for longer. Important It is advisable not to leave the pod or ground coffee in the filterholder. Otherwise, coffee will build up affecting the taste of the coffee. Should this occur, run a load of water through the system. 3-. Cleaning the filterholders and the showerheads Mobile filterholder: Wash the filterholder in hot water with a neutral detergent. Rinse thoroughly. Dry the filterholder with a soft cloth. Do not wash it in the dishwasher. The filters, tray and reservoir can be cleaned in the top of the dishwasher. If you wash them by hand, do not forget to rinse thoroughly. Dry with a soft cloth. Use a brush or similar item to remove coffee residue from the showerhead. 19 ascaso ! ENGLISH Important(mobile filterholder) The showerhead must be cleaned after 80 to 100 espresso coffees have been made. This should done as follows: Remove and clean the shower head with hot water with a neutral detergent. Once clean, replace it, following the instructions for the previous operation in reverse. Página 12 ascaso 10.Guarantee 12. Quick consultation table Possible problems Causes What to do? The coffee is not hot. The coffee machine has not reached he proper temperature. Cold accessories (cup, filter holder) Wait until the on pilot light has switched off. S e e g e n e r a l a d v i c e . Po i n t 4 The coffee comes out very The grind is too thick, and/or it is not properly tamped. There is insufficient ground coffee. Use special espresso coffee. Experiment with greater or lesser tamping. Fill the filter basket up to the edge. This guarantee will not be valid if: The coffee is not creamy. 1-. The receipt of purchase is not pre sented. 2-. The machine has not been cleaned sufficiently or limescale has built up. 3-. The machine has not been cleaned suficiently or limescale has built up. The grind is too thick. The coffee has not been tamped enough. The coffee is stale or not of good quality. The coffee does not come out or it comes out very slowly. There is no water in the reservoir or it is badly positioned. Steam switch on. The grind is very fine or has been tamped too much or/and shower. The filter basket is obstructed. The appliance has limescale buildup. A lot of water is left in the filter basket after making the Coffe The coffee has not been properly tamped. There is insufficient coffee in the filter basket. Coffee comes over the edges of the filter basket The filter holder is not positioned properly. There are remains of ground coffee on the edge of the filter basket. The joint of the head is dirty. The joint of the head is defective. The milk is not creamy. The steam tube is blocked. The milk is off . The milk is hot or lukewarm. The machine makes a lot of noise. There is no water in the reservoir. The reservoir is not positioned properly. The water intake is not immersed in the reservoir. The coffee is stale or very dry. The guarantee for this appliance is the receipt of purchase. Please keep this. This receipt must be shown at the Ser vice Centre in the event of breakdown. This appliance is guaranteed for our distributor(from the date of purchase) against any manufacturing fault or in the materials used.The amount paid for transport and packaging which may arise are payable by the user. 4-. The appliance has been dismantled by people who are not authorised by the Ascaso Official Technical Assistance Network. 11. E C Declaration Conformity Water Tank Cleaning ASCASO FACTORY SLU declares that the product referred to in this declaration - espresso coffee machine - complies with the requirements of the Directive of 14th of June 1989 on the standardi sation of the laws of Member States with regard to machinery (89/392/EEC), on electrical material (73/23/EEC) and on electromagnetic compatibility (89/396/CEE) SAVE THIS USER'S MANUAL 20 of ENGLISH STEEL BAR UM2id OK 2012.FH11 Mon Jun 04 16:49:04 2012 Use special espresso coffee. Experiment with greater or lessertamping. Change the coffee type. Use fresh and recently-ground coffee. Fill the reservoir or position it properly. Turn steam switch off. Use special espresso coffee. Experiment with greater or lesser tamping. Clean the filter basketor/and shower. Clean the appliance. See point 7. Tamp properly. See point 4. Increase the amount of coffee in the filter basket, up to the edge. Follow the filter holder adjustment procedure. Point 4. Clean the remains of coffee from the edge of the filter basket before positioning it. Clean the joint with a damp cloth. Call the service centre. Clean the steam tube. Use fresh, cold milk (fridge temperature). Fill the reservoir with water. Adjust the reservoir. Immerse the tube in the reservoir. Use fresh coffee. *There are no grind, coffee amount or tamping problems with the pod or pod system. Call your technical service for any anomaly. 21