1
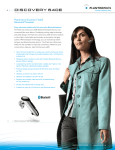
FIG.4:
Wearing the Headset
with hook
FIG.5:
Wearing the Headset
without hook
FIG.6:
Clipping the Headset
to your clothes
FIG.7:
Attaching the Headset
to your mobile
FIG.9: Changing covers
Note:
Please Note:
Please read the “Safe Usage Guidelines” and “Limited Warranty”
before using the headset.
• The headset will not function
while charging.
• If the Indicator light [2] remains off while charging, the battery is already fully charged and
does not require further charging.
• To maximize battery life, do not
charge the headset for extended
periods of time.
• Full battery capacity will be
achieved after two or three full
charge/discharge cycles.
• When your battery is empty, it
takes up to three hours to completely charge your headset.
INTRODUCTION
Push the
button 3 sec
- Activate Bluetooth on your mobile
- Make sure the headset is charged
- Turn the headset on
- Headset is already in pairing mode
FIG.8: Mounting the ear hook
Thank you for choosing a
SH241 Bluetooth® headset
from AT&T, powered by
SouthWing. This user guide
provides all the information
you will need to use and care
for your product. All relevant
information regarding your
SouthWing product can be
found in the support section
of our website:
www.southwing.com/attSH241
Bluetooth is a registered trademark owned by Bluetooth SIG,
Inc. U.S.A. and licensed to
SouthWing.
1. CHARGING THE HEADSET
- Search for new device in your mobile
- Select your headset from the list
- Enter the PIN number : 0000
3. Enter the PIN number:
0000.
Now the headset and your
mobile phone are paired and
ready for hands free communication through the Bluetooth connection.
To save battery you can disconnect the headset and
your phone by pressing the
Multi-function button [2]
three times. To re-connect
them press the Multi-function button [2] once.
Normal pairing
You will need to follow the
steps below if you want to
pair your headset with another mobile phone.
1. Ensure the headset is off.
2. Put the headset in pairing
mode by pressing and holding the Multi-function button [2] for about 5 seconds
until the Indicator light [2]
flashes red and blue alternately and a series of high
tones are heard. Use the PIN
Code ‘0000´ (zero-zero-zerozero) for pairing.
3. Complete the normal pairing process by following
steps 1, 2 and 3 in the autopairing section.
3. WEARING AND CARRYING THE
HEADSET
Selecting an ear bud
The headset comes with different sized comfortable ear
buds, try and select the one
that best fits your ear.
To replace an ear bud:
1. Pull gently with your hand
one side of the earbud outwards. (see figure 2)
2. Select a new ear bud and
adjust it carefully so it fits perfectly over the speaker nozzle.
Wearing the Headset with the
Ear hook
The Ear hook can be used
for firm hold and maximum
comfort. To mount the Ear
hook, carefully place the
round head of the Ear hook
between the headset body
and the clip, and make sure
that it is adjusted firmly. (See
figure 2) To wear it follow
these steps:
1. Rotate the Ear hook [8]
slightly forward.
2. Gently place the Speaker
[5] into your ear canal.
3. Rotate the Ear hook [8]
backwards and adjust it behind your ear.
4. To use the headset in the
other ear, simply mount the
Ear hook [8] on the other
side of the headset.
Wearing the Headset without
the Ear hook
We recommend first to select the ear bud type and
size that best fits your ear
(see “Selecting an ear bud”).
To wear the headset without
using the Ear hook:
1. Remove the Ear hook by
pulling it out gently and store
it in a safe place.
2. Gently place the Speaker
[5] into your ear canal.
3. Find the most comfortable
position by rotating the headset forward and backward.
Carrying the Headset
When not in use, you can carry
your headset in one of the following convenient ways:
1. Attach it to your clothes
using the designed Clip in the
bottom part of the headset.
2. Attach it to your mobile
phone using the cord provided; connect one end to the
headset charging port and
use the cord to hold it to
your mobile.
1 second to reject the call.
* The features marked with an
asterisk will only work with Bluetooth phones which support the
Hands-free profile. Today, most
Bluetooth phones support this
profile.
Changing the volume
To increase the volume during a call, press Vol+ button
[3]. To decrease the volume,
press the Vol - button [4].
The headset will remember
previous volume settings
each time it is turned on.
ted, your phone will transfer
the call to your headset.
Initiating a call with voice dialing
To voice dial briefly press the
Multi-function button [2] and
wait for the feedback tone
from the phone. Then speak
the name of the person you
wish to call.
Note: your phone must support
voice dialing and you must first
record voice tags into your phone
associated to phone numbers
(please check your phone manual
for details)
Automatic answer (call pick-up)
4. GENERAL USAGE
Turning the Headset On and Off
To turn the headset on, press
and hold the Multi-function
button [2] for about 3 seconds until a rising series of
tones is heard and the Indicator light [2] flashes blue 6
times.
To turn the headset off, press
and hold the Multi-function
button [2] for about 3 seconds until a series of tones
is heard and the Indicator
light flashes showing that the
unit is turning off.
Accepting / rejecting* a call
When the phone rings (the
ring tone can be heard in the
headset), briefly press the
Multi-function button [2]
once to accept the call. Alternately, press and hold the
Multi-function button [2] for
You can configure the headset to automatically answer
all incoming calls after 3 seconds. To do so, while in the
ON state press Vol - for 3 seconds until you hear a beep,
after which the command
will be confirmed with the
message “auto answer on”.
To disable automatic answer
repeat the above action and
“auto answer off” will be
confirmed.
Activation of automatic call
pick-up will deactivate whisper mode, which can not be
activated again until automatic call pick-up has been deactivated.
Redial the last called number
Briefly press the Multi-function button [2] twice; the last
called number will be automatically dialed.
Ending a call
Press the Multi-function button [2] briefly during a call
and the call will be ended.
Transferring a call from the Headset to the mobile
During a call, you may wish
to transfer the call to your
mobile. To do so press the
Multi-function button [2]
twice. To transfer the call
back to the headset repeat
the same command.
Initiating a call from your mobile phone
Push4TM Favorite number
Dial the number as usual
with your phone. If your headset is on and the phone
has been correctly connec-
It is possible to save a favorite number in the headset
and speed dial it with the
Push4TM Multi-function but-
ton [2]. This number can be
automatically saved from the
last incoming call number
(not compatible for hidden or
unidentified call numbers).
To do so, press and hold
both Multi-function button [2]
and Vol+ buttons for 1 second, until you hear a series
of tones.
To call the stored favorite
number, press and hold the
Push4TM Multi-function button [2] for 1 second.
Deactivating audible calling
number identification
(whisper mode)
The headset informs you by
voice of the calling number
on a digit by digit basis when
whisper mode is activated.
To deactivate it, in the ON
state:
1. Press and hold simultaneously Vol+ and Vol - buttons
for 5 seconds. Turn the headset upwards a small angle
and hold it with your thumb
to make this action easier.
2. You will hear the “whisper
off” deactivation message.
All incoming calls from the
favorite number (if already
stored) will still be announced.
To activate whisper mode repeat the same command.
You will hear “whisper on”
activation message.
Please Note:
1. If the calling number is hidden,
whisper mode will not function.
2. To accept (or reject) the call,
use the Multi-function button at
anytime during the calling number announcement.
3. If the calling number is already
stored as a favorite number it will
be announced as such.
4. Activation of automatic call
pick up will deactivate whisper
mode, which can not be activated again until automatic call pick
up has been deactivated.
5. Certain mobile phones do not
implement the caller ID feature in
the standard format; therefore
the whisper mode feature cannot
function with these phones.
Changing the ring tone
To change the default ring
tone in the headset enter the
ring tone menu by pressing
either Vol+ or Vol - buttons
for 5 seconds. Next, use the
Vol+ and Vol - to select the
new ring tone and press the
Multi-function button [2]
once to select it and go back
to stand-by mode.
Battery Life
To conserve battery life, your
headset features an autosleep function. This function
switches the headset off
after 12 hours of inaction.
Once your headset has entered auto-sleep, it can be
switched on again normally.
To check your battery level,
press the Multi-function button [2] 4 times, and a series
of beeps will indicate the talk
time in hours (4 beeps indicates 4 or more hours of talk
time).
When the battery is low the
headset will produce an audible warning tone sequence
every 30 seconds, please
charge it immediately as you
have only few minutes of talk
time left.
TROUBLESHOOTING
Problems
Suggestions
The Headset will not
turn on
- The Headset battery may need charging.
- Try recharging the Headset.
- Do not leave your headset
connected to the charger for
extended periods of time, as
excessive charging will reduce battery life.
Safe usage guidelines
Pairing is unsuccessful
Pairing has succeeded
but calls are not heard
- Try moving the phone and Headset closer together
during pairing.
- Make sure that the mobile phone is in the correct
Bluetooth mode.
- Some electrical devices such as microwave ovens
create a noisy electrical environment making it difficult for the Headset to communicate with the phone.
Try moving away from such devices and try again.
- Make sure that your phone is switched on and ready
to connect to the Headset.
The Headset stops responding to button presses
- Ensure that your Headset battery is charged.
- Try resetting your headset by charging it for a
few seconds and then switching it on again.
Audible calling number
identification does not
work
- If the calling number is hidden, whisper mode
will not function.
- Activation of automatic call pick up will deactivates whisper mode.
- Certain mobile phones do not implement the
caller ID feature in the standard format; therefore the whisper mode feature cannot function
with these phones.
6. ADDITIONAL INFORMATION
Customer Service
Visit us online at:
www.southwing.com/att-SH241
Call toll free in USA/Canada
1-877-71S-WING or 1-877717-9464 or email us at:
customer.serviceusa@
southwing.com
Battery Care
Your headset battery will
have a long life provided you
follow these guidelines:
- Do not charge your headset
outdoors.
- Do not charge your headset
if the ambient temperature is
above 104 degrees Fahrenheit (40 degrees Celsius) or
below 32 degrees Fahrenheit
(0 degrees Celsius).
-- Only use the product according to the directions within this User Guide. Usage
of this product contrary to
these directions could cause
injury. In addition, any usage
of this product contrary to
this User Guide will void any
warranty.
- Do not use the product in
an environment where it may
come in contact with liquid,
be exposed to high humidity
or extreme temperatures.
Do not place the product in a
fire as it may explode causing injury or death.
- Do not use the product in
areas where usage of radio
transmitters is prohibited
(e.g. aircraft and hospitals) or
close to sensitive devices
that may be affected by a
radio transmitter (e.g. pacemakers).
- Do not attempt to service
this product yourself. If the
product requires servicing,
this must be performed by
an approved service person.
- If the product becomes
dirty, it should be cleaned
with a soft cloth. Do not use
any cleaning agents as these
may damage the plastics,
electronics or battery.
- Usage of this product while
driving, may reduce your abi-
lity to react to road conditions.
- Be aware that using a wireless headset while driving is
illegal in certain countries.
Therefore, you should check
the local laws before using
the product while driving.
- As this product contains
parts which may cause injury
if consumed, keep it out of
reach of children.
- Use only the power supply
provided by SouthWing or by
AT&T in AT&T packaging labeled as compatible with the
SH241 headset.
Caution: Prolonged use of the
headset at high volume may
cause hearing problems.
Limited Warranty & Warranty
Exclusions
Please Note: For all warranty related issues, please return the product to the store where it was
purchased.
One year Limited warranty:
what is covered: AT&T
warrants to the original purchaser of this wireless accessory that should this
product or any part be proved defective in materials or
workmanship, from the date
of proof of purchase for a
period of one (1) year, then it
will be subject to the terms
of this one year limited warranty. Such defects will be
repaired, replaced or credit
issued at AT&T's option, wi-
thout charge for parts or
labor directly related to the
defect.
Limitations and Exclusions:
This warranty does not apply
to any cost incurred for removal or reinstallation, or to
any product or part thereof
which has suffered through
normal wear and tear, alteration, improper installation,
physical abuse, misuse, neglect or accident. Nor does it
cover defects caused by
shipment to an AT&T service
center, or repair or service of
the product by anyone other
than an AT&T service center.
Damage resulting from an
act of God, including but not
limited to fire, flood, earthquake and other natural disasters will be excluded.
This limited warranty is in
lieu of all other warranties,
express or implied either in
factor by operations of law,
statutory or otherwise, including, but not limited to any
implied warranty of merchantability or fitness for a particular use. AT&T does not
authorize any other person to
assume any liability beyond
the warranty herein described. In no event, whether
based in contract or tort shall
AT&T and/or SouthWing be
liable for incidental, consequential, indirect, special, or
punitive damages of any kind
resulting from the use of this
product, including interrupted or incomplete phone
calls, or arising out of any
breach of this warranty. In no
event shall AT&T be liable for
damage in excess of the purchase price.
7. FCC STATEMENT AND NOTICE
(Federal Communications Commission, USA)
This device complies with
Part 15 of the FCC Rules.
Operation is subject to the
following two conditions:
(1) This device may not
cause harmful interference.
(2) This device must accept
any interference received, including interference that may
cause undesired operation.
For questions regarding your
product or this FCC declaration, contact:
SouthWing
2655 LeJeune Rd.
Suite 810
Coral Gables, FL. 33134
FAX: + 1 305 442 1676
fcc_certifications@
southwing.com
To identify this product, refer
to the Part, Series, or Model
number found on the product.
The FCC requires the user to
be notified that any changes
or modifications made to this
device that are not expressly
approved by the party responsible for compliance may
void the user's authority to
You will need to charge the
battery of your headset. To
do so, follow these steps:
1. Plug the power supply
into a power outlet.
2. Plug the connector of the
power supply into the Charging Socket [1]. The Indicator
light [2] will turn red to indicate the headset battery is
charging.
3. Once the Indicator light
[2] turns off, the headset is
fully charged and can be removed from the power supply.
operate the equipment.
This equipment has been
tested and found to comply
with the limits for a Class B
digital device, pursuant to
Part 15 of the FCC Rules.
These limits are designed to
provide reasonable protection against harmful interference in a residential
installation. This equipment
generates, uses, and can radiate radio frequency energy
and, if not installed and used
in accordance with the instructions, may cause harmful
interference to radio communications. However, there is
no guarantee that interference will not occur in a particular installation. If this
equipment does cause harmful interference to radio or television reception, which can
be determined by turning the
equipment off and on, the
user is encouraged to try to
correct the interference by
one or more of the following
measures:
- Reorient or relocate the receiving antenna.
- Increase the separation between the equipment and receiver.
- Connect the equipment into
an outlet on a circuit different from that to which the
COMMANDS SUMMARY TABLE
HOW TO? ACTION
HEADSET RESPONSE
Pairing Mode
In OFF state press and hold Multifunction Button for 5 sec and see
the pairing instructions of your
phone
The Indicator light flashes red and
blue alternatively and a series of
high tones can be heard. The unit
prompts you to use PIN Code ‘0000’
(zero-zero-zero-zero) for pairing
Power On
In the OFF state press and hold
The headset turns on and light flasthe Multi-function Button for 3 sec hes blue 6 times
Power Off
In ON state press and hold Multifunction Button for 3 sec
Light flashes blue six times and the
headset turns off
Accept call
During incoming call press Multifunction Button once
The headset picks the call up
Reject Call1
During incoming call press and
hold Multi-function button for 1
sec
The headset rejects call
Voice Dialing2
In ON state press the Multi-function button once
The headset makes a series of short
beeps while the mobile
initiates the voice dialing command
End Call
During a call press the Multi-func- The headset hangs up the current
tion button once
call
2. PAIRING THE HEADSET
Auto-pairing
For added convenience, your
headset has an auto-pairing
function so that when you
turn the headset on for the
first time, it is already in pairing mode. The Indicator
light [2] will flash red and
blue alternatively and a series of high tones and a
voice prompt saying the PIN
Code ‘0000´ (zero-zero-zerozero) can be heard.
Follow these steps to pair
the headset with your mobile
phone:
1. Put the mobile phone into
pairing mode (reference your
phone user manual). Ensure
that the mobile phone is no
more than 3 feet (1meter)
away from the headset.
2. Select the headset name
“SouthWing SH241” from
the list.
receiver is connected.
- Consult the dealer or an experienced radio or television
technician for help.
FCC RF Radiation Exposure
Statement:
This equipment complies
with FCC radiation exposure
limits set forth for an uncontrolled environment. End
users must follow the specific operating instructions for
satisfying RF exposure compliance. This transmitter
must not be co-located or
operating in conjunction with
any other antenna or transmitter.
This product emits radio frequency energy, but the radiated output power of this
device is far below the FCC
radio frequency exposure limits. Nevertheless, the device should be used in such
a manner that the potential
for human contact with the
antenna during normal operation is minimized.
© 2007 AT&T Intellectual Property. All rights reserved. AT&T, AT&T logo and all
other marks contained herein are trademarks of AT&T Intellectual Property and/or
AT&T affiliated companies.
Push4TM favo- Press and hold both Multi-function Stores an incoming call number in
rite number
button and Vol+ buttons for 1 se- favorites
save
cond
Push4TM favo- Press and hold the Push4TM Multi- The call to the number stored as farite number
function button for 1 sec
vorite is set-up
call
Last Number
Redial1
Press Multi-function button twice Last called number is re-dialed
Activate /de- In ON state press Vol - buttons for
activate auto- 3 seconds
matic call pick
up
“auto answer on” voice tag can be
heard; if whisper mode is on, then
“whisper off” can be heard at the
same time since whisper mode is
deactivated automatically. “auto
answer off” when deactivated
Deactivate /
In ON state press simultaneously
activate audi- Vol+ and Vol - buttons for 5 seble caller iden- conds
tification
(whisper
mode)
“whisper off” voice tag can be
heard. “whisper on” when activated
Check battery In ON state press Multi-function
level
button 4 times
A series of beeps indicates remaining talk time in hours
Volume up
During a call, press Vol+ button
repeatedly
Every press you hear a beep with
higher volume and higher tone
Volume down
During a call, press Vol - button re- Every press you hear a beep with
peatedly
lower volume and lower tone
Disconnect
from the
phone1
To disconnect the headset from
The headset is now in disconnected
the phone press the Multi-function mode
button 3 times
Connect to the To connect the headset to the
phone1
phone press the Multi-function
button once
The headset connects to the last
connected phone
Enter Ring
Press Vol+ or Vol - for 5 seconds
tone selection
The 1st available ring tone can be
heard
Check different Press Vol+ or Vol - once
ring tones
Different ring tones are heard
Select ring
tone
Current ring tone is selected
Press Multi-function button once
1 Only with mobile phones supporting Hands-free mode
2 Only with mobile phones supporting voice dialing.
Importante: antes de usar el auricular,
leer las pautas de uso seguro y la garantía limitada.
INTRODUCCIÓN
Gracias por elegir el auricular
SH241 con Bluetooth® de AT&T
que funciona con tecnología
SouthWing. Esta guía del usuario proporciona toda la información necesaria para usar y
cuidar el producto. Toda la información sobre el producto
SouthWing se encuentra en la
sección de ayuda de nuestro
sitio web
www.southwing.com/att-SH241.
Importante:
• El auricular no funcionará mientras
se está cargando.
• Si la luz indicadora [2] se mantiene
apagada mientras está cargándose,
quiere decir que la batería ya está
cargada por lo que no necesita más
carga.
• Para prolongar al máximo la vida
útil de la batería, no cargar el auricular durante períodos extensos.
• La capacidad total de la batería se
alcanzará luego de dos o tres ciclos
de carga y descarga completos.
• Cuando la batería esté descargada,
tomará hasta tres horas cargarla
completamente.
auricular "SouthWing SH241"
de la lista.
3. Ingresar el PIN: 0000
El auricular y el teléfono móvil ya
están listos para una comunicación sin usar las manos mediante la conexión Bluetooth.
Para ahorrar batería se puede
desconectar el auricular y el teléfono al oprimir tres veces el
botón con varias funciones [2].
Para volver a conectarlos, oprimir una vez el mismo botón [2].
TABLA DE RESUMEN DE FUNCIONES
FUNCIÓN
Modalidad de
conexión
PROCEDIMIENTO
Con el aparato APAGADO, oprimir
el botón con varias funciones durante 5 segundos. Consultar las
instrucciones de conexión del teléfono.
RESPUESTA DEL AURICULAR
La luz indicadora parpadeará en
forma intermitente entre rojo y azul,
y se oirá una serie de tonos altos. La
unidad indica al usuario utilizar el PIN
‘0000’ (cero-cero-cero-cero) para realizar la conexión.
Encendido
Con el aparato APAGADO, oprimir
el botón con varias funciones durante 3 segundos.
El auricular se enciende y la luz azul
parpadea 6 veces.
Apagado
Con el aparato ENCENDIDO, oprimir el botón con varias funciones
durante 3 segundos.
La luz azul parpadea 6 veces y se
apaga el auricular.
Atender una
llamada
Durante una llamada entrante,
oprimir una vez el botón con varias funciones.
El auricular recibe la llamada.
Rechazar una
llamada1
Durante una llamada entrante,
oprimir durante 1 segundo el
botón con varias funciones.
El auricular rechaza la llamada.
2. CÓMO CONECTAR EL AURICULAR
Bluetooth es marca registrada de
Bluetooth SIG, Inc. U.S.A. y su uso
por parte de SouthWing está autorizado.
1. CÓMO CARGAR EL AURICULAR
Será necesario cargar la batería del auricular siguiendo
estos pasos:
1. Conectar el enchufe a un
tomacorriente.
2. Conectar el otro extremo
del cable al puerto de carga
[1]. La luz indicadora [2] se tornará roja para indicar que la batería del auricular está en
proceso de carga.
3. Una vez que se apague la
luz indicadora [2], el auricular
estará completamente cargado y podrá desenchufarse.
Conexión usual
Será necesario seguir los
pasos a continuación para conectar el auricular a otro teléfono móvil.
1. Cerciorarse de que el teléfono esté apagado.
2. Poner el teléfono en modo
de conexión oprimiendo el
botón con varias funciones [2]
durante 5 segundos hasta que
la luz indicadora [2] parpadee
entre rojo y azul en forma intermitente y se escuche una serie
de señales sonoras. Utilizar el
PIN ‘0000´ (cero-cero-cerocero) para la conexión.
3. Completar el proceso de
conexión usual siguiendo los
pasos del 1 al 3 en la sección
de conexión automática.
3. CÓMO USAR Y LLEVAR EL
AURICULAR
Selección de un audífono
El auricular viene con dos cómodos audífonos de diferentes tamaños. Escoger el que
calce mejor después de probarlos.
Para reemplazar un audífono:
1. Con la mano, tirar con cuidado hacia afuera un lado del
audífono. (ver figura 2)
2. Escoger un nuevo audífono
y ajustarlo con cuidado para
que calce perfectamente en la
punta del altavoz.
Cómo usar el auricular con el
gancho
El gancho ayuda a sostener el
auricular con mayor firmeza y
comodidad. Para colocar el
gancho, poner con cuidado la
punta redonda del gancho
entre el cuerpo y el clip del auricular asegurándose de que
quede sujeto con firmeza. (Ver
figura 2) Para usarlo seguir
estos pasos:
1. Rotar el gancho [8] levemente hacia adelante.
2. Colocar el altavoz [5] con
cuidado en el interior de la oreja.
3. Rotar el gancho [8] hacia
atrás y ajustarlo detrás de la
oreja.
4. Para usar el auricular en la
otra oreja, simplemente colocar el gancho [8] del otro lado
del auricular.
Cómo usar el auricular sin el
gancho
Recomendamos primero seleccionar el tipo y tamaño de
audífono que mejor se ajuste a
la oreja (ver la sección sobre
cómo escoger un audífono).
Para usar el auricular sin el
gancho:
1. Quitar el gancho con cuidado y guardarlo en un lugar
seguro.
2. Colocar el altavoz [5] con cuidado en el interior de la oreja.
3. Hacer girar el auricular hacia
adelante y hacia atrás hasta encontrar la posición más cómoda.
Cómo llevar el auricular
Cuando no esté en uso, se
puede llevar de las siguientes
formas:
1. Sujetarlo a la ropa con el
clip diseñado en la parte inferior del auricular.
2. Sujetarlo al teléfono con el
cable que se incluye. Conectar
un extremo del cable al puerto
de carga del auricular.
rante una llamada, oprimir el
botón Vol+ [3]. Para bajar el
volumen, oprimir el botón Vol [4]. El auricular recordará las
configuraciones previas cada
vez que se le encienda.
4. USO EN GENERAL
Encendido y apagado del auricular
Para encender el auricular, oprimir el botón con varias funciones [2] durante 3 segundos
hasta que se escuche una
serie de señales sonoras y parpadee 6 veces la luz indicadora
[2] en azul.
Para apagarlo, oprimir el botón
con varias funciones [2] durante 3 segundos aproximadamente hasta que se escuche
una serie de señales sonoras
que indiquen que se apagará la
unidad.
Atender o rechazar* una llamada
Cuando suena el teléfono (el
tono de timbre se puede escuchar en el auricular), oprimir
brevemente el botón con varias funciones [2] una vez para
atender la llamada. Para rechazarla, oprimir el botón con varias funciones [2] durante 1
segundo.
* Las funciones marcadas con un
asterisco funcionarán únicamente
con teléfonos Bluetooth compatibles con el perfil de manos libres.
Actualmente la mayoría de los teléfonos Bluetooth son compatibles
con este perfil.
Respuesta automática (contestador de llamadas)
Se puede configurar el auricular para que automáticamente
responda todas las llamadas
entrantes luego de 3 segundos. Para hacerlo, mientras
está ENCENDIDO, oprimir Vol durante 3 segundos hasta que
se escuche una señal sonora,
luego de la cual se confirmará
la instrucción con el mensaje
"auto answer on" (respuesta
automática activada). Para desactivarla, repetir el paso anterior
y se escuchará la confirmación
"auto answer off" (respuesta
automática desactivada).
La activación del contestador
de llamadas automático desactivará la modalidad de murmullo, la cual no podrá volver a
activarse hasta que se haya
desactivado el contestador de
llamadas.
Iniciar una llamada desde el teléfono móvil
Marcar el número en el teléfono como de costumbre. Si el
auricular está encendido y el
teléfono está correctamente
conectado, el teléfono transferirá la llamada al auricular.
Cómo cambiar el volumen
Iniciar una llamada mediante
marcación por voz
Para aumentar el volumen du-
Para la marcación por voz, opri-
mir el botón con varias funciones [2] y esperar el tono de
respuesta del teléfono. Luego,
decir el nombre de la persona
a quien se quiere llamar.
Importante: el teléfono debe ser compatible con la marcación por voz y
primero se deben grabar instrucciones de voz relacionadas con los números de teléfono (verificar el
manual del teléfono para obtener
más información)
Volver a marcar el último número
Oprimir rápidamente dos
veces el botón con varias funciones [2], el último número al
que se llamó se marcará automáticamente.
mente a partir de la última llamada recibida (no es compatible con números ocultos o sin
identificación). Para hacerlo,
oprimir el botón con varias funciones [2] y Vol + durante 1 segundo hasta que se escuche
una serie de tonos.
Para llamar el número favorito
que está guardado, oprimir el
botón con varias funciones
Push4TM [2] durante 1 segundo.
Cómo desactivar el aviso de
identificación del número que
llama (modalidad de murmullo)
Cómo guardar números favoritos con Push4TM
Cuando está activada la modalidad de murmullo, el auricular
informa los dígitos del número
que llama en forma verbal.
Para desactivarlo, mientras
está ENCENDIDO:
1. Oprimir simultáneamente
los botones Vol+ y Vol - durante 5 segundos. Girar el auricular levemente hacia arriba y
sostenerlo con el pulgar para
facilitar este paso.
2. Se escuchará el mensaje de
desactivación "whisper off"
(murmullo desactivado). Se
anunciarán todas las llamadas
entrantes del número favorito
(si ya está guardado). Para activar la modalidad de murmullo
repetir el mismo paso. Se escuchará el mensaje de activación "whisper on" (murmullo
activado).
Es posible guardar un número
favorito en el auricular y hacerle marcación rápida con el
botón con varias funciones
Push4TM[2]. Este número
puede guardarse automática-
Importante:
1. Si el número que llama está
oculto, no funcionará la modalidad de
murmullo.
2. Para atender (o rechazar) la lla-
Finalizar una llamada
Oprimir rápidamente el botón
con varias funciones [2] y se
cortará la llamada.
Transferir una llamada del auricular al teléfono móvil
Durante una llamada, es posible que se quiera transferir la
llamada al teléfono móvil. Para
hacerlo, oprimir dos veces el
botón con varias funciones [2].
Para volver a transferir la llamada al auricular, repetir el
mismo paso.
mada, usar el botón con varias funciones durante el aviso de llamada
entrante.
3. Si el número que llama ya está
guardado como favorito se anunciará
como tal.
4. La activación del contestador de
llamadas automático desactivará la
modalidad de murmullo, la cual no
podrá volver a activarse hasta que se
haya desactivado el contestador de
llamadas.
5. Ciertos teléfonos móviles no pueden implementar la función de identificador de llamadas en el formato
estándar; por lo tanto, es posible que
la función de la modalidad de murmullo no funcione con estos teléfonos.
Cómo cambiar el tono de timbre
Para cambiar el tono de timbre
en el auricular, ingresar al
menú de tonos de timbre del
auricular oprimiendo ya sea el
botón Vol+ o Vol - durante 5
segundos. Luego, usar Vol+ y
Vol - para escoger el tono de
timbre y oprimir el botón con
varias funciones [2] una vez
para seleccionarlo. Después,
volver a la modalidad de duración sin llamadas.
Vida útil de la batería
Para conservar la vida útil de la
batería, el auricular cuenta con
una función de apagado automático. Esta función apaga el
auricular luego de 12 horas de
inactividad. Una vez que el auricular queda en esta modalidad, se puede volver a
encender como de costumbre.
Para verificar la carga de la batería, oprimir 4 veces el botón
con varias funciones [2] y una
serie de señales sonoras indicará las horas de tiempo de llamadas (4 señales sonoras
indican 4 o más horas de
tiempo de llamadas).
Cuando la batería esté baja, el
auricular emitirá una serie de
tonos de advertencia en una
secuencia de 30 segundos. Se
deberá poner a cargar de inmediato ya que sólo quedan
unos cuantos minutos de
tiempo de llamadas.
Se realiza la conexión
pero no se escuchan las
llamadas
- Corroborar que el teléfono esté encendido y preparado para conectarse al auricular
El auricular no responde
al oprimir los botones
- Asegurarse que la batería del auricular esté cargada.
- Reactivar el auricular cargándolo por unos segundos
y encendiéndolo nuevamente.
No funciona la identificación verbal de la persona
que llama
- Si el número de la persona que llama está oculto, no
funcionará la modalidad de murmullo.
- La activación del contestador de llamadas automático desactivará la modalidad de murmullo.
- Algunos teléfonos móviles no cuentan con la función de identificador de llamadas en el formato estándar, por lo que la modalidad de murmullo no funciona
con estos teléfonos.
6. INFORMACIÓN ADICIONAL
Servicio al cliente
Visitar la página:
www.southwing.com/att-SH241,
llamar sin cargo desde los
EE. UU. o Canadá al 1-87771S-WING o al 1-877-7179464, o enviar un correo a :
customer.serviceusa@
southwing.com
Mantenimiento de la batería
5. DIAGNÓSTICO Y SOLUCIÓN DE PROBLEMAS
Problemas
Sugerencias
El auricular no enciende
- Es posible que se deba cargar la batería del auricular.
- Recargar el auricular.
No es posible realizar la
conexión
- Acercar el teléfono y el auricular durante la conexión.
- Cerciorarse de que el teléfono móvil esté en la modalidad Bluetooth correcta.
- Algunos aparatos eléctricos, como los hornos de microondas, generan un ambiente eléctrico ruidoso que
dificulta la comunicación entre el auricular y el teléfono.
Alejarse de tales aparatos e intentar nuevamente.
La batería del auricular tendrá
larga duración siempre y
cuando se sigan estas pautas:
- No cargar el auricular al aire
libre.
- No cargar el auricular si la
temperatura ambiente es superior a los 104 grados Fahrenheit (40 grados Celsius) o
inferior a los 32 grados Fahrenheit (0 grados Celsius).
- No dejar el auricular conectado al cargador por largos
períodos, ya que la carga excesiva reducirá la vida útil de
la batería.
Pautas de uso seguro
- Utilizar el producto sólo de
acuerdo con las instrucciones que aparecen en la Guía
del usuario. Si el uso del producto se opone a estas instrucciones, existe la
posibilidad de que ocurran lesiones. Asimismo, si el uso
del producto se opone a la
Guía del usuario, se anulará
cualquier garantía.
- No usar el producto en un
ambiente donde pueda entrar en contacto con líquidos,
quedar expuesto a humedad
excesiva o temperaturas extremas.
No arrojar el producto al
fuego, ya que puede explotar
provocando lesiones o la
muerte.
- No utilizar el producto en
áreas donde esté prohibido
el uso de radiotransmisores
(por ejemplo, aviones y hospitales) o cerca de aparatos delicados que puedan verse
afectados por un radiotransmisor (por ejemplo, marcapasos).
- Si el producto necesita
mantenimiento, sólo un profesional calificado, más no el
usuario, debe realizarlo.
- Si el producto se ensucia,
se debe limpiar con un paño
suave. No emplear agentes
de limpieza ya que pueden
dañar los componentes plásticos, electrónicos o la batería.
- Es posible que la utilización
del producto mientras el
usuario esté conduciendo reduzca la capacidad de reaccionar a las condiciones de la
carretera.
- Es importante tener en
cuenta que el empleo de un
teléfono móvil al conducir es
ilegal en algunos países. Por
lo tanto, se recomienda consultar las leyes locales antes
de usar el producto al volante.
- Dado que este producto
contiene piezas que pueden
causar lesiones en caso de
ingerirse, mantener fuera del
alcance de los niños.
- Utilizar únicamente la fuente
de alimentación suministrada
por SouthWing o por AT&T en
el embalaje de la empresa
que sea compatible con el
auricular SH241.
Advertencia: es posible que el uso
prolongado del auricular con el volumen alto provoque problemas de
audición.
Garantía limitada y exclusiones
de la garantía
Importante: para todas las cuestiones relacionadas con la garantía,
devolver el producto en la tienda
donde se adquirió.
Cobertura de la garantía limitada por un año: AT&T garantiza al comprador original de
este accesorio móvil que en
caso de que el producto o
cualquiera de sus piezas
tenga defectos en el material
o la fabricación, a partir de la
fecha de la constancia de
compra por un período de un
(1) año, quedará sujeto a los
términos de esta garantía limitada por un año. AT&T
podrá optar por reparar los
defectos, reemplazar el producto o emitir un crédito, sin
cobrar cargo alguno por las
piezas o reparaciones directamente relacionadas con el
defecto.
Limitaciones y exclusiones:
esta garantía no se aplica a
ningún costo incurrido por la
eliminación o reinstalación, ni
a ningún producto o pieza del
mismo que haya sufrido desgaste normal, alteraciones,
instalación inadecuada,
abuso físico, uso incorrecto,
negligencia o accidente. La
garantía tampoco cubre los
defectos causados por el
envío a un centro de reparación de AT&T o por el mantenimiento o reparación del
producto por una persona
ajena al centro de reparación
de AT&T. Quedan excluidos
los daños generados por
casos de fuerza mayor, incluidos, entre otros, incendio, inundación, terremoto y otros
desastres naturales. La presente garantía limitada se extiende en lugar de cualquier
otra garantía expresa o implícita, de hecho o de derecho,
por legislación o de otro
modo, incluida, entre otras,
cualquier garantía implícita
de comerciabilidad o idoneidad para un uso determinado. AT&T no autoriza a
ninguna otra persona a asumir otra responsabilidad además de la garantía descrita
en el presente. Bajo ninguna
circunstancia, ya sea que
surja por contrato o por perjuicio, ni AT&T ni SouthWing
serán responsables por
daños incidentales, indirectos, especiales o punitivos de
ningún tipo que se originen
del uso del producto, incluidas las llamadas telefónicas
interrumpidas o incompletas,
o que se originen de un incumplimiento de esta garantía. En ningún caso AT&T será
responsable por daños y perjuicios que superen el precio
de compra.
7. DECLARACIÓN Y AVISO DE LA
FCC (Comisión Federal de Comunicaciones, EE. UU.)
Este aparato cumple con la
Parte 15 de las Normas de la
FCC. El funcionamiento está
sujeto a las siguientes dos
condiciones:
(1) El aparato no podrá causar
interferencias perjudiciales.
(2) El aparato debe aceptar
cualquier interferencia que
reciba, incluso interferencias
que puedan provocar un funcionamiento no deseado.
En caso de tener preguntas
sobre el producto o la declaración de la (FCC), comunicarse con:
SouthWing
2655 LeJeune Rd.
Suite 810
Coral Gables, FL. 33134
FAX: + 1 305 442 1676
fcc_certifications@
southwing.com
Para identificar este producto, consultar el número
de pieza, serie o modelo que
aparece en el producto.
La Comisión Federal de Comunicaciones exige informar
al usuario que es posible que
cualquier cambio o modificación efectuada al aparato que
no esté aprobada expresamente por la parte responsable del cumplimiento anule la
autorización del usuario de
utilizar el equipo.
Este equipo se sometió a las
pruebas correspondientes y
se comprobó que cumple
con los límites establecidos
para un aparato digital de
clase B, de conformidad con
la Parte 15 de las normas de
la FCC. Estos límites se establecieron para proporcionar
una protección razonable
contra interferencias perjudiciales en una instalación residencial. Este equipo genera,
emplea y puede irradiar energía de radiofrecuencia, y en
caso de no instalarse y utilizarse de acuerdo con las instrucciones, puede provocar
interferencias perjudiciales
para las comunicaciones por
radio. Sin embargo, no se garantiza la no ocurrencia de interferencias en una
instalación determinada. Si el
equipo causa efectivamente
interferencias perjudiciales a
la recepción de radio o televisión, lo que se puede determinar al encender o apagar el
equipo, se recomienda intentar corregir las interferencias
al seguir uno o más de estos
pasos:
- Reorientar o reubicar la antena receptora.
- Aumentar la separación
entre el equipo y el receptor.
- Conectar el equipo en un
enchufe que esté en un circuito diferente al que está
conectado el receptor.
- Solicitar ayuda al concesionario o a un técnico especializado en radio o televisión.
Conexión automática
Para mayor comodidad, el auricular cuenta con una función
de conexión automática de
modo que al encenderlo la primera vez ya esté en modo de
conexión. La luz indicadora [2]
parpadeará entre rojo y azul en
forma intermitente y se escuchará una serie de tonos junto
con una instrucción verbal que
indicará el PIN ‘0000´ (cerocero-cero-cero). Para conectar
el auricular al teléfono móvil,
seguir los pasos a continuación:
1. Poner el teléfono móvil en
la modalidad de conexión (consultar el manual del usuario del
teléfono). Asegurarse de que
el teléfono móvil no esté a
más de 3 pies (1 metro) de distancia del auricular.
2. Seleccionar el nombre del
Declaración sobre la exposición a las frecuencias de
radio de la FCC:
Este equipo cumple con los
límites de exposición a la radiación de la FCC establecidos para un ambiente no
controlado. Los usuarios finales deben seguir las instrucciones específicas de
funcionamiento para cumplir
con las normas de exposición a las frecuencias de
radio. Este transmisor no
debe colocarse en el mismo
lugar ni funcionar en conjunto con ninguna otra antena o transmisor.
Este producto emite energía
de radiofrecuencia, pero la
energía irradiada del aparato
es muy inferior a los límites
de exposición a las frecuencias de radio de la FCC. No
obstante, el aparato debe
usarse de modo tal que se
minimice la posibilidad de
contacto humano con la antena durante el funcionamiento normal.
Marcación por Con el aparato ENCENDIDO, oprivoz2
mir una vez el botón con varias
funciones.
Finalizar una
llamada
El auricular emite una serie de señales sonoras breves mientras el teléfono móvil inicia el comando de
marcación por voz.
Durante una llamada, oprimir una El auricular corta la llamada actual.
vez el botón con varias funciones.
Guardar núme- Oprimir simultáneamente durante Guarda el número de una llamada
ros favoritos 1 segundo el botón con varias fun- entrante en los favoritos.
con Push4TM ciones y Vol+.
Llamar a números favoritos con
Push4TM
Oprimir durante 1 segundo el
botón con varias funciones
Push4TM.
Llama al número almacenado como
favorito.
Remarcación
del último número1
Oprimir dos veces el botón con
varias funciones.
Se vuelve a marcar el último número.
Activar y des- Con el aparato ENCENDIDO, opriactivar el con- mir durante 3 segundos el botón
testador de
Vol -.
llamadas automático
Se escuchará la instrucción de voz
de activación de respuesta automática “auto answer on”. Si está activada la modalidad de murmullo, se
escuchará al mismo tiempo el mensaje de desactivación “whisper off”,
dado que se desactiva automáticamente. Se escuchará el mensaje de
desactivación “auto answer off” al
desactivarlo.
Activar y desactivar la identificación
verbal de la
persona que
llama (modalidad de murmullo)
Con el aparato ENCENDIDO, oprimir durante 5 segundos los botones Vol+ y Vol simultáneamente.
Se escuchará la instrucción de voz
de desactivación “whisper off”. Se
escuchará el mensaje de activación
“whisper on” al activarlo.
Verificar la
Con el aparato ENCENDIDO, opricarga de la ba- mir el botón con varias funciones
tería
4 veces.
Una serie de señales sonoras indica
el tiempo de llamadas restante en
horas.
Subir el volumen
Durante una llamada, oprimir repe- Cada vez que se oprime, se escucha
tidamente el botón Vol+.
una señal sonora con volumen y
tono más altos.
Bajar el volumen
Durante una llamada, oprimir repe- Cada vez que se oprime, se escucha
tidamente el botón Vol-.
una señal sonora con volumen y
tono más bajos.
Desconectar
del teléfono1
Para desconectar el auricular del
teléfono, oprimir 3 veces el botón
con varias funciones.
El auricular queda en modalidad de
desconexión.
Conectar al te- Para conectar el auricular del telé- El auricular se conecta al último teléfono1
fono, oprimir una vez el botón con léfono al que estuvo conectado.
varias funciones.
Cumple con las
normas de la FCC
PARA USO EN EL HOGAR O LA OFICINA
© 2007 AT&T Intellectual Property. Todos los derechos reservados. AT&T, el logotipo de AT&T y todas las otras marcas de contenidas aquí son marcas comerciales
de AT&T Intellectual Property y/o compañías afiliadas a AT&T.
Ingresar selec- Oprimir el botón Vol+ o Vol- dución de tono
rante 5 segundos.
de timbre
Se escuchará el primer tono de timbre disponible.
Consultar
Oprimir el botón Vol+ o Vol- una
otros tonos de vez.
timbre
Se escuchan otros tonos de timbre.
Seleccionar
Oprimir una vez el botón con vatono de timbre rias funciones.
Se selecciona el tono de timbre actual.
1 Sólo con teléfonos móviles compatibles con la modalidad de manos libres.
2 Sólo con teléfonos móviles compatibles con la marcación por voz.