1
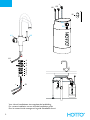
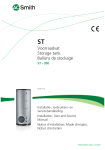
NL
UK
FR
Montage- en bedieningsintructies - Garantievoorwaarden
Assembly and operating instructions - Terms and conditions of warranty
Instructions de montage et d’utilisation - Conditions de garantie
H2
G2
J
M
B4
B3
K1
K2
H1
A
B
S
C
D
E
F
L
G1
Voor inhoud installatieset zie meegeleverde handleiding.
For content installation set see included installation guide.
Pour le contenu kit de montage voir le guide d’installation fourni.
2
1
2
3a
B
S
G1
C
D
E
F
Ø 33 - 40 mm
3 Nm
L
3b
max. 35 mm
A
max.
Ø 70 mm
4
max. 65 mm
C
D
E
F
8 Nm
5
6
7
8
9
10
Installeer de installatieset volgens de meegeleverde instructies.
Install the installation set according to included instructions.
Installez l’installation régler selon les instructions fournies.
Indien u via onze webshop de waterfilterset heeft gekocht, installeer dan het waterfilter en inlaatcombinatie volgens instructies meegeleverd bij de waterfilterset.
In case you have bought the water filter set through our webshop, please do install the water filter and
safety group according to the instructions included with the water filter set.
Si vous avez acheté le filtre à eau dans notre webshop, s.v.p. installez le filtre à eau et le groupe sécurité
conformement les instructions fournies avec l’ensemble de filtre à eau.
11
12
5 Nm
13
L
H1
G1
J
5 Nm
H2
M
5 Nm
G2
H2
8 Nm
3
15
14
17
18
B3
K1
B4
K2
B3
B6
474
B5
72,5
72,5
257
257
344
409
16
179
179
Quadro
4
225
210
210
Arco
Boiler
NL
Uitleg van de symbolen
In deze handleiding en/of op het apparaat worden de volgende symbolen gebruikt:
Staat voor de standaard veiligheidsnormen volgens de relevante Europese richtlijnen.
Niet opvolgen van deze waarschuwing kan het apparaat schade toerichten.
Niet opvolgen van deze waarschuwing kan u of anderen in gevaar brengen.
Geeft aan dat er spanning op het apparaat kan staan.
Niet opvolgen van deze waarschuwing kan u en/ of het apparaat schade toerichten.
Gebruiksaanwijzing lezen.
Schadelijke materialen en elektrische of elektronische apparaten moeten naar een daarvoor bestemd
recycle punt worden gebracht.
Inleiding
Gefeliciteerd met uw Hotto!
Uw Hotto product bestaat uit een kokend water boiler en 3-in-1 kraan met kokend
water functie. Daarbij is het voorgeschreven dat u de Hotto installatieset gebruikt om
de Hotto te installeren. De Hotto boiler levert naast kokend water ook warm water. De
maximale temperatuur van het warme water is op de boiler in te stellen. Bovendien kunt
u de Hotto boiler in de 70 °C stand zetten waarbij het water tot maximaal 70 °C
opgewarmd wordt.
Veiligheid staat voorop bij Hotto. Daarom zijn zowel de kraan als boiler voorzien van
kindveilige voorzieningen. Echter dient bij het gebruik altijd rekening te worden gehouden
met het gevaar van kokend water in het algemeen.
Indien u storingen ervaart raadpleeg dan de storingswijzer in deze handleiding. Als u
ondanks de storingswijzer extra hulp nodig heeft kunt u altijd contact opnemen met onze
servicelijn. Hiervoor kunt u ook terecht op onze website: www.hotto.com
1.
Gebruik van de handleiding
Gelieve deze gebruiksaanwijzing goed te lezen alvorens het apparaat te installeren en in
gebruik te nemen! Om uw eigen veiligheid en die van anderen te garanderen, raden wij u
aan om deze installatie-en bedieningsinstructies voor het eerste gebruik goed door te lezen. Bewaar deze handleiding en de andere documentatie in de nabijheid van het apparaat.
Dit apparaat is geproduceerd volgens de geldende normen en is getest door daartoe
bevoegde instanties. De technische eigenschappen van het product zijn weergeven op de
sticker achterop de boiler.
De installatie dient te worden uitgevoerd door daartoe gekwalificeerde personen. Alle reparatie- en onderhoudswerkzaamheden aan of in het apparaat, zoals bijvoorbeeld kalkverwijdering, dienen te worden uitgevoerd door een gekwalificeerd service- en onderhoudsbedrijf. De lokaal geldende richtlijnen dienen hierbij altijd in acht genomen te worden!
5
NL
Dit apparaat is bedoeld voor gebruik in thuisomgevingen en vergelijkbare omgevingen zoals: personeelskeukens in winkels, kantoren en andere werkomgevingen; boerderijen; door
gasten in hotels, motels en andere residentiële omgevingen; in bed & breakfast omgevingen. Het moderne ontwerp, de gebruikte materialen en het geavanceerde productieproces waarborgen de hoge kwaliteit van het product.
Het apparaat mag gebruikt worden door kinderen vanaf de leeftijd van 8 jaar en door
personen met verminderde fysieke, zintuiglijke of mentale capaciteiten of met gebrek aan
ervaring of kennis, indien zij onder het toezicht staan of gebruiksinstructies voor het veilig
gebruik van dit toestel gekregen hebben en de mogelijke gevaren begrijpen.
Er moet op worden toegezien dat kinderen niet met het apparaat spelen. Kinderen die
niet onder toezicht staan, mogen dit toestel ook niet reinigen of onderhouden.
Het apparaat is een drukboiler! U dient bij de koud water toe voer een inlaatcombinatie
(0,8 MPa, met Kiwa Keur) te gebruiken! Installeer deze volgens meegeleverde instructies.
Conformiteitsverklaring
Quantex Group B.V. verklaart hierbij dat het apparaat in overeenstemming is met:
»» 2006/95/EC Laagspanningsrichtlijn
»» 2004/108/EC Elektromagnetische compatibiliteit richtlijn
»» 2011/65/EC RoHS II
En tevens overeenkomt met de volgende Europese geharmoniseerde normen:
»» EN 60335-1: 2012
»» EN 60335-2-15: 2003 + A2:2008 + A11:2012
»» EN 60335-2-21: 2003 + A1:2005 + A2:2008
»» EN 55014-1: 2006 + A1:2009 + A2:2011
»» EN 55014-2: 1997 + A1:2001+ A2:2008
»» EN 61000-3-2: 2006 + A1:2009 + A2:2009
»» EN 61000-3-3: 2008
»» EN 62233: 2008 +C1:2008
Quantex Group B.V., Gildestraat 13, 6883 DB Velp, Nederland, 2014-10-30
2.
Montagehandleiding
Milieu
Om schade tijdens transport te voorkomen, wordt het product geleverd in een stevige
verpakking. Deze verpakking bestaat uit herbruikbaar materiaal. Voer de verpakking daarom op verantwoorde wijze af.
Inleveren van het oude apparaat
Oude apparaten mogen niet in het huisvuil! Zou het apparaat eens niet meer kunnen
worden gebruikt, dan is iedere verbruiker wettelijk verplicht, oude apparaten gescheiden
van het huisvuil, bijv. bij een verzamelplaats van zijn gemeente/zijn stadsdeel af te geven.
Daarmee wordt gegarandeerd, dat de oude apparaten vakkundig worden verwerkt en
negatieve uitwerkingen op het milieu vermeden worden.
6
NL
Installatie
Dit apparaat dient te worden ingebouwd volgens het schema op de eerste pagina’s van
deze gebruiksaanwijzing. Elke andere manier kan leiden tot ernstige schade aan het apparaat.
Het apparaat moet zo dicht mogelijk bij de wateraansluitingen worden geïnstalleerd en op
een locatie waar geen kans op vorst bestaat (bijvoorbeeld in tuinhuisjes en caravans).
Gebruik bij de montage van wartels en knelkoppelingen altijd 2 steeksleutels om buiging
en wringing van leidingen en appendages te vermijden.
Vorst
Wanneer er in een ruimte kans op vorst bestaat, mag het apparaat niet in deze ruimte
worden geïnstalleerd. Wanneer het apparaat desondanks wordt geïnstalleerd in een ruimte waar kans op vorst bestaat, moet het apparaat worden geleegd en afgesloten voordat
het gevaar ontstaat.
De Hotto is niet geschikt voor installatie op een omgekeerde osmose installatie of een
wateronthardende installatie met een pH-verlagende werking.
Voor aansluiting dient altijd de Hotto inlaatcombinatie te worden gebruikt. Gebruik het
apparaat nooit zonder inlaatcombinatie!
Gebruik van een andere kraan dan de meegeleverde Hotto 3-in-1 kraan, of een wijziging
die is aangebracht aan de kraan/boiler combinatie, kan het product beschadigen. De garantie zal automatisch vervallen bij een foutieve installatie of aanpassing!
Belangrijk: Steek nooit de stekker in de wandcontactdoos voordat het apparaat met
water is gevuld!
Waterkwaliteit
In gebieden waar de waterhardheid boven de 12 °dH uitkomt moet een door Hotto
erkend waterfilter worden geplaatst in de toevoerleiding. Dit is een garantievoorwaarde.
Zie www.hotto.com voor meer informatie en bestelmogelijkheden voor waterfilters.
Daarnaast stellen wij de onderstaande eisen aan de waterkwaliteit. U kunt deze waarden
opvragen bij uw waterleverancier.
Zuurgraad
7 - 9,5 pH
Fe (IJzergraad)
< 0,2 mg/l
CI (Chloorgehalte)
< 150 mg/l
DH (Duitse Hardheid)
< 12 °dH
Minimale stromingsdruk
0,1 MPa
2A
Aansluiten kraan
Stap 1: Draai de koud en warm water slangen (G1, L) in de kraan.
Stap 2: Plaats de kraan in het gat (ø 33 - 40 mm) van het aanrecht met de Hotto rozet
(A) naar voren wijzend en de rubberen ring (B).
7
NL
Indien het aanrechtblad dunner is dan 35 mm ga naar stap 3a, anders vervolg bij stap 3b.
Stap 3a: Bij een aanrecht dunner dan 35 mm plaats achtereenvolgens de stabiliteitsdriehoek (S), rubber ring (C) en metalen ring (D). Draai vervolgens de moer (E) met de twee
schroeven (F) erin handvast aan.
Stap 3b: Bij een aanrecht tussen de 35 en 65 mm plaats achtereenvolgens de rubber ring
(C) en metalen ring (D). Draai vervolgens de moer (E) met de twee schroeven (F) erin
handvast aan.
Stap 4: Draai de twee schroeven aan ter fixatie van de moer (E).
Voorkom dat de slangen geknikt of gedraaid geïnstalleerd worden.
2B
Aansluiten installatieset
Stap 5: Sluit de water hoofdkraan. Installeer vervolgens de installatieset volgens de meegeleverde instructies, stappen 6 t/m 9.
2C
Aansluiten boiler
Aansluiting van het apparaat op het elektriciteitsnet dient te worden gedaan volgens de
normen voor elektrische installaties en de lokaal geldende regels en wetten. Het apparaat
dient rechtstreeks te worden aangesloten op het elektriciteitsnet (geaarde wandcontactdoos) door middel van het snoer met stekker.
Gevaar door een beschadigde voedingskabel moet worden vermeden. Bij beschadiging
moet de voedingskabel door de fabrikant, zijn klantenservice of een gelijkwaardig
gekwalificeerde persoon worden vervangen.
Vergewis u ervan dat door toevoeging van het apparaat de gebruikte groep in uw
groepenkast niet wordt overbelast.
Elke aanpassing aan het product en de (interne) bedrading kan zorgen voor defecten
indien deze niet wordt uitgevoerd door professionele vakmensen. De garantie is slechts
geldig indien het product in zijn originele staat is en dus op geen enkele wijze is aangepast.
Om brandgevaar te voorkomen als gevolg van een onbedoelde nulstelling van de
thermische uitschakeling dient u dit toestel niet van stroom te voorzien via een extern
schakel- instrument, zoals een timer, of op een stroomkring aan te sluiten die regelmatig
aan en uit wordt gezet door het elektriciteitsbedrijf.
Plaats de Hotto boiler nooit liggend of ondersteboven. De boiler moet altijd rechtop
staan, zodat de schakelaar (B5) zich onderaan bevindt.
Stap 10: Draai de koud water toevoerslang (J) van boiler op de Hotto inlaatcombinatie.
Stap 11: Draai de warm water slang (G1) van de kraan op de warm water slang (G2)
van de boiler. Draai vervolgens de kokend water slang (H1) van de kraan op de kokend
water slang (H2) van de boiler.
8
NL
Stap 12: Steek de koud water slang (L) van de kraan in het knel t-stuk die voor de inlaatcombinatie is geplaatst. Draai de knelmoer van de t-stuk goed aan met passende
steeksleutel.
Stap 13: Plaats de beschermende isolatie (M) om de kokend water slang koppeling.
Fixeer deze met het meegeleverde montagebandje.
Draai vervolgens de water hoofdkraan en de stopkraan (O7) van de inlaatcombinatie open. Vul de Hotto boiler met koud water door de kokend water knop te
openen totdat er geen lucht meer uit de kraan komt. Dit kan enkele minuten duren.
Nadat de boiler is gevuld met water draait u de hendel van het warme water (K2) helemaal open. Laat het water stromen totdat er geen lucht meer uit de kraan komt. Steek
daarna de stekker in de wandcontactdoos.
Belangrijk: Mocht het apparaat onverhoopt toch aan het elektriciteitsnet worden aangesloten zonder gevuld te zijn met water, of om enige andere reden afslaan na kortstondig
gebruik, gelieve dan de stekker uit de wandcontactdoos te halen en het apparaat te laten
afkoelen (minimaal 30 minuten). Mogelijk dient de boiler gereset te worden, zie storingswijzer.
3.
Gebruikershandleiding
Het apparaat dient absoluut met water gevuld te zijn voordat deze wordt aangesloten op
het elektriciteitsnet!
Het apparaat dient altijd aangesloten te worden met een inlaatcombinatie!
Ingebruikname (stap 16)
De boiler wordt aangezet met de rode schakelaar (B5) op de achterzijde nadat de boiler
helemaal gevuld is met water. De boiler is nu standby en warmt nog niet op. U zult merken dat het led lampje aan de voorzijde oranje kleurt.
70° C instelling (stap 17)
Druk éénmaal op de standby knop (B3) en het water wordt opgewarmd tot maximaal
70°C. De linker blauwe led gaat branden totdat de temperatuur is bereikt: dan kleurt de led rood.
100° C instelling (stap 17)
Druk nogmaals op de standby knop (B3) en het water wordt tot 100°C verwarmd. Nu
wordt de rechter led blauw en daarna rood zodra de temperatuur is bereikt.
Temperatuur instellen warm water (stap 18)
De temperatuur van het warme water kan worden ingesteld door de ronde knop (B4)
aan de voorzijde van de boiler naar links (lagere temperatuur) of rechts (hogere temperatuur) te draaien. Het instelbereik is 35 - 70 °C als de boiler in de 100 °C stand staat. Het
instelbereik in de 70 °C stand is 35 - 60 °C.
9
NL
Bediening kraan (stap 14/15)
• Koud en warm water
Met de hendel (K2) in verticale stand geeft de kraan koud water. Men tapt pas warm
water als de hendel naar voren wordt gehaald. Hierdoor wordt er niet onbewust warm
water en energie verspild.
• Kokend water
Om kokend water te tappen moet men eerst de pal indrukken (15.1) en vervolgens de
knop naar achteren draaien (15.2) van de kokend water knop (K1). Bij het loslaten van
de knop (K1) draait deze direct terug door de ingebouwde springveer. Deze bediening
voorkomt dat nieuwsgierige kinderen per ongeluk de kokend water kraan aanzetten.
Als het water in de boiler wordt verwarmd neemt het volume toe. Dit wordt expansie
water genoemd. Dit expansie water druppelt weg via de inlaatcombinatie. Dit is
noodzakelijk en mag niet verhinderd worden.
Als de gehele voorraad aan kokend water wordt getapt, duurt het ongeveer 20 minuten
alvorens het water weer op temperatuur is. Het LED lampje bij knop (B3) op de boiler
zal rood kleuren als de volledige voorraad in de boiler weer de ingestelde temperatuur
bereikt heeft.
4.
Onderhoud
Dit apparaat bevat geen onderdelen die door de gebruiker moeten of kunnen worden
onderhouden. Professioneel onderhoud dient altijd vakkundig te worden uitgevoerd.
De inlaatcombinatie dient voor de afvoer van het expansie water, dat via een trechter
wegdruppelt. De trechter moet zo gedraaid worden dat deze in een continue
neerwaartse richting wijst en moet altijd een open verbinding met de atmosfeer hebben.
Tussen de trechter en de riolering wordt een afvoerslang aangesloten. Het geheel moet in
een vorstvrije omgeving worden geplaatst.
Controleer de werking van de inlaatcombinatie door 1x per jaar aan de grote knop op
de inlaatcombinatie te draaien, zodat er water uitstroomt en sluit hem dan weer direct.
Hiermee wordt voorkomen dat de klep in de inlaatcombinatie vast gaat zitten.
Controleer dan ook of de afvoer niet verstopt is. Is dat wel het geval, ontstop dan de
afvoer of laat dit doen.
Probeer nooit het apparaat zelf te repareren! In geval van een storing, tracht deze op te
lossen middels de storingswijzer in deze handleiding. Neem contact op met de Hotto
servicelijn indien nodig, zie ook www.hotto.com.
Reiniging
De buitenzijde van het apparaat kan worden schoongemaakt met een licht vochtige doek
met schoonmaak- of afwasmiddel. Oplosmiddelen of schuurmiddelen dienen niet te worden gebruikt.
Legionella preventie
Bij langdurige uitschakeling van het apparaat, bijvoorbeeld i.v.m. vakantie, dient u het apparaat vóór het eerste gebruik volledig tot de maximale temperatuur op te warmen. Het
wordt aanbevolen om de leidingen gedurende 1 minuut door te spoelen.
10
NL
5.
Storingswijzer
Let op! Raadpleeg bij problemen altijd de storingswijzer!
Indien het water in het apparaat niet meer opwarmt, controleer dan eerst of de stekker
goed in de wandcontactdoos zit en of de zekering van de groep, waarop het apparaat is
aangesloten, nog functioneert.Voor alle verdere storingen raadpleeg de storingswijzer.
Mocht het apparaat niet functioneren, omdat deze is aangesloten zonder hem met water
te vullen, volg dan de storingswijzer. Het apparaat is oververhit geraakt en zal moeten
afkoelen of moet mogelijk worden gerepareerd.
Indien het apparaat meerdere keren is gereset, maar nog steeds niet functioneert, neem
dan contact op met de Hotto servicelijn.
6.
Ontkoppelen en ledigen Hotto boiler
Indien de boiler ontkoppeld moet worden, ga als volgt te werk:
1.Zet de boiler in standby modus door op de standby knop (B3) te drukken totdat
alleen het oranje standby LED lampje brandt.
2.Tap het kokende water uit de boiler met de kokend water knop (K1) totdat er koud
water uit de kraan komt.
3.Schakel de boiler uit met de schakelaar (B5) en haal de stekker uit het stopcontact.
4.Draai de stopkraan van de inlaatcombinatie dicht.
5.Haal de druk van de boiler door de kokend water kraan (K1) te openen tot er geen
(inmiddels koud) water meer uit de uitloop komt.
6.Vervolgens kunnen de slangen van de boiler worden ontkoppeld. Houd er rekening mee
dat er water uit de koud water slang (H2) kan komen.
7.Plaats de boiler in de buurt van de gootsteen.
8.Blaas op de warm water slang (G2) van de boiler en het restant van water in de boiler
zal via de koud water slang (H2) uit de boiler stromen.
Een kleine hoeveelheid water zal waarschijnlijk in de boiler achterblijven.
11
NL
7.
Technische specificaties
Beschrijving
8L drukboiler set en 3in1 kraan
Plaatsing boiler
staand
Werkdruk
0,8 MPa
Temperatuur instelbereik boiler
70 °C - 100 °C
Temperatuur instelbereik warm water
35 °C - 70 °C
Elektrische aansluiting
1/N/PE 230 V
Frequentie
50 Hz
Nominaal vermogen
2.200 W
Inhoud
8l
Kabelmaat
3 x 1,5 mm²
Maximum aanbevolen volume water
10,0 l / min
Beschermingsklasse
I
IP beschermingsklasse
IPX4
Afmetingen boiler (HxBxD)
485 x 225 x 225 mm
Afmetingen Arco kraan (HxBxD)
410 x 225 x 170 mm
Afmetingen Quadro kraan (HxBxD)
350 x 225 x 170 mm
Beschikbaar water 100 °C *
6l
Beschikbaar water 60 °C *
16 l
Beschikbaar water 40 °C *
28 l
* Bij instelling standby knop op 100 °C en een koud water temperatuur van 15 °C
12
NL
NL
8.
Garantiebepalingen
Garantie
De rechten uit deze fabrieksgarantie zijn een aanvulling op de wettelijke rechten van
de koper. De wettelijke rechten van de koper, met name ten opzichte van de verkoper,
worden op geen enkele wijze door deze garantie beperkt.
Rechten
Bij een claim van rechten op grond van deze garantie moet het desbetreffende
aankoopbewijs worden meegeleverd.
Inhoud
Hotto Nederland staat er als producent voor in dat dit product vrij is van materiaalen productiefouten. Materiaal- en productiefouten die zich binnen de garantieperiode
openbaren, geven recht op garantie. Er bestaat geen recht op garantie als de fouten het
gevolg zijn van onkundige installatie, onkundige ingebruikname, onjuiste
gebruikscondities of onjuist uitgevoerde onderhouds- of reparatiewerkzaamheden.
Ook normale slijtage, waaronder verkalking geeft geen recht op garantie. Het recht op
garantie komt te vervallen als het probleem is veroorzaakt door extreme
drinkwater waarden (pH waarde niet tussen 7 en 9.5 en/of Cl boven 150 mg/l en/of Fe
boven 0.2mg/l en/of Duitse Hardheid boven de 12 °dH.)
Duur
De garantieperiode bedraagt 24 maanden. De garantieperiode gaat in op de dag van
aankoop van het product.Verleende reparaties leiden niet tot een verlenging van de
garantieperiode en start ook geen nieuwe garantieperiode.
Claimen
Voor Nederland/België: bij een defect product contacteer de Hotto servicelijn. Zie voor
meer informatie de website www.hotto.com
Hotto is niet aansprakelijk voor transportschade. Hotto bepaalt of het product
gerepareerd of vervangen wordt. Vervangen onderdelen of producten worden eigendom van Hotto.
Vervallen
Reparatiepogingen door de klant of door derden die daartoe niet door Hotto zijn
van garantie geautoriseerd, maken de garantie ongeldig. De garantie vervalt ook als er onderdelen
in het product worden aangebracht of ermee worden verbonden, die geen originele
onderdelen van Hotto zijn.
Beperking
Aan deze garantie kunnen geen andere rechten worden ontleend dan reparatie of
vervanging van het product. Deze garantie geeft geen recht op schadevergoeding,
ongedaan maken van de koop, korting of compensatie voor vervolgschade.
Deze garantie geldt niet voor apparaten die buiten Nederland of België zijn aangeschaft.
De wettelijke voorschriften en de leveringsvoorwaarden van de landelijke
verkooporganisatie of de importeur moeten in acht worden genomen.
Registratie
U kunt uw Hotto product registreren op www.hotto.com.
13
NL
NL
Montage storingswijzer
Klacht
De slangen zijn te kort
De inlaatcombinatie geeft een
onaangename rioollucht af
Oorzaak
U probeert de boiler te ver van de inlaatcombinatie en/of de kraan te monteren
Geen lus in zwarte afvoer slang van inlaatcombinatie
Oplossing
Plaats de boiler dichter bij de inlaatcombinatie en/of
kraan
Maak een lus in de slang, zoals afgebeeld op de installatiehandleiding (stap 9) van de installatieset.
Water storingswijzer
Klacht
Na installatie maakt kraan pruttelende geluiden
Er komt geen koud water uit de
kraan
Er komt geen warm of kokend
water uit de kraan
Er komt weinig water uit de kraan
Oorzaak
Er zit lucht in de leidingen
Oplossing
Beide kranen goed openen en ontluchten (stopkraan, keukenkraan)
Hoofdkraan dicht
Hoofdkraan opendraaien
Stopkranen dicht
Stopkranen opendraaien
Stopkraan inlaatcombinatie dicht Stopkraan opendraaien
Waterdruk is te laag
Controleer of de hoofdkraan en
stopkranen helemaal open zijn
Controleer of er geen knik in
een slang zit
Verkalking van de uitloop
Er komt warm water uit de koud
Slangen van de kraan zijn omgewater kraan
wisseld
Warm water is te warm of te koud Warmwater temperatuur niet
naar wens ingesteld
Er komt geen warm water uit de
Boiler is (nog) niet opgewarmd,
warmwater kraan en geen kokend zie LED aanduiding op afbeelding
water uit de kokendwater kraan
17 en §3
Boiler niet aangesloten op het
elektriciteitsnet
Boiler is defect
Bij het open draaien van de kokend Boiler staat in de 70°C stand
water knop (K1) komt er warm
water uit de kraan, maar geen
Water is niet opgewarmd tot
kokend water
100°C
Kokend water komt heftiger
Boiler moet gereset worden
sputterend uit de kraan met heviger Sensor of de besturing is defect
stoomvorming, anders dan normaal
Kokend water komt sputterend
Verkalking van de uitloop
uit de kraan en de kraan heeft een
lagere kokend water opbrengst.
Er zit een witte substantie in het
Er is te veel kalkafzetting in de
warme water
tank
De boiler maakt kookgeluiden
Te veel kalkafzetting in de boiler
Controleer een ander tappunt, is hier de druk ook laag, open dan
de hoofdkraan helemaal, is de druk nog te laag neem dan contact op
met het waterleidingbedrijf.
Open de betreffende kraan helemaal
Verhelp de knik, of laat de slang vervangen als deze beschadigd is
Reinig of vervang de straalbreker
Sluit de slangen op de juiste manier aan
Stel de temperatuur in met de ronde knop (B4) op de boiler
Wacht tot de boiler is opgewarmd, dit duurt ongeveer 25 minuten
Controleer of de boiler ingeschakeld is.Volg hiervoor de instructies
in §3
Steek de stekker in de wandcontactdoos
Controleer of de betreffende electriciteitsgroep is ingeschakeld
Neem contact op met Hotto Servicelijn
Zet de boiler met de stand-by knop (B3) in de 100°C stand, zie §3, en
wacht tot de boiler LED rood wordt.
Wacht tot het water is opgewarmd. De LED lamp op de boiler zal
rood kleuren als het water is opgewarmd.
Druk de reset knop (B6) in, aan de achterzijde van de boiler
Neem contact op met Hotto Servicelijn, zie www.hotto.com
Reinig of vervang de straalbreker
Boiler door installateur schoon laten maken
Neem contact op met Hotto Servicelijn, zie www.hotto.com
Elektra storingswijzer
Klacht
De groepen vallen steeds uit
Oorzaak
Te veel apparaten op één groep
De aardlekschakelaar treedt in
werking
Er zit kortsluiting in het elektrische circuit
Standby lampje brandt niet
Boiler krijgt geen spanning
Geen water in de boiler en
beveiliging stroomonderbreking
treedt in
14
Oplossing
Gebruik minder apparaten tegelijk of sluit apparaten aan op een
andere groep; of gebruik een energieverdeler, zie www.hotto.com
Onderzoek welk apparaat de sluiting veroorzaakt: Neem de stekker
van de Hotto boiler uit de wandcontactdoos, reset de aardlekschakelaar, treedt deze weer in werking dan is uw Hotto boiler niet de
oorzaak. Controleer welk ander apparaat de oorzaak is. Treedt de
aardlekschakelaar weer in werking door de Hotto boiler, neem dan
contact op met de Hotto Servicelijn, zie www.hotto.com
Steek de stekker in de wandcontactdoos
Schakel de boiler in met de rode knop (B5) aan de achterzijde
Controleer of er spanning op de wandcontactdoos staat
Controleer in de groepenkast of de betreffende groep en bijbehorende aardlekschakelaar is ingeschakeld
Trek de stekker er uit en laat het apparaat 30 minuten afkoelen.Vul
met water. Druk RESET knop (B6) aan de achterkant in. Bij meerdere
keren resetten contact opnemen met de servicelijn, www.hotto.com.
UK
UK
Symbols
The following symbols are used in these instructions/appear on the device:
Complies with the basic safety standards set by European Directives.
Failure to observe the instructions identified by this symbol may endanger persons.
Failure to observe the instructions identified by this symbol may lead to damage to the device.
Indicates a voltage that is present.
Failure to observe the instructions identified by this symbol may lead to damage to the device.
Read the manual.
Faulty and/or electrical or electronic appliances that are to be disposed of must
be handed in at the relevant recycling centres set up for this purpose
Introduction
Congratulations on your Hotto!
Your Hotto product consists of a boiling water boiler and a 3-in-1 tap with boiling
water function.You must use the Hotto installation set to install the Hotto. In addition to
boiling water, the Hotto boiler also provides hot water.You can adjust the maximum hot
water temperature on the boiler.You can also set the Hotto boiler to 70°C, which means
that the water will be heated to a maximum of 70°C.
Safety comes first at Hotto. That is why both the tap and the boiler are provided with
child-safe features. However, during use you should always be aware of the general hazard
of boiling hot water.
In case of failures, please consult the troubleshooter in this manual. If, in
spite of this troubleshooter, you still need some extra help, please do not hesitate to contact our service line. For this you can also visit our website: www.hotto.com.
1.
Use of the manual
These instructions contain important information about commissioning, operating the device and maintenance. To ensure your safety and that of others we suggest that you read
these installation and operating instructions before using the device for the first time.
Please keep the instructions and other documentation close to the device.
This device was manufactured in accordance with current standards and has been
tested by competent agencies. The technical characteristics of the product can be found
on the rating plate at the rear of the boiler.
The device should be installed by qualified persons. All repair and maintenance work on
the device, for example the removal of limestone and water scale deposits, may only be
carried out by duly authorised technical staff. The applicable regulations and regional requirements must always be duly observed!
15
UK
UK
This device is intended for use in household and similar applications such as: staff kitchen
areas in shops, offices and other working environments; farm houses; by clients in hotels,
motels and other residential type environments; bed and breakfast type environments. Its
modern design and the use of carefully selected materials and an improved manufacturing
process ensure high quality.
This device can be used by children aged from 8 years and above and persons with reduced physical, sensory or mental capabilities or lack of experience and knowledge if they
have been given supervision or instruction concerning use of the device in a safe way and
understand the hazards involved.
Children shall not play with the device. Cleaning and user maintenance shall not be made
by children without supervision.
The device is a pressure boiler! A safety group (0,8 MPa, with Kiwa certificate) must be
applied to the cold water supply. Install according to accompanied instructions.
Statement of conformity
Quantex Group B.V. duly declares that the device complies with the following directives:
»» 2006/95/EC Low Voltage Directive
»» 2004/108/EC Electromagnetic Compatibility Directive (EMC)
»» 2011/65/EC RoHS II
The product also conforms to the following harmonised European standards:
»» EN 60335-1: 2012
»» EN 60335-2-15: 2003 + A2:2008 + A11:2012
»» EN 60335-2-21: 2003 + A1:2005 + A2:2008
»» EN 55014-1: 2006 + A1:2009 + A2:2011
»» EN 55014-2: 1997 + A1:2001+ A2:2008
»» EN 61000-3-2: 2006 + A1:2009 + A2:2009
»» EN 61000-3-3: 2008
»» EN 62233: 2008 +C1:2008
Quantex Group B.V., Gildestraat 13, 6883 DB Velp, The Netherlands, 2014-10-30
2.
Mounting instructions
Environment
This device is delivered in sturdy packaging in order to avoid damage during transport.
This packaging is made of recyclable material. Please dispose the packaging in a responsible manner.
Disposal of the device
Old devices must not be disposed of in your household waste!
Every consumer is legally obliged to dispose of old devices separately from their household waste and to take them, for example, to a collection point in their local community
or local district. Old electrical devices will usually be accepted free of charge. This ensures
that the old devices are properly recycled and any negative impacts on the environment
are avoided. This is why electrical devices are marked with the symbol shown on the left.
16
UK
UK
Installation
The device should be installed in accordance with the drawing on the first page of the
user manual. Any other installation position may result in serious damage to the device.
Installation should take place as close as possible to a cold water connection. The product
should be protected from the effects of frost (for example in caravans, summer houses,
etc.).
When mounting swivels and compression fittings, always use 2 open-end spanners in order to prevent bending and twisting pipes and accessories.
Frost
In case of risk of frost in a room, the device should not be installed in this room. If, despite this advice, the device is installed in a room where there is a risk of frost, the device
should be emptied before the risk arises.
The Hotto is not suitable for installation on a reverse osmosis installation or a
water softening installation with pH reduction.
Always use the Hotto safety group for connecting. Never use the device without a safety
group!
Use of a different tap than the supplied Hotto 3-in-1 tap, or a change in the
tap/boiler combination, may damage the product. The warranty will always become invalid
in case of incorrect installation or modification!
Important: Never insert the plug in the earthed wall socket before the appliance is filled
with water!
Water quality
In areas where the water hardness is above 12 °dH a water filter approved by Hotto
must be placed in the supply water line. Failure in doing so will void the warranty. See
www.hotto.com for more information and ordering options for water filters. The water
quality must meet the following requirements:
pH scale
7 - 9,5 pH
Fe (Iron level)
< 0,2 mg/l
CI (Chlorine content)
< 150 mg/l
DH (German Hardness)
< 12 °DH
Minimum flow pressure
0,1 MPa
2A
Connecting the tap
Step 1: Connect the cold and hot water hoses (G) by screwing them in the tap.
Step 2: Place the tap in the hole (ø 33 - 40 mm). The Hotto logo of the rosette (A) with
rubbering ring (B) should be pointing towards the front.
If the counter top is less than 35 mm thick, go to step 3a. Else, proceed with step 3b.
Step 3a: In case of a counter top less than 35 mm thick, first place the stability triangle
(S), then the rubber ring (C) and finally the metal ring (D). Then tighten the nut (E) containing the two screws (F) by hand.
Step 3b: In case of a counter top between 35 and 65 mm thick, place the rubber ring
(C) and then the metal ring (D). Then tighten the nut (E) containing the two screws (F)
by hand.
17
UK
UK
Step 4: Tighten the two screws to fixate the nut (E).
Make sure the hoses are not installed with a kink or twist.
2B
Connecting the installation set
Step 5: Close the main water tap. Then install the installation set according to the provided instructions, steps 6 to 9.
2C
Connecting the boiler
Connection of the device to the power supply network must take place in accordance
with electric installation standards and as specified by local laws and regulations. The
device must be directly connected to the power supply network (230V) via the electrical
cable and plug.
Avoid danger from damaged power supply cables. In the event of damage, the device must
be replaced by the manufacturer or its customer service department, or by an
equivalently-qualified person.
Ensure that the addition of this device will not overload the fuse protection in your mains.
Internal modifications to the product may cause problems if this work is not carried out
by authorized and qualified technical staff. The warranty only applies if the product has
not been modified in any way, i.e. subject to it being in unchanged condition.
In order to avoid creating an unsafe situation by inappropriate resetting of the maximum
temperature safety device, this unit may not be powered via an external switching device
(a time switch for example) or connected to a circuit, which is regularly switched on and
off by the power supply company.
Never place the Hotto boiler lying down or upside down. The boiler should always be
upright, so that the switch (B5) is at the bottom.
Step 10: Connect the boiler’s cold water supply hose (J) to the Hotto safety group.
Step 11: Connect the tap’s hot water hose (G1) to the boiler’s hot water hose
(G2). Then connect the tap’s boiling water hose (H1) to the boiler’s boiling water hose
(H2).
Stap 12: Insert the tap’s cold water hose (L) in the compression t-piece in front of the
safety group. Properly tighten the clamp nut of the t-piece using a suitable
open-end wrench.
Stap 13: Place the insulation part (M) around the boiler’s boiling water hose connection.
Fixate the insulation with the accompanied tie wrap.
Then open the main water tap and the stop valve (O7) of the safety group. Fill
the Hotto boiler with cold water by opening the boiling water knob until no more air is
coming out of the tap. This may take a few minutes. After the boiler has been filled with
water you must fully open the lever for hot water (K2). Allow the water to flow until no
more air is coming out of the tap. Then insert the plug in the wall socket.
18
UK
UK
Important: In the unlikely event that the device is connected to the mains power supply
without being filled with water, or if for some reason the device switches off after a short
while, please disconnect the plug from the wall socket to allow the device to cool down.
It may be necessary to reset the boiler: See the troubleshooter.
3.
User instructions
The device must be filled with water before connected to the electrical supply!
The device should always be connected to a safety group!
Implementation (step 16)
The boiler is switched on with the red switch (B5) on the rear, after the boiler has been
fully filled with water. The boiler is now standby and is not yet heating.You will see that
the LED at the front turns orange.
70° C setting (step 17)
Press the standby key (B3) once and the water will be heated to a maximum of 70°C.
The left blue LED will light until the temperature has been reached, after which the LED
will turn red.
100° C setting (step 17)
Press the standby key (B3) once more, and the water will be heated to 100°C. Now the
right LED will turn blue and then red once the temperature has been reached.
Setting the temperature for hot water (step 18)
The hot water temperature can be adjusted by turning the round knob (B4) at the front
of the boiler to the left (lower temperature) or to the right (higher temperature). The
setting range is 35 - 70 °C, if the boiler is set to 100 °C. The setting range when the boiler is set to 70 °C is 35 - 60 °C.
Using the tap (step 14/15)
• Cold and hot water
With the lever (K2) in vertical position, the tap will provide cold water.You will only get
hot water if the lever is moved towards the front. In this way no hot water and energy is
wasted.
• Boiling water
In order to get boiling water you must first push in the catch (15.1) and then rotate the
boiling water knob (K1) away from you (15.2). When you let go of the knob (K1), the
built in spring will make sure that it will return to its original position immediately. This
feature will prevent curious children from activating the boiling water tap by accident.
If the water in the boiler is heated, the volume will increase. This is referred to as expansion water. The expansion water will drip away via the safety group. This is necessary and
should not be prevented.
If all the boiling water is used, it will take approximately 20 minutes for the water to
reach the correct temperature. The LED on the boiler will turn red once all the water in
the boiler has reached the set temperature.
19
UK
4.
UK
Maintenance
This device does not require any maintenance by the user. Professional maintenance
should always be carried out by an expert.
The safety group discharges expansion water through its funnel. This funnel must be
placed in a continuous downward direction and must always be left open to the atmosphere. A discharge hose is placed between the funnel and sewer. This construction must
always be placed in a frost-free environment.
Check the functioning of the safety group by turning the large knob on the safety group
once a year, allowing water to flow out, and closing it immediately. This will prevent the
valve of the safety group from getting stuck. Also check the drain for blockages. If it is
blocked, unblock the drain or instruct a third party to do so.
If faulty, never try to repair the device yourself. Please contact the nearest service specialist or the party that supplied the device originally. See www.hotto.com
Cleaning
The housing of the device can simply be cleaned with a damp cloth. Do not use aggressive
cleaners or cleaners with a scouring effect!
Legionella prevention
Do not use heated water as drinking water. After prolonged shutdown of the device for
example due to holidays, the device should be fully heated up to the maximum temperature before re-using. It is recommended to flush the pipes for one minute.
20
UK
5.
Troubleshooting
Note: in case of problems, always consult the troubleshooter!
If the water in the device is no longer heated, first check whether the plug is properly
connected to the wall socket and whether the fuse of the device group is still working.
For all other failures, please consult the troubleshooter.
If the device no longer works because it was connected without being filled with water
first, follow the troubleshooter. The device has been overheated and needs to cool down,
or possibly repaired.
If the device has been reset several times, but still does not work, please contact the
Hotto service line.
6.
Disconnect and drain boiler
When the boiler needs to be disconnected follow these steps:
1. Put the boiler in standby mode by pressing the standby button (B3) untill the standby
LED turns orange.
2. Drain the boiling water with the boiling water knob (K1) untill cold water comes out
of the tap.
3. Turn off the boiler with the switch on the back side of the boiler (B5) and pull out the
plug from the socket.
4. Close the stop valve from the safety group.
5. Relief the pressure from the boiler by opening the boiling water knob (K1) untill no
(cold) water comes out of the tap.
6. Now the hoses of the boiler can be disconnected. Please note that some water may
come out of the cold water hose (H2).
7. Place the boiler near the sink.
8. Blow on the warm water hose (G2) from the boiler and the remaining water will flow
out of the boiler through the cold water hose (H2).
It is likely that a small amount of water will remain in the boiler.
21
UK
7.
UK
Technical specifications
Description
8L boiler set and 3-in-1 tap
Mounting boiler
vertical
Operating pressure
0,8 MPa
Temperature range boiler
70 °C / 100 °C
Temperature range hot water
35 °C - 70 °C
Supply
1/N/PE 230 V
Frequency
50 Hz
Nominal capacity
2200 W
Boiler volume
8l
Cable size
3 x 1,5 mm²
Maximum recommended water volume 10,0 l / min
Protection class
I
Type of Protection
IPX4
Dimensions boiler (HxWxD)
485 x 225 x 225 mm
Dimensions Arco tap (HxWxD)
410 x 225 x 170 mm
Dimensions Quadro tap (HxWxD)
350 x 225 x 170 mm
Available water 100 °C *
6l
Available water 60 °C *
16 l
Available water 40 °C *
28 l
* At 100 °C setting and with a water inlet temperature of 15 °C
22
NL
UK
8.
Warranty
Warranty conditions
The rights under this manufacturer’s warranty shall apply in addition to the buyer’s
statutory rights. This warranty shall in no way restrict the buyer’s statutory rights in
particularly towards the seller.
Entitlement The claiming of rights under this warranty shall be subject to the submission of the
respective proof of purchase.
Content
Hotto Nederland shall guarantee as the manufacturer that this product is free of material and manufacturing errors. Material and manufacturing errors arising during the
warranty period shall justify the rights under the warranty. This warranty shall not cover
errors due to improper installation or incorrect usage, incorrect operating conditions
or defective maintenance or repair work.
Normal wear and tear as for lime scaling shall also be excluded under this warranty. The
warranty will not be valid if the problem is caused by extreme values of drinking water
(pH value not between 7 and 9.5 and/or Cl above 150 mg/l and/or Fe above 0.2mg/l
and/or German water hardness above the 12 °dH).
Duration
The warranty shall be valid for 24 months. The warranty period shall commence on the
day on which the product is purchased. Warranty services provided shall neither prolong the warranty period nor initiate a new warranty period.
Claims
Claims for the Netherlands/Belgium: in case of a defective product you should contact
the Hotto service line. For more information, see our website www.hotto.com
Hotto shall not be liable for transport damage. The product shall be repaired or replaced at the discretion of Hotto. Hotto shall acquire ownership of replaced parts or
products..
Invalidity of Attempted repairs carried out by a customer or third party that are not authorized
warranty
by Hotto shall invalidate the warranty. The same shall apply if parts are installed in the
product or connected to the product that are not original parts from Hotto.
Restriction
This warranty shall be restricted to rectification of the defect and subsequent delivery.
This warranty shall not include compensation, withdrawal from the agreement, reduction in price or any reimbursement for consequential loss due to defects.
This warranty does not apply to devices purchased outside the Netherlands/Belgium.
The statutory provisions and delivery conditions of the national company or importers
must be observed.
23
UK
NL
Installation troubleshooter
Complaint
The hoses are too short
Cause
You are trying to install the boiler too far from
the safety group and/or tap
No loop in the black drain hose of the safety
group
The safety group provides an
unpleasant smell of sewage.
Solution
Place the boiler closer to the safety group and/or tap
Make a loop in the hose, as shown on the installation
drawing (step 9) of the installation set.
Water troubleshooter
Complaint
Tap is making bubbling noises
No water
No hot water
Little water is coming from the tap
Hot water is coming out of the cold
water tap
Hot water is too hot or too cold
No hot water coming from the hot
water tap and no boiling water from
the boiling water tap
When turning open the boiling water
knob (1), there is hot water coming
from the tap, but no boiling water
Boiling water is coming out of the tap
with more bubbling noises and more
steam is created than otherwise
Boiling water is coming out of the tap
with bubbling noises and the tap has a
low yield of boiling water.
There is a white substance in the hot
water
The device makes boiling noises
Cause
There is air in the pipes
Main valve closed
Stop valves closed
Stop valve safety unit closed
Water pressure is too low
Solution
Open both taps wide and de-aerate (stop valve, kitchen tap)
Open main valve
Open stop valves
Open stop valve
Check a different outlet. If the pressure is low here as well, fully
open the main tap. If the pressure is still too low you should
contact the water supplier.
Check whether the main tap and Fully open the tap concerned
stop valves are fully opened
Make sure there is no kink in the Remedy the kink, or replace the hose if it is damaged
hose
Scaling of the outlet
Clean or replace the aerator
The hoses of the tap have been
Connect the hoses correctly
mixed up
Hot water temperature has not Adjust the temperature using the round knob (B4) on the boiler
been set correctly
Boiler is not (yet) heated up, see Wait for the boiler to heat up, approximately 25 minutes
LED indication on figure 17 and Check whether the boiler is switched on. For this, follow the
in §3
instructions in §3
Boiler is not connected to the
Place the plug in the wall socket
power supply
Check whether the power group concerned is switched on
Boiler is defective
Contact the Hotto service line
Boiler is set to 70°C
Set the boiler to 100° using the standby knob (B3), see §3, and
wait for the boiler LED to turn red.
Water is not heated to 100°C
Wait until the water is heated. The LED on the boiler will turn
red once the water has been heated.
Boiler must be reset
Press the reset button (B6) at the rear of the boiler
Sensor or control unit is
Contact the Hotto service line, see www.hotto.com
defective
Scaling of the outlet
Clean or replace the aerator
There is too much scaling in the
tank
Too much scale deposit in the
device
Have the boiler cleaned by an installer
Contact the Hotto service line, see www.hotto.com
Electricity troubleshooter
Complaint
The groups are switched off
continuously
The earth leakage circuit
breaker is activated
Standby LED does not light
24
Cause
Too many devices on one group
Solution
Use less devices at the same time or connect devices to a different
group, or use an energy divider, www.hotto.com
There is a short circuit in the
Investigate which device causes the short circuit: Remove the plug of the
electrical circuit
Hotto boiler from the wall socket, reset the earth leakage circuit
breaker. If it is activated again, this will mean that your Hotto boiler is
not the cause. Check which other device may be the cause. If the earth
leakage circuit breaker is activated again as a result of the Hotto boiler,
please contact the Hotto service line, see www.hotto.com
Boiler is getting no voltage
Place the plug in the wall socket
Switch on the boiler using the red button (B5) at the rear
Check whether there is voltage on the wall socket
Check in the group box whether the group concerned and the
accompanying earth leakage circuit breakers are switched on
No water in the boiler and safety Pull out the plug and allow the device to cool down for 30 minutes. Fill
power interrupter is activated
with water. Press the RESET button (B6) at the rear. In case of several
resets, please contact the service line.
FR
Explication des symboles
Dans le présent manuel et/ou sur l’appareil, les symboles suivants sont utilisés:
Fait référence aux normes de sécurité standard des directives européennes pertinentes.
Ne pas respecter cet avertissement peut entraîner un danger, pour vous comme pour votre
entourage. Ne pas respecter cet avertissement peut engendrer des dégâts pour l’appareil.
Indique que l’appareil peut être sous tension.
Ne pas respecter cet avertissement peut être préjudiciable pour vous comme pour l’appareil.
Lire le mode d‘emploi.
Les matériaux nuisibles ainsi que les appareils électriques ou électroniques doivent être
amenés en un lieu de recyclage prévu à cette fin.
Introduction
Félicitations pour l’acquisition de votre Hotto !
Votre produit Hotto se compose d’un chauffe-eau et d’un robinet 3-en-1 avec fonction
eau bouillante. Il est également conseillé d’utiliser le kit d’installation pour installer votre
Hotto. Le chauffe-eau Hotto produit non seulement de l’eau bouillante mais aussi de l’eau
chaude. La température maximale de l’eau chaude se règle sur le chauffe-eau.Vous pouvez
aussi mettre le chauffe-eau Hotto sur la position 70°C et l’eau sera alors chauffée à 70°C
maximum.
Chez Hotto, la sécurité est primordiale. C’est la raison pour laquelle le robinet et le
chauffe-eau sont équipés de sécurités enfants. Toutefois, lors de son utilisation, il convient
de toujours tenir compte du danger que représente l’eau bouillante de manière générale.
Si vous constatez des dysfonctionnements, consultez la liste des pannes de ce mode
d’emploi. Si vous avez malgré cela besoin d’une aide supplémentaire, vous pouvez toujours prendre contact avec notre service technique.Vous pouvez également consulter
notre site Internet : www.hotto.com.
1.
Utilisation de la notice
Ces instructions de service contiennent des informations importantes sur la mise en service, le démarrage et l‘entretien. Pour votre propre sécurité et pour la sécurité d‘autrui,
nous vous recommandons de lire attentivement cette notice d‘utilisation et de montage
avant la première mise en service.Veuillez conserver la notice ainsi que les autres documents à proximité de l‘appareil.
Cet appareil est fabriqué selon les normes en vigueur et a été testé par les instances
compétentes en la matière Les caractéristiques techniques du produit sont mentionnées
sur l’étiquette qui se trouve à l’arrière du chauffe-eau.
25
FR
L’installation doit être effectuée par des personnes qualifiées en la matière. Tous les travaux d’entretien ou de réparation à effectuer dans ou sur l’appareil, comme le détartrage,
doivent être exécutés par un service qualifié et une entreprise d’entretien. Les directives
en vigueur localement doivent toujours être prises en compte!
Cet appareil est destiné à être utilisé dans des applications domestiques et analogues
telles que: Les coins cuisines réservés au personnel des magasins, bureaux et autres
environnements professionnels; Lies fermes; L’utilisation par les clients des hôtels, motels
et autres environnements à caractère résidentiel; Les environnements de type chambres
d’hôtes. Sa conception moderne, les matériaux utilisés et le processus de production
avancés garantissent le haut niveau de qualité du produit.
Cet appareil peut être utilisé par des enfants de plus de 8 ans ainsi que par des personnes
dont les capacités physiques, sensorielles ou mentales sont réduites, ou des personnes dénuées d’expérience ou de connaissance s‘ils ont eu connaissance de l‘utilisation en toute
sécurité de l‘appareil et s‘ils ont conscience des dangers de son utilisation.
Les enfants doivent être surveillés afin qu‘ils ne jouent pas avec l‘appareil. Le nettoyage et
la maintenance par l‘utilisateur ne doivent pas être effectués par des enfants sans surveillance.
Cet appareil est une chauffe-eau de pression! Un groupe de sécurité (0,8 MPa, certifié
Kiwa) doit être appliqué au niveau de l’alimentation en eau froide ! Installez-le conformément aux instructions fournies.
Déclaration de conformité
»» La société Quantex Group B.V. déclare que le Hotto chauffe-eau est conforme aux
directives ci-dessous:
»» 2006/95/EC Directive Basse Tension
»» 2004/108/EC Directive de compatibilité électromagnétique
»» 2011/65/EC RoHS II
Le produit est aussi conforme aux normes UE harmonisées suivantes:
»» EN 60335-1: 2012
»» EN 60335-2-15: 2003 + A2:2008 + A11:2012
»» EN 60335-2-21: 2003 + A1:2005 + A2:2008
»» EN 55014-1: 2006 + A1:2009 + A2:2011
»» EN 55014-2: 1997 + A1:2001+ A2:2008
»» EN 61000-3-2: 2006 + A1:2009 + A2:2009
»» EN 61000-3-3: 2008
»» EN 62233: 2008 +C1:2008
Quantex Group B.V., Gildestraat 13, 6883 DB Velp, Les Pays-Bas, 2014-10-30
2.
Notice de montage
Environnement
Pour empêcher les dommages liés au transport, l‘appareil est livré dans un emballage
solide. Cet emballage est fabriqué à partir de matériaux recyclables. Éliminez donc cet
emballage de manière responsable.
26
FR
Éliminer l’appareil
Ne pas jeter les appareils usagés avec les ordures ménagères! Si un appareil n’est plus
utilisable, le consommateur est tenu de l’éliminer séparément des ordures ménagères,
de le porter par ex, au dépôt central de sa commune ou de son quartier. Cela garantit
le recyclage professionnel adéquat des appareils usagers et évite les impacts négatifs sur
l’environnement. C’est pourquoi les appareils portent le symbole représenté à gauche.
Installation
L’appareil doit être monté selon le schéma situé à la première page de cette notice d‘utilisation. Toute autre position d‘installation peut entraîner des dommages graves à l‘appareil. L‘installation doit se trouver le plus près possible des conduites d‘eau froide et dans
un endroit où le gel n‘a aucune influence sur l‘appareil (par example caravane, cabane de
jardin, etc.).
Utilisez toujours 2 clés à fourche pour le montage d’écrous à raccord et de raccords
rapides afin d’éviter le pliage ou la torsion des canalisations et des accessoires.
Gel
L‘appareil ne doit pas être installé dans une pièce où il existe un risque de gel. Si l‘appareil
est tout de même installé dans une pièce où il existe un risque de gel, l‘appareil doit être
vidangé avant que le danger ne se présente.
Le système Hotto ne convient pas pour une installation sur une unité d’osmose inverse
ou sur un système d’adoucissement de l’eau avec réduction du pH.
Pour le raccordement, il faut toujours utiliser le groupe de sécurité Hotto
L’utilisation d’un autre robinet que le robinet 3-en-1 Hotto livré avec le chauffe-eau, ou
toute modification apportée à la combinaison robinet/chauffe-eau peut endommager le
produit. La garantie sera automatiquement annulée en cas de mauvaise installation ou
adaptation !
Important : Ne branchez jamais la fiche dans la prise murale avant que l’appareil soit rempli d’eau !
Qualité de l’eau
Dans les zones où la dureté de l’eau est au dessus de 12 °dH un filtre à eau approuvé
par Hotto doit être placé dans la ligne d’alimentation d’eau. Le non, ce faisant, d’annuler
la garantie.Voir www.hotto.com pour plus d’informations et des options ordonnant pour
filtres à eau. La qualité de l’eau doit répondre aux exigences suivantes:
Échelle de pH
7 - 9,5 pH
Fe (Niveau Fer)
< 0,2 mg/l
CI (Teneur en chlore)
< 150 mg/l
dH (Dureté de l’eau)
< 12 °dH
Pression de débit minimum
0,1 MPa
2A
Raccordement du robinet
Étape 1: Fixez les flexibles d’eau froide et d’eau chaude (G) dans le robinet.
Étape 2: Placez le robinet dans le trou (ø 33 - 40 mm) de l’évier avec la rosette Hotto
(A) orientée vers l’avant et le joint en caoutchouc (B).
27
FR
Si l’épaisseur du plan de travail est inférieure à 35 mm, passez à l’étape 3a, sinon, passez à
l’étape 3b.
Étape3a: Si l’épaisseur du plan de travail est inférieure à 35 mm, placez successivement
le triangle de stabilité (S), le joint en caoutchouc (C) et le joint métallique (D).Vissez-y
ensuite solidement l’écrou (E) avec les deux vis (F).
Étape 3b: Si le plan de travail a une épaisseur allant de 35 à 65 mm, placez successivement le joint en caoutchouc (C) et le joint métallique (D).Vissez-y ensuite solidement
l’écrou (E) avec les deux vis (F).
Étape 4: Serrez les deux vis afin de fixer l’écrou (E).
Évitez que les flexibles ne soient pliés ou tournés lors de leur installation.
2B
Raccordement du kit d’installation
Étape 5: Fermez l’arrivée d’eau principale. Installez ensuite le kit d’installation conformément aux instructions fournies, étapes 6 à 9.
2C
Raccordement du chauffe-eau
Le raccordement de l’appareil au réseau d’électricité doit être effectué suivant les normes
d’installation électrique et les lois et règlements en vigueur localement. L’appareil doit
être raccordé au réseau d’électricité à l’aide d’un cordon muni d’une fiche.
Prévenir tout danger lié à des câbles électriques endommagés. Si un câble est endommagé, l’appareil doit être remplacé par le fabricant, son service à la clientèle ou une personne de qualification équivalente.
Assurez-vous que la protection électrique soit suffisante, du fait de l‘ajout de l‘appareil.
Toute adaptation apportée au produit et à son câblage (interne) peut être à l’origine de
défauts si elle n’est pas exécutée par du personnel qualifié. La garantie n’est valable que si
le produit se trouve dans son état d’origine, sans la moindre adaptation.
Afin d’éviter les risques liés à une remise à zéro accidentelle de l’interrupteur à relais
thermique, cet appareil ne doit pas être alimenté par un dispositif de marche/ arrêt externe (minuterie) ni branché sur un circuit régulièrement allumé et éteint par le fournisseur
d’énergie.
Ne placez jamais le chauffe-eau Hotto horizontalement ou à l’envers. Le chauffe-eau doit
toujours être vertical, afin que l’interrupteur (B5) se situe en bas.
Étape 10: Fixez le flexible de l’arrivée d’eau froide (J) du chauffe-eau sur le groupe sécurité Hotto.
Étape 11: Fixez le flexible d’eau chaude (G1) du robinet sur le flexible d’eau chaude (G2)
du chauffe-eau. Fixez ensuite le flexible d’eau bouillante (H1) du robinet sur le flexible
d’eau bouillante (H2) du chauffe-eau.
28
FR
Étape 12: Introduisez le flexible d’eau froide (L) du robinet dans la pièce rigide en T qui
se trouve avant le groupe de sécurité.Vissez solidement l’écrou rigide de la pièce en T
avec la clé appropriée.
Étape 13: Placez la pièce d’isolation (M) autour de la connexion du flexible d’eau bouillante. Fixez l’isolation avec l’attache autobloquante incluse.
Ouvrez ensuite l’arrivée d’eau principale et le robinet d’arrêt (O7) de le
groupe de sécurité. Remplissez le chauffe-eau Hotto avec de l’eau froide en tournant le
bouton de l’eau bouillante jusqu’à ce qu’il n’y ait plus d’air qui sorte du robinet. Cela peut
prendre quelques minutes. Lorsque le chauffe-eau est rempli d’eau, ouvrez complètement
la poignée de l’eau chaude (K2). Laissez couler l’eau jusqu’à qu’il n’y ait plus d’air qui
sorte du robinet. Insérez ensuite la fiche dans la prise murale.
Important: Si par malheur l’appareil serait connecté au réseau d’électricité sans être
rempli d’eau, ou qu’il se déclencherait inopinément pour une raison ou une autre, veuillez retirer la fiche de la prise de courant et laisser refroidir l’appareil. Il est possible que le
chauffe-eau doive être réinitialisé, voir liste des pannes.
3.
Instructions d’utilisation
L’appareil doit absolument être rempli d’eau avant d’être raccordé au réseau électrique!
Ne jamais utiliser l’appareil sans groupe de sécurité!
Mise en service (étape 16)
Lorsque le chauffe-eau est complètement rempli d’eau, allumez le chauffe-eau à l’aide de
l’interrupteur rouge (B5) qui se trouve à l’arrière. Le chauffe-eau est maintenant en veille
et ne chauffe pas encore.Vous remarquerez que le témoin LED situé à l’avant est orange.
Réglage à 70° C (étape 17)
Poussez une seule fois sur le bouton de veille (B3) et l’eau sera chauffée jusqu’à 70°C
maximum. Le témoin LED bleu à gauche s’allumera jusqu’à ce que la température soit
atteinte : le témoin LED deviendra ensuite rouge.
Réglage à 100 C (étape 17)
Poussez encore une fois sur le bouton de veille (B3) et l’eau sera chauffée jusqu’à
100° C. Maintenant, le témoin LED à droite devient bleu, puis rouge dès que la température est atteinte.
Réglage de la température de l’eau chaude (étape 18)
La température de l’eau chaude peut être réglée en tournant le bouton rond (B4) qui se
trouve à l’avant du chauffe-eau vers la gauche (diminution de la température) ou vers la
droite (augmentation de la température). La plage de réglage est de 35 - 70 °C lorsque le
chauffe-eau est en position 100 °C. La plage de réglage dans la position 70 °C est de
35 - 60 °C.
29
FR
Utilisation du robinet (étape 14/15)
• Eau froide et chaude
Quand la poignée (K2) est en position verticale, le robinet donne de l’eau froide. On
n’obtiendra de l’eau chaude que si la poignée est positionnée vers l’avant. On évite ainsi
de gaspiller inconsciemment de l’eau chaude et de l’énergie.
• Eau bouillante
Pour avoir de l’eau bouillante, il faut d’abord enfoncer le cliquet (15.1) puis tourner le
bouton vers l’arrière (15.2) du bouton de l’eau bouillante (K1). Lorsqu’on relâche le bouton (K1), il reprend directement sa position grâce au ressort intégré. Ce système empêche que des enfants un peu trop curieux activent par accident le robinet d’eau bouillante.
Lorsque l’eau chauffe dans le chauffe-eau, son volume augmente. On appelle cela l’eau
d’expansion. Cette eau d’expansion s’évacue par le groupe de sécurité. Cette évacuation
est indispensable et ne peut pas être empêchée.
Lorsque tout le stock d’eau bouillante a été utilisé, il faut environ 20 minutes avant que
l’eau ne revienne à température. Le témoin LED sur le chauffe-eau sera rouge lorsque
toute l’eau du chauffe-eau aura de nouveau atteint la température programmée.
4.
Maintenance
Cet appareil ne nécessite aucune maintenance de la part de l‘utilisateur. Les travaux de
maintenance doivent toujours être effectués par un spécialiste.
Le groupe de sécurité évacue de l’eau d’expansion par un entonnoir. Cet entonnoir doit
être tourné de telle manière qu’il soit constamment orienté vers le bas et doit toujours
être laissé ouvert à l’air libre. Un tuyau de décharge est placé entre l’entonnoir et l’égout.
L’ensemble doit toujours être placé dans un environnement sans gel.
Une fois par an, vérifiez le fonctionnement du groupe de sécurité en tournant le gros
bouton qui se trouve sur le groupe de sécurité, jusqu’à ce que de l’eau s’écoule, puis
refermez-le immédiatement. Cette manipulation permet d’éviter un blocage de la soupape
dans le groupe de sécurité.Vérifiez également que l’évacuation n’est pas obstruée. Si c’est
le cas, débouchez ou faites déboucher l’évacuation.
Ne jamais essayez la réparation vous-même. En cas de panne contactez le service technique de Hotto.
Entretien
La face extérieure d’appareil peut être nettoyée à l’aide d’un chiffon légèrement humide
et d’un détergent. Les dissolvants et produits abrasifs ne doivent pas être utilisés.
Prévention de la légionelle
N‘utilisez pas l‘eau chauffée comme eau potable. Après un très long arrêt de l‘appareil, par
exemple pendant les vacances, l‘appareil doit être complètement chauffé jusqu‘à la température maximale avant la remise en service. Il est recommandé de rincer les conduites
pendant une minute.
30
FR
5.
Élimination des défauts
Attention! Pour toutes les dysfonctionnements, s’il vous plaît consulter la guide de perturbation!
Si l’eau dans l’appareil ne réchauffe plus, contrôlez d’abord si la fiche est bien enfichée
dans la prise et si le fusible du groupe de l’appareil fonctionne bien. Pour toutes les autres
dysfonctionnements, s’il vous plaît consulter la guide de perturbation.
Si l’appareil ne fonctionne pas parce qu’il a été raccordé sans être rempli d’eau, suivez le
guide de dépannage. L’appareil a surchauffé et il doit refroidir.
En cas l’appareil ne pas fonctionne conséquent à plusieurs reprises, contactez le service
technique de Hotto
6.
Débranchez et vide chauffe-eau
Si le chauffe-eau doit être déconnecté, procédez comme suit :
1. Mettez le chauffe-eau en mode veille en appuyant sur le bouton de veille (B3) jusqu’à ce
que la LED “veille” orange s’allume.
2.Videz l’eau bouillante avec le bouton de l’eau bouillante (K1) jusqu’à ce que l’eau froide
sorte du robinet.
3. Éteignez le chauffe-eau avec le commutateur (B5) et retirez la fiche de la prise.
4. Fermez la vanne d’arrêt du groupe de sécurité.
5. Évacuez la pression du chauffe-eau en ouvrant le robinet d’eau bouillante (K1) jusqu’à
ce que l’eau (entre-temps devenue froide) ne sorte plus du robinet.
6. Maintenant, vous pouvez débrancher les flexibles du chauffe-eau. Tenez compte du fait
que de l’eau peut sortir du flexible d’eau froide (H2).
7. Placez le chauffe-eau près de l’évier.
8. Soufflez dans le flexible d’eau chaude (G2) du chauffe-eau pour que l’eau résiduelle
s’écoule hors du chauffe-eau par le flexible d’eau froide (H2).
Il est possible qu’une petite quantité d’eau reste dans le chauffe-eau.
31
FR
FR
7.
Spécifications techniques
Description
8L chauffe-eau set et 3-en-1 robinet
Montage mural
vertical
Pression de travail
0,8 MPa
Plage de réglage de la température chauffe-eau
70 °C - 100 °C
Plage de réglage de la température eau chaude
35 °C - 70 °C
Raccordement électrique
1/N/PE 230 V
Fréquence
50 Hz
Puissance nominale
2.200 W
Contenance
8l
Dimensions du câble
3 x 1,5 mm²
Volume d’eau maximum recommandé
10,0 l / min
Classe de protection
I
Classe de protection IP
IPX4
Dimensions chauffe-eau (H x l x P)
485 x 225 x 225 mm
Dimensions Arco robinet (H x l x P)
410 x 225 x 170 mm
Dimensions Quadro robinet (H x l x P)
350 x 225 x 170 mm
Quantité d’eau 100 °C *
6l
Quantité d’eau 60 °C *
16 l
Quantité d’eau 40 °C *
28 l
* A 100 °C de réglage et à une température d’entrée de 15 °C
32
FR
FR
8.
Conditions de garantie
Garantie
Les droits découlant de la garantie fabricant s‘appliquent en sus des droits légaux de
l‘acheteur. Les droits légaux de l‘acheteur, notamment à l‘égard du vendeur, ne sont aucunement limités par la présente garantie.
Bien-fondé
Pour faire valoir les droits découlant de la garantie, la présentation de la quittance
d‘achat correspondante est nécessaire.
Contenu
Hotto Pays-Bas, répond du fait que ce produit est exempt de défauts de fabrication et
de matériaux. Les défauts de fabrication et de matériaux qui apparaissent pendant la
période de garantie justifient les droits découlant de la garantie. Les défauts qui sont
attribués à une installation incorrecte ou à une mise en service incorrecte, à de mauvaises conditions de fonctionnement ou à erreurs dans des travaux de maintenance ou de
réparation ne justifient pas les droits découlant de la garantie. Les signes d‘usure normale ne justifient pas non plus les droits découlant de la garantie.
Des signes normaux d‘usure, tout comme la formation de calcaire, n‘engendrent pas de
droits issus de la garantie. Des défauts causés par une eau potable extrême (pH non
compris entre 7 et 9,5 et/ou Cl supérieur à 150 mg/l et/ou Fe supérieur à 0,2 mg/l et/ou
dureté de l’eau au dessus de 12 °dH.) n‘engendrent pas de droits issus de la garantie.
Durée
La période de garantie est de 24 mois. La période de garantie commence le jour de
l‘achat du produit. Les prestations de garantie fournies n‘entraînent aucune prolongation de la période de garantie et une nouvelle période de garantie ne commence pas à
courir.
Conversion Réclamations pour les Pays-Bas/la Belgique : en cas de produit défectueux, contactez le
en valable
service technique de Hotto. Pour plus d’informations, consultez le site Internet www.
hotto.com
Hotto n‘est pas responsable des dommages liés au transport. Il est à l‘appréciation de
Hotto de réparer le produit ou de le remplacer par un nouveau produit. La propriété
des pièces ou du produit remplacés est transférée à Hotto.
Extinction
de la
garantie
Des essais de réparation qui sont effectués par le client ou par un tiers qui n‘est pas
autorisé par Hotto pour effectuer une réparation, entraînent l‘extinction de la garantie. Il en est de même si des pièces qui ne sont pas des pièces originales de Hotto sont
installées sur le produit ou sont raccordées au produit.
Limitation
La présente garantie se limite à une réparation ou à une livraison supplémentaire. La
présente garantie n‘englobe aucun droit à dommages-intérêts, aucune renonciation,
aucune diminution ou aucun droit à remplacement pour dommages consécutifs à un
défaut.
La garantie ne s‘applique pas aux appareils achetés hors de les Pays-Bas/la Belgique. Les
directives légales et les conditions de livraison de la société du pays ou de l‘importateur
doivent être respectées.
33
FR
FR
Réclamation
Les flexibles sont trop courts
Le groupe de sécurité dégage une
odeur d’égouts désagréable.
Réclamation
Après l’installation, le robinet
produit des bruits de crépitement
Il n‘y a pas d‘eau
Cause
Vous essayez d’installer le chauffe-eau trop loin
de le groupe de sécurité et/ou du robinet.
Pas de boucle dans le tuyau d’évacuation noir de
le groupe de sécurité
Solution
Installez le chauffe-eau plus près de le groupe de
sécurité et/ou du robinet.
Faites une boucle dans le flexible du kit d’installation,
comme illustré dans le mode d’emploi (étape 9).
Cause
Il y a de l’air dans les conduites
Solution
Bien ouvrir les deux robinets et purger l’air (robinet d’arrêt,
robinet de la cuisine)
Robinet d’arrêt principal est fermé
Ouvrez le robinet d’arrêt principal
Robinet d’arrêt est fermé
Ouvrez le robinet d’arrêt
Il n‘y a pas d‘eau chaude
Robinet d’arrêt du tube d’expansion Ouvrez le robinet d’arrêt
est fermé
Il y a peu d’eau qui sort du robinet La pression de l’eau est trop faible. Vérifiez avec un autre robinet; si la pression est toujours faible,
ouvrez complètement le robinet principal; si la pression est toujours trop faible, contactez la société de distribution d’eau.
Vérifiez si le robinet principal et les Ouvrez complètement le robinet concerné
robinets d’arrêt sont
complètement ouverts
Vérifiez qu’il n’y a pas de pli dans un Éliminez le pli ou faites remplacer le tuyau s’il est endommagé
des tuyaux.
Entartrage du bec du robinet
Nettoyez ou remplacez le brise-jet
De l’eau chaude sort du robinet
Les flexibles du robinet ont été
Raccordez correctement les flexibles
d’eau froide
intervertis
L’eau chaude est trop chaude ou
La température de l’eau chaude n’a Réglez la température à l’aide du bouton rond (B4) sur le chauffetrop froide
pas été réglée comme souhaité
eau
Attendez jusqu’à ce que le chauffe-eau soit chaud, cela dure enviIl n’y a pas d’eau chaude qui sort du Le chauffe-eau n’est pas (encore)
robinet d’eau chaude et pas d’eau
chaud, voir indication LED sur l’illus- ron 25 minutes.
Vérifiez que le chauffe-eau est bien allumé. Pour cela, suivez les
bouillante qui sort du robinet d’eau tration 17 et §3
instructions au §3.
bouillante.
Le chauffe-eau n’est pas raccordé au Insérez la fiche dans la prise murale.
Vérifiez que le groupe électrique concerné est bien branché
réseau électrique.
Le chauffe-eau est en panne
Contactez le service technique de Hotto
Lorsque l’on tourne le bouton de
Le chauffe-eau est sur la position
Placez le chauffe-eau sur la position 100°C à l’aide du bouton de
l’eau bouillante (1), l’eau est chaude 70°C
veille (B3), voir §3, et attendez jusqu’à ce que le témoin LED du
mais pas bouillante
chauffe-eau devienne rouge
L’eau n’est pas chauffée à 100°C
Attendez que l’eau ait fini de chauffer. Le témoin LED sur le
chauffe-eau deviendra rouge lorsque l’eau sera chaude
L’eau bouillante sort du robinet
Le chauffe-eau doit être réinitialisé
Enfoncez le bouton RESET (B6) qui se trouve à l’arrière du
avec de violents crachotements
chauffe-eau
Le capteur ou la commande est
Contactez le service technique de Hotto, www.hotto.com
et produit une grande quantité de
défectueux
vapeur, plus que la normale
L’eau bouillante sort du robinet
Entartrage du bec du robinet
Nettoyez ou remplacez le mousseur
avec de violents crachotements et
le robinet a un débit d’eau bouillante plus faible
Il y a une substance blanche dans
Il y a trop de calcaire dans la cuve
Faites nettoyer le chauffe-eau par un installateur
l’eau chaude
Réclamation
Cause
L’appareil fait un son d’ébullition Trop de calcinose dans l’appareil
L’électricité disjoncte sans arrêt Trop d’appareils branchés sur un
seul groupe
Le disjoncteur se déclenche
Il y a un court-circuit dans le
circuit électrique
La veilleuse ne s’allume pas
34
Solution
Contactez le service technique de Hotto
Utilisez moins d’appareils en même temps ou branchez certains appareils
sur un autre groupe. Achetez un distributeur d’énergie.
Trouvez l’appareil qui provoque ce court-circuit : Retirez la fiche du
chauffe-eau Hotto de la prise murale, réinitialisez le disjoncteur; s’il se
déclenche à nouveau, cela signifie que votre chauffe-eau Hotto est hors de
cause.Vérifiez quel autre appareil provoque le court-circuit. Si le disjoncteur se déclenche à nouveau à cause du chauffe-eau Hotto, contactez
le service technique de Hotto, www.hotto.com
Le chauffe-eau ne reçoit pas
Insérez la fiche dans la prise murale
Allumez le chauffe-eau à l’aide du bouton rouge (B5) qui se trouve à
d’électricité
l’arrière
Vérifiez s’il y a du courant sur la prise murale
Vérifiez dans l’armoire électrique si le groupe concerné et le disjoncteur
correspondant sont branchés
Pas d’eau dans le chauffe-eau et Retirez la prise et laissez l’appareil refroidir pendant 30 minutes. Remplisla protection contre les coupures sez-le d’eau. Poussez sur le bouton RESET (B6) qui se trouve à l’arrière de
de courant s’est déclenchée
l’appareil. Après plusieurs réinitialisations, contactez le service technique
Hotto Nederland
Gildestraat 13
6883 DB Velp
The Netherlands
www.hotto.com
[email protected]
V1 15-04
Another quality product from Holland.
www.hotto.com