1
USING THE MICROSENTRY II ™ CONTROL
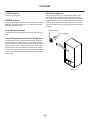
Starting your appliance
Alarm
The appliance will begin start up when initially plugged in or
when power resumes after a power outage. If the appliance
has been turned off during use, “OFF” will appear on the
display. To start the appliance from the “OFF” position press
and hold the ON/OFF button for three seconds.
Set
C
F
Colder
Warmer
Press and Hold
Set temperature
Figure 7
ON/OFF
Control located
on face of door
Press and Hold
The factory preset for the "hi" and "Lo" temperature deviation is +2°C from set temperature for the "hi" and -2°C from
set temperature for the "Lo". If these temperature variations
need to be adjusted, please call AGA Marvel customer
service at 800-223-3900 for instructions.
• Temperature Sensor Fault: If the control
detects that the temperature sensor is not
properly functioning, an audible alarm will
sound, and “E1” will flash on the display. Please call AGA
MARVEL customer service or your dealer if this error code
is displayed.
• Condenser Needs Cleaning: When the
appliance has reached the recommended
amount of run time for a condenser cleaning,
“cL” will flash on the display as a reminder to clean the condenser. No audible alarm is associated with the condenser
clean warning. To clear the alarm:
1) Press and release the SET key until “cnd”
is displayed on the screen.
2) While “cnd” is displayed, press and hold the SET
key. The display will show the number of weeks the
condenser has been operating.
3) Continue to hold the SET key, then press and re
lease the ON/OFF key. The number shown on the
display will be reset to 00.
4) Release the SET key.
5) The display will return to normal operation after a
few seconds with no key presses.
See the “care and cleaning” section for cleaning instructions.
To set the set temperature, press and continue to hold
“SET” button. After one second, set temperature will be
displayed. While holding “SET” button use the “WARMER”
or “COLDER” button to desired set temperature.
NOTE
Momentarily pressing & releasing “SET” button will access
information menu of control. Refer to appendix A for information on this feature.
Appliance operation
The available temperature range of the refrigerator is 1° to
7° C. For the freezer it is -12° to -25° C.
It may take up to 24 hours for your appliance to reach desired temperature. This will depend on amount of contents
loaded and number of openings and closings of the door.
For best results allow the appliance to “pull down” to desired set temperature before loading. Once contents are
loaded, allow at least 48 hours for temperature to stabilize
before making any adjustments to the set temperature.
Alarms
Your MicroSentry II™ appliance control will monitor appliance function and alert you with a series of audible and
visual alarms. For all alarm and error codes, the alarm
LED located in the top left corner of the display panel will
illuminate a steady amber. For all alarm and error codes
except condenser cleaning, an audible alarm will sound,
beeping in one (1) second intervals.
•
Door Ajar Alarm: If the door has been
left open for over five (5) minutes, the alarm
will sound and the display panel will flash
“do.” The alarm will stop once the door has been closed.
• High and Low Temperature Alarm: If
your unit reaches an unacceptable temperature, above or below your set temperature for
a period of greater than 60 minutes, the temperature alarm will sound in one (1) second
intervals. The display panel will flash either “hi” or “Lo” depending upon the condition. “hi” indicates a high temperature alarm, and “Lo” indicates a low temperature alarm.
Alarm Mute
Press any key to mute the audible portion of an alarm.
NOTE-This action will only mute the alarm. If the condition that caused the alarm continues, the alarm code will
continue to flash and will sound for 20 seconds every 60
minutes.
Turning Appliance Off
To turn appliance off, press and hold “ON/OFF” button for
three (3) seconds. “OFF”
display.
will appear on the
Additional MicroSentry II™ Features
Refer to Appendix A for details on additional features available.
7