1
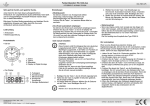
DE FR
ES
MD 5000
Installation Manual
1. Supplied Material
have to be followed, in particular with regard to
health and safety (e.g. earthing, bridging, etc.).
Composite materials used are nonconductive.
Each package contains:
• 1 iPERL device
• manual
• sealings
• optional connection kits
• NRV (if ordered)
Torque: tighten iPERL to a minimum torque
setting of 20Nm and a maximum of 30Nm.
2. General Instructions
Please read this guide prior to installing
iPERL.
iPERL is a metering endpoint designed for
use with potable water supplies to residential,
commercial and industrial activities.
iPERL is intended for maintenance-free
operation for up to 15 years.
IPERL is hermetically sealed and therefore
there is no servicing of the meter required.
3. Permissible Operating Conditions
• min. water conductivity required: 120µS/cm
(25 °C)
• Cold water meter: from 0.1 °C up to 50 °C
• Pressure stage: PN16
• Mechanical environment: M2 (MID)
fixed installation with minimum vibration
• Electromagnetic environmental class: E1
and E2 (MID) residential and commercial
• Protection class: IP68
• Climatic environment: from -15 °C up to 60
°C
4. Installation Requirements
Ensure that the pipework does not introduce
mechanical stresses on the meter body:
checking both alignment of the pipework
with the threaded connections and distance
between unions with the meter lay length.
If there is mechanical stress usage of the
brackets is recommended. When mounting
iPERL onto a network, ensure contact surfaces
are even and clean and use new gaskets.
At all times during installation and thereafter
all statutory provisions, regulations and norms
1
←
1 Installation position: iPERL has been
designed to operate, with no impact on
metrological performance, in all installation
angles and orientations.
2 Please avoid installing iPERL as shown
below as a reduction of battery lifetime could
occur.
Keep the valves closed when the premises
are vacant. Make sure you close both valves
before and after the meter for safety reasons
when installation is not finished yet or there is
no water consumption for a longer period, e.g
due to vacant premises.
iPERL is free of any constraint for upstream or
downstream straight pipe lengths.
Flow direction: iPERL’s metrological
performance is independent of flow direction
and orientation of the meter can be selected to
best suit the installation conditions. iPERL will
detect flow direction when installed and set the
direction indicator accordingly.
Pressure: please ensure that iPERL strictly
operates within the pressure rating printed on
the meter body.
All iPERL settings and functions will be
automatically and correctly activated once the
flowtube is saturated.
5. Installation Procedure (Volume
registration & Flow direction)
STEP1:
1A: Remove iPERL from its packaging and
locate any optional component (filter, nonreturn-valve* (NRV), ...)
In case you need a non-return-valve please
consider:
3 iPERL, DN 15, 110 and 115 mm: NRV
installation in meter screw connection
4 All other nominal sizes and lengths: NRV
installation in measuring tube
iPERL will display the following symbols:
5 No Volume, no flow and the alarm flag
(raised for empty pipe)
1B: Install iPERL according to the most
suitable LCD orientation
STEP2:
6 Once installed, open the upstream valve to
fill the meter. The alarm flag disappears after
a short while, this indicates that the meter has
detected water in the pipe.
iPERL is now fully operational, although in
stand-by mode. At this point, also the radio
transmission is activated which is indicated by
a flashing radio symbol. The meter starts to
send out radio telegrams.
STEP3:
7 To activate the “flow direction detection”,
ensure a flow above the threshold of 3 l/h for DN 15
5 l/h for DN 20
8 l/h for DN 25
12.5 l/h for DN 32
20 l/h for DN 40
Both arrows blink to indicate the meter is
detecting its forward flow direction. After
reaching the threshold the arrow is set.
It starts to accumulate volume into the three
registers forward, reverse and billing volume.
The flowrate will start to be displayed after the
first 4 hours of operation.
When the billing volume register reaches the
threshold of
25l for DN 15
40l for DN 20
63l for DN 25 - 40
the meter takes that register with the higher
volume accumulated as the forward register
and fixes the flow direction.
From this moment on the flow direction cannot
be changed; any flow in the 'wrong' direction
will now trigger the alarm flag for 'reverse flow'
and will be counted as reverse volume.
5
3
iPERL
8 After the flow direction is set, the functions
for performing the higher analysis, such as
data logging and leak detection, become
active and are assigned to the respective data
fields.
9 IMPORTANT! iPERL does not register the
volume if the averaged flowrate is below
1 l/h for DN 15
1.6 l/h for DN 20
2.5 l/h for DN 25
4 l/h for DN 32
6.4 l/h for DN 40
6. iPERL Display and Characters
10 After installation is successfully completed
the display shows:
• Meter reading and preselected unit
• Current flowrate and preselected unit
• Flow direction
• RF active
Alarms are displayed directly on the display
after the LCD self-test:
AL – 05 Empty pipe
AL – 06 Magnetic tampering
AL – 07 Reverse Flow
AL – 08 Broken pipe / Leakage
If any of the following graphics is displayed,
please contact your supplier:
• Alarm flag + AL-xx (except 05-08, see above)
• Low battery warning
• Test mode
7. Disposal
11 This product contains a lithium Ion battery.
In the interest of protecting the environment,
this battery may not be disposed in household
waste after its period of use. The local
and national regulations for environmental
protection are to be considered.
8
*Australia only: NRV is already pre-installed!
EN
Graphic
Description
11
Meter Reading
Current flowrate
←
2
8
www.sensus.com
[email protected]
6
9
Alarm flag
4
Flow direction
RF active
←
7
10
Low battery warning
Test mode
1241
Lithium
5
MD 5000 INT4 • 0003
Index units
Flowrate units
DE FR
ES
MD 5000
Einbau- und Betriebsanweisung
1. Lieferumfang
Jede Verpackungseinheit enthält:
• 1 iPERL
• Bedienungsanleitung
• Dichtungen
• Optionalen Anschluss-Satz (sofern entsprechend bestellt)
• Rückflussverhinderer (sofern bestellt)
2. Allgemeine Hinweise
Bevor Sie iPERL installieren, lesen Sie bitte
diese Einbau- und Betriebsanweisung und
gehen Sie wie beschrieben vor. iPERL ist ein
Endpunkt zur Messung von Trinkwasser in
Wohngebäuden sowie im gewerblichen und
industriellen Bereich.
iPERL ist für einen wartungsfreien Betrieb
von bis zu 15 Jahren bestimmt. Nationale
Einbaufristen sind jedoch zu beachten. Da
iPERL hermetisch abgedichtet ist, entsteht kein
Wartungsaufwand.
3. Zulässige Betriebsbedingungen
• Mindest-Leitfähigkeit des Wasser: 120µS/cm
(25 °C)
• Kaltwasser: von + 0,1 bis zu + 50 °C
• Druckstufe: PN 16
• Mechanische Umgebungsklasse nach MID:
M2 = unbedeutende Schwingungen und
Erschütterungen
• Elektromagnetische Umgebungsklasse nach
MID: E1 und E2 = für Wohn-, Gewerbe- und
Industrieanlagen
• Schutzklasse: IP68
• Umgebungstemperatur: von - 15 bis zu + 60
°C
4. Installationsvoraussetzungen
Stellen Sie sicher, dass die Rohrleitungen keine
mechanischen Kräfte (Zug, Druck, etc.) auf
das Gerät ausüben: Überprüfen Sie sowohl die
lineare Ausrichtung der Rohrleitungen mit den
Schraubverbindungen, als auch den Abstand
entsprechend der Baulänge des iPERL. Bei
mechanischer Belastung empfiehlt es sich,
einen Montagebügel zu verwenden. Bei der
Montage des iPERL in ein Rohrnetz müssen
alle Dichtflächen eben und sauber sein, sowie
mit neuen Dichtungen ausgestattet werden.
1
←
Während und nach der Installation sind alle
gesetzlichen Bestimmungen, Vorschriften
und Normen zu beachten, insbesondere im
Hinblick auf Arbeitssicherheit (z. B. Erdung,
Erdungsbrücken, etc.). Die verwendeten
Verbundmaterialien sind nichtleitend.
Drehmoment: Die Verschraubung des iPERL
ist mit einem Drehmoment von min. 20 Nm und
max. 30 Nm anzuziehen
1 Einbaulage: Beliebig; iPERL garantiert volle
messtechnische Leistungsfähigkeit unabhängig
von der Einbaulage
2 Bitte vermeiden Sie die unten aufgeführte
Einbaulage, da sonst die Lebensdauer der
Batterie negativ beeinträchtigt wird.
Halten Sie die Ventile geschlossen, wenn die
Räumlichkeiten leer stehen. Stellen Sie aus
Sicherheitsgründen sicher, das beide Ventile
vor und nach dem Zähler geschlossen sind,
wenn die Installation noch nicht abgeschlossen
ist oder es für eine längere Zeit keinen
Wasserverbrauch gibt, z.B. bei leerstehenden
Gebäuden.
iPERL benötigt keinerlei geraden Ein- bzw.
Auslaufstrecken
Durchflussrichtung: Die Fließrichtung hat keinen
Einfluss auf die metrologische Genauigkeit des
iPERL. Er kann in jeder gewünschten Position
installiert werden. iPERL erkennt nach der
Installation automatisch die Fließrichtung und
zeigt dies entsprechend auf dem Display an.
Druckstufe: Stellen Sie sicher, dass der
maximale Druck der Druckstufe des iPERL
entspricht. Die Druckstufe finden Sie auf dem
Gehäuse des iPERL.
Sobald das Messrohr mit Wasser befüllt ist,
werden alle Einstellungen und Funktionen
von iPERL automatisch erkannt und den
Anforderungen entsprechend korrekt aktiviert.
5. Installation (Durchflusserkennung &
Fließrichtung)
SCHRITT1:
1A: Entnehmen Sie iPERL aus der Verpackung
und installieren Sie ggf. zusätzliche
Komponenten (Filter, Rückschlagventil*, etc.)
Wenn Sie einen Rückflussverhinderer
benötigen, beachten Sie bitte Folgendes:
3 Bei iPERL DN 15, Baulänge 110 mm und
115 mm wird der Rückflussverhinderer in die
Zählerverschraubung montiert
4 Bei allen anderen Nenngrößen und
Baulängen wird der Rückflussverhinderer in das
Messrohr montiert
Folgende Symbole werden angezeigt:
5 Kein Volumen, kein Durchfluss und
Alarmflagge (bei leerer Rohrleitung).
1B: Installieren Sie iPERL entsprechend der
besten Ablesbarkeit des Displays.
SCHRITT 2:
6 Nach der Installation öffnen Sie das
Zulaufventil, bis die Alarmflagge auf dem
Display erlischt und damit anzeigt, dass sich
Wasser im Messrohr befindet. iPERL ist nun
voll funktionsfähig, befindet sich jedoch noch
im Stand-by Modus. Zu diesem Zeitpunkt wird
auch die Funkübertragung aktiviert, was durch
ein blinkendes Funksymbol auf dem Display
angezeigt wird. Das Gerät startet mit der
Übetragung der Funktelegramme.
SCHRITT 3:
7 Um die „Fließrichtungserkennung“ zu
aktivieren, muss das Gerät einen Durchfluss
von min.
3 l/h bei DN 15
5 l/h bei DN 20
8 l/h bei DN 25
12,5 l/h bei DN 32
20 l/h bei DN 40
erfahren.
Der tatsächliche Durchfluss wird auf dem
Display angezeigt, nachdem das Gerät 4
Stunden in Betrieb war.
Beide Pfeile blinken, um anzuzeigen, dass der
Zähler seine Vorwärtsflussrichtung erkennt.
Nach Erreichen des Schwellwerts wird der Pfeil
festgelegt. Das Gerät speichert das Volumen
in drei verschiedenen Registern: Vorwärts- ,
Rückwärts- und Verbrauchsvolumen.
Sobald das Verbrauchsvolumen den
Schwellwert von 25l bei DN 15
40l bei DN 20
63l bei DN 25 - 40
5
3
iPERL
erreicht hat, wird das Register mit dem höheren
Volumen als Vorwärtsregister definiert und
die Fließrichtung fixiert. Ab diesem Moment
ist die Fließrichtung festgelegt und kann nicht
mehr geändert werden. Jeder Durchfluss in der
„falschen“ Richtung löst nun die Alarmflagge
aus und wird als Rückwärtsvolumen erfasst.
8 Nachdem die Fließrichtung eingestellt ist,
sind alle Funktionen für die Messdaten-Analyse
aktiv, wie etwa Datenprotokollierung (Logging)
oder Leckagenerkennung. Diese sind ab sofort
den jeweiligen Datenfeldern zugewiesen.
9 Wichtig: iPERL zählt keine Durchflussmenge,
solange der gemittelte Durchfluss unterhalb von
1 l/h bei DN 15
1,6 l/h bei DN 20
2,5 l/h bei DN 25
4 l/h bei DN 32
6,4 l/h bei DN 40 ist.
6. iPERL Display und Symbole
10 Nach vollständiger Installation des iPERL
zeigt das Display folgenden Inhalt an:
• Verbrauchsvolumen und entsprechende Einheit
• Aktueller Durchfluss und entsprechende Einheit
• Durchflussrichtung
• Funkübertragung aktiviert
Folgende Alarme werden unmittelbar nach dem
LCD-Selbsttest auf dem Display angezeigt:
AL – 05 leere Rohrleitung
AL – 06 Magnetische Beeinflussung
AL – 07 Rückwärtsfluss
AL – 08 Rohrbruch / Leckage
Falls eines der folgenden Symbole angezeigt
wird, wenden Sie sich bitte an Ihren Lieferanten:
• Alarmflagge + AL-xx (außer 05-08, s. oben)
• Warnung für schwache Batterie
• Test-Modus
7. Entsorgung
11 Dieses Gerät enthält eine Lithium-batterie.
Im Interesse des Umweltschutzes darf diese
Batterie nicht mit dem normalen Haushaltsmüll
entsorgt werden. Die jeweiligen nationalen
Umweltvorschriften sind zu beachten.
8
* nur für Australien: Rückschlagventil ist bereits vormontiert!
EN
Graphic
Description
11
Meter Reading
Current flowrate
←
2
8
www.sensus.com
[email protected]
6
9
Alarm flag
4
Flow direction
RF active
←
7
10
Low battery warning
Test mode
1241
Lithium
5
MD 5000 INT4 • 0003
Index units
Flowrate units
DE FR
ES
MD 5000
Manuel d’Installation
1. Matériel fourni
Chaque conditionnement contient :
• 1 iPERL
• Manuel
• Joints
• 1 ensemble d’accessoires de montage
• Clapet anti-retour (si commandé)
2. Instructions générales
Veuillez lire ce guide attentivement avant
d’installer iPERL.
iPERL est un compteur pour réseau d’eau
potable à destination des logements et des
activités commerciales et industrielles.
iPERL est destiné à fonctionner sans
entretien pour une durée de 15 ans. iPERL
est donc entièrement scellé et ne nécessite
aucune maintenance.
3. Conditions de fonctionnement
• conductivité de l'eau minimum requise :
120µS/cm (25 °C)
• Compteur eau froide : de +0,1 °C à +50 °C
• Pression maximale admissible : PN16
• Environnement mécanique : M2
(installations fixes avec vibrations faibles)
• Environnement électromagnétique : E1
(résidentiel) et E2 (commercial et industrie
légère)
• Indice de Protection : IP68
• Environnement climatique : de -15 °C à
+60 °C.
4. Conditions d'installation
Assurez-vous que la conduite ne crée pas
de contrainte mécanique sur le corps du
compteur en vérifiant l’alignement entre
la canalisation et le compteur ainsi que la
distance entre les raccords et la longueur du
corps.
En cas de tension mécanique, l’utilisation d’un
support est recommandée.
1
←
Au montage d’iPERL sur le réseau, vérifiez
que les filetages soient lisses et propres et
utilisez des joints neufs.
A chaque étape de l’installation, l’ensemble
des dispositions suivantes, les règlements
et les normes en vigueur doivent être
suivis, particulièrement en ce qui concerne
la santé et la sécurité (ex : mise à la terre,
raccordement, ...). Les matériaux composites
utilisés sont non-conducteurs.
Serrage : serrez les écrous de raccords
iPERL avec un couple de serrage compris
entre 20 Nm et 30 Nm.
1 Positions d’installation : iPERL a été
conçu pour fonctionner, sans impacter ni sa
précision ni sa métrologie, dans toutes les
positions et orientations.
Evitez cependant de le monter dans la
position 2 ci-dessous afin de ne pas
affecter la durée de vie de la batterie.
Gardez les vannes fermées quand les locaux
sont inutilisés. Veillez à fermer les vannes
amont et aval au compteur pour des raisons
de sécurité quand l’installation n’est pas
terminée ou qu’il n’y a pas de consommation
d’eau pendant une grande période, locaux
inoccupés par exemple.
iPERL ne nécessite pas de longueurs droites
ni en aval ni en amont (U0 / D0 selon MID).
Sens d’écoulement : la précision d’iPERL
est absolument indépendante du sens
d'écoulement de l’eau. Son installation peut
donc se faire simplement en tenant compte
des conditions de pose. iPERL détecte
automatiquement le sens d’écoulement et
l’affiche instantanément sur son écran LCD.
Pression : assurez-vous qu’iPERL opère
strictement dans la limite de pression
indiquée sur le corps du compteur.
Tous les paramètres et fonctions d’iPERL
sont automatiquement activés une fois le
tube d’écoulement plein.
5. Procédure d’Installation
(Enregistrement du Volume & Sens
d’Ecoulement)
ETAPE 1 :
1A : retirez iPERL de son emballage en
prenant soin de mettre de côté tous les
accessoires livrés avec (filtre, clapet*…)
Dans le cas où vous avez besoin d’un clapet :
3 IPERL DN15, 110 et 115 mm : installation
du clapet en appui dans la tubulure
4 Toutes les autres tailles et dimensions :
clapet insér dans le tube de mesure
5 Pas de volume, pas de débit et drapeau
d’alarme activé (activé car conduite vide)
1B : Installez iPERL selon la position la plus
adaptée pour faciliter sa lecture.
ETAPE 2 :
6 Une fois installé, ouvrez la vanne amont
afin de remplir le compteur. Le drapeau
d’alarme doit disparaître après un court
instant, cela indique qu'iPERL a détecté la
présence d’eau dans la conduite.
iPERL est maintenant opérationnel, et les
émissions radio sont dorénavant activées.
Ceci est matérialisé par un symbole radio
clignotant. Le compteur commence à
émettre.
ETAPE 3 :
7 Pour que le “sens d’écoulement” soit
activé, veuillez-vous assurer que vous avez
atteint les seuils de débit suivants : 3 l/h pour DN 15
5 l/h pour DN 20
8 l/h pour DN 25
12,5 l/h pour DN 32
20 l/h pour DN 40
Le débit réel sera affiché à l’écran après 4
heures de fonctionnement.
Les 2 flèches clignotent pour indiquer que
le compteur détecte son sens d’écoulement.
Une fois que le seuil de volume mini
est atteint, la flèche indiquant le sens
d’écoulement est figée.
iPERL commence alors à comptabiliser les
volumes Aller et Retour séparément.
Lorsque l’index volume atteint les valeurs de
seuils suivants :
25l pour DN 15
40l pour DN 20
63l pour DN 25 - 40
Dès lors, le sens d’écoulement ne pourra
5
3
iPERL
être modifié ; tous les débits contraires
déclencheront désormais l’alarme “Retour
d’eau” et seront comptés comme un volume
retour.
8 Une fois que le sens d’écoulement du
compteur est figé, les fonctions d’analyse
(comme la détection de fuite, ou la
sauvegarde des données) sont activées.
9 IMPORTANT! iPERL ne comptabilise pas
de volume pour les débits moyens inférieurs à :
1 l/h pour DN 15
1,6 l/h pour DN 20
2,5 l/h pour DN 25
4 l/h pour DN 32
6,4 l/h pour DN 40
6. Indications présentes à l’affichage
10 Après installation, l’affichage indique :
•Index et son unité
•Débit instantané et son unité
•Sens d’écoulement du flux
•Emissions radio activées
Les alarmes sont affichées directement sur
l’écran, juste après le test d’affichage comme
suit :
AL – 05 Conduite vide
AL – 06 Fraude magnétique
AL – 07 Retour d’eau
AL – 08 Rupture canalisation/Fuite
Si l’un de ces symboles est affiché, veuillez
contacter votre fournisseur :
•Alarme + AL-xx (sauf 05 et 08, voir ci-
dessus)
•Alerte batterie faible
•Mode Test
7. Recyclage
11 Ce produit contient une pile Ion-Lithium.
En vue de la protection de l’environnement,
cette pile ne doit pas être jetée à la poubelle
en fin de vie. Vous devez respecter les
conditions de recyclage des produits selon
les réglementations en vigueur dans le pays
concerné.
8
*Pour l’Australie uniquement : le clapet anti retour est préinstallé lors de la livraison
EN
Graphic
Description
11
Index du compteur
Débit instantané
←
2
8
www.sensus.com
[email protected]
6
9
Drapeau d'alarme
4
Sens d'écoulement
RF activée
←
7
10
Alerte batterie faible
Mode test
1241
Lithium
5
MD 5000 INT4 • 0003
Unités d'index
Unités de débit
DE FR
ES
MD 5000
Manual de Instalación
1. Material Suministrado
Par: aplicar en iPERL un mínimo par de rosca
de 20 Nm y un máximo de 30 Nm. Cada caja contiene:
• 1 dispositivo iPERL
• manual
• juntas
• kits de conexión opcionales
• válvula anti-retorno (si solicitada)
1 Posición de instalación: iPERL se ha
diseñado para funcionar en todas las
posiciones sin ningún impacto en su
comportamiento metrológico.
Lea atentamente esta guía antes de instalar
iPERL.
2 Por favor evite instalar iPERL como se
muestra en la figura inferior ya que podría
producir una reducción de la vida útil de la
batería.
iPERL es un sensor de medida diseñado
para su uso en el suministro de agua potable
residencial, comercial e industrial.
iPERL está diseñado para un funcionamiento
libre de mantenimiento de hasta 15 años.
IPERL está herméticamente sellado y por lo
tanto no requiere ningún tipo de mantenimiento.
Asegúrese de cerrar la válvula anterior y
posterior al sensor de medida por razones
de seguridad cuando la instalación no esté
finalizada todavía o en caso de que no tenga
que existir consumo de agua por un periodo
de tiempo prolongado (por ej. en el caso de un
piso desocupado).
3. Condiciones de Funcionamiento
iPERL no tiene ninguna restricción en cuanto a
tramo recto aguas arriba y aguas abajo.
2. Instrucciones Generales
• Conductividad mínima del agua requerida:
120 µS/cm (25 °C)
• Medidor de agua fría: de 0,1 °C hasta 50 °C
• Presión admisible: PN16
• Clase mecánica: M2 (MID) instalación fija con
mínima vibración
• Clase electromagnética: E1 y E2 (MID)
residencial y comercial
• Protección: IP68
• Entorno climático: desde -15 °C hasta 60 °C
4. Requisitos de instalación
Asegurar que la tubería no produce estrés
mecánico en el cuerpo del medidor: comprobar
la alineación de la tubería con las roscas de
conexión y la longitud del tramo de conexión
con la longitud del medidor. Si existe estrés
mecánico, el uso de abrazaderas es
recomendable. Cuando se instale iPERL en
la tubería, asegurar que las superficies de
contacto están limpias, niveladas y que las
juntas utilizadas son nuevas.
En toda instalación se debe cumplir la
normativa vigente en materia de seguridad
laboral y medioambiental (aislamiento eléctrico,
etc..). El material composite utilizado no es
conductor.
1
←
Dirección de flujo: el comportamiento
metrológico de iPERL es independiente
de la dirección de flujo y puede escoger la
mejor posición acorde a las condiciones de
instalación. iPERL detectará la dirección de
flujo una vez instalado y fijará la dirección de
medición acordemente.
Presión: por favor asegúrese que iPERL opera
estrictamente dentro del ratio de presión
indicado en el cuerpo del medidor.
Todas las configuraciones y funciones de
iPERL se activaran automáticamente una vez la
tubería esté llena (ver 5).
5. Procedimiento de instalación (registro de
volumen & dirección de Flujo)
PASO 1:
1A: Extraiga iPERL de su embalaje y ensamble
cualquier componente opcional (filtro, válvula
anti-retorno*, ...).
En el caso que se necesite una válvula antiretorno, considere lo siguiente:
3 iPERL, DN 15, 110 y 115 mm: instalación en
la conexión roscada del sensor de medida
4 Otros tamaños y longitudes: válvula antiretorno instalada en el tubo de medida
5 Sin volumen, sin caudal y aviso de alarma
(activado por tubería vacía)
1B: Instalar iPERL según la orientación más
adecuada para la pantalla LCD
PASO 2:
6 Una vez instalado, abrir la válvula aguas
arriba para llenar el sensor de medida. El aviso
de alarma desaparece después de un corto
espacio de tiempo, lo que indica que el equipo
ha detectado agua en la tubería.
Ahora IPERL está completamente operativo,
aunque en modo stand-by. En este momento,
también se activa la transmisión radio indicada
mediante un símbolo radio intermitente. El
sensor de medida empieza a enviar telegramas
radio.
PASO 3:
7 Para activar la “detección de dirección de
flujo”, asegure un caudal por encima de los
siguientes niveles
3 l/h para DN 15
5 l/h para DN 20
8 l/h para DN 25
12,5 l/h para DN 32
20 l/h para DN 40
El caudal instantaneo será mostrado en
pantalla tras 4 horas de operación.
Ambas flechas parpadean para indicar que el
sensor de medida está detectando su dirección
de flujo hacia adelante. Una vez alcanzado el
nivel, la flecha queda fijada.
Se empieza a acumular volumen en los tres
registros de volumen hacia adelante, hacia
atrás y de facturación.
Cuando el registro de volumen de facturación
alcanza los siguientes límites
25 l para
DN 15
40 l para
DN 20
63 l para
DN 25 - 40
el sensor de medida toma ese registro con el
volumen acumulado más alto como el registro
de volumen hacia adelante y fija la dirección
de flujo.
Desde este momento, la dirección del flujo
no puede cambiarse; cualquier caudal en la
dirección contraria activará la alarma de caudal
de retorno y será contabilizada como volumen
en sentido contrario
5
3
iPERL
8 Una vez la dirección de flujo se fija, las
funciones para realizar análisis más detallados,
como el registrador de datos y la detección
de fuga, se activan y son asignadas a sus
respectivos campos de datos.
9 ¡IMPORTANTE! iPERL no registra volumen
si el caudal medio es inferior a
1 l/h para DN 15
1,6 l/h para DN 20
2,5 l/h para DN 25
4 l/h para DN 32
6,4 l/h para DN 40
6. Pantalla y características de iPERL
10 Después de la correcta y completa
instalación, la pantalla muestra:
• lectura del sensor de medida y unidades pre-seleccionadas
• caudal actual y unidades pre-seleccionadas
• Dirección del flujo
• Radio activa
Las alarmas se muestran directamente en la
pantalla después del auto-chequeo del LCD:
AL – 05 Tubería vacía
AL – 06 Manipulación magnética
AL – 07 Flujo reverso
AL – 08 Tubería rota / Fuga
Si alguno de los siguientes símbolos se
muestra, contacte con su proveedor:
• Aviso de alarma + AL-xx (excepto 05-08, ver arriba)
• Aviso de batería baja
• Modo de ensayo
7. Eliminación de residuos
11 Este producto contiene una batería
de ión litio. Con el interés de proteger el
medioambiente, esta batería no puede ser
depositada en la basura urbana una vez
utilizada. Las regulaciones locales y nacionales
para la protección del medio ambiente tienen
que ser consideradas.
8
*sólo para Australia: válvula anti-retorno ya instalada
EN
Símbolo
Descripción
11
Índice del medidor
caudal instantáneo
←
2
8
www.sensus.com
[email protected]
6
9
Unidades del caudal
Alarma
4
Dirección del flujo
RF activa
←
7
10
Aviso de batería baja
Modo ensayo
1241
Lithium
5
MD 5000 INT4 • 0003
Unidades del índice