1
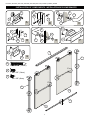
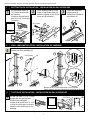
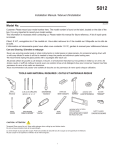
CORDOBA
By/Par
Fleurco
Model:
Modèle:
Installation manual | Manuel d’installation
ES1046 | ES1048 | ES1148 | ES1056 | ES1060 | ES1160 | ET856 | ET860 | ET960
Model:
EN Modèle:
Customer: Please keep this manual and product code number for future reference and replacement parts ordering if necessary.
F
Client : Veuillez conserver ce manuel et le code de produit pour votre référence future et au besoin la commandent les pièces de rechange.
EN
Care and Cleaning / Entretien et nettoyage
The manufacturer suggests using only mild detergents or warm soap applied with a soft cloth for regular cleaning . Always rinse well after cleaning
and dry blotting with a damp cloth or chamois . The use of scouring pads , gritty cloths and harsh abrasive cleaners should always be avoided.
Le manufacturier suggére de utiliser seulement un détergent doux ou une solution d’eau tiède applique avec un linge pour le nettoyage régulier.
TOOLS AND MATERIAL REQUIRED / OUTILS ET MATERIAUX REQUIS
DRILL
PERÇEUSE
3/16 ˝& 1/8˝ DRILL BITS
MÈCHE 3/16˝ & 1/8˝
SCREWDRIVERS
TOURNEVIS
MITER BOX
BOITE À ONGLETS
HAMMER
MARTEAU
BLOCK
BLOC
HACKSAW WITH 32 TEETH
PER INCH BLADE
PENCIL
CRAYON
TAPE MEASURE
RUBAN À MESURER
KNIFE
COUTEAU UTILITAIRE
LEVEL
NIVEAU
SCIE À MÉTAUX AVEC 32 DENTS
PAR POUCE PAR LAME
MASKING TAPE
RUBAN À MASQUER
SAFETY GLASSES
LUNETTE DE SÉCURITÉ
Ware safety glasses when cutting top and bottom tracks
Porter des lunettes de sécurité lors de la coupe de la rail supérieure et inférieure.
PARTS LISTING / LISTE DES PIÈCES
NO
1
2
3
4
5
6
7
8
9
10
11
12
13
14
15
16
17
18
DESCRIPTION
Top Track / Rail supérieure
Wall Jamb / Jambage
Back Door Panel / Panneau de porte arrière
Bottom Track / Rail inférieure
Towel bar / Barre de serviettes
Nylon Bushing / Nylon bushing
Plastic wall anchor / Ancrage en plastic
Flat rubber washer / Rondelle plate en caoutchouc
Bottom Guide / Guide du bas
Bumper Guide / Guide de butoir
Front Door Panel / Panneau de porte avant
Roller / Roulette
# 8 x 1-1/2” (38 mm) / Screw / # 8 x 1-1/2 (38 mm)” Vis
Wrench / Clé
# 8 x 3/8 (11 mm) Screw / # 8 x 3/8 (11 mm) Vis
Towel Bar Cap (w post) / Capuchon pour barre de serviettes
# 6 x 3/8 (9 mm) Screw / # 6 x 3/8 (9 mm) Vis
Wall bumper / Butoir
QTY
1
2
1
1
2
4
6
8
1
2
1
8
6
1
8
4
2
6
06.2013
F
ES1046 | ES1048 | ES1148 | ES1056 | ES1060 | ES1160 | ET856 | ET860 | ET960
INSTALLATION OF COMPONENTS / INSTALLATION DES COMPOSANTES
11
2
15
6
13
12
A
B
18
13
10
16
D
5
9
E
8
15
G
17
#6 x 3/8” (9mm)
B
2
A
#8 x 1-1/2” (38mm)
D
G
#8 x 3/8” (11mm)
F
A
1
12
15
4
17
7
18
C
8
6
2
13
16
7
3
5
E
G
E
B
C
B
2
D
C
3
F
11
B
2
4
ES1046 | ES1048 | ES1148 | ES1056 | ES1060 | ES1160 | ET856 | ET860 | ET960
1
BOTTOM TRACK INSTALLATION / INSTALLATION DU RAIL INFERIEURE
1
Cut the bottom track (4)
1/8” (3 mm) shorter than
the opening.
Couper le rail inférieur(4)
plus court 1/8” (3mm) que
l’ouverture
*
2
Install bottom guide (9) in the
center of the bottom track (4).
Installer le guide du bas (9) au
milieu du rail inférieure.
-1/8”(3 mm)
17
9
3
Caulk and install the
bottom track (4) .
Calfeutrer et installer le
rail inférieur (4) .
4
-1/8”(3 mm)
CENTER
CENTRE
4
4
2
WALL JAMB INSTALLATION / INSTALLATION DU JAMBAGE
4
Install both wall jambs (2) .
Installer les deux jambages (2) .
2
2
3/16”(5 mm)
13
2
7
18
7
2
13
7
18
10
4
Bumper guide (10) lip toward inside of tub or shower.
Placer le butoir (10) vers l’intérieure de la douche ou de bain.
3
5
TOP TRACK INSTALLATION / INSTALLATION DU RAIL SUPERIEURE
Cut the Top track (1) 1/16’’ (2 mm)
shorter than the opening and
install on the wall jambs.
Couper la rail supérieure (1) 1/16”
(2 mm) plus court que l’ouverture.
Installer la rail supérieure sur les
jambage
1
-1 /16”( 2mm)
1
* Tub installation shown / Installation sur baignoire illustré
3
2
ES1046 | ES1048 | ES1148 | ES1056 | ES1060 | ES1160 | ET856 | ET860 | ET960
6
7
Assemble and install the rear (inner) glass door (3).
Assembler et installer le panneau de la porte
en verre (3) à l’intérieur de la douche .
Assemble and install the front (outer) glass door (11).
Assembler et installer le panneau de la porte en verre (11)
à l’intérieur de la douche .
15
15
12
12
3
Tighten with hexkey
Serrer avec clé
hexagonale.
ustar
19
19
16
8
5
8
Rough or pattern side of glass.
Côté texturé du verre.
5
Rough or pattern side of glass.
Côté texturé du verre.
16
Tighten with hex key
Serrer avec clé hexagonale.
Side A
Insert one of the anti-jump inside the
top track on side A
Insérer la pièce anti-saut à l'intérieur du rail supérieur
Côté A
Côté A
Side A
Côté A
Side B
Côté B
Adjust
Ajuster
Install the second door
panel onto the top track
and slide panel over to
side A.
Accrocher le deuxième
panneau sur le rail
supérieur et coulissez-le
vers le côté A
Side B
Côté B
Install one of the door
panel onto the top track
and slide panel over to side A.
Accrocher un des panneaux sur le rail
supérieur et coulisser le vers le côté A
Insert the second anti-jump inside the
top track on side B.
Insérer la deuxième pièce anti-saut à l'intérieur
du rail supérieur côté B.
8
Caulking
Finition calfeutrage
HEURES
HOURS
4