1
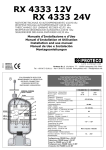
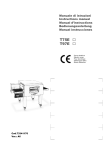
RX 4331 12-24V
RICEVITORE MONOCANALE AD AUTOAPPRENDIMENTO 433.92 Mhz
BRANCHEMENT RECEPTEUR MONOCANAL 433.92 Mhz
MONO-CHANNEL SELF-LEARNING RECEIVER 433.92 Mhz
RECEPTOR DE MEMORIZACIÓN AUTOMÁTICA 433.92 Mhz
SELBLERNENDER EIN-KANAL EMPFÄNGER 433,92 Mhz
2006_02
Manuale d’Installazione e d’Uso
Manuel d'Installation et Utilisation
Installation and use manual
Manual de Uso e Instalación
Montageanleitungen
PRODOTTI
PRODUITS
PRODUCTS
ERZEUGNIS
PRODUCTOS
1
Proteco S.r.l. Via Neive, 77 - 12050 Castagnito (CN) ITALY
Tel. +39 0173 210111 - Fax +39 0173 210199 www.proteco.net - [email protected]
COLLEGAMENTO RICEVITOR
BRANCHEMENT DU RÉCEPTEUR
RECEIVER CONNECTION
CONEXION RECEPTOR
EMPFÄNGER VERKNÜPFEN
Antenna - Antenne
Aerial - Antena - Antenne
LED
P1
+ 12 / 24V
START
Alimentazione - Alimentation
Power supply - Alimentación
Spannungsversorgung
Frequenza - Fréquence
Frequency - Frequencia
Frequenz
Assorbimento - Consommation à vide
Absorption - Absorvimiento
Liestungsaufnahme
n° max. codici - n° maximum du code
n° max. codes - n° max. códigos
Kodeanzahl
Portata relè - Portée du relais
Relay range - Alcance relè
Relaisfähigkeit
Predisposto per FRAME fino a 24 BIT
Préparé pour FRAME jusqu'à 24 BIT
Preset for FRAME up to 24 BIT
Predispuesto para FRAME hasta 24 BIT
Vorbereitet für FRAME bis 24 BIT
12V / 24V ca cc
433,92 Mhz
20 MA
9
1A
24V
2
•
•
•
•
•
•
Det. A
•
•
•
•
•
•
•
•
•
•
Sollevare e togliere il coperchio.
Inserire l’antenna nell’apposito foro facendo attenzione che sullo stelo sia
posizionato il tappino e la guarnizione come da dettaglio A (Fig. 2).
Assicurarsi che lo stelo sia inserito a fondo nel morsetto corrispondente.
Avvitare la vite.
Inserire il cavo di alimentazione nell’apposito passacavo, avendo in precedenza
forato con una matita, dettaglio B (Fig. 2).
Uplift and remove the cover.
Plug the aerial in the proper hole, paying attention that the cap and the washer
are as shown in detail A (drawing 2).
Make sure that the aerial is deeply plugged into the corresponding terminal and
then fix it with a screw.
Pierce the rubber fairlead with a pencil or a tool as shown in detail B (drawing
2) and then insert the power supply cable.
Soulevez le couvercle par le bas.
Introduisez l'antenne par le trou du haut, assurez vous que le petit joint est
bien en place. (Fig. A 2)
Placer l'antenne dans le connecteur sur la borne de gauche comme le montre
le schéma, serrez sans exagération.
Avec un objet pointu percez la membrane au bas du boîtier et insérez le câble
d'alimentation.(Fig. B 2)
Levantar y quitar la tapa.
Introducir la antena en el agujero ponendo atención en que haya la pequeña
tapa y la guarnición como en detalle A , (dibujo 2).
Controlar que la antena sea introducida en el agujero del borne correspondiente
y fijar con un tornillo.
Introducir el cable en la pasteca, después de agujerearla con un lápiz, detalle B
(dibujo 2).
Det. B
•
•
•
•
Den Deckel hochziehen und wegnehmen.
Die Antenne an den dazu bestimmtes Loch einstecken. Sich versichern dass
beide den Plastikpfropfen und die Dichtung am Schraft sind, laut anliegendem
Muster A Fig. 2.
Sich versichern dass der Schraft richtig in der korrespondierenden Klemme
eingesteckt ist. Verschrauben.
Das Speisekabel an den dazu bestimmten Kabeldurchgang einstecken. Zuvor
bei einem Bleistift durchlöchern, laut anliegendem Muster B Fig.2 .
3
Dopo aver eseguito i collegamenti vedi Fig. 1 e provveduto alla memorizzazione dei
telecomandi vedi “AUTOAPPRENDIMENTO CODICI” chiudere il coperchio e fissarlo
con le due viti in dotazione (Fig. 3).
Once the receiver is completely connected (see drawing 1) and the transmitters'
codes are correctly stored (see paragraph “SELF LEARNING STORAGE OF CODES”)
close the cover and fix it with the provided screws.
Une fois les branchements réalisés (Fig. 1) et seulement quand vous aurez
programmé les télécommandes (Programmation), refermez le couvercle avec les 2 vis
fournies.(Fig. 3)
Después de efectuar las conexiones (ver dibujo 1) y memorizar los mandos (ver
parágrafo MEMORISACION AUTOMATICA CODIGOS) cerrar la tapa y fijarla con los
dos tornillos provisto en dotación.
Nach der Anschlüsse Fig. 1 und dem Memorieren der Handsendern, Abschnitt
„SELBLERNEN DER KODEN“ , den Deckel schließen und befestigen bei der zwei
vermachtenen Schrauben (Fig. 3).
INSTALLAZIONE
Posizionare il ricevitore in verticale nel punto più alto possibile e in posizione libera
da ostacoli.
E' necessario non installare più ricevitori a distanze inferiori ai 4-5 metri uno
dall'altro, poiché ciò potrebbe causare anomalie nel funzionamento.
PROGRAMMAZIONE
PRIMA DI ESEGUIRE LA PROGRAMMAZIONE DELLA RICEVENTE RADIO,
PROCEDERE ALLA CANCELLAZIONE DI TUTTI I CODICI IN MEMORIA.
(Inseriti in fase di collaudo vedi paragrafo “CANCELLAZIONE DEI CODICI”)
a)
b)
c)
d)
e)
AUTOAPPRENDIMENTO DEI CODICI
Creare un codice personalizzato sui telecomandi a Dip-Switch, evitando di
mettere i dip-switch tutti in posizione OFF o in posizione ON.
Nei telecomandi a codice RANDOM non è necessario inserire il codice perché
è già inserito in fase di collaudo in maniera casuale. (16.000.000 di
combinazioni)
Trasmettere un segnale premendo uno dei tasti sul telecomando.
Il LED 1 del ricevitore lampeggia.
Premere il tasto P1 del ricevitore entro 4 secondi per memorizzare il codice.
Il codice 1 è stato memorizzato, il LED 1 si spegne, il ricevitore è pronto a
ricevere il secondo codice partendo dal punto (b).
Ripetere la stessa procedura per memorizzare il 2°/3°/ 4°/ 5° ....9° codice.
In seguito alla ricezione di un codice già presente in memoria viene attivato il relè
di uscita e si accende il LED 1.
INSTALLATION
Il est préférable de placer le récepteur le plus haut possible si votre site le permet,
essayer de le placer sans obstacle immédiat et ne pas placer plusieurs récepteurs
(même de matériel différent) trop proches les uns des autres. Il faut garder une
distance minime de 4-5 mètres afin d'assurer un bon fonctionnement.
PROGRAMMATION
IL FAUT EFFACER TOUS LES CODES MÉMORISÉS AVANT
LA PROGRAMMATION DU RÉCEPTEUR RADIO.
(Voir « EFFACEMENT DES CODES »)
a)
b)
c)
d)
e)
È possibile cancellare i codici solamente uno alla volta.
Ripetere l’operazione per ogni codice da cancellare.
Se premendo il tasto P1, il LED 1 lampeggia velocemente 3 volte significa che
non vi sono codici in memoria.
Per i motivi di cui sopra, vi suggeriamo di annotare a parte i codici memorizzati al
relativo utente, così non sarà necessario avere a disposizione il trasmettitore per
procedere alla cancellazione, ma si inizierà direttamente la procedura dal punto c).
a)
b)
c)
d)
e)
a)
b)
c)
d)
AUTO-APPRENTISSAGE DES CODES
Pour la programmation des télécommandes à dip-switch (micro-interrupteurs),
choisissez un codage.
Ne pas placer les dip-switch tous en ON ou tous en OFF.
Pour les télécommandes vous n'avez pas besoin de faire cette manipulation
les codes sont déjà inclus de manière aléatoire (16.000.000 de
combinaisons).
Placez vous de manière à ce que la télécommande soit au minimum à 1 mètre
du récepteur et envoyez une impulsion avec le bouton de la télécommande
que vous avez choisi, la LED 1 du récepteur va clignoter.
Vous avez 4 secondes pour appuyer sur le bouton P1, cela va mémoriser le
code. Le code 1 est mémorisé.
Répétez la même procédure pour mémoriser le code 2, 3 , ect…9ème code.
CANCELLAZIONE DEI CODICI
E' necessario identificare qual'è il codice che si desidera cancellare.
Per fare ciò è necessario avere a disposizione il trasmettitore che si desidera
cancellare e premere il relativo tasto.
Il LED 1 segnalerà con 1 lampeggio se il codice è in posizione 1. Segnalerà
con 2 lampeggi se il codice è in posizione 2, e così via, fino a 9 lampeggi, se il
codice è in posizione 9.
Premere il tasto P1 del ricevitore per iniziare la ricerca del codice da
cancellare.
Il LED 1 lampeggerà una volta per ogni codice memorizzato e due volte veloci
per un codice libero (questa operazione verrà ripetuta per ognuno dei 9
codici).
Se il codice da cancellare e in posizione 4, appena il LED 1 ha segnalato la
quarta posizione premere il tasto P1 e tenere premuto fino a quando il LED 1
lampeggia 3 volte.
Il codice è cancellato.
EFFACEMENT DES CODES
Il faut identifier le code que vous souhaitez effacer . A ce titre munissez vous
de la télécommande concernée et appuyez sur la touche enregistrée.
La LED 1 va signaler par une suite de clignotement la position du canal
occupé. (exemple : 1 clignotement pour le premier canal, 2 clignotement pour
le 2emme canal etc.…)
Appuyez sur la touche P1 du récepteur pour commencer la recherche du code
à effacer.
La LED 1 clignote une fois à chaque canal mémorisé ou 2 fois rapidement pour
un canal libre.
Si le code à effacer est en 4éme position (la LED1 clignote 4 fois), a cet
instant maintenez le bouton P1 en appui jusqu'à ce que la LED1 clignote 3
fois. Le code est effacé
Les codes peuvent être effacés qu'une fois.
Répétez l'opération pour chaque code a effacer. Si en appuyant la touche P1 la
LED1 clignote 3 fois rapidement, il n'y a pas de canaux mémorisés.
C'est souhaitable noter de côté les codes mémorisés pour chaque usager, de cette
manière il ne faudra pas disposer de la télécommande pour effacer, mais on
commencera de suite la procédure au paragraphe c).
Suite à la réception d'un code déjà mémorisé, le relé de sortie se met en fonction
et la LED 1 s'allume.
INSTALLATION
Fix the receiver vertically and as high as possible, with no obstacles around.
If you have other receivers installed, you have to put them at least 4-5 meters
faraway the one from the other in order to let them working properly.
ALL PRE-STORED TEST CODES MUST BE
DELETED BEFORE PROGRAMMING RADIO RECEIVER
(see paragraph “DELETING CODES”)
STORING NEW REMOTE CONTROL'S CODE
a) If your remote control has dip-switches, then set up a new code (to made a
safe code, avoid setting the dip-switches all in ON or all in OFF position).
If your remote control doesn't have any dip-switches the code has already
been random generated (it can random generate 16.000.000 different
combinations of codes).
b) Give an impulse by pressing on of the remote control's buttons.
LED1 on the receiver will light up.
c) Press button P1 on the receiver within 4 second to save the code storing.
d) Once the code is stored, LED1 will go off.
The receiver is now ready to have another code stored.
e) Repeat the same procedure for each different code
Press a remote control's button to check if a code is already stores in the receivers'
memory: the output relay should activate itself and LED1 should light on.
a)
b)
c)
d)
e)
DELETING CODES
Push the button on the remote control that you want to delete from the
receiver's storage.
LED1 will blink once if the code is stored in position nr 1, twice if the code is
stored in position nr 2 and so on until position nr 9.
Press button P1 on the receiver to go trough the stored codes and find the
one you want delete.
Going through the storing positions the LED1 will blink once if in the position
there's a code stored or twice if there's no code stored in that position.
Once you reach the position in which the code you want to delete is stored
(i.e. if the code you want to delete is in position nr 4 then wait until LED1
blinks once in the fourth position) press button P1 and keep on pressing until
LED1 blinks three times quickly.
The code is now successfully deleted.
Codes can be deleted one by one only.
Repeat the complete procedure for each code you want to delete.
If no more codes are stored, LED1 blinks three times quickly when you press
button P1.
We recommend you to take a note of the position assigned to each code/customer
so you don't need to have the remote control in your hands when you want to
delete its code from the receiver and you can start the deleting procedure from
point c).
INSTALACIÓN
Colocar en posición vertical el receptor, en el punto más alto, en
posición libre de obstáculos.
Para optimizar el funcionamiento, no instalar los receptores a menos de
4 - 5 metros el uno del otro.
PROGRAMACIÓN
ANTES DE PROGRAMAR LA RECEPTORA BORRAR TODOS LOS
CÓDIGOS MEMORIZADOS EN LA FASE DE ENSAYO.
(que fueron memorizados en la fase de prueba, ver parágrafo
“CANCELACION DE LOS CODIGOS”)
AUTO APRENDISAJE DE LOS CÓDIGOS
A) Crear un código personalisado en el transmisor con los 10 Deep
Switches, evitar poner todos los deep switches en posición ON o en
posición OFF.
En los transmisores con código aleatorio Ud. no tiene que introducir
un código porque este transmisor ya tiene el código introducido en
la fase de prueba de manera casual (hay 16.000.000 de
combinaciones)
b) Transmitir un señal pulsando una de las teclas del mando a
distancia: el LED 4 del receptor relampagueará.
c) Para memorizar un código, es necesario pulsar la tecla P1 del
receptor dentro de 4 segundos.
d) El primer código ha sido memorizado, el LED 4 ya no relampaguea, y
es posible memorizar un segundo código en el receptor (empezando
nuevamente desde el punto b).
e) Repetir el mismo procedimiento para memorizar los restantes
códigos.
CANCELACIÓN DE LOS CÓDIGOS
a) Es necesario identificar el código que se quiere borrar.
Para poderlo hacer es imprescindible tener el transmisor que se
quiere anular o el prospecto "CÓDIGOS" con los diferentes códigos
memorizados (véase el prospecto que sigue).
b) Pulsando la tecla del transmisor, el LED 4 señalará con un
relampagueo si el código se encuentra en posición 1, con dos
relampagueos si el código se encuentra en posición 2 y continúa de
esta manera hasta el final de la programación.
c) Pulsar la tecla P1 del receptor para empezar a buscar el código que se
quiere anular.
d) El LED 4 relampagueará una vez por cada código memorizado y dos
veces rapidamente por cada código libre (se repetirá esta operación
por cada uno de los seis códigos presentes en memoria).
e) Si el código que hay que borrar se encuentra en posición 4, pulsar la
tecla P1 cuando el LED 4 señale la posición 4 y mantener apretado
hasta que el LED 4 relampaguee 3 veces.
Se pueden cancelar los códigos sólo a uno a uno.
Repetir la oparación para cada código que quiere cancelar.
Si pulsando la tecla P1 el LED1 relampaguea 3 veces con 3
relampagueos veloces, significa que no hay códigos memorizados.
Sugerimos escribir los códigos memorizados y el nombre del cliente, así
que no hay que tener el transmisor a disposición para cancelar el código
y Ud. podrá empezar directamente desde el punto c)
Con la recepción de un código memorizado se activa el relay de salida
conectado con la tecla que ha sido pulsada y el LED 1.
MONTAGE
Den Empfänger auf eine hohe Hindernisse frei Stellung vertikal stellen.
Es ist nötig ein Abstand von 4/5 mt. zwischen verschiedene Empfänger
stehen lassen, um Arbeitsweiseunregelmäßigkeiten zu vermeiden.
PROGRAMMIERUNG
LÖSCHEN ALLE DI MEMORIERTE KODE
VOR DER PROGRAMMIERUNG DES EMPFÄNGERS.
(Abschnitt „LÖSCHUNG DER KODEN“)
SELBLERNEN DER KODEN
a) Schaffen die persönliche Kode auf Dip-Switch Handsender.
Die Dip-Switch müssen nicht alle auf Stellung OFF oder ON sein.
So weit die RANDOM Handsender ist es nicht nötig die Kode
einschalten, weil schon wahlfrei während der Prüfung eingestellt
war. (16.000.000 Kombinationen)
b) Auf einen Knopf des Handsenders drücken um ein Zeichen zu geben.
Das LED1 des Handsenders blitzt.
c) Für 4 Sekunden auf Knopf P1 des Empfängers drücken um die Kode
zu memorieren.
d) Die Kode 1 ist jetzt memoriert, das LED 1 ist erloschen.
Das Empfänger ist bereit um die zweite Kode zu bekommen, sehen
Abschnitt B.
e) Die selbe Prozedur wiederholen um neue Kode 2°/3°/4°/5° .... zu
memorieren.
Nach dem Empfang einer Kode die schon memoriert ist, wird das
Ausgangrelé aktiv und das LED1 blitzt.
LÖSCHUNG DER KODEN
a) Es ist nötig ermitteln die Kode zu löschen.
Dazu ist der zugehörige Handsender nötig, dann den bezüglichen
Knopf drücken.
b) Das LED1 blitzt einmal wenn die Kode auf Stellung 1 ist. Zweimal
wenn die Kode auf Stellung 2 ist, und so weiter, bis 9 Blitzen, wenn
die Kode auf Stellung 9 ist.
c) Den Knopf P1 des Empfängers drücken um die Kode zu löschen
finden.
d) Das LED1 blitzt einmal für jeder memorierte Kode und, zweimal
schnell, wenn die Kode frei ist (die selbe Prozedur wird für jener der
9 Kode).
e) Falls ist die Kode zu löschen auf Stellung 4, sobald wird das LED1
die vierte Stellung anzeigen, den Knopf P1 drücken und weiter
drücken bis das LED1 blitzt dreimal. Jetzt ist die Kode gelöscht.
Die Kode können nur eine auf einmal gelöscht sein.
Die selbe Prozedur folgen für jede Kode zu löschen.
Den Knopf 1 drücken; wenn das LED1 blitzt dreimal schnell, gibt es
keine memorierte Kode.
Deswegen ist es besser die memorierte Kode aufzuschreiben, damit wird
den Handsender zur Löschung nicht nötig, und kann man die Prozedur
gerade aus Abschnitt C anfangen.