1
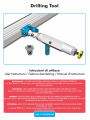
Attrezzo di foratura “DT” (cod. 005 004 021 – 005 004 026) - ISTRUZIONI DI UTILIZZO
IMPIEGO SU LINEE PER ARIA COMPRESSA IN PRESSIONE
L’ attrezzo di foratura “DT” è stato progettato per poter forare in tutta sicurezza una linea di distribuzione HBS od AP per aria
compressa mentre questa è in pressione, senza doverla svuotare.
1.
2.
3.
4.
5.
6.
7.
8.
9.
10.
11.
12.
Fissare la piastra di uscita (A) nel punto della barra cava HBS od AP da forare.
Avvitare sulla piastra (A) la valvola a sfera (B), applicando sul filetto del sigillante (Teflon).
Aprire la valvola a sfera (B).
Avvitare la parte anteriore filettata dell’attrezzo (C) alla valvola a sfera.
Applicare il filtro/silenziatore (D) al corpo dell’attrezzo (C).
Inserire il gambo della punta (E) nel mandrino del trapano, serrandolo in modo appropriato.
Eseguire la foratura della barra cava.
Arretrare completamente con il trapano in modo da sfilare la punta (E) dalla valvola (B).
Chiudere la valvola (B).
Svitare il filtro/silenziatore (D) e rimuovere i trucioli di alluminio.
Svitare l’attrezzo (C) dalla valvola (B).
L’attrezzo è ora pronto per una nuova operazione di foratura.
IMPIEGO SU LINEE PER ARIA COMPRESSA O FLUIDI NON PRESSURIZZATE
Al fine di evitare l’ingresso dei trucioli di alluminio nella linea, si può impiegare il dispositivo DT in combinazione con un
semplice aspirapolvere, collegato al corpo dell’attrezzo attraverso un tubo flessibile ed un portagomma da ½”.
1.
2.
3.
4.
5.
Fissare la piastra d’uscita (A) nel punto della barra cava HBS od AP da forare.
Avvitare l’estremità filettata dell’attrezzo (C) direttamente alla piastra di uscita (A).
Applicare l’attacco portagomma (F) al corpo dell’attrezzo (C).
Collegare il portagomma (F) all’aspiratore attraverso un tubo flessibile.
Attivare l’aspiratore ed eseguire il foro: i trucioli verranno evacuati dall’aspiratore attraverso il portagomma.
Drilling tool “DT” (code 005 004 021 – 005 004 026) – USER INSTRUCTIONS
USE OF “DT” ON PRESSURIZED COMPRESSED AIR DISTRIBUTION LINES.
The drilling tool “DT” is designed to allow the safe drilling of a hole into a HBS or AP compressed air distribution line that is still
under pressure, without the need of emptying the pipework before hand.
1.
2.
3.
4.
5.
6.
7.
8.
9.
10.
11.
12.
Fix the outlet plate (A) where the HBS or AP profile must be drilled.
Screw the ball valve (B) on the outlet plate (A), putting a sealant on the thread (i.e. Teflon).
Open the ball valve (B).
Screw the threaded side of the tool (C) on the ball valve (B).
Put the filter/silencer (D) on the body of the tool (C).
Insert the tool end (E) into the spindle of a drill, tightening properly.
Drill the hole in the profile.
Move the drill backwards completely, thus allowing the tool (E) to pass through the valve (B).
Shut off the valve (B).
Unscrew the filter/silencer (D) and remove the aluminium chips.
Unscrew the tool (C) from the valve (B).
The tool is now ready for a new drilling session.
USE OF “DT” ON NON-PRESSURIZED COMPRESSED AIR OR FLUID DISTRIBUTION LINES.
In order to avoid the aluminium chips falling inside the profile, it is possible to connect DT to an ordinary vacuum cleaner,
connected to the body of the tool by means of a flexible hose and a ½” joint.
1.
2.
3.
4.
5.
Fix the outlet plate (A) where the HBS or AP profile must be drilled.
Screw the threaded side of the tool (C) straight into the outlet plate (A).
Fix the ½” joint (F) on the body of the tool (C).
Connect the joint (F) to the vacuum cleaner using a flexible hose.
Switch the cleaner on and drill the hole in the profile: aluminium chips will be automatically removed by the vacuum
cleaner through the joint (F).
BOHRVORRICHTUNG “DT” (Art. Nr. 005 004 021 – 005 004 026) GEBRAUCHSANLEITUNG
EINSATZ BEI UNTER DRUCK STEHENDEN ANLAGEN
Die Bohrvorrichtung “DT” wurde entwickelt, um in einer unter Druck stehenden HBS oder AP Verteilungslinie sicher zu bohren,
ohne die Leitung entleeren zu müssen.
1.
2.
3.
4.
5.
6.
7.
8.
Setzen Sie die Ausgangplatte (A) an die für die Bohrung vorgesehene Stelle auf dem HBS oder AP Profil
Schrauben Sie ein Kugelhahnventil (B) auf die Ausgangsplatte (A) und dichten Sie das Gewinde ab (Teflon)
Öffnen Sie das Kugelhahnventil (B)
Bohrvorrichtung (C) auf das Kugelhahnventil aufschrauben
Schallgedämpftes Filterstück (D) an die Bohrvorrichtung (C) schrauben
Ende der Bohrvorrichtung (E) auf einen Bohrer schrauben
Bohrung vornehmen
Nach Bohrung Bohrer zurückziehen, so daß die Spitze der Bohrvorrichtung (B) komplett aus dem Kugelhahnventil
gezogen wird
9. Kugelhahnventil schließen (B)
10. Schallgedämpften Filter (D) abschrauben und Aluminiumsplitter entsorgen
11. Bohrvorrichtung (C) von dem Kugelhahnventil (B) abschrauben
12. Bohrvorrichtung ist für nächste Anwendung bereit
ARBEIT AN NICHT UNTER DRUCK STEHENDEN ANLAGEN
Um die Verschmutzung der Profilrohre mit Aluminiumspänen zu vermeiden, kann man das DT mit einer Ansaugvorrichtung
(Schlauchanschlußstück ½“ ) verbinden.
1.
2.
3.
4.
5.
Setzen Sie die Ausgangplatte (A) an die für die Bohrung vorgesehene Stelle auf dem HBS oder AP Profil
Bohrvorrichtung (C) auf die Ausgangsplatte (A) aufschrauben
½“ Schlauchanschlußstück (F) an die Bohrvorrichtung (C) anbringen
Schlauchanschlußstück (F) mittels flexiblen Schlauches anschließen
Sauger einstellen und Bohrung vornehmen: die Aluminiumsplitter werden automatisch aus der Rohrleitung abgesaugt.
Outil de perçage « DT » (cod.005 004 021 – 005 004 026) – MANUEL D’INSTRUCTIONS
UTILISATION SUR DES RESEAUX POUR AIR COMPRIME SOUS PRESSION
L’outil de perçage « DT » a été projeté pour permettre de forer, en toute sécurité, une ligne de distribution d’air comprimé HBS
ou AP lorsque celle-ci est sous pression, sans pour autant devoir vider le réseau.
1.
2.
3.
4.
5.
6.
7.
8.
9.
10.
11.
12.
Fixer la bride de sortie (A) à l’endroit où le perçage doit être effectué.
Visser le clapet à bille (B) sur la bride de sortie (A) en appliquant de la colle (Téflon).
Ouvrir le clapet à bille (B).
Visser la partie antérieure filetée de l’outil (C) sur le clapet à bille.
Monter le filtre/silencieux (D) sur le corps de l’outil (C).
Insérer la tige du foret (E) dans le mandrin de la perceuse en serrant correctement.
Percer la barre creuse.
Reculer complètement avec la perceuse da façon à retirer le foret (E) du clapet à bille (B).
Fermer le clapet à bille (B).
Dévisser le filtre/silencieux (D) et retirer les copeaux d’aluminium.
Dévisser l’outil (C) du clapet à bille (B).
L’outil est maintenant prêt pour une nouvelle opération de perçage.
UTILISATION SUR DES RESEAUX POUR AIR COMPRIME OU FLUIDES NON PRESSURISES
Afin d’éviter que des copeaux d’aluminium n’entrent dans le réseau, il est possible d’utiliser le dispositif DT avec un simple
aspirateur à poussière connecté à l’outil par un tube flexible et une tétine de 1/2".
1.
2.
3.
4.
5.
Fixer la bride de sortie (A) à l’endroit où le perçage doit être effectué.
Visser la partie antérieure filetée de l’outil directement sur la bride de sortie (A).
Appliquer la partie filetée du raccord tétine (F) sur le corps de l’outil (C).
Relier la tétine (F) à l’aspirateur par un tube flexible.
Allumer l’aspirateur et réaliser le perçage : les copeaux seront automatiquement évacués par l’aspirateur en passant
par la tétine.