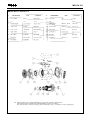
1
GENERATORS
MPL
MPL
MPL
MPL
MPL
MPL
10 SX - CX
15 SX - CX
20 SX - CX
40 SX - CX
65 SX - CX
80 SX - CX
MANUALE USO E MANUTENZIONE
USE AND MAINTENANCE MANUAL
GEBRAUCHSANWEISUNG UND WARTUNGSVORSCHRIFTEN
MANUEL D'INSTRUCTIONS ET D'ENTRETIEN
Cod. 41382
Nomefile:mum_mpl.pm5
Data di aggiornamento: 02/06/97
Redatto: C.A.
GENERATORS
MPL SX - CX
7
1
2
3
4
5
6
1
-2-
MPL SX - CX
GENERATORS
6
5
1
4
2
3
2
5
4
3
1
2
3
-3-
MPL SX - CX
GENERATORS
18
16
17
2
1
15
3
4
19
20
21
6
5
7
8
9
10
12
13
11
14
4
-4-
MPL SX - CX
GENERATORS
Schema elettrico MPL 10-15 SX - CX (M)
6
7
9
8
10
11
5
12
4
13
17
3
15
22
14
23
21
16
2
18
19
20
1
Rif. Descrizione
Rif. Descrizione
1
2
3
4
5
6
7
8
9
10
11
12
13
14
15
16
17
18
19
20
21
22
23
Presa trifase 3p + n + t 32 A
Presa monofase 2 p + t 16 A
Morsetto collegamento terra
Magnetotermico - differerenziale
Commutatore voltometrico
Voltmetro
Frequenzimetro
Contaore
Amperometro
Alternatore
Rotore
Diodi di eccitazione
-5-
Motorino avviamento
Chiave accensione
Modulo protezioni motore
Connettore colleg. quadro avviam. automatico
Pulsante arresto emergenza
Pressostato olio
Sensore sovratemperatura aria
Indicatore riserva carburante
Elettrovalvola stop
Alternatore DC
Batteria 12 V
MPL SX - CX
GENERATORS
Schema elettrico MPL 10-15 SX - CX (NSM)
6
7
12
9
8
10
11
24
5
4
13
17
3
22
15
14
23
21
16
2
18
19
20
1
Rif. Descrizione
Rif. Descrizione
1
2
3
4
5
6
7
8
9
10
11
12
13
14
15
16
17
18
19
20
21
22
23
24
Presa trifase 3p + n + t 32 A
Presa monofase 2 p + t 16 A
Morsetto collegamento terra
Magnetotermico - differerenziale
Commutatore voltometrico
Voltmetro
Frequenzimetro
Contaore
Amperometro
Alternatore
Rotore
Diodi di eccitazione
-6-
Motorino avviamento
Chiave accensione
Modulo protezioni motore
Connettore colleg. quadro avviam. automatico
Pulsante arresto emergenza
Pressostato olio
Sensore sovratemperatura aria
Indicatore riserva carburante
Elettrovalvola stop
Alternatore DC
Batteria 12 V
Regolatore elettronico di tensione
MPL SX - CX
GENERATORS
Schema elettrico MPL 20 SX - CX (E)
9
7
6
8
10
11
5
12
4
13
17
3
22
15
14
23
16
2
18
19
20
21
1
Rif. Descrizione
Rif. Descrizione
1
2
3
4
5
6
7
8
9
10
11
12
13
14
15
16
17
18
19
20
21
22
23
Presa trifase 3p + n + t 32 A
Presa monofase 2 p + t 16 A
Morsetto collegamento terra
Magnetotermico - differerenziale
Commutatore voltometrico
Voltmetro
Frequenzimetro
Contaore
Amperometro
Alternatore
Rotore
Diodi di eccitazione
-7-
Motorino avviamento
Chiave accensione
Modulo protezioni motore
Connettore colleg. quadro avviam. automatico
Pulsante arresto emergenza
Pressostato olio
Sensore sovratemperatura aria
Indicatore riserva carburante
Elettrovalvola stop
Alternatore DC
Batteria 12 V
MPL SX - CX
GENERATORS
Schema elettrico MPL 20 SX - CX (M)
7
6
9
8
10
11
5
12
13
4
3
6
17
22
15
14
21
16
18
2
19
20
23
1
Rif. Descrizione
Rif. Descrizione
1
2
3
4
5
6
7
8
9
10
11
12
13
14
15
16
17
18
19
20
21
22
23
Presa trifase 3p + n + t 32 A
Presa monofase 2 p + t 16 A
Morsetto collegamento terra
Magnetotermico - differerenziale
Commutatore voltometrico
Voltmetro
Frequenzimetro
Contaore
Amperometro
Alternatore
Rotore
Regolatore elettronico di tensione
-8-
Motorino avviamento
Chiave accensione
Modulo protezioni motore
Connettore colleg. quadro avviam. automatico
Pulsante arresto emergenza
Pressostato olio
Sensore sovratemperatura aria
Indicatore riserva carburante
Elettrovalvola stop
Alternatore DC
Batteria 12 V
MPL SX - CX
GENERATORS
Schema elettrico MPL 40 - 65 SX - CX (VM -M)
9
10
12
11
13
14
8
15
7
16
19
5
6
17
26
18
20
4
3
21
22 23
2
24
1
Rif. Descrizione
1
2
3
4
5
6
7
8
9
10
11
12
13
14
25
15 Regolatore elettronico di tensione
Rif. Descrizione
Presa trifase 3p + n + t 32 A
Presa monofase 2 p + t
Magnetotermico unipolare
Magnetotermico tripolare
Morsettiera collegamento di potenza
Morsetto collegamento terra
Magnetotermico - differerenziale
Commutatore voltometrico
Voltmetro
Frequenzimetro
Contaore
Amperometro
Alternatore
Rotore
16
17
18
19
20
21
22
23
24
25
26
-9-
Motorino avviamento
Chiave accensione
Modulo protezioni motore
Pulsante arresto emergenza
Elettrovalvola stop
Connettore colleg. quadro avviam. automatico
Pressostato olio
Termostato aria
Indicatore riserva carburante
Batteria
Alternatore DC
MPL SX - CX
GENERATORS
MECC ALTE ECN 31 LC
- 10 -
I
GENERATORS
INDICE
IL MANCATO RISPETTO DELLE SPECIFICHE
CONTENUTE NEL SEGUENTE MANUALE DI
INSTALLAZIONE, COMPORTA IL DECADIMENTO
DELLA GARANZIA SUL PRODOTTO
Figure ..................................................................... 2
Schemi elettrici ..................................................... 5
1
1.1
1.2
1.3
1.4
Informazioni generali ................................... 12
Scopo del manuale .......................................... 12
Documentazione allegata ................................. 13
Identificazione della macchina .......................... 13
Descrizione della macchina ............................. 13
2 Caratteristiche ............................................... 14
2.1 Caratteristiche tecniche ................................... 14
3 Norme di sicurezza ....................................... 15
3.1 Precauzioni ...................................................... 15
3.2 Collegamento del gruppo a terra ....................... 15
4
4.1
4.2
4.3
4.4
Utilizzo del generatore ................................. 15
Controlli preliminari .......................................... 15
Avviamento ....................................................... 15
Arresto ............................................................. 16
Collegamento al quadro automatico ................. 16
5
Protezioni ....................................................... 16
6
6.1
6.2
6.3
6.4
6.5
6.6
6.7
6.8
Manutenzione ................................................ 17
Manutenzione ordinaria del motore ................... 17
Cambio olio motore .......................................... 17
Disareazione impianto ...................................... 17
Sostituzione filtro aria ....................................... 18
Pulizia delle griglie di aspirazione ..................... 18
Periodo di inattività ........................................... 18
Tavola interventi programmati ........................... 18
Tavola guasti .................................................... 18
- 11 -
MPL SX - CX
I
GENERATORS
MPL SX - CX
1 INFORMAZIONI GENERALI
Consultare attentamente questo manuale prima di procedere a qualsiasi intervento sulla macchina.
1.1 Scopo del manuale
Grazie per aver scelto un prodotto MASE.
Questo manuale è stato redatto dal Costruttore e costituisce parte integrante del corredo del gruppo elettrogeno.
Le informazioni contenute sono dirette agli utilizzatori e alle persone incaricate alla loro manutenzione.
Il manuale definisce lo scopo per cui la macchina è stata costruita e contiene tutte le informazioni necessarie per
garantirne un uso sicuro e corretto.
La costante osservanza delle indicazioni, in esso contenute, garantisce la sicurezza dell’uomo della macchina,
l’economia d’esercizio ed una maggiore durata della macchina stessa.
Per facilitare la consultazione esso è stato suddiviso in sezioni che ne identificano i concetti principali; per una
consultazione rapida degli argomenti consultare l’indice descrittivo.
Le parti di testo da non trascurare sono state evidenziate in grassetto e precedute da simboli qui di seguito illustrati e
definiti.
PERICOLO
Indica che è necessario prestare attenzione al fine di non incorrere in serie conseguenze che
potrebbero provocare la morte del personale o possibili danni alla salute.
ATTENZIONE
Situazione che potrebbe verificarsi durante il periodo di vita di un prodotto, sistema o impianto
considerato a rischio in materia di danni alle persone, alle proprietà, all’ambiente o di perdite economiche.
CAUTELA
Indica che è necessario prestare attenzione al fine di non incorrere in serie conseguenze che
potrebbero portare al danneggiamento di beni materiali quali le risorse o il prodotto
INFORMAZIONI
Indicazioni di particolare importanza.
I disegni sono forniti a scopo esemplificativo. Anche se la macchina in vostro possesso si differenzia sensibilmente dalle
illustrazioni contenute in questo manuale la sicurezza e le informazioni sulla stessa sono garantite.
Il costruttore, nel perseguire una politica di costante sviluppo ed aggiornamento del prodotto, può apportare modifiche
senza preavviso.
- 12 -
I
GENERATORS
1.2 Documentazione allegata
Parte integrante del presente manuale è la seguente
documentazione:
- Dichiarazione CEE di conformità;
- Manuale uso e manutenzione del motore;
- Libretto SERVICE;
- Certificato di garanzia;
- Cartolina di garanzia.
1.3 Identificazione della macchina
Vedere FIG.1
1 - Codice macchina
2 - Fattore di potenza
3 - Frequenza dichiarata
4 - Potenza continua
5 - Tensione nominale
6 - Corrente
7- Numero di serie
Vedere FIG. 2
1 - Panello strumenti
2 - Portellone di accesso al motore
3 - Bocchettone rifornimento carburante
4 - Griglie aspirazione aria di raffreddamento
5 - Griglia scarico aria di raffreddamento
6 - Tubo scarico fumi di combustione
I dati che identificano il nro di codice della macchina, il nro
di matricola e l’anno di costruzione devono essere sempre
precisati al costruttore per informazioni, richieste di ricambi, ecc.
1.4 Descrizione della macchina
FIG. 4 Legenda
1 - Modulo protezioni motore
2 - Voltmetro
3 - Frequenzimetro
4 - Amperometro
5 - Contaore
6 - Commutatore voltometrico
7 - Chiave di accensione
8 - Interruttore magnetotermico differenziale
9 - Interruttore magnetotermico
10 - Presa monofase 32 A 2p + t
11 - Presa trifase 32 A 4 p+ n + t
12 - Pulsante di arresto di emergenza
13 - Morsetto per collegamento a terra
14 - Connettore allacciamento quadro automatico
- 13 -
MPL SX - CX
Il gruppi elettrogeni della serie MPL-SX e CX (10 - 15 - 20
- 40 - 65) sono stati progettati per impiego in campo
industriale utilizzando motorizzazioni di alta affidabilità
del tipo diesel a 1500 giri, raffreddamento ad aria.
Particolare attenzione è stata posta al grado di protezione, da agenti esterni; alla salvaguardia del motore, tutela
delle parti elettriche da sovraccarichi o sovratemperature
con sistemi automatici in grado di arrestare il gruppo in
caso di anomalie di funzionamento.
I gruppi della serie MPL - SX e CX risultano essere
particolarmente silenziosi grazie ad una cabina
insonorizzante, internamente coibentata e ad un sistema
avanzato d'insonorizzazione dello scarico dei fumi di
combustione.
Gli alternatori impiegati sono del tipo sincrono
autoeccitato autoregolati, in grado di erogare correnti di
spunto estremamente elevate con stabilità di tensione
inferiore al 5%.
I
GENERATORS
MPL SX - CX
2. CARATTERISTICHE
2.1
Caratteristiche tecniche
MODELLO
GENERATORE
Tipo
Potenza cont.
Tensione
Frequenza
Corrente
Cos φ
Grado di protezione
10 SX - CX
VA
V
Hz
A
IP
MOTORE
Tipo
Modello
Cilindri
n.
Alimentazione
Potenza
KW
Cilindrata
cm³
Aspirazione
Giri / m
Capacità serbatoio l.
Consumo orario
Impianto elettrico
Dimen. (LxLxA)
Peso
VA
V
Hz
A
IP
MOTORE
Tipo
Modello
Cilindri
n.
Alimentazione
Potenza
KW
Cilindrata
cm³
Aspirazione
Giri / m
Capacità serbatoio l.
Consumo orario
Impianto elettrico
Dimen. (LxLxA)
Peso
15 SX-CX (SAME)
20 SX - CX (VM)
sincrono, 3 ~ fasi.
15000
400
50
21,6
0,8
23
sincrono, 3 ~ fasi.
15000
400
50
21,6
0,8
23
sincrono, 3 ~ fasi.
20000
400
50
28,8
0,8
23
VM
SUN 2105
2
Diesel
20,6
1992
Atmosferica
1500
72
SAME
1052 LP
2
Diesel
19,9
2078
Atmosferica
1500
72
VM
SUN 2105
2
Diesel
20,6
1992
Atmosferica
1500
72
4,5
12
2000x900x1500
800
4,9
12
2000x900x1500
800
5
12
2000x900x1500
800
20 SX-CX (SAME)
40 SX-CX (VM)
65 SX-CX (VM)
sincrono, 3 ~ fasi.
19000
400
50
27,5
0,8
23
sincrono, 3 ~ fasi.
40000
400
50
57,8
0,8
23
sincrono, 3 ~ fasi.
50000
400
50
72,2
0,8
23
SAME
1052 LP
2
Diesel
19,9
2078
Atmosferica
1500
72
SAME
10003.A
3
Diesel
31,6
3000
Atmosferica
1500
96
VM
SUN 4105T
4
Diesel
56,6
3980
Compressore
1500
96
4,9
12
2000x900x1500
800
6,7
12
2850x900x1755
920
11,6
12
2850x900x1755
1200
sincrono, 3 ~ fasi.
10000
400
50
14,4
0,8
23
LOMBARDINI
9 LD 625/2
2
Diesel
10,9
1248
Atmosferica
1500
72
l/h
3,5
V
12
mm 2000x900x1500
Kg
800
MODELLO
GENERATORE
Tipo
Potenza cont.
Tensione
Frequenza
Corrente
Cos φ
Grado di protezione
15 SX-CX (VM)
l/h
V
mm
Kg
- 14 -
MPL SX - CX
I
GENERATORS
3. NORME DI SICUREZZA
3.1 Precauzioni
Leggere attentamente i Manuali delle istruzioni per l’uso
e la manutenzione prima di procedere alle operazioni di
avviamento e impiego.
Il Costruttore declina ogni responsabilità per danni a
persone o cose, conseguenti l’inosservanza delle norme
di sicurezza.
Esaminare attentamente le targhe segnaletiche di sicurezza applicate sulla macchina e rispettarne le indicazioni in esse contenute
attenzione alla sezione del cavo da utilizzare. Per il
collegamento del cavo di terra utilizzare l'apposito morsetto posto sul pannello prese (Fig. 4 Rif. 11). Per il
collegamento a terra, seguire le indicazioni della tabella
per la scelta della sezione del cavo da utilizzare in
funzione della potenza del gruppo.
Potenza KVA 10÷20 20÷40 40÷60
Sezione mm² 10
20
30
60÷80 80÷100
40
50
- Non consentire l’uso del gruppo elettrogeno a persone
non competenti o senza una adeguata istruzione.
- Non consentire a bambini o animali di avvicinarsi al
gruppo elettrogeno in funzione.
- Non accedere al generatore con mani bagnate essendo
il generatore una potenziale fonte di shock elettrici se
mal utilizzato.
- Eventuali controlli su gruppo elettrogeno vanno eseguiti
a motore spento; controlli con il gruppo in funzione
vanno effettuati solo da personale specializzato.
PERICOLO
Prima di eseguire operazioni di controllo o manutenzione sul gruppo elettrogeno collegato al quadro
automatico di avviamento è obbligatorio settare la
funzione BLOCCO o sconnetterlo staccando il connettore di collegamento
- I gas di scarico contengono monossido di carbonio ed
altri residui nocivi: non far mai funzionare il gruppo in
ambienti non adeguatamente aerati.
- Non far funzionare il gruppo in vicinanza di luoghi con
pericolo di esplosione o incendio.
- Il rifornimento del carburante va eseguito esclusivamente
a motore spento.
- Il collegamento a terra del gruppo va eseguito utilizzando
cavo di rame di sezione adeguata.
ATTENZIONE
Nell’utilizzo del generatore occorre tener presente
che nei luoghi bagnati o molto umidi e nei luoghi
conduttori ristretti esiste l’obbligo del rispetto degli
articoli 313 e 318 del D.P.R. 27/04/55 NR.547, nonché’
del CAP. 11 SEZ. IV della norma C.E.I. 64-8.
3.2 Collegamento del gruppo a terra
Per la sicurezza degli utilizzatori il collegamento a terra
del gruppo va sempre eseguito prestando particolare
- 15 -
4. UTILIZZO DEL GENERATORE
4.1 Controlli preliminari
Al primo avviamento del gruppo, dopo aver eseguito un
qualsiasi intervento di manutenzione, è buona norma
accertarsi sempre:
- che l’olio sia a livello tramite l’astina vedi tabella olii
consigliati.
- Che tutte le utenze elettriche siano disinserite per non
avviare il gruppo sotto carico.
- Che le tubazioni del combustibile siano integre e
correttamente collegate.
- Che non vi siano connessioni elettriche in cattivo stato.
4.2 Avviamento
Verificare, prima di procedere all’avviamento del gruppo
elettrogeno, che tutte le utenze siano disinserite, evitando
in tal modo di mettere sotto sforzo il motore ancora freddo.
Procedere all’avviamento ruotando in senso orario la
chiave dello START (fig. 4 rif. 7) di uno scatto. Si noterà
l’accensione di tutti i LED in funzione di autocontrollo per
circa 2 sec, in seguito rimarrà acceso il LED di ricarica
batteria (fig. 4 rif. 18) e il LED di bassa pressione olio
(fig. 4 rif. 16).
Avviare il gruppo ruotando completamente la chiave di
accensione in senso orario e rilasciare solo ad avviamento
avvenuto badando a non superare, in ogni caso, più di 5
sec. ad ogni tentativo.
Tutte le protezioni verranno attivate dopo 15" dall'avviamento del gruppo, ed in caso di anomalie di funzionamento, il gruppo verrà arrestato e segnalata l'anomalia con
l'accensione della relativa spia.
Prima di alimentare gli utilizzi è bene lasciar funzionare,
senza carico applicato, il motore per almeno cinque
minuti permettendo ad esso di raggiungere progressivamente la temperatura di lavoro. Tale accorgimento, garantirà una maggiore durata del motore ed eliminerà il rischio
di grippaggi.
GENERATORS
I
4.3 Arresto
MPL SX - CX
Funzione Manuale (simboleggiata dalla mano)
Questa funzione consente di avviare manualmente il
gruppo elettrogeno, tramite il pulsante di start posto sul
quadro automatico, indipendentemente dalla presenza o
meno della tensione di rete. Nel caso in cui sia presente
la tensione di rete, anche con gruppo elettrogeno avviato
manualmente, gli utilizzi saranno sempre alimentati dalla
tensione di rete.
Qualora la tensione di rete venisse a mancare, con la
funzione Manuale settata e il gruppo elettrogeno avviato,
il quadro automatico eseguirà lo scambio della linea
alimentando gli utilizzi tramite il gruppo elettrogeno.
Il gruppo si arresta ruotando completamente in senso
antiorario la chiave di accensione (fig. 4 rif. 7)
Prima di arrestare il gruppo, si consiglia di farlo funzionare, per alcuni minuti, senza carichi inseriti permettendo,
in tal modo, di ridurre le temperature interne del motore e
dell’alternatore.
4.4 Collegamento al quadro automatico
I gruppi della serie SX e CX sono predisposti per essere
collegati ad un quadro di controllo automatico in grado di
avviare automaticamente il gruppo elettrogeno ed eseguire la commutazione di linea al mancare della tensione di
rete ed eseguire l'operazione inversa quando la tensione
di rete è nuovamente disponibile.
Inoltre il quadro automatico provvederà a mantenere
carica la batteria di avviamento del gruppo elettrogeno
anche quando questo sarà spento.
Il collegamento del quadro automatico al gruppo avviene
tramite un connettore a 6 poli presente sul cruscotto del
gruppo (fig. 4 rif. 14) e una spina per il prelievo della
corrente da inserire nella presa posta sul cruscotto del
gruppo elettrogeno (fig. 4 rif. 11).
Funzione Test
Col settaggio di questa funzione, il quadro automatico
esegue un ciclo di avviamento in automatico del gruppo
elettrogeno, al fine di verificarne la funzionalità. Si consiglia di eseguire questo test almeno una volta alla settimana.
Funzione Blocco (simboleggiata dal lucchetto)
Il settaggio di questa funzione inibisce l'avviamento del
gruppo elettrogeno dal quadro automatico.
CAUTELA
Settare questa funzione quando si operano interventi
di manutenzione o riparazione sul gruppo elettrogeno, per impedirne l'avviamento dello stesso, nel caso
dovesse mancare la tensione di rete.
ATTENZIONE
Col quadro automatico collegato al gruppo elettrogeno la chiave di accensione, posta sul cruscotto, deve
restare nella posizione OFF .
Sul quadro automatico è presente
- un selettore per la selezione della funzione desiderata
( MANUALE, AUTOMATICA, BLOCCO, TEST);
- quattro spie ad indicare lo stato dei contattori;
- quattro spie di funzionamento e allarme;
- due pulsanti per l'avviamento e l'arresto.
5. PROTEZIONI
I gruppi sono dotati di una serie di protezioni che li
salvaguardano da un utilizzo non corretto e da inconvenienti che ne possono pregiudicare l'integrità.
Esse sono:
Funzione automatico
Se il selettore della funzione è posizionato in AUT, il
quadro automatico avvierà il gruppo al mancare della
tensione di rete. Se il gruppo non si avvia, il quadro
eseguirà ulteriori tentativi di avviamento, fino ad massimo
di 4, dopo i quali si accenderà una spia ad indicare il
mancato avviamento.
- Protezione bassa pressione olio
Interviene spegnendo il gruppo quando la pressione nel
circuito di lubrificazione è insufficiente; il suo intervento è
segnalato dall’accensione del LED (fig. 4 rif. 16)
E’ generalmente sufficiente reintegrare la quantità di olio
mancante per poter riavviare il gruppo.
ATTENZIONE
Prima di settare la funzione AUT è indispensabile
premere il pulsante STOP posto sul quadro automatico o settare la funzione di Blocco per alcuni istanti.
Questa operazione è necessaria perché, dopo 10
secondi che il quadro automatico si trova in funzione
MANUALE, senza che sia stato eseguito l'avviamento
tramite il pulsante di START, si attivano le protezioni
che impediranno l'avviamento del gruppo.
- 16 -
MPL SX - CX
I
GENERATORS
ATTENZIONE
ATTENZIONE
La protezione bassa pressione olio non da un’indicazione sul livello dell’olio. Un controllo periodico
del livello olio è indispensabile al fine di evitare danni
al motore.
- Protezione alta temperatura motore
Controllare il livello dell’olio tramite l’apposita astina
graduata . (fig. 2 rif. 3)
Il livello dell’olio deve sempre essere compreso tra le
tacche di MAX e MIN incise sull’astina.
6.2 Cambio olio motore
Interviene spegnendo il gruppo qualora la temperatura di
funzionamento del motore sia troppo elevata.
Il suo intervento è segnalato dall’accensione del LED (fig.
4 rif. 19)
Il gruppo deve essere riavviato solo dopo aver individuato
ed eliminato la causa dell’intervento.
- Protezione da cortocircuito e sovraccarico
Per una protezione da cortocircuiti e sovraccarichi, i
gruppi sono stati dotati di interruttori magnetotermici e
interruttori differenziali, i quali intervengono, interrompendo l'erogazione della corrente, qualora si dovesse verificare una condizione di sovraccarico all'alternatore o un
cortocircuito.
Prima di ripristinare l'erogazione della corrente, riportando
la leva del magnetotermico in posizione 'ON' (fig. 4 rif. 8
- 9) è necessario rimuovere la causa che ne ha provocato
l'intervento.
Sono utilizzati per questo scopo:
- Un 'interruttore magnetotermico differenziale generale,
che ha il compito d' interrompere l'erogazione della
corrente a tutte le prese in caso di cortocircuito,
sovraccarico e dispersione di corrente verso terra. (fig.
4 rif. 8)
- Interruttori magnetotermici di protezione alle prese di
bassa potenza, in grado di interrompere il circuito,
qualora venga prelevata una corrente superiore a quella
nominale dalla presa stessa.
6. MANUTENZIONE
Utilizzare olio AKROS TURBO 15 W 40
I rabbocchi e i caricamenti vanno eseguiti attraverso il foro
indicato alla fig. 3 rif. 4.
Per informazioni dettagliate al riguardo consultare il manuale uso e manutenzione del motore che accompagna
la macchina.
Per la sostituire dell’olio motore è necessario prima
rimuovere la portina di chiusura inferiore della cassa
insonorizzante, togliere il tappo posto sulla coppa olio e
lasciarlo defluire dopo aver posto un contenitore di raccolta sotto il telaio.
Si consiglia di eseguire lo svuotamento con olio ancora
sufficientemente caldo in modo da consentire un agevole
deflusso.
ATTENZIONE
Non disperdere nell'ambiente l'olio esausto in quanto
prodotto inquinante.
Consegnare l'olio lubrificante esausto presso gli appositi Centri di Raccolta incaricati dello smaltimento.
6.3 Disareazione impianto
La presenza di bolle d’aria all’interno dell’impianto di
alimentazione è la causa del funzionamento irregolare del
motore o l’incapacità di raggiungere il numero di giri
nominale. L’aria può penetrare all’interno del circuito di
alimentazione attraverso una giunzione non perfettamente a tenuta (tubazione, filtri, serbatoio) o quando il
carburante all’interno del serbatoio è al livello minimo. Per
eliminare le bolle d’aria all’interno del circuito di alimentazione è necessario, prima di tutto, rimuovere la causa che
ne ha permesso l’entrata ed eseguire le seguenti operazioni:
CAUTELA
Qualsiasi intervento di manutenzione al gruppo elettrogeno va eseguito da personale autorizzato, effettuato a motore spento e dopo averlo lasciato raffreddare a sufficienza.
6.1 Manutenzione ordinaria del motore
Gli interventi periodici, da effettuare sul motore, sono
riportati sulla tabella: per informazioni più dettagliate
consultare il manuale fornito dal costruttore del motore,
allegato ad ogni gruppo.
- 17 -
1- Allentare le viti di sfiato poste sul filtro carburante e sulla
pompa di iniezione (vedere libretto uso e manutenzione
del motore).
2- Agire manualmente sulla leva della pompa carburante
AC fino a quando dalle viti di sfiato non è fuoriuscita tutta
l’aria contenuta all’interno dell’impianto di alimentazione.
(fig.3 rif. 5)
4- Riserrare le viti di sfiato ed avviare il motore.
5- Ripetere le operazioni sopra descritte se il funzionamento
del motore non risultasse ancora regolare.
GENERATORS
I
MPL SX - CX
6.7 Tavola interventi programmati
INFORMAZIONI
Fare riferimento al libretto uso e manutenzione del
motore per maggiori dettagli sull’impianto di alimentazione.
6.4 Pulizia filtro aria
Per un corretto funzionamento, ed una lunga durata del
motore, è importante pulire o sostituire periodicamente
la cartuccia del filtro aria. Un filtro non efficiente può essere
la causa di perdita di potenza del motore e di eccessiva
fumosità allo scarico.
Per sostituire la cartuccia del filtro aria eseguire le seguenti
operazioni:
- rimuovere il coperchio in plastica del filtro aria dopo aver
svitando completamente le viti di fissaggio.
- sostituire la cartuccia del filtro riposizionando correttamente la nuova;
- rimontare il coperchio riavvitando correttamente le viti di
serraggio.
OPERAZIONE
ORE
Controllo livello olio in coppa
Controllo tensione cinghia
Pulizia filtro aria
Sostutuzione olio carter
Verifica livello elettrolito e stato carica batter.
Sostituzione filtro combustibile
Sostituzione filtro olio
Sostituzione cinghia alternatore
Registro gioco bilancieri
Controllo iniettori
Taratura e pulizia iniettori
Controllo spazzole alternatore
Revisione parziale
Revisione generale
10
50
100
150
150
300
300
500
600
600
600
1200
2500
5000
6.8 Tavola guasti
Il motorino di avviamento gira ma il motore principale
non si avvia.
ATTENZIONE
Cambiare l'olio e pulire la cartuccia del filtro aria ogni
100 ore di funzionamento.
Ridurre gli intervalli se il gruppo elettrogeno lavora in
ambienti particolarmente polverosi.
- Verificare la presenza di carburante all’interno del serbatoio. (Rifornire)
- Verificare se l’elettrovalvola di stop è alimentata. (Consultare Centro Assistenza)
- Verificare il funzionamento della pompa carburante .
(Consultare Centro Assistenza)
6.5 Pulizia griglie di aspirazione
Il pannello di controllo non si attiva ruotando la chiave
di accensione
Controllare periodicamente la pulizia delle griglie di aspirazione e scarico aria di raffreddamento (fig.2 rif.4-5). e le
alette di raffreddamento dei cilindri.
Queste devono restare libere da elementi che ostruiscono
il regolare flusso dell'aria di raffreddamento (foglie, carta,
stracci, ecc.)
- Controllare l’integrità dei fusibili di protezione (Sostituire)
- Controllare il cavo di collegamento e le connessioni
elettriche. (Ricollegare)
- Controllare l’integrità della batteria. (Ricaricare o sostituire)
6.6 Periodo di inattività
Il gruppo si spegne durante il periodo di lavoro.
Se il gruppo deve rimanere inutilizzato per un lungo periodo
è necessario eseguire le seguenti operazioni:
- sostituire l’olio del carter motore
- sostituire il filtro combustibile
- Togliere l’iniettore e immettere alcune gocce di olio
all’interno della camera di combustione ed eseguire
manualmente un paio di rotazioni dell’albero motore;
rimontare l’iniettore e chiudere l’aspirazione e lo scarico.
- Verificare se è stata attivata una protezione con l’accensione della relativa spia. (Rimuoverne la causa e ritentare
l’avviamento)
- Controllare la presenza di carburante nel serbatoio.
(Ripristinare il livello)
Il motore funziona in maniera irregolare.
- Controllare i filtri del carburante. (Sostituire)
- Controllare il funzionamento della pompa carburante
(Sostituire)
- Controllare la taratura degli iniettori. (Consultare un Centro
Assistenza Autorizzato)
- 18 -
UK
GENERATORS
CONTENTS
FAILURE TO ADHERE TO THE INSTRUCTIONS AND
SPECIFICATIONS CONTAINED IN THIS INSTALLATION
MANUAL WILL INVALIDATE THE PRODUCT GUARANTEE.
1.
1.1
1.2
1.3
1.4
GENERALINFORMATION ............................... 20
Scope of the manual .......................................... 20
Attached documentation ................................... 21
Manufacturer-machine identification .............. 21
Machine description ........................................... 21
2.
2.1
SPECIFICATIONS ........................................ 22
Technical specification .................................. 22
3.
3.1
3.2
SAFETY REGULATIONS .................................. 23
Precautions ......................................................... 23
Earthing the generator ....................................... 23
4.
4.1
4.2
4.3
4.4
USING THE GENERATOR ................................ 23
Preliminary checks ............................................ 23
Start-up ................................................................ 23
Stop ...................................................................... 23
Hook up to the automatic control panel ......... 23
5.
CUTOUTS .......................................................... 24
6.
6.1
6.2
6.3
6.4
6.5
6.6
6.7
6.8
MAINTENANCE .................................................. 25
Normal maintenance .......................................... 25
Motor oil change ................................................. 25
Deaeration of fuel system .................................. 25
Replacement of air filter ..................................... 25
Topping up the coolant ...................................... 25
Period of inactivity .............................................. 25
Table of scheduled operations .......................... 26
Troubleshooting .................................................. 26
Wiring diagram list ..................................................... 26
- 19 -
MPL SX - CX
UK
GENERATORS
MPL SX - CX
1 GENERAL INFORMATION
Read this manually carefully before using the machine.
1.1 Scope of the manual
Thank you for having chosen a MASE product.
This manual was prepared by the Manufacturer and is an integral part of the components supplied with the machine.
This information has been prepared for users and the personnel assigned to perform maintenance on such equipment.
The manual defines the scope for which the machine was built and contains all the information needed to ensure safe
and correct use.
Strict compliance with these instructions will guarantee the safety of persons and the machine and will ensure
economic operation and extended machine service life.
This manual has been divided into sections which identify the main concepts. Consult the table of contents for a quick
guide to the various subjects.
The most important parts of the text are indicated in bold and are preceded by the symbols illustrated and described
below.
DANGER
This indicates that operators must be very careful to avoid serious consequences which might lead to the death of
personnel or create possible health hazards.
WARNING
A situation that might occur during the useful life of the product, system or plant which is considered at risk in terms
of injury to persons or damage to property and the environment or economic losses.
CAUTION
This indicates that careful attention is needed to avoid serious consequences that might damage material goods such
as resources or the product.
INFORMATION
Particularly important instructions.
The drawings are supplied for the sake of examples. Even if your machine differs greatly from the illustrations included
in this manual, machine safety and information are still guaranteed.
Since the manufacturer is constantly developing and updating the product, changes may be made without prior
notice.
- 20 -
GENERATORS
UK
1.2 Attached documentation
The generating units in this series MPL-SX and CX (10 15 - 20 - 40 - 65) have been designed for industrial use and
are driven by highly reliable, 1500 r.p.m. air-cooled diesel
engines. Special attention has been paid to: the degree of
protection against foreign bodies; safeguarding the engine; protecting the electrical components from surges or
excessively high temperatures. This is achieved through
an automatic system able to shut down the unit if any
malfunction arises. The MPL - SX and CX units are
particularly silent thanks to a fully insulated, soundproofed cabin and to an advanced system for soundproofing the exhaust discharge of combustion fumes
Synchronous, self-exciting, self-regulating alternators are
employed which can provide extremely high peak currents with a voltage stability of less than 5%.
The following documentation is an integral part of this
manual:
- EEC conformity declaration;
- Engine operation and maintenance manual;
- Exploded view of spare parts;
- SERVICE handbook;
- Warranty certificate;
- Warranty card.
1.3 Manufacturer-machine identification
See FIG. 1
1 - Machine code
2 - Power factor
3 - Rated frequency
4 - Continuous output
5 - Nominal voltage
6 - Power supply
7 - Series number
See FIG. 2
1 - Instrument panel
2 - Engine access hatch
3 - Fuel tank opening
4 - Cooling air intake grid
5 - Cooling air discharge grid
6 - Exhaust fume discharge pipe
Every request for information, spare parts, etc. must
bear the machine identification data, machine number
and year of manufacture.
1.4 Description of the machine
FIG. 4 Key
12345678910 11 12 13 14 -
MPL SX - CX
Engine protection module
Voltmeter
Frequency meter
Ammeter
Counter
Voltmeter transformer
Ignition key
Magnetothermic differential switch
Magnetothermic switch
Single-phase outlet 32 A 2p + t
Three-phase outlet 32 A 4p + n + t
Emergency shut-off switch
Terminal for ground connection
Connector for hook up to the automatic control
panel
- 21 -
UK
GENERATORS
MPL SX - CX
2 SPECIFICATIONS
2.1
Technical specifications
MODEL
GENERATOR
Type
Power
Voltage
Frequency
Current
Power factor
Degree of protec.
ENGINE
Type
Model
No. of cylinders
Fuel
Power supply
Displacement
Intake
r.p.m.
Tank capacity
10 SX - CX
VA
V
Hz
A
Cos φ
IP
KW
cm³
l.
Hourly consumption l/h
Electrical system volt
Size (LxWxH)
mm
Weight
Kg
MODEL
15 SX-CX (VM)
15 SX-CX (SAME)
synchronous - 3 ph. synchronous - 3 ph. synchronous - 3 ph.
10000
15000
15000
400
400
400
50
50
50
14.4
21.6
21.6
0.8
0.8
0.8
23
23
23
KW
cm³
l.
Hourly consumption l/h
Electrical system volt
Size (LxWxH)
mm
Weight
Kg
synchronous - 3 ph.
20000
400
50
28.8
0.8
23
LOMBARDINI
9 LD 625/2
2
Diesel
10.9
1248
Atmospheric
1500
72
VM
SUN 2105
2
Diesel
20.6
1992
Atmospheric
1500
72
SAME
1052 LP
2
Diesel
19.9
2078
Atmospheric
1500
72
WM
SUN 2105
2
Diesel
20.6
1992
Atmospheric
1500
72
3.5
12
2000x900x1500
800
4.5
12
2000x900x1500
800
4.9
12
2000x900x1500
800
5.0
12
2000x900x1500
800
20 SX-CX (SAME)
40 SX-CX (VM)
65 SX-CX (VM)
GENERATOR
Type
synchronous - 3 ph. synchronous - 3 ph. synchronous - 3 ph.
Power
VA
19000
40000
50000
Voltage
V
400
400
400
Frequency
Hz
50
50
50
Current
A
27.45
57.8
72.2
Power factor
Cos φ
0.8
0.8
0.8
Degree of protec. IP
23
23
23
ENGINE
Tipe
Model
No. of cylinders
Fuel
Power supply
Displacement
Intake
r.p.m.
Tank capacity
20 SX - CX (VM)
SAME
1052 LP
2
Diesel
19.9
2078
Atmospheric
1500
72
SAME
10003.A
3
Diesel
31.6
3000
Atmospheric
1500
96
VM
SUN 4105T
4
Diesel
56.6
3980
Compressor
1500
96
4.9
12
2000x900x1500
800
6.7
12
2850x900x1755
920
11.6
12
2850x900x1755
1200
- 22 -
MPL SX - CX
UK
GENERATORS
tions to be used; these depend on the power rating of the
generator.
3 SAFETY REGULATIONS
3.1 Precautions
Power
Carefully read the Instruction and Maintenance Manuals
before starting up and using the machine.
Section mm² 10
The manufacturer declines any responsibility for damages to persons or things stemming from noncompliance
with the safety standards.
Carefully examine the safety panels applied to the machine and follow their contents to the letter.
-
Do not allow unqualified or inadequately trained personnel to use the generator.
-
Keep children or animals away from the generator
when it is running.
-
Do not approach the generator with wet hands as it is
a potential source of electrical shock if improperly used.
-
Do not perform any operations on the generator unless
the motor is off; tests which require the motor to be
running must only be performed by specialized personnel.
DANGER
When the generator is connected to an automatic
start-up panel, before any tests or maintenance can be
performed, it must be locked out - by selecting the
BLOCK function - or disconnected - by disengaging
the connector.
- The exhaust fumes contain carbon monoxide and other
harmful substances; never run the unit in an inadequately ventilated area.
- Do not run the unit in the vicinity of areas where there is
the risk of explosion or fire.
- Refuelling must only be performed when the engine is off.
- The unit is grounded using an adequate diameter copper
cable.
KVA 10÷20 20÷40 40÷60 60÷80 80÷100
20
30
40
50
4 USING THE GENERATOR
4.1 Preliminary checks
The first time the unit is started up after maintenance, a
good rule of thumb is always to make certain that:
- the oil is at the required level. This is done using the dip
stick: see table for the suggested oils.
- the electrical devices are off so that the generator will not
start up under a load.
- the fuel pipes are in good condition and properly
connected.
- no electrical connections are in poor condition.
4.2 Start-up
Before starting up the generator, make certain that all
devices are off so as to prevent forcing the engine when it
is cold. Proceed with start-up by rotating the START key
(fig. 4 ref. 7) clockwise one click. All the LEDs will light up
for approximately 2 seconds as the self-check is performed. The battery recharge LED (fig. 4 ref. 18) and the
low oil pressure LED (fig. 4 ref. 16) will then remain on.
Start up the unit by turning the ignition key clockwise all
the way; only release it when the engine has cut in.
However, in no case should the key be held down for more
than 5 seconds in an attempt to start up the engine.
All protections cut in 15 sec. after the unit is started up
and, in case of malfunction, the unit will shut down and a
warning light will go on indicating the malfunction.
Before turning on any of the devices, leave the engine
running without any load for at least five minutes. This will
allow it to reach operating temperature gradually thus
ensuring maximum engine life and preventing seizing.
4.3 Shut down
PRECAUTION
When using the generator, bear in mind that in wet or
very damp places and in confined, conductive spaces
the following regulations must be complied with:
Chap. 11, sect. IV of CEI regulation 64-8.
3.2 Grounding the unit
For user safety the unit must always be grounded paying
particular attention to the section of the cable used.
Connect the ground cable with the special terminal
located on the outlet panel (Fig. 5 Ref. 13). Make ground
connections following the table indicating the cable sec-
- 23 -
The unit is shut down by turning the ignition key
(fig. 4 ref. 7) all the way counter-clockwise.
Before shutting down the unit, it is advisable to let it run
for a few minutes without any load thus lowering the
temperature inside the engine and the alternator.
4.4 Hook up to the automatic control panel
The series SX and CX units are prepared for connection to
an automatic control panel able to automatically start up
the generator, to switch lines when line power cuts out and
switch back when the line voltage is returned.
GENERATORS
UK
In addition, the automatic control panel maintains the
charge in the generator start-up battery, even when the
generator is off.
MPL SX - CX
Block function (padlock)
Selecting this function prevents the generator from being
started up by the automatic control panel.
DANGER
The unit is hooked up to the automatic control panel
through the 6-pin connector found on the unit instrument
panel (fig. 4 ref. 14) and a power supply plug inserted in the
outlet located on the generator instrument panel (fig. 4 ref.
11).
Select this function whenever maintenance or repairs
are being performed on the unit. This will prevent the
generator from being accidentally started up in case
the line power cuts out.
ATTENTION
When the generator is connected to the automatic
control panel the ignition key located in the instrument panel must remain in the OFF position.
5 PROTECTIONS
The automatic control panel has the following parts:
- a function selector (MANUAL, AUTOMATIC, BLOCK,
TEST);
- four warning lights indicating the status of the contactors;
- four operating warning lights and alarms;
- two buttons, one for start up and one for shut down.
The units are equipped with a series of protections to
safeguard them from improper use and from failures which
could compromise their function. These protect against:
- Low oil pressure
Automatic operation
If the function selector is in the AUT position, the automatic control panel will start up the unit whenever the line
voltage cuts out. If the unit is not on, the panel will make
a maximum of 4 attempts to turn it on. If these prove
unsuccessful, a warning light will go on indicating that
start up has failed.
This cuts in, turning off the unit, whenever there is
inadequate pressure in the lubrication circuit; when it cuts
in a LED (fig. 4 ref. 16) goes on.
In this case, adding additional oil is usually enough to start
up the unit once more.
ATTENTION
ATTENTION
The low oil pressure protection does not provide any
indication as to the oil level. To prevent damaging the
engine, it is essential to check the oil level periodically.
Before setting the AUT function, it is essential to press
the STOP button located on the automatic control
panel or set the BLOCK function for a few instants.
This operation is required because, after the automatic control panel has been operating in MANUAL
for 10 seconds, if the start-up is not performed by
pressing the START button, the protections will cut in
preventing start up.
- High engine temperature
This protection cuts in, turning off the unit whenever the
engine operating temperature is too high. When activated
a LED (fig. 4 ref. 19) goes on.
In this case, the unit can only be started up again after the
cause has been identified and eliminated.
Manual operation (hand)
This function makes it possible to start up the generator
manually whether there is voltage from the mains or not.
This is done using the START button located on the
automatic control panel. If the mains are powered, the
equipment will, in any case, be powered from the mains
even when the generator is on.
- Short circuits and overloads
To protect against short circuits and overloads, the unit is
equipped with magnetothermic and differential breakers
which cut off the power supply when the alternator is
overloaded or there is a short circuit.
Before powering the unit again by flipping the magnetothermic breaker levers (fig. 4 ref. 8-9) back to the ON
position, the problem which caused it to trip must be
removed.
For this purpose the following breakers are used:
- the general differential magnetothermic circuit breaker:
in the case of short circuit, overload and current leakage
to ground, this cuts off the power supply to all outlets (fig.
4 ref. 8).
When Manual function has been selected and the generator is on, should the line power cut out, the automatic
control panel will switch the power supply line so that the
equipment is powered by the generator.
Test function
Setting the unit to this function, the automatic control
panel will perform an automatic start-up cycle in order to
check generator function. It is advisable to perform this
test at least once a week.
- 24 -
MPL SX - CX
UK
GENERATORS
- Magnetothermic circuit breakers to the low voltage
outlets; these break the circuit whenever the voltage at a
given outlet is higher than the nominal voltage for that
particular outlet.
6 MAINTENANCE
PRECAUTION
All maintenance operations on the generator must be
performed by authorized personnel. Maintenance
must be performed after the engine has been turned
off and has cooled down sufficiently.
6.1 Ordinary engine maintenance
first place. The following operations must then be performed:
1 - Turn the ignition key clockwise one click so that the
shut-off solenoid valve is opened.
2 - Loosen the vent screws located on the fuel filter and
on the injection pump (see the engine use and
maintenance manual).
3 - Manually manipulate the AC fuel pump lever until the
all the air in the system has been eliminated through
the vent screws (fig. 3 ref. 5).
4 - Tighten the vent screws once more and start up the
engine.
5 - Repeat the above operations if the engine is still not
functioning properly.
INFORMATIONS
The periodic maintenance required for the engine is
reported in the table. For more detailed information, see
the manual supplied by the engine manufacturer and
attached supplied with the generator.
ATTENTION
Check the oil level using the special, graduated dip
stick (fig. 2 ref. 3).
The oil level must always be between the MAX and
MIN level notches on the stick.
6.2 Changing the engine oil
Use AKROS TURBO 15 W 40 oil
The oil tank is filled and topped up through the hole
indicated in fig. 3 ref. 4.
For more detailed information, see the engine use and
maintenance manual provided with the machine.
To change the engine oil, first remove the lower hatch
closing the soundproofing case. Then withdraw the cap
located on the oil sump and drain it into a container placed
under the body.
It is advisable to drain the oil when it is still sufficiently
warm as it will flow more easily.
ATTENTION
Do not disperse spent oil in the environment as it
causes pollution.
Deliver spent lubricating oil to special Collection
Centres which handle disposal.
6.3 Venting the system
The presence of air bubbles in the fuel system can cause
the engine to run irregularly or prevent it from reaching its
nominal r.p.m. Air can penetrate the fuel circuit through
imperfectly sealed joints (i.e. piping, filters, tanks) or
when the level of fuel in the tank is at a minimum. To
eliminate air bubbles from the fuel circuit one must first
eliminate the failure which allowed the air to enter in the
- 25 -
Consult the engine use and maintenance manual for
further details on the fuel system.
6.4 Replacing the air filter
To ensure proper functioning and long engine life it is
important to clean and periodically replace the air filter
cartridge. An inefficient filter can cause loss of engine
power and can give rise to excessively smoky exhaust.
To replace the air filter cartridge operate as follows:
- Remove the plastic lid from the air filter after having
removed the securing screws;
- Remove the filter cartridge and insert a new one
positioning it carefully;
- Replace the lid and tighten it with the securing screws.
ATTENTION
Clean the air filter cartridge every 200 hours of operation.
Shorten this interval if the generator is operated in a
particularly dusty environment.
Replace the cartridge when it is excessively fouled or
damaged.
6.5 Cleaning the air intake grids
Periodically check the cooling air intake and discharge
grids (fig. 2 ref. 4-5) and the cylinder cooling fins for fouling.
These must be free of any foreign bodies which could
obstruct the flow of cooling air (i.e. leaves, paper, rags,
etc.).
6.6 Periods of inactivity
If the unit will not be used for a long period of time, the
following operations must be performed:
- replace the engine oil sump;
- replace the fuel filter;
- remove the injector, insert a few drops of oil inside the
combustion chamber and manually rotate the drive
shaft a few times; reinstall the injector and close the
suction and delivery openings.
UK
GENERATORS
6.7 Table of scheduled operations
OPERATION
Check the level of the oil in the sump
Check belt tension
Clean the air filter
Replace the oil sump
Check the level of the electrolytes
and thebattery charger status
Replace the fuel filter
Replace the oil filter
Replace the alternator belt
Regulate the play in the rocker lever
Check the injectors
Calibrate and clean the injectors
Check alternator bushes
Partial overhaul
General overhaul
MPL SX - CX
WIRING DIAGRAM LIST MPL 10- 15 SX- CX (M)
1
2
3
4
5
6
7
8
9
10
11
12
13
14
15
16
17
18
19
20
21
22
23
HOURS
10
50
100
150
150
300
300
500
600
600
600
1200
2500
5000
6.8 Troubleshooting
The starter motor turns but the main engine does not
cut in.
- Make certain there is fuel in the tank (refill).
- Make certain that the Stop solenoid valve is powered
(contact the Service Centre)
- Make certain that the fuel pump is functioning (contact
the Service Centre)
The control panel does not cut in when the ignition
key is turned.
Socket 3 p + n + e 32A
Socket 2 p + e 16 A
Output terminal
Circuit breaker - earth fault device
Commutator
Voltmeter
Frequency meter
Hour counter
Ampermeter
Stator
Rotor
Diode bridge
Starter
Starting key
Cutout module
Connector
Emergency stop button
Oil pressure indicator
Air thermostat
Fuel float
Solenoid valve
DC alternator
Battery
WIRING DIAGRAM LIST MPL 10-15 SX- CX (NSM)
1
2
3
4
5
6
7
8
9
10
11
12
13
14
15
16
17
18
19
20
21
22
23
24
- Check the protection fuse (replace)
- Check the connection cable and electrical connectors
(reconnect)
- Make certain that the battery is operative (recharge or
replace)
The unit cuts out during operation.
- Check whether the protection has been activated and
the warning light is on (remove the cause and try to start
up again)
- Make certain there is fuel in the tank (refill)
The engine is running irregularly.
- Check the fuel filters (replace)
- Make certain that the fuel pump is operating properly
(replace)
- Check calibration of the injectors (contact an Authorized Service Centre)
- 26 -
Socket 3 p + n + e 32A
Socket 2 p + e 16 A
Output terminal
Circuit breaker - earth fault device
Commutator
Voltmeter
Frequency meter
Hour counter
Ampermeter
Stator
Rotor
Diode bridge
Starter
Starting key
Cutout module
Connector
Emergency stop button
Oil pressure indicator
Air thermostat
Fuel float
Solenoid valve
DC alternator
Battery
Automatic Voltage Regulator
GENERATORS
MPL SX - CX
UK
WIRING DIAGRAM LIST MPL 20 SX- CX (E)
WIRING DIAGRAM LIST MPL 40-65 SX- CX (VM-M)
1
2
3
4
5
6
7
8
9
10
11
12
13
14
15
16
17
18
19
20
21
22
23
1
2
3
4
5
6
7
8
9
10
11
12
13
14
15
16
17
18
19
20
21
22
23
24
25
26
Socket 3 p + n + e 32A
Socket 2 p + e 16 A
Output terminal
Circuit breaker - earth fault device
Commutator
Voltmeter
Frequency meter
Hour counter
Ampermeter
Stator
Rotor
Diode bridge
Starter
Starting key
Cutout module
Connector
Emergency stop button
Oil pressure indicator
Air thermostat
Fuel float
Solenoid valve
DC alternator
Battery
WIRING DIAGRAM LIST MPL 20 SX- CX (M)
1
2
3
4
5
6
7
8
9
10
11
12
13
14
15
16
17
18
19
20
21
22
23
Socket 3 p + n + e 32A
Socket 2 p + e 16 A
Output terminal
Circuit breaker - earth fault device
Commutator
Voltmeter
Frequency meter
Hour counter
Ampermeter
Stator
Rotor
Diode bridge
Starter
Starting key
Cutout module
Connector
Emergency stop button
Oil pressure indicator
Air thermostat
Fuel float
Solenoid valve
DC alternator
Battery
- 27 -
Socket 3 p + n + e 32A
Socket 2 p + e 16 A
Circuit breaker 1p
Circuit breaker 3 p
Output terminal
Earth terminal
Circuit breaker - earth fault device
Commutator
Voltmeter
Frequency meter
Hour counter
Ampermeter
Stator
Rotor
Automatic Voltage Regulator
Starter
Starting key
Cutout module
Emergency stop button
Solenoid valve
Connector
Oil pressure indicator
Air thermostat
Fuel float
Battery
D.C. alternator
D
GENERATORS
- INHALT -
DIE NICHTBEACHTUNG DER IN DIESEM
HANDBUCH AUFGEFÜHRTEN HINWEISE HAT DEN
VERFALL DER GARANTIE ZUR FOLGE
1.
1.1
1.2
1.3
1.4
ALLGEMEINE HINWEISE ................................ 29
Zweckdeshandbuchs ..................................... 29
Beigefügtedokumentation .................................. 30
Hersteller - kenndaten des Gerätes .............. 30
Beschreibung des Gerätes ........................... 30
2.
2.1
CHARAKTERISTIKEN .................................. 31
Technische Daten ......................................... 31
3.
3.1
3.2
SICHERHEITSVORSCHRIFTEN ................... 32
Vorsichtsmaßnahmen ................................... 32
Erdung des Aggregates ................................. 32
4.
4.1
4.2
4.3
4.4
BETRIEB DES STROMAGGREGATES .........
Kontrollen vor Inbetriebnahme .......................
Start ..............................................................
Stopp ............................................................
Anschluß an Automatiktafel ..........................
5.
SCHUTZEINRICHTUNGEN ........................... 33
6.
6.1
6.2
6.3
6.4
6.5
6.6
6.7
6.8
WARTUNG ...................................................
Ordentliche Wartung des Motor .....................
Motorölwechsel .............................................
Entlüftung der Anlage ....................................
Wechsel des Luftfilters ..................................
Reiningung des Ansauggrills .........................
Stillstandszeiten ...........................................
Wartungstabelle ............................................
Fhlersuche ....................................................
32
32
32
33
33
34
34
34
34
34
35
35
35
35
- 28 -
MPL SX - CX
GENERATORS
D
MPL SX - CX
1. ALLGEMEINE HINWEISE
Bevor Sie jegliche Art von Eingriff auf die Maschine vornehmen, lesen Sie aufmerksam dieses Handbuch.
1.1
ZWECK DES HANDBUCHS
Danke, daß Sie sich für ein MASE Produkt entschieden haben.
Dieses Handbuch wurde vom Hersteller verfaßt und ist ein Bestandteil der Maschinenausstattung.
Die Hinweise richten sich an Benutzer und Personen, die mit der Wartung der Maschine beauftragt sind.
Das Handbuch beschreibt den Zweck, zu dem diese Maschine gebaut wurde und enthält alle notwendigen Hinweise, um einen sicheren und korrekten Gebrauch zu garantieren.
Die Beachtung aller in diesem Handbuch enthaltenen Hinweise garantiert die Sicherheit des Menschen und der
Maschine, die Betriebseinsparung und eine längere Lebensdauer der Maschine.
Um Ihnen das Nachschlagen zu erleichtern, ist das Handbuch in Kapitel unterteilt, die mit den Grundbegriffen
betitelt sind; für ein schnelleres Finden der Argumente, ziehen Sie die Inhaltsangabe heran.
Besonders wichtige Textpassagen sind fettgedruckt und mit hier im folgenden aufgelisteten Zeichen versehen.
GEFAHR Weist darauf hin, daß besondere Aufmerksamkeit erforderlich ist, um Vorfälle zu vermeiden, die
den Tod oder eventuelle Gesundheitsschäden des Personals hervorrufen könnten.
ACHTUNG Diese Situation könnte während der Lebensdauer eines Produktes, eines Systems oder einer
Anlage eintreten, die als gefährlich angesehen werden und Schäden an Personen, Eigenschaften und der Umwelt
hervorrufen oder finanziellen Verlust zur Folge haben könnten.
VORSICHT Weist darauf hin, daß besondere Aufmerksamkeit erforderlich ist, um Vorfälle zu vermeiden, die
Schäden an Material und Maschine hervorrufen könnten.
HINWEISE Hinweise von besonderer Wichtigkeit.
Die Zeichnungen dienen nur als Beispiele. Auch wenn Ihre Maschine wesentlich von den in diesem Handbuch
abgebildeten abweicht, wird für die Sicherheit und die Richtigkeit der Hinweise garantiert.
In dem Bemühen um eine Produktionspolitik mit konstanter Fortentwicklung behält sich der Hersteller das Recht
vor, ohne Vorankündigung Produktänderungen vorzunehmen.
- 29 -
GENERATORS
D
1.2 BEILIEGENDE DOKUMENTATION
Die stromerzeugenden Aggregate der Serie MPL-SX und
CX (10 - 15 - 20 - 65) sind für den industriellen Einsatz mit
Antrieb durch ausgesprochen zuverlässige luftgekühlte
Dieselmotoren mit 1.500 Umdrehungen konzipiert worden. Besondere Aufmerksamkeit wurde auf den Schutzgrad gegen äußere Einwirkungen und auf den Schutz des
Motors verwendet; alle elektrischen Bauteile werden mit
automatischen Systemen gegen Überlast und zu hohe
Temperaturen geschützt, die in der Lage sind, das Aggregat bei Funktionsstörungen anzuhalten. Die Aggregate
der Serie MPL - SX und CX sind aufgrund einer innen
gedämmten Schalldämpfungskabine und der Verwendung eines fortschrittlichen Systems des Dämpfung der
Geräusche der Verbrennungsabgase besonders leise.
Die verwendeten Alternatoren sind synchrone, selbsterregende und selbstregelnde Alternatoren, die in der Lage
sind, sehr hohe Spitzenstromstärken mit einer Spannungsstabilität von unter 5% abzugeben.
Die folgende Dokumentation stellt einen integralen Bestandteil des vorliegenden Handbuches dar:
-
Erklärung zur CE-Konformität;
Bedienungs- und Wartungsanleitung des Motors;
SERVICE-Handbuch;
Garantie-Zertifikat;
Garantiekarte.
1.3 HERSTELLER - IDENTIFIZIERUNG DER MASCHINE
Siehe Abbildung 1
1234567-
Maschinenkennummer
Leistungsfaktor
angegebene Frequenz
Dauerleistung
Nominalspannung
Stromstärke
Seriennummer
Siehe Abbildung 2
123456-
MPL SX - CX
Instrumententafel
Inspektionsklappe Motor
Einfüllstutzen Kraftstoff
Ansauggrill Kühlluft
Auslaßgrill Kühlluft
Auslaßleitung Verbrennungsgase
Die Daten zur Identifizierung der Kennummer der Maschine, der Seriennummer und des Baujahres müssen bei
Anfragen an den Hersteller, bei der Bestellung von Ersatzteilen usw. immer angegeben werden.
1.4 BESCHREIBUNG DER MASCHINE
Abbildung 5
1 - Modul Motorschutz
2 - Voltmeter
3 - Frequenzmeter
4 - Amperemeter
5 - Stundenzähler
6 - Voltmetrischer Umschalter
7 - Zündschlüssel
8 - Magnetothermischer Differentialschalter
9 - Magnetothermischer Schalter
10 -Einphasensteckdose 32 A 2p + t
11 -Dreiphasensteckdose 32 A 4p + n + t
12 -Notaustaste
13 -Erdungsklemmleiste
14 -Steckverbindung Anschluß Automatiktafel
- 30 -
MPL SX - CX
D
GENERATORS
2. EIGENSCHAFTEN
2.1
TECHNISCHE EIGENSCHAFTEN
MODELL
GENERATOR
Typ
Leistung
Spannung
Frequenz
Stromstärke
Cos φ
Schutzgrad
MOTOR
Typ
Modell
Zylinder
Speisung
Leistung
Hubraum
Ansaugung
U/min
Tankvolumen
Verbrauch/St.
Elektrik
Abmessungen
Gewicht
10 SX - CX
MOTOR
Typ
Modell
Zylinder
Speisung
Leistung
Hubraum
Ansaugung
U./min
Tankvolumen
Verbrauch/St.
Elektrik
Abmessungen
Gewicht
15 SX-CX (SAME)
20 SX - CX (VM)
synchron, Dreiphasen synchron, Dreiphasen synchron, Dreiphasen synchron, Dreiphasen
10000
15000
15000
20000
400
400
400
400
50
50
50
50
14,4
21,6
21,6
28,8
0,8
0,8
0,8
0,8
IP
23
23
23
23
VA
V
Hz
A
St.
KW
cm³
l.
l/h
V
mm
Kg
MODELL
GENERATOR
Typ
Leistung
Spannung
Frequenz
Stromstärke
Cos φ
Schutzgrad
15 SX-CX (VM)
VA
V
Hz
A
IP
LOMBARDINI
9 LD 625/2
2
Diesel
10,9
1248
Atmosphärische
1500
72
VM
SUN 2105
2
Diesel
20,6
1992
Atmosphärische
1500
72
SAME
1052 LP
2
Diesel
19,9
2078
Atmosphärische
1500
72
VM
SUN 2105
2
Diesel
20,6
1992
Atmosphärische
1500
72
3,5
12
2000x900x1500
800
4,5
12
2000x900x1500
800
4,9
12
2000x900x1500
800
5
12
2000x900x1500
800
20 SX-CX (SAME)
40 SX-CX (VM)
65 SX-CX (VM)
synchron, Dreiphasen synchron, Dreiphasen synchron, Dreiphasen
19000
40000
50000
400
400
400
50
50
50
27,5
57,8
72,2
0,8
0,8
0,8
23
23
23
l.
SAME
1052 LP
2
Diesel
19,9
2078
Atmosphärische
1500
72
SAME
10003.A
3
Diesel
31,6
3000
Atmosphärische
1500
96
VM
SUN 4105T
4
Diesel
56,6
3980
Kompressor
1500
96
l/h
V
mm
Kg
4,9
12
2000x900x1500
800
6,7
12
2850x900x1755
920
11,6
12
2850x900x1755
1200
St.
KW
cm³
- 31 -
GENERATORS
D
3.2 ERDUNG
3. SICHERHEITSBESTIMMUNGEN
Zur Sicherheit der Benutzer muß bei der Ausführung der
Erdung auf den Querschnitt des verwendeten Kabels
geachtet werden. Benutzen Sie für den Anschluß des
Erdungskabels die entsprechende Klemme auf dem Anschlußpaneel (Abbildung 5 - 13). Folgen Sie bei der
Erdung den Angaben der folgenden Tabelle für den
Querschnitt des zu verwendenden Kabels in Abhängigkeit von der Leistung des Aggregats.
3.1 VORSICHTSMAßNAHMEN
Lesen Sie die Bedienungs- und Wartungshandbücher vor
der Inbetriebnahme und der Benutzung aufmerksam durch.
Der Hersteller lehnt jegliche Haftung für Schäden an
Personen oder Sachen ab, die auf der Nichtbeachtung der
Sicherheitsbestimmungen beruhen.
Leistung kVA 10÷20 20÷40 40÷60 60÷80 80÷100
Schauen Sie sich die auf der Maschine angebrachten
Sicherheitsschilder genau an und beachten Sie die in
ihnen enthaltenen Angaben.
-
Verhindern Sie, daß Kinder oder Tiere sich an den
laufenden Generator annähern.
-
Fassen Sie den Generator nie mit nassen Händen an,
da bei falscher Benutzung des Generators die Gefahr
eines elektrischen Schlags besteht.
-
Querschnitt mm2
Gestatten Sie die Benutzung der Maschine keinen
unbefugten oder unzureichend ausgebildeten Personen.
-
MPL SX - CX
Betreiben Sie den Generator nicht in der Nähe von
explosions- oder brandgefährdeten Orten.
-
Das Nachfüllen von Kraftstoff darf ausschließlich bei
stehendem Motor erfolgen.
-
Die Erdung des Generators wird unter Verwendung
eines Kupferkabels von geeigneter Stärke ausgeführt.
40
50
Vor dem ersten Anlassen des Aggregats und nach der
Ausführung von Wartungsarbeiten sollte stets überprüft
werden:
Vor der Ausführung von Kontroll- oder Wartungsarbeiten an dem an eine automatische Starttafel
angeschlossenen Generator muß die SPERR-Funktion eingestellt werden oder die Steckverbindung
muß gezogen werden.
-
30
4.1 KONTROLLEN VOR ARBEITSBEGINN
-
der richtige Ölstand: Meßstab. Siehe Tabelle der
empfohlenen Öle;
-
daß alle elektrischen Verbraucher ausgeschaltet sind,
damit das Aggregat nicht unter Last eingeschaltet wird;
-
daß die Kraftstoffleitungen unversehrt und richtig angeschlossen sind;
-
daß keine beschädigten elektrischen Leiter vorhanden sind.
GEFAHR
Die Abgase enthalten Kohlenmonoxid und andere
gesundheitsschädliche Substanzen; nehmen Sie den
Generator nicht in Betrieb, wenn eine ausreichende
Lüftung nicht gewährleistet ist.
20
4. BENUTZUNG DES GENERATORS
Eventuelle Kontrollarbeiten an dem Generator werden
immer mit stehendem Motor ausgeführt; Kontrollarbeiten
mit laufendem Motor dürfen ausschließlich von Fachpersonal ausgeführt werden.
-
10
4.2 ANLASSEN
Überprüfen Sie vor dem Anlassen des Generators, daß
alle Verbraucher abgeschaltet sind, um eine Belastung
des noch kalten Motors zu vermeiden. Das Aggregat wird
gestartet, indem der Zündschlüssel (Abbildung 4 - 7) um
eine Position nach rechts gedreht wird. Beim Anlassen
leuchten alle LEDs zur Selbstkontrolle für ca. 2 Sekunden
auf, danach bleiben die LED ‘Batterie nachladen’ (Abbildung 4 - 18) und die LED ‘Öldruck niedrig’ (Abbildung 4 16) an.
Das Aggregat anlassen, indem der Zündschlüssel ganz
nach rechts gedreht wird; erst loslassen, nachdem das
Anlassen erfolgt ist, der Startversuch darf aber in keinem
Fall mehr als fünf Sekunden dauern.
Alle Schutzvorrichtungen werden 15 Sekunden nach dem
Anlassen aktiviert und bei Funktionsstörungen wird das
Aggregat angehalten und die entsprechende Kontrolleuchte
leuchtet auf.
ACHTUNG
Bei der Verwendung des Generators muß stets berücksichtigt werden, daß bei nassen oder sehr feuchten Orten und bei engen Leiterzonen die Beachtung
der 313 und 318 des Erlasses des Regierungspräsidenten vom 27. 04. 55 Nr. 547 sowie des Abschnitts
11, Teil IV der CEI-Norm 64-8 vorgeschrieben ist.
- 32 -
MPL SX - CX
D
GENERATORS
Vor dem Speisen der Verbraucher sollte der Motor fünf
Minuten ohne Last laufen, damit er nach und nach die
Betriebstemperatur erreicht. Dies garantiert eine längere
Lebensdauer des Motors und verringert die Gefahr des
Festfressens.
4.3 ANHALTEN
Das Aggregat wird angehalten, indem der Zündschlüssel
(Abbildung 4 - 7) ganz nach links gedreht wird.
Es wird empfohlen, das Aggregat vor dem Abschalten
einige Minuten ohne eingeschaltete Last zu betreiben,
um die Temperatur im Motor und im Alternator zu senken.
4.4 ANSCHLUß AN AUTOMATIKTAFEL
Die Aggregate der Serie SX und CX sind für den Anschluß
an Automatiktafeln vorbereitet, die den Generator automatisch einschalten und die Leitung umschalten, wenn
die Netzspannung unterbrochen wird sowie die umgekehrte Operation ausführen, sobald die Netzspannung
wieder zur Verfügung steht.
Außerdem hält die Automatiktafel die Anlasserbatterie
des Generators auch dann geladen, wenn dieser ausgeschaltet ist.
Der Anschluß der Automatiktafel an das Aggregat erfolgt
mit einer 6-poligen Steckverbindung auf dem Armaturenbrett des Aggregats (Abbildung 4 - 14) und einem Stecker
zur Abnahme der Spannung, der in die Steckdose auf
dem Armaturenbrett des Aggregats eingesteckt wird
(Abbildung 4 - 11).
ACHTUNG
Schutzvorrichtungen des Aggregats eingreifen, wenn
das Anlassen mit der Taste START nicht innerhalb
von 10 Sekunden erfolgt, wenn die Automatiktafel
sich in der Funktion MANUELL befindet.
Manuelle Funktion (angezeigt durch das Symbol ‘Hand’)
Diese Funktion gestattet das manuelle Anlassen des
Generators mit der Starttaste auf der Automatiktafel,
unabhängig davon, ob die Netzspannung vorhanden ist
oder nicht. Wenn die Netzspannung vorhanden ist, so
werden die Verbraucher auch bei eingeschaltetem Generator immer von der Netzspannung gespeist.
Falls die Netzspannung ausfällt, wechselt die Automatiktafel bei eingeschalteter manueller Funktion und laufendem Aggregat die Leitung und speist die Verbraucher mit
dem Aggregat.
Testfunktion
Wenn diese Funktion eingestellt wird, führt die Automatiktafel beim Einschalten einen automatischen Test des
Aggregats durch, um dessen Funktionsbereitschaft zu
überprüfen. Es wird empfohlen, diesen Test zumindest
einmal pro Woche auszuführen.
Sperrfunktion (angezeigt durch das Symbol ‘Schloß’)
Die Einstellung dieser Funktion sperrt das Anlassen des
Aggregats durch die Automatiktafel.
VORSICHT
Stellen Sie diese Funktion bei Wartungs- oder Reparaturarbeiten an dem Generator ein, um ein Anlaufen desselben bei Stromausfällen zu verhindern.
Wenn die Automatiktafel an den Generator angeschlossen ist, muß der Zündschlüssel auf dem Armaturenbrett in der Position OFF bleiben.
Auf der Automatiktafel ist vorhanden:
- ein Wahlschalter zur Wahl der gewünschten Funktion
(MANUELL, AUTOMATIK, SPERRE, TEST);
- vier Kontrolleuchten für den Status der Kontaktgeber;
- vier Kontrolleuchten für Funktionsweise und Alarme;
- zwei Tasten zum Anlassen und Anhalten.
Automatikfunktion
Falls der Wahlschalter auf AUT gestellt ist, läßt die
Automatiktafel den Generator an, sobald die Netzspannung ausfällt. Falls das Aggregat nicht anläuft, werden
maximal vier weitere Startversuche ausgeführt und danach leuchtet eine Kontrolleuchte auf, die anzeigt, daß
das Aggregat nicht gestartet worden ist.
ACHTUNG
Vor dem Einstellen der Automatikfunktion muß unbedingt die Stopptaste auf der Automatiktafel gedrückt oder die Sperrfunktion für einige Sekunden
eingestellt werden. Dies ist erforderlich, weil die
- 33 -
5. SCHUTZVORRICHTUNG
Die Aggregate sind mit einer Reihe von Schutzvorrichtungen ausgestattet, die sie gegen eine unrichtige Benutzung und gegen Funktionsstörungen schützen, die sie
beschädigen könnten.
Dazu zählen:
-
Schutz gegen niedrigen Öldruck
Greift ein, indem das Aggregat abgeschaltet wird, wenn
der Druck in der Schmierungsanlage ungenügend ist; der
Eingriff wird immer durch das Aufleuchten der LED (Abbildung 4 - 16) angezeigt.
Es ist im allgemeinen ausreichend, Öl nachzufüllen, um
das Aggregat wieder anlassen zu können.
ACHTUNG
Der Schutz gegen zu niedrigen Öldruck ist keine
Anzeige des Ölstands. Zur Vermeidung von Schäden am Motor ist eine regelmäßige Überprüfung des
Ölstands unverzichtbar.
D
GENERATORS
-
Schutz gegen hohe Temperatur des Motors
Konsultieren Sie für detaillierte Angaben das mit der
Maschine gelieferte Bedienungs- und Wartungshandbuch
des Motors.
Beim Ölwechsel muß zuerst die untere Verschlußklappe
des Schalldämpfunsgehäuses abgenommen werden; dann
den Stopfen der Ölwanne abnehmen und das Öl in einen
unter dem Rahmen aufgestellten Behälter laufen lassen.
Es wird empfohlen, das Öl abzulassen, wenn der Motor
noch warm ist, damit es besser fließt.
Greift ein, indem das Aggregat abgeschaltet wird, wenn
die Betriebstemperatur des Motors zu hoch ist.
Der Eingriff wird durch das Aufleuchten der LED (Abbild 4
- 19) angezeigt.
Das Aggregat darf erst wieder angelassen werden, nachdem die Ursache des Eingreifens gefunden und behoben
worden ist.
-
MPL SX - CX
ACHTUNG
Schutz gegen Kurzschluß und Überlast
Das Altöl muß gemäß der geltenden Umweltschutzbestimmungen entsorgt werden.
Geben Sie Altöl bei den autorisierten Annahmestellen ab.
Zum Schutz gegen Kurzschluß und Überlast wurden
magnetothermische Schalter und Differentialschalter verwendet, die eingreifen und die Stromabgabe unterbrechen, wenn eine Überlastung des Alternators oder ein
Kurzschluß auftritt.
Vor dem Wiedereinschalten des Stroms durch Stellen
des Hebels des magnetothermischen Schalters (Abbildung 4 - 8-9) in die Position ‘ON’ muß die Ursache
gefunden werden, die den Eingriff ausgelöst hat.
Diese Schalter haben die folgenden Aufgaben:
- ein allgemeiner magnetothermischer Differentialschalter hat die Aufgabe, bei einem Kurzschluß, bei
Überlastung oder bei Dispersion gegen Erde die
Stromabgabe an allen Steckdosen zu unterbrechen
(Abbildung 4 - 8).
- Magnetothermische Schutzschalter an den Steckdosen mit niedriger Leistung unterbrechen die Schaltung, wenn eine Stromstärke abgenommen wird, die
über der Nominalleistung der Steckdose liegt.
6.3 ENTLÜFTUNG DER ANLAGE
Luftblasen im Innern der Speisungsanlage führen zu einer
unregelmäßigen Funktion des Motors oder dazu, daß die
Nominaldrehzahl nicht erreicht wird. Die Luft kann durch
einen nicht perfekt schließenden Anschluß (Leitungen,
Filter, Tank) in das System gelangen, oder wenn der
Kraftstoff im Tank den Minimalpegel erreicht. Zur Entlüftung des Systems muß zuerst die Ursache des Eindringens der Luft behoben werden; folgen Sie dann den
folgenden Angaben:
1 - Drehen sie den Zündschlüssel um eine Position nach
rechts, bis das Magnetventil zum Anhalten geöffnet
wird.
2 - Lockern Sie die Ausblasschrauben am Kraftstoffilter
und an der Einspritzpumpe (siehe Bedienungs- und
Wartungsanleitung des Motors).
3 - Bedienen Sie den Hebel der Kraftstoffpumpe AC von
Hand, bis die gesamte im Innern des Systems enthaltene Luft aus den Ausblasschrauben herausgekommen ist (Abbildung 3 - 5).
4 - Ziehen Sie die Schrauben wieder an und lassen Sie
den Motor an.
5 - Wiederholen Sie den oben beschriebenen Arbeitsschritt, bis der Motor ordnungsgemäß funktioniert.
6. WARTUNG
Sämtliche Wartungseingriffe am Generator müssen mit
stehendem Motor und nach einer ausreichenden Abkühlzeit von Fachpersonal ausgeführt werden.
6.1 ORDENTLICHE WARTUNG DES MOTORS
Die am Motor vorzunehmenden periodischen Eingriffe
werden in der Tabelle wiedergegeben: Konsultieren Sie für
detaillierte Angaben das mit jedem Aggregat gelieferte
Handbuch vom Hersteller des Motors.
HINWEISE
Nehmen Sie für weitere Details auf das Bedienungsund Wartungshandbuch der Speisungsanlage Bezug.
ACHTUNG
Kontrollieren Sie den Ölstand mit dem entsprechenden Meßstab (Abbildung 2 - 3).
Der Ölstand muß immer zwischen den beiden Markierungen (MIN. und MAX.) des Meßstabs liegen.
6.4 AUSTAUSCH DES LUFTFILTERS
Für eine korrekte Funktion und eine lange Lebensdauer
des Motors ist es wichtig, die Patrone des Luftfilters in
regelmäßigen Abständen zu reinigen und zu ersetzen.
Ein nicht wirkungsvoller Filter kann zu einem Leistungsabfall des Motors und zu einer übermäßigen Rauchentwicklung am Auslaß führen.
Gehen Sie beim Austauschen der Patronen des Luftfilters
wie folgt vor:
6.2 ÖLWECHSEL MOTOR
Verwenden Sie Öl vom Typ AKROS TURBO 15 W 40
Das Ein- und Nachfüllen erfolgt durch die auf Abbildung 3
- 4 gezeigte Öffnung.
- 34 -
-
MPL SX - CX
D
GENERATORS
Entfernen Sie den Plastikdeckel des Filters nach dem
Herausdrehen der Befestigungsschrauben.
Ersetzen Sie die Filterpatronen und setzen Sie eine
neue Patrone auf korrekte Weise ein.
Bringen Sie den Deckel wieder an und ziehen Sie die
Befestigungsschrauben wieder an.
ACHTUNG
Reinigen sie die Filterpatronen ca. alle 200 Betriebsstunden.
Verkürzen Sie diese Wartungsintervalle, falls der
Generator in einer besonders staubigen Umgebung
betrieben wird.
Ersetzen Sie die Patrone immer, wenn sie stark
verschmutzt oder beschädigt ist.
6.8 FUNKTIONSSTÖRUNGEN
Der Anlassermotor läuft, aber der Hauptmotor springt
nicht an.
- Überprüfen, ob Kraftstoff im Tank vorhanden ist. (Nachfüllen.)
- Überprüfen, ob das Magnetventil zum Anhalten gespeist wird. (Kundendienst benachrichtigen.)
- Überprüfen, ob die Kraftstoffpumpe funktioniert. (Kundendienst benachrichtigen.)
6.5 Reinigung des Ansauggrills
Das Kontrollpaneel wird beim Drehen des Zündschlüssels nicht aktiviert.
- Sicherungen kontrollieren. (Ersetzen.)
- Verbindungskabel und elektrische Steckverbindungen
kontrollieren. (Verbinden.)
- Batterie kontrollieren. (Nachladen oder ersetzen.)
Kontrollieren Sie die Ansauggrills und die Auslaßgrills der
Kühlluft (Abbildung 2 - 4-5) und die Kühlrippen der Zylinder
in regelmäßigen Abständen; sie müssen stets sauber
sein.
Es dürfen keinerlei Fremdkörper vorhanden sein, die den
Luftstrom der Kühlluft behindern (Blätter, Papier, Lappen
usw.).
Das Aggregat geht während der Arbeit aus.
- Überprüfen, ob eine Schutzvorrichtung aktiviert worden ist - Aufleuchten der entsprechenden
Kontrolleuchte (Ursache beheben und Startversuch
durchführen.)
- Kontrollieren, ob Kraftstoff im Tank vorhanden ist.
(Nachfüllen.)
6.6 STILLSTANDSZEITEN
Das Motor läuft unregelmäßig.
- Kontrollieren Sie den Kraftstoffilter. (Ersetzen.)
- Kontrollieren Sie die Funktion der Kraftstoffpumpe.
(Ersetzen.)
- Die Tarierung der Einspritzung kontrollieren (Wenden
Sie sich an eine autorisierte Kundendienststelle.)
Falls das Aggregat für einen längeren Zeitraum nicht
benutzt wird, so sind die folgenden Arbeitsschritte auszuführen:
- Das Motoröl austauschen.
- Den Kraftstoffilter auswechseln.
- Die Einspritzung abnehmen, einige Tropfen Öl in die
Brennkammer geben und die Motorwelle ein paar Mal
von Hand drehen; die Einspritzung wieder montieren
und Ansaugung und Auslaß schließen.
6.7 WARTUNGSTABELLE
Arbeitsschritt
Stunden
Kontrolle Ölstand in Wanne
10
Kontrolle Riemenspannung
50
Reinigung Luftfilter
100
Ölwechsel
150
Überprüfung Elektrolyt und Status Batterie
150
Ersetzung Kraftstoffilter
300
Ersetzung Ölfilter
300
Ersetzung Riemen Alternator
500
Einstellung Spiel Kipphebel
600
Kontrolle Einspritzung
600
Tarierung und Reinigung Einspritzung
600
Kontrolle Bürsten Alternator
1200
Teilüberholung
2500
Generalüberholung
5000
- 35 -
Siehe Abbildung 5 (MPL 10-15 SX-CX M)
1
2
3
4
5
6
7
8
9
10
11
12
13
14
15
16
17
18
19
20
21
22
23
Dreiphasensteckdose 32A 4p + n + t
Einphasensteckdose 16A 2p + t
Erdungsklemmleiste
Magnetothermischer Differentialschalter
Voltmetrischer Umschalter
Voltmeter
Frequenzmeter
Stundenzähler
Amperemeter
Stator
Rotor
Erregungdiode
Anlaßmotor
Zündschlüssel
Modul Motorschutz
Steckverbindung Anschluß Automatiktafel
Notaustaste
Ölpressostat
Luftthermostat
Kraftstoffschwimmer
Magnetventil
DC Alternator
Batterie
GENERATORS
D
MPL SX - CX
Siehe Abbildung 6 (MPL 10-15 SX-CX NSM)
Siehe Abbildung 8 (MPL 20 SX-CX M)
1
2
3
4
5
6
7
8
9
10
11
12
13
14
15
16
17
18
19
20
21
22
23
24
1
2
3
4
5
6
7
8
9
10
11
12
13
14
15
16
17
18
19
20
21
22
23
Dreiphasensteckdose 32A 4p + n + t
Einphasensteckdose 16A 2p + t
Erdungsklemmleiste
Magnetothermischer Differentialschalter
Voltmetrischer Umschalter
Voltmeter
Frequenzmeter
Stundenzähler
Amperemeter
Stator
Rotor
Erregungdiode
Anlaßmotor
Zündschlüssel
Modul Motorschutz
Steckverbindung Anschluß Automatiktafel
Notaustaste
Ölpressostat
Luftthermostat
Kraftstoffschwimmer
Magnetventil
DC Alternator
Batterie
Elektronischerspannungsregler
Dreiphasensteckdose 32A 4p + n + t
Einphasensteckdose 16A 2p + t
Erdungsklemmleiste
Magnetothermischer Differentialschalter
Voltmetrischer Umschalter
Voltmeter
Frequenzmeter
Stundenzähler
Amperemeter
Stator
Rotor
Elektronischerspannungsregler
Anlaßmotor
Zündschlüssel
Modul Motorschutz
Steckverbindung Anschluß Automatiktafel
Notaustaste
Ölpressostat
Luftthermostat
Kraftstoffschwimmer
Magnetventil
DC Alternator
Batterie
Siehe Abbildung 8 (MPL 40-65 SX-CX VM-M)
Siehe Abbildung 7 (MPL 20 SX-CX E)
1
2
3
4
5
6
7
8
9
10
11
12
13
14
15
16
17
18
19
20
21
22
23
1
2
3
4
5
6
7
8
9
10
11
12
13
14
15
16
17
18
19
20
21
22
23
24
25
26
Dreiphasensteckdose 32A 4p + n + t
Einphasensteckdose 16A 2p + t
Erdungsklemmleiste
Magnetothermischer Differentialschalter
Voltmetrischer Umschalter
Voltmeter
Frequenzmeter
Stundenzähler
Amperemeter
Stator
Rotor
Erregungdiode
Anlaßmotor
Zündschlüssel
Modul Motorschutz
Steckverbindung Anschluß Automatiktafel
Notaustaste
Ölpressostat
Luftthermostat
Kraftstoffschwimmer
Magnetventil
DC Alternator
Batterie
- 36 -
Dreiphasensteckdose 32A 4p + n + t
Einphasensteckdose 16A 2p + t
Leitungsschutzschalter 1p
Leitungsschutzschalter 3p
Klemmkasten
Erdungsklemmleiste
Magnetothermischer Differentialschalter
Voltmetrischer Umschalter
Voltmeter
Frequenzmeter
Stundenzähler
Amperemeter
Stator
Rotor
Elektronischerspannungsregler
Anlaßmotor
Zündschlüssel
Modul Motorschutz
Notaustaste
Magnetventil
Steckverbindung Anschluß Automatiktafel
Ölpressostat
Luftthermostat
Kraftstoffschwimmer
Batterie
DC Alternator
F
GENERATORS
INDEX
LE NON RESPECT
DES SPÉCIFICATIONS CONTENUES DANS CE
MANUEL D'INSTRUCTIONS ET D'ENTRETIEN
ENTRAÎNE L'ANNULLATION DE LA GARANTIE
Figures .................................................................... 2
Schémas électriques ............................................. 5
1
1.1
1.2
1.3
1.4
Informations générales .............................
Objet du manuel ...........................................
Documentation annexe ................................
Identification du générateur ..........................
Description du générateur ............................
38
38
39
39
39
2
Caractéristiques techniques ..................... 40
3
3.1
3.2
Normes de sécurité ................................... 41
Précautions .................................................. 41
Branchement du groupe à la terre ................ 41
4
4.1
4.2
4.3
4.4
Utilisation du générateur ..........................
Contrôles préliminaires .................................
Mise en fonction ...........................................
Arrêt .............................................................
Branchement au tableau automatique ..........
5
Protections ................................................. 42
6
6.1
6.2
6.3
6.4
6.5
6.6
6.7
6.8
Maintenance ..............................................
Maintenance ordinaire du moteur .................
Vidange huile du moteur ...............................
Désaération du circuit ..................................
Remplacement du filtre de l’air .....................
Nettoyage des grilles d'aspiration .................
Période d’inactivité .......................................
Tableau interventions programmées .............
Tableau des pannes .....................................
41
41
41
41
42
42
42
42
42
43
43
43
43
43
Légendes des schémas électriques ................... 44
- 37 -
MPL SX - CX
F
GENERATORS
1
MPL SX - CX
INFORMATIONS GENERALES
Consulter attentivement ce manuel avant de procéder à une quelconque intervention sur la machine.
1.1
OBJECTIF DU MANUEL
Nous vous remercions d’avoir choisi un produit MASE.
Ce manuel a été rédigé par le constructeur et fait partie intégrante de la dotation de la machine (1).
Les informations contenues dans ce manuel s’adressent aux utilisateurs ainsi qu’aux personnes chargées de
l’entretien.
L’observation constante des indications figurant dans ce manuel garantit la sécurité du personnel et de la machine,
l’économie de fonctionnement ainsi qu’une durée de vie plus longue de la machine.
Afin de faciliter la consultation, ce manuel est divisé en chapitres dans lesquels sont expliqués les concepts
principaux : pour une consultation rapide des sujets traités, consulter l’index descriptif.
Les parties les plus importantes sont rédigées en gras et sont précédées de symboles illustrés et définis ci-après.
DANGER
Ce symbole indique qu’une attention particulière est nécessaire afin d’éviter des conséquences
graves susceptibles de provoquer la mort du personnel ou des dommages possibles pour la santé.
ATTENTION
Ce symbole indique une situation susceptible d’avoir lieu durant la vie d’un produit, d’un système
ou d’une installation et jugée comme une situation à risque en matière de dommages aux personnes, aux propriétés,
à l’environnement ou de pertes économiques.
PRECAUTION
Ce symbole indique qu’une attention particulière est nécessaire afin d’éviter des conséquences
graves susceptibles de provoquer des dommages des biens matériels tels que les ressources ou le produit.
INFORMATIONS Indications particulièrement importantes.
Les dessins sont fournis à titre d’exemple. Même si la machine en votre possession est sensiblement différente des
illustrations contenues dans ce manuel, la sécurité ainsi que les informations la concernant sont garanties.
Dans le but de poursuivre une politique de développement constant et de mise à jour du produit, le constructeur se réserve
le droit d’apporter des modifications sans préavis.
- 38 -
F
GENERATORS
1.2 Documentation annexe
La documentation suivante fait partie intégrante de ce
manuel.
- Déclaration CEE de conformité ;
- Manuel d’utilisation et de maintenance du moteur ;
- Livret de SERVICE ;
- Certificat de garantie ;
- Carte de garantie ;
1.3 Constructeur - identification du générateur
Voir FIG. 1:
1 - Code générateur
2 - Facteur de puissance
3 - Fréquence déclarée
4 - Puissance continue
5 - Tension nominale
6 - Courant nominale
7 - Numéro de série
Les données qui identifient le numéro de code du générateur, le numéro de matricule et l’année de construction
doivent toujours être précisées au constructeur pour
recevoir renseignements, demandes de pièces de rechange, etc.
Voir FIG. 2
1 - Tableau des contrôles
2 - Coffre inspection moteur
3 - Goulotte remplissage gasoil
4 - Grille aspiration air de refroidissement
5 - Grille sortie air de refroidissement
6 - Tuyau de décharge gaz de combustion
1.4 Description du générateur
Voir FIG. 4
1Module protections moteur
2Voltmètre
3Fréquencemètre
4Ampèremètre
5Compte-heures
6Commutateur voltmètrique
7Clef pour l’allumage
8Disjoncteur magnétothermique différentiel
9Disjoncteur magnétothermique
10 - Prise monophasée 32A 2p ± t
11 - Prise triphasée 32A 4p ± n + t
12 - Poussoir d’arrêt d’urgence
13 - Borne de branchement à la terre
14 - Borne de connection armoire automatique
Les groupes électrogènes de la série MPL-SX et CX (10-
- 39 -
MPL SX - CX
15-20-40-65) ont été projetés pour une utilisations dans le
secteur industriel en utilisant des motorisations de grande
fiabilité du type diesel à 1500 tours avec refroidissement
à air.
Une particulière attention a été donnée au degré de
protection contre les agents externes et pour la sauvegarde du moteur et des parties électriques contre les
surcharges ou les surtempératures grâce à des systèmes automatiques en mesure d’arrêter le groupe en cas
d’anomalies dans le fonctionnement.
Les groupes de la série MPL-SX et CX résultent être
particulièrement silencieux grâce à une cabine insonore,
calorifugée à l’intérieur et grâce à un système avancé
d’insonorisation de l’évacuation des fumées de combustion.
Les alternateurs utilisés sont du type synchrone autoexcité, ils sont auto-réglés et en mesure de distribuer des
courants de démarrage très élevés avec une stabilité de
tension inférieure à 5% .
F
GENERATORS
MPL SX - CX
2 CARACTERISTIQUES TECHNIQUES
MODELE
15 SX-CX (VM)
15 SX-CX (SAME)
20 SX - CX (VM)
synchrone, 3 ~ ph.
15000
400
50
21,6
0,8
23
synchrone, 3 ~ ph.
15000
400
50
21,6
0,8
23
synchrone, 3 ~ ph.
20000
400
50
28,8
0,8
23
LOMBARDINI
9 LD 625/2
2
Diesel
10,9
1248
Atmospherique
1500
72
VM
SUN 2105
2
Diesel
20,6
1992
Atmospherique
1500
72
SAME
1052 LP
2
Diesel
19,9
2078
Atmospherique
1500
72
VM
SUN 2105
2
Diesel
20,6
1992
Atmospherique
1500
72
Consumation
l/h
3,5
Equipment électrique V
12
Dimension (LxLxH) mm 2000x900x1500
Poids
Kg
800
4,5
12
2000x900x1500
800
4,9
12
2000x900x1500
800
5
12
2000x900x1500
800
MODELE
20 SX-CX (SAME)
40 SX-CX (VM)
65 SX-CX (VM)
synchrone, 3 ~ ph.
19000
400
50
27,5
0,8
23
synchrone, 3 ~ ph.
40000
400
50
57,8
0,8
23
synchrone, 3 ~ ph.
50000
400
50
72,2
0,8
23
SAME
1052 LP
2
Diesel
19,9
2078
Atmospherique
1500
72
SAME
10003.A
3
Diesel
31,6
3000
Atmospherique
1500
96
VM
SUN 4105T
4
Diesel
56,6
3980
Compresseur
1500
96
4,9
12
2000x900x1500
800
6,7
12
2850x900x1755
920
11,6
12
2850x900x1755
1200
GENERATEUR
Type
Puissance cont.
Tension
Fréquence
Courant
Cos φ
Degré de protection
10 SX - CX
VA
V
Hz
A
IP
MOTEUR
Type
Modèle
Cylindre
n.
Alimentation
Puissance
KW
Cylindrée
cm³
Aspiration
Tours / min
Capacité réservoir l.
GENERATEUR
Type
Puissance cont.
Tension
Frequence
Courant
Cos φ
Degré de protection
MOTEUR
Type
Modèle
Cylindre
Alimentation
Puissance
Cylindrée
Aspiration
Tours / min
Capacité réservoir
VA
V
Hz
A
IP
n.
KW
cm³
l.
Consumation
l/h
Equipement électrique V
Dimension (LxLxH) mm
Poids
Kg
synchrone, 3 ~ ph.
10000
400
50
14,4
0,8
23
- 40 -
MPL SX - CX
F
GENERATORS
3 NORMES DE SECURITE
4 UTILISATION DU GENERATEUR
3.1 Précautions
4.1 Contrôles préliminaires
Lire attentivement les manuels des instructions pour
l’utilisation et la maintenance avant de procéder aux
opérations de mise en fonction et d’utilisation.
A la première mise en fonction du groupe, après avoir
exécuté une intervention quelconque de maintenance, il
faut toujours s’assurer :
- que l’huile est au niveau juste et cela grâce à la tige, voir
tableaux des huiles conseillées.
- que tous les usagers électriques sont débranchés pour
ne pas mettre en fonction le groupe sous charge.
- que les tuyaux du combustibles sont intègres et correctement raccordés.
- qu’il n’y a pas de branchements électriques en mauvaises conditions.
Le constructeur décline toute responsabilité pour les
dommages aux personnes ou aux choses dus à l’inobservance des normes de sécurité.
Examiner attentivement les plaques de sécurité appliquées sur le générateur et respecter les indications qui y
sont contenues.
- Ne pas permettre l’utilisation du groupe électrogène à
des personnes non compétentes ou sans une préparation adéquate.
- Ne pas permettre aux enfants ou aux animaux de
s’approcher du groupe électrogène en fonction.
- Ne pas accéder au générateur avec des mains mouillées
car le générateur est une source potentielle de chocs
électriques s’il est mal utilisé.
- Les éventuels contrôles sur un groupe électrogène
doivent être effectués quand le moteur est éteint : les
contrôles avec le groupe en fonction ne doivent être faits
que par un personnel spécialisé.
- Les gaz d’évacuation contiennent du monoxyde de
carbone et d’autres résidus nocifs ; ne jamais faire
fonctionner le groupe dans des locaux aérés de façon
inadéquate.
- Ne pas faire fonctionner le groupe près des lieux
présentant des dangers d’explosion ou d’incendie.
- Le ravitaillement en carburant ne doit être fait que quand
le moteur est éteint.
ATTENTION
En utilisant le générateur, il faut tenir compte du fait
que dans les lieux mouillés ou très humides et dans
les endroits conducteurs restreints il existe l’obligation de respecter du CHAP. 11 SECTION IV de la
norme C.E.I. 64-8.
3.2
Branchement du groupe à la terre
Pour des raisons de sécurité pour les usagers, le branchement à la terre du groupe doit toujours être exécuté en
faisant très attention à la section du câble utilisé (voir table
suivante). Pour le branchement du fil de terre, utiliser la
borne spéciale placée sur le tableau des prises.
Puissance kVA 10÷20 20÷40 40÷60 60÷80 80÷100
Section mm² 10
20
30
40
50
- 41 -
4.2 Mise en fonction
Vérifier avant de procéder à la mise en fonction du groupe
électrogène que tous les usagers sont débranchés en
évitant, de cette façon, de mettre sous effort le moteur
encore froid. Procéder à la mise en fonction en tournant
dans le sens des aiguilles d’une montre la clef du START
(fig. 5 réf. 7) d’un déclic. On verra toutes les LED s’allumer
en fonction d’autocontrôle pendant environ 2 sec., puis
resteront allumées seule la LED de préchauffage des
bougies (fig.5 réf.1), la LED de recharge de la batterie et
la LED de basse pression de l’huile.
La carte électronique de contrôle du groupe pourvoira à
alimenter les bougies de préchauffage pendant 20" après
quoi on peut mettre en fonction le groupe en tournant
complètement la clef d’allumage dans le sens des aiguilles
d’une montre et en ne la relâchant que lorsque la mise en
fonction a eu lieu en faisant attention à ne pas dépasser,
dans tous les cas, plus de 5 sec. pour chaque tentative.
Toutes les protections seront activées 30" après la mise
en fonction du groupe et en cas d’anomalies dans le
fonctionnement, le groupe sera arrêté et l’anomalie sera
signalée grâce à l’allumage du relatif voyant.
Avant d’alimenter les usagers, il faut laisser fonctionner à
vide le moteur pendant cinq minutes au moins en lui
permettant d’atteindre progressivement la température de
travail. Cette précaution garantira une plus longue vie au
moteur et éliminera les risques de grippages.
4.3 Arrêt
Le groupe s’arrête en tournant complètement, dans le
sens contraire à celui des aiguilles d’une montre, la clef
d’allumage (fig.5 réf.7).
Avant d’arrêter le groupe, on conseille de le faire fonctionner pendant quelques minutes sans charges introduites
en permettant, ainsi, de réduire les températures internes
du moteur et de l’alternateur.
F
GENERATORS
4.4 Branchement au tableau automatique
MPL SX - CX
Avant de rétablir la distribution du courant, en reportant le
disjoncteur magnétothermique en position «ON» (fig. 5 réf
8-9) il faut éliminer la cause qui en a provoqué l’intervention.
Dans ce but, on a utilisé :
- un disjoncteur magnétothermique différentiel général qui
a la tâche d’interrompre la distribution du courant à
toutes les prises en cas de court-circuit, surcharge et
dispersion de courant vers la terre.
- deux disjoncteurs magnétothermiques de protection
aux prises de basse puissance en mesure d’interrompre
si un courant supérieur au nominal était prélevé de la
prise même.
Les groupes de la série MPL sont prédisposés pour être
branchés à un tableau de contrôle automatique en mesure de faire démarrer automatiquement le groupe électrogène et d’exécuter la commutation de ligne quand la
tension du réseau est coupée et d’exécuter l’opération
inverse quand la tension du réseau est de nouveau
disponible.
De plus, le tableau automatique pourvoira à garder la
batterie de démarrage du groupe électrogène sous charge
même quand il est éteint.
Le branchement du tableau automatique au groupe a lieu
à travers un connecteur à 6 pôles présent sur le tableau
de bord du groupe (fig. 7 réf. 13) et une fiche pour prélever
le courant à introduire dans la prise placée sur le tableau
de bord du groupe électrogène (fig. 7 réf. 11).
6. MAINTENANCE
PRECAUTION
5 PROTECTIONS
Toute intervention de maintenance au groupe électrogène doit être exécutée par un personnel autorisé
et doit être faite quand le moteur est éteint et qu’il est
suffisamment refroidi.
Les groupes sont munis d’une série de protections qui les
protègent contre une utilisation non correcte et contre les
inconvénients qui peuvent en compromettre l’intégrité.
Les protections sont :
6.1 Maintenance ordinaire du moteur
Les interventions périodiques à faire sur le moteur sont
reportées dans le tableau : pour des renseignements plus
détaillés, consulter le manuel fourni par le constructeur du
moteur et annexé à chaque groupe.
- Protection basse pression de l’huile
Elle intervient en éteignant le groupe quand la pression
dans le circuit de lubrification est insuffisante : son
intervention est signalée par l’allumage de la LED (fig. 5
réf. 1).
En général, il suffit de réintégrer la quantité d’huile
manquante pour pouvoir remettre en fonction le groupe.
ATTENTION
Contrôler le niveau de l’huile grâce à la tige spéciale
graduée.
Le niveau de l’huile doit toujours être compris entre
les encoches de MAX et de MIN gravées sur la tige.
ATTENTION
6.2 Vidange huile moteur
La protection de basse pression de l’huile ne donne
pas d’indications sur le niveau de l’huile. Un contrôle
périodique du niveau de l’huile est indispensable
pour éviter des dommages au moteur.
Utiliser de l’huile AKROS TURBO 15W 40
Les remplissages et les chargements doivent être faits à
travers l’orifice indiqué à la fig.2 réf.1.
Pour avoir des renseignements plus détaillés à ce sujet,
consulter le manuel d’utilisation et de maintenance du
moteur annexé à la machine.
Pour vidanger l’huile du moteur, il faut enlever le portillon
de fermeture inférieure de la caisse insonore ainsi que le
bouchon placé sur le carter à huile et laisser couler l’huile
après avoir placé un conteneur de récolte sous le châssis.
On conseille d’exécuter la vidange quand l’huile est
encore suffisamment chaude pour permettre un écoulement facile.
- Protection température élevée de l’eau
Elle intervient en éteignant le groupe si la température de
fonctionnement du moteur est trop élevée.
Son intervention est signalée par l’allumage de la LED (fig.
5 réf. 1).
Le groupe ne peut être remis en fonction qu’après avoir
repéré et éliminé la cause de l’intervention.
- Protection contre court-circuit et surcharge
Pour le protéger contre les courts-circuits et les surcharges, le groupe a été muni de disjoncteurs
magnétothermiques et de disjoncteurs différentiels qui
interviennent en interrompant la distribution du courant s’il
devait y avoir une condition de surcharge à l’alternateur ou
un court-circuit.
6.3 Désaération du circuit
La présence de bulles d’air à l’intérieur du circuit d’alimentation est la cause du fonctionnement irrégulier du moteur
- 42 -
MPL SX - CX
F
GENERATORS
ou de l’incapacité à atteindre le nombre de tours nominaux. L’air peut pénétrer à l’intérieur du circuit d’alimentation à travers une jonction non parfaitement étanche
(tuyau, filtres, réservoir) ou quand le carburant à l’intérieur
du réservoir est au niveau minimum. Pour éliminer les
bulles d’air à l’intérieur du circuit d’alimentation, il faut
d’abord éliminer la cause qui en a permis l’entrée et
ensuite exécuter les opérations suivantes :
1 - Dévisser les vis de l’évent placées sur le filtre du
carburant et sur la pompe d’injection (voir manuel
d’utilisation et de maintenance du moteur).
2 - Agir à la main sur le levier de la pompe du carburant AC
jusqu’à ce qu’à travers les vis d’évent ne soit pas sorti
tout l’air contenu dans le circuit d’alimentation.
3 - Resserrer les vis d’évent et faire démarrer le moteur.
4 - Répéter les opérations susdécrites si le fonctionnement du moteur n’était pas encore régulier.
INFORMATIONS
Se référer au manuel d’utilisation et de maintenance
du moteur pour avoir plus de détails sur le circuit
d’alimentation.
6.4 Remplacement du filtre air
Pour garantir un fonctionnement correct et une longue vie
au moteur, il est important de remplacer périodiquement
la cartouche du filtre à air. Un filtre non efficace peut être
la cause de la perte de puissance du moteur et de trop de
fumées à l’évacuation.
Pour remplacer la cartouche du filtre à air, exécuter les
opérations suivantes :
- enlever le couvercle en plastique du filtre à air après avoir
complètement dévissé les vis de fixation.
- remplacer la cartouche du filtre en repositionnant correctement la nouvelle.
- remonter le couvercle en revissant correctement les vis
de fixation.
ATTENTION
Nettoyer la cartouche du filtre à air toutes les 100
heures de fonctionnement.
Réduire les intervalles si le groupe électrogène travaille dans des locaux particulièrement poussiéreux.
6.5 Nettoyage des grilles d’aspiration
Contrôler périodiquement le nettoyage des grilles d’aspiration et d’évacuation de l’air de refroidissement (fig. 2 réf.
4) et les ailettes de refroidissement des cylindres.
Ces grilles doivent rester libres de tout élément pouvant
entraver le flux régulier de l’air de refroidissement (feuilles,
papiers, chiffons, etc.).
6.6 Périodes d’inactivité
Si le groupe doit rester inutilisé pendant une longue
période, il faut faire les opérations suivantes :
- remplacer l’huile du carter du moteur
- 43 -
- remplacer le filtre combustible
- enlever l’injecteur et introduire quelques gouttes d’huile
à l’intérieur de la chambre de combustion et exécuter,
à la main, quelques tours de rotation de l’arbre moteur;
remonter l’injecteur et fermer l’aspiration et l’évacuation.
6.7 Tableau des interventions programmées
OPERATION
HEURES
Contrôle niveau huile dans carter
Contrôle tension courroie
Nettoyage filtre à air
Vidange huile carter
Vérification niveau électrolyte et état charg. batt.
Remplacement filtre combustible
Remplacement filtre à huile
Remplacement courroie alternateur
Réglage jeu culbuteurs
Tarage et nettoyage injecteurs
Contrôle brosses alternateur
Révision partielle
Révision générale
10
50
100
150
150
300
300
500
600
600
1200
2500
5000
6.8 Tableau des pannes
Le démarreur tourne mais le moteur principal ne
démarre pas.
- Vérifier la présence du carburant à l’intérieur du réservoir
(Remplir)
- Vérifier si l’électrovanne d’arrêt est alimentée (Consulter
le Centre Service après vente)
- Vérifier le fonctionnement de la pompe de carburant
(Consulter le Centre Service après vente).
Le tableau de contrôle ne s’active pas en tournant la
clef d’allumage.
- Contrôler l’intégrité des fusibles de protection (Remplacer)
- Contrôler le câble de branchement et les connexions
électriques (Rebrancher)
- Contrôler l’intégrité de la batterie (Recharger ou remplacer).
Le groupe s’éteint pendant la période de travail
- Vérifier si une protection contre l’allumage du témoin
relatif a été activée. (Eliminer la cause et essayer de
nouveau le démarrage)
- Contrôler la présence de carburant dans le réservoir
(Rétablir le niveau).
Le moteur fonctionne irrégulièrement
- Contrôler les filtres du carburant (Remplacer)
- Contrôler le fonctionnement de la pompe du carburant
(Remplacer)
- Contrôler le tarage des injecteurs (Consulter un centre
service après vente autorisé)
GENERATORS
F
MPL SX - CX
LÉGENDES DES SCHÉMAS ÉLECTRIQUES
Réf.
1
2
3
4
6
6
7
8
9
10
11
12
13
14
15
16
17
18
19
20
21
** MPL 10-15 SX-CX (M) ** [pag. 5]
** MPL 20 SX-CX (E) ** [pag. 7]
** MPL 20 SX-CX (M) ** [pag. 8]
Réf.
1
2
3
4
5
6
7
8
9
10
11
12
13
14
15
16
17
18
19
20
21
22
23
Réf.
1
2
3
4
5
6
7
8
9
10
11
12
13
14
15
16
17
18
19
20
21
22
23
24
Description
Prise triphasée 3p +n + t 32 A
Prise monophasée 2 p + t 16 A
Borne branchement terre
Interrupteur magnétothermique-différentiel
Commutateur voltmétrique
Voltmètre
Fréquencemètre
Compte-heures
Ampèremètre
Alternateur
Rotor
Diodes d’excitation
Démarreur
Clef d’allumage
Module protections moteurs
Connecteur branchement tableau démarrage automatique
Poussoir arrêt d’urgence
Pressostat huile
Capteur de surtempérature
Détecteur niveau combustible
Electrovanne de stop
Alternateur CC
Batterie 12 V
22
23
24
25
26
** MPL 10-15 SX-CX (NSM) ** [pag. 6]
Description
Prise triphasée 3p +n + t 32 A
Prise monophasée 2 p + t 16 A
Borne branchement terre
Interrupteur magnétothermique-différentiel
Commutateur voltmétrique
Voltmètre
Fréquencemètre
Compte-heures
Ampèremètre
Alternateur
Rotor
Diodes d’excitation
Démarreur
Clef d’allumage
Module protections moteurs
Connecteur branchement tableau démarrage automatique
Poussoir arrêt d’urgence
Pressostat huile
Capteur de surtempérature
Détecteur niveau combustible
Electrovanne de stop
Alternateur CC
Batterie 12 V
Régulateur électronique de tension (AVR)
- 44 -
** MPL 40-65 SX-CX (VM-M) ** [pag. 9]
Description
Prise triphasée 3p +n + t 32 A
Prise monophasée 2 p + t 16 A
Interrupteur magnétothermique 1P
Interrupteur magnétothermique 3P
Boîte à bornes
Borne branchement terre
Interrupteur magnétothermique-différentiel
Commutateur voltmétrique
Voltmètre
Fréquencemètre
Compte-heures
Ampèremètre
Alternateur
Rotor
Régulateur électronique de tension (AVR)
Démarreur
Clef d’allumage
Module protections moteurs
Poussoir arrêt d’urgence
Electrovanne de stop
Connecteur branchement tableau démarrage automatique
Pressostat huile
Capteur de surtempérature
Détecteur niveau combustible
Batterie 12 V
Alternateur CC