Transcript
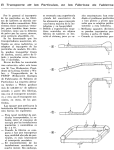
PELI
™
Peli 9435 User Manual
Mast Operation
1. Lift the LED head fully upwards then slide the mast down to lock
into the mount.
2. Pull the lever on the black locking clamp, lift the head upwards and
snap the lever back into place.
3. To collapse the mast, reverse the procedure.
Light Operation
1. Press keypad once for full power
2. Press again for low power
3. Press again to switch off
Low Battery Warning:
Before the battery turns off, the LED head will flash for a short period
every 10 minutes to let the user know that the battery voltage is low.
The warning period starts 30 minutes before there is insufficient
voltage to power the light.
Catalog #9435
WARRANTY RETURN POLICY
Please contact your local distributor or retailer for information on how
to handle your warranty items and to obtain accessories for all Peli
products.
Environmental
At the end of its technical life, the battery should be sent to
a suitable recycling center or returned to the point of purchase.
Warranty Seal
Pelican Products seals its products using (a Void Sticker / Paint Seal)
to prevent unauthorized modification, servicing and /or repair
attempts. Breaking or removing this seal will void the Pelican
Warranty, please see website for full details. For service or maintenance, please return to your nearest authorized Pelican repair centre.
Pelican guarantees its AALG products for 1 year against defects in
materials and workmanship. Refer tp www.pelican.com/warranty for
full details.
AALG Ltd declaration of conformity EU Directive 94/9/EC
We AALG Ltd, 4 Chater Court, Halifax Drive, Market Deeping,
Peterborough, PE6 8AH, UK
declares that under our sole responsibility for supply/manufacture of
the product:
Model Type: 9435 Remote Area Lighting System
Technical File Ref: Intertek 09041970
Standards: EN60079-0 2006, EN60079-11 2007
to which this declaration relates is in conformity with the essential
health & safety requirements of the Atex directive 94/9/EC, the
equipment is designed to satisfy the requirement of clauses 1,2,7 &
1.0.6 ANNEX II of the Atex directive 94/9/EC, providing the above
model is used, serviced and maintained in accordance with the
accompanying instructions.
Responsible person: Piero Manigo managing director Peli products,
S.L.U.
Date: 11 January 2011
Coding: Conforms to UL Std.783, ISA 12.12.01 & CSA C22.2 No. 213
Class I Division 2 Groups ABCD T4
II 3 G Ex ic IIC T4 Gc
Cert#. ITS09ATEX26777
IECEx ITS 10.0011
UO = 13.5V, IO = 14mA, PO = 0.19W and UM = 15V
Special conditions for safe use:
RISK OF IGNITION – DO NOT OPEN PRODUCT IN HAZARDOUS
AREA
RISK OF IGNITION – DO NOT CHARGE IN A HAZARDOUS AREA
USE APPROVED BATTERY PACK ONLY - CAT#009433-3520-000
USE APPROVED CHARGER ONLY – CAT#009436-3435-000
MAXIMUM CHARGING VOLTAGE = 15v
DO NOT OPERATE PRODUCT IF DAMAGED
II 3 G Ex ic IIC T4 Gc
Núm. cert. ITS09ATEX26777
IECEx ITS 10.0011
UO = 13,5 V, IO = 14 mA, PO = 0,19 W y UM = 15 V
CONDICIONES ESPECIALES PARA UN USO SEGURO:
RIESGO DE IGNICIÓN: NO ABRIR EL PRODUCTO EN UNA ZONA
PELIGROSA
RIESGO DE IGNICIÓN: NO CARGAR EL PRODUCTO EN UNA
ZONA PELIGROSA
UTILIZAR ÚNICAMENTE BATERÍAS HOMOLOGADAS CAT
09433-3520-000
UTILIZAR ÚNICAMENTE CARGADOR HOMOLOGADO CAT
09436-3435-000
TENSIÓN DE CARGA MÁXIMA = 15 V
NO UTILIZAR EL PRODUCTO SI ESTÁ DAÑADO
Medio ambiente
Charging:
WARNING: RISK OF IGNITION – DO NOT CHARGE IN A HAZARDOUS AREA
DO NOT OPERATE THE PRODUCT WITH THE CHARGER
CONNECTED
1. Insert the charger plug into the blue socket on the rear of the light
housing and twist the blue locking collar to secure the plug.
2. Plug the charger into the electrical outlet and switch on.
Observe the following sequence:
Slow Yellow Flash = Pre Charge
Fast Green Flash = Rapid Charge
Slow Green Flash = Maintain
Solid Green Light = Ready
Responsible person:
Piero Manigo managing director Peli products, S.L.U
Fecha: 11 de enero de 2011
Código: conforme a la norma UL 783, ISA 12.12.01 y CSA C22.2 n.º
213
Clase I, división 2, grupos ABCD T4
Manual del usuario de
Peli 9435
Funcionamiento del mástil
1. Eleve el cabezal del LED totalmente hacia arriba y, a continuación, deslice
el mástil hacia abajo hasta que encaje en la base
2. Tire de la palanca situada en la brida de bloqueo negra, eleve el cabezal y
vuelva a ajustar la palanca en su lugar
3. Para plegar el mástil, siga el procedimiento inverso
Funcionamiento de la linterna
1. Pulse la tecla una vez para máxima potencia
2. Pulse de nuevo para potencia baja
3. Pulse de nuevo para apagar la unidad
Modo intermitente
La batería de plomo sellada se debería enviar a un centro de reciclaje o
devolverla en el punto de compra.
Sello de garantia
Pelican Products sella sus productos con (una etiqueta de seguridad
/ un sello de pintura) para evitar su modificación, reparación o
mantenimiento no autorizados.
La rotura o retirada de este sello invalidará la garantía de Pelican.
Consulte nuestro sitio web para obtener más información. Para
reparaciones u operaciones de mantenimiento, diríjase al servicio
técnico autorizado Pelican más cercano.
Pelican garantiza los productos del AALG durante 1año contra
defectos en materiales y mano de obra. Mas infornación en
www.pelican.com/warranty
1. Mantenga pulsada la tecla durante 3 segundos y el cabezal del
LED parpadeará
2. Pulse de nuevo la tecla para apagar la unidad
Manuel d’utilisateur
Peli 9435
AVISO: RIESGO DE IGNICIÓN: NO CARGAR EN UNA ZONA
PELIGROSA NO UTILIZAR EL PRODUCTO CON EL CARGADOR
ENCHUFADO
1. Conectar el cargador en la toma azul de la parte posterior de la linterna
y girar el anillo de bloqueo azul para fijar el conector.
2. Enchufar el cargador y encender.
Se producirá la siguiente secuencia:
Parpadeo lento luz amarilla: precarga
Parpadeo lento luz verde: carga rápida
Parpadeo lento luz verde: mantener
Luz verde fija: carga finalizada
Fonctionnement du mât
Declaración de conformidad con la directiva 94/9/CE de la UE de AALG
Ltd.
AALG Ltd., con sede en Chater Court, 4, Halifax Drive, Market Deeping,
Peterborough, PE6 8AH (Reino Unido)
declara que, bajo su exclusiva responsabilidad como proveedor/fabricante
del producto:
Modelo: 9435 Remote Area Lighting System
Núm. certificado: Intertek 09041970
Normas: EN60079-0 2006, EN60079-11 2007
al cual se refiere esa declaración cumple los requisitos básicos de salud y
seguridad de la directiva ATEX 94/9/CE, el equipo satisface los
requisitos de las cláusulas 1, 2, 7 y 1.0.6., anexo II, de la directiva ATEX
94/9/CE, a condición de que el modelo citado tenga un uso, servicio y
mantenimiento conforme a las instrucciones que se adjuntan.
1. Soulevez la tête de la LED vers le haut puis faites glisser le mât vers le
bas pour le verrouiller bien en place
2. Tirez sur le levier sur le clamp de verrouillage noir, soulevez
la tête vers le haut et faites claquer le levier en place
3. Pour rentrer le mât, inverser la procédure
Fonctionnement de la lumière
1. Appuyez une fois sur le clavier pour une puissance maximum
2. Appuyez à nouveau pour une faible puissance
3. Appuyez à nouveau pour éteindre
Mode clignotement
1. Appuyez et maintenez la touche enfoncée pendant 3 secondes
pour que la tête LED clignote
2. Appuyez à nouveau sur la touche pour éteindre
Indicateur clignotant lentement en jaune = Préchargement
Indicateur clignotant rapidement en vert = Chargement rapide
Indicateur clignotant lentement en vert = Maintenir
Indicateur allumé en vert = Prêt
Déclaration de conformité Directive 94/9/CE de l'UE de AALG Ltd
Nous, AALG Ltd, 4 Chater Court, Halifax Drive, Market Deeping,
Peterborough, PE6 8AH, Royaume-Uni,
déclarons sous notre entière responsabilité que la fourniture/fabrication du
produit :
Modèle : Système d'éclairage pour zones d'accès difficiles 9435
Fiche technique de référence : Intertek 09041970
Normes : EN60079-0 2006, EN60079-11 2007
à laquelle se réfère la présente déclaration est conforme aux exigences
fondamentales de la directive ATEX 94/9/CE en termes de santé et de
sécurité, et que l'équipement est conçu pour satisfaire aux conditions
requises des clauses 1, 2, 7 et 1.0.6 de l'annexe II de la directive ATEX
94/9/CE, à condition que le modèle ci-dessus soit utilisé, réparé et
entretenu conformément aux instructions l'accompagnant.
Responsible person: Piero Manigo managing director Peli products, S.L.U
Date : 11 janvier 2011
Code : conforme à la norme UL 783, ISA 12.12.01 et CSA C22.2 N° 213
Classe I, division 2, groupes ABCD T4
II 3 G Ex ic IIC T4 Gc
Cert#. ITS09ATEX26777
IECEx ITS 10.0011
UO = 13,5 V, IO = 14 mA, PO = 0,19 W et UM = 15 V
Conditions Spéciales pour une utilisation en toute
sécurité :
RISQUE DE COMBUSTION – N'OUVREZ PAS LE PRODUIT DANS UNE
ZONE DANGEREUSE
RISQUE DE COMBUSTION – NE RECHARGEZ PAS LE PRODUIT
DANS UNE ZONE DANGEREUSE
UTILISEZ UNIQUEMENT UN BLOC-PILES HOMOLOGUÉ CAT#009433-3520-000
UTILISEZ UNIQUEMENT UN CHARGEUR HOMOLOGUÉ –
CAT#009436-3435-000
TENSION DE CHARGE MAXIMALE = 15 V
N'UTILISEZ PAS LE PRODUIT S'IL EST ENDOMMAGÉ
Environnement
La batterie au plomb acide devra être envoyée à un centre
de recyclage ou au point d’achat.
POLITIQUE DE GARANTIE DE REMPLACEMENT
Envoyez tous les articles pour réparation ou remplacement directe
ment au Département de réparation client des produits Pelican (port
payé). Veuillez appeler pour obtenir un numéro d’autorisation. En ce
qui concerne notre garantie, Pelican Products remplacera ou réparera
tout produit cassé ou défectueux. À la réception des marchandises,
Pelican Products vous informera de tous frais de retour ou de ma
nutention. Si votre détaillant local ne stocke pas les pièces acces
soires ci-dessus, vous pouvez les commander directement auprès
de Pelican Products. Envoyez un chèque ou un mandat en dollars
américains, ou commandez par téléphone avec votre MasterCard ou
VISA (demandez le Service Client). DÉSOLÉ, le paiement avec contre
remboursement n’est pas accepté. 2 – 3 semaines. Pelican Products
paye les frais de port et de manutention. PORT PAYÉ POUR LES
CODES POSTAUX AMÉRICAINS UNIQUEMENT.
Avertissement :
RISQUE DE COMBUSTION – NE RECHARGEZ PAS LE
PRODUIT DANS UNE ZONE DANGEREUSE N'UTILISEZ PAS
LE PRODUIT LORSQU'IL EST RACCORDÉ AU CHARGEUR
1. Insérez la fiche du chargeur dans la prise bleue située à l'arrière du
boîtier du système d'éclairage et faites tourner la bague de
verrouillage bleue pour bien fixer la fiche.
2. Branchez le chargeur dans la prise électrique et mettez-le en
marche.
La séquence de fonctionnement est la suivante :
4001753
0359