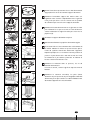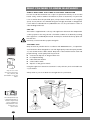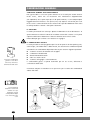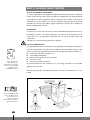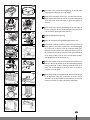
1
R 17
3
MANUEL D'UTILISATION
2
2
GEBRAUCHSANWEISUNG
14
5
INSTRUCCIONES DE USO
26
4
OPERATING MANUAL
38
>
ISTRUZIONI D’USO
50
1
GEBRUIKSAANWIJZING
62
E
E
3
PAGE PLIANTE
2
AUFFALTBLATT
5
HOJA DESPLEGABLE
4
FOLD-OUT PAGE
>
PIEGHEVOLE
1
UITVOUWBLAD
E
E
E
a - EMC
E
E
E
E
E
E
E
E
E
E
E
E
E
E
E
E
Chère Madame, Cher Monsieur,
Nous vous remercions de la confiance que vous avez bien voulu témoigner à
notre marque en choisissant un appareil mobile de chauffage a combustible
liquide Zibro. Vous venez d'acquérir un produit de qualité, qui vous donnera
entière satisfaction durant de très nombreuses années. A condition, bien sûr, de
respecter les consignes d'utilisation. C'est pourquoi nous vous invitons
vivement à consulter ce manuel afin d'assurer à votre appareil une durée de
vie optimale.
Les produits Zibro sont garantis contre tout vice de fabrication ou de
conception (hors consommables) pendant une durée de 2 ans à compter de
leur date d'achat.
Nous vous souhaitons beaucoup de chaleur et de confort avec votre Zibro .
Bien cordialement,
PVG International b.v.
Service-Consommateurs
1 LISEZ PRÉALABLEMENT LE MANUEL D'UTILISATION.
2 EN CAS DE DOUTE, CONTACTEZ VOTRE REVENDEUR ZIBRO.
3 POUR LIRE, DÉPLIEZ LA DERNIÈRE PAGE.
3
2
R 17 C
E
E
E
E
E
E
E
E
E
E
E
E
E
E
L'UTILISATION
DANS LES GRANDES LIGNES
ÉLÉMENTS
IMPORTANTS
Voici, dans les grandes lignes, la marche à suivre pour
utiliser votre appareil mobile de chaufage à
combustible liquide. Le MANUEL D'UTILISATION
(page 5 et suivantes) reprend chaque étape en détail.
1
Retirez les différents emballages
(voir le chapitre A, fig. A).
2
Remplissez le réservoir amovible I et attendez 30 minutes
avant d’allumer l’appareil mobile de chaufage à combustible
liquide (voir le chapitre B, fig. I).
3
4
Placez les piles dans leur logement L (voir le chapitre A, fig. H).
5
Allumez l’appareil en tournant à fond le bouton
central B à droite puis en appuyant doucement sur le
mécanisme d’allumage 3 (voir chapitre C, fig. J et K).
Après allumage de l’appareil, il vous faut attendre 10 à 15
minutes avant de pouvoir contrôler si l’appareil fonctionne
bien (voir le chapitre D).
7
Eteignez l’appareil à pétrole (voir le chapitre E).
•
•
•
•
•
•
E
E
E
E
E
E
E
E
E
E
E
E
E
E
B
Bouton central
C
Mécanisme
4
Brûleur
E
Poignée du brûleur
F
Indicateur du
combustible
Le remplissage du réservoir doit se faire
(sécurité contre l’incendie):
- soit appareil à l’arrêt,
- soit dans un autre local que celui où est
installé le chauffage,
- dans tous les cas, l’utilisateur doit vérifier la
bonne fermeture de son réservoir rechargé
en dehors de toute source de chaleur ou de
feux nus (voir le chapitre B).
Votre appareil dégagera une odeur de 'neuf'
en chauffant pour la première fois.
Conservez votre combustible dans un endroit
frais, à l'abri de la lumière après avoir fermé le
ou les bidons avec le bouchon d'origine.
Le combustible vieillit. Utilisez à chaque début
de saison de chauffage du nouveau combustible.
Si vous chauffez au Zibro Extra ou Zibro Kristal
vous êtes assurés d'avoir un combustible de
bonne qualité.
Si vous changez de marque et/ou de type de
pétrole, vous devez d'abord vous assurer que
l’appareil à pétrole consomme entièrement le
combustible présent.
E
Bouton de sécurité
d'allumage
Vérifiez le positionnement du brûleur D celui-ci doit être
vertical (voir le chapitre A, fig. E).
6
A
G
Grille
H
Couvercle du
réservoir amovible
I
Réservoir amovible
J
Jauge de
combustible du
réservoir amovible
E
E
K
Allumeur
L
Logement des piles
M
Verrouillage
E
E
E
3
3
R 17
E
E
E
CE QUE VOUS DEVEZ SAVOIR AU PRÉALABLE:
AÉREZ TOUJOURS SUFFISAMMENT
Quel que soit le modèle, vous devez toujours prévoir une pièce de volume minimal
afin d'utiliser l’appareil en toute sécurité, sans aération supplémentaire. Si le
volume de la pièce est plus petit que celui préconisé, vous devez toujours
entrebâiller une fenêtre ou une porte (± 2,5 cm). Il est important que chaque pièce
où l’appareil est utilisé soit munie d'une entrée d'air suffisante et d'une sortie d'air
efficace (section minimale de 50 cm2 pour chaque orifice). N'utilisez pas votre
appareil dans les pièces insuffisamment aérées ou situées au-dessous du niveau du
sol et/ou au-dessus de niveau plus haut que 1500 mètres, ni dans les caravanes, les
bateaux et les cabines de véhicules. Toute modification du système de sécurité est
interdite, car dans ce cas, nous ne pourrons plus garantir le bon fonctionnement du
contrôleur d'atmosphère. En cas de doute, consultez votre revendeur.
DESSUS TEMPÉRÉ (LE ‘SAFE TOP’)
L’appareil est muni d’un dessus tempéré, nommé le système ‘Safe top’.
Ceci permet de diminuer la température du plateau supérieure.
Si le dessus tempéré est touché par accident, ce dessus tempéré permet un risque
réduit.
Attention: le plateau supérieur et la grille devant restent chaud.
Eviter tout contact avec la grille.
LE COMBUSTIBLE APPROPRIÉ
Seul un combustible
approprié vous garantit
un usage sûr et durable
de votre appareil.
Votre appareil a été conçu pour fonctionner avec du pétrole pur, de haute qualité
et dénué d'eau, comme Zibro Extra et Zibro Kristal. Seuls ces combustibles vous
assureront une combustion propre et optimale. Un combustible de moins bonne
qualité peut se traduire par:
E un dépôt de carbone excessif sur la mèche
E une combustion imparfaite
E une réduction de la durée de vie de l’appareil
E un dégagement de fumée et/ou de mauvaise odeur
E un dépôt sur la grille ou le manteau
Un combustible approprié est donc essentiel pour un usage sûr et durable de votre
appareil.
Consultez toujours votre revendeur le plus proche sur le combustible approprié
pour votre appareil.
A
Vous trouverez ce
bouchon de transport
séparément dans le
carton. Pour transporter
l’appareil dans votre
véhicule, utilisez
obligatoirement le
bouchon de transport. Il
faut donc bien le
conserver!
3
4
R 17
MANUEL
B
A
E
E
E
E
I N S TA L L AT I O N D E L’ A P PA R E I L
1 Retirez avec précaution votre appareil du carton et vérifiez-en le contenu.
En plus de l’appareil, vous devez disposer:
E d'une pompe à combustible
E d'un bouchon de transport
E du présent manuel d'utilisation
C
Conservez le carton et l'emballage (fig. A) à des fins d'entreposage et/ou de
transport.
2 Retirez les calages de protection :
E Soulevez la grille hors de la rainure (fig. B) et tirez-la vers l'avant.
E Tirez sur les deux cotés de l’emballage en poussant légèrement vers le bas
(fig. C).
E Enlevez la chambre de combustion et autres protections situé dessous la
chambre de combustion (fig. D).
E Remettez le brûleur en place. Le brûleur se trouve bien positionné si, à
l'aide de la poignée E, vous pouvez le déplacer sans effort légèrement à
gauche et à droite (fig. E).
E Ouvrez le couvercle du réservoir amovible H et retirez la cale de carton.
D
E
3 Remplissez le réservoir amovible en suivant les instructions du chapitre B.
4 Placez les piles dans leur logement L, situé à l'arrière de l’appareil, à pétrole
(fig. F). Faites attention aux pôles + et -.
5 La surface du sol doit être plane. Déplacez l’appareil s'il n'est pas
parfaitement horizontal. N'essayez pas de corriger sa position en mettant en
dessous des livres ou un objet quelconque.
F
6 Votre appareil est maintenant prêt à l'emploi.
G
B
REMPLISSAGE DU COMBUSTIBLE
Remplissez votre réservoir amovible dans un lieu approprié (au cas où vous
renverseriez du combustible). Procédez comme suit:
1 Assurez-vous que l’appareil est éteint.
H
2 Soulevez le couvercle H, dégagez le réservoir amovible I et retirez-le de
l’appareil (fig. G). Attention! quelques gouttes de combustible peuvent
encore s'écouler du réservoir. Posez le réservoir amovible (bouchon en haut)
puis dévissez le bouchon du réservoir.
3 Prenez la pompe à main et introduisez le tuyau rigide dans le bidon.
Veillez à ce que ce dernier soit plus haut que le réservoir amovible (fig. H).
Introduisez le tuyau flexible dans l'orifice du réservoir amovible.
3
5
R 17
E
E
4 Serrez le bouton situé au dessus de la pompe (en le tournant à droite).
5 Pressez la pompe plusieurs fois jusqu'à ce que le combustible commence à
couler dans le réservoir amovible. Une fois que c'est le cas, vous n'avez plus
besoin de presser la pompe.
I
vide
6 Lors du remplissage, observez attentivement la jauge du niveau de
combustible J (fig. I). Si celle-ci est pleine, désamorcez la pompe en
desserrant le bouton situé sur la pompe (en le tournant à gauche).
Ne remplissez jamais trop le réservoir, surtout si le combustible est très froid
(en chauffant, le combustible se dilate).
plein
7 Ne laissez pas le combustible encore présent dans la pompe, remettez-le dans
le bidon et retirez la pompe avec soin. Vissez le bouchon du réservoir
minutieusement sur le réservoir. Essuyez le combustible éventuellement
renversé.
8 Dans tous les cas, l’utilisateur doit verifier la bonne fermeture du reservoir
rechargé en dehors de toute source de chaleur ou de feux nus. Remettez le
réservoir amovible dans l’appareil. Refermez le couvercle. Pensez à fermer
votre bidon pour éviter des dépôts d'eau.
C
A L L U M A G E D E L’ A P PA R E I L
Au début, un appareil mobile de chauffage à combustible liquide neuf dégage
une certaine odeur. Assurez donc une aération supplémentaire ou bien allumez
votre appareil la première fois à l'extérieur de l'espace habitable.
☞
Si vous utilisez l’appareil pour la première fois, vous devez, après avoir placé le
réservoir amovible plein, attendre 30 minutes environ avant d'allumer. Cela
permet à la mèche de s'imbiber de combustible. Procédez de la même manière
lors d'un changement de mèche.
Avant d'allumer l’appareil, vérifiez toujours l'indicateur du combustible F pour
savoir si vous devez d'abord remplir le réservoir amovible.
Allumez toujours l’appareil en vous servant de son allumage électrique.
N'utilisez jamais d'allumettes ou de briquet.
Procédez comme suit:
J
1 Tournez le bouton central B à droite jusqu'à la butée (fig. J). En exerçant une
petite pression, vous pourriez faire tourner le bouton central un peu plus; ce
dernier revient cependant tout seul par effet ressort.
2 Appuyez sur le mécanisme d'allumage C (fig. K) mais pas trop fort. Dès
qu'une petite flamme apparaît dans le brûleur D, vous pouvez relâcher le
mécanisme d'allumage.
K
3
6
R 17
☞ ☞
E
Si après une première utilisation de l’appareil le bouton ne tient pas
enclenché.
Tourner le bouton (fig. L) dans le sens inverse des aiguilles d’une montre, puis
refaire l’opération inversée pour procéder à l’allumage (chapitre C).
Après allumage de l’appareil, vérifiez toujours que le brûleur D est bien
vertical en le bougeant légèrement à l'aide de la poignée E vers la gauche et
vers la droite (fig. E). Cela doit s'effectuer sans forcer. Si le brûleur est mal
positionné, il se formera de la fumée et de la suie.
D
F O N C T I O N N E M E N T D E L’ A P PA R E I L
Après allumage de l’appareil, il vous faut attendre 10 à 15 minutes avant de
pouvoir contrôler si l’appareil fonctionne bien. Les hauteurs maximales et
minimales autorisées pour votre flamme sont indiquées figure P. Une flamme trop
haute peut provoquer la formation de fumée et de suie alors qu'une flamme trop
basse entraîne la formation d'odeur et d'usure de la mèche. Vous pouvez régler la
flame un peu en vous servant du bouton central 2 (fig. L).
Les causes possibles d’une flamme trop basse sont:
E trop peu de combustible
(remplissez le réservoir)
E combustible de mauvaise qualité
(consultez votre revendeur)
E trop peu d’aération
(entrebâillez une fenêtre ou une porte)
E usure de la mêche
(consultez votre revendeur, ou changez
la mèche, voir chapitre M)
L
E
E X T I N C T I O N D E L’ A P PA R E I L
Laisser l’appareil brûler pendant 1 minute environ en position basse (fig. L).
Tournez ensuite le bouton central B à gauche jusqu'à la butée. La flamme
s'éteindra après quelques instants.
☞
M
F
Dans les cas d'urgence, vous pouvez éteindre l’appareil en appuyant sur la
touche de sécurité A (fig. M)
RÉAJUSTEMENT DE LA HAUTEUR DE LA MÈCHE
Après un certain temps d’utilisation, la combustion ne s’effectue plus
suffisamment (chapitre D). Dans ce cas, vous pouvez régler la hauteur de la mèche.
Eteignez l’appareil. Procédez comme suit:
Q
1 Appuyez sur le bouton d’extinction A (fig. M).
2 Tirez le bouton central B de l’appareil de manière à ce que le verrouillage
K soit visible.
3 Mettez la bague plastique entre le pouce et l'index et tirez-la vers l'avant.
Tournez la bague de 1 palier plus haut vers la position 2 ou 3 (fig. Q). Pressez
la bague avec précaution de manière à ce que l'évidement réenveloppe le
petit cliquet.
4 Poussez avec précaution le bouton central B pour le mettre en place. Cela
ne peut s'effectuer que d'une seule manière : voyez l'arrière du bouton pour
la bonne position.
☞
Si le réajustement de la hauteur de la mèche ne donne pas l'effet souhaité,
vous devez laisser l’appareil brûler la totalité du combustible (chapitre H).
Si la combustion reste quand même faible et votre mèche se trouve entre-temps
en position 3, prenez contact avec votre revendeur, ou changez la mèche, voir
chapitre M).
Si, la flamme devient trop haute (fig. Q), vous devez remettre le verouillage M un
cran plus bas. Si non, vous risquez de provoquer la formation de fumée et de suie.
3
7
R 17
G
PA N N E S : C A U S E S E T R E M È D E S
Si vous n'arrivez pas à remédier à une panne à l'aide des instructions ci-dessous,
vous devez contacter votre revendeur.
F
L’ALLUMAGE NE MARCHE PAS.
E Les piles ne sont pas bien placées dans leur logement.
Vérifiez (fig. F).
E Les piles ne sont pas assez puissantes pour l'allumage.
Changez-les (fig. F).
E L’appareil a entièrement consommé son combustible ou bien la mèche a
été changée.
Après avoir remis le réservoir amovible plein en place, attendez 30 minutes
avant d'allumer.
E Vous avez poussé le mécanisme d'allumage C trop fort.
Poussez moins fort (chapitre C).
E L’allumeur K est défectueux.
Consultez votre revendeur.
FLAMME INSTABLE ET/OU SUIE ET/OU ODEUR.
E Le brûleur D n’est pas correctement placé.
Mettez-la bien droit à l’aide de la poignée E jusqu’à ce que vous puissiez la
bouger facilement légèrement à gauche et à droite.
E Vous utilisez un combustible usagé.
Commencez chaque saison froide avec un combustible neuf.
E Vous utilisez un combustible inadapté.
Voir LE COMBUSTIBLE APPROPRIÉ.
E De la poussière s’est accumulée en dessous de l’appareil.
Consultez votre revendeur.
E La hauteur de la mèche n’est pas correct.
Voir chapitre F.
L’APPAREIL S’ÉTEINT LENTEMENT.
E Le réservoir amovible est vide.
Voir le chapitre B.
E Il y a de l’humidité dans le filtre.
Asséchez le filtre (chapitre H).
E Il y a de l’humidité dans le réservoir inférieur.
Consultez votre revendeur.
E Le haut de la mèche s’est durci.
L’appareil doit consommer tout son combustible (chapitre H).
Utilisez le propre combustible.
E Vous utilisez un combustible usagé.
Commencez chaque saison froide avec un combustible neuf.
L’APPAREIL BRULE TOUJOURS FAIBLEMENT.
E La mèche est trop basse.
Voir chapitre F.
E L’appareil a consommé pratiquement tout le combustible avant d’être de
nouveau rempli.
Après avoir placé le réservoir amovible plein, attendez 30 minutes avant
d’allumer.
E Vous utilisez un combustible usagé ou inadapté.
Voir LE COMBUSTIBLE APPROPRIÉ
E La pièce est insuffisamment aérée.
Ouvrez largement une fenêtre ou porte pendant quelque temps, puis
laissez-la entrebâillée.
L’APPAREIL BRULE TROP FORT.
E Vous utilisez un combustible inadapté, trop volatil.
Voir LE COMBUSTIBLE APPROPRIÉ.
E La mèche est trop élevée.
Voir chapitre F.
3
8
R 17
H
À P R O P O S D E L’ E N T R E T I E N
Votre appareil exige peu d'entretien. Mais vous devez essuyer la poussière et les
taches au moyen d'un chiffon sec. A défaut de quoi, des taches tenaces peuvent se
former. Normalement, trois éléments sont sujets à l'usure:
1. LES PILES
Vous pouvez les changer vous-même. Ne jetez pas les piles usagées à la poubelle.
Observez les règles en vigueur dans votre commune concernant les petits déchets
chimiques.
2. L’ALLUMEUR
L’allumeur tiendra plus longtemps si vous allumez l’appareil de manière
appropriée. Changez les piles à temps et veillez à ne pas enfoncer trop fort le
mécanisme d'allumage. Si le fil à incandescence est cassé, ou déformé vous devez
remplacer l’allumeur.
allumeur défaillant du
fait du filament rompu.
3. LA MÈCHE
Pour prolonger la durée de vie de la mèche, vous devez laisser de temps à autre
l’appareil consommer entièrement son combustible (jusqu'à ce qu'il s'éteigne de
lui-même). Procédez ainsi lorsque vous constatez que la flamme devient faible. En
consommant totalement son combustible, l’appareil dégage une odeur. Il vous est
donc conseillé de le faire à l'extérieur de l'espace habitable.
☞
Le filtre
combustible
Les réparations, le remplacement des pièces importantes et le travail sur les
éléments de sécurité ne doivent être exécutés que par des spécialistes agrées
(et reconnus par le fabricant ou l’importateur). Avant de procéder à son
entretien, laissez l’appareil refroidir.
N
LE FILTRE COMBUSTIBLE
Vérifiez aussi régulièrement le filtre à combustible:
Enlevez le réservoir amovible I hors de l’appareil puis retirez le filtre à
combustible (fig. N). Ayez un chiffon à portée de main pour essuyer le combustible
restant. Retirez le filtre à combustible et nettoyez-le avec du pétrole ou à l'aide
d'une soufflette (ne nettoyez jamais à l'eau!). Remettez le filtre à combustible
en place dans l’appareil.
☞☞
I
Ne démontez pas vous-même l’appareil. Pour toute réparation éventuelle, contactez toujours votre revendeur.
Avant de procéder à son entretien, laissez l’appareil refroidir.
ENTREPOSAGE (FIN DE LA SAISON)
A la fin de la saison, nous vous conseillons de faire en sorte que l’appareil
consomme la totalité de son combustible puis de l'entreposer dans de bonnes
conditions. Veuillez suivre les instructions suivantes:
1 Allumez l’appareil à l'extérieur de l'espace habitable et laissez-le
consommer entièrement son combustible.
2 Laissez l’appareil refroidir.
3 Nettoyez l’appareil à l'aide d'un chiffon sec.
4 Retirez les piles de l’appareil L et conservez-les dans un endroit sec.
3
5 Nettoyez le filtre à combustible (chapitre H).
9
R 17
6 Rangez l’appareil dans un lieu sans poussière, si possible en utilisant
l'emballage d'origine. Vous ne pourrez pas conserver le combustible restant
pour la saison suivante. Allumez l’appareil et laissez-le consommer
entièrement son combustible. Ne jetez pas le combustible n'importe où.
Observez les règles en vigueur dans votre commune concernant les déchets
chimiques. En tout cas, commencez la nouvelle saison avec du combustible
neuf. Lorsque vous réutilisez votre appareil suivez les instructions de
nouveau (chapitre A).
N
J
TRANSPORT
Afin d'éviter les fuites de combustible durant le transport de l’appareil, vous devez
prendre les précautions suivantes:
1 Laissez l’appareil refroidir.
2 Retirez le réservoir amovible I de l’appareil et retirez le filtre à combustible
(fig. N). Ce dernier peu goutter un peu; gardez un chiffon à portée de main.
Conservez le filtre et le réservoir amovible indépendamment de l’appareil.
O
3 Mettez le bouchon de transport à la place du filtre à combustible (fig. O) et
enfoncez-le bien.
4 Transportez l’appareil toujours en position verticale.
K
SPÉCIFICATIONS TECHNIQUES
Allumage
Combustible
Bouchon de transport
Puissance calorifique max.
Conseiller pour des pièces normalement
airées (m3)**
Consommation de combustible (l/heure)*
Consommation de combustible (g/heure)*
Autonomie du réservoir (heures)
Contenance du réservoir amovible (litres)
Poids (kg)
Dimensions (mm)
(plateau inférieur compris)
Accessoires
Piles
Type mêche
*
**
L
électrique
Combustible liquide pour appareils
mobiles de chauffage
250 g/h
3000 Watt
minimum 85
maximum 110
0,313
250
minimum 12,8
4,0
9,0
largeur
428
295
profondeur
hauteur
513
pompe à main
bouchon de transport
2x R20kG, MN 1300, 1,5V, size D
F
En cas de réglage en position maximale
Ces valeurs sont données à titre indictif
CONDITIONS DE GARANTIE
Votre appareil est couvert par une garantie de 2 ans à compter de la date d'achat.
Durant cette période, tous les vices de fabrication ou de conception seront réparés
gratuitement. De plus, les règles suivantes s'appliquent :
1 Nous rejetons expressément toute autre demande d'indemnisation, y compris
en cas de préjudice indirect.
3
10
R 17
2 La réparation ou le changement de pièces effectués dans la période de
garantie n'entraîne pas la reconduction de la garantie.
3 La garantie ne s'applique pas dans les cas suivants: modifications apportées au
l’appareil, usage de pièces non d'origine, réparations de l’appareil
effectuées par des tiers.
4 Les pièces sujettes à l'usure normale, comme la mêche, les piles, l’allumeur et
la pompe à main ne sont pas couverts par la garantie.
5 La garantie s'applique uniquement si vous présentez le bon d'achat d'origine,
daté et ne portant pas de modifications.
6 La garantie ne s'applique pas en cas de dommage occasionné par des
manipulations non conformes au manuel d'utilisation, par une négligence ou
par l'usage de combustible non approprié ou usagé. Un combustible non
approprié peut même être dangereux*.
7 Les frais d'expédition et les risques liés à l'envoi de l’appareil ou de ses
pièces sont toujours à la charge de l'acheteur.
En cas de problème, consultez le manuel d'utilisation. Si le problème persiste,
consultez votre revendeur.
* Les matières hautement inflammables, par exemple, peuvent produire une combustion incontrôlable avec,
pour conséquence, un jaillissement des flammes. Dans ce cas, n'essayez pas de déplacer l’appareil mais éteignezle immédiatement (voir le chapitre E). En cas d'urgence, vous pouvez utiliser un extincteur mais uniquement du
type B: extincteur à acide carbonique ou à poudre.
10 CONSEILS POUR UN USAGE EN TOUTE SÉCURITÉ
1
Attirez l'attention des enfants sur la présence d'un appareil en
combustion.
2
Ne déplacez pas l’appareil lorsqu'il chauffe ou s'il est encore brûlant.
Dans ces conditions, il ne faut pas ajouter du combustible ni
entreprendre l'entretien du l’appareil.
3
Placez l'avant l’appareil à au moins 1,5 mètre du mur, des rideaux
et des meubles.
4
N'utilisez pas l’appareil dans des pièces poussiéreuses ni dans des
endroits à fort courant d’air. Dans ces deux cas, la combustion ne sera
pas optimale.
5
Eteignez l’appareil avant de sortir ou d'aller vous coucher.
6
Conservez le combustible exclusivement dans des réservoirs et bidons
adaptés.
7
Veillez à ce que le combustible ne soit pas exposé à la chaleur ou à des
écarts de température extrêmes. Conservez le combustible toujours dans
un endroit frais, sec et sombre (la lumière solaire dégrade la qualité du
combustible).
8
N'utilisez jamais l’appareil dans des endroits où des gaz, solvants ou
vapeurs nocives (par exemple: gaz d'échappement ou vapeurs de
peinture) peuvent être présents.
9
Le plateau supérieur de l’appareil devient brûlant. Ce n’est pas
permis de couvrir l’appareil (risque d’incendie).
10
Aérez toujours suffisamment.
3
11
R 17
1
2
LE CHANGEMENT DE LA MÈCHE
M
3
AVANT DE COMMENCER A CHANGER LA MECHE,
L’APPAREIL DOIT ETRE ETEINT ET TOTALEMENT
REFROIDI.
4
1 Ouvrez la porte de réservoir et retirez le réservoir
amovible.
2 Retirez les piles qui se trouvent dans leur logement a
l’arrière de l’appareil.
5a
5b
3 Ouvrez la grille et retirez le brûleur puis refermez la
grille.
4 Retirez le bouton central en tirant vers vous
6
7
5 Devissez les vis de maintien du manteau (3)
Soulevez le manteau vers le haut, puis l’inclinez vers
vous pour passer l’axe du bouton central.
6 Devissez les vis papillons (4) de maintien du support
mèche.
8a
8b
7 Retirez le support mèche.
8 Enlevez la vis qui se trouve sur l’axe du bouton central.
Retirez la butée de maintien en la tirant vers vous.
9 Tournez complètement vers la droite l’axe.
9
10
10 Retirez l’ensemble support de mèche en le tirant vers le
haut.
11 Retirez la mèche de l’anneau support mèche. Pour cela
retirez le crochet de maintien (ergot) du trou de
11
l’anneau de mèche. Pour cela il est conseillé de se munir
de gants et d’un récipient pour mettre la mèche dedans
une fois enlevée.
3
12
R 17
12a
12b
12 Prenez la mèche et positionner les crochets de maintien
(ergots) dans les trous de l’anneau support de mèche.
13 Remettez l’ensemble support de mèche dans son
13a
13b
logement. Puis tourner complètement vers la gauche
l’axe, pour que celui-ci soit en contact avec le système
de cannelure qui se trouve sur le support de mèche.
14 Remettez la butée de maintien en la glissant sur l’axe
puis remettez la vis qui se trouve sur l’axe du bouton
1 4a
1 4b
central. Remettez le support mèche puis visser les vis
papillons (4).
15 Remettez le support de brûleur en place.
16 Serrez manuellement les papillons de manière égale.
15
16
17 Pour tester le bon fonctionnement du coulissement de
la mèche. Mettez la mèche en position basse puis à
l’aide du système masselotte déclencher l’appareil.
Répétez quelque fois. Si la mèche n’arrive pas dans la
position la plus basse elle à été mal monté et il faut
recommencer la procédure à partir de 12. Retirez le
17a
17b
bouton central en tirant vers vous.
18 Remettez le manteau dans sa position, les vis de
maintien du manteau.
Le bouton central, ouvrez la grille et repositionnez le
brûleur.
18a
18b
19 Remettez le réservoir amovible, les piles (faites
attention au pôle positif et au pôle négatif)et attendez
30 minutes pour que la mèche soit bien imbibée avant
de mettre l’appareil en fonctionnement.
18c
18d
19a
19 b
3
13
R 17
Sehr geehrte Kundin, sehr geehrter Kunde,
herzlichen Glückwunsch! Sie sind jetzt der stolze Besitzer eines Zibro, der TopMarke transportabler Kaminöfen. Sie haben sich für ein absolutes
Qualitätsprodukt entschieden, an dem Sie noch viele Jahre Ihre Freude haben
werden, vorausgesetzt, Sie benutzen den Kaminofen verantwortungsvoll. Lesen
Sie deswegen zuerst diese Gebrauchsanweisung aufmerksam durch, um so eine
optimale Lebensdauer Ihres Zibro zu garantieren.
Im Namen des Herstellers bieten wir Ihnen 24 Monate Garantie auf alle
eventuell auftretenden Material- und Herstellungsfehler.
Wir wünschen Ihnen viel Wärme und Komfort mit Ihrem Zibro.
Mit freundlichen Grüßen
PVG International b.v.
Abteilung Kundendienst
1 LESEN SIE ZUERST DIE GEBRAUCHSANWEISUNG.
2 WENDEN SIE SICH IM ZWEIFELSFALL AN IHREN HÄNDLER.
3 VOR DEM LESEN DER GEBRAUCHSANWEISUNG BITTE DAS LETZTE BLATT AUFFALTEN.
2
14
R 17
E
E
E
BENUTZUNG
KURZ ZUSAMMENGEFASST
WICHTIGE
EINZELTEILE
Nachfolgend sind in groben Zügen die Schritte
angegeben, die zur Inbetriebnahme Ihres Kaminofens ausgeführt werden müssen. Detaillierte
Beschreibung der Handlungen entnehmen Sie bitte
der GEBRAUCHSANWEISUNG (Seite 17 ff).
1
Entfernen Sie das gesamte Verpackungsmaterial
A
Sicherheitstaste
B
Drehregler
C
Zünd-Taste
4
Brennkammer
E
Handgriff
(siehe Kapitel A, Abb. A).
2
Befüllen Sie den Brennstofftank I und warten Sie 30 Minuten
bevor Sie den Kaminofen starten (siehe Kapitel B, Abb. H).
3
Geben Sie die Batterien in das Batteriefach L
Brennkammer
(siehe Kapitel A, Abb.F).
4
Überprüfen Sie, ob die Brennkammer D gerade steht
F
Brennstoffanzeige
G
Gitter
H
Deckel
(siehe Kapitel A, Abb. E).
5
Starten Sie den Kaminofen, indem Sie den Drehregler B langsam nach rechts drehen, bis er sich nicht weiter drehen läßt,
anschließend die Zünd-Taste C vorsichtig betätigen (siehe
Kapitel C, Abb. J und K).
Brennstofftank
6
Nach dem Starten des Ofens dauert es 10 bis 15 Minuten bevor
Sie sehen, ob der Ofen richtig brennt (siehe Kapitel D).
7
I
Brennstofftank
J
Brennstoffanzeige
Schalten Sie den Kaminofen aus (siehe Kapitel E).
•
Das erste Mal wird Ihr Kaminofen während des
Brennstofftank
Brennens noch ‘neu’ riechen.
•
Lagern Sie den Brennstoff an einem kühlen,
dunklen Ort.
•
Elektrische Zündung
L
Batteriefach
M
Dochthöhe
Brennstoff altert. Beginnen Sie jede Heizsaison
mit neuem Brennstoff.
•
K
Wenn Sie Zibro Extra oder Zibro Kristal benutzen,
können Sie sich auf die Qualität des Brennstoffs
verlassen.
•
Wenn
Sie
zwischen
den
einzelnen
Sorten
wechseln, müssen Sie den Kaminofen erst vollständig leer brennen lassen.
E
E
E
E
E
E
E
E
E
E
E
E
E
E
E
E
E
E
E
E
2
15
R 17
E
E
E
WICHTIG ZU WISSEN
JEDERZEIT AUSREICHEND VENTILIEREN
Jedes Modell benötigt eine bestimmte minimale Raumgröße, um den Kaminofen
sicher, ohne zusätzliche Ventilation besonder gut betreiben zu können (siehe Kapitel K).
Wenn der betreffende Raum kleiner als der angegebene Minimumwert ist, muß
dafür gesorgt werden, daß immer ein Fenster oder eine Tür einen Spalt breit offen
bleibt (ca. 2,5 cm). Dies ist ebenfalls empfehlenswert bei Räumen, die besonders
gut isoliert oder zugfrei sind und/oder über 1500 m liegen. Benutzen Sie den
Kaminofen nicht in Keller- oder anderen unterirdisch gelegenen Räumen.
DER SAFE TOP
Der Ofen ist versehen von einem Safe Top. Dieser verringert die Temperatur an der
Oberseite des Ofens. Sollte die Oberseite berührt werden, so wird das Risiko auf
schwere Verletzung erheblich verringert. Berücksichtigen Sie aber, daß die
Oberseite immer noch heiß wird.
Berühren Sie die Oberseite und das Gitter nicht.
DER RICHTIGE BRENNSTOFF
Nur mit dem richtigen
Brennstoff ist eine
sichere, effiziente und
komfortable Benutzung
Ihres Kaminofens
gewährleistet.
Ihr Kaminofen wurde für die Benutzung von wasserfreiem, sauberem Petroleum
hoher Qualität, wie Zibro Extra oder Zibro Kristal, entwickelt. Nur dieser
Brennstoff sorgt für eine saubere und optimale Verbrennung. Brennstoff
geringerer Qualität kann zu folgenden Problemen führen:
E übermäßige Ablagerung auf dem Docht
E unvollständige Verbrennung
E verkürzte Lebensdauer von Docht und Kaminofen
E Rauch und/oder Geruch
E Niederschlag auf dem Gitter oder Gehäuse
Der richtige Brennstoff ist also wichtig für einen sicheren, effizienten und
komfortablen Gebrauch Ihres Kaminofens.
Informieren Sie sich bei Ihrem Händler in Ihrer direkten Umgebung über den
richtigen Brennstoff für Ihren Kaminofen.
A
Diesen Transportverschluß finden Sie im
Verpackungskarton. Nur
hiermit kann der
Kaminofen nach
Benutzung problemlos
transportiert werden.
Bewahren Sie den
Verschluß also gut auf!
2
16
R 17
GEBRAUCHSANWEISUNG
A
E
E
E
E
D I E I N S TA L L AT I O N D E S K A M I N O F E N S
1 Nehmen Sie den Kaminofen vorsichtig aus dem Karton und kontrollieren Sie
den Inhalt auf Vollständigkeit.
Außer dem Kaminofen muß folgendes vorhanden sein:
E eine Syphonpumpe
E ein Transportverschluß
E diese Gebrauchsanweisung
B
C
Bewahren Sie den Karton und das Verpackungsmaterial (Abb. A) zwecks
Lagerung und/oder Transport auf.
2 Entfernen Sie das übrige Verpackungsmaterial:
E Entfernen Sie das Stückchen Verpackungsmaterial vom Gitter G.
Heben Sie das Gitter aus der Kerbung (Abb. B) und ziehen Sie es nach vorn.
E Ziehen Sie den Karton an der Oberseite der Brennkammer D vorsichtig
heraus und entfernen sie ihn (Abb. C). Nehmen Sie die Brennkammer aus
dem Kaminofen und entfernen Sie auch das Verpackungsmaterial unter der
Brennkammer (Abb. D).
E Setzen Sie die Brennkammer wieder ein. Die Brennkammer steht richtig,
wenn sie sich ohne Schwierigkeiten mit dem Handgriff E etwas nach links
und rechts verschieben lässt (Abb.E).
E Schließen Sie das Gitter: leicht anheben, um es wieder in die Kerbung
einrasten zu lassen.
E Öffnen Sie den Deckel des Brennstofftanks H und entfernen Sie das
Stückchen Karton.
D
E
3 Befüllen Sie den Brennstofftank wie in Kapitel B beschrieben.
F
4 Legen Sie die Batterien in das dafür bestimmte Fach L an der Rückseite des
Kaminofens (Abb. F). Achten Sie dabei auf die + und - Pole.
5 Der Boden muß stabil und waagerecht sein. Stellen Sie den Kamin an eine
andere Stelle, falls er nicht waagerecht steht. Versuchen Sie nicht durch
Unterlage von Büchern oder ähnlichem den Stand zu korrigieren.
6 Ihr Kaminofen ist jetzt betriebsbereit.
B
DAS BEFÜLLEN MIT BRENNSTOFF
Füllen Sie den Brennstofftank nicht im Wohnraum, sondern an einer dazu
geeigneten Stelle (falls etwas verschüttet wird). Gehen Sie wie folgt vor:
1 Der Kaminofen sollte ausgeschaltet sein.
G
2 Öffnen Sie den Deckel H und ziehen Sie den Brennstofftank I aus dem
Kaminofen (Abb. G). Achtung: der Tank kann kurz nachtropfen. Stellen Sie
den Brennstofftank ab (mit dem Tankverschluß nach oben) und drehen Sie
den Tankverschluß auf.
2
17
R 17
E
E
3 Den glatten, steifen Schlauch der Syphonpumpe in den Kanister stecken. Das
Befüllen ist einfacher, wenn der Kanister höher steht als der Brennstofftank
(Abb.H). Den geriffelten Schlauch stecken Sie dann in die Öffnung des
Brennstofftanks.
H
4 Den weißen Knopf oben auf der Pumpe zudrehen (nach rechts).
5 Einige Male die Pumpe drücken, bis der Brennstoff in den Brennstofftank
fließt. Sobald dies der Fall ist, brauchen Sie nicht mehr zu drücken.
6 Achten Sie während des Füllvorgangs auf die Brennstoffanzeige des
Brennstofftanks J (Abb. I). Wenn Sie sehen, daß der Tank fast voll ist, stellen Sie
den Füllvorgang ein. Hierzu drehen Sie den weißen Knopf oben auf der Pumpe
wieder auf (nach links). Den Tank niemals zu voll füllen. Vor allem nicht, wenn
der Brennstoff sehr kalt ist (Brennstoff dehnt sich aus, wenn er wärmer wird).
I
leer
7 Lassen Sie den Brennstoff, der sich noch in der Pumpe befindet, in den
Kanister zurückströmen und entfernen Sie die Pumpe vorsichtig. Schrauben
Sie den Tankverschluß wieder sorgfältig auf den Tank. Wischen Sie eventuell
verschütteten Brennstoff weg.
voll
8 Kontrollieren Sie, ob der Tankverschluß gerade sitzt und fest angezogen ist.
Setzen Sie den Brennstofftank wieder in den Kaminofen ein (Tankverschluß
nach unten). Schließen Sie den Deckel.
C
D A S S TA R T E N D E S K A M I N O F E N S
Ein neuer Ofen verursacht zu Beginn etwas Geruch. Sorgen Sie deswegen für zusätzliche Ventilation oder starten Sie den Ofen das erste Mal außerhalb des Wohnraumes.
☞
Wenn Sie den Kaminofen zum ersten Mal benutzen, müssen Sie nach dem
Einsetzen des Brennstofftanks ca. 30 Minuten warten, bevor Sie den Ofen
starten, damit sich der Docht mit Brennstoff vollsaugen kann. Dies trifft auch
zu, wenn Sie den Kaminofen vollständig leer gebrannt haben,
beziehungsweise nach Austausch des Dochtes.
Achten Sie vor dem Starten des Kaminofens darauf, daß sich noch genügend Brennstoff im Tank befindet (mit Hilfe der Brennstoffanzeige F).
Starten Sie den Kaminofen immer über die elektrische Zündung K.
Niemals Streichhölzer oder ein Feuerzeug benutzen.
Hierbei gehen Sie wie folgt vor:
J
1 Drehen Sie den Drehregler 2 nach rechts bis zum Anschlag (Abb. J). Mit
einem gewissen Druck könnten Sie den Drehregler dann noch etwas weiter
drehen, er federt dann jedoch von selbst wieder zurück.
2 Drücken Sie die Zünd-Taste C vorsichtig (ca. 2-3 Sekunden) (Abb. K), aber
nicht zu stark. Spätestens wenn in der Brennkammer eine kleine Flamme
sichtbar wird, lassen Sie die Zünd-Taste los. Falls notwendig, Vorgang wiederholen.
K
☞
2
18
R 17
Sollte bei erster Benutzung des Ofens der Flammenregler nicht verriegelt sein,
drehen Sie dann den Flammenregler (Abb. L) erst ganz nach links, bevor Sie
den Docht für die Zündung in die höchste Position einstellen (Kapitel C).
☞
E
D
L
Vor dem Starten des Kaminofens immer kontrollieren, ob die Brennkammer D
gerade steht, indem Sie den Handgriff E kurz nach links und rechts
schieben (Abb. E). Dies muß ohne Schwierigkeiten möglich sein. Wenn die
Brennkammer schräg steht, führt dies zu Rauch- und Rußentwicklung.
DAS BRENNEN DES OFENS
Nachdem der Kaminofen gestartet wurde, dauert es 10 bis 15 Minuten, bevor Sie
kontrollieren können, ob der Ofen gut brennt. Eine zu hohe Flamme kann Rauchund Rußentwicklung verursachen, während eine zu niedrige Flamme zu
Geruchsbildung führt. Auf der Seite neben dem Faltblatt können Sie sehen, wie
hoch die Flamme minimal und maximal brennen (Abb. P) sollte. Sie können die
Flamme mit dem Drehregler B etwas regulieren (Abb. L).
Eine zu niedrige Flamme kann entstehen durch:
E zu wenig Brennstoff
(befüllen Sie den Brennstofftank)
E schlechten Brennstoff
(wenden Sie sich an Ihren Händler)
(ein Fenster oder eine Tür einen Spalt breit öffnen)
E zu wenig Ventilation
E Verschleiß des Dochtes
(Dochtwechsel erforderlich, siehe Kapitel M)
E
D A S A U S S C H A LT E N D E S K A M I N O F E N S
Lassen Sie den Kaminofen ungefähr eine Minute auf einem niedrigen Stand
brennen (Abb. L). Dann drehen Sie den Drehregler B nach links bis zum Anschlag.
Die Flamme erlöscht dann von selbst.
☞
M
F
In Notfällen schalten Sie den Kaminofen durch Eindrücken der Sicherheitstaste
A aus (Abb. M).
DAS EINSTELLEN DER DOCHTHÖHE
Nach einiger Zeit ist die Verbrennung nicht mehr hoch genug (Kapitel D). In diesem Fall
können Sie die Dochthöhe nachstellen, um die Verbrennung zu verbessern. Bei der
Nachstellung muß der Kaminofen ausgeschaltet sein. Gehen Sie folgendermaßen vor:
Q
1 Drücken Sie die Abschalt-Taste A (Abb. M).
2 Ziehen Sie den Drehregler B vom Ofen ab, so daß die Verriegelung der
Dochthöhe M sichtbar wird.
3 Nehmen Sie den Kunststoffring zwischen Daumen und Zeigefinger und ziehen
Sie ihn zu sich heran. Drehen Sie den Ring eine Stufe höher auf Stand 2 oder 3
(Abb. Q). Drücken Sie den Ring vorsichtig an, so daß die Aussparung den Stift
wieder umschließt.
4 Stecken Sie den Drehregler wieder an die vorgesehene Stelle. An der Rückseite
des Reglers sehen Sie die richtige Position.
F
☞
Wenn die Nachstellung der Dochthöhe nicht den gewünschten Effekt hat, müssen
Sie den Kaminofen leerbrennen lassen (Kapitel H).
Wenn die Verbrennung auch dann noch zu gering ist und der Docht inzwischen auf
2
19
R 17
Stand 3 eingestellt ist, wenden Sie sich bitte an Ihren Händler, oder wechseln Sie den
Docht, siehe Kapitel M.
Wenn die Verbrennung nach der Nachstellung zu hoch ist (Abb. Q), soll die
Verriegelung der Dochthöhe wieder eine Stellung niedriger eingestellt werden. Sonst
ist Ruß- und Rauchentwicklung möglich.
G
STÖRUNGEN, URSACHEN UND LÖSUNGEN
Wenn sich eine Störung nicht mit Hilfe der untenstehenden Hinweise beheben
läßt, dann wenden Sie sich bitte an Ihren Händler.
DER OFEN LÄSST SICH NICHT STARTEN.
E Die Batterien sitzen nicht richtig im Batteriefach.
Überprüfen (Abb. F).
E Die Batteriespannung ist zu niedrig.
Austauschen (Abb. F)
E Sie haben den Kaminofen vollständig leerbrennen lassen oder den Docht
ausgetauscht.
Nach Einsetzen des gefüllten Brennstofftanks 30 Minuten mit dem Starten
warten.
E Sie haben die Zünd-Taste C zu stark betätigt.
Behutsam drücken (ca. 2-3 Sekunden) (Kapitel C).
E Die elektrische Zündung K ist defekt. Wenden Sie sich an Ihren Händler.
UNGLEICHE FLAMME UND/ODER RUß UND/ODER GERUCH
E Die Brennkammer D ist nicht richtig eingesetzt.
Mit dem Handgriff E die Brennkammer richtig einsetzen, bis sie sich mühelos
etwas nach links und rechts verschieben läßt.
E Sie benutzen veralteten Brennstoff.
Fangen Sie jede neue Heizsaison mit neuem und richtigem Brennstoff an.
E Sie benutzen einen falschen Brennstoff.
Siehe KORREKTER BRENNSTOFF (Kapitel „Wichtig zu wissen”).
E Staubanhäufung im unteren Bereich des Kaminofens.
Wenden Sie sich an Ihren Händler.
E Die Dochthöhe ist nicht richtig eingestellt.
Siehe Kapitel F.
DER KAMINOFEN GEHT LANGSAM AUS.
E Der Brennstofftank ist leer.
Trockenen Sie den Filter (Kapitel H).
E Es befindet sich Feuchtigkeit im Filter.
Siehe Kapitel B.
E Es befindet sich Feuchtigkeit im unteren Reservoir.
Wenden Sie sich an Ihren Händler.
E Der Docht ist an der Oberseite verhärtet.
Kaminofen außerhalb des Wohnraumes vollständig leer brennen lassen
(Kapitel H). Verwenden Sie richtigen Brennstoff.
E Sie benutzen veralteten Brennstoff.
Fangen Sie jede neue Heizsaison mit neuem und richtigem Brennstoff an.
DIE FLAMME DES OFENS BRENNT ZU NIEDRIG.
E Der Docht ist zu niedrig eingestellt.
Die Dochtnachstellung eine Stufe höher stellen (Kapitel F).
E Der Kaminofen hat vor dem Nachfüllen fast den gesamten Brennstoff
verbraucht.
Nach dem Einsetzen des vollen Brennstofftanks 30 Minuten warten, bevor der
Kaminofen erneut gestartet wird.
E Sie benutzen veralteten oder einen falschen Brennstoff.
Siehe KORREKTER BRENNSTOFF (Kapitel „Wichtig zu wissen”).
E Der Raum wird nicht ausreichend ventiliert.
Ein Fenster oder eine Tür kurz weit öffnen und danach einen Spalt breit offen
lassen.
2
20
R 17
DIE FLAMME DES KAMINOFENS BRENNT ZU HOCH.
E Sie benutzen einen falschen, zu flüchtigen Brennstoff.
Siehe KORREKTER BRENNSTOFF (Kapitel „Wichtig zu wissen”).
E Der Docht ist zu hoch eingestellt.
Die Dochtnachstellung eine Stufe niedriger stellen (Kapitel F).
H
D I E WA R T U N G
Ihr Kaminofen benötigt kaum Wartung. Staub und Flecken sollten jedoch
rechtzeitig mit einem feuchten Tuch entfernt werden, da ansonsten hartnäckige
Flecken entstehen können. Normalerweise sind nur die folgenden drei Teile dem
Verschleiß ausgesetzt:
1. DIE BATTERIEN
Diese können Sie selbst austauschen. Werfen Sie die alten Batterien nicht in den
Abfalleimer, sondern entsorgen Sie diese laut den örtlichen Vorschriften für
chemischen Kleinabfall.
2. DIE ELEKTRISCHE ZÜNDUNG
Die Zündspirale hat eine längere Lebensdauer, wenn Sie den Kaminofen immer
vorsichtig starten. Wechseln Sie die Batterien rechtzeitig aus und achten Sie
darauf, daß Sie die Zünd-Taste nicht zu stark betätigen. Wenn der Glühfaden
gerissen ist, muß die Zündspirale ausgetauscht werden.
Elektrische Zündung mit
gerissenem Glühfaden
3. DER DOCHT
Um die Lebensdauer des Dochtes zu verlängern, sollten Sie den Kaminofen von
Zeit zu Zeit vollständig leer brennen lassen (bis er von selbst ausgeht). Tun Sie dies,
sobald Sie merken, daß die Flamme etwas schwächer wird. Da dieser Vorgang
etwas Geruch verursacht, empfehlen wir Ihnen, dies außerhalb des Wohnbereiches
zu tun.
Brennstoffsieb
DER BRENNSTOFFFILTER
Kontrollieren Sie auch den Brennstofffilter regelmäßig:
Nehmen Sie den Brennstofftank I aus dem Kaminofen und entfernen Sie den
Brennstofffilter (Abb. N). Halten Sie ein Tuch bereit, da noch ein wenig Brennstoff
aus dem Filter tropfen kann. Drehen Sie den Brennstofffilter um und klopfen Sie
Ihn auf einem harten Untergrund leer, um den Schmutz zu entfernen. (Unter
keinen Umständen mit Wasser reinigen!) Setzen Sie den Brennstofffilter
wieder in den Kaminofen ein.
N
☞ ☞
I
Entfernen Sie selbst keine Teile aus dem Kaminofen. Wenden Sie sich bezüglich
einer eventuellen Reparatur immer an Ihren Händler.
Bevor Sie Wartungsarbeiten ausführen, muß der Kaminofen ausgeschaltet und
abgekühlt sein.
LAGERUNG (ENDE DER HEIZSAISON)
Wir empfehlen Ihnen, den Kaminofen am Ende jeder Heizsaison vollständig leer
brennen zu lassen und ihn danach gut aufzubewahren. Beachten Sie dazu
folgende Hinweise:
2
21
R 17
1 Starten Sie den Ofen außerhalb des Wohnraumes und lassen Sie ihn
vollständig leer brennen.
2 Lassen Sie den Kaminofen anschließend abkühlen.
3 Den Kaminofen mit einem feuchten Tuch reinigen und danach mit einem
trockenen Tuch trocken reiben.
4 Die Batterien aus dem Batteriefach nehmen L und an einer trockenen
Stelle aufbewahren.
5 Reinigen Sie den Brennstofffilter.
6 Lagern Sie den Kaminofen staubfrei, nach Möglichkeit in der
Originalverpackung. Den übriggebliebenen Brennstoff sollten Sie in der
nächsten Heizsaison nicht mehr verwenden. Entsorgen Sie übriggebliebenen
Brennstoff gemäß den Vorschriften, die in Ihrer Gemeinde für chemische
Kleinabfälle gelten. Beginnen Sie jede neue Heizsaison immer mit neuem
Brennstoff Beachten Sie wieder die Gebrauchsanweisung (wie beschrieben ab
Kapitel A), wenn Sie den Kaminofen erneut in Betrieb nehmen.
N
J
TRANSPORT
Um zu verhindern, daß der Kaminofen während des Transportes Brennstoff
verliert, müssen folgende Maßnahmen getroffen werden:
1 Lassen Sie den Kaminofen abkühlen.
2 Nehmen Sie den Brennstofftank I aus dem Kaminofen und entfernen Sie den
Brennstofffilter (Abb. N). Dieser kann eventuell etwas nachtropfen; halten Sie
ein Tuch bereit. Den Brennstofffilter und den Brennstofftank außerhalb des
Kaminofens aufbewahren.
O
3 Setzen Sie den Transportverschluß anstelle des Brennstofffilters ein (Abb. O)
und drücken Sie ihn fest, so daß kein Brennstoff austritt.
4 Den Kaminofen immer aufrecht transportieren.
Transportverschluß
K
T E C H N I S C H E D AT E N
Zündung
elektrisch
Brennstoff
Kapazität (kW)
Abmessungen (mm)
Breite
428
(einschließlich Bodenplatte)
Tiefe
295
Höhe
513
3,00
*
Geeigneter Raum (m )
85-110
3 **
Zubehör
Brennstoffverbrauch (Ltr/Std)* 0,313
Brennstoffverbrauch (g/Std)*
250
Brenndauer pro Tank (Std)
12,8
*
Inhalt Brennstofftank (Liter)
4,0
Gewicht (kg)
9,0
*
**
2
22
R 17
Bei Einstellung auf maximalem Stand
Angegebene Werte sind Richtwerte
Syphonpumpe
Transportverschluß
Benötigte Batterien
2x R20kG, MN 1300
Dochttyp
F
1,5V
L
GARANTIEBEDINGUNGEN
Sie erhalten auf Ihren Kaminofen 24 Monate Garantie ab Kaufdatum. Innerhalb
dieser Zeit werden alle Material- und Herstellungsfehler kostenlos behoben.
Hierbei gelten folgende Regeln:
1 Alle weiteren Ansprüche auf Schadenersatz, inklusive Folgeschäden, werden
nicht anerkannt.
2 Reparatur oder Austausch von Teilen innerhalb der Garantiezeit führt nicht
zur Verlängerung der Garantie.
3 Die Garantie verfällt, wenn Veränderungen angebracht wurden, NichtOriginal Teile montiert oder Reparaturen durch Dritte am Kaminofen
ausgeführt wurden.
4 Teile, die normalem Verschleiß ausgesetzt sind, wie die Zündspirale, die
Batterien, der Docht und die Syphonpumpe, fallen nicht unter die Garantie.
5 Die Garantie gilt ausschließlich unter Vorlage der datierten Originalrechnung,
auf der keine Veränderungen vorgenommen wurden.
6 Die Garantie gilt nicht bei Schäden, die durch zweckwidrige Handlungen
entstanden sind, beziehungsweise durch Verwahrlosung und durch die
Benutzung von falschem oder veraltetem Brennstoff. Falscher Brennstoff
kann sogar gefährlich sein.*
7 Die Versandkosten und das Versandrisiko des Kaminofens, oder dessen Teile,
gehen zu allen Zeiten zu Lasten des Käufers.
Um unnötige Kosten zu vermeiden, empfehlen wir Ihnen, immer zuerst sorgfältig
die Gebrauchsanweisung zu lesen. Finden Sie darin keine Lösung, wenden Sie sich
an Ihren Händler.
* Leicht entzündliche Stoffe können zum Beispiel zu unkontrollierbarer Verbrennung führen, die ausschlagende
Flammen zur Folge haben. Versuchen Sie in diesem Fall nie, den Kaminofen zu transportieren, sondern schalten
Sie den Kaminofen unverzüglich aus (siehe Kapitel E). In Notfällen können Sie einen Feuerlöscher benutzen,
jedoch ausschließlich einen Kohlendioxid- oder Pulver-Feuerlöscher.
10 SICHERHEITSRATSCHLÄGE
1
2
3
4
5
6
7
8
9
10
Machen Sie Kinder immer auf die Anwesenheit eines brennenden Ofens
aufmerksam.
Transportieren Sie den Ofen nicht, wenn er brennt oder noch heiß ist. In
diesem Fall auch keine Wartungsarbeiten durchführen.
Stellen Sie den Kaminofen so auf, daß er sich mit der Vorderseite
minimal 1,5 Meter von Mauern, Gardinen und Möbeln befindet. Achten
Sie ebenfalls darauf, daß der Raum über dem Kaminofen frei ist.
Benutzen Sie den Kaminofen nicht in staubigen Räumen und nicht an
Stellen, an denen es stark zieht. In beiden Fällen erhalten Sie keine
optimale Verbrennung.
Schalten Sie den Kaminofen aus, bevor Sie das Haus verlassen oder zu
Bett gehen.
Lagern und transportieren Sie den Brennstoff ausschließlich in den
dazu bestimmten Tanks und Kanistern.
Achten Sie darauf, daß der Brennstoff nicht Hitze oder extremen
Temperaturunterschieden ausgesetzt wird. Lagern Sie den Brennstoff
immer an einem kühlen, trockenen und dunklen Ort (Sonnenlicht
schadet der Qualität)
Benutzen Sie den Kaminofen niemals an Stellen, an denen schädliche
Gase oder Dämpfe auftreten könnten (zum Beispiel Auspuffgase oder
Farbdämpfe).
Das Gitter des Kaminofens wird heiß. Der Kaminofen darf nicht
abgedeckt werden (Brandgefahr).
Achten Sie immer auf ausreichende Ventilation.
2
23
R 17
1
WECHSELN DES DOCHTES
2
M
3
4
DER OFEN MUSS GANZ ABGEKÜHLT SEIN, BEVOR
SIE MIT DEM DOCHTWECHSEL BEGINNEN.
1 Öffnen Sie den Deckel und nehmen Sie den Brennstoftank heraus.
2 Nehmen Sie die Batterien aus dem Batteriefach.
3 Das Gitter aus der Kerbung heben und nach vorn
ziehen. Die Brennkammer aus dem Ofen nehmen. Das
5a
5b
Gitter schließen.
4 Den Drehregler vom Ofen abziehen.
5 Die drei Gehäuseschrauben an der Unterseite lösen. Das
Gehäuse ein wenig nach vorn ziehen und von der
6
7
Bodenplatte abnehmen.
6 Die Flügelmuttern unter dem Brennersitz lösen.
7 Heben Sie Den Brennersitz und den Dochtmechanismus
hoch.
8a
8b
8 Die Schraube, die den Halter festhält, aus der Achse drehen. Halter und Feder entfernen.
9 Halter bis zum Ende nach rechts drehen und den
Dochthalter entfernen (inkl. Docht).
9
10
10 Dochthalter abheben und von der Hauptluftröhre
abnehmen.
11 Docht drücken, um die drei Dochtstifte zu lösen und um
den Docht vom Dochthalter zu entfernen. Dafür sorgen, dass Sie Handschuhe tragen und ein Behälter für
11
2
24
R 17
den gebrauchten Docht bereitsteht.
12a
12b
12 Den Docht in den Dochthalter in die Richtung, die auf
dem Dochthalter eingraviert ist, einsetzen.
13 Schieben Sie den Dochthalter (inkl. Docht) über die
Hauptluftröhre. Dann das Oberteil der Achse von rechts
13a
13b
in die Nut für den Dochthalter (mit Docht) einsetzen
und den Behälter links bis zum Ende eindrehen.
14 Den Docht-Lebensverlängerer (Dochtstellung auf “1”),
Feder und Halterung einbauen. Danach die Schraube
anziehen, die den Halter festhält.
1 4a
1 4b
15 Den Brennersitz wieder montieren.
16 Die Flügelmuttern gleichmäßig handfest anziehen.
17 Den Rändeldrehknopf für den Docht auf den Dochtmechanismus setzen. Den Knopf so weit wie möglich nach
15
16
rechts drehen. Auf die Kippsicherung drücken, um zu
kontrollieren, ob der Docht vollständig hinabgelassen
werden kann. Mehrere Male wiederholen. Wenn der
Docht nicht ganz nach unten geschoben werden kann,
wurde er nicht ordnungsgemäß eingesetzt. Ist das der
Fall, Arbeitsweise ab Punkt 12 wiederholen. Den
17a
17b
Drehregler vom Ofen abziehen.
18 Das Gehäuse wieder aufsetzen und die drei Schrauben
festdrehen. Den Rändeldrehknopf des Dochtes einstellen. Dann die Brennkammer wieder einsetzen. Kontrollieren Sie, ob diese gerade steht, indem Sie mit dem
Handgriff kurz nach links und rechts schieben. Das
18a
18b
Gitter schliessen.
19 Den gefüllten Brennstofftank wieder aufsetzen. Die
Batterien in das Batteriefach einlegen (achten Sie dabei
auf die + und – Pole). Nach dem Einsetzen des
Brennstofftanks und der Batterien müssen Sie 30
18c
18d
19a
19 b
Minuten warten, bevor Sie den Ofen starten.
2
25
R 17
Estimado Cliente:
Le felicitamos por la compra de su Zibro, la marca de primera entre estufas
transportables. Usted acaba de comprar un producto de calidad absoluta, que
le dará plena satisfacción durante muchos años, a condición de que lo utilice
debidamente. Por lo tanto, lea primero este manual del usuario, para una vida
útil máxima de su Zibro.
En nombre del fabricante le ofrecemos una garantía de 24 meses para toda
clase de faltas de fabricación y de material.
Le deseamos mucho y agradable calor, así como una gran comodidad con su
Zibro.
Un saludo cordial,
PVG International b.v.
Departamento Atención al Cliente
1 LEA PRIMERO LAS INSTRUCCIONES DE USO.
2 EN CASO DE DUDA, CONSULTE A SU DISTRIBUIDOR.
3 PARA LEER ESTE MANUAL, DESPLIEGUE LA ÚLTIMA PÁGINA.
5
26
R 17
E
E
E
E
E
E
E
E
E
EL USO A GRANDES RASGOS
PIEZAS IMPORTANTES
Estos son a grandes rasgos los pasos a seguir para la
utilización de su estufa portátil. Para su correcta
A
Botón de seguridad
B
Botón regulador
Retire todo el material de embalaje (vea capítulo A, fig. A).
C
Botón de encendido
Llene el depósito extraíble I y espere 30 minutos antes de
encender la estufa (vea capítulo B, fig. H).
4
Cámara de
Coloque las pilas en su alojamiento L (vea capítulo A, fig. F).
E
utilización, le remitimos al MANUAL (pág. 29 y
siguientes).
1
2
3
combustión
Asa de la cámara de
combustión
4
Asegúrese de que la cámara de combustión D está en posición
recta (vea capítulo A, fig. E).
F
Indicador del
combustible
5
6
7
Encienda la estufa, girando el botón B hacia la derecha hasta
el tope y seguidamente oprima con cuidado el botón C del
encendido (vea capítulo C, fig. J y K).
Después de encender la estufa, se debe esperar entre 10 y 15
minutos para comprobar que la estufa está funcionando
correctamente (vea capítulo D).
G
Rejilla
H
Tapa del depósito
I
Depósito extraible
J
Indicator del
Apague la estufa (vea capítulo E).
combustible en el
depósito extraible
•
•
•
•
•
E
E
E
E
E
E
E
La primera vez que encienda su estufa,
desprenderá un olor a "nuevo".
Guarde el combustible en un lugar fresco y
oscuro.
El combustible envejece. Comience cada otoño
con nuevo combustible.
Si Usted utiliza Zibro Extra o Zibro Kristal, tiene la
seguridad de hacer uso del combustible
apropiado. Le aconsejamos Zibro Extra o Zibro
Kristal por su alta calidad constante en todas y
cada una de sus garrafas.
En caso que cambie de tipo de combustible, debe
asegurarse primero que la estufa ha consumido
todo el combustible presente.
E
E
E
E
E
E
E
E
E
K
Resistencia
L
Alojamiento de
pilas
M
Botón 1-2-3 (altura
de la mecha)
E
E
E
E
5
27
R 17
E
E
E
LO QUE DEBE SABER PREVIAMENTE
VENTILAR SIEMPRE SUFICIENTEMENTE
Para todos los modelos y para poder utilizar la estufa con toda seguridad sin
necesidad de ventilación suplementaria, es necesario un espacio mínimo (vea
capítulo K). Si el espacio en cuestión es más pequeño que el indicado, deberá
siempre entreabrir una puerta o ventana (± 2,5 cm). Aconsejamos lo mismo en el
caso de ser una habitación muy aislada o que esté protegida contra las corrientes
de aire y/o a una altura de 1500 metros. No utilice su estufa en sótanos ni en otros
espacios subterráneos.
C U B I E RTA D E S E G U R I D A D
Junto con la estufa se proporciona una cubierta de seguridad. Este macanismo
hace disminuir la temperatura en la tapa superior de la estufa. De esta manera, el
riesgo de sufrir algún daño al tocar accidentalmente la tapa superior disminuye
considerablemente. No obstante, tenga en cuenta que la tapa superior estará
caliente en cualquier caso.
Evite cualquier contacto con la tapa superior y con la rejilla.
EL COMBUSTIBLE APROPIADO
Su estufa está diseñada para quemar parafina líquida (combustible especial para
estufas), de alta calidad y sin agua, como lo es Zibro Extra o Zibro Kristal.
Solamente este combustible asegura una combustión limpia y completa: Un
combustible de calidad inferior puede conducir a:
E excesiva adherencia de alquitrán en la mecha
Solamente el
combustible apropiado
le garantiza un uso
seguro, eficaz y cómodo
de su estufa.
E
una combustión incompleta
E
una reducción en la durabilidad de la estufa
E
la formación de humo y/o malos olores
E residuos en la rejilla o en el revestimiento
El combustible apropiado es, por lo tanto, esencial para un uso seguro, eficaz y
cómodo de su estufa.
Consulte siempre al distribuidor más cercano sobre el combustible apropiado para
su estufa.
A
Este tapón de transporte
(amarillo) lo encontrará
dentro de la caja.
Solamente con este
tapón podrá transportar
su estufa sin problemas.
¡Por consiguiente,
guárdelo bien!
5
28
R 17
MANUAL
A
E
E
E
E
I N S TA L A C I O N D E L A E S T U FA
1 Extraiga de la caja con cuidado la estufa y controle el contenido.
B
Además de la estufa, la caja debe contener:
E una bomba manual de combustible
E un tapón de transporte
E el presente manual del usuario
C
Guarde la caja y el material de embalaje (fig. A) para almacenar o transportar
la estufa.
2 Quite el material de embalaje:
E El embalaje de protección colocado en la rejilla G. Abra la rejilla,
levantándola con cuidado (fig. B).
E El embalaje colocado encima del quemador D se quita empujándolo un
D
poco hacia abajo (fig. C).
E Saque el quemador de la estufa y quite el embalaje que está colocado
debajo del quemador (fig. D).
E Vuelva a colocar el quemador en su sitio. Está colocado correctamente si,
cogiéndolo por la espiral E, se puede girar fácilmente hacia la izquierda y
la derecha. Cierre la rejilla.
E
E Levante la tapa del depósito H y quite el cartón.
3 Llene el depósito extraíble, siguiendo las instrucciones del capítulo B.
4 Coloque las pilas en su alojamiento L situado en la parte posterior de la
estufa (fig. F). Observe los polos + y -.
F
5 El suelo debe ser sólido y nivelado, compruébelo. Desplace la estufa si no está
bien nivelada. No intente corregir esta posición, colocando libros u otros
objetos debajo.
6 Su estufa está ahora lista para su uso.
B
LLENAR DE COMBUSTIBLE
No llene nunca el depósito extraíble dentro del salón, hágalo en un lugar más
apropiado (existe siempre el riesgo de que caigan gotas de combustible). Proceda
como sigue:
1 Asegúrese de que la estufa está apagada.
G
2 Abra la tapa H y extraiga el depósito extraíble I de la estufa (fig. G).
Atención: el depósito puede gotear algo. Ponga el depósito extraíble en el
suelo (tapón hacia arriba) y desenrosque.
5
29
R 17
E
E
3 Tome la bomba manual de combustible e introduzca el tubo liso, más rígido
H
en el bidón, procurando que éste último esté colocado más alto que el
depósito extraíble (fig. H). Introduzca la goma flexible ranurada en el orificio
del depósito extraíble.
4 Apriete el botón superior de la bomba (girándolo hacia la derecha).
5 Comprímase algunas veces la bomba, hasta que el combustible comience a
entrar en el depósito extraíble. Una vez que esto suceda, ya no hace falta
comprimir más la bomba.
6 Durante la operación de llenado, no deje de vigilar el indicador del
I
combustible del depósito extraíble J (fig. I). Si está lleno, cese de llenar
aflojando el botón superior de la bomba (hacia la izquierda). Nunca llene el
depósito hasta el tope, sobre todo cuando el combustible esté muy frío
(el combustible se dilata por el calor).
vacío
lleno
7 Deje que el combustible presente en la bomba se vacíe en el depósito y retire la
misma con cuidado. Cierre el depósito, enroscando el tapón cuidadosamente.
Limpie eventuales gotas de combustible que hayan podido caer.
8 Controle si el tapón del depósito está en posición recta y debidamente
apretado. Coloque el depósito extraíble de nuevo en la estufa. Cierre la tapa.
C
E N C E N D E R L A E S T U FA
Al principio, una estufa nueva desprende siempre algún olor. Por consiguiente,
asegúrese de que haya ventilación suplementaria.
☞
Si Usted utiliza la estufa por primera vez, después de haber colocado el depósito
extraíble lleno de combustible, espere mínimo unos 30 minutos antes de encenderla. De
esta forma, la mecha podrá absorber el combustible. Haga lo mismo después de que la
estufa haya consumido todo el combustible y después de poner una nueva mecha.
Antes de encender la estufa, mire siempre el indicador de combustible F para
comprobar si en el depósito extraíble queda suficiente combustible.
Encienda la estufa siempre con la resistencia K.
No utilice nunca cerillas o un mechero.
Proceda como sigue:
1 Gire el regulador 2 hacia la derecha hasta alcanzar el tope (fig. J).
Aplicando cierta presión, podrá girarlo algo más; sin embargo, volverá
automáticamente a su posición tope.
J
2 Oprima el botón del encendido C (fig. K) sin ejercer fuerza. En cuanto se
aprecie una llama en la cámara de combustión D, suelte el botón.
5
30
R 17
☞
K
Aunque se ha utilizado la estufa algunas veces el mando regulador no se queda fijo en
su posición.
Gire el mando regulador (fig. L) totalmente hacia la izquierda. Posteriormente, para
encender la estufa, gire el mando regulador totalmente hacia la derecha (capítulo C).
Antes de encender la estufa, controle siempre si la cámara de combustión D
☞
E
está bien recta, moviendola con ayuda del asa E un poco a la izquierda y
derecha (fig. E). Esto se efectuará sin ninguna dificultad. Si la cámara de
combustión está desnivelada, se producirían humos y hollín.
D
L A C O M B U S T I O N D E L A E S T U FA
Después de encender la estufa, se debe esperar entre 10 y 15 minutos para
L
comprobar que la estufa está funcionando correctamente. Sólo entonces se podrá
comprobar si la estufa quema debidamente. Una llama demasiado alta puede
provocar la formación de humos y hollín, mientras que una llama demasiado baja
entraña la formación de malos olores. En la página contigua a la hoja desplegable
viene indicada la altura máxima y mínima de la llama (fig. P). La llama puede ser
regulada un poco con el botón regulador B (fig. L).
Las posibles causas de una llama demasiado baja son:
E
E
escaso combustible
(llene el depósito)
E
combustible de mala calidad
(consulte a su distribuidor)
E
insuficiente ventilación
(entreabra una puerta o ventana)
E
desgaste de la mecha
(cambiar mecha, capítulo M)
A PA G A R L A E S T U FA
Deje la estufa durante ± 1 minuto encendida en la posición mínima (fig. L).
A continuación, gire lentamente el botón regulador B à hacia la izquierda hasta
su tope. La llama se apagará automáticamente.
☞
M
F
En caso de emergencia, apague la estufa con el botón de seguridad A (fig. M).
EL REAJUSTE DE LA ALTURA DE LA MECHA
Después de pasado algún tiempo, la llama no subirá lo suficiente (capítulo D). En tal
caso, para corregir la llama, puede reajustar la altura de la mecha. Proceda como
sigue:
Q
1 Oprima el botón de apagado A (fig. M).
2 Extraiga el botón regulador B de la estufa. De esta manera, el
botón M para la altura de la mecha quedará a la vista.
3 Coja el anillo de plástico entre el dedo pulgar e índice y tire de él hacia fuera.
Gire el anillo aumentando una posición, bien a la posición 2 o a la posición 3
(fig. Q). Oprima el anillo cuidadosamente, de modo que el pestillo penetre en
la ranura.
4 Coloque el botón del regulador cuidadosamente en su sitio, para ello existe
una sola manera. Observe la parte interior del botón para la posición correcta.
5
31
R 17
☞
Si de este modo no se obtiene el resultado deseado, deje que la estufa queme
todo el combustible (capítulo H).
Cuando la llama todavia es demasiado baja y la mecha esta en posicion 3, consulte
a su distribuidor o cambiar la mecha, capítulo M).
Si despues del ajuste la llama sube demasiado hay que poner el anillo en una
posicion menor, si no puede producirse humo y/u hollin.
G
FA L L O S , C A U S A S Y S O L U C I O N E S
Si resulta imposible resolver un fallo siguiendo las instrucciones dadas a
continuación, consulte a su distribuidor.
F
5
32
R 17
NO SE LOGRA ENCENDER LA ESTUFA.
E Las pilas no están correctamente colocadas en su alojamiento.
Controlar (fig. F).
E Las pilas ya no tienen la suficiente potencia para realizar el encendido
Cambiar las pilas (fig. F).
E La estufa ha consumido todo el combustible o bien la mecha ha sido cambiada.
Después de colocar el depósito extraíble lleno, esperar 30 minutos para
encender la estufa.
E Usted oprime la palanca del encendido C hacia abajo con demasiada fuerza.
Oprimir con menos fuerza (capítulo C).
E El filamento de la resistencia de encendido K está partido.
Consulte a su distribuidor.
LLAMA INESTABLE Y/U HOLLIN Y/U OLOR.
E La cámara de combustión D no está colocada de forma correcta.
Póngala recta con el asa E, hasta que logre moverla más fácilmente hacia la
izquierda y derecha.
E Usted utiliza un combustible envejecido.
Comience cada otoño con nuevo combustible.
No ponga nunca el combustible en un lugar expuesto al sol.
E Usted utiliza un combustible inadecuado.
Vea EL COMBUSTIBLE APROPIADO (capítulo ‘Lo que previamente debe saber’).
E Se ha acumulado polvo en la base de la estufa.
Consulte a su distribuidor.
E La altura de la mecha no es la correcta.
Veya capítulo F.
LA ESTUFA SE APAGA LENTAMENTE.
E El depósito extraíble está vacío.
Vea capítulo B.
E El filtro contiene agua.
Seque el filtro (capítulo H).
E El depósito inferior contiene agua.
Consulte a su distribuidor.
E La parte superior de la mecha se ha endurecido o tiene humedad.
Deje que la estufa queme todo el combustible. Use un combustible adecuado.
E Usted utiliza combustible envejecido.
Comience cada otoño con nuevo combustible.
LA ESTUFA SIGUE FUNCIONANDO CON LLAMA BAJA.
E La mecha está demasiado baja.
Saque el botón regulador B y ponga el botón 1, 2, 3 M en una posición
más baja (vea capítulo F).
E Antes de rellenar el depósito la estufa había consumido casi todo el
combustible.
Después de colocar el depósito extraíble lleno, esperar 30 minutos para
encender la estufa.
E Usted utiliza combustible viejo o inadecuado.
Vea EL COMBUSTIBLE APROPIADO (capítulo ‘Lo que previamente debe saber’).
E No hay suficiente ventilación en la habitación.
Abra un momento una puerta o ventana de par en par, y después déjela
entreabierta.
LA ESTUFA QUEMA DEMASIADO FUERTE.
E Usted utiliza un combustible inadecuado y demasiado volátil.
Vea EL COMBUSTIBLE APROPIADO (capítulo ‘Lo que previamente debe saber’).
E La mecha está demasiado alta.
Saque el botón regulador B y ponga el botón 1, 2, 3 M en una posición
más baja (vea capítulo F).
H
MANTENIMIENTO
Su estufa requiere poco mantenimiento. Lo que sí es importante es que quite el polvo
y las manchas a tiempo con un paño húmedo, ya que si no podrían formarse manchas
permanentes. Normalmente, tan solo tres piezas están sometidas a desgaste:
1. LAS PILAS
Estas las puede cambiar Usted mismo. No tire las pilas viejas en el cubo de la
basura. Siga las instrucciones vigentes en su municipio para Pequeños Residuos
Químicos.
2. LA RESISTENCIA
La resistencia durará más tiempo si la estufa es encendida correctamente. Cambie
las pilas a su debido tiempo y procure no oprimir el botón del encendido con
Resistencia con filamento
partido
demasiada fuerza. Si el filamento incandescente se ha partido, deberá ser
sustituida la resistencia por una nueva.
3. LA MECHA
Para prolongar la vida útil de la mecha, de vez en cuando la estufa debe consumir
todo el combustible presente (hasta que se apague sola). Proceda así cuando
filtro del combustible
observe que la llama quede más baja. Cuando consuma todo el combustible, la
N
estufa despedirá cierto olor, razón por la cual recomendamos lo haga fuera del
espacio habitable.
FILTRO DEL COMBUSTIBLE
Asimismo, controle periódicamente el filtro del combustible: Saque el depósito
extraíble ”de la estufa y retire el filtro del combustible (fig. N). Este puede gotear;
tenga un trapo a mano. Sacuda el filtro del combustible incidiendo en un fondo
duro para quitar los posos. Nunca limpiar con agua! Coloque el filtro del
combustible en la estufa.
☞ ☞
I
No extraiga Usted mismo piezas de la estufa. Para eventuales reparaciones,
consulte siempre a su distribuidor.
Antes de efectuar cualquier revisión, deje que la estufa se enfríe.
ALMACENAMIENTO (fin del invierno)
Llegado el fin del invierno, le recomendamos que antes de guardarla, deje que la
estufa queme todo el combustible existente en el depósito. Para este fin, siga las
instrucciones siguientes:
5
33
R 17
1 Encienda la estufa fuera del espacio habitable y deje que todo el combustible
se queme.
2 Deje que la estufa se enfríe.
3 Limpie la estufa con un paño húmedo y séquela con un paño seco.
4 Extraiga las pilas de la estufa L y guárdelas en un lugar seco.
5 Limpiar el filtro de combustible (Vea capítulo H).
6 Guarde la estufa protegida del polvo, si es posible en su embalaje original. El
combustible que ha sobrado no lo puede utilizar en el invierno próximo.
Por lo tanto, consúmalo. No obstante, si sobrara algo de combustible, no lo
tire, pero siga las reglas vigentes en su municipio con respecto a pequeños
residuos químicos. En cualquier caso, comience el próximo invierno con
combustible nuevo. Si vuelve a usar la estufa de nuevo, siga nuevamente las
N
instrucciones (a partir del capítulo A).
J
TRANSPORTE
Para evitar que la estufa pierda combustible durante el transporte, se deben
tomar las siguientes precauciones:
1 Deje enfriar la estufa.
O
2 Saque el depósito extraíble I de la estufa y retire el filtro del combustible
(fig. N). Este puede gotear un poco; tenga un paño a mano. Guarde el filtro y
el depósito extraíble fuera de la estufa.
3 Coloque el tapón de transporte en el lugar del filtro del combustible (fig. O)
y oprímalo bien y coloque nuevamente el deposito extraible en su posición.
Tapón de transporte
4 Transporte la estufa siempre en posición vertical.
K
ESPECIFICACIONES TECNICAS
Encendido
eléctrico
Dimensiones (mm) ancho
Combustible
parafina
(placa de base incl.)
3,00
Capacidad (kW)*
Volumen apropiado del espacio (m )
3 **
Consumo de combustible (g/hora)
*
34
R 17
Accesorios
profundo
295
alto
513
bomba manual de combustible
tapón de transporte
250
Duración de combustión por depósito (hora)*12,8 Pilas
2x R20kG, MN 1300
Contenido depósito extraíble (litros)
4,0
1,5V, size D
Peso (kg)
9,0
*
5
85-110
0,313
Consumo de combustible (l/hora)
*
428
En caso de estar en posición máxima
Tipo de mecha
F
** Estos valores son a título indicativo
L
CONDICIONES DE GARANTIA
Su estufa está cubierta por una garantía de 24 meses, a partir de la fecha de compra.
Durante este período, todos los defectos de material o de fabricación serán reparados
sin coste alguno. Además, se aplican las siguientes reglas:
1 No asumimos ninguna responsabilidad por otros daños, incluido daños
indirectos.
2 La reparación o el recambio de piezas efectuado dentro del período de
garantía no da lugar a una prórroga de la misma.
3 La garantía no se aplicará en los casos que: se hayan realizado modificaciones;
se hayan montado piezas no originales; reparaciones efectuadas por terceros.
4 Las piezas que están sujetas a desgaste normal, tales como la mecha, pilas,
resistencia de encendido y la bomba manual de combustible, no están cubiertas
por la garantía.
5 La garantía se aplica únicamente si Usted presenta la factura de compra,
fechada y sin modificación alguna.
6 La garantía no se aplica en caso de daños ocasionados por manipulaciones no
conformes con el manual de instrucciones, por negligencias y por el uso de
combustible envejecido o inapropiado. El uso de combustible inapropiado
incluso puede ser peligroso*, por ello, se aconseja Zibro Extra o Zibro Kristal.
7 Los gastos de envío y los riesgos del envío de la estufa o piezas de ésta,
correrán en todos los casos a cargo del comprador.
* Los materiales muy inflamables - no es el caso del Zibro Extra o Zibro Kristal -, pueden conducir, por ejemplo, a
una combustión incontrolable, resultando en un incendio. En tal caso, no intente transportar la estufa, apáguela
inmediatamente (vea capítulo E). En casos de emergencia puede utilizar un extintor de llamas, pero únicamente
del tipo B: extintores de incendios con ácido carbónico o con polvo.
10 SUGERENCIAS PARA UN USO SEGURO
1
2
3
4
5
6
7
8
9
10
Advierta a los niños siempre de la presencia de una estufa encendida.
No transportar la estufa cuando esté encendida o esté aún caliente,
ni tampoco llenarla de combustible, ni efectuar trabajos de
mantenimiento.
Ponga el frontal de la estufa a una distancia mínima de 1,5 metros de la
pared, cortinas y muebles.
No utilice la estufa en habitaciones polvorientas, ya que la combustión
no será óptima.
Apague la estufa antes de salir de casa o al acostarse.
Conserve y transporte el combustible únicamente en los depósitos y
bidones destinados para ello.
No exponga el combustible al calor o a cambios extremos de
temperatura. Guarde el combustible en un lugar oscuro, seco y fresco
(la luz solar afecta a la calidad).
Nunca utilice la estufa en lugares donde gases o vapores nocivos puedan
estar presentes (por ej., gases de escape o vapores de pintura).
La rejilla de la estufa se calienta. Al cubrir la estufa con algún material,
se crea un riesgo de incendio.
Asegúrese siempre de una ventilación suficiente.
5
35
R 17
1
2
CAMBIAR LA MECHA
M
3
ANTES DE COMENZAR A CAMBIAR LA MECHA, LA
ESTUFA TIENE QUE ESTAR APAGADA Y COMPLETAMENTE FRÍA.
4
1 Abra la tapa del depósito extraíble y sáquelo.
2 Quite las pilas.
3 Abra la rejilla, levantándola ligeramente y tirando de
5a
5b
ella hacia delante. Extraiga el quemador de la estufa.
Cierre la rejilla.
4 Quite el mando regulador de la estufa, tirando de él
hacia delante.
6
7
5 Afloje los tornillos de la carcasa, que se encuentran en
la parte inferior de la misma. Tire ligeramente de la
carcasa hacia delante y sepárelo de la placa base.
6 Quite las palomillas de la base del quemador.
7 Levante el asiento del quemador y el mecanismo de la
8a
8b
mecha.
8 Quite el tornillo de la base que sujeta al quemador y
quite la abrazadera y el muelle.
9 Gire el mecanismo de la rueda hacia la derecha, hasta el
9
10
final y quite el collar de la mecha.
10 Levante el collar de la mecha y sáquelo del tubo.
11 Con la mano, comprima la mecha hasta soltar los tres
pivotes y separe la mecha de su collar. Procure realizar
11
esta operación con guantes y tener un recipiente a
mano para depositar la mecha usada .
5
36
R 17
12a
12b
12 Ponga la nueva mecha en el collar según la indicación
grabada en este último.
13 Coloque el collar (con su mecha) en el tubo.
13a
13b
Posteriormente, vuelva a girar el mecanismo de la
rueda hacia la derecha, hasta que suba y coloque el
cuello de la mecha en la ranura.
14 Coloque el regulador de altura de mecha y situelo en la
posición 1. Ajuste la abrazadera y el muelle. Ajuste
1 4a
1 4b
igualmente el tornillo de la base que sujeta al
quemador.
15 Coloque el asiento del quemador en su sitio.
16 Apriete las palomillas uniformemente con la mano.
15
16
17 Coloque el mando giratorio en su sitio. Gire el mando
tan a la derecha como sea posible. Presione el botón de
apagado de emergencia. Compruebe que la mecha
retrocede hasta su posición original. Repita este
proceso viarias veces. En el caso de que la mecha no
vuelva a su posición inicial, ello significa que no se ha
17a
17b
colocado correctamente. En este caso, repita el proceso
a partir del paso 12. Quite el mando regulador de la
estufa, tirando de él hacia delante.
18 Coloque la carcasa en su posición y ajuste los 3 tornillos.
Ponga el mando regulador de la mecha y el quemador
18a
18b
en sus respectivas posiciones. Compruebe que el
quemador esté bien colocado, moviéndolo por su asa
hacia la izquierda y derecha. Cierre la rejilla.
19 Ponga el depósito extraíble lleno en su sitio.
Ponga pilas en su cajetín (compruebe que los polos
18c
18d
positivo y negativo se han colocado donde indican las
marcas + y -). Siempre que cambie la mecha, deje
transcurrir 30 minutos antes de utilizar la estufa de
nuevo.
19a
19 b
5
37
R 17
Dear Sir, Madam,
Congratulations on your purchase of this Zibro heater, the number one brand
amongst portable heaters. You have purchased a first-class quality product,
which will serve you for many years to come. This, of course, provided you use
the heater correctly. Please read these Directions for Use first, to ensure the
maximum lifetime for your Zibro heater.
This appliance comes with a 24-month manufacturer’s warranty on all defects in
material or workmanship.
We wish you much warmth and comfort from your Zibro heater.
Yours sincerely,
PVG International b.v.
Customer Service Department
1 READ THE DIRECTIONS FOR USE FIRST.
2 IN CASE OF ANY DOUBT, CONTACT YOUR DEALER.
3 BEFORE YOU START READING, FOLD OUT THE LAST PAGE.
4
38
R 17
E
E
E
E
E
E
E
E
E
E
GENERAL DIRECTIONS FOR USE
MAIN COMPONENTS
Below you will find the main steps to be taken for
using your heater. For more details, please refer to
A
Safety button
B
Knurled wick
the MANUAL (pages 41 ff.).
adjustment knob
1
2
Remove all packaging materials (refer to Section A, Fig. A).
C
Ignition button
4
Combustion
Fill the removable tank I and wait 30 minutes before you
ignite the heater (refer to Section B, Fig. H).
chamber
3
Insert the batteries into the battery holder L
E
(refer to Section A, Fig. F).
Combustion
chamber handle
4
Check whether the combustion chamber D is fully upright
(refer to Section A, Fig. E).
5
F
Fuel indicator
G
Grill
H
Lid for removable
Ignite the heater by turning the knurled wick adjustment
knob B as far to the right as possible and then gently push the
ignition button C (refer to Section C, Fig. J and K).
tank
6
After igniting the heater it will take 10 to 15 minutes before
you can check if the heater burns well (refer to Section D).
7
I
Removable tank
J
Fuel gauge
Switch off the heater (refer to Section E).
•
removable tank
The first time you ignite your heater it will smell
K
Ignition coil
L
Battery holder
M
Wick height lock
like ’new’ for a short time.
•
•
Store your fuel in a cool and dark place.
Fuel has a limited shelf life. Start every heating
season with new fuel.
•
The right quality of fuel will be assured, when you
use Zibro Extra or Zibro Kristal for your heater.
•
If you change to another brand and/or type of
paraffin oil, you must first finish up all the
remaining fuel in the heater.
E
E
E
E
E
E
E
E
E
E
E
E
E
E
E
E
E
E
E
E
4
39
R 17
E
E
E
WHAT YOU NEED TO KNOW IN ADVANCE
ALWAYS MAKE SURE THAT THERE IS SUFFICIENT VENTILATION
For each model the minimum size of space is specified in which you can use the
heater safely, without additional ventilation (refer to Section K). If a particular
room is smaller than the specified space, always leave a window or door slightly
ajar (± 2.5 cm). We also recommend doing this in highly insulated or draught-free
rooms and/or at altitudes above 1,500 metres. Do not use your heater in cellars or
other underground areas.
SAFE TOP
The heater is supplied with a safe top. This application decreases the temperature
of the top plate. In this way, the risk of harmful accidents at accidentally touching
the top plate is considerably decreased. However, be aware that the top plate still
becomes hot.
Avoid any contact with the top plate and grille.
THE RIGHT FUEL
Only use Class C1 paraffin fuel in accordance with BS2869 Part two, or equivalent.
Your heater has been designed for use with high-quality water-free pure paraffin
oil, such as Zibro Extra or Zibro Kristal. Only fuels of this kind will ensure clean and
proper burning. Lower quality fuel may result in:
E
excessive tar deposits on the glass fibre wick
E
incomplete burning
E
reduced heater lifetime
E
smoke and/or smells
E
deposits on the grid or mantle
Using the right fuel is therefore essential for safe, efficient, and comfortable use
of your heater.
Only the use of the
correct fuel will ensure
safe, efficient, and
comfortable use of your
heater.
Always refer to your local dealer for the right fuel for your heater.
A
This transportation cap
is packed separately in
the box. Only this cap
ensures trouble-free
transportation of the
heater after use.
Store it well!
4
40
R 17
MANUAL
A
E
E
E
E
INSTALLING THE HEATER
1 Carefully remove your heater from the box and check the contents.
B
In addition to the heater you also need to have:
E a manual fuel pump
E a transportation cap
E these directions for use
Keep the box and the packaging materials (Fig. A) for storage and/or
C
transportation.
2 Remove the other packaging materials:
E Remove the packaging material from the grill G. Lift the grill from the slot
(Fig. B) and pull it forward.
E Push the packing material on top of the combustion chamber D slightly
D
down and remove it (Fig. C). Remove the packaging materials from under
the combustion chamber as well (Fig. D).
E Put the combustion chamber back into its place. The combustion chamber
is positioned correctly when it can be smoothly moved a little to the left
and to the right by its handle E (Fig. E). Close the grill: Slightly lift it to
reposition it in its slot.
E Open the lid of the removable tank H and remove the piece of cardboard.
E
3 Fill the removable tank as indicated in Section B.
4 Insert the batteries into their holder L at the back of the heater (Fig. F).
Ensure that the positive and negative poles match the + and - marks indicated
on the battery housing.
F
5 The floor should be firm and completely level. Reposition the heater, when it is
not level. Do not correct the situation by placing books or other goods under the
heater. Please refer to the separate instructions in the carton box for fixing of
the heater.
6 Your heater is now ready for use.
B
FILLING FUEL
Do not fill the removable tank in the living room, but in a more suitable place
(there can always be some spillage). Follow the procedure below:
G
1 Make sure that the heater is switched off.
2 Open the lid H and lift the removable tank I out of the heater (Fig. G).
Note: Some drops may leak from the tank. Put down the removable tank
(cap pointing upwards) and screw off the fuel cap.
4
41
R 17
E
E
3 Take the manual fuel pump and insert the smooth, most rigid tube into the
jerrycan. Make sure that it is in a higher position than the removable tank
H
(Fig. H). Insert the ribbed hose into the opening of the removable tank.
4 Lock the valve on top of the pump (turn clockwise).
5 Squeeze the pump a few times, until fuel starts flowing into the removable
tank. As soon as this happens, there is no need to press any longer.
6 Check the removable tank fuel gauge J while filling the tank (Fig. I). Stop
filling by loosening the valve on top of the pump (turn anti-clock-wise), once
the gauge indicates that the tank is full. Never overfill the tank, especially not
I
when the fuel is very cold (fuel expands when it heats up).
7 Let the remaining fuel in the pump flow back into the jerrycan and carefully
remove the pump. Carefully screw the fuel cap back on the tank. Clean
empty
off any spilled fuel.
full
8 Check whether the fuel cap is straight and tightened properly. Reinstall the
removable tank in the heater (cap down). Close the lid.
C
IGNITING THE HEATER
A new heater may give off some smells for a short while, when it is used for the
first time. You should therefore provide extra ventilation or ignite the heater
outside the living room.
When you use the heater for the first time, first put the filled removable tank into
☞
place, and then wait approximately 30 minutes before you ignite the heater. This
allows the glass fibre wick to soak up the fuel. Follow the same procedure when you
have completely burnt up all fuel from the tank, and after the glass fibre wick has
been replaced.
Before igniting the heater, always check the fuel indicator F to see whether the
removable tank needs filling up.
Always ignite the heater with the ignition coil K. Never use matches or a cigarette
lighter.
J
Follow the procedure below:
1 Turn the knurled wick adjustment knob 2 clockwise to its stop (Fig. J). If you
apply more pressure you may turn it slightly further; however, it will automatically
return to the startposition.
K
2 Push in the ignition button C (Fig. K), but do not apply too much force.
Release the ignition button as soon as a flame is visible in the combustion
chamber D.
☞
4
42
R 17
If the heater has been used only a few times and the wick adjustment knob is not
locked, first turn the wick adjustment knob (Fig. L) completely left, before putting the
wick in the highest position for ignition (Section C).
E
After having ignited the heater, always check whether the combustion
☞
chamber D is level, by sliding it slightly to the left and the right by its handle E
(Fig. E). This should be a smooth movement. If the combustion chamber is not
level, this will cause smoke and soot to develop.
D
BURNING OF THE HEATER
After you have ignited the heater, it will take 10 to 15 minutes before you can check
L
whether the heater is burning well. Too high a flame may cause smoke and soot,
whereas too low a flame causes smells. The page opposite the folding page shows
the minimum and maximum permissible burning heights of the flame (Fig. P). The
flame can be slightly adjusted with the knurled wick adjustment knob B (Fig. L).
Burning that is too low may be caused by:
E
insufficient fuel
(fill the tank)
E
poor fuel quality
(contact your dealer)
E
insufficient ventilation
(put window or door ajar)
E
wastage of the wick
(contact your dealer or replace the wick,
refer to section M)
E
SWITCHING OFF THE HEATER
Let the heater burn at its lowest setting (Fig. L) for approximately one minute.
Then slowly turn the knurled wick adjustment knob B anti-clockwise to its stop.
The flame will extinguish after a little while.
☞
M
F
In case of an emergency, switch off the heater by pushing in the safety button
A (Fig. M).
ADJUSTING THE WICK HEIGHT
After a period of time the combustion may no longer be high enough (Section D). In
that case you can adjust the wick height to improve the flame. To do this, the heater
must have been switched off. Follow the procedure below:
Q
1 Push the OFF button A (Fig. M).
2 Pull the knurled wick adjustment knob B off the heater, so the wick height
lock M will be visible.
3 Take the plastic collar between your thumb and index finger and pull it out.
Turn the collar up one step, to either position 2 or 3 (Fig. Q). Carefully push
the collar back, so the pin engages in the recess.
4 Carefully reinstall the knurled wick adjustment knob. This can be done in one
way only - check the rear of the cap for the correct position.
☞
If adjustment of the wick height does not have the required effect, let the
heater burn until all fuel has been used up (Section H).
4
43
R 17
If the flame height is still too low and the wick is set on position 3, then contact your
dealer, or replace the wick, refer to section M. If the flame gets too high after adjusting (Fig Q), the wick height lock should be placed one position lower again.
Otherwise smoke or soot may be caused.
G
MALFUNCTION, CAUSES AND SOLUTIONS
If any malfunctioning cannot be solved from the directions below, please contact
your dealer.
F
4
44
R 17
THE HEATER DOES NOT IGNITE
E The batteries are not positioned correctly in the holder.
Check (Fig. F).
E There is not enough power left in the batteries for the ignition.
Replace (Fig. F).
E You have run out of fuel from the tank or the wick has been replaced.
After having refilled and replaced the removable tank, wait for 30 minutes
before igniting the heater.
E You are pushing the ignition button C with too much force.
Push it in less forcefully (Section C).
E The ignition coil K is defective.
Contact your dealer.
IRREGULAR FLAME AND/OR SOOT AND/OR SMELLS
E The combustion chamber D has not been positioned correctly.
Use the handle E to put it level, until you can easily slide it slightly to the left
and to the right and the chamber is level.
E You are using fuel which is past its ‘use by’ date.
Start every heating season with fresh fuel.
E You are using the incorrect type of fuel.
Refer to THE RIGHT FUEL (See Section ’What you need to know in advance’).
E Dust has gathered in the lower part of the heater.
Contact your dealer.
E The wick height is not correct.
See section F.
THE HEATER SLOWLY EXTINGUISHES
E The removable tank is empty.
See Section B.
E The fuel filter is contaminated by moist.
Dry the fuel filter (Section H).
E The lower reservoir is contaminated by moist.
Contact your dealer.
E The wick has hardened on the upper side.
Burn the heater until all fuel is used (Section H). Use the right fuel.
E You are using fuel which is past its ‘use by’ date.
Start every heating season with fresh fuel.
THE HEATER REMAINS BURNING LOW
E Wick position too low.
Reinstall the wick height lock (Section F).
E Before you refilled the tank, the heater had burnt up almost all the fuel.
After having refilled and replaced the removable tank, wait for 30 minutes
before igniting the heater.
E You are using the incorrect type of fuel.
Refer to THE RIGHT FUEL (See Section ’What you need to know in advance’).
E The room is insufficiently ventilated.
Leave a window or a door wide open for a while.
THE HEATER IS BURNING TOO HIGH
E You are using an incorrect, too volatile type of fuel.
Refer to THE RIGHT FUEL (See Section ’What you need to know in advance’).
E Wick position too high.
Reinstall the wick height lock (Section F).
H
MAINTENANCE
Your heater needs hardly any maintenance. It is, however, important that you
remove dust and stains in time with a damp cloth, because otherwise these may
cause stains that are hard to remove. Under normal conditions, only three
components are subject to wear:
1. THE BATTERIES
You may replace the batteries yourself. Do not dispose of old batteries along with
the other domestic waste. Follow the locally applicable regulations regarding the
disposal of domestic chemical waste.
2. THE IGNITION COIL
The ignition coil will have a longer life, if you ignite the heater in the correct
manner. Replace the batteries in time and take care not to push in the ignition
button with too much force. If the filament is broken, the ignition coil must be
broken ignition coil
replaced.
3. THE WICK
To extend the glass fibre wick life, you must occasionally let the heater burn until
the tank is completely emptied and the heater extinguishes by itself. Do this when
you notice that the flame is weakening. The burn-out will cause some smells, so it
fuel filter
is recommended that you take the heater outside of the living room.
N
THE FUEL FILTER
Check the fuel filter regularly as well.
Remove the removable tank I from the heater and take out the fuel filter (Fig. N).
Some drops of fuel may spill from the filter; keep a cloth at hand. Turn the fuel
filter upside down and clean it from all dirt deposits by tapping it on a hard
surface. (Never clean it with water!) Reposition the fuel filter in the heater.
☞ ☞
I
Do not remove any heater components yourself. Always contact your dealer for
repairs.
Let the heater cool down first, before you start any maintenance or service work.
STORAGE (END OF THE HEATING SEASON)
We recommend that you burn up all the fuel in the fuel tank at the end of the heating
season and store the heater properly. Follow the procedure on the next page:
1 Ignite the heater outside the living room and let it burn until all fuel is used.
4
45
R 17
2 Let the heater cool down.
3 Clean the heater with a damp cloth and then dry it with a dry cloth.
4 Remove the batteries from the holder L and store them in a dry place.
5 Clean the fuel filter (refer to section H).
6
Store the heater in a dust-free place, if possible in its original packaging.
Unused fuel cannot be used for the next heating season. If there is still some
fuel left, do not throw it away, but dispose of it in accordance with the local
regulations for the disposal of domestic chemical waste. Always start the new
heating season with fresh fuel. When you start re-using the heater, follow the
instructions again (starting from Section A and as specified).
N
J
TRANSPORTATION
Take the following measures to avoid fuel leakage during the transportation of
the heater:
1 Let the heater cool down.
2 Remove the removable tank I from the heater and remove the fuel filter
(Fig. N). Some drops may leak from the filter; keep a cloth at hand. Store the
O
fuel filter and the removable tank outside the heater.
3 Place the transportation cap into the position of the fuel filter (Fig. O).
Press it tight.
4 Always move the heater in an upright position.
Transportation cap
K
SPECIFICATIONS
Ignition
electrical
Fuel
Capacity (kW)*
Suitable space (m )
width
428
paraffin
(including base plate) depth
295
3.00
height
513
85-110
3 **
Fuel consumption (l/hr)
*
Dimensions (mm)
Accessories:
0.313
Fuel consumption (g/hr)*
250
Burning time per tank (hr)*
12.8
transportation cap
Required batteries
Capacity removable tank (litres) 4.0
Weight (kg)
*
**
4
46
R 17
At maximum setting
Specified values are indicative
9.0
manual fuel pump
2x R20kG, MN 1300
1.5V, size D
Wick type
F
L
WARRANTY PROVISIONS
Your heater comes with a 24-month warranty starting on the date of purchase.
Within this period all defects in material or workmanship will be repaired without
any charge. The following provisions shall apply regarding this warranty:
1 We expressly dismiss all other claims for damages, including consequential
damages.
2 Any repairs or replacements of components within the term of warranty will
not result in an extension of the term of warranty.
3 The warranty will no longer apply, when the heater has been modified,
non-original parts have been used, or when it is repaired by third parties.
4 The warranty will not apply to parts that are subject to normal wear, such as
the batteries, the ignition coil, the wick and the manual fuel pump.
5 The warranty will only apply, when you present the original, dated proof of
purchase, provided no changes have been made to it.
6 The warranty will not apply to damages caused by actions not in compliance
with the Directions for Use, neglect, and the use of an incorrect type of fuel,
or fuel past its use-by date. The use of incorrect fuel can even be dangerous*.
7 Transportation costs and the risks involved during the transportation of the
heater or heater components will always be the responsibility of the
purchaser.
In order to avoid unnecessary costs, we recommend that you always read the
’Directions for Use’ carefully first. In case they offer no solution, please take the
heater to your dealer for repair.
* Highly inflammable substances may induce uncontrollable burning, causing flames to break out. Should this
happen, never try to move the heater, but always switch off the heater immediately (refer to Section E). In cases
of emergency you may use a fire extinguisher, but only a type B extinguisher: a carbon dioxide or powder
extinguisher.
10 TIPS FOR SAFE USE
1
Make sure that children are always aware of the presence of a burning
heater.
2
Do not move the heater when it is burning or still hot. Do not refill nor
service the heater when it is burning or still hot.
3
Position the front of the heater at a minimum distance of 1.5 metres
from walls, curtains, and furniture.
4
Do not use the heater in dusty rooms or in very draughty places. In
both cases you will not have optimum burning.
5
Switch off the heater, before you go to sleep.
6
Store and move fuel only in suitable tanks and jerrycans.
7
Make sure that the fuel is not exposed to heat or extreme temperature
changes. Always store the fuel in a cool, dry and dark place (sunlight
will affect the quality).
8
Never use the heater in places where harmful gasses or fumes may be
present (e.g. exhaust gasses or paint fumes).
9
Be aware that the grid of the heater becomes hot. If the appliance is
covered there is a risk of fire.
10
Always make sure that there is sufficient ventilation.
4
47
R 17
1
2
REPLACEMENT OF THE WICK
M
3
ENSURE THAT THE HEATER IS OFF AND COMPLETELY
COOL BEFORE STARTING TO REPLACE THE WICK.
4
1 Open the lid and remove the removable tank.
2 Remove the batteries from the battery holder.
3 Open the front grill. Remove the combustion chamber
5a
5b
from the heater. Close the grill.
4 Pull the knurled wick adjustment knob off the heater.
5 Unscrew the three cabinet screws on the back and sides
of the heater. Pull the cabinet forward slightly, and then
6
7
remove it from the base plate.
6 Unscrew the four wing nuts from the wick holder.
7 Lift up the wick holder and the wick mechanism.
8 Remove the screw on the stem holding the bracket and
8a
8b
remove the bracket, spring and wick height lock.
9 Turn right the stem to the end and remove the wick
sleeve (with wick).
10 Lift the wick sleeve up and remove it from the primary
9
10
air tube.
11 Squeeze the wick to loosen the three wick pins and
remove the wick from the wick sleeve. Ensure that you
are wearing gloves and that you have a container in
which to put the old wick.
11
4
48
R 17
12a
12b
12 Install the wick to the wick sleeve according to the allowed direction engraved on the wick sleeve.
13 Install the wick sleeve (with wick) to the primary air
tube. And then install the top of the stem into the
13a
13b
groove of the wick sleeve (with wick) from right side,
and left the stem to the end.
14 Install the wick height lock (the wick position should be
adjusted at No. 1), spring and bracket. Then tighten the
screw which is holding the stem.
1 4a
1 4b
15 Put the wick holder chassis back into position.
16 Screw the four wing nuts hand tight.
17 Place the knurled wick adjustment knob on the wick
15
16
mechanism. Turn the knob as far to the right as possible. Press the tip-over switch. Check that the wick can
be lowered completely. Repeat this check a number of
times. If the wick cannot be lowered completely it has
not been placed correctly. If this is the case, repeat the
procedure from No. 12. Pull the knurled wick adjustment knob off the heater.
17a
17b
18 Put the cabinet back into position and tighten the three
screws. Put the knurled wick adjustment knob back into
position. Now put the combustion chamber back into
position. Check that it is level by sliding it slightly to the
left and the right by its handle. Close the grill.
18a
18b
19 Put the filled removable tank into position. Put the batteries into the battery holder (ensure that the positive
and negative poles match the + and – marks indicated
on the battery housing). Wait 30 minutes after replacing the tank and batteries before using the heater.
18c
18d
19a
19 b
4
49
R 17
Egregio Signore, Gentile Signora,
Ci congratuliamo con Lei per l’acquisto di una Zibro, il marchio principale fra le
stufe portatili. Lei ha acquistato un prodotto di qualità indiscussa, da cui trarrà
grande soddisfazione per molti anni, naturalmente sempre a patto che Lei
adoperi la stufa in modo corretto. Per tale motivo, al fine di garantire la
massima durata della Zibro, Le consigliamo di leggere con attenzione le
istruzioni prima dell’uso.
A nome del fabbricante Le offriamo 24 mesi di garanzia per tutti i danni
imputabili alla produzione o al materiale.
Le auguriamo molto calore e comfort con la Sua Zibro.
Cordiali saluti,
PVG International b.v.
Servizio clienti
1 LEGGERE DAPPRIMA LE ISTRUZIONI D'USO.
2 IN CASO DI DUBBIO, RIVOLGERSI AL RIVENDITORE.
3 PRIMA DI PROCEDERE ALLA LETTURA, SPIEGARE COMPLETAMENTE L'ULTIMA PAGINA.
>
50
R 17
E
E
E
E
OSSERVAZIONI
SULL'USO GENERALE
COMPONENTI
PRINCIPALI
Qui di seguito vengono descritte in generale le
A
Pulsante di
operazioni da compiere per l'uso delle stufe portatili.
spegnimento rapido
Per maggiori dettagli si prega di fare riferimento alle
istruzioni d'uso (da pagina 53 in poi).
1
2
3
Togliere tutti i materiali dell’imballaggio
(cfr. capitolo A, fig. A).
B
Manopola
C
Pulsante di
accensione
4
Riempire il serbatoio estraibile I ed attendere 30 minuti prima
di accendere la stufa (cfr. capitolo B, figura H).
Camera di
combustione
E
Porre le batterie nello scomparto L (cfr. capitolo A, figura F).
Maniglia della
camera di
combustione
4
Controllare che la camera di combustione D sia in posizione
eretta (cfr. capitolo A, fig. E).
F
Indicatore del
combustible
5
Girare la manopola B a destra fino a che non si ferma;
premere lentamente il pulsante C per accendere la stufa
(cfr. capitolo C, fig. J e K).
G
Griglia
H
Sportellino del
serbatoio estraibile
6
7
Dopo l’accensione occorono circa 10/15 minuti prima che si
possa controllare se la stufa funziona bene (cfr. capitolo D).
Spegnere la stufa (cfr. capitolo E).
I
Serbatoio estraibile
J
Indicatore del
combustible nel
serbatoio estraibile
•
La prima volta, durante la combustione, la stufa
K
Resistenza di
avrà quel particolare odore di 'nuovo'.
•
accensione
Conservare il combustibile in un luogo buio ed
asciutto.
•
Il
combustibile
invecchia.
Cominciare
L
ogni
Scomparto delle
batterie
stagione fredda con nuovo combustibile.
•
Quando si fa uso di Zibro Extra o Zibro Kristal, si è
M
sicuri di utilizzare combustibile di qualità.
•
Bloccagio per
l’altezza dello
Se si passa ad un’altra marca o tipo di petrolio,
stoppino
fare bruciare dapprima la stufa fino a che non vi è
più traccia del vecchio combustibile
E
E
E
E
E
E
E
E
E
E
E
E
E
E
E
E
E
E
E
E
>
51
R 17
E
E
E
OSSERVAZIONI GENERALI
VENTILARE SEMPRE SUFFICIENTEMENTE
Per ogni modello occorre uno spazio minimo in cui la stufa può essere usata in
modo sicuro, senza che sia necessaria una ventilazione supplementare
(cfr. capitolo K). Se lo spazio è più piccolo di quello indicato, occorre sempre aprire
leggermente una finestra o una porta (± 2,5 cm). Questo vale anche per locali
molto isolati o senza ventilazione e/o situati al di sopra dei 1500 metri. Non usare
la stufa portatile in cantine o altri spazi sotterranei.
IL “SAFE TOP”
La stufa è provvista di un “safe top”. Questo fa diminuire il calore del tettuccio. In
questa maniera si riduce il numero di incidenti causati dal contatto con la parte
superiore della stufa. Attenzione: il tettuccio diventa ancora molto caldo.
Evitare dunque ogni contatto con il tettuccio e la griglia.
IL COMBUSTIBILE GIUSTO
La stufa portatile è stata progettata per l’uso di un petrolio di alta qualità, puro,
senza acqua, come Zibro Extra o Zibro Kristal, che assicura una combustione pulita
ed ottimale. Un combustibile di qualità inferiore può causare i seguenti problemi:
Solo con il combustibile
giusto si è sicuri di un
uso sicuro, efficiente e
confortevole della stufa.
E
accumulo eccessivo di catrame sullo stoppino
E
combustione insufficiente
E
durata limitata della stufa
E
fumo e/o cattivo odore
E
accumulo sulla griglia o sul rivestimento.
Il combustibile giusto è quindi essenziale per un uso sicuro, efficiente e
confortevole della stufa.
Consultare sempre il rivenditore a Lei più vicino per la scelta del combustibile
adatto alla stufa.
A
Questo tappo di
trasporto si trova nella
scatola. Serve per
trasportare la stufa
senza problemi dopo
l'uso. Conservare con
cura!
>
52
R 17
MANUALE
B
A
E
E
E
E
INSTALLAZIONE DELLA STUFA
1 Estrarre con cautela la stufa dalla scatola e controllare il contenuto.
Oltre alla stufa, devono essere presenti i seguenti componenti:
E una pompa a sifone per il combustibile
E un tappo per il trasporto
E le istruzioni d’uso
C
Conservare la scatola ed il materiale d’imballaggio (fig. A) per
l’immagazzinaggio e/o il trasporto.
2 Togliere il resto del materiale d’imballaggio:
E Togliere il materiale d’imballaggio in corrispondenza della griglia G.
D
Sollevare la griglia dall’intaglio (fig. B) e tirarla in avanti.
E Togliere il materiale d’imballaggio sopra alla camera di combustione D
(fig. C).
E Togliere la camera di combustione dalla stufa. Rimuovere il materiale
d’imballaggio sottostante (fig. D).
E Porre la camera di combustione di nuovo nella sua sede. Essa è posizionata
E
correttamente se può essere spostata con la maniglia E leggermente verso
sinistra e verso destra (fig. E). Chiudere la griglia.
E Aprire il coperchio del serbatoio estraibile H e togliere il pezzo di cartone.
3 Riempire il serbatoio estraibile come indicato nel capitolo B.
F
4 Porre le batterie nell’apposito scomparto L sul lato posteriore della stufa
(fig. F). Fare attenzione ai poli + e -.
5 Il pavimento deve essere robusto e perfettamente piano. Spostare la stufa,
qualora questa non sia in bolla. Non cercare di correggere la posizione
mettendo sotto la stufa libri o altro materiale.
6 Adesso la stufa è pronta per l’uso.
B
RIFORNIMENTO DEL COMBUSTIBILE
Non riempire il serbatoio estraibile nello spazio abitativo, ma in un luogo più adatto
(una parte di combustibile può sempre fuoriuscire). Compiere le seguenti operazioni:
G
1 Assicurarsi che la stufa sia spenta.
2 Aprire il coperchio H ed estrarre il serbatoio I dalla stufa (fig. G).
Attenzione: il serbatoio può gocciolare leggermente. Appoggiare detto
serbatoio (con il tappo in alto) e svitare il tappo.
>
53
R 17
E
E
3 Prendere la pompa a sifone per il combustibile ed inserire il tubo liscio, più
H
rigido, nella latta. Assicurarsi che questa sia più in alto rispetto al serbatoio
estraibile (fig. H). Il tubo flessibile nervato deve essere inserito nell'apertura
del serbatoio estraibile.
4 Fissare la manopola che si trova sopra la pompa (verso destra).
5 Premere alcune volte la pompa, fino a che il combustibile non comincia a
scorrere nel serbatoio estraibile. In seguito, non occorre più premere.
6 Durante il rifornimento, fare attenzione all'indicatore del combustibile nel
serbatoio estraibile J (fig. I). Se questo è pieno, interrompere il rifornimento
I
svitando (verso sinistra) la manopola sopra la pompa. Non riempire mai troppo
il serbatoio, soprattutto se il combustibile è molto freddo (il combustibile
fuoriesce se diventa caldo).
vuoto
7 Lasciare scorrere di nuovo il combustibile ancora presente nella pompa verso la
pieno
latta e rimuovere la pompa facendo molta attenzione. Avvitare bene il tappo
sul serbatoio. Asciugare eventuali tracce di combustibile.
8 Controllare che il tappo del serbatoio sia diritto e ben avvitato. Porre nuovamente
il serbatoio estraibile nella stufa (con il tappo verso il basso). Chiudere il coperchio.
C
ACCENSIONE DELLA STUFA
Una stufa nuova provoca sempre all’inizio un odore particolare. Per tale motivo,
assicurarsi che vi sia una ventilazione più che sufficiente, oppure accendere la stufa
la prima volta al di fuori dello spazio abitativo.
☞
Quando si usa la stufa per la prima volta, riempire il serbatoio estraibile di
combustibile ed attendere circa 30 minuti prima di accenderla. In questo modo
lo stoppino può impregnarsi di combustibile. Ciò vale anche dopo che la stufa
ha bruciato fino a vuotarsi e dopo la sostituzione dello stoppino.
Prima di accendere la stufa, guardare sempre l’indicatore del combustibile F per
assicurarsi che nel serbatoio estraibile vi sia una quantità sufficiente di combustibile.
Accendere sempre la stufa con l’ausilio della resistenza di accensione K.
Non usare mai fiammiferi o un accendino.
J
Compiere le seguenti operazioni:
1 Accendere la stufa girando la manopola B a destra (fig. J). Esercitando una
leggera pressione il regolatore può essere girato ulteriormente; il regolatore
torna da sé alla posizione originale.
K
2 Premere il pulsante di accensione C (fig. K), esercitando una lieve pressione.
Non appena scaturirà la fiamma nella camera di combustione D, rilasciare
il pulsante dell’accensione.
☞
>
54
R 17
Quando la stufa è nuova, la manopola non è bloccata, per cui prima di portare
lo stoppino nella posizione giusta per l’accensione (capitolo C), girare tutta la
manopola (fig. L) in senso anti-orario.
E
Dopo l’accensione della stufa controllare sempre che la camera di combustione D
☞
sia nella posizione corretta, spostandola con la maniglia E leggermente verso sinistra e destra (fig. E). Questo movimento deve avvenire senza intoppi. Se la camera
di combustione non si trova nella posizione corretta, si avranno fumo e fuliggine.
D
LA COMBUSTIONE DELLA STUFA
Dopo l’accensione, occorre attendere 10-15 minuti prima che si possa controllare se
L
la stufa funziona bene. Una fiamma troppo alta può provocare fumo e fuliggine,
mentre una fiamma troppo bassa può provocare cattivi odori. Nella pagina accanto
al pieghevole si può vedere il limite minimo e massimo della fiamma (fig. P). La
fiamma può esser leggermente regolata con il manopola B (fig. L).
Le cause di una fiamma troppo bassa possono essere le seguenti:
E
combustibile insufficiente
E
combustibile di cattiva qualità (consultare il rivenditore)
E
ventilazione insufficiente
E
stoppino consumato
(riempire il serbatoio)
(aprire leggermente una porta o una finestra)
(consultare il rivenditore oppure sostituire
lo stoppino: cfr capitolo M)
E
SPEGNIMENTO DELLA STUFA
Far bruciare la stufa al minimo (fig. L) per un minuto circa, dopodiché girare lentamente la
manopola 2 in senso antiorario fino a che non si ferma. Dopo poco la fiamma si spegnerà.
☞
M
F
In caso d’emergenza, spegnere la stufa con il pulsante di spegnimento rapido A (fig. M).
REGOLAZIONE DELL’ALTEZZA DELLO STOPPINO
Dopo un certo periodo, la combustione non è più abbastanza alta (capitolo D). In tal
caso, occorre regolare l’altezza dello stoppino per migliorare la combustione. A tale
proposito la stufa deve essere spenta. Compiere le seguenti operazioni:
Q
1 Premere il pulsante di sicurezza A (fig. M).
2 Togliere la manopola della stufa B sfilandola dalla sua sede, così si vedrà il
dispositivo di blocco dell’altezza dello stoppino M.
3 Tirare l’anello di plastica tenendolo fra pollice ed indice. Ruotarlo verso l’alto
e portarlo alla posizione 2 o 3 (fig. Q). Premere con cautela l’anello, in modo
che la scanalatura chiuda di nuovo la palettina.
4 Premere con cautela la maniglia del regolatore della fiamma, per riportarla
alla posizione originale. A tale proposito, occorre osservare il lato posteriore
del tappo, per determinare la posizione corretta.
☞
Se la regolazione dell’altezza dello stoppino non porta all’effetto desiderato, occorre
lasciare funzionare la stufa fino a che non vi è più combustibile (capitolo H).
>
55
R 17
Se durante la combustione l’altezza della fiamma rimane ancora bassa e lo stoppino è nella
posizione 3, consultare il rivenditore oppure sostituire lo stoppino: cfr capitolo M.
Se in seguito alla regolazione dello stoppino l’altezza della fiamma fosse troppo alta,
(fig. Q) mettete il bloccaggio sul numero inferiore, altrimenti si formeranno fumo e
fuliggine.
G
GUASTI, CAUSE E SOLUZIONI
Se non si riesce a risolvere un guasto con l’aiuto delle indicazioni riportate qui di
seguito, occorre rivolgersi direttamente al rivenditore della stufa.
F
>
56
R 17
NON SI RIESCE AD ACCENDERE LA STUFA.
E Le batterie non sono installate correttamente nello scomparto.
Controllare (fig. F).
E Le batterie non hanno più una carica sufficiente per l’accensione.
Sostituirle (fig. F).
E La stufa non ha più combustibile oppure lo stoppino deve essere sostituito.
Dopo aver installato il serbatoio estraibile pieno, attendere 30 minuti prima
di procedere all’accensione.
E Il pulsante di accensione C è stato premuto con troppa forza verso il basso.
Premere con meno forza (capitolo C).
E La resistenza di accensione K è interrotta.
Consultare il rivenditore della stufa.
FIAMMA INCOSTANTE E/O FULIGGINE E/O CATTIVO ODORE.
E La camera di combustione D non è stata installata correttamente.
Correggerne la posizione con la maniglia E, fino a spostarla facilmente verso
sinistra e verso destra.
E Il combustibile è vecchio.
Cominciare ogni stagione fredda con nuovo combustibile.
E Si fa uso del combustibile sbagliato.
Cfr. IL COMBUSTIBILE GIUSTO (cfr. capitolo ‘Osservazioni generali’).
E All’interno della stufa si ha un accumulo di polvere.
Rivolgersi al rivenditore.
E L’altezza dello stoppino non è stata regolata.
Cfr. capitolo F.
LA STUFA SI SPEGNE LENTAMENTE.
E Il serbatoio estraibile è vuoto. Cfr. il capitolo B.
E Nel filtro c’è dell’umidità. Asciugare il filtro (Cfr. capitolo H).
E Nel serbatoio inferiore vi è dell’umidità. Rivolgersi al rivenditore.
E Lo stoppino è indurito sulla parte superiore. Fare bruciare la stufa fino a che
non vi è più combustibile (capitolo H). Usare il combustibile giusto.
E Si fa uso di combustibile vecchio.
Cominciare ogni stagione fredda con combustibile nuovo.
LA STUFA CONTINUA A BRUCIARE AL MINIMO.
E Lo stoppino è troppo basso.
Regolare l’altezza dello stoppino ad una posizione più alta (cfr. capitolo F).
E Prima del rifornimento la stufa doveva aver finito quasi tutto il combustibile.
Riempire il serbatoio estraibile di combustibile ed attendere 30 minuti prima
di procedere all’accensione.
E Si fa uso di combustibile vecchio o del tipo sbagliato.
Cfr. IL COMBUSTIBILE GIUSTO (cfr. capitolo ‘Osservazioni generali’).
E Il locale non ha una ventilazione sufficiente. Spalancare per qualche minuto
una finestra o una porta e poi lasciarle leggermente aperte.
LA STUFA BRUCIA TROPPO, CON FIAMME NON REGOLARI.
E Si fa uso di un combustibile sbagliato, troppo volatile.
Cfr. IL COMBUSTIBILE GIUSTO (cfr. capitolo ‘Osservazioni generali’).
E Lo stoppino è troppo alto.
Regolare l’altezza dello stoppino ad una posizione più bassa (cfr. capitolo F).
H
LA MANUTENZIONE
La stufa richiede una manutenzione minima. Tuttavia, occorre eliminare
periodicamente polvere e sporco con un panno umido, perché potrebbero crearsi
macchie difficili da eliminare. Normalmente sono solo tre le parti che si consumano.
1. LE BATTERIE
Le batterie possono essere sostituite. Non gettare le batterie vecchie fra i rifiuti
domestici. Seguire le vigenti normative locali sullo smaltimento di piccoli rifiuti
chimici.
2. LA RESISTENZA DI ACCENSIONE
La resistenza di accensione dura più a lungo se la stufa viene accesa nel modo
corretto. Sostituire per tempo le batterie e fare attenzione a non premere troppo
forte il pulsante di accensione. Se il filamento è rotto, occorre sostituire la
resistenza interrotta
resistenza di accensione.
3. LO STOPPINO
Per prolungare la durata dello stoppino, soprattutto quando si nota che la fiamma
diventa più debole, occorre ogni tanto tenere accesa la stufa fino ad esaurimento
del combustibile (fino a che non si spegne da sola). Così facendo può darsi che la
stufa faccia cattivo odore; per questo si consiglia di compiere quest’operazione al
di fuori dello spazio abitativo.
Il filtro
N
IL FILTRO
Controllare periodicamente anche il filtro del carburante:
Togliere il serbatoio estraibile I e il filtro dalla stufa (fig. N). Poiché possono
cadere alcune gocce di carburante, tenere un panno a portata di mano.
Picchiettare il filtro su una superficie rigida, tenendolo capovolto, per togliere lo
sporco (non pulirlo mai con acqua). Riporre il filtro nella stufa.
☞ ☞
I
L’utente non deve rimuovere da solo le parti della stufa. Per un’eventuale
riparazione contattare sempre il rivenditore.
Prima di procedere alla manutenzione lasciare raffreddare la stufa.
IMMAGAZZINAGGIO (FINE DELLA STAGIONE FREDDA)
Alla fine della stagione fredda si consiglia di tenere accesa la stufa facendo in
modo che si esaurisca tutto il combustibile in essa presente e poi di
immagazzinarla in un luogo sicuro. A tale proposito compiere le seguenti
operazioni:
1 Accendere la stufa al di fuori dello spazio abitativo e lasciarla bruciare fino ad
esaurimento del combustibile.
2 Lasciare raffreddare la stufa.
>
57
R 17
3 Pulire la stufa con un panno umido ed asciugarla con un panno asciutto.
4 Togliere le batterie dalla stufa L e conservarle in un luogo asciutto.
5 Pulire il filtro (cfr. capitolo H).
6 Conservare la stufa in un luogo senza polvere, facendo possibilmente uso
dell’imballaggio originale. Il combustibile rimasto non può essere più
utilizzato per la stagione successiva. Qualora rimanga del combustibile, non
gettarlo via, ma smaltirlo conformemente alla vigente legislazione locale per i
rifiuti chimici di piccole dimensioni. Cominciare in ogni caso la nuova stagione
N
fredda con del combustibile nuovo. Quando si riaccende la stufa, seguire
nuovamente le istruzioni (come riportate a partire dal capitolo A).
J
TRASPORTO
Per evitare che la stufa perda combustibile durante il trasporto, occorre prendere
le seguenti precauzioni:
O
1 Lasciare raffreddare la stufa.
2 Togliere il serbatoio estraibile I dalla stufa e rimuovere il filtro del
combustibile (fig. N). Questo può perdere qualche goccia di combustibile;
tenere un panno a portata di mano. Conservare il filtro ed il serbatoio
estraibile al di fuori della stufa.
3 Mettere il tappo per il trasporto al posto del filtro (fig. O) e premerlo bene.
tappo per il trasporto
4 Trasportare la stufa sempre in posizione eretta.
K
SPECIFICHE
Accensione
elettrica
Dimensioni (mm)
larghezza
Combustibile
petrolio
(con piastra inferiore)
profondità
295
altezza
513
3,00
Capacità (kW)*
Spazio riscaldabile (m3)**
85-110
Accessori pompa a sifone per il combustibile
Consumo di combustibile (l/ora) 0,313
tappo per il trasporto
*
Consumo di combustibile (g/ora)
250
Autonomia (ora)*
12,8
*
Batterie necessarie
Capacità serbatoio estraibile (litri) 4,0
Peso (kg)
* Con regolazione al massimo
L
428
9,0
2x R20kG, MN 1300
1,5V, size D
Tipo di stoppino
F
** valori riportati sono indicativi
CONDIZIONI DELLA GARANZIA
La stufa ha una garanzia di 24 mesi a partire dalla data d'acquisto. Entro questo
periodo tutti i guasti imputabili ai materiali ed alla produzione vengono riparati
gratuitamente. Le condizioni sono le seguenti:
>
58
R 17
1 La PVG International rifiuta esplicitamente tutti gli accordi relativi a
rimborso dei danni, compreso il rimborso di danni sorti in seguito a guasti.
2 La riparazione o la sostituzione delle parti entro il termine di garanzia non
implica un prolungamento della garanzia stessa.
3 La garanzia viene considerata nulla qualora siano state apportate delle
modifiche, qualora siano state montate delle parti non originali o qualora
siano state effettuate delle riparazioni alla stufa da parte di terzi.
4 Le parti normalmente sottoposte ad usura, come le batterie, la resistenza, lo
stoppino e la pompa a sifone per il combustibile, non sono comprese nella
garanzia.
5 La garanzia vale esclusivamente se l'utente è in possesso della ricevuta
d’acquisto originale, datata, alla quale non siano state apportate modifiche o
correzioni.
6 La garanzia viene considerata nulla in caso di danni sorti in seguito ad azioni
non conformi alle istruzioni d’uso, in seguito a negligenza ed in seguito
all’uso di combustibile del tipo sbagliato o vecchio. L’uso di combustibile
sbagliato può anche costituire un pericolo*.
7 Le spese di spedizione ed i rischi che la spedizione della stufa o delle parti
comportano sono sempre a carico dell'acquirente.
Per prevenire spese inutili, si consiglia dapprima di consultare con attenzione le
istruzioni d'uso. Qualora queste non offrano alcuna soluzione al problema,
portare la stufa dal rivenditore per la riparazione.
* Le sostanze leggermente infiammabili possono portare ad una combustione non controllabile, con fiamme
pericolose come conseguenza. In tal caso, non cercare di spostare la stufa, ma spegnerla immediatamente
(cfr. capitolo E). In caso d’emergenza si può fare uso di un estintore, esclusivamente del tipo B: estintore a
polvere o ad acido carbonico.
10 CONSIGLI PER UN USO SICURO
1
2
3
4
5
6
7
8
9
10
Richiamare sempre l’attenzione dei bambini sui pericoli di una stufa
accesa.
Non spostare la stufa se questa è accesa o se è ancora calda. In tal caso,
non riempirla di combustibile e non eseguire la manutenzione.
Porre la parte anteriore della stufa ad una distanza minima di 1,5 metri
da pareti, tende o mobili. Mantenere libero lo spazio sopra la stufa.
Non usare la stufa in locali polverosi. Non si avrà una combustione
ottimale.
Spegnere la stufa prima di uscire o prima di andare a letto.
Conservare e trasportare il combustibile nei contenitori appositi.
Assicurarsi che il combustibile non sia esposto a fonti di calore o a forti
escursioni termiche. Conservare sempre il combustibile in un luogo
fresco, secco ed asciutto (la luce del sole ne intacca la qualità).
Non usare mai la stufa in luoghi dove possono essere presenti gas o
vapori pericolosi (ad esempio, gas di scarico o vapori di vernici).
La griglia della stufa diventa calda. Non coprire la stufa (pericolo di
incendio).
Assicurarsi sempre che la ventilazione sia sufficiente.
>
59
R 17
1
2
SOSTITUZIONE DELLO STOPPINO
M
3
PRIMA DI PROCEDERE ALLA SOSTITUZIONE DELLO
STOPPINO, LA STUFA DEVE ESSERE SPENTA E
COMPLETAMENTE FREDDA.
4
1 Aprire lo sportellino del serbatoio e togliere il serbatoio
estraibile.
2 Togliere le batterie dal suo comparto.
5a
5b
3 Sollevare la griglia dalla’incastro e tirarla in avanti.
Togliere la camera di combustione dalla stufa. Chiudere
la griglia.
4 Sfilare la manopola dalla stufa.
6
7
5 Svitare le tre viti del mantello della stufa, poste nella
sua parte inferiore. Spostare leggermente in avanti il
mantello e sollevarlo dalla base della stufa.
6 Svitare i galletti che fissano il piano di combustione alla
vaschetta.
8a
8b
7 Sollevare e togliere tutto il blocco.
8 Togliere la vite dal pernio tendendo fermo il supporto e
rimuoverlo insieme alla molla.
9 Girare completamente il pernio in senso orario e
9
10
togliere l’anello porta stoppino (stoppino compreso).
10 Sollevare l’anello porta stoppino e toglierlo dal camino
d’aspirazione.
11 Comprimere lo stoppino per liberarlo dai tre punti di
11
ancoraggio e sfilarlo dall’anello porta stoppino.
Indossare i guanti e assicurarsi di avere a portata di
mano un recipiente dove mettere lo stoppino vecchio.
>
60
R 17
12a
12b
12 Reinserire lo stoppino nell’anello porta stoppino
rispettando il giusto verso indicato sullo stoppino
stesso.
13a
13b
13 Inserire l’anello porta stoppino (stoppino compreso) nel
camino di aspirazione. Riposizionare la parte superiore
del pernio dentro l’incavo dell’anello porta stoppino
dalla parte di destra e girare il pernio completamente a
sinistra.
1 4a
1 4b
14 Inserire la regolazione dello stoppino (la posizione
dello stoppino dovrebbe essere regolata sul n° 1) , la
molla ed il supporto. Riavvitare la vite che tiene fermo il
pernio.
15 Rimettere a posto il piano di combustione.
15
16
16 Avvitare gradualmente i galletti seguendo una
sequenza a croce (1-3-2-4).
17 Inserire di nuovo la manopola nella sua sede. Ruotare la
manopola completamente verso destra. Premere il tasto
di spegnimento. Controllare che lo stoppino si abbassi
17a
17b
del tutto. Ripetere più volte questo controllo. Se lo
stoppino non si abbassa completamente, non è stato
montato bene nel suo meccanismo. In questo caso la
procedura deve essere ripetuta a partire dal n° 12.
Sfilare la manopola dalla stufa.
18a
18b
18 Rimettere al suo posto il mantello e riavvitare le tre viti.
Rimettere a posto la manopola e poi la camera di
combustione. Controllare che quest’ultima sia in
posizione verticale, prendendola dalla maniglia della
camera di combustione e muovendola verso destra e
sinistra. Chiudere la griglia.
18c
18d
19 Rimettere al suo posto il serbatoio pieno e riporre le
batterie nell’apposito vano (fare attenzione ai poli + e-).
Dopo aver rimesso a posto il serbatoio e le batterie,
aspettare 30 minuti prima di riaccendere la stufa.
19a
19 b
>
61
R 17
Geachte mevrouw, meneer,
Van harte gefeliciteerd met de aankoop van uw Zibro, het A-merk onder de
verplaatsbare kachels. U hebt een kwaliteitsproduct aangeschaft, waar u nog
vele, vele jaren plezier van zult hebben, mits u de kachel verantwoord gebruikt
natuurlijk. Lees daarom eerst deze gebruiksaanwijzing, voor een optimale
levensduur van uw Zibro.
Wij geven u namens de fabrikant 24 maanden garantie op alle optredende
materiaal- en fabricagefouten.
We wensen u veel warmte en comfort met uw Zibro.
Met vriendelijke groet,
PVG International b.v.
Afdeling klantenservice
1 LEES EERST DE GEBRUIKSAANWIJZING.
2 RAADPLEEG BIJ TWIJFEL UW ZIBRO DEALER.
3 VOUW VOOR HET LEZEN DE LAATSTE PAGINA UIT.
1
62
R 17
E
E
E
E
E
E
E
E
E
E
E
HET GEBRUIK IN HOOFDLIJNEN
BELANGRIJKE
ONDERDELEN
Dit zijn in grote lijnen de stappen die u moet nemen
om uw kachel te gebruiken. Voor de precieze hande-
A
Beveiligingstoets
B
Draaiknop
C
Ontstekingstoets
4
Verbrandingskamer
E
Handgreep
lingen verwijzen wij u naar de HANDLEIDING (pag. 65
en verder).
1
Verwijder alle verpakkingsmaterialen (zie hoofdstuk A, fig. A).
2
Vul de wisseltank I en wacht 30 minuten alvorens de kachel te
ontsteken (zie hoofdstuk B, fig. H).
3
Plaats de batterijen in de houder L (zie hoofdstuk A, fig. F).
4
Controleer of de verbrandingskamer D goed recht staat
verbrandingskamer
F
Brandstofindicatie
G
Grille
H
Deksel wisseltank
I
Wisseltank
J
Brandstofmeter
(zie hoofdstuk A, fig. E).
5
Ontsteek de kachel door de draaiknop B naar rechts te
draaien tot deze niet verder kan en vervolgens de ontstekingstoets C rustig in te drukken (zie hoofdstuk C, fig. J en K).
6
Na het ontsteken duurt het 10 à 15 minuten voordat u kunt
controleren of de kachel goed brandt (zie hoofdstuk D).
wisseltank
7
Schakel de kachel uit (zie hoofdstuk E).
•
De eerste keer zal uw kachel tijdens het branden
even naar ‘nieuw’ ruiken.
•
Ontstekingsspiraal
L
Batterijhouder
M
Koushoogte-
Bewaar uw brandstof op een koele,
donkere plaats.
•
K
Brandstof veroudert.
vergrendeling
Begin elk stookseizoen met nieuwe brandstof.
•
Wanneer u stookt met Zibro Extra of Zibro Kristal,
bent u verzekerd van de juiste kwaliteit brandstof.
•
Indien u overgaat op een ander merk en/of soort
kerosine, moet u de kachel eerst helemaal laten
leegbranden.
E
E
E
E
E
E
E
E
E
E
E
E
E
E
E
E
E
E
E
E
1
63
R 17
E
E
E
WAT U VOORAF MOET WETEN
ALTIJD VOLDOENDE VENTILEREN
Voor elke verplaatsbare kachel geldt een bepaalde minimumruimte (zie hoofdstuk K)
waarin u deze veilig, zonder extra ventilatie kunt gebruiken. Als de betreffende
ruimte kleiner is dan aangegeven, dient u altijd een raam of deur op een kier te
zetten (± 2,5 cm). Dit raden wij ook aan bij ruimtes die sterk geïsoleerd of tochtvrij
gemaakt zijn en/of boven 1500 m. liggen. Gebruik uw kachel niet in kelders en
andere ondergrondse ruimtes.
DE SAFE TOP
De kachel is voorzien van een safe top. Deze vermindert de temperatuur van de
bovenplaat. Hierdoor wordt bij eventueel contact met de bovenzijde van de
kachel het risico op ongelukken verkleind. Let op: de bovenzijde wordt nog
steeds heet.
Vermijd elk contact met de bovenplaat en de grille.
DE JUISTE BRANDSTOF
Uw verplaatsbare kachel is ontworpen voor het gebruik van watervrije, zuivere kerosine van hoge kwaliteit, zoals Zibro Extra of Zibro Kristal. Alleen deze zorgt voor een
schone en optimale verbranding. Brandstof van mindere kwaliteit kan leiden tot:
Alleen met de juiste
brandstof bent u
verzekerd van een veilig,
efficiënt en comfortabel
gebruik van uw
verplaatsbare kachel.
E
overmatige teeraanslag op de kous
E
onvolledige verbranding
E
beperkte levensduur van kous en kachel
E
rook en/of stank
E
aanslag op de grille of mantel
De juiste brandstof is dus essentieel voor een veilig, efficiënt en comfortabel
gebruik van uw kachel.
Overleg altijd met de dichtstbijzijnde dealer over de juiste brandstof voor uw
kachel.
A
Deze transportdop vindt
u los in de doos. Alleen
hiermee kunt u de
kachel na gebruik
probleemloos vervoeren.
Goed bewaren dus!
1
64
R 17
HANDLEIDING
A
E
E
E
E
HET INSTALLEREN VAN DE KACHEL
1 Haal uw kachel voorzichtig uit de doos en controleer de inhoud.
B
Naast de kachel moet u ook beschikken over:
E een brandstofhevelpompje
E een transportdop
E deze gebruiksaanwijzing
C
Bewaar de doos en het verpakkingsmateriaal (fig. A)
voor opslag en/of transport.
2 Verwijder het overige verpakkingsmateriaal:
E Verwijder het stukje verpakkingsmateriaal bij de grille G. Licht de grille
uit de inkeping (fig. B) en trek hem naar voren.
D
E Druk het verpakkingsmateriaal boven de verbrandingskamer D iets naar
beneden en verwijder het uit de kachel (fig. C).
E Neem de verbrandingskamer uit de kachel en verwijder het daaronder
aanwezige verpakkingsmateriaal (fig. D).
E Zet de verbrandingskamer terug op zijn plaats. De verbrandingskamer
staat goed als u hem met de handgreep E soepel een beetje naar links en
E
rechts kunt schuiven (fig. E). Sluit de grille.
E Open de deksel van de wisseltank H en verwijder het stukje karton.
3 Vul de wisseltank zoals aangegeven in hoofdstuk B.
4 Plaats de batterijen in de daarvoor bestemde houder L aan de achterzijde
F
van de kachel (fig. F). Let op de + en - polen.
5 De vloer moet stevig en waterpas zijn. Verplaats de kachel als deze niet
waterpas staat. Probeer dit niet te corrigeren door er boeken of iets anders
onder te leggen.
6 Uw kachel is nu gebruiksklaar.
B
VULLEN MET BRANDSTOF
Vul de wisseltank niet in de woonruimte, maar op een meer geschikte plaats
G
(er kan altijd een beetje gemorst worden). U gaat daarbij als volgt te werk:
1 Zorg dat de kachel uit is.
2 Open het deksel H en til de wisseltank I uit de kachel (fig. G). Let op: de
tank kan even nadruppelen. Zet de wisseltank neer (dop naar boven) en
schroef de tankdop eraf.
1
65
R 17
E
E
3 Neem het brandstofhevelpompje en steek de gladde, meest stugge pijp in de
H
jerrycan. Zorg dat deze hoger staat dan de wisseltank (fig. H). De geribbelde
slang steekt u in de opening van de wisseltank.
4 Draai de knop bovenop het pompje vast (naar rechts).
5 Knijp enkele keren in het pompje, totdat de brandstof in de wisseltank
stroomt. Als dat eenmaal het geval is, hoeft u niet meer te knijpen.
6 Let tijdens het vullen op de brandstofmeter van de wisseltank J (fig. I). Als u
ziet dat deze vol is, stop dan met vullen door de knop boven op het pompje
weer los te draaien (naar links). Maak de tank nooit te vol. Vooral niet als de
I
brandstof erg koud is (brandstof zet uit als deze warmer wordt).
7 Laat de brandstof die nog aanwezig is in het pompje, terugstromen in de
jerrycan en verwijder het pompje voorzichtig. Schroef de tankdop nauwkeurig
op de tank. Veeg eventueel gemorste brandstof weg.
leeg
vol
8 Controleer of de tankdop recht zit en goed is aangedraaid. Plaats de
wisseltank weer in de kachel (dop naar beneden). Sluit het deksel.
C
HET AANMAKEN VAN DE KACHEL
Een nieuwe kachel veroorzaakt in het begin extra geur. Zorg dus voor extra ventilatie of ontsteek uw kachel de eerste keer buiten de leefruimte.
Als u de kachel voor de eerste keer gebruikt, moet u na het plaatsen van de
☞
gevulde wisseltank zo’n 30 minuten wachten met aanmaken. Zo kan de kous
zich volzuigen met brandstof. Dit geldt ook nadat u de kachel helemaal leeg
hebt laten branden en na het vervangen van de kous.
Kijk vóór het aanmaken van de kachel altijd even op de brandstofindicatie F om
te weten of u eerst de wisseltank moet bijvullen.
Maak de kachel altijd aan met behulp van de ontstekingsspiraal K.
Gebruik nooit lucifers of een aansteker.
U gaat als volgt te werk:
J
1 Draai de draaiknop 2 naar rechts tot aan de aanslag (fig. J). Met enige
druk zou u de draaiknop dan nog wat verder kunnen draaien; deze veert
dan echter vanzelf terug.
2 Druk de ontstekingstoets C in (fig. K), maar niet te hard. Zodra een
vlammetje in de verbrandingskamer D zichtbaar wordt, kunt u de
K
ontstekingstoets loslaten.
☞
1
66
R 17
De kachel is sinds kort in gebruik en de draaiknop wordt niet vergrendeld.
Draai de draaiknop (fig. L) eerst geheel linksom alvorens de kous in de hoogste
positie te brengen voor ontsteking (hoofdstuk C).
Controleer na het ontsteken van de kachel altijd of de verbrandingskamer D
E
☞
goed recht staat, door deze aan de handgreep E even naar links en rechts te
schuiven (fig. E). Dit moet soepel gaan. Als de verbrandingskamer ongelijk
staat, leidt dit tot rook- en roetontwikkeling.
D
HET BRANDEN VAN DE KACHEL
Na het ontsteken van de kachel duurt het 10 à 15 minuten voordat u kunt
L
controleren of de kachel goed brandt. Op de pagina naast het uitvouwblad kunt u
zien hoe hoog uw kachel minimaal en maximaal mag branden (fig. P). Een te hoge
vlam kan rook- en roetvorming veroorzaken, terwijl een te lage verbranding tot
geurontwikkeling leidt. U kunt de vlam enigszins instellen met de vlamregelaar (2)
(fig. L).
Een te lage verbranding kan ontstaan door:
E
te weinig brandstof
(vul de tank)
E
slechte brandstof
(raadpleeg uw dealer)
E
te weinig ventilatie
(zet een raam of deur op een kier)
E
slijtage van de kous
(raadpleeg uw dealer, of vervang de kous,
zie hoofdstuk M)
E
HET UITZETTEN VAN DE KACHEL
Laat de kachel ± een minuut branden op een lage stand (fig. L). Draai vervolgens
de draaiknop B naar links tot aan de aanslag. De vlam zal dan vanzelf na enige
tijd doven.
☞
M
F
In noodgevallen schakelt u de kachel uit door de beveiligingstoets A in te
drukken (fig. M).
HET VERSTELLEN VAN DE KOUSHOOGTE
Na verloop van tijd is de verbranding niet meer hoog genoeg (hoofdstuk D). In dat
geval kunt u de koushoogte verstellen om de verbranding te verbeteren. Hiervoor
Q
dient de kachel uit te zijn. U gaat als volgt te werk:
1 Druk de UIT-toets A in (fig. M).
2 Trek de draaiknop B van de kachel, zodat de koushoogtevergrendeling M
zichtbaar wordt.
3 Neem de plastic ring tussen duim en wijsvinger en trek deze naar voren. Draai
de ring één stap hoger naar stand 2 of 3 (fig. Q). Druk de ring voorzichtig aan,
zodat de uitsparing weer om het palletje sluit.
4 Duw de draaiknop voorzichtig op zijn plaats. Dit kan maar op één manier:
bekijk de achterkant van de dop voor de juiste positie.
Als het verstellen van de koushoogte niet het gewenste effect heeft, moet u de
kachel helemaal laten leegbranden (hoofdstuk H).
1
67
R 17
☞
Blijft de verbranding ook dan nog te laag en staat uw kous inmiddels op stand 3,
neem dan contact op met uw dealer of vervang de kous, zie hoofdstuk M.
Als de verbranding na het bijstellen te hoog wordt (fig. Q), moet u de koushoogte
vergrendeling weer een stand lager zetten. Anders hebt u kans op rook- en roetontwikkeling.
G
STORINGEN, OORZAKEN EN OPLOSSINGEN
Als u een storing niet kunt oplossen met behulp van de onderstaande aanwijzingen, dient u contact op te nemen met uw dealer.
F
1
68
R 17
HET AANMAKEN LUKT NIET.
E De batterijen zitten niet goed in de houder.
Controleren (fig. F).
E De batterijen zijn niet meer krachtig genoeg voor de ontsteking.
Vervangen (fig. F).
E U hebt de kachel helemaal leeggestookt of de kous is vervangen.
Na het plaatsen van de gevulde wisseltank 30 minuten wachten met
ontsteken.
E U duwt de ontstekingstoets C te krachtig in, waardoor de ontstekingsspiraal
smoort in de kous.
Minder hard indrukken (hoofdstuk C).
E De ontstekingsspiraal K is stuk.
Raadpleeg uw dealer.
SLECHTE VERBRANDING EN/OF ROET/GEUR.
E De verbrandingskamer D is niet goed geplaatst.
Zet deze recht met de handgreep E, tot u hem makkelijk wat naar links en
rechts kunt schuiven.
E U gebruikt verouderde brandstof.
Begin elk stookseizoen met nieuwe brandstof.
E U gebruikt verkeerde brandstof.
Zie DE JUISTE BRANDSTOF (hoofdstuk ”Wat u vooraf moet weten”).
E Er is sprake van stofophoping onder in de kachel.
Raadpleeg uw dealer.
E De koushoogte is niet goed.
Zie hoofdstuk F.
DE KACHEL GAAT LANGZAAM UIT.
E De wisseltank is leeg.
Zie hoofdstuk B.
E Er zit vocht in het zeefje.
Maak het zeefje droog (hoofdstuk H, fig. P).
E Er zit vocht in het onderreservoir.
Raadpleeg uw dealer.
E De kous is aan de bovenzijde verhard.
Kachel helemaal leegbranden (hoofdstuk H). Gebruik de juiste brandstof.
E U gebruikt verouderde brandstof.
Begin elk stookseizoen met nieuwe brandstof.
DE KACHEL BLIJFT LAAG BRANDEN.
E De kous staat te laag.
Zet de koushoogtevergrendeling een stand hoger (hoofdstuk F).
E De kachel had voor het bijvullen vrijwel alle brandstof verbruikt.
Na het plaatsen van de volle wisseltank 30 minuten wachten met ontsteken.
E U gebruikt oude of verkeerde brandstof.
Zie DE JUISTE BRANDSTOF (hoofdstuk ”Wat u vooraf moet weten”).
E De ruimte wordt onvoldoende geventileerd.
Zet even een raam of deur wijd open en laat deze daarna op een kier staan.
DE KACHEL BRANDT TE HOOG.
E U gebruikt verkeerde, te vluchtige brandstof.
Zie DE JUISTE BRANDSTOF (hoofdstuk ”Wat u vooraf moet weten”).
E De kous staat te hoog.
Zet de koushoogtevergrendeling een stand lager (hoofdstuk F).
H
OVER HET ONDERHOUD
Uw kachel vergt weinig onderhoud. Wel dient u stof en vlekken bijtijds af te
nemen met een vochtige doek, omdat er anders hardnekkige vlekken kunnen ontstaan. Normaal gesproken zijn er slechts drie onderdelen aan slijtage onderhevig:
1. DE BATTERIJEN
Deze kunt u zelf vervangen. Gooi de oude batterijen niet in de vuilnisbak. Volg de
regels zoals die in uw gemeente gelden voor Klein Chemisch Afval.
2. DE ONTSTEKINGSSPIRAAL
De ontstekingsspiraal gaat langer mee als u de kachel op de juiste manier ontsteekt. Vervang op tijd de batterijen en let op dat u de ontstekingstoets niet te
krachtig indrukt. Als de gloeidraad gebroken is, dient de ontstekingsspiraal ver-
ontstekingsspiraal met
gebroken gloeidraad
vangen te worden.
3. DE KOUS / LEEGBRANDEN
Om de levensduur van de kous te verlengen, moet u de kachel van tijd tot tijd
helemaal laten leegbranden (tot hij vanzelf uitgaat). Doe dit wanneer u merkt dat
Brandstofzeefje
de verbranding wat minder wordt. Het leegbranden veroorzaakt enige geur, dus
N
het is raadzaam dit buiten de leefruimte te doen.
HET BRANDSTOFZEEFJE
Controleer ook met enige regelmaat het brandstofzeefje:
haal de wisseltank I uit de kachel en verwijder het brandstofzeefje (fig. N). Dit
kan wat nadruppelen; houd een doekje bij de hand. Klop het brandstofzeefje
omgekeerd leeg op een harde ondergrond, om het vuil te verwijderen. (Nooit
reinigen met water!) Plaats het brandstofzeefje weer in de kachel.
☞ ☞
I
Verwijder zelf geen onderdelen van de kachel. Neem voor een eventuele reparatie altijd contact op met uw dealer.
Laat de kachel afkoelen voordat u onderhoud pleegt.
OPSLAG (EINDE STOOKSEIZOEN)
Wij raden u aan de kachel aan het einde van het stookseizoen helemaal leeg te branden en daarna goed op te bergen. U gaat als volgt te werk:
1 Maak de kachel aan buiten de leefruimte en laat hem geheel leegbranden.
2 Laat de kachel afkoelen.
3 Maak de kachel schoon met een vochtige doek en droog deze af.
4 Haal de batterijen uit de batterijhouder L en bewaar deze op een droge plaats.
5 Reinig het brandstofzeefje (zie hoofdstuk H).
1
69
R 17
6 Berg de kachel stofvrij op, zo mogelijk in de originele verpakkingsmaterialen.
Overgebleven brandstof kunt u een volgend stookseizoen niet meer gebruiken.
Houdt u toch wat over gooi deze brandstof dan niet weg, maar volg de regels zoals
die in uw gemeente gelden voor Klein Chemisch Afval. Begin het nieuwe
stookseizoen in elk geval met nieuwe brandstof en raadpleeg opnieuw deze
gebruiksaanwijzing.
N
J
VERVOER
Om te voorkomen dat uw kachel tijdens transport brandstof lekt, moet u de volgende maatregelen nemen:
1 Laat de kachel afkoelen.
2 Haal de wisseltank I uit de kachel en verwijder het brandstofzeefje (fig. N).
Dit kan wat nadruppelen; houd een doekje bij de hand.
O
Bewaar het brandstofzeefje en de wisseltank buiten de kachel.
3 Duw de transportdop op de plaats van het brandstofzeefje (fig. O) en druk
deze goed aan.
4 Vervoer de kachel altijd rechtop.
K
Transportdop
SPECIFICATIES
Ontsteking
Brandstof
elektrisch
Afmetingen (mm)
kerosine
(inclusief bodemplaat) diepte
3,00
Capaciteit (kW)
*
Geschikte ruimte (m )
85-110
3 **
breedte
hoogte
Accessoires
Brandstofverbruik (l/uur) 0,313
428
295
513
brandstofhevelpomp
transportdop
*
Brandstofverbruik (g/uur) 250
*
Brandduur per tank (uur)* 12,8
Inhoud wisseltank (liter)
4,0
Gewicht (kg)
9,0
Batterijen
2x R20kG, MN 1300
1,5V, size D
Type kous
F
* Bij instelling op maximale stand, ** Opgegeven waarden zijn indicatief
L
DE GARANTIEVOORWAARDEN
U krijgt op uw kachel 24 maanden garantie vanaf de aankoopdatum. Binnen deze
periode worden alle materiaal- en fabricagefouten kosteloos verholpen. Hierbij
gelden de volgende regels:
1 Alle verdere aanspraken op schadevergoeding, inclusief gevolgschade wijzen
wij uitdrukkelijk af.
2 Reparatie of vervanging van onderdelen binnen de garantietermijn leidt niet
tot verlenging van de garantie.
1
70
R 17
3 De garantie geldt niet wanneer veranderingen zijn aangebracht, nietoriginele onderdelen zijn gemonteerd of reparaties aan de kachel zijn
verricht door derden.
4 Onderdelen die aan normale slijtage onderhevig zijn, zoals de batterijen,
de kous, de ontstekingsspiraal en het brandstofhevelpompje, vallen buiten de
garantie.
5 De garantie geldt uitsluitend als u de originele, gedateerde aankoopbon
overlegt en als daarop geen veranderingen zijn aangebracht.
6 De garantie geldt niet bij schade ontstaan door handelingen die afwijken van
de gebruiksaanwijzing, door verwaarlozing en door het gebruik van verkeerde of verouderde brandstof. Verkeerde brandstof kan zelfs gevaarlijk zijn*.
7 De verzendkosten en het risico van het opsturen van de kachel of onderdelen
daarvan, komen altijd voor rekening van de koper.
Om onnodige kosten te voorkomen, raden wij u aan eerst altijd zorgvuldig de
gebruiksaanwijzing te raadplegen. Wanneer deze geen uitkomst biedt, geef de
kachel dan in reparatie bij uw dealer.
* Licht ontvlambare stoffen kunnen bijvoorbeeld leiden tot een oncontroleerbare verbranding, met uitslaande
vlammen als gevolg. Probeer in dat geval nooit de kachel te verplaatsen, maar zet de kachel onmiddellijk uit
(zie hoofdstuk E). In noodgevallen kunt u een brandblusser gebruiken, maar dan uitsluitend van het type B:
een koolzuur- of poederblusser.
1 0 TIPS VOOR EEN VEILIG GEBRUIK
1 Wijs kinderen altijd op de aanwezigheid van een brandende kachel.
2 Verplaats de kachel niet als deze brandt of nog heet is. In dat geval ook
niet bijvullen en geen onderhoud verrichten.
3 Plaats de voorkant van de kachel op minimaal 1,5 meter van muur,
gordijnen en meubels. Houd ook de ruimte boven de kachel vrij.
4 Gebruik de kachel niet in stoffige ruimtes en niet op plaatsen waar het
sterk tocht. In beide gevallen krijgt u geen optimale verbranding.
5 Zet de kachel uit voordat u vertrekt of naar bed gaat.
6 Bewaar en vervoer de brandstof uitsluitend in de daarvoor bestemde
wisseltankjes en jerrycans.
7 Zorg ervoor dat de brandstof niet bloot staat aan hitte of extreme
temperatuurverschillen. Bewaar de brandstof altijd op een koele,
droge en donkere plaats (zonlicht tast de kwaliteit aan).
8 Gebruik de kachel nooit op plaatsen waar schadelijke gassen of dampen
aanwezig kunnen zijn (bv. uitlaatgassen of verfdampen).
9 De bovenzijde van de kachel wordt heet. De kachel mag niet
afgedekt worden (brandgevaar).
10 Zorg altijd voor voldoende ventilatie.
1
71
R 17
1
2
HET VERVANGEN VAN DE KOUS
M
3
VOORDAT U BEGINT MET HET VERVANGEN VAN DE
KOUS, DIENT DE KACHEL UIT EN VOLLEDIG
AFGEKOELD TE ZIJN.
4
1 Open het tankklepje en haal de wisseltank eruit.
2 Haal de batterijen uit de batterijhouder.
5a
5b
3 Licht de grille uit de inkeping en trek hem naar voren.
Neem de branderkop uit de kachel. Sluit de grille.
4 Trek de draaiknop van de kachel af.
6
7
5 Schroef de drie mantelschroeven, aan de onderzijde van
de kachel, los. Trek de mantel iets naar voren en verwijder deze van de bodemplaat.
6 Draai de vleugelmoeren onder de branderzitting los.
8a
8b
7 Til de branderzitting en het kousmechanisme omhoog.
8 Draai de schroef welke de beugel vasthoudt los en ver9
10
wijder veer en de beugel.
9 Draai de as geheel rechtsom en maak de koushouder
(met kous) los van de as.
10 Licht de koushouder op en schuif deze van de lucht-
11
schacht af.
11 Knijp de kous samen, zodat de kous loskomt uit de
koushouder en neem de kous eruit. Draag hierbij handschoenen en zet een bakje klaar om de oude kous in te
doen.
1
72
R 17
12a
12b
12 Plaats de kous overeenkomstig de op de koushouder
aangegeven richting in de koushouder.
13 Plaats de koushouder (met kous) over de luchtschacht.
13a
13b
Plaats daarna het uiteinde van de as aan de rechterzijde
in de sleuf van de koushouder en draai de gehele as
linksom.
14 Plaats de koushoogtevergrendeling (de koushoogte op
positie 1 zetten), de veer en de beugel terug. Draai de
1 4a
1 4b
schroef welke de beugel vasthoudt vast.
15 Plaats de branderzitting terug.
16 Draai de vleugelmoeren gelijkmatig handvast aan.
17 Plaats de draaiknop op het kousmechanisme. Draai de
15
16
knop geheel naar rechts. Activeer de omvalbeveiliging
en controleer of de kous naar de onderste stand gaat.
Herhaal dit een aantal keren. Wanneer de kous niet in
de onderste positie komt is deze onjuist gemonteerd en
moet de procedure vanaf stap 12 herhaald worden.
Trek de draaiknop van de kachel af.
17a
17b
18 Plaats de mantel terug en draai de drie mantelschroeven vast. Plaats de draaiknop en de verbrandingskamer
terug. Controleer of deze laatste goed recht staat, door
deze aan de handgreep even naar links en rechts te
schuiven. Sluit de grille.
18a
18b
19 Plaats de gevulde wisseltank terug. Plaats de batterijen
in de batterijhouder (let op de plus en min). Na het
plaatsen van de wisseltank en de batterijen, moet u 30
minuten wachten voordat u de kachel aanmaakt.
18c
18d
19a
19 b
1
73
R 17
✗
E
E
✓
E
E
E
E
E
E
E
1-3 cm.
E
E
E
E
E
FP
✗
E
E
E
E
E
E
E
E
E
E
I
H
J
G
D
K
E
L
F
A B
C
M
E
E
E
E
E
E
E
E
E
E
M
E
E
E
E
E
E
E
E
E
E
E
E
E
DISTRIBUTED IN EUROPE BY PVG INTERNATIONAL b.v.
2 DEUTSCHLAND
PVG Deutschland GmbH
Beiersdorfstraße 4
46446 EMMERICH
tel:
+49 2821 76713
fax:
+31 412 622 893
email: [email protected]
6 DANMARK
PVG Scandinavia A/S
Niels Bohrsvej 10
6100 HADERSLEV
+45 73 53 02 02
tel:
fax:
+45 73 53 02 04
email: [email protected]
5 ESPAÑA
PVG España S.A.
Pol. Ind. San José de Valderas II
Comunidad ”La Alameda”
C/ Aurora Boreal, 19
28918 LEGANÉS (Madrid)
+34 91 611 31 13
tel:
fax:
+34 91 612 73 04
email: [email protected]
3 FRANCE
PVG France SARL
4, Rue Jean Sibélius
B.P. 185
76410 SOTTEVILLE SOUS LE VAL
+33 2 32 96 07 47
tel:
fax:
+33 0 820 34 64 84
email: [email protected]
Rev. 6/05
u NORGE
Sunwind - Gylling A/S
Rudsletta 71-75 / P.O. Box 64
N-1309 RUD
tel:
+47 67 17 13 70
fax:
+47 67 17 13 80
email: [email protected]
1 NEDERLAND
PVG International B.V.
P.O. Box 96
5340 AB OSS
tel:
+31 412 694 694
fax:
+31 412 622 893
email: [email protected]
9 PORTUGAL
Gardena, Lda
Recta da Granja do Marquês
ALGUEIRÃO
2725-596 MEM MARTINS
tel:
+ 35 21 92 28 530
fax:
+ 35 21 92 28 536
email: [email protected]
: POLSKA
PVG Polska Sp. z. o. o.
ul. Kościelnej 110
26-800 Białobrzegi
+48 48 613 00 70
tel:
fax:
+48 48 613 00 70
email: [email protected]
man_R17
q SCHWEIZ
PVG Schweiz AG
Genuastrasse 15
4142 MÜNCHENSTEIN
tel:
+41 61 337 26 51
fax:
+41 61 337 26 78
email: [email protected]
> ITALIA
PVG Italy SRL
Via Niccolò Copernico 5
50051 CASTELFIORENTINO (FI)
+39 571 628 500
tel:
fax:
+39 571 628 504
email: [email protected]
avg©060613
e BELGIË
PVG Belgium NV/SA
Industrielaan 55
2900 SCHOTEN
tel:
+32 3 326 39 39
+32 3 326 26 39
fax:
email: [email protected]
4 UNITED KINGDOM
Lister Gases
Bridge Street
Holloway Bank, Wednesbury
West Midlands WS10 OAW
+44 121 506 1818
tel.:
+44 121 505 1744
fax:
email: [email protected]
TURKEY
tel:
fax:
email:
+ 90 232 463 33 72
+ 90 232 463 69 91
[email protected]
Printed in Japan
7076000903
PVG Traffic
i ÖSTERREICH
PVG Austria VertriebsgmbH
Salaberg 49
3350 HAAG
tel:
+43 7434 44867
+43 7434 44868
fax:
email: [email protected]