1
DIGI IV & V S
ATTENTION - Format spécial pour impression Recto / Verso !
DIGI IV & V S
Route de Beaumont
F 60530 Fresnoy-en-Thelle
tél. : 33 (0)3.44.26.51.89
fax : 33 (0)3.44.26.90.79
WARNING - Special format for "Front & Back" page printing !
Mise à jour 01/97
Updated 01/97
copyright © R Juliat 1995
copyright © R Juliat 1995
2
DIGI IV & V S
NOTES
CONTENTS
DIGI IV & V S
I - INTRODUCING THE SYSTEM (PAGE 3)
SYSTEM LOGIC (PAGE 4)
II - SCREENS LIST (PAGE 5)
1. DATA CHANNELS (PAGES 6)
2. CURVES (PAGE 7)
3. LOCAL LEVELS (PAGE 8)
4. STAGE LEVELS (PAGE 9)
5. TEST (PAGE 10)
6. INFORMATION (PAGE 10)
7. PLUS MENU (PAGE 11)
- 7/1. RENAME (PAGE 12)
- 7/2. MEMORIES UPDATE (PAGE 13)
- 7/3. DYNAMIC MEMORIES UPDATE (PAGES 14 -15)
- 7/4. MEMORIES LINK (PAGE 16)
- 7/5. SHOW PARAMETERS (PAGE17)
- 7/6. SHOW INFORMATION (PAGE 18)
- 7/7. SHOW READY (PAGE 19)
- 7/8. PREFERENCES (PAGES 20 - 22)
PATCH (PAGE 23)
III- APPENDIX :
- 256 Steps chart (DMX or AVAB) (PAGES 24-25)
- Conduct DIGI IV s (PAGES 26-29)
- Data Wiring (PAGE 30)
Note: This user's manual covers the program versions: 1-30 → for the DIGI IV S and
program versions: 1-01 → for the DIGI V S.
copyright © R Juliat 1995
copyright © R Juliat 1995
DIGI IV & V S
CABLAGE DATA XLR 5
XLR 5 DATA WIRING
STANDARD
STANDARD
Rep
DMX 512
AVAB
1
0V.
0V.
2
DATA 1-
DATA -
3
DATA 1+
DATA +
4
( DATA 2 - )
+15V
5
( DATA 2+ )
-15V.
CABLAGE ANALOG. 0/+10V
0/+10V. ANALOG WIRING
1 à
6 : Ch.
8
9 : 0V.
DIGI IV & V S
TABLES DES MATIERES
2
I - PRESENTATION DU DIGIBOX IV S (PAGE 3)
+
LOGIQUE DU SYSTEME (PAGE 4)
7
: Non utilisé.
Not used
II - LISTE DES ECRANS (PAGE 5)
DATA 2 NON UTILISÉE
DATA 2 NOT USED
NOTES
1. CIRCUITS DATA (PAGE 6)
2. COURBES (PAGE 7)
3. VALEURS LOCALES (PAGE 8)
4. VALEURS SCENES (STAGE) (PAGE 9)
5. TEST (PAGE 10)
6. INFORMATIONS (PAGE 10)
7. MENU PLUS (PAGE 11)
- 7/1. RENAME (PAGE 12)
- 7/2. CREER DES MEMOIRES (PAGE 13)
- 7/3. CREER DES MEMOIRES DYNAMIQUES (PAGES 14 - 15)
- 7/4. ENCHAINER LES MEMOIRES (PAGE 16)
- 7/5. PARAMETRES DU SPECTACLE (PAGE 17)
- 7/6. INFORMATION SPECTACLE (PAGE 18)
- 7/7. LANCER LE SPECTACLE (PAGE 19)
- 7/8. PREFERENCES (PAGES 20 - 22)
PATCH (PAGE 23)
III - ANNEXES :
- Tableau 256 pas (DMX or AVAB) (PAGES 24-25)
- Conduite DIGI IV s (PAGES 26-29)
- Câblage Data (PAGE 30)
Nota: Ce manuel d'utilisation est valable pour le DIGI IV S versions de programme
1-30 → , et pour le DIGI V S versions de programme: 1-01 → .
copyright © R Juliat 1995
copyright © R Juliat 1995
3
DIGI IV & V S
SCREENS
DIGI IV & V S
INTRODUCING THE SYSTEM.
DIGI IV S is a digital, maximum six channels dimmer. It belongs to the
ROBERT JULIAT digital dimmers family. It is close to DIGI IV, with
which it shares the facility of controls and dialogue, having both a higher
confort - through its LCD display - and the possibility of performing
preprogrammed sequences.
DIGI IV S recognizes a digital order in both DMX 512 or AVAB
protocols. Each time the unit is switched on and each time a serial
connection is made, the protocol is automatically recognized.
DIGI IV S accepts directly analog 0/+10 V or local controls. The output
value is defined by the highest input value (the highest level takes
precedence), and according to the curves assigned to the channels.
DIGI IV S is designed for either one-phase or three-phase A.C. Voltage.
Supply at a constant 45.5 to 64 Hz frequency. It is recommended that
the network frequency remains constant. Read with care the relevant
technical pages for additional information concerning electrical connections and dimmer output.
DIGI IV S can be set according to several parameters, it can display
supervision information and it accepts sequence commands. All these
functions are performed by the DIGI IV S in addition to real time light
control.
Most interesting of all, DIGI IV S is able to work “autonomously” i.e. to
perform animated programmable sequences. You will thus be able to
declare Dynamic Memories on the unit, which will be performed
through a local or external command. The linking of memories allows
you to work in an easier, more practical way.
Since the 1.30 Version, a "Smoothing" function has been added to
perform a better light flux control by increasing the digital input
command resolution from 256 steps to 7500 steps.
When "Smoothing" is ON (default option), you will see no more
unwanted light steps for small digital command changes.
copyright © R Juliat 1995
copyright © R Juliat 1995
DIGI IV & V S
ECRANS
DIGI IV & V S
3
PRESENTATION DU SYSTEME.
Le DIGI IV S est un gradateur entièrement numérique, équipé de six
circuits maximum. Il fait partie de la famille des gradateurs numériques
ROBERT JULIAT. Son plus proche parent est le DIGI IV, avec lequel
il partage la facilité des commandes et de dialogue, offrant à la fois un
plus grand confort d’utilisation - donné par l'afficheur LCD - et la
possibilité d’exécution de séquences préprogrammées.
Le DIGI IV S reconnaît une commande digitale en protocole DMX 512
ou AVAB. La reconnaissance du protocole est automatique. Elle
s’effectue à la mise sous tension du gradateur et à chaque établissement d’une liaison série.
Le DIGI IV S peut également recevoir une commande analogique en
0/+10 V et une commande locale, directement sur l’unité. La valeur de
sortie est déterminée par la valeur d’entrée la plus forte (le plus fort
l'emporte), et par les courbes de restitution affectées aux circuits.
Le DIGI IV S peut être alimenté en tension alternative monophasée ou
triphasée, avec une fréquence stable du réseau comprise entre 45,5
Hz et 64 Hz. La stabilité de la fréquence d’alimentation est recommandée. Pour de plus amples renseignements sur le branchement électrique et la puissance de sortie des gradateurs, reportez-vous aux
notices techniques des produits.
Le DIGI IV S peut aussi être configuré selon plusieurs paramètres, il
peut recevoir des commandes d’animation et afficher des informations
utiles à la surveillance de l'unité. Toutes ces fonctions sont effectuées
par le DIGI IV S pendant qu’il accomplit sa tâche de gradation lumière
en temps réel.
La plus intéressante caractéristique ajoutée au DIGI IV S, est sa
possibilité de fonctionner en “autonome”, c’est à dire, d’exécuter des
animations programmées sur l'unité. Ainsi, l’utilisateur va pouvoir
déclarer sur le bloc des Mémoires Dynamiques, qui vont être exécutées à partir d’une commande locale ou externe. L'enchaînement de
mémoires offre une facilité de travail et une souplesse accrues.
A partir de la Version 1.30, une fonction de lissage a été ajoutée pour
améliorer le rendu lumineux en augmentant la résolution de la commande numérique de 256 pas à 7500 pas par interpolation.
Quand la fonction de lissage est active (par défaut), des sauts de
lumière indésirables n'apparaissent plus lorsque l'on modifie lentement la commande numérique.
copyright © R Juliat 1995
copyright © R Juliat 1995
4
DIGI IV & V S
DIGI IV & V S
SCREENS
SYSTEM LOGIC.
The DIGIBOX IV S is equipped with an "dashboard" located on the front which gives access to
several screens, fields and messages.
After a reset, the screen indicates as follows (see drawing below) :
ERROR
rj CHAN ØØ1 ÷ ØØ6
ØØ ØØ ØØ ØØ ØØ ØØ
DATA IN
SELECT
- +
EXIT
RESET
First line: N° of the 1st channel and of the last channel read by the unit.
Second line: output level for each channel.
A set of 4 keys allows you to proceed inside the program.
The 5th key RESET allows the card to start-up again without clearing the data recorded in the
unit memory.
You will find various screens: different menus that allow you to choose between distinct options;
and edit screens wherein different parameters are displayed and may be modified. Use the 4
keys to 'travel' through all these screens.
In the menus, the "+" and "-" keys display the different options; choose the desired option with
the SELECT key. In the edit screens, the SELECT and EXIT keys allow you to go forwards or
backwards between the fields; while the "+" and "-" keys allow you to change the value of the
blinking field (the working field).
SELECT
This key allows you to enter a chosen edit screen from a menu.
In the edit screen, it allows you to select the next field with the aim of modifying it.
"+" KEY
"-" KEY
These keys allow you to scroll through the menus.
In the edit screen, you can change the digital (channels, local values, a.s.o.) or alphanumerical
values (curves, ON/OFF values). A blinking field is the working field and you can change its value
through the "+" and "-" keys.
EXIT
This key allows you to go back to the previous field in an edit screen.
On the first field of an edit screen or in a menu; the key allows you to exit the screen and to return
to the previous screen.
SELECT & These keys pressed simultaneously allows you to return instantly to the previous screen.
EXIT
This function will be used mainly to exit multiple-field screens.
EXIT &
"-" KEY
By pressing these keys together (both at once) you will operate, for each startup screen,
a RESET to the default program values. These two keys will perform a General Reset,
when the IV S is switched on or after a Hard Reset.
copyright © R Juliat 1995
copyright © R Juliat 1995
DIGI IV & V S
ECRANS
DIGI IV & V S
4
LOGIQUE DU SYSTEME.
Le DIGIBOX IV S comporte un "tableau de bord" sur sa face avant permettant l'accès aux
différents écrans et rubriques, ainsi que l'affichage des messages.
L'afficheur "après reset" présente l'écran suivant (voir dessin ci-dessous) :
ERROR
rj CIRC ØØ1 ÷ ØØ6
ØØ ØØ ØØ ØØ ØØ ØØ
DATA IN
SELECT
- +
EXIT
RESET
Première ligne: N° du premier et du dernier circuit lu par l'unité.
Deuxième ligne: niveau de restitution de chaque circuit.
Un ensemble de 4 touches permet de circuler à l'intérieur du programme.
La 5ème touche, RESET, effectue un redémarrage de la carte sans effacement des données
enregistrées en mémoire.
Vous trouverez plusieurs écrans qui s'affichent sur le LCD. Ces écrans sont soit des menus qui
vous permettent le choix parmi plusieurs possibilités qui se déroulent sur le LCD, soit des écrans
d'édition où divers paramètres sont visualisés et peuvent être modifiés. Pour 'naviguer' parmi
tous les écrans à votre disposition, vous utilisez les 4 touches.
Dans les menus, les touches "+" et "-" permettent de faire défiler les options pour en choisir une
avec la touche SELECT. Dans les écrans d'édition, les touches SELECT et EXIT permettent
d'avancer ou de reculer d'une rubrique (un 'champ') tandis que les touches "+" et "-" vous
permettent de changer la valeur du champ qui clignote (le champ actif).
SELECT
Dans les menus, cette touche vous permet d'entrer dans l'écran d'édition désiré.
Dans les écrans d'édition, la touche vous permet de sélectionner le champ suivant (pour le
modifier).
TOUCHES
"+" & "-"
Chacune de ces touches vous permet de faire défiler les menus jusqu'à l'endroit que vous
recherchez.
Dans l'intérieur d'un écran d'édition, chacune des touches vous permet de changer des chiffres
(circuits, valeurs locales, etc) ou des paramètres (courbes, valeurs ON/OFF, etc.). Le clignotement d'un champ indique que vous pouvez modifier sa valeur à l'aide des touches "+" et "-".
EXIT
SELECT
& EXIT
TOUCHE
"-" & EXIT
copyright © R Juliat 1995
Cette touche vous permet de reculer d'une rubrique dans les écrans d'édition.
Si vous étiez sur le premier champ de l'écran ou dans un menu, la touche vous permet de sortir
vers l'écran précédent.
Cette combinaison de touches(pressées ensemble) permet une sortie immédiate de l'écran vers
l'écran précédent. Elle est utile surtout pour abandonner un écran d'édition qui a plusieurs
champs.
Cette combinaison de touches (pressées ensemble) permet de faire, sur chaque écran de
départ un RESET sur les valeurs par défaut mémorisées par le programme. A l'allumage
du IV S, ou après un RESET hard, ces touches permettront d'effectuer un RESET général.
copyright © R Juliat 1995
5
DIGI IV & V S
SCREENS
DIGI IV & V S
SCREENS LIST.
THE DIGIBOX IV S SCREENS.
1/ Channels screen: displays the levels and accedes to DATA channels
assignment. (See page 6)
- Press the "+" key
rj CHAN ØØ1 ÷ ØØ6
ØØ ØØ ØØ ØØ ØØ ØØ
+
2/ Curves screen: displays the curves and accedes to curves assignment.
(See page 7)
- Press the "+" key
rj CURVE ØØ1 ÷ ØØ6
LL LL LL LL LL LL
3/ Local screen: displays the local levels and accedes the level
updating screen. (See page 8)
- Press the "+" key
rj LOCAL ØØ1 ÷ ØØ6
ØØ ØØ ØØ ØØ ØØ ØØ
4/ Stage screen: accedes to the Stage display, i.e. value and source
(analog, digital or local) for each channel. (See page 9)
- Press the "+" key
rj STAGE ØØ1 ÷ ØØ6
LEVELS
5/ Test screen: channel test. (See page 10)
- Press the "+" key
rj TEST ØØ1 ÷ ØØ6
TEST OFF
6/ Information screen: displays the acknowledged protocol and accedes
to several Information displays. (See page 10).
- Press the "+" key
rj INFO ØØ1 ÷ ØØ6
PROTOCOL
NONE
7/ Plus Menu: to accede to the Rename, Show and Preferences
functions (See page11).
rj +MENU ØØ1 ÷ ØØ6
PLUS FUNCTIONS
To scroll through these screens backwards, press the "-" key.
- Press "-".
To accede to the corresponding edit screen press the SELECT key.
- Press SELECT
To reach the first screen (channels screen) press EXIT.
- Press EXIT
To obtain a SOFT RESET for the screen's corresponding values, press
together EXIT and "-".
- Press EXIT and "-".
copyright © R Juliat 1995
copyright © R Juliat 1995
DIGI IV & V S
ECRANS
DIGI IV & V S
5
LISTE DES ECRANS.
LES ECRANS DU DIGI IV S.
1/ Ecran circuits: affichage des niveaux et accès à l'affectation des
circuits sur la ligne DATA. (Voir page 6)
- Pressez la touche "+"
rj CIRC ØØ1 ÷ ØØ6
ØØ ØØ ØØ ØØ ØØ ØØ
+
2/ Ecran courbes: affichage des courbes par prise et accès à l'affectation des courbes. (Voir page 7)
- Pressez "+"
rj COURB ØØ1 ÷ ØØ6
LL LL LL LL LL LL
3/ Ecran local: affichage des niveaux locaux et accès à la mise à niveau
des prises en Mode local. (Voir page 8)
- Pressez "+"
rj LOCAL ØØ1 ÷ ØØ6
ØØ ØØ ØØ ØØ ØØ ØØ
4/ Ecran Stage: accès à l'affichage Stage, valeur et origine pour
chaque prise (analogique, numérique, locale). (Voir page 9)
- Pressez "+"
rj STAGE ØØ1 ÷ ØØ6
NIVEAUX
5/ Ecran test: accès au test par prise. (Voir page 10)
- Pressez "+"
rj TEST ØØ1 ÷ ØØ6
TEST OFF
6/ Ecran informations: affichage du protocole reconnu sur l'entrée
DATA et accès à l'affichage Informations. (Voir page 10)
- Pressez "+"
rj INFO ØØ1 ÷ ØØ6
PROTOCOLE AUCUN
7/ Menu Plus: permet d'accéder aux fonctions Rename, Show et
Préférences.(Voir page 11).
rj MENU + ØØ1 ÷ ØØ6
ACCES FONCTIONS PLUS
Pour parcourir tous ces écrans dans l'ordre inverse ou pour reculer d'un
écran presser la touche "-" (moins).
- Pressez "-"
Pour accéder aux écrans d'édition correspondants à chaque option
pressez la touche SELECT.
- Pressez SEL
Pour retourner au premier écran (écran circuits) pressez EXIT.
- Pressez EXIT
Pour faire un RESET SOFT des valeurs correspondantes à chaque
écran pressez ensemble EXIT et "-".
- Pressez EXIT et "-".
copyright © R Juliat 1995
copyright © R Juliat 1995
6
DIGI IV & V S
DIGI IV & V S
SCREENS
1. DATA CHANNELS.
THE DATA CHANNEL ASSIGNATION.
DIGIBOX IV S allows you to assign the first Data channel on the unit.
Set the unit on the channels screen : "CHAN" is blinking.
rj CHAN ØØ1 ÷ ØØ6
ØØ ØØ ØØ ØØ ØØ ØØ
SELECT
Press SELECT to reach the channels assignment edit screen. On the
first line, "ed ch" says that you are in the Editing Mode, then “PATCH
OFF” indicates the patch is OFF (assignment of first channel, the next
5 ones following in digital order). If the patch is ON, any channel number
may be freely assigned to any plug of the unit. For now the PATCH is
in the OFF mode. But, you can modify it, in the "Preferences" option of
the Plus Menu. (See page 23)
ed ch
PATCH OFF
P1→ØØ1P2→ØØ2 P3→ØØ3
SELECT
Press the SELECT Key to access control of the first data channel.
You can read the following : P1 →ØØ1, the number ØØ1 is blinking.
Each time you see a blinking "field", be it numeric or alphanumeric,
it shows you can modify its value by using the "+" and "-" keys.
ed ch
+
Press the "+" key to change the first DATA channel number, 10 for
example.
The "-" key allows you to lower the channel number.
SELECT allows you to scroll through the other channels, without
modifying them.
Press EXIT to go back to the previous channel. Press EXIT, while on
the first channel, to return to the start screen.
Press EXIT and SELECT simultaneously to return to the start screen
from any channel.
You have just assigned a new "address" to your dimmer. In our
example, the unit is controlled through 10 to 15 DATA channels.
PATCH OFF
P1→ØØ1P2→ØØ2 P3→ØØ3
-
EXIT
rj CHAN Ø1Ø ÷ Ø15
ØØ ØØ ØØ ØØ ØØ ØØ
Default values after a SOFT RESET (both EXIT and "-" keys
pressed together while on the start screen): PATCH OFF and
Channels 1 to 6.
Note: Each edit screen will be acceded and edited in the same
way.
All the new values are stored indefinitely on the unit, even after a
power cut.
copyright © R Juliat 1995
copyright © R Juliat 1995
DIGI IV & V S
ECRANS
DIGI IV & V S
6
1. CIRCUITS DATA.
AFFECTER LES CIRCUITS DATA.
Le DIGIBOX IV S peut effectuer un adressage du premier circuit de
l'unité en DATA. Placez-vous sur l'écran circuits, l’indication "CIRC"
clignote (écran affiché après un reset de l'unité).
rj CIRC ØØ1 ÷ ØØ6
ØØ ØØ ØØ ØØ ØØ ØØ
SELECT
SELECT, accède à l'écran d'édition de l'adressage circuit. Sur la
première ligne, "ed ch" indique que vous êtes en Mode Edition, puis
"PATCH OFF" vous indique que le patch est OFF (affectation du
premier circuit, les 6 circuits se suivant dans l’ordre numérique). Si le
patch est ON, cela signifie qu'on peut affecter un circuit différent pour
chaque prise du bloc de gradateurs. Pour le moment nous laisserons
le PATCH en mode OFF. Mais, vous pouvez le modifier dans l'option
"Préférences" du "Menu Plus" (Voir page 23).
Pressez la touche SELECT pour accéder au réglage du premier circuit
en data.
Vous obtenez l'affichage suivant : P1→ØØ1, avec ØØ1 clignotant.
Chaque fois qu'un "champ" numérique ou alphanumérique clignote cela indique que vous pouvez en modifier la valeur à l'aide
des touches + et -.
Utilisez la touche + pour changer le N° du premier circuit DATA, par
exemple le circuit 1Ø. La touche "-" vous permet de décrémenter le N°.
Avec SELECT vous pouvez consulter les autres circuits, mais non les
modifier.
Pressez EXIT pour reculer d'un circuit. Pressez EXIT, sur le premier
circuit, pour revenir à l'écran de départ.
Pressez EXIT et SELECT ensemble pour revenir à l'écran de départ à
partir de n'importe quel circuit.
Vous venez de donner une nouvelle "adresse" à votre gradateur qui
sera commandé par les circuits DATA de 1Ø à 15 dans cet exemple.
Valeurs par défaut après un RESET SOFT (touche EXIT et "-"
pressées ensemble dans l'écran de départ): PATCH OFF et Circuits 1 à 6.
REMARQUE : Tous les écrans d'édition sont accessibles et
seront édités selon le même processus.
ed ch
PATCH OFF
P1→ØØ1P2→ØØ2 P3→ØØ3
SELECT
ed ch PATCH OFF
P1→ØØ1P2→ØØ2 P3→ØØ3
+
-
EXIT
rj CIRC Ø1Ø ÷ Ø15
ØØ ØØ ØØ ØØ ØØ ØØ
Toutes les modifications sont mises automatiquement en mémoire et sont conservées, même en cas de coupure de courant.
copyright © R Juliat 1995
copyright © R Juliat 1995
7
DIGI IV & V S
SCREENS
Tableau 256 pas /
256 steps chart.
DIGI IV & V S
25
2. CURVES.
Les pas DMX/
DMX steps.
ASSIGNING CURVES TO THE CHANNELS.
DIGIBOX IV S allows you to assign to each channel one of 5 curves
provided for by the program : LL (Linear Light), LV (Linear Voltage), FL
(Fluorescence), PA (For PAR110V lamps exclusively), SR (Static
Relay). Go to the curves screen by using the "+" et "-" keys: "CURVE"
is blinking. SELECT accedes the curves edit screen.
WARNING : ROBERT JULIAT is not responsible for lamps breaking
when they are mounted in series and controlled by a DIGI 4S on PAR
curve.
rj CURVE ØØ1 ÷ ØØ6
LL LL LL LL LL LL
SELECT
ed c CH ØØ1→PLUG 1
LL LL LL LL LL LL
On the first line you can read "ed" for editing, then a lower case "c"
indicates curves editing and "CH ØØ1→PLUG 1" shows the channel
and plug to which you assigne the curve.
On the 2nd line, the first curve "LL" is blinking : it is the curve assigned
to the first plug of the unit.
+
Press the "+" et "-" keys to update the curve for this plug, "LV" (linear
voltage) for example.
ed c CH ØØ1→PLUG 1
LT LL LL LL LL LL
SELECT allows you to select (and modify if desired) the curve of the
next plug; EXIT for the previous plug.
EXIT on the first plug, or EXIT and SELECT pressed together on any
plug will allow you to exit the edit screen and return to the curves
screen. Now a lower case "c" on the upper right side of any screen says
that at least one channel has been assigned a curve which differs from
the LL (Linear Light) default curve.
Default values after a SOFT RESET (both EXIT and "-" keys
pressed together on the curves screen) are : plugs 1 to 6 assigned
to a LL curve (Linear Light).
copyright © R Juliat 1995
SELECT
-
EXIT
rj CURVE ØØ1 ÷ ØØ6 c
LT LL LL LL LL LL
Décimal (%).
Hexadécimal.
Les pas DMX/
DMX steps.
Décimal (%).
Hexadécimal.
192
193
194
195
196
75
76
76
76
77
C0
C1
C2
C3
C4
224
225
226
227
228
88
88
89
89
89
E0
E1
E2
E3
E4
197
198
199
200
201
202
203
77
78
78
78
79
79
80
C5
C6
C7
C8
C9
CA
Cb
229
230
231
232
233
234
235
90
90
91
91
91
92
92
E5
E6
E7
E8
E9
EA
Eb
204
205
206
207
208
209
210
211
212
213
214
215
216
217
218
219
220
221
222
80
80
81
81
82
82
82
83
83
84
84
84
85
85
85
86
86
87
87
CC
Cd
CE
CF
d0
d1
d2
d3
d4
d5
d6
d7
d8
d9
dA
db
dC
dd
dE
236
237
238
239
240
241
242
243
244
245
246
247
248
249
250
251
252
253
254
93
93
93
94
94
95
95
95
96
96
96
97
97
98
98
98
99
99
FF (100%)
EC
Ed
EE
EF
F0
F1
F2
F3
F4
F5
F6
F7
F8
F9
FA
Fb
FC
Fd
FE
223
87
dF
255
FF (100%)
FF
copyright © R Juliat 1995
25
DIGI IV & V S
Tableau 256 pas /
256 steps chart.
ECRANS
DIGI IV & V S
7
2. COURBES.
Les pas DMX/
DMX steps.
Décimal (%).
Hexadécimal.
Les pas DMX/
DMX steps.
Décimal (%).
Hexadécimal.
128
129
130
131
132
50
51
51
51
52
80
81
82
83
84
160
161
162
163
164
63
63
64
64
64
A0
A1
A2
A3
A4
133
134
135
136
137
138
139
52
53
53
53
54
54
55
85
86
87
88
89
8A
8b
165
166
167
168
169
170
171
65
65
65
66
66
67
67
A5
A6
A7
A8
A9
AA
Ab
140
141
142
143
144
145
146
147
148
149
150
151
152
153
154
155
156
157
158
55
55
56
56
56
57
57
58
58
58
59
59
60
60
60
61
61
62
62
8C
8d
8E
8F
90
91
92
93
94
95
96
97
98
99
9A
9b
9C
9d
9E
172
173
174
175
176
177
178
179
180
181
182
183
184
185
186
187
188
189
190
67
68
68
69
69
69
70
70
71
71
71
72
72
73
73
73
74
74
75
AC
Ad
AE
AF
b0
b1
b2
b3
b4
b5
b6
b7
b8
b9
bA
bb
bC
bd
bE
159
62
9F
191
75
bF
copyright © R Juliat 1995
AFFECTER DES COURBES SUR LES CIRCUITS.
Le DIGIBOX IV S permet d'affecter sur chaque circuit une des 5
courbes prévues par le programme : LL (Linéaire Lumière), LT
(Linéaire Tension), FL (Fluorescence), PA (Pour lampes PAR 110V
exclusivement), RS (Relais Statique). Avec "+" et "-" placez-vous sur
l'écran courbes: "COURB" clignote. SELECT accède à l'écran d'édition de l'affectation des courbes.
ATTENTION : La société ROBERT JULIAT dégage toute responsabilité en cas de bris de lampes montées en série contrôlées par un DIGI
4S en courbe PAR.
Sur la première ligne vous lisez "ed" édition, un "c" minuscule indique
l’édition des courbes et "CH ØØ1→PRISE 1" vous indique le circuit et
la prise édités pour lui affecter une courbe.
Sur la 2ème ligne, la première courbe "LL" clignote : elle correspond
à la première prise de votre unité.
Pressez les touches "+" et "-" pour choisir la courbe de cette prise, par
exemple "LT" (linéaire tension).
SELECT permet de sélectionner (et modifier si on le veut) la courbe
affectée à la prise suivante; EXIT pour la prise précédente.
EXIT sur la première prise ou EXIT et SELECT pressées ensemble sur
n'importe quelle prise vous font sortir de l'écran d'édition et revenir à
l'écran courbes. Maintenant un "c" minuscule à droite de la première
ligne vous signalera, dans tous les écrans, que vous avez affecté sur
au moins un circuit une courbe différente de la courbe LL (Linéaire
Lumière), courbe affectée par défaut.
rj COURB ØØ1 ÷ ØØ6
LL LL LL LL LL LL
SELECT
ed c CH ØØ1→PRISE 1
LL LL LL LL LL LL
+
-
ed c CH ØØ1→PRISE 1
LT LL LL LL LL LL
SELECT
EXIT
rj COURB ØØ1 ÷ ØØ6 c
LT LL LL LL LL LL
Valeurs par défaut après un RESET SOFT (touche EXIT et pressées ensemble dans l'écran courbes) : les prises de 1 à 6 sont
en courbe LL (Linéaire Lumière).
copyright © R Juliat 1995
8
DIGI IV & V S
SCREENS
Tableau 256 pas /
256 steps chart.
DIGI IV & V S
24
3. LOCAL LEVELS.
Les pas DMX/
DMX steps.
SETTING LOCAL LEVELS TO CHANNELS.
DIGIBOX IV S allows setting 0 to 100% levels to each channel (plug),
directly from the unit itself. Connection with any control board is not
required. These values are stored and played back, even after a power
cut. Go to the local levels screen by using the "+" and "-" keys:
"LOCAL" is blinking.
SELECT accedes the local levels edit screen.
"ed" for edition shown on the first line, then a lower case l shows the
levels edition and "CH ØØ1→PLUG 1" signals the channel and the
plug to which you assign its level.
On the 2nd line, the first level "ØØ" is blinking which corresponds the
first plug of this unit.
Press the "+" and "-" key to set a level for this plug, 45% for example.
rj LOCAL ØØ1 ÷ ØØ6
ØØ ØØ ØØ ØØ ØØ ØØ
SELECT
ed l CH ØØ1→PLUG 1
ØØ ØØ ØØ ØØ ØØ ØØ
+
-
ed l CH ØØ1→PLUG 1
45 ØØ ØØ ØØ ØØ ØØ
SELECT allows you to go to the next plug; EXIT goes back to the
previous one.
EXIT pressed on the first plug, or EXIT and SELECT pressed together
on any plug, exits the edit screen and returns to the local levels screen.
Now a lower case"l" on the upper right side of any screen indicates that
at least one plug has been set a local value above 0 (default value).
These values are stored and will be read by the unit each time it will be
turned on.
Default values after a SOFT RESET (both EXIT and "-" keys
pressed together on the local screen) : Local values for the 6 plugs
are Ø%.
copyright © R Juliat 1995
SELECT
EXIT
rj LOCAL ØØ1 ÷ ØØ6 l
45 ØØ ØØ ØØ ØØ ØØ
Décimal (%).
Hexadécimal.
Les pas DMX/
DMX steps.
Décimal (%).
Hexadécimal.
64
65
66
67
68
25
25
26
26
27
40
41
42
43
44
96
97
98
99
100
38
38
38
39
39
60
61
62
63
64
69
70
71
72
73
74
75
27
27
28
28
29
29
29
45
46
47
48
49
4A
4b
101
102
103
104
105
106
107
40
40
40
41
41
42
42
65
66
67
68
69
6A
6b
76
77
78
79
80
81
82
83
84
85
86
87
88
89
90
91
92
93
94
30
30
31
31
31
32
32
33
33
33
34
34
35
35
35
36
36
36
37
4C
4d
4E
4F
50
51
52
53
54
55
56
57
58
59
5A
5b
5C
5d
5E
108
109
110
111
112
113
114
115
116
117
118
119
120
121
122
123
124
125
126
42
43
43
44
44
44
45
45
45
46
46
47
47
47
48
48
49
49
49
6C
6d
6E
6F
70
71
72
73
74
75
76
77
78
79
7A
7b
7C
7d
7E
95
37
5F
127
50
7F
copyright © R Juliat 1995
24
DIGI IV & V S
Tableau 256 pas /
256 steps chart.
ECRANS
DIGI IV & V S
8
3. VALEURS LOCALES.
Les pas DMX/
DMX steps.
Décimal (%).
Hexadécimal.
Les pas DMX/
DMX steps.
Décimal (%).
Hexadécimal.
0
1
2
3
4
0
0
1
1
2
00
01
02
03
04
32
33
34
35
36
13
13
13
14
14
20
21
22
23
24
5
6
7
8
9
10
11
2
2
3
3
4
4
4
05
06
07
08
09
0A
0b
37
38
39
40
41
42
43
15
15
15
16
16
16
17
25
26
27
28
29
2A
2b
12
13
14
15
16
17
18
19
20
21
22
23
24
25
26
27
28
29
30
5
5
5
6
6
7
7
7
8
8
9
9
9
10
10
11
11
11
12
0C
0d
0E
0F
10
11
12
13
14
15
16
17
18
19
1A
1b
1C
1d
1E
44
45
46
47
48
49
50
51
52
53
54
55
56
57
58
59
60
61
62
17
18
18
18
19
19
20
20
20
21
21
22
22
22
23
23
24
24
24
2C
2d
2E
2F
30
31
32
33
34
35
36
37
38
39
3A
3b
3C
3d
3E
31
12
1F
63
25
3F
copyright © R Juliat 1995
GRADUER LES CIRCUITS EN MODE LOCAL.
Le DIGIBOX IV S permet de graduer chaque circuit (prise) de 0 à 100%
directement sur l'unité, sans raccordement d’une console de pilotage.
Ces valeurs seront mémorisées et restituées, même après une coupure d'alimentation. Avec "+" et "-" placez-vous sur l'écran local:
"LOCAL" clignote.
SELECT accède à l'écran d'édition du mode de réglage local.
Sur la première ligne vous lisez "ed" édition, un l minuscule indique
l'édition des niveaux et "CH ØØ1→PRISE 1" vous signale le circuit et
la prise édités pour lui mettre un niveau.
Sur la 2ème ligne le premier niveau "ØØ" clignote, il correspond à la
première prise de votre bloc.
Pressez les touches "+" et "-" pour mettre cette prise à niveau, par
exemple à 45%.
rj LOCAL ØØ1 ÷ ØØ6
ØØ ØØ ØØ ØØ ØØ ØØ
SELECT
ed l CH ØØ1→PRISE 1
ØØ ØØ ØØ ØØ ØØ ØØ
+
-
ed l CH ØØ1→PRISE 1
45 ØØ ØØ ØØ ØØ ØØ
SELECT permet de choisir la prise suivante, EXIT la prise précédente.
EXIT sur la première prise ou EXIT et SELECT pressées ensemble sur
n'importe quelle prise vous font sortir de l'écran d'édition et revenir à
l'écran local. Maintenant un "l" minuscule à droite de la première ligne
vous signalera, dans tous les écrans, qu'une au moins des prises, a
une valeur locale supérieure à 0, qui est la valeur par défaut. Ces
valeurs sont mémorisées, et seront restituées à chaque mise en route
de l'unité.
SELECT
EXIT
rj LOCAL ØØ1 ÷ ØØ6 l
45 ØØ ØØ ØØ ØØ ØØ
Valeurs par défaut après un RESET SOFT (touche EXIT et "-"
pressées ensemble dans l'écran local) : les valeurs Locales des
6 prises sont à Ø%.
copyright © R Juliat 1995
9
DIGI IV & V S
SCREENS
ECRANS
DIGI IV & V S
4. STAGE LEVELS.
PATCH.
DISPLAYING THE COMMAND LEVELS.
FAIRE UN PATCH SOFT.
DIGIBOX IV S allows you to control each plug between 0 and 100%
directly on the unit, through : a digital DMX or AVAB command, an
analog 0/+10V control, or a local command. These commands can all
be present at the same time, in which case the highest level takes
precedence.
The "STAGE" screen shows the level of each plug.
This is an information screen, not an edit screen.
Go to the stage screen by using the "+" and "-" keys : "STAGE" is
blinking.
Le DIGIBOX IV S peut effectuer un adressage en DATA par circuit :
c’est la fonction PATCH. Pour accéder à ce mode il faut mettre le
PATCH “ON”. Aller sur l'option Patch du menu Préférences.
rj STAGE ØØ1 ÷ ØØ6.
PR1→ LEVEL 45 LOC+
1/ SELECT, accède "PATCH OFF" avec OFF clignotant vous offre le
choix entre le mode "patch OFF" (affectation du premier circuit, les 6
autres se suivent en ordre numérique) ou "patch ON" (un circuit
différent pour chaque prise de l'unité).
23
2/9 rj PREFERENCES
PATCH OFF
2/ Pressez la touche "+".
SELECT
Vous obtenez sur l'écran "PATCH ON".
SELECT accedes the Stage information screen.
3/ Pressez SELECT.
On the first line, "CH.001->PLUG 1" shows you the channel number.
The plug number "1" is blinking. On the second line, the first two letters
(LL, FL, PA, a.s.o.) show the corresponding curve. "LEVEL 45"
indicates the 45% level for the 1st plug. "LOC" signifies the source of
the highest level control (here Local); and "+" shows that other
controls, digital and/or analog, exist at a smaller level. If the digital
command is the highest on, "DIG" will replace "LOC"; or "ANA" for the
analog command. If only one command exists, the "+" sign does not
appear. If there is no command, the screen will show "LEVEL 00".
Press the "+" (or SELECT) and "-" keys to look at the other plugs.
Vous obtenez l'affichage suivant : "SELECT 1s POUR FORCER LE
PATCH ON".
rj CH. ØØ1→PLUG 1/6
LEVEL 45 LOC +
WARNING :
The STAGE display allows access to the RESET function which
enables the unit to restore the default values of LOCAL controls.
Default values after a SOFT RESET (both EXIT and "-" keys
pressed together) : Local values for the 6 plugs are Ø%.
rj SELECT 1s POUR
FORCER LE PATCH ON
Vous obtenez l'affichage suivant : "FORCER LE PATCH ON EFFECTUE".
+
EXIT
Press EXIT to return the startup display.
4/ Pressez SELECT 1 seconde.
-
5/ Pressez EXIT.
SELECT
Vous revenez à l'écran d'édition. Le chiffre 001 après P1 clignote. Vous
pouvez changer sa valeur avec les touches "+" et "-", puis passer au
suivant avec SELECT. La touche EXIT vous permet de revenir en
arrière. On va établir, par exemple, les circuits 128, 127, 126, 125, 124
et 123 pour les prises 1, 2, 3, 4, 5, 6.
EXIT, pressé quand vous êtes sur la prise 1 "P1", permet la sortie du
menu. Maintenant un "p" minuscule à droite de la première ligne vous
signalera, dans l'écran de départ, que vous êtes en mode 'PATCH
ON'; ce "p" va apparaître dans tous les écrans décrits à la page 5.
Obs: Les circuits affichés sur ces écrans correspondent à la première
et à la sixième prise; donc, pour le patch de notre exemple, le premier
circuit affiché est plus grand que le deuxième.
FORCER LE PATCH ON
EFFECTUE
ed ch PATCH ON
P1→128 P2→127 P3→126
rj CIRC 128 ÷ 123 p
ØØ ØØ ØØ ØØ ØØ ØØ
Pour mettre le patch OFF, répéter les points 1 à 4; ou effectuer,
dans l'écran de départ, un RESET SOFT (touches EXIT et "-"
pressées ensemble).
copyright © R Juliat 1995
copyright © R Juliat 1995
23
DIGI IV & V S
ECRANS
SCREENS
DIGI IV & V S
PATCH.
4. VALEURS SCENES (STAGE).
THE SOFT PATCH.
VISUALISER LES NIVEAUX DE COMMANDE.
DIGIBOX IV S can carry out a DATA addressing per channel : this is
the PATCH function. To accede this mode, you will set the PATCH
“ON”. Go to the Preferences menu in the Patch option.
Le DIGIBOX IV S permet de graduer chaque prise de 0 à 100%
directement sur l'unité à partir : d'une commande numérique au
standard AVAB ou DMX, d'une commande en analogique 0+10V, ou
d'une commande locale.. Toutes ces commandes peuvent être présentes en même temps, dans ce cas le niveau le plus fort l'emporte.
L'écran "STAGE" permet de visualiser le niveau et la présence d'une
ou plusieurs commandes sur chaque prise. Ce n'est pas un écran
d'édition mais d'information. Avec "+" et "-" placez-vous sur l'écran
stage: "STAGE" clignote.
1/ SELECT, accedes "PATCH OFF" with a blinking OFF allows you
to choose between the mode “patch OFF” (addressing of the first
channel, the next 5 ones following in digital order) or “patch ON” (any
channel number freely assigned to any plug of the unit).
2/9 rj PREFERENCES
PATCH OFF
9
rj STAGE ØØ1 ÷ ØØ6
PR1→NIVEAU 45 LOC+
2/ Press the "+" key.
SELECT
The displays says "PATCH ON".
SELECT accède à l'écran d'information du mode Stage.
3/ Press SELECT.
The display becomes : "PRESS SELECT 1s FOR PATCH ON"
(SELECT 1 s to operate patch on).
rj PRESS SELECT 1s
FOR
PATCH ON
4/ Press SELECT for 1 second.
The display becomes : "PATCH ON PERFORMED".
5/ Press EXIT.
You will return to the editing display. The 001 number, showing after
P1, is blinking. You can change its value by using the "+" and "-" keys,
then you can go to the next one by using SELECT. The EXIT key will
allow you to go back.
Setting, for example, the channels 128, 127, 126, 125, 124 and 123 for
the plugs 1, 2, 3, 4, 5, 6.
EXIT, pressed while you are on the first plug "P1", allows you to escape
the editing menu. Now a lower case "p" on the upper right side of the
start screen indicates that you are in the "PATCH ON" mode. This lower
case "p" will stay on all the screens described in page 5.
Note: The channels displayed on these screens correspond to the first
and the sixth plug; therefore, in our example, the first displayed channel
is greater then the second one.
To set the patch OFF, repeat the points 1 to 4 or reset SOFT in the
start screen (the EXIT and "-" keys pressed together).
copyright © R Juliat 1995
PATCH ON
PERFORMED
Sur la première ligne, "CH.001->PRISE 1" vous indique le circuit
consulté. Le numéro de la prise (le chiffre 1) clignote.
Sur la deuxième ligne, les 2 premières lettres (LL, FL, PA, etc.)
visualisent la courbe affectée à la prise; "NIVEAU 45" vous indique
l'intensité de 45% de la prise; "LOC" indique l'origine de la commande
la plus élevée (ici locale); enfin, le "+" vous signale que d'autres
commandes, numériques et/ou analogiques, sont présentes mais à un
niveau inférieur. Si la commande numérique est la plus grande, on va
voir "NUM" au lieu de "LOC"; ou "ANA" pour la commande analogique. Si une seule commande est présente, le signe "+" n'est pas
affiché. S'il n'y a pas de commande on va voir simplement 'NIVEAU 00'.
Pressez les touches "+" (ou SELECT) e t" -" pour consulter les autres
prises.
rj CH. ØØ1→PR. 1/6
NIVEAU 45 LOC +
+
-
SELECT
ed ch PATCH ON
P1→128 P2→127 P3→126
rj CHAN 128 ÷ 123 p
ØØ ØØ ØØ ØØ ØØ ØØ
EXIT
EXIT vous fait revenir à l'écran de départ.
ATTENTION :
La fonction RESET est accesssible sur l'écran STAGE, elle permet une remise aux valeurs par défaut des commandes LOCALES.
Valeurs par défaut après un RESET SOFT (touche EXIT et "-"
pressées ensemble) : les valeurs Locales des 6 prises sont à Ø%.
copyright © R Juliat 1995
10
DIGI IV & V S
SCREENS
ECRANS
5. TEST.
TESTING THE CHANNELS.
DIGIBOX IV S allows you to test each channel (plug) to a preset value
: 50%.
Go to the test screen by using the "+" and "-" keys, "TEST" is blinking.
rj TEST ØØ1 ÷ ØØ6
TEST OFF
SELECT
SELECT accedes to the start test screen, which is a safety screen
against a careless manipulation: to carry out the test, you should first
set to: TEST ON.
Press SELECT.
The test level begins to blink; you may modify it by using the "+" and
"-" keys. The new value will be saved as test default value, replacing
the 50% default value.
Press SELECT.
Here is the test mode screen. The first line "CH 001 -> PR.1/6" shows
the channel and the plug (the blinking '1') under test. On the second
line, the first 2 letters (LL, FL, PA, a.s.o.) shows the corresponding
curve; "LEVEL 50" indicates the 50% command level; while "TEST"
indicates the command source. The test does not cancel the other
(digital and/or analog) input commands; the displayed value will be the
highest command followed by its source (TEST, DIG or ANA); the "+"
sign shows that other (lower) commands are also received.
Press the "+" (or SELECT) and "-" key to test the other channels
(plugs).
WARNING :
The TEST display allows access to the RESET function which
enables the unit to restore the default values of LOCAL controls.
Default values after a SOFT RESET (both EXIT and "-" keys
pressed together) : Local values for the 6 channels are Ø% and the
test level is 50%.
rj
TEST
OFF
TEST
LEVEL
50
+
-
rj
TEST
TEST
LEVEL
ON
50
DIGI IV & V S
Enfin, l'option CODE ACCES va indiquer la présence d'un code
d'accès. Le code par défaut est 0000, et aucune protection contre des
manipulations non autorisées n'est prise. Par contre, si vous choisissez un autre code (entre 0001 et 9999), celui-ci vous sera demandé la
première fois que vous entrerez dans un écran d'édition, après un
redémarrage de l'unité. Un utilisateur non autorisé à faire des modifications (par exemple sur le premier circuit, sur les courbes, le spectacle, etc.) et qui ne connaît donc pas le code, n'aura accès qu'aux écrans
d'information décrits dans la page 5. En cas de perte ou d'oubli, le DIGI
IVs est prévu avec un code 'rj' égal au nombre 'pi' par 1000 soit 3142;
entrez ce code trois fois pour déverrouiller l'unité.
SELECT
Quand "Français" clignote, vous pouvez mettre l'affichage en "Anglais" grâce aux touches "+" et "-". Si vous avez changé la langue, en
quittant cette rubrique avec la touche EXIT (ou SELECT), vous
reviendrez à l'écran de départ de l'unité, "CHAN"; en effet le programme génère de nouveaux écrans dans la langue de votre choix.
6. INFORMATION.
8/9 rj PREFERENCES
CODE ACCES ØØØØ
Le code d'accès vous permet de vous protéger contre des modifications non autorisées des paramètres de votre unité. Quand le code
"0000" clignote vous pouvez choisir un code d'accès. Une fois ce code
établi, aucune personne, ne le connaissant pas, ne peut accéder aux
écrans d'édition pour modifier les paramètres du DIGI IVs. Tachez de
ne pas oublier vous-même votre code d'accès (dans ce cas-là vous
pouvez utiliser quand même le code 'rj' 3142).
La dernière option est la langue. Vous pouvez choisir entre le français
et l'anglais. A la demande, le constructeur équipe le DIGI IVs, sans frais
supplémentaires, avec n'importe quelle autre langue en alphabet latin.
rj CH 001 → PL.1/6
LL LEVEL 50 TEST+
22
Quand vous êtes dans l'écran de départ Préférences (ou Informations), vous pouvez faire un RESET SOFT des préférences. Les
valeurs par défaut sont: START SOFT ON, PATCH OFF, BOOSTER
ON, LISSAGE ON, protocole admissible DMX/AVAB, affichage Décimal, Analogique 0/+10V, code accès 0000; pour la langue, il n'y a
pas une valeur par défaut et le dernier choix est gardé.
9/9 rj PREFERENCES
LANGUE FRANCAIS
9/9 rj PREFERENCES
LANGUE ANGLAIS
rj CHAN ØØ1 ÷ ØØ6
ØØ ØØ ØØ ØØ ØØ ØØ
READING THE INFORMATION.
DIGIBOX IV S allows you to read the information which enables you to
check the unit.
The second line of this screen will say "PROTOCOLE NONE" if no
DATA input is connected. If a DATA line is connected the message will
say, for example "DMX 512", thus giving the nature of the recognized
protocol and the frame length. In case of an error, the message
"PROTOCOL ERROR" is displayed and the red error LED lights up.
rj INFO ØØ1 ÷ ØØ6
PROTOCOL
NONE
rj INFO ØØ1 ÷ ØØ6
PROTOCOL DMX 512
The SELECT key allows you to accede to a 3 items menu providing
more information about the average number of erroneous frames, the
Frequency and the unit's software version.
copyright © R Juliat 1995
copyright © R Juliat 1995
22
DIGI IV & V S
SCREENS
The next preference is the password. The default password is 0000; in
this case, no protection is taken against an unauthorized handling. On
the contrary, if you choose a password (between 0001 and 9999), this
password will be demanded the first time you try to accede to an edit
screen after the unit is restarted. A user who doesn't know the
password will be only able to watch the information screens shown in
page 5, but may not modify the DIGI IVs parameters (e.g. the first
channel, the curves, the show, a.s.o.). In the case were you have
forgotten your password, the DIGI IVs is provided with the 'rj' password
3142 ('pi' multiplied by 1000); this password will always unlock the unit.
8/9 rj PREFERENCES
PASSWORD ØØØØ
When the Preference (or Information) screen is displayed, you can
reset the preferences. The default values are: SOFT START ON,
PATCH OFF, BOOSTER ON, SMOOTHING ON, admissible protocole
DMX/AVAB, decimal display, 0/+10V analog, password 0000.
There isn't a default value for the language, and the last choice is used.
10
5. TEST.
TESTER LES CIRCUITS.
rj TEST ØØ1 ÷ ØØ6.
TEST OFF
SELECT
SELECT rentre dans l'écran de démarrage test. Cet écran représente
une protection contre une erreur de manipulation : pour effectuer le
test, vous devez mettre d'abord TEST ON.
Pressez "+" ou "-".
SELECT permet de continuer quand le TEST est ON.
9/9 rj PREFERENCES
LANGUAGE ENGLISH
When "English" is blinking, you can change it to French by using the
"+" and "-" keys.
If you have changed the language and you press SELECT or EXIT you
return back to the startup screen, "CIRC". In fact, the program generates
new screens in the chosen language.
DIGI IV & V S
Le DIGIBOX IV S permet de tester chaque circuit (prise) à une valeur
prédéfinie par le programme : 50%.
Avec "+" et "-" placez-vous sur l'écran test, "TEST" clignote.
The password gives you a protection against non-authorized unit
parameter modifications. When the '0000' password is blinking, you
may choose your password. Once the password fixed, a user, who
does'nt know it, may not accede to the edit screen and modify the DIGI
IV s parameters. Try not to forget your password yourself (in case you
do, use the 'rj' password 3142).
The last option is the language. You may choose between the English
and the French. ROBERT JULIAT will equip the unit on request and
free of charge with any other language of the Latin alphabet.
ECRANS
9/9 rj PREFERENCES
LANGUAGE FRENCH
rj CIRC ØØ1 ÷ ØØ6
ØØ ØØ ØØ ØØ ØØ ØØ
Pressez SELECT.
Vous êtes entré dans l'écran de mode Test. Sur la première ligne vous
lisez "CH 001 → PR.1/6" qui vous indique le circuit testé. Le numéro
de la prise (le chiffre 1) clignote.
Le test ne supprime pas les autres commandes présentes aux entrées
de l'unité (numériques et/ou analogiques); la valeur affichée va être la
valeur de commande la plus élevée suivie par l'origine (TEST, NUM ou
ANA); le "+" vous signale que d'autres commandes sont présentes
mais à un niveau inférieur.
Pressez les touches "+" (ou SELECT) et "-" pour tester les autres
circuits (prises).
EXIT vous fait revenir à l'écran de départ.
ATTENTION :
La fonction RESET est accessible sur l'écran TEST, elle permet
une remise aux valeurs par défaut des commandes LOCALES.
Valeurs par défaut après un RESET SOFT (touche EXIT et pressées ensemble) : les valeurs Locales des 6 circuits sont à Ø%
et la valeur de test est à 50%.
rj
TEST
OFF
NIVEAU TEST
50
+
-
rj
TEST
NIVEAU TEST
ON
50
SELECT
rj CH 001 → PR.1/6
LL NIVEAU 50 TEST+
6. INFORMATIONS.
LIRE LES INFORMATIONS.
Le DIGIBOX IV S permet de visualiser un certain nombre d'informations permettant de vérifier l'unité.
Sur la deuxième ligne de cet écran sera affiché "PROTOCOLE
AUCUN", si aucune ligne de DATA n'est raccordée en entrée. Si une
DATA est raccordée, le message sera par exemple "DMX 512",
indiquant la nature du protocole reconnu et la longueur de la trame. En
cas d'erreur, le message "PROTOCOLE ERR" s'affiche et la LED
rouge d'erreur s'allume. L'unité permet donc à chaque raccordement
de vérifier la validité de la transmission.
La touche SELECT vous permet d’accéder à un menu de 3 rubriques
pour un complément d’information sur le nombre moyen de trames
erronées, la fréquence du réseau et la version du programme.
copyright © R Juliat 1995
rj INFO ØØ1 ÷ ØØ6
PROTOCOLE AUCUN
rj INFO ØØ1 ÷ ØØ6
PROTOCOLE DMX 512
copyright © R Juliat 1995
11
DIGI IV & V S
SCREENS
ECRANS
DIGI IV & V S
21
7. PLUS MENU
Select the Plus Menu to accede to the options. The first option
concerns the rename function, the 2nd to the 7th option controls the
show and the 8th option allows you to change the preferences.
Vous passez ensuite au paramètre suivant, le protocole admissible.
"DMX/AVAB" signifie que la reconnaissance du protocole reçu par
l'unité est automatique. Quand "DMX/AVAB" clignote, vous pouvez
choisir de n'admettre qu'un protocole: DMX 512 par exemple.
SHOW
Le message "DMX/AVAB" indique la reconnaissance automatique du
protocole; par contre, si vous avez choisi un seul protocole (DMX 512
ou AVAB), celui-ci est indiqué sur l'écran comme étant le seul protocole
admissible. Un autre protocole est repoussé. (Cette possibilité de
verrouillage est intéressante dans le cas d'une installation fixe).
DIGIBOX IV S allows you to save an internal sequence of Dynamic
Memories which the unit will be able to restore by its own means. We
call "Dynamic Memories" a set of recorded channel levels necessarily
linked to a time. Thus, a 0 time deletes a Dynamic Memory, while any
level (even 0%) linked to a non-zero time generates a Dynamic
Memory. Go to the show screen by using the "+" and "-" keys: "SHOW"
is blinking.
MEMORY UPDATE" : By selecting this item, you may edit common
(dynamic) memories, where the 6 plug levels that you set are linked
with a only time (see page 13).
" MEMORY LINK" : This item allows you to see the sequence which
is created automatically each time a memory is saved. You can
also edit this sequence (see page 16).
"PARAMETERS" : This item allows you to choose the inner or outer
controls to play the sequence and/or to give a default time to link
Dynamic Memories (see page 17).
Le paramètre suivant est l'échelle du votre pupitre ANALOGIQUE.
Vous pouvez régler votre entrée analogique entre 0/+10V et 0/+5V,
pour une commande de 0 à 100%.
"SHOW INFORMATION” : This item allows you to read the percentages
of available memories left and the number of used memories (see page
18).
La notation "10V" indique la plage de votre pupitre analogique:
0/+10V. Si vous avez un pupitre 0/+5V vous pouvez l'utiliser dans toute
la plage 0% à 100% si vous choisissez l'entrée analogique de 5V. Dans
ce cas-la, vous aurez la notation '5V" sur l'écran préférences.
"SHOW READY” : This item allows you to start up the sequence
according to the chosen parameters (see page 19).
5/9 rj PREFERENCES
ADM. PR. DMX 512
Vous passez au paramètre suivant, l'affichage. Quand "DEC" (pour
l'affichage décimal) clignote, vous pouvez choisir l'affichage hexadécimal "HEXA" avec les touches "+" et "-". Cette fonction est surtout
utile en maintenance de système, pour vérifier la transmission numérique.
Le message "DEC" indique le fait que les valeurs de commande sont
affichées en décimale, plus précisément en pourcentage par rapport à
la valeur maximale (255 pas de commande). Pour avoir une précision
accrue d'affichage et pour regarder tous les pas de commande
envoyés par votre pupitre, vous pouvez utiliser l'affichage hexadécimal
(notation HEX). Un tableau de conversion décimal/hexa est donné en
annexe.
Attention: le mode d'affichage (décimal ou hexa) ne modifie pas la
précision des commandes reçues et exécutées par le DIGI IVs.
"DYN MEMORY UPDATE" : This item allows you to edit a complex
Dynamic Memory whose channels will each have its own time and
value (see pages 14 and 15).
5/9 rj PREFERENCES
ADM. PR. DMX/AVAB
6/9 rj PREFERENCES
AFFICHAGE
DEC
6/9 rj PREFERENCES
AFFICHAGE
HEXA
7/9 rj PREFERENCES
ANALOG Ø ÷ 1ØV
7/9 rj PREFERENCES
ANALOG Ø ÷ 5V
copyright © R Juliat 1995
copyright © R Juliat 1995
21
DIGI IV & V S
SCREENS
ECRANS
DIGI IV & V S
11
7. MENU PLUS
You can reach in the same manner the next preference, the admissible
protocol. "DMX/AVAB" shows that the received protocol is automatically
recognized. When "DMX/AVAB" is blinking, you may choose only one
protocol: e.g. DMX 512.
The "DMX/AVAB" message shows the automatic protocol detection
between the DMX and AVAB protocols; on the contrary, when you
choose a protocol (DMX512 or AVAB), this one is shown as the only
admissible protocol. Another protocol is rejected. (This locking possibility
is interesting for a fixed installation).
Sélectionnez le Menu Plus pour modifier les options. La première
option concerne la fonction rename, les options 2 à 7 concernent le
spectacle et l'option 8 vous permet de modifier les préférences.
5/9 rj PREFERENCES
ADM. PR. DMX/AVAB
5/9 rj PREFERENCES
ADM. PR. DMX 512
The next preference is the display mode. When "DEC" (for the decimal
display) is blinking, you can choose the hexadecimal display mode
("HEX") by using the "+" and "-" keys. This mode is useful for the digital
transmission check during service operations.
The "DEC" message shows that the order values are displayed in
decimal notation, more precisely in percentage of the 255 steps
greatest order. To enhance the display accuracy and to watch all the
order steps transmitted by your lightboard, you can use the hexadecimal
display (HEX). A decimal/hexadecimal conversion table is given in the
appendix.
Warning: The display mode (decimal or hexadecimal) does not modify
the accuracy of the DIGI IV s input/output commands.
6/9 rj PREFERENCES
DISPLAY
DEC
6/9 rj PREFERENCES
DISPLAY
HEX
7/9 rj PREFERENCES
ANALOG Ø ÷ 1ØV
7/9 rj PREFERENCES
ANALOG Ø ÷ 5V
copyright © R Juliat 1995
Le DIGIBOX IV S permet d'enregistrer une séquence interne de
Mémoires Dynamiques qui pourront êtres restituées de manière
autonome par l'unité. Nous appelons “Mémoire Dynamique” l’enregistrement de valeurs de circuits nécessairement liées à une temporisation. Ainsi, l’attribution d’un temps 0 provoque l'effacement de la
mémoire, par contre un niveau (même 0%) associé à un temps défini
génère une mémoire.
"CREER MEMOIRES" : Cette option vous permet d'éditer des mémoires (toujours dynamiques) simples, où les valeurs que vous donnez
pour les 6 prises de l'unité sont associées à un temps unique (voir page
13).
"CREER MEM.DYN." : Cette option vous permet d'éditer une Mémoire Dynamique complexe dans laquelle chaque circuit sera indépendant en temps et en valeur (voir pages 14 et 15).
"ENCHAINER MEMOIRES" : Cette option vous permet de visualiser
la séquence qui est créée automatiquement chaque fois que vous
enregistrez une mémoire. Vous pourrez aussi éditer cette séquence
(voir page 16).
The next preference is your ANALOG lightboard scale. You may fix
your analog input 0/+10V or 0/+5V, corresponding to a 0 to 100%
command.
The "10V" notation shows your analog lightboard scale: 0/+10V. When
you use a 0/+5V analog lightboard, you can obtain the full 0% to 100%
scale if you choose the 5V analog input. In this case, the "5V" notation
is displayed on the preferences screen.
SPECTACLE (SHOW).
"PARAMETRES SPECTACLE" : Cette rubrique vous permet de
choisir les commandes externes ou internes pour le déroulement de la
séquence et/ou de déterminer un temps par défaut pour l'enchaînement des Mémoires Dynamiques (voir page 17).
"INFO SPECTACLE" : Cette rubrique affiche la capacité mémoires
disponible et le nombre de mémoires enregistrées (voir page 18).
"LANCER SPECTACLE" : Cette rubrique vous permet de démarrer la
restitution de la séquence interne en fonction des paramètres que vous
avez choisis (voir page 19).
copyright © R Juliat 1995
12
DIGI IV & V S
SCREENS
ECRANS
7/1. RENAME.
7/8. PREFERENCES.
RENAMING THE CHANNELS.
MODIFIER LES PREFERENCES.
DIGIBOX IV S allows you to give new channels numbers in order that
the unit channels match the lightboard channels. To access the
RENAME function you must put the RENAME function "ON". Go to the
rename screen of the Plus Menu by using the "+" et "-" keys.
SELECT accedes to the rename edit screen.
"edit" appears on the first line to indicate the Editing mode, next
"RENAME OFF" with a blinking "OFF" allows the choice between the
“rename OFF” or “rename ON” modes.
1/8 rj
PLUS MENU
→ RENAME
SELECT
edit
RENAME OFF
1→ØØØ1 2→ØØØ2 3→ØØØ3
Press the "+" key.
+
The display says "RENAME ON".
edit
RENAME ON
1→ØØØ1 2→ØØØ2 3→ØØØ3
Press SELECT.
You will read the following : "PRESS SELECT 1s FOR RENAME ON".
Press SELECT for 1 second.
SELECT
Press EXIT to return the startup display.
"CHØØ1" appears on the first line to indicate the DATA channel
number. The number ØØØ1 next to 1 (PLUG 1) is blinking.
You can change its number by using the "+" and "-" keys. The
SELECT key will take you to the next number.
SELECT
RENAME ON
PERFORMED
L'option Start soft: un démarrage lent de l'unité pour atteindre les
valeurs de commande externe empêche une consommation brutale
sur le réseau électrique. La temporisation est de l'ordre de 2 secondes.
8/8 rj MENU PLUS
→
PREFERENCES
1/9 rj PREFERENCES
START SOFT ON
Pressez EXIT pour revenir au choix du paramètre à modifier ou
SELECT pour passer directement à la modification du paramètre
suivant, le PATCH.
Quand "ON" clignote, vous pouvez désactiver le PATCH avec les
touches "+" et "-". (voir page 23 pour créer un patch des circuits).
De la même manière on accède au paramètre suivant le BOOSTER.
Quand "ON" clignote, vous pouvez désactiver le BOOSTER avec les
touches "+" et "-".
2/9 rj PREFERENCES
PATCH ON
2/9 rj PREFERENCES
PATCH OFF
EXIT
ed RENAME ON CHØØ1
1→ØØØ1 2→ØØØ2 3→ØØØ3
SELECT
+
-
EXIT
EXIT, while on the first plug, or EXIT and SELECT pressed together on
any plug enables you to escape the edit screen and return the previous
screen. Now a lower case "r" on the upper right side of any screen
indicates that you are in the "RENAME ON" mode.
When in “REN ON” Mode, the RENAME display shows on any
other screen. For instance the CURVES screen will say : Rename
number, Data and plug numbers.
Pressez SELECT pour accéder à l'écran d'édition Préférences du
Menu Plus. Sur la première ligne, "1/9" vous signale que vous avez
accès au premier paramètre parmi 9, le START SOFT. Pressez "+" et
"-" pour regarder les autres préférences. Pressez SELECT encore une
fois pour modifier le Paramètre affiché.
Pressez SELECT.
"ON" clignote, vous pouvez modifier le mode de START avec les
touches "+" et "-".
Pressez "+", vous avez choisi le START SOFT OFF. Pressez "+"
encore une fois, vous êtes revenu au mode START SOFT ON, que
nous vous conseillons de garder.
20
Attention: Dans le cas d'un spectacle (show), l'option START SOFT
n'est pas active. L'utilisateur à la liberté - et la responsabilité - de choisir
les niveaux de départ du premier pas ainsi que les niveaux 'panique'.
rj PRESS SELECT 1s
FOR
RENAME ON
You will read the following : "RENAME ON PERFORMED".
DIGI IV & V S
ed c RØØØ1→CHØØ1→PL1
LL LL LL LL LL LL
L'option "BOOSTER ON": celle-ci vous assure une grande fiabilité de
câblage. Le booster permet une séparation des lignes DATA IN et
DATA OUT. Quand la valeur du booster est ON, la ligne DATA OUT
devient un émetteur, qui réajuste les niveaux logiques mais sans
reformatage du signal. Quand le booster est désactivé (OFF), il y a
continuité de la ligne Data, et le signal de sortie est identique à celui
d'entrée.
Note: Le booster est automatiquement court-circuité dès la mise hors
tension du gradateur, ce qui assure, en toutes conditions, la continuité
de la ligne DATA.
Vous passez ensuite au paramètre suivant, le LISSAGE.
Quand "ON" clignote, vous pouvez désactiver le LISSAGE avec les
touches "+" et "-".
3/9 rj PREFERENCES
BOOSTER ON
3/9 rj PREFERENCES
BOOSTER OFF
4/9 rj PREFERENCES
LISSAGE ON
4/9 rj PREFERENCES
LISSAGE OFF
Default values after a SOFT RESET (both EXIT and "-" keys
pressed together) : RENAME OFF and R ØØØ1 to ØØØ6.
copyright © R Juliat 1995
copyright © R Juliat 1995
20
DIGI IV & V S
SCREENS
ECRANS
7/8. PREFERENCES.
7/1. RENAME.
MODIFYING THE PREFERENCES.
RENUMEROTER LES CIRCUITS.
From the startup screen, you reach the preferences screen in the Plus
Menu by using the "+" and "-" keys.
Press SELECT to accede the Preferences edit screen. On the first line,
"1/9" shows that you may accede to the soft start, the first parameter
among 9. Press "+" and "-" to watch the other preferences. Press
SELECT again to modify the displayed preference.
Press SELECT.
"ON" is blinking, you may modify the START mode by using the "+" and
"-" keys. Press "+", now the SOFT START is disabled (OFF). Press
"+" again, the SOFT START is re-enabled (ON). We advise you to
choose this mode.
8/8 rj PLUS MENU
→P R E F E R E N C E S
Press EXIT to reach the preferences choice; or SELECT to accede to
the next preference, the Patch. When"ON" is blinking, you may disable
the patch by using the "+" and "-" keys. (see page 23 to create a soft
patch)
You can reach in the same manner the next preference, the Booster.
When"ON" is blinking, you may disable the booster by using the "+"
and "-" keys.
The booster represents a partition between the input and output
signals. When the booster is enabled (ON), the DATA out line becomes
a transmitter with re-adjusted logical levels. If the booster is disabled
(OFF), the output signal is identical with the input signal.
Note: When the unit is turned off, the Booster function is automatically
bypassed.
You can reach in the same manner the next preference, the Smoothing.
When"ON" is blinking, you may disable the smoothing by using the "+"
and "-" keys.
Le DIGIBOX IV S permet de renuméroter les circuits pour avoir une
concordance entre les circuits du jeu et ceux des gradateurs. Pour
accéder à la fonction RENAME il faut mettre le RENAME “ON”. Avec
+ et - placez-vous sur l'écran rename.
SELECT, accède à l'écran d'édition du Rename circuit.
Sur la première ligne "edit" indique que vous êtes en mode Edition,
puis "RENAME OFF" avec "OFF" clignotant vous offre le choix entre
le mode “rename OFF” ou “rename ON”.
1/8 rj
12
MENU PLUS
→ RENAME
SELECT
edit
RENAME OFF
1→ØØØ1 2→ØØØ2 3→ØØØ3
1/9 rj PREFERENCES
START SOFT ON
The Soft start option: a slow startup that reaches the external commands
after 2 seconds preserves the electrical network from a rough
consumption.
Warning: The Soft start option is disabled for a show sequence. The
user is free to choose the first step levels and time or the panic levels
- and is responsible for his/her choice.
DIGI IV & V S
Pressez la touche "+" .
+
Vous obtenez sur l'écran "RENAME ON".
edit
RENAME ON
1→ØØØ1 2→ØØØ2 3→ØØØ3
2/9 rj PREFERENCES
PATCH ON
2/9 rj PREFERENCES
PATCH OFF
Pressez SELECT.
Vous obtenez l'affichage suivant : "SELECT 1s POUR FORCER LE
RENAME ON".
SELECT
rj SELECT 1s POUR
FORCER LE RENAME ON
SELECT
Pressez SELECT 1 seconde.
3/9 rj PREFERENCES
BOOSTER ON
3/9 rj PREFERENCES
BOOSTER OFF
4/9 rj PREFERENCES
SMOOTHING ON
4/9 rj PREFERENCES
SMOOTHING OFF
Vous obtenez l'affichage suivant : "FORCER LE RENAME ON
EFFECTUE".
FORCER RENAME ON
EFFECTUE
EXIT
Pressez EXIT, pour revenir à l'écran d'édition.
Sur la première ligne, "CHØØ1" indique le N° de circuit DATA. Le
chiffre ØØØ1 après 1 (PRISE 1) clignote.
Vous pouvez changer sa valeur avec les touches "+" et "-", puis
passer au suivant avec SELECT.
EXIT vous permet de revenir en arrière.
EXIT sur la première prise ou EXIT et SELECT pressées ensemble sur
n'importe quelle prise vous font sortir de l'écran d'édition et revenir à
l'écran rename.
Maintenant, un"r" minuscule à droite de la première ligne vous
signalera, dans tous les écrans, que vous êtes en mode "RENAME
ON".
En Mode “REN ON”, l'affichage du RENAME apparaît dans les
autres écrans. Exemple l'écran COURBES : avec dans l'ordre, N°
Rename, Data et prise.
ed RENAME ON CHØØ1
1→ØØØ1 2→ØØØ2 3→ØØØ3
SELECT
+
-
EXIT
ed c RØØØ1→CHØØ1→PR1
LL LL LL LL LL LL
Valeurs par défaut après un RESET SOFT (touche EXIT et "-"
pressées ensemble) : RENAME OFF et R ØØØ1 à ØØØ6.
copyright © R Juliat 1995
copyright © R Juliat 1995
13
DIGI IV & V S
SCREENS
7/2. MEMORIES UPDATE.
7/7. LANCER LE SPECTACLE.
COMMON DYNAMIC MEMORIES UPDATE.
LANCER LE SPECTACLE.
Go to the " MEMORY UPDATE" screen by using the "+" and "-" keys.
Pressing SELECT will show the common dynamic memories update
screen. “ØØ1/ØØØ” is blinking, this is the memory you will be
working on. If several memories have been saved, the "+" and "-" keys
will enable you to choose the one you want to edit.
The display says “ØØ1/ØØØ”, no preset memory has been saved and
the total time of the ØØ1 memory is 00 minute 00 second and 0 tenth
of a second.
SELECT TØØm is blinking, +/- time as minutes.
The system is already provided with a default time of 10 seconds, which
shows on the display. You can change this time, for this memory, by
using the +/- keys. (As concerning the modification for the default time,
see PARAMETERS page 18)
SELECT 1Ø is blinking, +/- time as seconds.
Here, 10 seconds by default (maximum time = 60 minutes).
SELECT . Ø is blinking, +/- select 10th of second.
You can now set the levels for the unit's 6 plugs, displayed on the
second line: "+" or "-" key to modify the levels, SELECT and EXIT to
go forwards and backwards, EXIT + SELECT to quit the edit screen (at
the same time, the memory is updated). Returning to the first field (the
memory number) saves the memory you have just created. In our
example, the 1st memory has the 100% levels for the first plug, 0% for
the others (2 to 6 plugs) and a time of 10 seconds.
2/8 rj PLUS MENU
→MEMORY
UPDATE
To validate a Memory, you will give a minimum time value (different
from 0).
To delete a Memory, you will assign it a time value equal to 0.
WARNING : The Dynamic Memories add up. For example,Dynamic
Memory 1 = CH 1 at 50%, M 2 = CH 1 at 50%, CH 2 at 50%, M 3 =
CH 1 at 50%, CH 2 at 50%, CH 3 at 50%. If you make a loop with
these 3 memories, when you come back to M 1 at the end of this
loop, the CH 1 will stay at 50%, CH 2and 3 will fade to 0% BECAUSE
the real content of M 1 is : CH1 at 50%, CH 2 to CH 6 is at 0%. In this
example, if you wish to pass through a blackout before you return
to M 1, you will create a M 4 with all channels at 0%, since 0% IS
a level.
Presser les touches "+" ou "-" pour accéder à la rubrique LANCER
SPECTACLE à partir du menu spectacle.
Presser la touche SELECT pour afficher l'écran de déroulement du
spectacle.
M ØØ1/ØØØ TØØ mØØ.Ø
ØØ ØØ ØØ ØØ ØØ ØØ
M ØØ1/ØØØ TØØ m1Ø.Ø
ØØ ØØ ØØ ØØ ØØ ØØ
M ØØ1/ØØØ TØØ mØ5Ø
FF ØØ ØØ ØØ ØØ ØØ
ØØ1/ØØ1 is blinking, and ØØ1 shows that a Dynamic Memory has
been saved.
Then you can record a second Memory (by using the "+" key to show
ØØ2, and the SELECT key to affect a time value) or you can return to
the previous screen through EXIT.
DIGI IV & V S
ECRANS
M ØØ1/ØØ1 TØØ mØØ.Ø
FF ØØ ØØ ØØ ØØ ØØ
Sur la première ligne vous lisez “PASØØ1”, c'est le pas en attente ou
en cours de restitution, à côté “JØ1” représente le nombre de sauts
(Jump) à effectuer -qu’ils soient en attente ou en cours de restitution et enfin le temps du premier pas de votre spectacle "TØhØ2m3Ø" qui
va se dérouler comme un compte à rebours.
7/8 rj MENU PLUS
→LANCER SPECTACLE
SELECT
PASØØ1 JØ1 TØhØ2m3Ø
ØØ ØØ ØØ ØØ ØØ ØØ
Sur la deuxième ligne figurent les valeurs de restitution de chaque
circuit.
Dès votre arrivée dans cet écran, vous avez la possibilité de commander le déroulement de votre spectacle, en utilisant le clavier (les 4
touches), ou des commandes fugitives externes (sur les potentiomètres ou les touches Flash d'un pupitre analogique ou numérique). Dans
le tableau ci-dessous vous pouvez trouver toutes les commandes
spectacle.
Commande
Entrée
Entrée
Entrée
spectacle
touches
analogique
numérique
________________________________________________________________________
GO
SELECT
Entrée 1
Circuit 1
PAUSE
"-" (moins)
Entrée 2
Circuit 2
AVANCE D'UN PAS
"+" et EXIT
Entrée 3
Circuit 3
RECULE D'UN PAS
"-" et EXIT
Entrée 4
Circuit 4
ALLEZ AU DEBUT
(pas 1, T0h00m00)
"+" (plus)
Entrée 5
Circuit 5
PANIQUE
EXIT et SEL
Entrée 6
Circuit 6
SORTIE
EXIT 1seconde
Attention: Si le DIGI IVs est coupé quand l'écran de déroulement
du spectacle est affiché, le spectacle va recommencer à la mise
sous tension de l'unité à partir du premier pas.
Presser EXIT 1 seconde pour arrêter le spectacle et sortir de cet
écran.
copyright © R Juliat 1995
19
EXIT
copyright © R Juliat 1995
19
DIGI IV & V S
SCREENS
ECRANS
DIGI IV & V S
7/7. SHOW READY.
7/2. CREER DES MEMOIRES.
STARTING THE SHOW.
CREER LES MEMOIRES DYNAMIQUES SIMPLES.
Press the "+" or "-" keys to accede to the entry “SHOW READY” from
the Plus Menu.
Press the SELECT key to display the show's running screens .
The first line shows “STP ØØ1” to indicate the step which is being
released or which is waiting ; next "JØ1", which is the number of Jumps
you have decided - either waiting or performing - lastly you can see the
shows first step time "TØØhØ2m3Ø" which will be counting backwards.
7/8 rj PLUS MENU
→SHOW READY
SELECT
STPØØ1 JØ1 TØhØ2m3Ø
ØØ ØØ ØØ ØØ ØØ ØØ
The second line shows the output values of each channel.
Once this screen displayed, you are able to control the show by means
of the 4 keys or by sending fugitive external orders, through the flash
keys or channel master of an analog or digital lightboard. The table
below contains all the show commands.
Show
Keys
Analog
Digital
command
entry
entry
entry
____________________________________________________________________________
GO
SELECT
1st Entry
1st Channel
PAUSE
"-" (minus)
2nd Entry
2nd Channel
1 STEP FORWARDS
"+" and EXIT
3rd Entry
3rd Channel
1 STEP BACKWARDS
"-" and EXIT
4th Entry
4th Channel
GO TO START
(1st step, T0h00m00)
"+" (plus)
5th Entry
5th Channel
PANIC
EXIT and SEL
6th Entry
6th Channel
QUIT
EXIT 1second
Warning: If the DIGI IVs is switched off when the show running
screen is displayed, the show will restart from the begining once
the unit is switched back on.
EXIT
Press EXIT for 1 second to stop the show and to leave this screen.
copyright © R Juliat 1995
Avec "+" et "-" placez-vous sur l'option "CREER MEMOIRES" du
menu Spectacle. SELECT accède à l'écran d'édition des mémoires
dynamiques simples. “ØØ1/ØØØ” clignote, c'est la mémoire sur
laquelle vous allez travailler. Si plusieurs mémoires sont enregistrées,
les touches "+" et "-" vous permettent de choisir la mémoire à éditer.
Vous pouvez lire qu'aucune mémoire n'est enregistrée, “ØØ1/ØØØ”,
et que le temps total de la mémoire 001 est de 00 minute 00 seconde
et 0 dixième de seconde.
SELECT TØØm Clignote, +/- temps en minutes.
Le système est déjà pourvu d’un temps par défaut de 10 secondes, qui
apparaît alors. Vous pouvez toujours modifier ce temps, pour cette
mémoire, grâce aux touches +/- . (Pour la modification du temps par
défaut, voir PARAMETRES page 18)
SELECT 1Ø Clignote, +/- temps en secondes.
Ici, 10 secondes par défaut (temps maxi = 60 minutes).
SELECT . Ø Clignote, +/- choix 10 ème de seconde.
Vous pouvez maintenant établir les niveaux pour les 6 prises de l'unité,
qui s'affichent sur la deuxième ligne; "+" ou "-" pour modifier les
niveaux, SELECT et EXIT pour vous déplacer en avant ou en arrière,
EXIT + SELECT pour quitter l'écran d'édition tout en conservant les
modifications de la mémoire. Si vous retournez sur le premier champ,
( le numero de la mémoire ) la mémoire que vous venez de composer
est enregistrée. Ici, pour la mémoire 1, la prise 1 est à 100%, les prises
2 à 6 sont à 0% et le temps est de 10 secondes.
ØØ1/ØØ1 Clignote, et ØØ1 indique qu'une mémoire dynamique a été
enregistrée.
Vous pouvez alors enregistrer une deuxième mémoire (touche "+"
pour afficher ØØ2, puis SELECT pour mettre un temps) ou revenir à
l’écran précédent avec EXIT.
13
2/8 rj MENU PLUS
→ CREER MEMOIRES
M ØØ1/ØØØ TØØ mØØ.Ø
ØØ ØØ ØØ ØØ ØØ ØØ
M ØØ1/ØØØ TØØ m1Ø.Ø
ØØ ØØ ØØ ØØ ØØ ØØ
M ØØ1/ØØØ TØØ mØ5Ø
FF ØØ ØØ ØØ ØØ ØØ
M ØØ1/ØØ1 TØØ mØØ.Ø
FF ØØ ØØ ØØ ØØ ØØ
Pour valider une mémoire il faut mettre une valeur de temps minimum
(différente de 0).
Pour effacer une mémoire, il faut lui donner une valeur de temps égale
à 0.
ATTENTION : Les Mémoires Dynamiques s’additionnent. Prenons un exemple : mémoire dynamique 1 = circuit 1 à 50%, M 2 =
circuit 1 à 50%, 2 à 50%, M 3 = circuit 1 à 50%, 2 à 50%, 3 à 50 %.
Si vous créez une boucle avec ces 3 mémoires, quand vous
repasserez la M 1 en fin de boucle, le circuit 1 restera à 50%, le 2
et le 3 descendront à 0% PUISQUE le véritable contenu de la M 1
est : 1 à 50%, circuits 2 à 6 à 0%. Si, dans cet exemple, vous voulez
passer par un noir avant de retrouver la mémoire 1, vous créerez
une M 4 ayant tous les circuits à 0%, puisque 0% est un niveau.
copyright © R Juliat 1995
14
DIGI IV & V S
SCREENS
ECRANS
7/3. DYNAMIC MEMORIES UPDATE.
7/6. INFORMATION SPECTACLE.
COMPLEX DYNAMIC MEMORIES UPDATE.
INFORMATION SUR LE SPECTACLE.
Go to the "DYN. MEMORY UPDATE" screen by using the "+" and "" keys.
Pressing SELECT will show the complex Dynamic Memories update
screen which will enable you to assign each channel a different time if
you wish.
“M01/00” is blinking, this is the memory you will be working on.
"MØØ1 PL1 TØhØØmØØ.Ø"
"£Ø1/ØØ tØØmØØ.Ø =ØØØ"
MØØ1 is blinking, +/- select Memory.
SELECT PL1 is blinking, +/- select plug.
SELECT £Ø1 is blinking, +/- select Event.
SELECT tØØm is blinking, +/- time as minutes.
3/8
rj
PLUS MENU
→ DYN. MEMORY UPDATE
Presser les touches "+" et "-" pour accéder à la rubrique INFO
SPECTACLE.
18
6/8 rj MENU PLUS
→ INFO SPECTACLE
SELECT
SELECT
Presser la touche SELECT pour accéder aux deux rubriques offertes
par ce menu.
MØØ1 TØhØØmØØ.Ø PL1
£ Ø1/ØØ t ØØm ØØ.Ø = 2Ø
dmØØ1 TØhØØm1Ø.Ø PL1
£ Ø1/ØØ t ØØm 1Ø.Ø = 2Ø
SELECT 1Ø is blinking, +/- time as seconds.
Here, 5 seconds, (maximum time = 60 minutes).
SELECT . Ø is blinking, +/- set 10th of second.
SELECT = ØØ is blinking, +/- set level.
SELECT PL1 is blinking, +/- back to select channel.
Returning to select channel saves the event. Then you can record a
second event or go to the next channel.
It requires a time value higher than 0 to validate an event, in which case
the channel level will not shift during the given time. As soon as an event
is recorded, the next one is ready : £2. It is always possible to modify
a previous event by selecting it by using the + and - keys.
A saved event is shown with a capital "E". If you make an alteration (be
it time or value), the "E" turns to "e". If you modify the level of an event
or if you want to create another event, the following signs will appear
before the level :
DIGI IV & V S
"1/2" clignote sur la première ligne pour vous signaler que la
touche + vous permettra d’afficher la deuxième rubrique d’information.
Sur la deuxième ligne, "% ESPACE DISP. 96" vous indique le
pourcentage d’espace mémoire qui est encore disponible sur l'unité. Ici
96% puisque des opérations ont déjà été effectuées (voir l'écran
suivant, 2/2).
dmØØ1 TØhØØmØ5.Ø PL1
£ Ø1/ØØ t ØØm Ø5.Ø = 2Ø
Presser la touche "+" pour afficher la deuxième rubrique :
1/2 INFO SPECTACLE
% ESPACE DISP. 96
+
dmØØ1 TØhØØmØ5.Ø PL1
E Ø1/Ø1 t ØØm ØØ.ØØ =ØØ
dmØ1 TØhØØmØ5.Ø PL1
E £ Ø2/Ø1 t ØØm ØØ.Ø = ØØ
“2/2” clignote sur la première ligne. La touche "+" vous
permettra de revenir à la rubrique d’information précédente si vous le
souhaitez.
Sur la 2ème ligne, "5 PAS / 5 MEM. DYN." vous indique le contenu de
votre séquence. Ici, nous avons programmé 5 pas avec 5 mémoires
dynamiques.
2/2 INFO SPECTACLE
5 PAS / 5 MEM. DYN.
EXIT
copyright © R Juliat 1995
= Value equals the previous event.
dmØ1TØhØØmØ5.Ø PL1
eØ1/Ø1 tØØm ØØ.ØØ = ØØ
∨ Value lower than the previous event.
dmØ1 TØhØØmØ5.Ø PL1
eØ1/Ø1 tØØm ØØ.ØØ ∨
∧ Value higher than the previous event.
dmØ1 TØhØØmØ5.Ø PL1
eØ1/Ø1 tØØm ØØ.ØØ ∧ 25
Puis pressez EXIT pour revenir à l’écran INFO SPECTACLE.
6/8 rj MENU PLUS
→ INFO SPECTACLE
copyright © R Juliat 1995
18
DIGI IV & V S
SCREENS
ECRANS
DIGI IV & V S
7/6. SHOW INFORMATION.
7/3. CREER DES MEMOIRES DYNAMIQUES.
SHOW INFORMATION.
CREER LES MEMOIRES DYNAMIQUES COMPLEXES.
Press the "+/-" keys to accede to the SHOW INFORMATION item.
Press the SELECT key to accede to the two entries allowed by this
menu.
On the first line, "1/2" is blinking ; pressing the "+" key will allow
you to read the second information item.
The second line says, "FREE SPACE % 96" to show the percentage
of free memories left on the unit. In this example, 96% space left since
operations have been performed previously (refer to next screen
display, 2/2 ).
6/8 rj PLUS MENU
→ SHOW INFORMATION
SELECT
1/2 SHOW INFORMATION
FREE SPACE % 96
+
Press the "+" key to read the second item :
On the first line, "2/2" is blinking ; pressing the "+" key will allow
you to go back to the previous item information.
The second line reads, "5 STEPS / 5 DYN. MEM." to show the contents
of your sequence. In this example, 5 steps with 5 Dynamic Memories
have been previously programmed.
2/2 SHOW INFORMATION
5 STEPS / 5 DYN. M.
EXIT
Then press EXIT to return the INFO SPECTACLE screen.
6/8 rj PLUS MENU
→ SHOW INFORMATION
copyright © R Juliat 1995
Avec "+" et "-" placez-vous sur l'option "CREER MEM.DYN." du menu
Spectacle. SELECT accède à l'écran d'édition des mémoires dynamiques (complexes).
SELECT, affiche l'écran de création des Mémoires Dynamiques complexes qui vous permet d’affecter un temps différent à chaque prise si
vous le souhaitez.
“MØØ1” clignote, vous indiquant le numéro de mémoire sur laquelle
vous allez travailler.
"MØØ1 PR1 TØhØØmØØ.Ø "
"£Ø1/ØØ tØØmØØ.Ø "
MØØ1 Clignote, +/SELECT PR1 Clignote, +/SELECT £Ø1 Clignote, +/SELECT tØØm Clignote, +/-
14
3/8
rj
MENU
PLUS
→ CREER MEM. DYN.
SELECT
MØØ1 TØhØØmØØ.Ø PR1
£ Ø1/ØØ t ØØm ØØ.Ø = 2Ø
choix Mémoire.
choix prise.
choix Evénement.
temps en minutes.
SELECT 1Ø Clignote, +/- temps en secondes.
Ici, 5 secondes, (temps maxi = 60 minutes).
SELECT . Ø Clignote, +/- choix en 10 ème de seconde.
SELECT = ØØ Clignote, +/- le niveau.
SELECT PR1 Clignote, +/- retour au choix circuit.
Le retour au choix circuit enregistre l'événement, vous pouvez alors
enregistrer un deuxième événement ou passer au circuit suivant.
Pour valider une événemen, il faut mettre une valeur de temps
supérieure à 0, dans ce cas le circuit ne bougera pas de valeur pendant
le temps rentré. Dès qu'un événement est enregistré, le suivant est
proposé : £2. Vous avez toujours la possibilité de modifier un événement précédent, en le choisissant avec les touches "+" et "-".
Un événement enregistré est marqué par un "E" majuscule. Si vous le
modifiez (temps ou valeur), le "E" devient "e" minuscule. Si vous
modifiez le niveau d'un événement ou que vous créez un autre
événement, vous trouverez les signes suivants à côté du niveau :
mdØØ1 TØhØØm1Ø.Ø PR1
£ Ø1/ØØ t ØØm 1Ø.Ø = 2Ø
mdØØ1 TØhØØmØ5.Ø PR1
£ Ø1/ØØ t ØØm Ø5.Ø = 2Ø
mdØØ1 TØhØØmØ5.Ø PR1
E Ø1/Ø1 t ØØm ØØ.ØØ =ØØ
mdØ1 TØhØØmØ5.Ø PR1
E £ Ø2/Ø1 t ØØm ØØ.Ø = ØØ
= Valeur identique à l'événement précédent.
mdØ1TØhØØmØ5.Ø PR1
eØ1/Ø1 tØØm ØØ.ØØ = ØØ
∨ Valeur inférieure à l'événement précédent.
mdØ1 TØhØØmØ5.Ø PR1
eØ1/Ø1 tØØm ØØ.ØØ ∨
∧ Valeur supérieure à l'événement précédent.
mdØ1 TØhØØmØ5.Ø PR1
eØ1/Ø1 tØØm ØØ.ØØ ∧ 25
copyright © R Juliat 1995
15
DIGI IV & V S
SCREENS
ECRANS
DIGI IV & V S
17
7/5. PARAMETRES DU SPECTACLE.
MODIFIER LES PARAMETRES SPECTACLE.
By carrying on with this method you can save the time and level "path"
of each channel.
You can also use the EXIT key to go backwards or to go to the absolute
time meter of your scene. This will allow you to see the light output at
any moment and be able to modify it or add new events.
Avec "+" et "-" placez-vous sur l'option "PARAMETRES" du Menu
Plus. Pressez SELECT pour accéder a la modification des paramètres
spectacle.
Le premier paramètre est le démarrage du spectacle. Il y a 3 possibilités de démarrage du spectacle à la mise sous tension de l'unité:
- Le démarrage manuel (MANUEL): pour lancer le spectacle, l'utilisateur refait le chemin à partir de l'écran de départ jusqu'à l'écran 'lancer
spectacle' (Page 19).
- Le démarrage automatique (AUTO): on arrive directement à cet écran
dès la mise sous tension et la séquence spectacle commence à partir
de son premier pas.
- Le démarrage panique (PANIQUE): l'unité se positionne toujours sur
l'écran spectacle et restitue les niveaux de sortie de 'panique' en
attendant une commande utilisateur.
Pressez la touche SELECT pour pouvoir modifier le mode de démarrage, et "+" où "-" pour le changer effectivement.
Pressez "+".
Attention: Si le DIGI IVs est coupé pendant l'exécution d'un spectacle,
le spectacle va recommencer à la mise sous tension de l'unité pour
n'importe quel mode de démarrage.
If you want to insert a new event in your dynamic memory, just go
somewhere in the event and assign it a new level or time goal.
When you only modify the level, the program will save up the remaining
time from the suppressed event for the next event. Thus the total time
for this Dynamic Memory stays unaltered.
To delete an event just bring back its time to 0% and save it again. In
this case, the time for this event will be taken away from the total time
of the dynamic memory.
NOTE : At the end of this user’s manual the annexes on pages 26
and 27 will show you the various patterns for creating events in
dynamic memories. The annex after (page 28) can be used as a
specific pattern cue sheet for the DIGIBOX IVS.
Press EXIT to return to the previous display or EXIT + SELECT.
Le temps par défaut, des mémoires dynamiques, vous permet de
parcourir plus rapidement les écrans d'édition des mémoires. Il est
préétabli à 10s et vous pouvez le changer entre 0 et 60 minutes.
3/8
rj
PLUS
MENU
→ DYN. MEMORY UPDATE
Le paramètre 'entrée niveaux' a deux valeurs: local (LOCAL), qui est
le mode où nous avons travaillé jusqu'à présent, et externe (EXT), où
l'utilisateur peut attribuer les niveaux pour les mémoires par l'intermédiaire d'un pupitre numérique ou analogique. Par exemple, dans
l'écran 'Créer mémoires', vous pouvez établir facilement les niveaux
des 6 prises de l'unité avec un pupitre analogique. Dans le cas d'un
pupitre numérique DMX ou AVAB, vous piloterez les prises du bloc en
fonction du N° circuit affecté en DATA . Par contre, si vous ne disposez
pas d'un pupitre, vous devez garder le choix 'LOCAL' pour l'entrée
niveaux.
Le dernier paramètre permet d'établir les 6 niveaux de restitution, dans
le cas de la commande 'panique', pendant l'exécution d'un spectacle.
Vous pouvez modifier cette valeur, commune pour toutes les prises,
entre 0 et 100%; valeur par défaut 30%.
5/8 rj MENU
→ PARAMETRES
PLUS
SELECT
1/4 rj PARAM. SHOW
DEMMARRAGE MAN
+
1/4 rj PARAM. SHOW
DEMMARRAGE AUTO
2/4 rj PARAM. SHOW
TEMPS DEFAUT ØØm1Øs
3/4 rj PARAM. SHOW
ENTREE NIVEAU LOCAL
4/4 rj PARAM. SHOW
NIVEAU PANIQUE 30
EXIT
Pressez EXIT pour revenir au menu spectacle.
5/8 rj MENU
→ PARAMETRES
copyright © R Juliat 1995
PLUS
copyright © R Juliat 1995
17
DIGI IV & V S
SCREENS
ECRANS
DIGI IV & V S
15
7/5. SHOW PARAMETERS.
MODIFYING THE SHOW PARAMETERS.
Go to the "PARAMETRES" item of Plus Menu by using the "+" and "" keys. Press SELECT to accede the show parameters update.
The first parameter is the show startup. You have 3 possibilities:
- The manual (MANUAL) startup: the user who wants to start the show
sequence must go along the whole path from the startup screen to the
show running screen (Page 19).
- The automatic startup (SELF): the unit reaches directly the show
running screen and the show begins with its first step.
- The panic startup (PANIC): the unit reaches also the show running
screen and shows out the 'panic' levels while waiting for user orders.
Press the SELECT key to accede to the startup mode updating; press
the "+" and "-" keys to update it.
Press "+"
Warning: If the DIGI IVs is switched off while a show is running, the
show will restart from the begining when the unit is switched on for any
startup mode.
The memory default time allows you to go quickly through the memory
edit screen. The time preset is 10s and you may change it between 0
and 60 minutes.
The 'level input' parameter has two values: local (LOCAL), the mode
used until now, and extern (EXT), where the user may set the levels by
means of a digital or analog lightboard. For example, you may easily
set up the 6 plug levels in the Memory updating screen by means of an
analog lightboard. A digital lightboard (DMX or AVAB protocol) will
allow you to guide the unit plugs by using the assigned DATA channel
numbers. On the contrary, if you have not a lightboard, you must keep
'LEVEL INPUT LOCAL'.
The last parameter allows you to set the 6 levels of the 'panic' order
when the show is running. You may modify this value, common for all
the plugs, between 0 and 100%; default value 30%.
5/8 rj PLUS MENU
→ SHOW PARAMETERS
SELECT
1/4 rj SHOW PARAM.
START MANUAL
+
Si vous voulez insérer un nouvel événement dans votre mémoire
dynamique, il suffit de vous placer en cours de déroulement d'un
événement et de lui affecter un nouveau but de niveau ou de temps.
1/4 rj SHOW PARAM.
START SELF
2/4 rj SHOW PARAM.
DEFAULT TIME ØØm1Øs
3/4 rj SHOW PARAM.
LEVEL
En poursuivant cette méthode vous pouvez enregistrer le "parcours"
en temps et en valeur de chaque circuit.
Vous pouvez aussi utiliser la touche EXIT pour revenir en arrière, ou
bien pour vous positionner sur le compteur de temps absolu de votre
scène, afin de voir l'état lumineux restitué à chaque instant et le
modifier ou ajouter de nouveaux événements.
INPUT
LOCAL
4/4 rj SHOW PARAM.
PANIC LEVEL 30
Quand vous modifiez uniquement le niveau, le programme laissera le
temps restant de l'événement coupé pour l'événement suivant. Il n'y
aura donc pas de modification du temps total de cette Mémoire
Dynamique
Pour supprimer un événement, il suffit de mettre son temps à 0% et de
le réenregistrer. Dans ce cas, le temps de cet événement sera
retranché du temps total de la mémoire dynamique.
REMARQUE: A la fin de ce manuel vous pouvez consulter les
annexes qui visualisent, sous forme de graphique (page 26 ) et de
tableau (page 27), les différents cas de figures de la création
d'événements d'une mémoire dynamique. L'annexe après (page
28) peut servir de modèle pour la notation des conduites de
Mémoires Dynamiques.
3/8
rj
MENU
PLUS
→ CREER
MEM.DYN.
EXIT Jusqu'au retour à l'écran précédent ou EXIT + SELECT.
EXIT
Press EXIT to reach the show menu.
5/8 rj PLUS MENU
→ SHOW PARAMETERS
copyright © R Juliat 1995
copyright © R Juliat 1995
16
DIGI IV & V S
SCREENS
ECRANS
DIGI IV & V S
7/4. MEMORY LINK.
7/4. ENCHAINER LES MEMOIRES.
LINKING DYNAMIC MEMORIES.
ENCHAINER LES MEMOIRES DYNAMIQUES.
Go to the "DYN. MEMORY LINK” screen by using the "+" and "-"
keys. This item will enable you to modifiy the automatic building of
the sequence : each time you save a memory,it is automatically
sequenced, in growing digital order.
4/8 rj PLUS MENU
→ MEMORY LINK
Avec "+" et "-" placez-vous sur l'option "ENCHAINER MEMOIRES"
du Menu Plus, qui permet de modifier la construction automatique
de la séquence puisque chaque fois que vous enregistrez une
mémoire elle est automatiquement mise en séquence, en ordre
numérique croissant.
16
4/8
rj
MENU
PLUS
→ ENCHAINER MEMOIRES
Press SELECT to display the sequence editing screen.
Presser SELECT pour afficher l'écran d'édition de la séquence.
Always proceed in the same manner : press SELECT to choose the
type of modification, then "+" and "-" to assign a value.
To remove a sequence step, set the corresponding memory number to
0. Then, the sequence is recalculated.
STPØØ1/ØØØ MØØ1/ØØ1
JUMP 1 BREAK OFF
Pour insérer un pas de séquence, mettre le n° de mémoire le plus grand
possible, cela créera automatiquement un nouveau pas placé dans
l'enchainement à l'endroit désiré. Par la suite, vous pouvez modifier le
n° de la mémoire de ce pas.
WARNING : If you have created common Dynamic Memories only,
the JUMP function is not available.
ATTENTION : Si vous n’avez créé que des Mémoires simples, la
fonction JUMP n’est pas accessible.
The JUMP function for the complex Dynamic Memories can have a
value between 1 and 99 or it can be CONTinuous.
When the JUMP is continuous and the screen says “BREAK ON”, a
manual GO will take you out of the loop by the end of the memory. When
it says "PAUSE OFF" you will escape from the loop as soon as you
press the GO key.
Default values after a SOFT RESET (both EXIT and "-" keys
pressed together) : JUMP 1, PAUSE OFF.
STPØØ1/ØØØ MØØ1/ØØ1
JUMP CONT BREAK OFF
STPØØ1/ØØØ MØØ1/ØØ1
JUMP 1 BREAK OFF
To quit, press the EXIT+ SELECT key.
EXIT
copyright © R Juliat 1995
PASØØ1/ØØØ MØØ1/ØØ1
JUMP 1 PAUSE OFF
Pour enlever un pas de la séquence, mettre le n° de la mémoire
correspondant à 0. L'enchainement est alors recalculé.
To insert a new step, set the greatest memory number as possible.
Then, the new step is created in the right place in the sequence and you
can modify the corresponding memory number.
When JUMP has a value between 1 and 99, the loop will come to an
end as soon as you press the "GO" key, whether PAUSE is "OFF" or
"ON". When "PAUSE ON" shows, the next sequence step will be
linked automatically : no need to press "GO".
Vous employez toujours la même méthode : SELECT pour choisir la
modification à effectuer et les touches "+" et "-" pour lui donner une
valeur.
SELECT
La fonction JUMP peut avoir pour les Mémoires Dynamiques complexes une valeur de 1 à 99 ou CONT qui veut dire continu. Quand le
JUMP est continu, avec “PAUSE ON” un GO manuel fait sortir de la
boucle en fin de mémoire ; avec “PAUSE OFF” vous sortirez de la
boucle au moment où vous presserez la touche GO.
Quand la valeur du JUMP est entre 1 et 99, que PAUSE soit "OFF"
ou "ON", vous sortirez de la boucle dès que la touche GO sera
pressée. Avec PAUSE OFF, sans presser de touche, le pas de
séquence suivant sera enchaîné automatiquement.
PASØØ1/ØØ1 MØØ1/ØØ1
JUMP CONT PAUSE OFF
PASØØ1/ØØ1 MØØ1/ØØ1
JUMP 1 PAUSE OFF
Valeurs par défaut après un RESET SOFT (touche EXIT et "-"
pressées ensemble) : JUMP 1, PAUSE OFF.
Pour sortir de cet écran, presser la touche EXIT+ SELECT.
EXIT
SELECT
copyright © R Juliat 1995

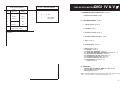


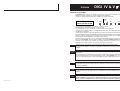
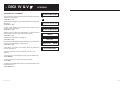


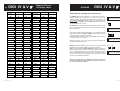
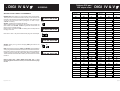
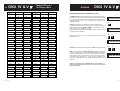
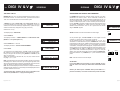

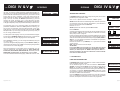
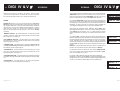

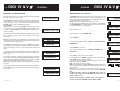
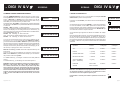

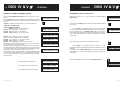
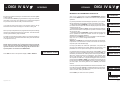
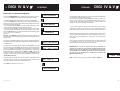
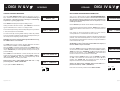


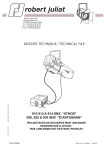
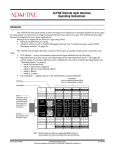
![UB25 Cover+Front Matter [Rev C] -- 1-02](http://vs1.manualzilla.com/store/data/005906297_1-9ba350e3ad2195c1d2103c91c2552cc1-150x150.png)