1
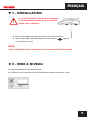
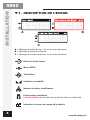
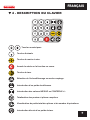
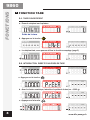
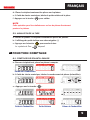
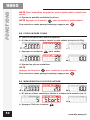
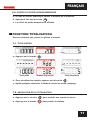
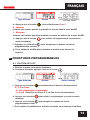
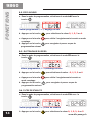
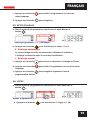
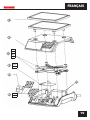
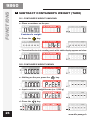
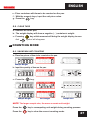
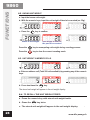
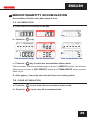
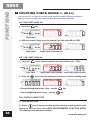
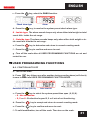
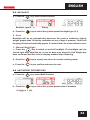
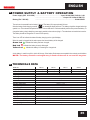
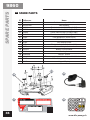
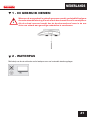
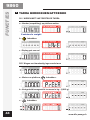
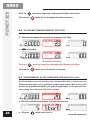
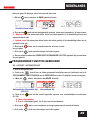
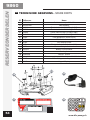
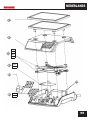
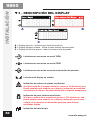
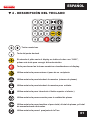
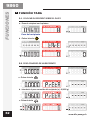
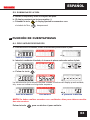
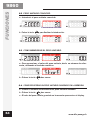
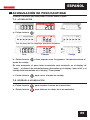
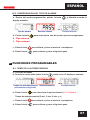
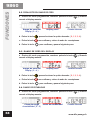
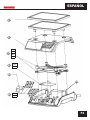
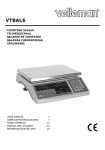
COMPTAGE
COUNTING
ww
w.b
3c
-pe
sag
e.f
r
9860
b3c
pesage
Balance compteuse - Counting Scale
Weegschaal - Balanza cuentapiezas
MANUEL D’UTILISATION
OPERATING MANUAL
GEBRUIKSAANWIJZING
MANUAL DE INSTRUCCIONES
..............
FR. .......... 3
. ....................
GB. ....... 21
................
NL. ....... 39
.....
ES. ....... 57
9860 Ver 2015 V1.1
9860
PRÉSENTATION
9860
2
NOTES...
www.b3c-pesage.fr
FRANÇAIS
Nous vous remercions d’avoir choisi la gamme de balance compteuse 9860. Elle intègre des solutions techniques avancées et a été conçue pour une utilisation simple et optimale. Dans le cas où des
questions ou des problèmes de fonctionnement ne seraient pas traités dans la notice d’utilisation,
veuillez vous rapprocher de notre service après vente.
SOMMAIRE
PRESENTATION .................................................................................................................3
1 - INSTALLATION . .................................................................................................................5
2 - MISE Á NIVEAU . ................................................................................................................5
3 - DESCRIPTION DE L’ECRAN .............................................................................................6
4 - DESCRIPTION DU CLAVIER .............................................................................................7
5 - FONCTION TARE ...............................................................................................................8
6 - FONCTION DE COMPTAGE ..............................................................................................9
7 - TOTALISATION DES PESÉES ......................................................................................... 11
8 - FONCTION CONTRÔLE +/-..............................................................................................12
9 - FONCTIONS PROGRAMMABLES ..................................................................................13
9.1 - FONCTION AUTO-OFF............................................................................... 13
9.2 - ZERO SUIVEUR.......................................................................................... 14
9.3 - RATTRAPAGE DU ZERO............................................................................ 14
9.4 - FILTRE DE STABILITE................................................................................ 14
9.5 - RETRO-ECLAIRAGE................................................................................... 15
9.6 - UNITES........................................................................................................ 15
10 - CALIBRATION - MESSSAGES D'ERREURS ................................................................16
11 - ALLIMENTATION - BATTERIE RECHARGEABLE . ......................................................17
12 - DONNEES TECHNIQUES ..............................................................................................17
13 - PIECÈS DETACHÉES ....................................................................................................18
UTILISATION
La balance compteuse 9860 est prévue pour un usage interne (HML). Elle est conforme aux modèles de type
décrit dans le certificat d’homologation ainsi qu’aux exigences applicables des directives
européennes 89/336/CEE et 73/23/CEE.
CONSIGNE DE SECURITÉ
Avant la première utilisation de la balance, lisez attentivement les informations contenues dans la présente notice. Vous y trouverez des instructions essentielles sur
l’installation, l’utilisation adéquate et la maintenance de l’appareil.
3
INSTALLATION
9860
B3C SAS ne peut pas être tenu responsable en cas de non respect des consignes mentionnées
ci-après : mettre l’appareil hors tension avant toute opération de maintenance ou de réparation.
Une installation non-conforme annule la validité de la garantie. Les caractéristiques de raccordement
électrique doivent correspondre aux valeurs spécifiées sur le bloc d’alimentation.
NETTOYAGE
Nettoyez la balance avec un chiffon humide et un détergent ordinaire. Ne pas employer de produit
abrasif et/ou corrosif.
MAINTENANCE
La balance ne nécessite aucune intervention de maintenance programmée. Il est toutefois conseillé
de vérifier la précision de la balance à intervalles réguliers.
REMARQUES
Conformément à la directive 89/336/CEE, cet appareil est protégé contre les perturbations radioélectriques. Les valeurs affichées par l’appareil peuvent toutefois être affectées par une exposition à de
très fortes perturbations d’origine électrostatique ou électromagnétique, provoquées par l’utilisation
d’un émetteur radio ou d’un téléphone portable à proximité immédiate de l’appareil, d’un appareil
insuffisamment protégé. Dès que ces perturbations disparaissent, l’appareil doit fonctionner normalement mais il peut s’avérer nécessaire de l’éteindre et de le rallumer aussitôt. Cet appareil est un
instrument de mesure. Par conséquent, les courants d’air, les vibrations, les brusques variations de
température et l’exposition directe au soleil peuvent affecter les valeurs de pesée affichées.
GARANTIE – RESPONSABILITÉ
Cet équipement est un appareil de mesure.
La garantie ne sera pas applicable pour les dommages ayant les causes suivantes : stockage/usage
montage ou erreur de mise en service par l’utilisateur ou un tiers, utilisation inappropriée ou inadéquate, erreur ou négligence au niveau de la manipulation, sollicitations exagérées de l’appareil, modification, usure naturelle, mise en contact avec des agents chimiques, électrochimiques, agressifs et
d’une façon générale toutes causes non imputables à la responsabilité de B3C SAS. Si des facteurs
d’ordre opérationnel, climatique ou autres devaient entraîner une modification essentielle des conditions d’utilisation ou de l’état du matériel, la garantie d’un bon fonctionnement global des appareils
deviendra sans objet. Toujours conserver l’emballage d’origine en cas d’éventuelle réexpédition.
PRÉCAUTIONS D’EMPLOI
La balance doit être placée dans un environnement protégé des courants d’air, des produits corrosifs,
des vibrations et des températures ou humidités extrêmes. Tous ces facteurs peuvent affecter le bon
fonctionnement de l’appareil.
4
www.b3c-pesage.fr
FRANÇAIS
1 - INSTALLATION
!
a - Avant de mettre sous tension l’appareil,
il est impératif de retirer la vis de sécurité
située sous la balance.
. - Sans aucune charge sur le plateau, mettre sous tension la balance.
b
c - Après un décompte, l’affichage indique zéro et le symbole
apparaît
sur la gauche de l’écran.
NOTE
Il est conseillé de laisser la balance sous tension pendant 5 minutes.
2 - MISE Á NIVEAU
a - Installez la balance sur son plan de travail.
b - Utilisez le niveau à bulle et les 4 pieds réglables pour mettre la balance de niveau.
5
INSTALLATION
9860
3 - DESCRIPTION DE L’ECRAN
A
B
C
A : Affichage du poids (brut ou net) ou du cumul des poids.
B : Affichage du poids de référence.
C : Affichage du nombre de pièces ou du cumul de pièces.
Entrée et Sortie de tare.
Mise à ZERO.
Totalisation.
Indication de stabilité.
Nombre de pièces insuffisantes.
Poids Unitaire insuffisant.
Le Poids Unitaire de l’échantillon est trop petit pour obtenir un résultat fiable.
Indication de niveau de charge de la batterie.
6
www.b3c-pesage.fr
FRANÇAIS
4 - DESCRIPTION DU CLAVIER
A
Touches numériques.
Touche décimale.
Touche de remise à zéro.
Annule la saisie ou la fonction en cours.
Touche de tare.
Sélection de l’échantillonnage en mode comptage.
Introduction d’un poids de référence.
Introduction des valeurs INF/SUP en CONTRÔLE +/-.
Totalisation des pesées et pièces comptées.
Visualisation du poids total des pièces et du nombre d’opérations.
Introduction directe d’un poids de tare.
7
FONCTIONS
9860
5
FONCTION TARE
5.1 - TARE D’UN RECIPIENT
a - Poser le récipient sur le plateau
Poids de la tare
b - Appuyez sur la touche
c - Le récipient taré, vous pouvez utiliser la fonction comptage (page 9)
5.2 - INTRODUCTION DIRECTE D’UN POIDS DE TARE
a - Appuyer sur la touche
b - Avec le clavier numérique, introduire le poids de la tare (ex : 0,960 g).
c - Appuyer sur la touche
8
www.b3c-pesage.fr
FRANÇAIS
d - Placer le récipient contenant les pièces sur le plateau.
e - A l’aide du clavier numérique, tabuler le poids unitaire de la pièce.
f - Appuyer sur la touche
pour valider.
NOTE
Cette opération peur être réalisée avec un bac de pièces directement
posé sur le plateau.
5.3 - ANNULATION DE LA TARE
a - Retirer du plateau le récipient contenant les pièces du plateau.
b - L’affichage du poids indique une valeur négative (-).
c - Appuyer sur la touche
Le symbole de Tare
6
pour annuler la tare.
disparaît
FONCTION COMPTAGE
6.1 - COMPTAGE PAR ECHANTILLONNAGE
a - Dans un récipient taré, placer les pièces à compter.
Poids de l’échantillon
b - A l’aide du clavier numérique, tabuler le nombre exact de pièces (échantillon).
c - Appuyer sur la touche
Poids de l’échantillon
.
Poids Unitaire
Valeur de l’échantillon
9
FONCTIONS
9860
NOTE Plus l’échantillon est grand et plus le poids unitaire calculé sera
précis.
d - Ajouter la quantité souhaitée de pièces.
NOTE Appuyer sur la touche
pour recalculer le poids unitaire.
Pour revenir au mode pesage/comptage, appuyez sur
.
6.2 - POIDS UNITAIRE CONNU
a - Dans un récipient taré, placer les pièces.
b - A l’aide du clavier numérique, tabuler le poids unitaire de la pièce (ici 20g).
c - Appuyer sur la touche
pour valider.
d - Ajouter les pièces souhaitées.
NOTE
Appuyer sur la touche
pour recalculer le poids unitaire.
Pour revenir au mode pesage/comptage, appuyez sur
.
6.3 - MEMORISATION D’UN POIDS UNITAIRE
a - A l’aide du clavier numérique, tabuler le numéro de la mémoire (ex: 5).
b - Appuyer 2 fois sur la touche
10
.
www.b3c-pesage.fr
FRANÇAIS
6.4 - RAPPEL DU POIDS UNITAIRE MEMORISE
a - A l’aide du clavier numérique, tabuler le numéro de la mémoire.
b - Appuyer 2 fois sur la touche
.
c - La valeur du poids mémorisé est affichée.
7
FONCTION TOTALISATION
Dans un récipient taré, placer les pièces à compter.
7.1 - TOTALISATION
a - Appuyer sur la touche
Total poids
.
Nombre d’opération
b - Pour visualiser les cumuls, appuyer sur la touche
Total des pièces
.
c - Après quelques secondes, la balance revient en mode comptage.
7.2 - ANNULATION DE LA TOTALISATION
a - Appuyer sur la touche
pour accéder aux cumuls en cours
b - Appuyer sur la touche
pour annuler les totaux.
11
FONCTIONS
9860
8
FONCTION CONTRÔLE +/- (Hi-Lo) avec alarme sonore
8.1 - INTRODUCTION DE LA VALEUR SUPERIEURE Hi
a - Appuyer sur la touche
.
Limite supérieure
b - Introduire la valeur pour la limite supérieure Hi (ex 2000).
Limite supérieure
Valeur introduite
8.2 - INTRODUCTION DE LA VALEUR INFERIEURE Lo
pour introduire la valeur inférieure Lo (ex : 1995)
a - Appuyer sur la touche
Limite inférieure
Limite supérieure
b - Appuyer sur la touche
Limite inférieure
pour valider l’enregistrement.
Pour procéder au comptage
- Modification des valeurs Hi et Lo : utiliser la touche
- Annulation des valeurs Hi et Lo : utiliser la touche
La balance émet un signal sonore.
.
.
8.3 - REGLAGE DE L’AVERTISSEUR SONORE
a - Eteindre et mettre sous tension la balance.
b - Pendant le décompte, appuyer 4 fois sur la touche
c - Avec la touche
12
.
, sélectionner le mode PASS.
www.b3c-pesage.fr
FRANÇAIS
Type d’alarme
d - Appuyer sur la touche
Alarme
valeur capteur à zéro comprise
entre 70000 et 90000
, pour sélectionner 0 ou 1.
0 - Interne
L’alarme est activée quand la quantité se trouve dans la zone Lo-HI.
1 - Externe
L’alarme est activée quand la quantité se trouve au dehors de la zone Lo-HI.
e - Appuyer sur la touche
mode comptage.
pour valider l’enregistrement et revenir au
f - Appuyer sur la touche
programmation suivant.
pour enregistrer et passer au pas de
g - Pour valider la modification, éteindre et mettre sous tension la
balance.
9
FONCTIONS PROGRAMMABLES
9.1 - FONCTION AUTO-OFF
a - Eteindre et mettre sous tension la balance.
b - Pendant le décompte, appuyer 4 fois sur la touche
Type d’alarme
Alarme
.
Valeur interne
c - Appuyer sur la touche
pour sélectionner la durée de fonctionnement
0, 2, 5 ou 8 mn.
- 0 - Pas d’extinction automatique.
- 2, 5 ou 8 - Extinction au delà de 2, 5, ou 8mn de non fonctionnement.
d - Appuyer sur la touche
comptage.
e - Appuyer sur la touche
programmation suivant.
pour valider l’enregistrement et revenir au mode
pour enregistrer et passer au pas de
f - Pour valider la modification, éteindre et mettre sous tension la balance.
13
FONCTIONS
9860
9.2 - ZERO SUIVEUR
a - Dans le mode de programmation, sélectionner le mode trAC avec la
touche
.
Valeur programmée (0 à 4) Réglage du zéro
b - Appuyer sur la touche
, pour sélectionner la valeur 0, 1, 2, 3 ou 4.
c - Appuyer sur la touche
pour valider l’enregistrement et revenir au mode
comptage.
d - Appuyer sur la touche
pour enregistrer et passer au pas de
programmation suivant.
9.3 - RATTRAPAGE DU ZERO
a - Dans le mode de programmation, sélectionner le mode ZEro avec la
touche
.
Valeur programmée (0 à 4)Affichage du zéro
b - Appuyer sur la touche
, pour sélectionner la valeur : 0, 1, 2, 3 ou 4.
c - Appuyer sur la touche
pour valider l’enregistrement et revenir au
mode comptage.
d - Appuyer sur la touche
pour enregistrer et passer au pas de
programmation suivant.
9.4 - FILTRE DE STABILITE
a - Dans le mode de programmation, sélectionner le mode FiLt avec la
touche
.
Valeur programmée (0 à 5)Filtre de stabilité
14
b - Appuyer sur la touche
pour sélectionner la valeur 0, 1, 2, 3, 4 ou 5.
www.b3c-pesage.fr
FRANÇAIS
c - Appuyer sur la touche
mode comptage.
pour valider l’enregistrement et revenir au
d - Appuyer sur la touche
pour enregistrer.
9.5 - RETRO-ECLAIRAGE
a - Dans le mode de programmation, sélectionner le mode bl avec la
touche
.
Valeur programmée (0 ou 1) Affichage
b - Appuyer sur la touche
, pour sélectionner la valeur : 0 ou 1.
0 - Eclairage automatique
Le rétro-éclairage est activé au moment de l’utilisation de la balance.
L’éclairage se désactive après 5 secondes d’inutilisation.
1 - Eclairage manuel
c - Appuyer sur la touche
pour activer ou désactiver l’éclairage de l’écran.
d - Appuyer sur la touche
pour valider l’enregistrement et revenir au mode
comptage.
e - Appuyer sur la touche
pour enregistrer et passer au pas de
programmation suivant.
9.6 - UNITES
a - Dans le mode de programmation, sélectionner le mode Unit avec la
touche
.
Valeur programmée (0 ou 1)
b - Appuyer sur la touche
Unité
, pour sélectionner 0 (kg/g) ou 1 (lb).
15
FONCTIONS
9860
10
MODE CALIBRATION
10.1 - AVEC MASSE PROGRAMMEE
En cas d’erreur, appuyer sur la touche
calibration sans enregistrement.
pour sortir du mode
a - Mettre sous tension la balance et s’assurer que l’affichage du poids
indique 0.
b - Maintenir appuyée la touche
jusqu’à ce que l’écran affiche :
Dans cet exemple, le poids demandé est 6000g
c - Placer sur le plateau, le poids de calibration en respectant la valeur
indiquée.
- Après stabilisation, valider en appuyant sur la touche
.
- Après quelques secondes, la balance revient en mode pesage.
10.2 - AVEC LA VALEUR DE MASSE CONNUE
La valeur du poids de calibration peut être changée en utilisant le clavier
numérique et la touche
.
En cas d’erreur, appuyer sur la touche
calibration sans enregistrement.
!
11
MESSAGES D’ERREUR
E1
Problème d’EPROM
- Recalibrer la balance.
E2
La balance ne se met pas à zéro
- Vérifier l’installation du plateau,
- Contrôler que rien ne touche le plateau,
- Recalibrer la balance.
E3
La valeur Lo est supérieure à la valeur Hi
- Vérifier les valeurs en Hi et Lo
E4
La mémoire selectionnée est utilisée
- Annuler les données enregistrées,
- Sélectionner un autre numéro.
Surcharge, le poids est supérieur à la portée
- Réduire la charge.
--OL--
16
pour sortir du mode
www.b3c-pesage.fr
FRANÇAIS
12
BATTERIE RECHARGEABLE
La balance 9860 fonctionne sur secteur et/ou batterie rechargeable.
Selon le temps de charge et l’ancienneté de la batterie, son utilisation peut varier de 30 à 70 heures.
Dans le temps, la durée de charge d’une batterie diminue.
Régulièrement, il conviendra de changer la batterie.
Quand la batterie a besoin d’être rechargée, le symbole “
” apparait à l’écran.
La balance continue de fonctionner pendant 10 heures, puis s´éteindra automatiquement.
Pour recharger la batterie, branchez le bloc d’alimentation secteur transformateur.
Le temps nécessaire pour recharger la batterie est d’au moins 12 heures.
Une LED “AC” indique l’état de charge de la batterie.
●●
●
Voyant Vert
Voyant Rouge
Voyant Jaune
: la batterie est suffisamment chargée.
: la batterie doit être chargée rapidement.
: la batterie se recharge.
NOTE
Si la balance n’est pas utilisée pendant un long moment, la batterie se décharge
et ne fonctionne plus. Nous conseillons vivement de la retirer.
13
DONNEES TECHNIQUES
Désignations
9860.03
9860.06
9860.15
9860.30
Plage de pesée (max.)
3kg
6kg
15kg
Lecture
0,1g
0,2g
0,5g
Sensibilité au comptage
0,05g
0,1g
0,2g
30kg
1g
0,5g
5kg (M1)
10kg (M1)
Echelon (d) min. comptage
4d
Vérifiable
non
Poids d’ajustage (min)
Temps de préchauffage
Bloc secteur
Batterie
Température d’utilisation
1kg (M1)
2kg (M1)
5 minutes
SAW-0801000 Input 100-240VAC 50/60Hz 0.5A (max) - Output 8V=1000A (ref 618.12080)
6V 4AH (ref 590.003)
de 0°C à + 40°C
Hydrométrie
Max 80% (non condensant)
Carter (mm)
(L) 300 x (P) 320 x (H) 115
Plateau (mm)
Housse de protection
(L) 300 x (P) 220
OUI (Thermo plastique)
Poids Net (kg)
4kg
Unités
g, Ib
Rattrapage du zéro
Tare
Temps de stabilisation
Chargement batterie
±4%
100% de la portée
≤2 seconds
10 heures de temps de charge
Calibration
Calibration externe
Capacité de résistance
120% de la portée
17
PIÉCES DE RECHANGE
9860
14
PIECES DETACHEES
ID Référence
1
2012010
2
002.006.007
Désignation
Plateau inox 300x230
Carter
3.1 106382
Capteur Zémic L6D-C3-5kg-0.4B-P
3.2 106383
Capteur Zémic L6D-C3-8kg-0.4B-P
3.3 106384
Capteur Zémic L6D-C3-20kg-0.4B-P
3.4 106385
Capteur Zémic L6D-C3-35kg-0.4B-P
9.1 31500
Carte CPU (avant 2012)
9.2 31501
Carte CPU ver. 2
10 30166
Affichage LCD
11.1 31701
Carte clavier (avant 2012)
11.2 31703
Carte clavier ver. A
12 590.003
Batterie 6V 4AH/20HR
13 30840
Pied réglable
14 20030009
Interrupteur ON/OFF
15 618-12080
Bloc alim. Input 230V - Output 12V-800mA 9,6V
16 33017
Lexan - Face clavier
17 33017
Lexan - Face affichage
13
14
15
17
16
9860
b3c
pesage
AC
C
18
01 64 99 34 34 - www.b3c-pesage.com
www.b3c-pesage.fr
FRANÇAIS
1
2
3.1
3
3.2
3.3
3.4
9
9.1
9.2
10
12
11
11.1
11.2
19
PRESENTATION
9860
20
NOTES...
www.b3c-pesage.fr
ENGLISH
Thank you for choosing the professional counting scale 9860. All the features of this product were
designed to the state of the art and are optimised for simple and straightforward use. If you any queries or problems not indicated in the operating manual, please contact our service.
CONTENTS
PRESENTATION ...............................................................................................................21
1 - GETTING STARTED .........................................................................................................23
2 - ADJUSTABLE LEVELING . ..............................................................................................23
3 - EXPLANATION OF DISPLAY SYMBOLS ........................................................................24
4 - KEYPAD FUNCTIONS ......................................................................................................25
5 - SUBTRACT CONTAINER’S WEIGHT (TARE) .................................................................26
6 - COUNTING MODE . ..........................................................................................................27
7 - WEIGHT/QUANTITY ACCUMULATION ...........................................................................29
8 - COUNTING CHECK RANGE +/- (Hi-Lo)...........................................................................30
9 - USER PROGRAMMING FUNCTIONS .............................................................................31
9.1 - AUTO-OFF................................................................................................... 31
9.2 - ZERO TRACKING RANGE.......................................................................... 32
9.3 - ZERO DISPLAY RANGE............................................................................. 32
9.4 - STABLE CLASS RANGE............................................................................. 32
9.5 - BACKLIGHT................................................................................................. 33
9.6 - UNITS.......................................................................................................... 33
10 - CALIBRATION MODE ....................................................................................................34
11 - POWER SUPPLY - BATTERY OPERATION ..................................................................35
12 - TECHNICAS DATA .........................................................................................................35
13 - SPARE PARTS . ..............................................................................................................36
INTENDED USE
The 9860 counting scale is used for weighing and counting products. This scale is intended for internal operations. The scale complies with the type described in the EC type Approval Certificate as well as the applicable
requirement of EC Directives 89/336/EEC and 73/23/EEC.
21
GETTING STARTED
9860
SAFETY INSTRUCTIONS
Before using the scale, please read with care the information given in the operating manual. It contains important instructions for installation, proper use
and maintenance of the appliance.
B3C SAS shall not liable for damages arising out of failure to heed the following instructions: When using electrical components under increased safety
requirement, always comply with the appropriate regulations. Never perform
work on the appliance while the power is switched on.
Improper installation will render the warranty null and avoid. Ensure the voltage marked on the power supply unit matches your mains power supply. The
device meets the requirement for electromagnetic compatibility. Do not exceed the maximum values specified in the applicable standards.
CLEANING
It’s sufficient to clean the scale with a moist cloth and a regular cleaning agent. Do not use any scourers.
MAINTENANCE
The scale does not require any routine maintenance. However, we recommend to check the scale’s
precision at regular intervals.
NOTE
Interference suppression of the unit corresponds to the valid EU directive 89/336/EEC. The display
value may be influenced by extreme electrostatic and electro-magnetic interference, e.g. operation of
a radio unit or a mobile phone in the immediate vicinity of the unit. When the electrostatic interference
is no longer present, the unit can again be used for its intended purpose. You may need to switch it on
again. If there is permanent electrostatic interference, we recommend to connect the platform with the
ground. The scale is a measuring instrument. Air currents, vibrations, rapid changes in temperature
and direct sunlight may have an effect on the accuracy of the scale.
WARRANTY - LIABILITY
This equipment is a measuring device.
No responsibility shall be accepted for damage caused through any of the following reasons: unsuitable or improper storage or use, incorrect or commissioning by the owner or third parties, natural wear,
changes or modifications, incorrect or negligent handling, overuse, chemical, electrochemical or electrical interference. If operating, climatic or any other influences lead to a major change in conditions or
material quality, the warranty for perfect until functioning shall be rendered null and void. Always keep
the original packaging in case you have to return the scale.
22
www.b3c-pesage.fr
ENGLISH
1 - GETTING STARTED
!
When the initial use, please refer to the following drawing to take off the
protection screw. When the transportation will be made, please install the
protection screw on the machine to avoid any damage sensitive components.
2 - ADJUSTABLE LEVELING
The scale is equipped with a level indicator on the left bottom side of the front panel and four adjustable leveling feet.
a - Adjust the leveling feet until the bubble appears in the center circle of the indicator.
23
GETTING STARTED
9860
3 - EXPLANATION OF DISPLAY SYMBOLS
A
B
C
A : Weight.
B : Reference Weight g/pc.
C : Total pieces Pcs
Scale is in TARE mode.
Scale is in ZERO mode.
Accumulation mode.
Stability display.
Lack of Sample Weight.
If the total sample weight on the pan is less than 10 display divisions, a triangular annunciator
.will appear to remind the user to add more samples until the annunciator disappears.
Lack of Unit Weight.
If the unit weight is less than 1/10 display divisions, a triangular annunciator will appear to remind
the user that the displayed unit weight is too small for getting accurate quantity calculations.
Low Voltage.
24
www.b3c-pesage.fr
ENGLISH
4 - KEYPAD FUNCTIONS
A
Numeric keys.
Decimal point key.
Zero key.
Deleting key.
To subtract the container’s weight. .Indicate that the current weight reading
is net weight.
To input sample size in the counting mode.
To input the known unit weight of item to be counted.
To input the HIGH & LOW weight/quantity limit for check function
To accumulate weight/quantity measured.
To recall total weight, count & accumulation times.
To preset TARE weight.
25
FUNCTIONS
9860
5
SUBTRACT CONTAINER’S WEIGHT (TARE)
5.1 - CONTAINER’S WEIGHT UNKNOWN
a - Place a container on the pan.
Container’s weight
b - Press the
key.
c - The scale will enter into counting mode while stable display appears as below
5.2 - CONTAINER’S WEIGHT KNOWN
a - Nothing on the pan, press the
key.
c - Input container’s weight known (ex : 0,960 g)
d - Press the
26
key.
www.b3c-pesage.fr
ENGLISH
e - Place container with items to be counted on the pan.
f - With the numeric keys, input the unit piece value.
g - Press the
key.
5.3 - CLEAR TARE
a - Remove all on the pan.
b - The weight display will show a negative ( - ) container’s weight.
c - Pressing
And
6
key at this moment will bring the weight display to zero.
symbol will disappear.
COUNTING MODE
6.1 - UNKNOWN UNIT COUNTING
a - Place few pieces of item to be counted on the pan.
Sample Weight
b - Input the quantity of item on the pan.
c - Press the
key.
Sample Weight
Unit Weight
Sample size
NOTE The larger sample size, the more accurate unit weight.
Press the
key to recomputing unit weight during counting process.
Press the
key to clear the current counting mode.
27
FUNCTIONS
9860
6.2 - KNOWN UNIT WEIGHT
a - Input the known unit weight.
b - With the numeric keys, input the unit weight of item to be counted (ex: 20g).
c - Press the
key to confirm.
Gross or net weight
Unit weight of item on
the pan to be counted
Press the
key to recomputing unit weight during counting process.
Press the
key to clear the current counting mode.
6.3 - UNIT WEIGHT IN MEMORY CELLS
a - Enter an address cell (Total 200 cells available) by pressing any of the numeric
keys.
b - Press two times the
key.
The stored unit weight will appear in the unit weight display.
6.4 - TO RECALL THE UNIT WEIGH STORED
a - Press the numeric key with stored unit weight inside.
b - Press the
key twice.
c - The stored unit weight will appear in the unit weight display.
28
.
www.b3c-pesage.fr
ENGLISH
7
WEIGHT/QUANTITY ACCUMULATION
Accumulation effective only when stays at zero.
7.1 - ACCUMULATION
a - Place item to be counted on the pan
b - Press the
key.
Total accumulated weight Total accumulationtimes
c - Press the
Total accumulated count
key to enter into accumulation status mode.
At this moment, total accumulated weight is shown In WEIGHT window, total accumulation times is shown in UNIT WEIGHT display and TOTAL PIECES shows accumulated count
d - After approx. 2 seconds, the scale will return to counting mode.
7.2 - CLEAR ACCUMULATION
a - Press the
key to enter into accumulation status mode.
b - Press the
key to clear all accumulated data.
29
FUNCTIONS
9860
8
COUNTING CHECK RANGE +/- (Hi-Lo)
User can set a Hi – Lo range for counting check, when the number of objects on the pan is
within the preset counting check range, the alarm will sound beeps repeatedly
8.1 - HIGH LIMIT VALUE Hi
a - Press the
key.
High limit
b - With the numeric Keys, input the desired high limit value Hi (ex 2000).
High limit
High limit value stored
8.2 - LOW LIMIT VALUE Lo
key to input the desired low limit value Lo (ex : 1995)
a - Press the
Low limit
b - Press the
High limit value stored Low limit value stored
key to store the parameters and return to normal counting mode.
- Change the high/low preset value : use the
- Clear the high/low preset value : use the
key.
key.
8.3 - CHECK ALARM TYPE
a - Turn on the scale.
30
b - Press
key 4 times one after another during counting down (selfcheck) to zero to enter into USER PROGRAMMING FUNCTION MODE.
The displays will indicate as below.
www.b3c-pesage.fr
ENGLISH
c - Press the
key, select the PASS function.
Check alarm type
d - Press the
Alarm
key, to revolve the system-preset check alarm type.
0 - Inside type The alarm sounds beeps only when either total weight or total
count falls inside the set range.
1 - Outside type The alarm sounds beeps only when either total weight or total count falls outside the set range.
e - Press the
key to determine and return to normal counting mode.
f - Press the
key to confirm and move to next.
g - Turn off the scale after all USER PROGRAMMING FUNCTIONS are set and
restart for use.
9
USER PROGRAMMING FUNCTIONS
9.1 - FONCTION AUTO-OFF
a - Turn on the scale.
b - Press
key 4 times one after another during counting down (self-check)
to zero to enter into USER PROGRAMMING FUNCTION MODE.
Auto.shut off time (0-2-5-8)
c - Press the
Auto shut Off
key to select the system-preset time span (0,2,5,8).
- 0 - No extinction.
- 2, 5 ou 8 - Exctinction beyond 2, 5 or 8 min of not functioning.
d - Press the
key to accept and return to normal counting mode.
e - Press the
key to confirm and move to next..
f - To valid modification, turn off the scale. Then turn on the scale.
31
FUNCTIONS
9860
9.2 - ZERO TRACKING RANGE
a - Press the
key, select the trAC function.
Zero tracking value (0 ~ 4)
Zero Tracking
b - Press the
key to select the system-preset zero tracking range (0,1,2,3,4).
c - Press the
key to accept and return to normal counting mode.
d - Press the
key to confirm and move to next.
9.3 - ZERO DISPLAY RANGE
a - Press the
key, select the ZEro function.
Zero display range (0 ~ 4)
b - Press the
Zero display
key to select the system-preset zero display range (0,1,2,3,4).
c - Press the
key to accept and return to normal counting mode.
d - Press the
key to confirm and move to next.
9.4 - STABLE CLASS RANGE
a - Press the
key, select the FiLt function.
Stable class range (0 ~ 5)
b - Press the
32
Stable class
key to select the system-preset zero display range (0,1,2,3,4,5).
c - Press the
key to accept and return to normal counting mode.
d - Press the
key to confirm and move to next.
www.b3c-pesage.fr
ENGLISH
9.5 - BACKLIGHT
a - Press the
key, select the bl function.
Backlight type (0 / 1)
b - Press the
Display
key to select the system-preset backlight type (0,1).
0 - Auto
Backlight will be on automatically whenever the scale is loaded by objects
weighs greater than 10 display resolution or any of keys is pressed. And it will
be going off also automatically approx. 5 seconds after the scale returns to zero.
1 - Manual BackLight
c - Press the
key to switch on and off backlight. The backlight can’t be
closed right after switched on. It can be done only when the Unit Weight has
been confirmed and the value in display window stops flickering.
d - Press the
key to accept and return to normal counting mode.
e - Press the
key to confirm and move to next.
9.6 - UNIT WEIGHT RECOMPUTING
a - Press the
key, select Unit function.
b - Press the
key to select the system-preset units of measure
0 (kg/g) or 1 (lb).
33
FUNCTIONS
9860
10
CALIBRATION MODE
Can only be done in kg
10.1 - WITH AN KNOWN WEIGHT
a - Turn on the scale and be sure it is zeroed.
b - Keep pressing
tion weight.
key until the following. Display shows the calibra-
Here, required weight is 6000g for calibration.
c - Put a weight same as what exactly shown in the UNIT.
Press the
key.
The scale will stop blinking and return to normal counting mode.
10.2 - WITH AN UNKNOWN WEIGHT
a - Turn on the scale and be sure it is zeroed.
b - Keep pressing
tion weight.
key until the following. Display shows the calibra-
c - Use the numeric keys to input a calibration value.
Press the
key.
The scale will stop blinking and return to normal counting mode.
!
11
ERROR MESSAGES
E1
E2
E3
E4
--OL---------
34
EPROM database
Recalibrate the scale.
1. Check if there is something on the pan or something
The initial zero is outside the range touches the top body when switch on the scale, move the
of the factory setting for zero
load and switch on again.
2. Recalibrate the scale.
The low limit value is set higher
Reset the limit values
than the high limit value
The address of storing unit weight
Input new address
is out of the address range
Low battery charge
Recharge the battery
Load exceeds scale capacity
Reduce the load on the pan
System is busy
Just wait
A value exceeds the display range
Cancel some operation item
www.b3c-pesage.fr
ENGLISH
12
POWER SUPPLY & BATTERY OPERATION
Power supply (Ref. 618-12080)
Battery (Ref. 590.003)
......................................................................................Input
100-240 VAC 50/60 Hz 0.4A
12V 1000mA 12W LPS
....................................................................................................................................6V 4AH/20HR
.............................................................................................. Output
The scale can be operated from the battery if desired. The battery life is approximately 60 hours.
When the battery needs charging a symbol “
” on the weight display will be on. The battery should be charged when the
symbol is on. The scale will still operate for about 10 hours after which it will automatically switch off to protect the battery. To
charge the battery, simply attach the power supply module to the scale and plug in. The scale does not need to be turned on.
The battery should be charged for 12 hours for full capacity. .
There is an LED to indicate the status of battery charging on the right of display.
When the scale is plugged into the mains power the internal battery will be charged.
● indicates the battery has been charged.
Red Led ● indicates the battery is nearly discharged.
Yellow Led ● indicates the battery is increasing the charge level.
Green Led
As the battery is used it may fail to hold a full charge. If the battery life becomes unacceptable then contact your distributor
NOTE : The battery should be recharged every 3 months if the scale is not used for long time.
13
TECHNICALS DATA
Order no
9860.03
9860.06
9860.15
9860.30
Weighting range (Max)
30000kg
3000g
6000g
15000g
Division
0,1g
0,2g
0,5g
1g
Counting resolution
0,05g
0,1g
0,2g
0,5g
Weighing Units
g, Ib
Zero Range
±4%
Tare Range
Full capacity by subtraction
Stabilization Time
Calibration
Operation Temperature
Humidity Range
Power supply
≤2 seconds
Automatic external with kg/g mass, factory calibration recovery
de 0°C à + 40°C
≤80% relative humidity, non-condensing
AC Adapter 9v - Input 230V-Output 12V-800mA 9.6V
Battery
Internal rechargeable sealed lead acid battery 6v/4Ah
Battery Life
50 hours with backlight on - 60 hours with backlight off.
Tare
Loading time of battery
Shipping Protection
Safe Overload Capacity
Platform size (W x D w H)
Net Weight (kg)
100% de la portée
10 h
Shipping screw to avoid damage to sensitive components
120% de la portée
300 x 230 x 120mm
4kg
35
SPARE PARTS
9860
14
SPARE PARTS
ID Référence
1
2012010
2
002.006.007
Name
Stainless steel pan 300x230
ABS Housing
3.1 106382
Zemic load cell L6D-C3-5kg-0.4B-P
3.2 106383
Zemic load cell L6D-C3-8kg-0.4B-P
3.3 106384
Zemic load cell L6D-C3-20kg-0.4B-P
3.4 106385
Zemic load cell L6D-C3-35kg-0.4B-P
9.1 31500
CPU Mainboard (before 2012)
9.2 31501
CPU Mainboard ver. 2
10 30166
LCD Display board
11.1 31701
Electronic Keyboard (before 2012)
11.2 31703
Electronic Keyboard ver. A
12 590.003
Battery 6V 4AH/20HR
13 30840
Leveling feet
14 20030009
ON/OFF Switch
15 618-12080
Power supply Input 230V - Output 12V-800mA 9.6V
16 33017
Keypad overlay
17 33017
Keypad Display
13
14
15
17
16
9860
b3c
pesage
AC
C
36
01 64 99 34 34 - www.b3c-pesage.com
www.b3c-pesage.fr
ENGLISH
1
2
3.1
3
3.2
3.3
3.4
9
9.1
9.2
10
12
11
11.1
11.2
37
INTRODUCTIE
9860
38
NOTES...
www.b3c-pesage.fr
NEDERLANDS
INDEX
VOORZORGSMAATREGELEN GEBRUIK ......................................................................39
1 - IN GEBRUIK NEMEN .......................................................................................................41
2 - ADJUSTABLE LEVELING . ..............................................................................................41
3 - UITLEG VAN DE DISPLAYTEKENS ................................................................................42
4 - FUNCTIES VAN HET TOETSENPANEEL ........................................................................43
5 - TARRA BEREKENEN/AFTREKKEN . ..............................................................................44
6 - TELLEN . ...........................................................................................................................45
7 - OPTELFUNCTIE ...............................................................................................................47
8 - TELCONTROLE BEREIK +/- (Hi-Lo – Hoog-Laag).........................................................48
9 - PROGRAMMEER FUNCTIES GEBRUIKER ....................................................................49
9.1 - AUTO/OFF................................................................................................... 49
9.2 - ZERO TRACKING RANGE.......................................................................... 50
9.3 - ZERO DISPLAY........................................................................................... 50
9.4 - STABLE CLASS........................................................................................... 50
9.5 - BACK-LIGHT............................................................................................... 51
9.6 - UNIT WEIGHT............................................................................................. 51
10 - KALIBREERMODUS ......................................................................................................52
11 - STROOMTOEVOER & ACCU WERKING ......................................................................53
12 - TECHNISCHE GEGEVENS ...........................................................................................53
13 - RESERVEONDERDELEN ..............................................................................................54
BEDOELD GEBRUIK
De B3C weegschaal weegschaal is binnen de EEG bedoeld certificaten van de typetoelating beschreven
richtlijnen 2004/108/CE - 2006/95/CE.
Veiligheidsinstructie
Lees voor de inbedrijfname van het apparaat de in de gebruiksaanwijzing opgenomen informatie zorgvuldig door. Deze bevatten belangrijke instructies voor de installatie, het correcte gebruik en het onderhoud van het apparaat.
De leverancier is niet aansprakelijk, wanneer de hierna volgende instructies niet worden
opgevolgd. Bij gebruik van elektrische componenten onder verhoogde veiligheidseisen
moeten de geldende bepalingen worden aangehouden. Werkzaamheden aan het apparaat
mogen nooit onder spanning worden uitgevoerd.
Bij ondeskundige installatie vervalt de garantie. De elektrische aansluitspecificaties moeten
overeenkomen met hetgeen op het netvoedingsapparaat is vermeld.
De apparaten zijn bedoeld voor gebruik in gebouwen. Let op de toegestane edrijfsomgevingstemperaturen (technische informatie).
Het apparaat voldoet aan de eisen voor de elektromagnetische compatibiliteit. Overschrijdingen van de in de normen vastgelegde maximale waarden moeten worden voorkomen.
Neem bij problemen contact op met uw B3C SAS-servicepartner.
39
IN GEBRUIK NEMEN
9860
40
REINIGING
It’s sufficient to clean the scale with a moist cloth and a regular cleaning agent. Do not use any scourers.
ONDERHOUD
The scale does not require any routine maintenance. However, we recommend to check the scale’s
precision at regular intervals.
GARANTIE – AANSPRKELIJKEID
Voor zover een door B3C te behandelen gebrek aan het geleverde aanwezig is, heeft B3C recht, naar
keuze het gebrek op te lossen of vervanging te leveren. Vervangen onderdelen worden eigendom van
B3C. Wanneer de reparatie of levering van vervanging niet afdoende is, gelden de wettelijke bepalingen. De garantietijd is 1 jaar vanaf de dag van koop. Bewaar daarom uw rekening als bewijs. In geval
van service kunt u contact opnemen met uw leverancier.
Geen aansprakelijkheid wordt genomen voor schade welke is ontstaan door de volgende oorzaken:
Onjuiste, ondeskundige opslag of gebruik, foutieve montage resp. inbedrijfname door de besteller of
door derden, natuurlijke slijtage, verandering of ingrijpen, foutieve of nalatige behandeling met in het
bijzonder overmatige belasting, chemische, elektrochemische, elektrische invloeden of vochtigheid,
voor zover deze niet op B3C zijn terug te voeren.
Wanneer bedrijfs, klimatologische of andere dergelijke invloeden tot een wezenlijke verandering van
de omstandigheden of de materiaaltoestand leiden, vervalt de garantie voor het optimaal functioneren
van het apparaat. Voor zover B3C in afzonderlijke gevallen garantie verleent, betekent dit de vrijheid
van gebreken bij de uitlevertoestand binnen de garantietijd
www.b3c-pesage.fr
NEDERLANDS
1 - IN GEBRUIK NEMEN
!
Wanneer de weegschaal in gebruik genomen wordt, ga alstublieft volgens
de onderstaande tekening te werk om de beschermschroef te verwijderen.
Als de schaal vervoerd wordt, doe de beschermschroef weer in de machine om schade aan gevoelige onderdelen te voorkomen.
2 - WATERPAS
Met behulp van de vier stelvoeten en het waterpas voor een horizontale stand zorgdragen.
41
IN GEBRUIK NEMEN
9860
3 - UITLEG VAN DE DISPLAYTEKENS
A
B
C
A : Totaalgewicht.
B : Gewicht per stuk - referentiegewicht.
C : Berekend totaal aantal stuks
Tarreren of tarra wissen.
Nulstelling modus.
Telmodus.
Stabiliteitsweergave.
Tekort aan referentiegewicht.
Eenheden
.
Accu bijna leeg.
42
www.b3c-pesage.fr
NEDERLANDS
4 - FUNCTIES VAN HET TOETSENPANEEL
A
Om getallen of letters in te voeren (alfanumerieke toetsen).
Koma toets
Nultoets.
Toets om te wissen.
Tarreren.
Invoeren van de referentiehoeveelheid.
Invoeren van het stuksgewicht.
Instellen van de grenswaarden.
De waarden optellen van gewicht/stuks.
Herinnering totaal gewicht, tellen en accumulatie.
Om TARRA gewicht vooraf in te stellen.
43
FUNCTIES
9860
5
TARRA BEREKENEN/AFTREKKE
5.1 - WEGEN MET VASTGESTELDE TARRA
a - Houder (verpakking) op platform zetten.
Container’s weight
b-
Indrukken.
c - Display gaat naar nul
5.2 - Wegen met handmatig ingevoerde tarra
a - Niets over platform,
Indrukken..
b - Vastgesteld tarragewicht invoeren in kg. (0,960 g).
c-
44
Indrukken.
www.b3c-pesage.fr
NEDERLANDS
e - Geteld aantal referentie-eenheden op platform plaatsen.
f - Bekend eenheidsgewicht invoeren in grammen.
g-
Indrukken om de waarde te bevestigen.
5.3 - Wissen van Tarra-waarde
a - Niets over platform.
b - Belasting weegschaal verwijderen en op
6
drukken.
TELLEN
6.1 - TELLEN MET ONBEKEND GEWICHT PER STUK
a - Geteld aantal referentie-eenheden op platform plaatsen.
Test Gewicht
b - Aantal stuks invoeren.
c-
Indrukken.
Test Gewicht
Invoer testgrootte
Gewicht per stuk
Testgrootte
45
FUNCTIES
9860
Druk op
naar hercomputing stuksgewicht tijdens het tellen.
Druk op de
toets om de huidige telmodus te wissen.
6.2 - TELLEN MET BEKEND GEWICHT PER STUK
b - Bekend stuksgewicht invoeren in grammen (vb. 20g)
c-
Indrukken.
Gross or net weight
Druk op
Druk op de
Unit weight of item on
the pan to be counted
naar hercomputing stuksgewicht tijdens het tellen.
toets om de telmodus te wissen.
6.3 - STUKSGEWICHT IN HET GEHEUGEN OPSLAAN (PLU code)
De PLU’s dienen voor het invoeren van vaak gebruikte delen: deze kunnen op
tijdbesparende wijze uit het geheugen worden opgeroepen. Met de PLU-code
worden tarra, productaanduiding en gewicht opgeslagen. De weegschaal kan,
naar gelang de versie, max. 200 PLU’s opslaan
a - Met het numerieke toetsenbord, PLU-nummer invoeren.
46
b - Druk de
toets twee keer in.
www.b3c-pesage.fr
NEDERLANDS
6.4 - OPROEPEN VAN HET STUKSGEWICHT IN HET GEHEUGEN
a - Met het numerieke toetsenbord, PLU-nummer invoeren.
b - Druk de
toets twee keer in.
c - De PLU is nu geactiveerd.
7
.
OPTELFUNCTIE
7.1 - ACCUMULATIE
a - Plaats een aantal te tellen referentie-eenheden op het platform.
b-
Indrukken.
Totaalgewicht
c - Druk op de
Totaal aantal
toets of wacht ong. 2 seconden, de schaal zal in de telstand
terugkeren.
d - Druk op de
toets om de accumulatie status modus in te gaan.
Op dit moment wordt het totaal verzamelde gewicht getoond in het WEIGHT/GEWICHT display, totaal aantal keren accumulatie wordt getoond in de UNIT WEIGHT
(STUKS GEWICHT) display en TOTAL PIECES (TOTAAL AANTAL STUKS) toont het
samengenomen aantal.
d - Druk weer op de
toets om terug te keren in de telmodus.
7.2 - ACCUMULATIE WISSEN
a - Druk op de
toets om in de accumulatie modus te gaan.
b - Druk op de
toets om alle geaccumuleerde gegevens te wissen.
47
FUNCTIES
9860
8
TELCONTROLE BEREIK +/- (Hi-Lo – Hoog-Laag)
De gebruiker kan een Hoog – Laag bereik instellen als telcontrole, als het aantal objecten op het platform binnen
het vooringestelde telcontrole bereik is, zal het alarm herhaaldelijk een pieptoon laten horen
8.1 - HOGE GRENS WAARDE (Hi-Ho)
a - Druk op de
toets.
Bovengrens
b - Met de numerieke toetsen, voer de gewenste bovengrenswaarde Hi (vb. 2000) in.
Bovengrens
Opgeslagen
bovengrenswaarde
8.2 - BENEDEN GRENS WAARDE (Lo-La)
a - Druk op de
in te voeren.
toets om de gewenste beneden grens waarde Lo (vb. : 1995)
Lagengrens
b - Druk op de
Opgeslagen
bovengrenswaarde
Opgeslagen
benedengrenswaarde
toets om de parameters op te slaan en terug te gaan naar de normale.
- De hoog/laag vooringestelde waarde veranderen: gebruik de
- De hoog/laag vooringestelde waarde wissen: gebruik de
toets.
toets.
8.3 - ALARM SOORT CONTROLEREN
a - Zet de schaal aan.
b - Druk de
48
oets 4 keer achter elkaar in gedurende het aftellen naar nul
(zelfcheck) om de PROGRAMMEER FUNCTIEMODUS van de GEBRUIKER
www.b3c-pesage.fr
NEDERLANDS
binnen te gaan. De displays zullen het volgende laten zien.
c - Met de
toets, selecteer de PASS (passeer) functie.
Controle alarm soort
Alarm
d - Druk op de
toets om het vooringestelde systeem “alarm soort controleren” te laten roteren.
0 - Binnen soort Het alarm piept alleen indien het totaal gewicht of de totaaltelling binnen het
ingestelde bereik valt.
1 - Buiten soort Het alarm piept alleen indien het totaal gewicht of de totaaltelling buiten het ingestelde bereik valt.
e - Druk op de
terug te gaan.
toets om de normale telmodus te kiezen en naar
f - Druk op de
toets om te bevestigen en verder te gaan.
g - Doe de schaal uit nadat alle GEBRUIKER PROGRAMMEER FUNCTIES ingesteld zijn en start weer
op voor gebruik.
9
PROGRAMMEER FUNCTIES GEBRUIKER
9.1 - AUTO/OFF - AUTOMATISCH/UIT
a - Doe de weegschaal aan.
b - Druk op de
toets 4 keer na elkaar gedurende het aftellen naar nul (zelfcheck) om in de
PROGRAMMEER FUNCTIE MODUS van de GEBRUIKER te komen. De displays tonen het volgend
c - Met de
toets, selecteer de AOFF functie.
Automatische.Uitschakel tijd
(0-2-5-8)
Automatisch Uit
d - Druk op de
oets om het vooraf ingestelde systeem voor uitschakeltijden te selecteren.
(0,2,5,8).
- 0 - Niet uitschakelen.
- 2, 5 ou 8 - Uitschakeling na 2, 5 or 8 min. van niet functioneren.
e - Druk op de
toets om te accepteren en terug te gaan naar de normale telmodus.
f - Druk op de
toets om te bevestigen en verder te gaan.
49
FUNCTIES
9860
9.2 - NUL REGISTRATIE BEREIK
a - Met de
toets, selecteer de trAC functie.
Nul registratie waarde (0 ~ 4) Nul registratie
b - Druk op de
toets om het vooringestelde systeem van nul registratie
bereik te selecteren (0,1,2,3,4).
c - Druk op de
toets om te accepteren en terug te gaan naar de normale
telmodus.
d - Druk op de
toets om te bevestigen en verder te gaan.
9.3 - NUL DISPLAY BEREIK
a - Met de
toets, selecteer de ZEro functie(nul).
Nul display bereik (0 ~ 4)
b - Druk op de
Nul display
toets om het vooringestelde systeem nul display bereik te
selecteren (0,1,2,3,4).
c - Druk op de
toets om te accepteren en terug te gaan naar de normale
telmodus.
d - Druk op de
toets om te bevestigen en verder te gaan.
9.4 - STABIEL KLASSE BEREIK
a - Met de
oets, selecteer de FiLT functie.
Stabiel klasse bereik (0 ~ 5)
b - Met de
50
Stabiel klasse
oets om het vooringestelde systeem van nul display
bereik (0,1,2,3,4,5).
www.b3c-pesage.fr
NEDERLANDS
c - Met de
oets om te accepteren en terug te gaan naar de normale telmodus.
d - Met de
toets om te bevestigen en verder te gaan.
9.5 - ACHTERGRONDVERLICHTING
a - Met de
toets, selecteer de bL (backlight = achtergrond verlichting) functie.
Soort achtergrond licht
(0 / 1)
b - Druk op de
Achtergrond licht
(backlight)
toets om het vooringestelde systeem voor de achtergrond
verlichting (0,1) te selecteren.
0 - Auto (automatisch)
De achtergrondverlichting gaat automatisch aan wanneer de schaal geladen wordt met voorwerpen
met een gewicht groter dan 10 display resolutie of er op een van de toetsen gedrukt wordt. En het
gaat ook automatisch na ongeveer 5 seconden uit nadat de schaal weer op nul terugkomt
1 - Handmatig instellen achtergrondverlichting
c - Druk op de
toets om de achtergrondverlichting aan en uit te zetten. Het achtergrondlicht
kan niet onmiddellijk na het aanzetten weer uitgezet worden. Het kan alleen gedaan worden wanneer Gewicht per stuk bevestigd is en de waarde in het display stopt met knipperen.
d - Druk op de
toets om te accepteren en terug te gaan naar de normale telmodus.
e - Druk op de
toets om te bevestigen en verder te gaan.
9.6 - STUKSGEWICHT HERCOMPUTING
a - Met de
toets, selecteer de Unit / stuks – functie.
b - Druk op de
toets om het vooringestelde systeem van maateenheden (0,1) te selecteren
0 (kg/g) or 1 (lb).
51
FUNCTIES
9860
10
KALIBREERMODUS
Kan alleen in kg. uitgevoerd worden
10.1 - MET EEN ONBEKEND GEWICHT
a - Schakel de schaal in en wees er zeker van dat display op nul staat.
b - Blijf op de toets
wicht toont.
drukken tot het volgende scherm het kalibreerge-
Vereist gewicht (6 kg) voor kalibreren.
Zet er een gewicht op dat precies hetzelfde als wat in de UNIT getoond wordt.
De getoonde waarde in het GEWICHT PER STUK scherm begint te
knipperen. De schaal zal stoppen met knipperen en terugkeren naar de
normale telmodus.
10.2 - MET EEN BEKEND GEWICHT
a - Het vereiste gewicht voor kalibreren kan veranderd worden door de
numerieke toetsen te gebruiken terwijl men zich bevindt in stap 2 zoals
hierboven beschreven.
b - Druk op de
komen.
toets om op elk moment uit de kalibreermodus te
c - Na de tweede stap te zijn begonnen, druk de
!
merieke toetsen om een kalibreerwaarde in te voeren (0.80000~1.20000).
11
FOUT MELDINGEN
E1
EPROM gegevensverlies.
Kalibreer de schaal opnieuw.
E2
De eerste nul is buiten het bereik van
de fabrieksinstelling voor nul.
1. Controleer of er iets op het platform staat of dat er
iets de bovenkant raakt als de schaal ingeschakeld
wordt, beweeg de lading en schakel weer in. .
2. Kalibreer de schaal opnieuw.
E3
De lage grenswaarde is hoger ingesteld dan de hoge grenswaarde.
De code voor het opslaan van het
stuksgewicht is buiten het codebereik.
Acculading is laag.
De belasting is hoger dan de capaciteit
van de schaal.
Systeem is bezig.
Een waarde is hoger dan het bereik
van de display.
E4
--OL--
52
toets in. Gebruik de nu-
--------
Stel de grenswaarden weer opnieuw in.
Voer een nieuw adres in.
Laad de accu weer op.
Verminder de belasting op het platform
Even wachten.
Annuleer enkele operationele items.
www.b3c-pesage.fr
NEDERLANDS
12
STROOMTOEVOER & ACCU WERKING
Stroomtoevoer (Ref. 618-12080)
Accu (Ref. 590.003)
......................................................................................Input
100-240 VAC 50/60 Hz 0.4A
12V 1000mA 12W LPS
....................................................................................................................................6V 4AH/20HR
.............................................................................................. Output
Indien gewenst kan de schaal op de accu functioneren. De accuduur is ongeveer 60 uur.
Als de accu geladen moet worden, wordt het symboo “
” op de weight display zichtbaar. De accu zou geladen moeten
worden als het symbool zichtbaar is. De schaal zal nog voor ong. 10 uur functioneren, waarna hij automatisch uitgaat om
de accu te beschermen. Om de accu te laden, verbind eenvoudig de stroomtoevoer modus met de schaal en stop deze in
het stopcontact. De schaal hoeft niet aangezet te worden.
De accu moet voor volledige capaciteit gedurende ongeveer 12 uur geladen worden.
Er is een LED die de status van het laden van de accu rechts op de display weergeeft. Als de schaal aangesloten is op de
stroomtoevoer zal de interne accu opgeladen worden.
● is, is de accu geladen.
Als het LED ● is, is de accu bijna leeg.
Als het LED ● betekent dat de accu aan het opladen is.
Als het LED
Als de accu tegelijkertijd wordt gebruikt, zou deze niet helemaal vol kunnen raken. Als de accuduur niet-acceptabel wordt,
neem dan contact op met uw distributeur.
N.B : De accu zou elke 3 maanden opgeladen moeten worden als de schaal gedurende lange
tijd niet gebruikt wordt.
13
AANZICHT MET UITEENGENOMEN DELEN - TECHNICALS DATA
Order no
9860.03
9860.06
9860.15
9860.30
Weighting range (Max)
30000kg
3000g
6000g
15000g
Division
0,1g
0,2g
0,5g
1g
Counting resolution
0,05g
0,1g
0,2g
0,5g
Weighing Units
g, Ib
Zero Range
±4%
Tare Range
Full capacity by subtraction
Stabilization Time
Calibration
Operation Temperature
Humidity Range
Power supply
≤2 seconds
Automatic external with kg/g mass, factory calibration recovery
de 0°C à + 40°C
≤80% relative humidity, non-condensing
AC Adapter 9v - Input 230V-Output 12V-800mA 9.6V
Battery
Internal rechargeable sealed lead acid battery 6v/4Ah
Battery Life
50 hours with backlight on - 60 hours with backlight off.
Tare
Loading time of battery
Shipping Protection
Safe Overload Capacity
Platform size (W x D w H)
Net Weight (kg)
100% de la portée
10 h
Shipping screw to avoid damage to sensitive components
120% de la portée
300 x 230 x 120mm
4kg
53
RESERVEONDERDELEN
9860
14
TECHNISCHE GEGEVENS - SPARE PARTS
ID Référence
1
2012010
2
002.006.007
Name
Stainless steel pan 300x230
ABS Housing
3.1 106382
Zemic load cell L6D-C3-5kg-0.4B-P
3.2 106383
Zemic load cell L6D-C3-8kg-0.4B-P
3.3 106384
Zemic load cell L6D-C3-20kg-0.4B-P
3.4 106385
Zemic load cell L6D-C3-35kg-0.4B-P
9.1 31500
CPU Mainboard (before 2012)
9.2 31501
CPU Mainboard ver. 2
10 30166
LCD Display board
11.1 31701
Electronic Keyboard (before 2012)
11.2 31703
Electronic Keyboard ver. A
12 590.003
Battery 6V 4AH/20HR
13 30840
Leveling feet
14 20030009
ON/OFF Switch
15 618-12080
Power supply Input 230V - Output 12V-800mA 9.6V
16 33017
Keypad overlay
17 33017
Keypad Display
13
14
15
17
16
9860
b3c
pesage
AC
C
54
01 64 99 34 34 - www.b3c-pesage.com
www.b3c-pesage.fr
NEDERLANDS
1
2
3.1
3
3.2
3.3
3.4
9
9.1
9.2
10
12
11
11.1
11.2
55
INTRODUCCIÓN
9860
56
NOTAS...
www.b3c-pesage.fr
ESPAÑOL
PRECAUCIONES ANTES DE UTILIZAR LA BALANZA
Gracias por adquirir este producto B3C. Esta balanza está equipada con las aracterísticas técnicas más avanzadas y ha sido optimizada para facilitar su manejo. Si necesita información o si su
aparato presenta algún problema que no aparece en las instrucciones e uso, diríjase al servicio
posventa de B3C.
INDICE
PRECAUCIONES ANTES DE UTILIZAR LA BALANZA .................................................57
1 - PUESTA EN MARCHA DE LA BALANZA . .....................................................................59
2 - NIVEL SITUADO ...............................................................................................................59
3 - DESCRIPCIÓN DEL DISPLAY .........................................................................................60
4 - DESCRIPCIÓN DEL TECLADO .......................................................................................61
5 - FUNCIÓN TARA . ..............................................................................................................62
6 - FUNCIÓN DE CUENTAPIEZAS .......................................................................................63
7 - ACUMULACIÓN DE PESO/CANTIDAD . .........................................................................65
8 - LíMITE SUPERIOR E INFERIOR EN EL MODO CUENTAPIEZAS..................................66
9 - FUNCIONES PROGRAMABLES .....................................................................................67
9.1 - Tiempo de la autodesconexión.................................................................... 67
9.2 - Preajuste del rango de cero......................................................................... 68
9.3 - Rango de cero del display........................................................................... 68
9.4 - Rango de estabilidad................................................................................... 68
9.5 - Tipo de iluminación del display.................................................................... 69
9.6 - Cambio de la unidad de pesada entre kg/g a Libras................................... 69
10 - CALIBRACIÓN - MENSAJES DE ERROR ....................................................................70
11 - ALIMENTACIÓN Y BATERIA RECARGABLE ...............................................................71
12 - DATOS TECNICOS . .......................................................................................................71
13 - PIEZAS DE RECAMBIO .................................................................................................72
USOS Y APLICACIÓNES
La balanza compacta 9860 ha sido diseñada para pesar materiales y determinar el número de piezas. Su
construcción cumple con el modelo de construcción homologado descrito en el certificado y siguiendo las
normativas vigentes de las directivas de la CE 89/336/CEE y 73/23/CEE.
57
INSTALACIÓN
9860
INSTRUCCIONES DE SEGURIDAD
Lea atentamente la información que aparece en las instrucciones de uso del
aparato antes de su puesta en marcha. Contienen informaciones útiles para
la instalación, la aplicación según lo previsto y el mantenimiento del aparato.
El fabricante no se hace responsable si no se respetan las instrucciones :
Al trabajar con componentes eléctricos en condiciones de altos requisitos de
seguridad se deben respetar las normas correspondientes. No realizar nunca
trabajos en el aparato bajo tensión.
La garantía no incluye daños derivados de la instalación inadecuada del
aparato. Las condiciones de la conexión eléctrica deben coincidir con los
valores impresos en el bloque de alimentación.
Los aparatos han sido concebidos para su uso en edificios. Respetar las temperaturas ambiente permitidas para el funcionamiento del aparato (informaciones técnicas).
El aparato cumple con los requisitos de compatibilidad electromagnética establecidos. Se debe evitar superar los valores máximos establecidos en las
normas. Si surge algún problema, diríjase al servicio posventa de B3C.
LIMPIEZA
Para limpiar la balanza utilice un paño húmedo y productos de limpieza que puede adquirir en comercios. No se deben utilizar productos abrasivos.
MANTENIMIENTO
La balanza no requiere un mantenimiento rutinario. Sin embargo, es conveniente comprobar la precisión a intervalos periódicos. La frecuencia dependerá del uso y del estado de la balanza. Si detecta
anomalías, póngase en contacto con su distribuidor o con el servicio posventa de B3C.
NOTA
Este aparato cuenta con protección antiparásita según la directiva vigente de la CE 89/336/CEE. Las
influencias electrostáticas y electromagnéticas externas en la proximidad del equipo de pesaje procedentes , p. ej., de un radiotransmisor o de un teléfono móvil pueden repercutir en el valor indicado.
Una vez finalizada la interferencia, el producto se puede volver a usar correctamente, en su caso
puede ser necesario conectarlo de nuevo. En caso de perturbaciones electroestáticas permanentes
le recomendamos que conecte a tierra la plataforma.
El aparato es un instrumento de medición. Las corrientes de aire, las vibraciones, cambios rápidos
de temperatura y la radiación solar pueden influir, asimismo, en el resultado del pesaje. La balanza
cumple con el tipo de protección IP 56. Se debe evitar una humedad del aire demasiado alta, así
como vapores, líquidos agresivos y un grado fuerte de suciedad.
58
www.b3c-pesage.fr
ESPAÑOL
GARANTIA – RESPONSABILIDAD
Si el material suministrado presenta un defecto atribuible a B3C, ésta estará facultada a eliminar el defecto o,
alternativamente, a suministrar un recambio.Las piezas sustituidas pasan a ser propiedad de B3C. Si la eliminación del defecto o el suministro de recambio fracasan, se aplicarán las disposiciones vigentes.
El período de garantía es de 2 años y comienza a partir de la fecha de la compra. Conserve su factura como
justificante.
La garantía no incluye en particular aquellos daños que se deriven de las siguientes causas:
Almacenamiento o uso inadecuado, montaje o puesta en marcha defectuosos por parte del comprador o de
terceros, desgaste natural, modificaciones o alteraciones, manejo defectuoso o negligente, en particular un
uso excesivo, influencias químicas, electroquímicas, eléctricas o humedad, en tanto éstas no se deban a
una falta por parte de B3C.
La garantía del perfecto funcionamiento conjunto de los aparatos queda anulada en el caso de que influencias
de servicio, climáticas o de otro tipo ocasionaran una alteración importante de las condiciones o del estado del
material. Siempre que SOEHNLE conceda una garantía en casos individuales, ésta se referirá a
la ausencia de defectos del objeto de suministro durante el período de garantía.
Conserve el embalaje original para el caso de que sea necesario transportar el aparato para su de
1 - PUESTA EN MARCHA DE LA BALANZA
!
a - Cuando se instale la balanza por primera
vez, seguir las recomendaciones descritas en el siguiente dibujo para retirar el
tornillo de seguridad.
2 - NIVEL SITUADO
La balanza dispone de un indicador de nivel situado en la parte izquierda del panel
frontal. También está equipada con 4 pies regulables. Ajustar los pies regulables
hasta que la burbuja quede justo en el centro del círculo del indicador..
59
INSTALACIÓN
9860
3 - DESCRIPCIÓN DEL DISPLAY
A
B
C
A : Display de peso - Indica el peso total del producto.
B : Display del peso unitario - Indica el peso unitario de cada pieza.
C : Display del total de piezas - Indica el número total de piezas.
La balanza se encuentra en modo TARA.
La balanza se encuentra en modo CERO.
La balanza se encuentra en modo acumulación de pesadas.
La lectura del display es estable.
Indicación de número de piezas insuficiente.
Si el peso total de la muestra inicial es menor a 10 divisiones, una
flecha señalará este símbolo en el display, indicando la necesidad
de aumentar el número de piezas hasta que el símbolo desaparezca
Indicación de peso unitario insuficiente.
Si el peso unitario de la muestra es menor a 1/10 divisiones, una
flecha señalará este símbolo en el display, indicando que el peso
unitario de la muestra es demasiado pequeño para obtener
resultados fiables.
Indicación de batería baja.
60
www.b3c-pesage.fr
ESPAÑOL
4 - DESCRIPCIÓN DEL TECLADO
A
Teclas numéricas.
Tecla del punto decimal.
Si estando el plato vacío el display no indica el valor cero “0000”,
pulsar esta tecla para corregir dicha desviación.
Tecla para borrar las lecturas numéricas visualizadas en el display.
Utilizar esta tecla para sustraer el peso de un recipiente.
Utilizar esta tecla para introducir la muestra (número de piezas).
Utilizar esta tecla para introducir la muestra peso unitario.
Utilizar esta tecla para introducir el límite superior e inferior.).
Utilizar esta tecla para acumular peso ó cantidad de piezas.
Utilizar esta tecla para visualizar el peso total, el total de piezas y el total
de acumulaciones efectuadas.
Utilizar esta tecla para el preajuste de la Tara.
61
FUNCIONES
9860
5
FUNCIÓN TARA
5.1 - COLOCAR EL RECIPIENT SOBRE EL PLATO
a - Poser le récipient sur le plateau
Peso del recipiente
b - Pulsar la tecla
5.2 - PESO CONOCIDO DE UN RECIPIENTE
a - Pulsar la tecla
b - Introducir el peso conocido del recipiente (ej : 0,9600 g).
c -Pulsar la tecla
62
www.b3c-pesage.fr
ESPAÑOL
5.3 - ELIMINACIóN DE LA TARA
a - Retirar el recipiente y todos los objetos del plato.
b - El display mostrará una lectura negativa (-).
c - Pulsando la tecla
el display quedará nuevamente a cero.
el símbolo de Tara
6
desaparecerá
FUNCIÓN DE CUENTAPIEZAS
6.1 - PESO UNITARIO DESCONOCIDO
a - Para introducir la muestra, situar unas cuantas piezas sobre el plato.
Peso de la muestra
b - Introducir mediante el teclado, el número de piezas colocadas sobre el plato.
c - Pulsar la tecla
.
La introducción de la muestra finaliza cuando la lectura del display quede estable,
tal y como se indica en el siguiente esquema
Peso de la muestra
Peso unitario
Nº piezas de la muestra
NOTA Se deben realizar muestras con cantidades altas para obtener resultados más exactos.
Pulsar la tecla
para recalcular el peso unitario.
63
FUNCIONES
9860
6.2 - PESO UNITARIO CONOCIDO
a - Introducir el peso unitario conocido.
Peso unitario conocido
b - Pulsar la tecla
para finalizar la introducción.
6.3 - COMO MEMORIZAR EL PESO UNITARIO
a - Para memorizar el valor del peso unitario, darle un número de referencia, utilizando el teclado numérico.
b - Pulsar la tecla
dos veces.
6.4 - COMO RECUPERAR UN PESO UNITARIO GUARDADO EN LA MEMORIA
a - Pulsar el número de referencia del peso unitario deseado.
b - Pulsar la tecla
dos veces.
c - El valor del peso unitario guardado en la memoria aparecerá en el display.
64
www.b3c-pesage.fr
ESPAÑOL
7
ACUMULACIÓN DE PESO/CANTIDAD
Colocar el artículo que debe pesar ó contar sobre el plato.
7.1 - ACUMULACIÓN
a - Pulsar la tecla
.
Las lecturas de los displays quedarán estables
Peso
b - Pulsar la tecla
Tiempos
Contaje
o bien esperar unos 2 segundos. La balanza volverá al
modo de contaje.
En este momento, el peso total acumulado será mostrado en el display de
“peso” , el número de acumulaciones efectuadas en el display “peso unit” y el
contaje total acumulado en el display “Total piezas”.
c - Pulsar la tecla
para volver al modo de contaje
7.2 - BORRAR LA ACUMULACIÓN
a - Pulsar la tecla
para acceder al modo de acumulación
b - Pulsar la tecla
para eliminar los datos de la acumulación.
65
FUNCIONES
9860
8
LíMITE SUPERIOR E INFERIOR EN EL MODO CUENTAPIEZAS
8.1 - INTRODUCIR EL VALEUR SUPERIOR Hi
El usuario puede ajustar un límite superior y uno inferior (Hi – Lo), para que cuando un número de objetos colocados sobre el plato se encuentre dentro de los
límites predeterminados, la balanza emita repetidamente una señal acústica
a - Pulsar la tecla
.
Límite superior
b - Introducir el límite superior (Utilizar la tecla
Límite superior
para borrar el valor no deseado)
Valor introducido del
límite superior
Ventana para visualizar el
valor del limite inferior
8.2 - INTRODUCIR EL VALEUR INFERIOR Lo
a - Pulsar la tecla
de nuevo e introducir el valor deseado para el límite inferior
tal y como se muestra a continuación (No se podrá introducir el límite inferior si no
se ha introducido antes el superior) (ex : 1995)
Límite inferior
b -Pulsar la tecla
Límite sup. introducido
Límite inferior
para completar la operación y volver al modo de contaje.
Borrar el límites superior e inferior
Acceder a la configuración de los límites superior e inferior. Configurar ambos
límites con el valor “0“, o bien pulsar directamente la tecla
66
.
www.b3c-pesage.fr
ESPAÑOL
8.3 - COMPROBACION DEL TYPO DE ALARME
a - Dentro del modo programación, pulsar la tecla
,y liberarla cuando el
display muestre.
Tipo de alarma
Cuentas internas
Revisión alarma
b - Pulsar la tecla
para seleccionar una de las dos opciones siguientes.
0 - Tipo interno
1 - Tipo externo
c - Pulsar la tecla
ara confirmar y volver al modo de cuentapiezas.
d - Pulsar la tecla
9
para confirmar y pasar al siguiente paso.
FUNCIONES PROGRAMABLES
9.1 - TIEMPO DE LA AUTODESCONEXION
a - Conectar la balanza.
b - Durante la cuenta atrás, pulsar la tecla
Tiempo de autodesconexión
previamente configurado)
b - Pulsar la tecla
cuatro veces. El display se mostrará.
Autodesconexión
Cuentas internas
para seleccionar la opción deseada ( 0, 2, 5, 8mm ).
Tiempo de autodesconexión (2 min., 5 min., 8 min., y o )
c - Pulsar la tecla
d - Pulsar la tecla
ara confirmar y volver al modo de cuentapiezas.
para confirmar y pasar al siguiente paso.
67
FUNCIONES
9860
9.2 - PREAJUSTE DEL RANGO DE CERO
a - Dentro del modo programación, mantener pulsada la tecla
cuando el display muestre.
Rango de cero del
Display ( 0 ~ 4 )
Display cero
y liberarla
Cuentas internas
b - Pulsar la tecla
para seleccionar la opción deseada ( 0, 1, 2, 3, 4 ).
c - Pulsar la tecla
ara confirmar y volver al modo de cuentapiezas.
d - Pulsar la tecla
para confirmar y pasar al siguiente paso.
9.3 - RANGO DE CERO DEL DISPLAY
a - Dentro del modo programación, mantener pulsada la tecla
cuando el display muestre.
Rango de cero del
Display ( 0 ~ 4 )
Display cero
y liberarla
Cuentas internas
b - Pulsar la tecla
para seleccionar la opción deseada ( 0, 1, 2, 3, 4 ).
c - Pulsar la tecla
ara confirmar y volver al modo de cuentapiezas.
d - Pulsar la tecla
para confirmar y pasar al siguiente paso.
9.4 - RANGO DE ESTABILIDAD
a - Dentro del modo programación, mantener pulsada la tecla
cuando el display muestre.
Clase de rango
Clase de estabilidad
de estabilidad ( 0 ~ 5 )
68
y liberarla
Cuentas internas
www.b3c-pesage.fr
ESPAÑOL
b - Pulsar la tecla
para seleccionar la opción deseada 0, 1, 2, 3, 4 ou 5.
El número más pequeño, es el tiempo más corto de estabilización
c - Pulsar la tecla
d - bien la tecla
para confirmar y volver al modo de cuentapiezas.
para confirmar y pasar al siguiente paso.
9.5 - TIPO DE ILUMINACION DEL DISPLAY
a - entro del modo programación, mantener pulsada la tecla
display muestre.
Tipo de iluminación
b - Pulsar la tecla
Iluminación
y liberarla cuando el
Cuentas internas
, para seleccionar la opción deseada. ( 0 or 1).
0 - Iluminación automática
El display se iluminará automáticamente cuando se coloquen objetos sobre el plato
de peso mayor a 9 veces la resolución de la balanza, ó bien pulsando cualquier tecla.
La iluminación de desactivará después de aprox. 5 segundos sin utilizar la balanza.
1 - Iluminación manual
c - Pulsar la tecla
(punto decimal) para activar ó desactivar la iluminación del
display..
d - Pulsar la tecla
para confirmar y volver al modo de cuentapiezas.
e - Pulsar la tecla
para confirmar y pasar al siguiente paso.
9.6 - CAMBIO DE LA UNIDAD DE PESADA ENTRE kg/g A LIBRAS
a - Dentro del modo de programación, mantener pulsada la tecla
Unidad de pesada
b - Pulsar la tecla
Unidad
.
Cuentas internas
, para seleccionar entre (0 = kg. / g 1 = lb).
69
FUNCIONES
9860
10
CALIBRACIÓN
10.1 - AVEC MASSE PROGRAMMEE
Para realizar esta operación se debe disponer de pesas de calibración muy bien
ajustadas.
a - Conectar la balanza y asegurarse de que el display esté a cero.
b - Mantener pulsada la tecla
hasta que el display visualice :
Pesa requerida para la calibración (6 kg) -ejemploColocar la pesa de calibración sobre el plato (el valor de esta pesa debe coincidir exactamente con el valor visualizado en el display “PESO UNIT”).
La lectura del display “Peso Unitario” parpadeará durante unos instantes,
seguidamente la balanza volverá al modo normal de pesaje.
La balanza está calibrada.
- El valor de la pesa de calibración requerida por la balanza puede ser cambiado
utilizando el teclado numérico y la tecla
siempre y cuando se encuentre
dentro del paso anterior número 2.
- Pulsar la tecla
para salir de la función de calibración
!
11
MESSAGES D’ERREUR
Durante la inicialización ó el funcionamiento de la balanza, es posible que el display muestre
mensajes de error. El significado de estos errores son los descritos a continuación
E1
E2
E3
--OL--
El plato de la balanza ha sido instalado
Colocarlo correctamente.
incorrectamente.
En el momento de conectar la balanza,
Retirar el objeto y conectar de nuevo.
había algún objeto sobre el plato.
Si el símbolo bateria aparece en el display, significa que la batería tiene bajo Recargar la batería
voltaje.
Sobrecarga
Retirar el peso del plato inmediatamente.
Si el mensaje de error persiste, deberá contactar con su Distribuidor
70
www.b3c-pesage.fr
ESPAÑOL
12
ALIMENTACION
AC 220V - DC 12V/800 Ma
FUNCIONAMIENTO DE LA BATERÍA RECARGABLE
La balanza puede ser utilizada con la batería interna recargable. La vida de la batería es
de aproximadamente 80 horas
Cuando la batería necesita ser cargada, el símbolo “
” aparecerá en el display, en este momento debe
ser cargada. La balanza seguirá funcionando durante unas 10 horas, después de desconectará automáticamente para proteger la batería.
Para cargar la batería, simplemente conecte el alimentador a la balanza y a la toma de corriente.
La duración de la carga será de 12 horas.
En la parte derecha del display hay un LED que indica el estado de la carga de la batería.
●
●●
- Si el LED está verde
significa que la batería ya ha sido cargada.
- Si el LED está rojo
significa que la batería está a punto de descargarse.
- Si el LED está amarillo
significa que la batería está incrementando el nivel de carga.
NOTA
Aunque la balanza no sea utilizada, la batería debe ser cargada cada 3 meses.
13
DATOS TECNICOS - TECHNICALS DATA
Order no
9860.03
9860.06
9860.15
9860.30
Weighting range (Max)
30000kg
3000g
6000g
15000g
Division
0,1g
0,2g
0,5g
1g
Counting resolution
0,05g
0,1g
0,2g
0,5g
Weighing Units
g, Ib
Zero Range
±4%
Tare Range
Full capacity by subtraction
Stabilization Time
Calibration
Operation Temperature
Humidity Range
Power supply
≤2 seconds
Automatic external with kg/g mass, factory calibration recovery
de 0°C à + 40°C
≤80% relative humidity, non-condensing
AC Adapter 9v - Input 230V-Output 12V-800mA 9.6V
Battery
Internal rechargeable sealed lead acid battery 6v/4Ah
Battery Life
50 hours with backlight on - 60 hours with backlight off.
Tare
Loading time of battery
Shipping Protection
Safe Overload Capacity
Platform size (W x D w H)
Net Weight (kg)
100% de la portée
10 h
Shipping screw to avoid damage to sensitive components
120% de la portée
300 x 230 x 120mm
4kg
71
PIEZAS DE RECAMBIO
9860
14
PIEZAS DE RECAMBIO - SPARE PARTS
ID Référence
1
2012010
2
002.006.007
Name
Stainless steel pan 300x230
ABS Housing
3.1 106382
Zemic load cell L6D-C3-5kg-0.4B-P
3.2 106383
Zemic load cell L6D-C3-8kg-0.4B-P
3.3 106384
Zemic load cell L6D-C3-20kg-0.4B-P
3.4 106385
Zemic load cell L6D-C3-35kg-0.4B-P
9.1 31500
CPU Mainboard (before 2012)
9.2 31501
CPU Mainboard ver. 2
10 30166
LCD Display board
11.1 31701
Electronic Keyboard (before 2012)
11.2 31703
Electronic Keyboard ver. A
12 590.003
Battery 6V 4AH/20HR
13 30840
Leveling feet
14 20030009
ON/OFF Switch
15 618-12080
Power supply Input 230V - Output 12V-800mA 9.6V
16 33017
Keypad overlay
17 33017
Keypad Display
13
14
15
17
16
9860
b3c
pesage
AC
C
72
01 64 99 34 34 - www.b3c-pesage.com
www.b3c-pesage.fr
ESPAÑOL
1
2
3.1
3
3.2
3.3
3.4
9
9.1
9.2
10
12
11
11.1
11.2
73
ww
w.b
3c
-pe
sag
e.f
r
b3c
pesage
DECLARATION OF EC CONFORMITY
DÉCLARATION CE DE CONFORMITÉ
DECLARACION CE DE CONFORMIDAD
DICHIARAZIONE DI CONFORMITA CE
VERKLARING CONFORMITEIT EG
DECLARAÇÃO (CE) DE CONFORMIDADE
MANUFACTURER - FABRICANT - FABRICANTE - PRODUTTORE - HERSTELLER - VERDELER
B3C SAS
ADRESS - ADRESSE - DIRECCIÓN - INDIRIZZO - ADRES - MORADA
10 Boulevard des Alliés 91720 MAISSE - FRANCE
E-MAIL
[email protected]
PRODUCT - PRODUIT - PRODUCTO - PRODOTTO - BEZEICHNUNG - PRODUÇÃO
GB - Compact scale 9860
FR - Balance électronique 9860
ES - Balanzas electrónicas 9860
IT - Bilance electroniche 9860
ND - Electronische weegschaal Reeks 9860
POR - Balanças industriais 9860
The indicated balances respect the following European Standards
Cet appareil est conforme aux directives européennes en vigueur
Las balanzas indicadas anteriormente cumplen las siguientes Normas Europeas
Le bilance indicate precedentemente soddisfare le seguenti Norme Europee
Die aufgeführten Waagen respektieren folgende europäische Normen
Het toestel voldoet aan volgende normen
As balanças cumprem as seguintes Normas da CEE
2004/108/CE - 2006/95/CE