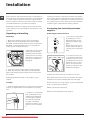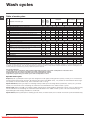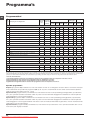
1
Instructions for use WASHING MACHINE Contents GB Installation, 2-3 GB English,1 F Français,13 NL Nederlands,25 Unpacking and levelling Connecting the electricity and water supplies The first wash cycle Technical data Description of the washing machine and starting a wash cycle, 4-5 Control panel Indicator lights Starting a wash cycle Wash cycles, 6 Table of wash cycles Personalisation, 7 IWC 5125 Setting the temperature Setting the spin speed Functions Detergents and laundry, 8 Detergent dispenser drawer Bleach cycle Preparing the laundry Garments requiring special care Load balancing system Precautions and tips, 9 General safety Disposal Care and maintenance, 10 Cutting off the water or electricity supply Cleaning the washing machine Cleaning the detergent dispenser drawer Caring for the door and drum of your appliance Cleaning the pump Checking the water inlet hose Troubleshooting, 11 Service, 12 Downloaded From WashingMachine-Manual.com Manuals 1 Installation GB ! This instruction manual should be kept in a safe place for future reference. If the washing machine is sold, transferred or moved, make sure that the instruction manual remains with the machine so that the new owner is able to familiarise himself/herself with its operation and features. ! Read these instructions carefully: they contain vital infor- Levelling the machine correctly will provide it with stability, help to avoid vibrations and excessive noise and prevent it from shifting while it is operating. If it is placed on carpet or a rug, adjust the feet in such a way as to allow a sufficient ventilation space underneath the washing machine. mation relating to the safe installation and operation of the appliance. Connecting the electricity and water supplies Unpacking and levelling Connecting the water inlet hose Unpacking 1. Remove the washing machine from its packaging. 2. Make sure that the washing machine has not been damaged during the transportation process. If it has been damaged, contact the retailer and do not proceed any further with the installation process. 3. Remove the 3 protective screws (used during transportation) and the rubber washer with the corresponding spacer, located on the rear part of the appliance (see figure). 1. Connect the supply pipe by screwing it to a cold water tab using a ¾ gas threaded connection (see figure). Before performing the connection, allow the water to run freely until it is perfectly clear. 2. Connect the inlet hose to the washing machine by screwing it onto the corresponding water inlet of the appliance, which is situated on the top right-hand side of the rear part of the appliance (see figure). 4. Close off the holes using the plastic plugs provided. 5. Keep all the parts in a safe place: you will need them again if the washing machine needs to be moved to another location. 3. Make sure that the hose is not folded over or bent. ! Packaging materials should not be used as toys for ! The water pressure at the tap must fall within the values children. indicated in the Technical details table (see next page). Levelling ! If the inlet hose is not long enough, contact a specialised 1. Install the washing machine on a flat sturdy floor, without resting it up against walls, furniture cabinets or anything else. 2. If the floor is not perfectly level, compensate for any unevenness by tightening or loosening the adjustable front feet (see figure); the angle of inclination, measured in relation to the worktop, must not exceed 2°. 2 Downloaded From WashingMachine-Manual.com Manuals shop or an authorised technician. ! Never use second-hand hoses. ! Use the ones supplied with the machine. ! Do not use extension cords or multiple sockets. Connecting the drain hose 65 - 100 cm Connect the drain hose, without bending it, to a drainage duct or a wall drain located at a height between 65 and 100 cm from the floor; GB ! The cable should not be bent or compressed. ! The power supply cable must only be replaced by authorised technicians. Warning! The company shall not be held responsible in the event that these regulations are not respected. The first wash cycle alternatively, rest it on the side of a washbasin or bathtub, fastening the duct supplied to the tap (see figure). The free end of the hose should not be underwater. Once the appliance has been installed, and before you use it for the first time, run a wash cycle with detergent and no laundry, using the wash cycle 2. ! We advise against the use of hose extensions; if it is absolutely necessary, the extension must have the same diameter as the original hose and must not exceed 150 cm in length. Technical data Model IWC 5125 Dimensions width 59.5 cm height 85 cm depth 52,5 cm Capacity from 1 to 5 kg Electrical please refer to the technical data plate fixed to the machine Electrical connections Before plugging the appliance into the electricity socket, make sure that: • the socket is earthed and complies with all applicable laws; connections • the socket is able to withstand the maximum power load of the appliance as indicated in the Technical data table (see opposite); • the power supply voltage falls within the values indicated in the Technical data table (see opposite); Water connection maximum pressure 1 MPa (10 bar) minimum pressure 0.05 MPa (0.5 bar) drum capacity 46 litres Spin speed up to 1200 rotations per minute Test • the socket is compatible with the plug of the washing machine. If this is not the case, replace the socket or the plug. Programmes according to Programme 2: temperature 60°C and 40°C; 2010/1061 ! The washing machine must not be installed outdoors, even in covered areas. It is extremely dangerous to leave the appliance exposed to rain, storms and other weather conditions. ! When the washing machine has been installed, the elec- This appliance conforms to the following EC Directives: - 2004/108/CE (Electromagnetic Compatibility) - 2002/96/EC - 2006/95/EC (Low Voltage) tricity socket must be within easy reach. Downloaded From WashingMachine-Manual.com Manuals 3 Description of the washing machine and starting a wash cycle GB Control panel WASH CYCLE PROGRESS/ DELAY TIMER indicator lights FUNCTION ON/OFF button buttons with indicator lights TEMPERATURE Detergent dispenser drawer knob Detergent dispenser drawer: used to dispense detergents and washing additives (see “Detergents and laundry”). ON/OFF button: switches the washing machine on and off. WASH CYCLE knob: programmes the wash cycles. During the wash cycle, the knob does not move. FUNCTION buttons with indicator light: used to select the available functions. The indicator light corresponding to the selected function will remain lit. TEMPERATURE knob: sets the temperature or the cold wash cycle (see “Personalisation”). SPIN SPEED knob: sets the spin speed or exclude the spin cycle completely (see “Personalisation”). WASH CYCLE PROGRESS/DELAY TIMER indicator lights: used to monitor the progress of the wash cycle. The illuminated indicator light shows which phase is in progress. If the Delay Timer function has been set, the time remaining until the wash cycle starts will be indicated (see next page). 4 Downloaded From WashingMachine-Manual.com Manuals button with indicator light DOOR LOCKED knob WASH CYCLE START/ PAUSE SPIN SPEED indicator light knob DOOR LOCKED indicator light: indicates whether the door may be opened or not (see next page). START/PAUSE button with indicator light: starts or temporarily interrupts the wash cycles. N.B. To pause the wash cycle in progress, press this button; the corresponding indicator light will flash orange, while the indicator light for the current wash cycle phase will remain lit in a fixed manner. If the DOOR LOCKED indicator light is switched off, the door may be opened. To start the wash cycle from the point at which it was interrupted, press this button again. Standby mode This washing machine, in compliance with new energy saving regulations, is fitted with an automatic standby system which is enabled after a few minutes if no activity is detected. Press the ON-OFF button briefly and wait for the machine to start up again. Indicator lights The indicator lights provide important information. This is what they can tell you: Delayed start If the DELAY TIMER function has been activated (see “Personalisation”), after the wash cycle has been started the indicator light corresponding to the selected delay period will begin to flash: Wash cycle phase indicator lights Once the desired wash cycle has been selected and has begun, the indicator lights switch on one by one to indicate which phase of the cycle is currently in progress. Wash Rinse Spin Drain End of wash cycle As time passes, the remaining delay will be displayed and the corresponding indicator light will flash: Function buttons and corresponding indicator lights When a function is selected, the corresponding indicator light will illuminate. If the selected function is not compatible with the programmed wash cycle, the corresponding indicator light will flash and the function will not be activated. If the selected function is not compatible with another function which has been selected previously, the indicator light corresponding to the first function selected will flash and only the second function will be activated; the indicator light corresponding to the enabled option will remain lit. The set programme will start once the selected time delay has expired. Door locked indicator light When the indicator light is on, the porthole door is locked to prevent it from being opened; make sure the indicator light is off before opening the door (wait approximately 3 minutes). To open the door during a running wash cycle, press the START/PAUSE button; the door may be opened once the DOOR LOCKED indicator light turns off. Starting a wash cycle 1. Switch the washing machine on by pressing the ON/OFF button. All indicator lights will switch on for a few seconds, then they will switch off and the START/PAUSE indicator light will pulse. 2. Load the laundry and close the door. 3. Set the WASH CYCLE knob to the desired programme. 4. Set the washing temperature (see “Personalisation”). 5. Set the spin speed (see “Personalisation”). 6. Measure out the detergent and washing additives (see “Detergents and laundry”). 7. Select the desired functions. 8. Start the wash cycle by pressing the START/PAUSE button and the corresponding indicator light will remain lit in a fixed manner, in green. To cancel the set wash cycle, pause the machine by pressing the START/PAUSE button and select a new cycle. 9. At the end of the wash cycle the indicator light will switch on. The door can be opened once the DOOR LOCKED indicator light turns off. Take out your laundry and leave the appliance door ajar to make sure the drum dries completely. Switch the washing machine off by pressing the ON/OFF button. Downloaded From WashingMachine-Manual.com Manuals 5 GB Wash cycles Table of wash cycles Wash cycles GB Detergents Max. temp. (°C) Max. speed (rpm) 90° 90° 60° 40° 1200 1200 1200 1200 - 3 Cotton: heavily soiled whites and resistant colours. 60° 1200 - 4 Coloured Cottons (3): lightly soiled whites and delicate colours. 40° 1200 - 5 Synthetics: heavily soiled resistant colours. 60° 800 5 Synthetics energetic (4): heavily soiled resistant colours. 40° 6 Synthetics: lightly soiled delicate colours. 1 2 2 2 Description of the wash cycle Daily Cotton with prewash: extremely soiled whites. Cotton: extremely soiled whites. Cotton (1-2): heavily soiled whites and resistant colours. Cotton (2): heavily soiled whites and delicate colours. Max. load (kg) Cycle duration Fabric softener Normal 5 5 5 5 - 145 125 165 155 - 5 3,25 120 85 5 3,25 85 60 - 2,5 2 100 70 800 - 2,5 2 90 65 40° 800 - 2,5 2 70 50 Prewash Wash Bleach Eco Eco Normal Time Time Special 7 Wool: for wool, cashmere, etc. 40° 800 - - 1 - 70 - 8 Silk/Curtains: for garments in silk and viscose, lingerie. 30° 0 - - 1 - 55 - 9 Jeans 40° 800 - - 3 - 60 - 30° 800 - - 1,5 - 15 - 11 Sport Intensive 30° 600 - - 3 - 85 - 12 Sport Light 30° 600 - - 3 - 58 - 13 Special Shoes 30° 600 - - Max. 2 pairs - 55 - 10 Express: to refresh lightly soiled garments quickly (not suitable for wool, silk and clothes which require washing by hand). Sport Partial wash cycles Rinse - 1200 - - 5 - 40 Spin - 1200 - - - - 5 - 15 - Drain - 0 - - - - 5 - 2 - The cycle duration indicated on the display or instruction manual is an estimate based on standard conditions. The actual duration may vary in relation to several factors, such as the temperature and pressure of the incoming water, ambient temperature, amount of detergent, load quantity and type, load balancing and any additional options selected. For all Test Institutes: 1) Test wash cycle in compliance with regulation 2010/1061: set wash cycle 2 with a temperature of 60°C and 40°C. 2) Long wash cycle for cottons: set wash cycle 2 with a temperature of 40°C. 3) Short wash cycle for cottons: set wash cycle 4 with a temperature of 40°C. 4) Synthetic program along: set wash cycle 5 with a temperature of 40°C. Specials wash cycles Express (wash cycle 10) this wash cycle was designed to wash lightly soiled garments quickly: it lasts just 15 minutes and therefore saves both energy and time. By selecting this wash cycle (10 at 30°C), it is possible to wash different fabrics together (except for wool and silk items), with a maximum load of 1.5 kg. Sport Intensive (wash cycle 11) is for washing heavily soiled sports clothing fabrics (tracksuits, shorts, etc.); for best results, we recommend not exceeding the maximum load indicated in the “Table of wash cycles”. Sport Light (wash cycle 12) is for washing lightly soiled sports clothing fabrics (tracksuits, shorts, etc.); for best results, we recommend not exceeding the maximum load indicated in the “Table of wash cycles”. We recommend using a liquid detergent and dosage suitable for a half-load. Sport Shoes (wash cycle 13) is for washing sports shoes; for best results, do not wash more than 2 pairs simultaneously. 6 Downloaded From WashingMachine-Manual.com Manuals Personalisation Setting the temperature GB Turn the TEMPERATURE knob to set the wash temperature (see Table of wash cycles). The temperature may be lowered, or even set to a cold wash . The washing machine will automatically prevent you from selecting a temperature which is higher than the maximum value set for each wash cycle. Setting the spin speed Turn the SPIN SPEED knob to set the spin speed for the selected wash cycle. The maximum spin speeds available for each wash cycle are as follows: Wash cycles Maximum spin speed Cottons 1200 rpm Synthetics 800 rpm Wool 800 rpm Silk drain only The spin speed may be lowered, or the spin cycle can be excluded altogether by selecting the symbol . The washing machine will automatically prevent you from selecting a spin speed which is higher than the maximum speed set for each wash cycle. Functions The various wash functions available with this washing machine will help to achieve the desired results, every time. To activate the functions: 1. Press the button corresponding to the desired function; 2. the function is enabled when the corresponding indicator light is illuminated. Note: If the indicator light flashes rapidly, this signals that this particular function may not be selected in conjunction with the selected wash cycle. Selecting this option enables you to suitably adjust drum rotation, temperature and water to a reduced load of lightly soiled cotton and synthetic fabrics (refer to the “Table of wash cycles”). “ ” enables you to wash in less time thereby saving water and electricity. We suggest using a liquid detergent suitably measured out to the load quantity. ! This function may not be used in conjunction with wash cycles 1, 2, 7, 8, 9, 10, 11, 12, 13, , , . Stain removal Bleaching cycle designed to remove the toughest stains. Please remember to pour the bleach into extra compartment 4 (see “Bleach cycle”). ! This function may not be used in conjunction with wash cycles 1, 7, 8, 9, 10, 11, 12, 13, , . Extra rinse By selecting this option, the efficiency of the rinse is increased and optimal detergent removal is guaranteed. It is particularly useful for sensitive skin. ! This function may not be used in conjunction with wash cycles 10, , . Delay timer This timer delays the start time of the wash cycle by up to 12 hours. Press the button repeatedly until the indicator light corresponding to the desired delay time switches on. The fifth time the button is pressed, the function will be disabled. N.B. Once the START/PAUSE button has been pressed, the delay time can only be modified by decreasing it until launching the set programme. ! This option is enabled with all programmes. Downloaded From WashingMachine-Manual.com Manuals 7 Detergents and laundry GB Detergent dispenser drawer Preparing the laundry Good washing results also depend on the correct dose of detergent: adding too much detergent will not necessarily result in a more efficient wash, and may in fact cause build up on the inside of your appliance and contribute to environmental pollution. • Divide the laundry according to: - the type of fabric/the symbol on the label - the colours: separate coloured garments from whites. • Empty all garment pockets and check the buttons. • Do not exceed the listed values, which refer to the weight of the laundry when dry: Durable fabrics: max. 5 kg Synthetic fabrics: max. 2,5 kg Delicate fabrics: max. 2 kg Wool: max. 1 kg Silk: max. 1 kg ! Do not use hand washing detergents because these create too much foam. Open the detergent dispenser drawer and pour in the detergent or washing additive, as follows. 4 1 2 3 ompartment 1: Pre-wash detergent (powder) Before pouring in the detergent, make sure that extra compartment 4 has been removed. compartment 2: Detergent for the wash cycle (powder or liquid) Liquid detergent should only be poured in immediately prior to the start of the wash cycle. compartment 3: Additives (fabric softeners, etc.) The fabric softener should not overflow the grid. extra compartment 4: Bleach Bleach cycle ! Traditional bleach should be used on sturdy white fabrics, and delicate bleach for coloured fabrics, synthetics and for wool. This option is particularly useful for the removal of stubborn stains. Place extra compartment 4 (supplied) into compartment 1. When pouring in the bleach, be careful not to exceed the “max” level marked on the central pivot (see figure). To run the bleach cycle on its own, pour the bleach into extra compartment 4, set the “Rinse” programme and activate the “Stain removal” option. To bleach during a wash cycle, pour in the detergent and any fabric softener you wish to use, set the desired wash cycle and enable the “Stain removal” option. The use of extra compartment 4 excludes the “Pre-wash” option. 8 Downloaded From WashingMachine-Manual.com Manuals How much does your laundry weigh? 1 sheet 400-500 g 1 pillow case 150-200 g 1 tablecloth 400-500 g 1 bathrobe 900-1200 g 1 towel 150-250 g Garments requiring special care Wool: all wool garments can be washed using programme 7, even those carrying the “hand-wash only” label. For best results, use special detergents and do not exceed 1 kg of laundry. Silk: use special wash cycle 8 to wash all silk garments. We recommend the use of special detergent which has been designed to wash delicate clothes. Curtains: fold curtains and place them in a pillow case or mesh bag. Use wash cycle 8. Jeans: Turn garments inside-out before washing and use a liquid detergent. Use programme 9. Load balancing system Before every spin cycle, to avoid excessive vibrations and to distribute the load in a uniform manner, the drum rotates continuously at a speed which is slightly greater than the washing rotation speed. If, after several attempts, the load is not balanced correctly, the machine spins at a reduced spin speed. If the load is excessively unbalanced, the washing machine performs the distribution process instead of spinning. To encourage improved load distribution and balance, we recommend small and large garments are mixed in the load. Precautions and tips ! This washing machine was designed and constructed in GB accordance with international safety regulations. The following information is provided for safety reasons and must therefore be read carefully. General safety • This appliance was designed for domestic use only. • The washing machine must only be used by adults, in accordance with the instructions provided in this manual. • Do not touch the machine when barefoot or with wet or damp hands or feet. • Do not pull on the power supply cable when unplugging the appliance from the electricity socket. Hold the plug and pull. • Do not open the detergent dispenser drawer while the machine is in operation. • Do not touch the drained water as it may reach extremely high temperatures. • Never force the porthole door. This could damage the safety lock mechanism designed to prevent accidental opening. • If the appliance breaks down, do not under any circumstances access the internal mechanisms in an attempt to repair it yourself. • Always keep children well away from the appliance while it is operating. • The door can become quite hot during the wash cycle. • If the appliance has to be moved, work in a group of two or three people and handle it with the utmost care. Never try to do this alone, because the appliance is very heavy. • Before loading laundry into the washing machine, make sure the drum is empty. Disposal • Disposing of the packaging materials: observe local regulations so that the packaging may be re-used. • The European Directive 2002/96/EC on Waste Electrical and Electronic Equipment, requires that old household electrical appliances must not be disposed of in the normal unsorted municipal waste stream. Old appliances must be collected separately in order to optimise the recovery and recycling of the materials they contain and reduce the impact on human health and the environment. The crossed out “wheeled bin” symbol on the product reminds you of your obligation, that when you dispose of the appliance it must be separately collected. Consumers should contact their local authority or retailer for information concerning the correct disposal of their old appliance. Downloaded From WashingMachine-Manual.com Manuals 9 Care and maintenance GB Cutting off the water and electricity supplies • Turn off the water tap after every wash cycle. This will limit wear on the hydraulic system inside the washing machine and help to prevent leaks. • Unplug the washing machine when cleaning it and during all maintenance work. Cleaning the pump The washing machine is fitted with a self-cleaning pump which does not require any maintenance. Sometimes, small items (such as coins or buttons) may fall into the prechamber which protects the pump, situated in its bottom part. ! Make sure the wash cycle has finished and unplug the appliance. Cleaning the washing machine To access the pre-chamber: The outer parts and rubber components of the appliance can be cleaned using a soft cloth soaked in lukewarm soapy water. Do not use solvents or abrasives. Cleaning the detergent dispenser drawer Remove the dispenser by raising it and pulling it out (see figure). Wash it under running water; this operation should be repeated frequently. 1. using a screwdriver, remove the cover panel on the lower front part of the washing machine (see figure); 2. unscrew the lid by rotating it anti-clockwise (see figure): a little water may trickle out. This is perfectly normal; Caring for the door and drum of your appliance • Always leave the porthole door ajar in order to prevent unpleasant odours from forming. 3. clean the inside thoroughly; 4. screw the lid back on; 5. reposition the panel, making sure the hooks are securely in place before you push it onto the appliance. Checking the water inlet hose Check the inlet hose at least once a year. If there are any cracks, it should be replaced immediately: during the wash cycles, water pressure is very strong and a cracked hose could easily split open. ! Never use second-hand hoses. 10 From WashingMachine-Manual.com Manuals Downloaded Troubleshooting Your washing machine could fail to work. Before contacting the Technical Assistance Centre (see “Assistance”), make sure that the problem cannot be not solved easily using the following list. GB Problem: Possible causes / Solutions: The washing machine does not switch on. • The appliance is not plugged into the socket fully, or is not making contact. • There is no power in the house. The wash cycle does not start. • The washing machine door is not closed properly. • The ON/OFF button has not been pressed. • The START/PAUSE button has not been pressed. • The water tap has not been opened. • A delayed start has been set (see “Personalisation”). The washing machine does not take in water (the indicator light for the first wash cycle stage flashes rapidly). • The water inlet hose is not connected to the tap. • The hose is bent. • The water tap has not been opened. • There is no water supply in the house. • The pressure is too low. • The START/PAUSE button has not been pressed. The washing machine continuously takes in and drains water. • The drain hose is not fitted at a height between 65 and 100 cm from the floor (see “Installation”). • The free end of the hose is under water (see “Installation”). • The wall drainage system is not fitted with a breather pipe. If the problem persists even after these checks, turn off the water tap, switch the appliance off and contact the Assistance Service. If the dwelling is on one of the upper floors of a building, there may be problems relating to water drainage, causing the washing machine to fill with water and drain continuously. Special anti-draining valves are available in shops and help to avoid this inconvenience. The washing machine does not drain or spin. • The wash cycle does not include draining: some wash cycles require the drain phase to be started manually. • The drain hose is bent (see “Installation”). • The drainage duct is clogged. The washing machine vibrates a lot during the spin cycle. • The drum was not unlocked correctly during installation (see “Installation”). • The washing machine is not level (see “Installation”). • The washing machine is trapped between cabinets and walls (see “Installation”). The washing machine leaks. • The water inlet hose is not screwed on properly (see “Installation”). • The detergent dispenser drawer is blocked (for cleaning instructions, see “Care and maintenance”). • The drain hose is not fixed properly (see “Installation”). The “option” indicator lights and the “start/pause” indicator light flash, while one of the “phase in progress” indicator lights and the “door locked” indicator light will remain lit in a fixed manner. • Switch off the machine and unplug it, wait for approximately 1 minute and then switch it back on again. If the problem persists, contact the Technical Assistance Service. There is too much foam. • The detergent is not suitable for machine washing (it should display the text “for washing machines” or “hand and machine wash”, or the like). • Too much detergent was used. Downloaded From WashingMachine-Manual.com Manuals 11 Service GB Before calling for Assistance: • Check whether you can solve the problem alone (see “Troubleshooting”); • Restart the programme to check whether the problem has been solved; • If this is not the case, contact an authorised Technical Assistance Centre using the telephone number provided on the guarantee certificate. ! Always request the assistance of authorised technicians. Have the following information to hand: • the type of problem; • the appliance model (Mod.); • the serial number (S/N). This information can be found on the data plate applied to the rear of the washing machine, and can also be found on the front of the appliance by opening the door. 12 From WashingMachine-Manual.com Manuals Downloaded Mode d’emploi LAVE-LINGE Sommaire FR Français FR Installation, 14-15 Déballage et mise à niveau Raccordements eau et électricité Premier cycle de lavage Caractéristiques techniques Description du lave-linge et démarrage d’un programme, 16-17 Bandeau de commandes Voyants Démarrage d’un programme Programmes, 18 Tableau des programmes Personnalisations, 19 IWC 5125 Sélection de la température Sélection de l’essorage Fonctions Produits lessiviels et linge, 20 Tiroir à produits lessiviels Cycle blanchissage Triage du linge Linge ou vêtements particuliers Système d’équilibrage de la charge Précautions et conseils, 21 Sécurité générale Mise au rebut Entretien et soin, 22 Coupure de l’arrivée d’eau et du courant Nettoyage du lave-linge Nettoyage du tiroir à produits lessiviels. Entretien du hublot et du tambour Nettoyage de la pompe Contrôle du tuyau d’arrivée de l’eau Anomalies et remèdes, 23 Assistance, 24 Downloaded From WashingMachine-Manual.com Manuals 13 Installation FR ! Conserver ce mode d’emploi pour pouvoir le consulter à tout moment. En cas de vente, de cession ou de déménagement, veiller à ce qu’il suive toujours le lave-linge pour que son nouveau propriétaire soit informé sur son mode de fonctionnement et puisse profiter des conseils correspondants. ! Lire attentivement les instructions: elles fournissent des conseils importants sur l’installation, l’utilisation et la sécurité de l’appareil. Déballage et mise à niveau Déballage 1. Déballer le lave-linge. 2. Contrôler que le lave-linge n’a pas été endommagé pendant le transport. S’il est abîmé, ne pas le raccorder et contacter le vendeur. 3. Enlever les 3 vis de protection servant au transport, le caoutchouc et la cale, placés dans la partie arrière (voir figure). 4. Boucher les trous à l’aide des bouchons plastique fournis. 5. Conserver toutes ces pièces: il faudra les remonter en cas de transport du lave-linge. ! Les pièces d’emballage ne sont pas des jouets pour Une bonne mise à niveau garantit la stabilité de l’appareil et évite qu’il y ait des vibrations, du bruit et des déplacements en cours de fonctionnement. Si la machine est posée sur de la moquette ou un tapis, régler les pieds de manière à ce qu’il y ait suffisamment d’espace pour assurer une bonne ventilation. Raccordements eau et électricité Raccordement du tuyau d’arrivée de l’eau 1. Reliez le tuyau d’alimentation en le vissant à un robinet d’eau froide à embout fileté 3/4 gaz (voir figure). Faire couler l’eau jusqu’à ce qu’elle soit limpide et sans impuretés avant de raccorder. 2. Raccorder le tuyau d’arrivée de l’eau au lavelinge en le vissant à la prise d’eau prévue, dans la partie arrière en haut à droite (voir figure). 3. Attention à ce que le tuyau ne soit pas plié ou écrasé. ! La pression de l’eau doit être comprise entre les valeurs enfants. indiquées dans le tableau des Caractéristiques techniques (voir page ci-contre). Mise à niveau ! Si la longueur du tuyau d’alimentation ne suffit pas, 1. Installer le lave-linge sur un sol plat et rigide, sans l’appuyer contre des murs, des meubles ou autre. 2. Si le sol n’est pas parfaitement horizontal, visser ou dévisser les pieds de réglage avant (voir figure) pour niveler l’appareil; son angle d’inclinaison, mesuré sur le plan de travail, ne doit pas dépasser 2°. 14 From WashingMachine-Manual.com Manuals Downloaded s’adresser à un magasin spécialisé ou à un technicien agréé. ! N’utiliser que des tuyaux neufs. ! Utiliser ceux qui sont fournis avec l’appareil. Raccordement du tuyau de vidange 65 - 100 cm Raccorder le tuyau d’évacuation, sans le plier, à un conduit d’évacuation ou à une évacuation murale placés à une distance du sol comprise entre 65 et 100 cm; ! N’utiliser ni rallonges ni prises multiples. FR ! Le câble ne doit être ni plié ni trop écrasé. ! Le câble d’alimentation ne doit être remplacé que par des techniciens agréés. Attention! Nous déclinons toute responsabilité en cas de non-respect des normes énumérées ci-dessus. Premier cycle de lavage ou bien l’accrocher à un évier ou à une baignoire, dans ce cas, fixer le support en plastique fourni avec l’appareil au robinet (voir figure). L’extrémité libre du tuyau d’évacuation ne doit pas être plongée dans l’eau. Avant la première mise en service de l’appareil, effectuer un cycle de lavage avec un produit lessiviel mais sans linge et sélectionner le programme 2. ! L’utilisation d’un tuyau de rallonge est absolument déconseillée mais si on ne peut faire autrement, il faut absolument qu’il ait le même diamètre que le tuyau original et sa longueur ne doit pas dépasser 150 cm. Caractéristiques techniques Modèle IWC 5125 Dimensions largeur 59,5 cm hauteur 85 cm profondeur 52,5 cm Capacité de 1 à 5 kg • la prise est bien reliée à la terre et est conforme aux réglementations en vigueur; Raccordements Voir la plaque signalétique appliquée sur la machine • la prise est bien apte à supporter la puissance maximale de l’appareil indiquée dans le tableau des Caractéristiques techniques (voir ci-contre); Raccordements Branchement électrique Avant de brancher la fiche dans la prise de courant, s’assurer que: • la tension d’alimentation est bien comprise entre les valeurs figurant dans le tableau des Caractéristiques techniques (voir ci-contre); • la prise est bien compatible avec la fiche du lave-linge. Autrement, remplacer la prise ou la fiche. ! Le lave-linge ne doit pas être installé dehors, même à l’abri, car il est très dangereux de le laisser exposé à la pluie et aux orages. ! Après installation du lave-linge, la prise de courant doit électriques hydrauliques Vitesse d'essorage pression maximale 1 MPa (10 bar) pression minimale 0,05 MPa (0,5 bar) capacité du tambour 46 litres jusqu'à 1200 tours minute Programmes d’essais selon la directive Programme 2 : température 60°C et 40°C 2010/1061 Cet appareil est conforme aux Directives Communautaires suivantes: - 2004/108/CE (Compatibilité électromagnétique) - 2002/96/CE - 2006/95/CE (Basse Tension) être facilement accessible. Downloaded From WashingMachine-Manual.com Manuals 15 Description du lave-linge et démarrage d’un programme FR Bandeau de commandes Voyants DÉROULEMENT CYCLE/DÉPART DIFFÉRÉ Touche avec voyant Touche MARCHE/ ARRÊT FONCTION Voyant Bouton HUBLOT VERROUILLÉ TEMPÉRATURE Tiroir à produits lessiviels MARCHE/ PAUSE Touches avec voyants Bouton PROGRAMMES Bouton ESSORAGE Tiroir à produits lessiviels: pour charger les produits lessiviels et les additifs (voir “Produits lessiviels et linge”). Voyant HUBLOT VERROUILLÉ: indique si la porte est verrouillée (voir page ci-contre). Touche MARCHE/ARRÊT: pour allumer ou éteindre le lave-linge. Touche avec voyant MARCHE/PAUSE: pour démarrer les programmes ou les interrompre momentanément. N.B.: pour effectuer une pause du lavage en cours, appuyer sur cette touche, le voyant correspondant se mettra à clignoter en orange tandis que celui de la phase en cours restera allumé fixe. Si le voyant HUBLOT VERROUILLÉ est éteint, on peut ouvrir la porte. Pour faire redémarrer le lavage exactement de l’endroit où il a été interrompu, appuyer une nouvelle fois sur la touche. Bouton PROGRAMMES: pour sélectionner les programmes. Pendant le programme, le bouton ne tournera pas. Touches avec voyants FONCTION: pour sélectionner les fonctions disponibles. Le voyant correspondant à la fonction sélectionnée restera allumé. Bouton TEMPÉRATURE: pour sélectionner la température ou un lavage à froid (voir “Personnalisations”). Bouton ESSORAGE: pour sélectionner l’essorage ou le supprimer (voir “Personnalisations”). Voyants DÉROULEMENT CYCLE/DÉPART DIFFÉRÉ: pour suivre le stade d’avancement du programme de lavage. Le voyant allumé indique la phase de lavage en cours. Si la fonction “Départ différé” (départ différé) a été sélectionnée, ils indiquent le temps restant jusqu’au démarrage du programme (voir page ci-contre). 16 From WashingMachine-Manual.com Manuals Downloaded Stand-by Ce lave-linge, conformément aux nouvelles normes en vigueur dans le domaine de l’économie d’énergie, est équipée d’un système d’extinction automatique (veille) activé après quelques minutes d’inutilisation. Appuyez brièvement sur la touche ON-OFF et attendre que la machine soit réactivée. Voyants Lavage Les voyants fournissent des informations importantes. Voilà ce qu’ils signalent: Rinçage Départ différé Si la fonction “Départ différé” a été activée (voir “Personnalisations”), le voyant correspondant au temps sélectionné se mettra à clignoter, après avoir lancé le programme: Vidange Au fur et à mesure que le temps passe, le temps restant est affiché avec clignotement du voyant correspondant. Quand le retard sélectionné touche à sa fin le programme sélectionné démarre. FR Essorage Fin de Lavage Touches fonction et voyants correspondants La sélection d’une fonction entraîne l’allumage du voyant correspondant. Si la fonction sélectionnée est incompatible avec le programme sélectionné, le voyant correspondant se met à clignoter et la fonction n’est pas activée. Si l’fonction sélectionnée est incompatible avec une autre fonction précédemment sélectionnée, le voyant correspondant à la première fonction se met à clignoter et seule la deuxième fonction est activée, le voyant de la touche s’allume au fixe. Voyant hublot verrouillé Le voyant allumé indique que le hublot est verrouillé pour en empêcher l’ouverture. Attendre que le voyant cesse de clignoter avant d’ouvrir la porte (3 minutes environ). Pour ouvrir le hublot tandis qu’un cycle est en cours, appuyer sur la touche MARCHE/PAUSE; si le voyant HUBLOT VERROUILLÉ est éteint, on peut ouvrir le hublot. Voyants phase en cours Une fois que le cycle de lavage sélectionné a démarré, les voyants s’allument progressivement pour indiquer son stade d’avancement: Démarrage d’un programme 1. Allumer le lave-linge en appuyant sur la touche MARCHE/ARRÊT. Tous les voyants s’allument pendant quelques secondes puis s’éteignent, seul le voyant MARCHE/PAUSE flashe. 2. Charger le linge et fermer le hublot. 3. Sélectionner à l’aide du bouton PROGRAMMES le programme désiré. 4. Sélectionner la température de lavage (voir “Personnalisations”). 5. Sélectionner la vitesse d’essorage (voir “Personnalisations”). 6. Verser les produits lessiviels et les additifs (voir “Produits lessiviels et linge”). 7. Sélectionner les fonctions désirées. 8. Appuyer sur la touche MARCHE/PAUSE pour démarrer le programme, le voyant correspondant vert restera allumé en fixe. Pour annuler le cycle sélectionné, appuyer sur la touche MARCHE/PAUSE pour placer l’appareil en pause et choisir un nouveau cycle. 9. A la fin du programme, le voyant s’allume. Quand le voyant HUBLOT VERROUILLÉ s’éteint, on peut ouvrir le hublot. Sortir le linge et laisser le hublot entrouvert pour faire sécher le tambour. Eteindre le lave-linge en appuyant sur la touche MARCHE/ARRÊT. Downloaded From WashingMachine-Manual.com Manuals 17 Programmes Tableau des programmes Programmes FR 1 2 2 2 Description du Programme Programmes pour tous les jours (Daily) Coton avec Prélavage: blancs extrêmement sales. Coton: blancs extrêmement sales. Coton (1-2): blancs et couleurs résistantes très sales. Coton (2): blancs et couleurs délicates très sales. Temp. maxi. (°C) Vitesse maxi (tours minute) 90° 90° 60° 40° 1200 1200 1200 1200 Detersivi Charge maxi (Kg) PréAssouLavage Javel lavage plissant - Durée cycle Normal Eco Time Normal Eco Time 5 5 5 5 - 145 125 165 155 85 3 Coton: blancs et couleurs résistantes très sales. 60° 1200 - 5 3,25 120 4 Coton couleurs (3): blancs peu sales et couleurs délicates. 40° 1200 - 5 3,25 85 60 5 Synthétique: couleurs résistantes très sales. 60° 800 - 2,5 2 100 70 5 Synthétique énergétique (4): couleurs résistantes très sales. 40° 800 - 2,5 2 90 65 6 Synthétique: couleurs délicates peu sales. 40° 800 - 2,5 2 70 50 7 Laine: pour laine, cachemire, etc. 40° 800 - - 1 - 70 - 8 Soie/Voilages: pour linge en soie, viscose, lingerie. 30° 0 - - 1 - 55 - 9 Jeans Express: pour rafraîchir rapidement du linge peu sale (ne convient pas pour la laine, la soie et le linge à laver à la main). Sport 40° 800 - - 3 - 60 - 30° 800 - - 1,5 - 15 - Programmes Spéciaux (Special) 10 11 Sport Intensive 30° 600 - - 3 - 85 - 12 Sport Light 30° 600 - - - 58 - 13 Sport Shoes 30° 600 - - 3 Max. 2 paires - 55 - Rinçage - 1200 - - 5 - 40 - Essorage - 1200 - - - - 5 - 15 - Vidange - 0 - - - - 5 - 2 - Programmes partiaux La durée du cycle indiquée sur l’écran ou dans la notice représente une estimation calculée dans des conditions standard. Le temps effectif peut varier en fonction de nombreux facteurs tels que : température et pression de l’eau en entrée, température ambiante, quantité de lessive, quantité et type de charge, équilibrage de la charge, options supplémentaires sélectionnées. Pour tous les instituts qui effectuent ces tests : 1) Programme de contrôle selon la norme 2010/1061: sélectionner le programme 2 et une température de 60°C et 40°C. 2) Programme coton long: sélectionner le programme 2 et une température de 40°C. 3) Programme coton court: sélectionner le programme 4 et une température de 40°C. 4) Programme Synthétique ainsi que: sélectionner le programme 5 et une température de 40°C. Programmes spéciaux Express (programme 10): spécialement conçu pour laver du linge peu sale en un rien de temps: il ne dure que 15 minutes et permet ainsi de faire des économies d’énergie et de temps. La sélection de ce programme (10 à 30°C) permet de laver ensemble des textiles différents (sauf laine et soie) en ne dépassant pas 1,5 kg de charge. Sport Intensive (programme 11): est spécialement conçu pour laver des textiles vêtements de sport (survêtements, shorts, etc.) très sales; pour obtenir d’excellents résultats nous recommandons de ne pas dépasser la charge maximale indiquée dans le “Tableau des programmes”. Sport Light (programme 12): est spécialement conçu pour laver des textiles vêtements de sport (survêtements, shorts, etc.) peu sales; pour obtenir d’excellents résultats nous recommandons de ne pas dépasser la charge maximale indiquée dans le “Tableau des programmes”. Nous recommandons d’utiliser de la lessive liquide, avec une dose pour la demi-charge. Sport Shoes (programme 13): est spécialement conçu pour laver des chaussures de sport; pour obtenir d’excellents résultats nous recommandons de ne pas en laver plus de 2 paires à la fois. 18 From WashingMachine-Manual.com Manuals Downloaded Personnalisations Sélection de la température Tourner le bouton TEMPÉRATURE pour sélectionner la température de lavage (voir Tableau des programmes). La température peut être abaissée jusqu’au lavage à froid ( ). La machine interdira automatiquement toute sélection d’une température supérieure à la température maximale prévue pour chaque programme. Sélection de l’essorage Tourner le bouton ESSORAGE pour sélectionner la vitesse d’essorage du programme sélectionné. Les vitesses maximales prévues pour les programmes sont: Programmes Vitesse maximale Coton 1200 tours/minute Synthétiques 800 tours/minute Laine 800 tours/minute Soie vidange seule La vitesse d’essorage peut être réduite ou l’essorage supprimé en sélectionnant le symbole . La machine interdira automatiquement tout essorage à une vitesse supérieure à la vitesse maximale prévue pour chaque programme. Fonctions Les différentes fonctions de lavage prévues par le lave-linge permettent d’obtenir la propreté et le blanc souhaités. Pour activer les fonctions: 1. appuyer sur la touche correspondant à la fonction désirée; 2. l’allumage du voyant correspondant signale que la fonction est activée. Remarque: Le clignotement rapide du voyant signale que la fonction correspondante n’est pas disponible pour le programme sélectionné. La sélection de cette option permet d’optimiser les mouvements mécaniques, la température et l’eau en fonction d’une charge réduite de coton et synthétiques peu sales (voir “Tableau des programmes”). “ ” permet de laver en faisant des économies considérables de temps et de consommations d’eau et d’énergie. Il est conseillé d’utiliser une dose de lessive liquide adaptée à la charge. ! Cette fonction n’est pas activable avec les programmes 1, 2, 7, 8, 9, 10, 11, 12, 13, , , . Anti-tâches Cycle de anti-tâches conseillé pour l’élimination de taches très résistantes. N’oubliez pas de verser l’eau de Javel dans le bac supplémentaire 4 (voir “Cycle blanchissage”). ! Cette option n’est pas activable avec les programmes 1, 7, 8, 9, 10, 11, 12, 13, , . Super Rinçage La sélection de cette option permet d’augmenter l’efficacité du rinçage et d’éliminer totalement toute trace de lessive. Elle est très utile pour les peaux particulièrement sensibles. ! Cette fonction n’est pas activable avec les programmes 10, , . Départ différé Pour différer la mise en marche de la machine jusqu’à 12 heures. Appuyer plusieurs fois de suite sur la touche jusqu’à ce que le voyant correspondant au retard souhaité s’allume. A la cinquième pression sur la touche, la fonction se désactive. N.B: Après avoir appuyé sur la touche MARCHE/PAUSE, le retard programmé ne peut être modifié que pour le diminuer jusqu’à lancer le programme sélectionné. ! Il est activé avec tous les programmes. Downloaded From WashingMachine-Manual.com Manuals 19 FR Produits lessiviels et linge FR Tiroir à produits lessiviels Triage du linge Un bon résultat de lavage dépend aussi d’un bon dosage de produit lessiviel: un excès de lessive ne lave pas mieux, il incruste l’intérieur du lave-linge et pollue l’environnement. • Trier correctement le linge d’après: - le type de textile / le symbole sur l’étiquette. - les couleurs: séparer le linge coloré du blanc. • Vider les poches et contrôler les boutons. • Ne pas dépasser les valeurs indiquées correspondant au poids de linge sec : Textiles résistants: 5 kg max. Textiles synthétiques: 2,5 kg max. Textiles délicats: 2 kg max. Laine: 1 kg max. Soie: 1 kg max. ! Ne pas utiliser de lessives pour lavage à la main, elles moussent trop. Sortir le tiroir à produits lessiviels et verser la lessive 4 ou l’additif comme suit. 1 2 3 Combien pèse le linge ? bac 1: Lessive prélavage (en poudre) Avant d’introduire la lessive, assurez-vous que le bac supplémentaire 4 n’est pas présent. bac 2: Lessive lavage (en poudre ou liquide) Versez la lessive liquide juste avant la mise en marche. bac 3: Additifs (adoucissant, etc.) L’assouplissant ne doit pas déborder de la grille. bac supplémentaire 4: Eau de javel ! N’utilisez pas de lessives pour lavage à la main, elles génèrent trop de mousse. Cycle blanchissage ! N’utilisez de l’eau de Javel traditionelle que pour les tissus blancs résistants et des détachants délicats pour les couleurs, les synthétiques et la laine. Montez le bac supplémentaire 4 fourni avec l’appareil à l’intérieur du bac 1. Lorsque vous versez l’eau de Javel, attention à ne pas dépasser le niveau “max” indiqué sur le pivot central (voir figure). Pour blanchir uniquement, versez l’eau de Javel dans le bac supplémentaire 4, sélectionnez le programme «Rinçage» et activez le fonction «Anti-tâches» . Pour blanchir en cours de lavage, versez le produit lessiviel et les additifs, sélectionnez le programme souhaité et activez le fonction «Anti-tâches» . L’utilisation du bac supplémentaire 4 exclut le prélavage. 20 From WashingMachine-Manual.com Manuals Downloaded 1 drap 400-500 g 1 taie d’oreiller 150-200 g 1 nappe 400-500 g 1 peignoir 900-1200 g 1 serviette éponge 150-250 g Linge ou vêtements particuliers Laine: grâce au programme 7 vous pouvez laver à la machine tous vos vêtements en laine, y compris ceux qui portent l’étiquette “ lavage à la main uniquement “ . Pour obtenir d’excellents résultats utilisez un produit lessiviel spécial et ne dépassez pas une charge de 1 kg. Soie: sélectionner le programme de lavage spécial 8 pour vêtements en soie. Il est conseillé d’utiliser une lessive spéciale pour linge délicat. Rideaux: pliez-les bien et glissez-les dans une taie d’oreiller ou dans un sac genre filet. Sélectionner le programme 8. Jeans: mettez les jeans à l’envers avant de les laver et utilisez une lessive liquide. Sélectionnez le programme 9. Système d’équilibrage de la charge Avant tout essorage, pour éviter toute vibration excessive et répartir le linge de façon uniforme, le lave-linge fait tourner le tambour à une vitesse légèrement supérieure à la vitesse de lavage. Si au bout de plusieurs tentatives, la charge n’est toujours pas correctement équilibrée, l’appareil procède à un essorage à une vitesse inférieure à la vitesse normalement prévue. En cas de déséquilibre excessif, le lave-linge préfère procéder à la répartition du linge plutôt qu’à son essorage. Pour une meilleure répartition de la charge et un bon équilibrage, nous conseillons de mélanger de grandes et petites pièces de linge. Précautions et conseils ! Ce lave-linge a été conçu et fabriqué conformément aux FR normes internationales de sécurité. Ces consignes sont fournies pour des raisons de sécurité, il faut les lire attentivement. Sécurité générale • Cet appareil est conçu pour un usage domestique. • Ce lave-linge ne doit être utilisé que par des adultes en suivant les instructions reportées dans ce mode d’emploi. • Ne jamais toucher l’appareil si l’on est pieds nus et si les mains sont mouillées ou humides. • Ne jamais tirer sur le câble pour débrancher la fiche de la prise de courant. • Ne pas ouvrir le tiroir à produits lessiviels si la machine est branchée. • Ne pas toucher à l’eau de vidange, elle peut atteindre des températures très élevées. • Ne pas forcer pour ouvrir le hublot: le verrouillage de sécurité qui protège contre les ouvertures accidentelles pourrait s’endommager. • En cas de panne, éviter à tout prix d’accéder aux mécanismes internes pour tenter une réparation. • Veiller à ce que les enfants ne s’approchent pas de l’appareil pendant son fonctionnement. • Pendant le lavage, le hublot a tendance à se réchauffer. • Deux ou trois personnes sont nécessaires pour déplacer l’appareil avec toutes les précautions nécessaires. Ne jamais le déplacer tout seul car il est très lourd. • Avant d’introduire le linge, s’assurer que le tambour est bien vide. Mise au rebut • Mise au rebut du matériel d’emballage: se conformer aux réglementations locales de manière à ce que les emballages puissent être recyclés. • La Directive Européenne 2002/96/EC sur les Déchets des Equipements Electriques et Electroniques, exige que les appareils ménagers usagés ne soient pas jetés dans le flux normal des déchets municipaux. Les appareils usagés doivent être collectés séparément afin d’optimiser le taux de récupération et le recyclage des matériaux qui les composent et réduire l’impact sur la santé humaine et l’environnement. Le symbole de la ‘’poubelle barrée’’ est apposée sur tous les produits pour rappeler les obligations de collecte séparée. Les consommateurs devront contacter les autorités locales ou leur revendeur concernant la démarche à suivre pour l’enlèvement de leur vieil appareil. Downloaded From WashingMachine-Manual.com Manuals 21 Entretien et soin FR Coupure de l’arrivée d’eau et du courant Nettoyage de la pompe • Fermer le robinet de l’eau après chaque lavage. Cela réduit l’usure de l’installation hydraulique du lave-linge et évite tout danger de fuites. Le lave-linge est équipé d’une pompe autonettoyante qui n’exige aucune opération d’entretien. Il peut toutefois arriver que de menus objets (pièces de monnaie, boutons) tombent dans la préchambre qui protège la pompe, placée en bas de cette dernière. • Débrancher la fiche de la prise de courant lors de tout nettoyage du lave-linge et pendant tous les travaux d’entretien. ! S’assurer que le cycle de lavage est bien terminé et Nettoyage du lave-linge Pour accéder à cette préchambre: Pour nettoyer l’extérieur et les parties en caoutchouc, utiliser un chiffon imbibé d’eau tiède et de savon. N’utiliser ni solvants ni abrasifs. débrancher la fiche. 1. démonter le panneau situé à l’avant du lave-linge à l’aide d’un tournevis (voir figure); Nettoyage du tiroir à produits lessiviels. Soulever le tiroir et le tirer vers soi pour le sortir de son logement (voir figure). Le laver à l’eau courante; effectuer cette opération assez souvent. 2. dévisser le couvercle en le tournant dans le sens inverse des aiguilles d’une montre (voir figure): il est normal qu’un peu d’eau s’écoule; Entretien du hublot et du tambour • Il faut toujours laisser le hublot entrouvert pour éviter la formation de mauvaise odeurs. 3. nettoyer soigneusement l’intérieur; 4. revisser le couvercle; 5. remonter le panneau en veillant à bien enfiler les crochets dans les fentes prévues avant de le pousser contre l’appareil. Contrôle du tuyau d’arrivée de l’eau Contrôler le tuyau d’alimentation au moins une fois par an. Procéder à son remplacement en cas de craquèlements et de fissures: car les fortes pressions subies pendant le lavage pourraient provoquer des cassures. ! N’utiliser que des tuyaux neufs. 22 From WashingMachine-Manual.com Manuals Downloaded Anomalies et remèdes Il peut arriver que le lave-linge ne fonctionne pas bien. Avant d’appeler le Service de dépannage (voir “Assistance”), contrôler s’il ne s’agit pas par hasard d’un problème facile à résoudre à l’aide de la liste suivante. Anomalies: Causes / Solutions possibles: Le lave-linge ne s’allume pas. • La fiche n’est pas branchée dans la prise de courant ou mal branchée. • Il y a une panne de courant. Le cycle de lavage ne démarre pas. • Le hublot n’est pas bien fermé. • La touche MARCHE/ARRÊT n’a pas été enfoncée. • La touche MARCHE/PAUSE n’a pas été enfoncée. • Le robinet de l’eau n’est pas ouvert. • Un départ différé a été sélectionné (voir “Personnalisations”). Il n’y a pas d’arrivée d’eau (le voyant de la première phase de lavage clignote rapidement). • Le tuyau d’arrivée de l’eau n’est pas raccordé au robinet. • Le tuyau est plié. • Le robinet de l’eau n’est pas ouvert. • Il y a une coupure d’eau. • La pression n’est pas suffisante. • La touche MARCHE/PAUSE n’a pas été enfoncée. Le lave-linge prend l’eau et vidange continuellement. • Le tuyau de vidange n’est pas installé à une distance du sol comprise entre 65 et 100 cm (voir “Installation”). • L’extrémité du tuyau de vidange est plongée dans l’eau (voir “Installation”). • L’évacuation murale n’a pas d’évent. Si après ces vérifications, le problème persiste, fermer le robinet de l’eau, éteindre la machine et appeler le service Assistance. Si l’appartement est situé en étage dans un immeuble, il peut y avoir des phénomènes de siphonnage qui font que le lave-linge prend et évacue l’eau continuellement. Pour supprimer cet inconvénient, on trouve dans le commerce des soupapes spéciales antisiphonnage. Le lave-linge ne vidange pas et n’essore pas. • Le programme ne prévoit pas de vidange: pour certains programmes, il faut la faire partir manuellement. • Le tuyau de vidange est plié (voir “Installation ”). • La conduite d’évacuation est bouchée. Le lave-linge vibre beaucoup pendant l’essorage. • Le tambour n’a pas été débloqué comme il faut lors de l’installation du lavelinge (voir “Installation”). • Le lave-linge n’est pas posé à plat (voir “Installation”). • Le lave-linge est coincé entre des meubles et le mur (voir “Installation”). Le lave-linge a des fuites. • Le tuyau d’arrivée de l’eau n’est pas bien vissé (voir “Installation”). • Le tiroir à produits lessiviels est bouché (pour le nettoyer voir “Entretien et soin”). • Le tuyau de vidange n’est pas bien fixé (voir “Installation”). Les voyants des options et le voyant marche/pause clignotent. Le voyant du phase de lavage et le voyant hublot verrouillé restent fixes. • Eteindre l’appareil et débrancher la fiche de la prise de courant, attendre 1 minute environ avant de rallumer. Si l’anomalie persiste, appeler le service d’assistance. Il y a un excès de mousse. • Le produit de lavage utilisé n’est pas une lessive spéciale machine (il faut qu’il y ait l’inscription “pour lave-linge”, “main et machine”, ou autre semblable). • La quantité utilisée est excessive. Downloaded From WashingMachine-Manual.com Manuals 23 FR Assistance FR Avant d’appeler le service après-vente: • Vérifier si on ne peut pas résoudre l’anomalie par ses propres moyens (voir “Anomalies et Remèdes”); • Remettre le programme en marche pour contrôler si l’inconvénient a disparu; • Autrement, contacter le Centre d’Assistance technique agréé au numéro de téléphone indiqué sur le certificat de garantie. ! Ne jamais s’adresser à des techniciens non agréés. Communiquer: • le type de panne; • le modèle de l’appareil (Mod.); • son numéro de série (S/N). Ces informations se trouvent sur la plaque signalétique apposée à l’arrière du lave-linge et à l’avant quand on ouvre la porte hublot. 24 From WashingMachine-Manual.com Manuals Downloaded Gebruiksaanwijzing WASAUTOMAAT Inhoud NL Nederlands NL Installatie, 26-27 Uitpakken en waterpas zetten Hydraulische en elektrische aansluitingen Eerste wascyclus Technische gegevens Beschrijving van de wasautomaat en starten van een programma, 28-29 Bedieningspaneel Controlelampjes Een programma starten Programma’s, 30 Programmatabel Persoonlijke instellingen, 31 IWC 5125 Instellen van de temperatuur Instellen van de centrifuge Functies Wasmiddelen en wasgoed,32 Wasmiddelbakje Voorbereiden van het wasgoed Bijzondere kledingstukken Balanceersysteem van de lading Voorzorgsmaatregelen en advies, 33 Algemene veiligheid Afvalverwijdering Onderhoud en verzorging, 34 Afsluiten van water en stroom Reinigen van de wasautomaat Reinigen van het wasmiddelbakje Onderhoud van deur en trommel Reinigen van de pomp Controleren van de buis van de watertoevoer Storingen en oplossingen, 35 Service, 36 Downloaded From WashingMachine-Manual.com Manuals 25 Installatie NL ! Het is belangrijk deze handleiding te bewaren voor latere raadpleging. In het geval u het apparaat verkoopt, of u verhuist, moet het boekje bij de wasautomaat blijven zodat de nieuwe gebruiker de functies en betreffende raadgevingen kan doornemen. Een correcte nivellering geeft de machine stabiliteit en voorkomt trillingen, lawaai en het zich verplaatsen van de automaat tijdens de werking. In het geval van vloerbedekking of een tapijt regelt u de stelvoetjes zodanig dat onder de wasmachine genoeg plaats is voor ventilatie. ! Lees de instructies aandachtig door: u vindt er belangrij- Hydraulische en elektrische aansluitingen ke informatie betreffende installatie, gebruik en veiligheid. Uitpakken en waterpas zetten Uitpakken 1. De wasautomaat uitpakken. 2. Controleer of de wasautomaat geen schade heeft geleden gedurende het vervoer. Indien dit wel het geval is moet hij niet worden aangesloten en moet u contact opnemen met de handelaar. 3. Verwijder de 3 schroeven die het apparaat beschermen tijdens het vervoer en de rubberen ring met bijbehorende afstandsleider die zich aan de achterkant bevinden (zie afbeelding). Aansluiting van de watertoevoerbuis 1. Sluit de toevoerbuis aan op de koudwaterkraan met een mondstuk met schroefdraad van 3/4 gas (zie afbeelding). Voordat u de wasautomaat aansluit moet u het water laten lopen totdat het helder is. 2. Verbind de watertoevoerbuis aan de wasautomaat door hem op de betreffende watertoevoer te schroeven, rechtsboven aan de achterkant (zie afbeelding). 4. Sluit de openingen af met de bijgeleverde plastic doppen. 5. Bewaar alle onderdelen: mocht de wasautomaat ooit worden vervoerd, dan moeten deze weer worden aangebracht. 3. Let erop dat er geen knellingen of kronkels in de buis zijn. ! Het verpakkingsmateriaal is geen speelgoed voor kinderen. ! De waterdruk van de kraan moet zich binnen de waarden Waterpas zetten van de tabel Technische Gegevens bevinden (zie bladzijde hiernaast). 1. Installeer de wasautomaat op een rechte en stevige vloer en laat hem niet steunen tegen een muur, meubel of dergelijke. 2. Als de vloer niet volledig horizontaal is kunt u de onregelmatigheid opheffen door de stelvoetjes aan de voorkant losser of vaster te schroeven (zie afbeelding); de inclinatiehoek, gemeten ten opzichte van het werkvlak, mag de 2° niet overschrijden. 26 From WashingMachine-Manual.com Manuals Downloaded ! Als de toevoerbuis niet lang genoeg is moet u zich wenden tot een gespecialiseerde winkel of een bevoegde installateur. ! Gebruik nooit tweedehands buizen. ! Gebruik de buizen die bij het apparaat worden geleverd. Aansluiting van de afvoerbuis 65 - 100 cm Verbind de buis, zonder hem te buigen, aan een afvoerleiding of aan een afvoer in de muur tussen de 65 en 100 cm van de grond ! Gebruik geen verlengsnoeren of dubbelstekkers. NL ! Het snoer mag niet gebogen of samengedrukt worden. ! De voedingskabel mag alleen door een bevoegde installateur worden vervangen. Belangrijk! De fabrikant kan niet aansprakelijk worden gesteld wanneer deze normen niet worden nageleefd. Eerste wascyclus af of hang hem aan de rand van een wasbak of badkuip, en bind de bijgeleverde steun aan de kraan (zie afbeelding). Het uiteinde van de afvoerslang mag niet onder water hangen. ! Gebruik nooit verlengstukken voor de buis; indien dit niet te vermijden is moet het verlengstuk dezelfde doorsnede hebben als de oorspronkelijke buis en mag hij niet langer zijn dan 150 cm. Na de installatie en voor u de wasautomaat in gebruik neemt, dient u een wascyclus uit te voeren met wasmiddel maar zonder wasgoed, op het programma 2. Technische gegevens Model IWC 5125 Elektrische aansluiting Afmetingen Voordat u de stekker in het stopcontact steekt moet u zich ervan verzekeren dat: breedte cm 59,5 hoogte cm 85 diepte cm 52,5 Vermogen van 1 tot 5 kg • het stopcontact geaard is en voldoet aan de geldende normen; • het stopcontact het maximum vermogen van de wasau -tomaat kan dragen, zoals aangegeven in de tabel Technische Gegevens (zie hiernaast); Elektrische aansluitingen Aansluiting waterleiding Snelheid • de spanning zich bevindt tussen de waarden die zijn aangegeven in de tabel Technische Gegevens (zie hiernaast); centrifuge ! De wasautomaat mag niet buitenshuis worden geïnstalleerd, ook niet op een beschutte plaats, aangezien het gevaarlijk is hem aan regen en onweer bloot te stellen. ! Als de wasautomaat is geïnstalleerd moet het stopcontact max.druk1MPa(10bar) min.druk0,05MPa(0,5bar) Inhoud trommel 46 liters tot 1200 toeren per minuu Testprogramma’s overeenkomstig • de contactdoos geschikt is voor de stekker van de wasautomaat. Indien dit niet zo is moet de stekker of het stopcontact vervangen worden. zie het typeplaatje met de technische eigenschappen dat op het apparaat is bevestigd Programma 2: temperatuur 60°C en 40°C richtlijn 2010/1061 Deze apparatuur voldoet aan de volgende EEC voorschriften: - 2004/108/CE (Elektromagnetische compatiabiliteit) - 2002/96/CE - 2006/95/CE (Laagspanning) gemakkelijk te bereiken zijn. Downloaded From WashingMachine-Manual.com Manuals 27 Beschrijving van de wasautomaat en starten van een programma NL Bedieningspaneel Controlelampjes VOORTGANG AAN/UIT toets TEMPERATUUR KNOP Wasmiddelbakje Toets met CYCLUS/UITGESTELDE START controlelampje START/ PAUZE Toetsen met controlelampjes FUNCTIE PROGRAMMAKNOP Controlelampje DEUR GEBLOKKEERD CENTRIFUGEKNOP Wasmiddelbakje: voor wasmiddelen en wasversterkers (zie “Wasmiddelen en wasgoed”). Controlelampje DEUR GEBLOKKEERD: om te zien of de deur kan worden geopend (zie pagina hiernaast). Toets AAN/UIT: voor het in- en uitschakelen van de wasautomaat. Toets met controlelampje START/PAUZE: om programma’s te starten of ze tijdelijk te onderbreken. N.B.: om de lopende wascyclus te pauzeren drukt u op deze toets. Het oranje licht van het betreffende controlelampje zal gaan knipperen terwijl het lampje van de lopende fase vast aan zal blijven staan. Als het controlelampje DEUR GEBLOKKEERD uit is, kunt u het deurtje openen. Om het programma te hervatten drukt u opnieuw op deze toets. PROGRAMMAKNOP: voor het instellen van de programma’s. Gedurende het programma blijft de knop stilstaan. Toetsen met controlelampje FUNCTIE: voor het selecteren van de beschikbare functies. Het controlelampje van de gekozen functie zal aanblijven. CENTRIFUGEKNOP: voor het instellen of uitsluiten van de centrifuge (zie “Persoonlijke Instellingen”). TEMPERATUURKNOP: voor het instellen van de temperatuur of koud wassen (zie “Persoonlijke Instellingen”). Controlelampjes VOORTGANG CYCLUS/UITGESTELDE START: voor het volgen van het verloop van het wasprogramma. Het controlelampje geeft de lopende fase weer. Als de functie “Uitgestelde start” is ingesteld, tonen de lampjes de tijd die resteert tot het starten van het programma (zie pagina hiernaast). 28 From WashingMachine-Manual.com Manuals Downloaded Stand- by modus Deze wasautomaat beschikt, in overeenkomst met de nieuwe normen betreffende de energiebesparing, over een systeem wat het apparaat automatisch na enkele minuten uitschakelt (stand-by) indien men het niet gebruikt. Druk kort op de ON-OFF toets en wacht tot de wasautomaat weer aangaat. Controlelampjes De controlelampjes geven belangrijke informatie. Ze geven informatie over: Uitgestelde start Als de functie “Uitgestelde Start” is geactiveerd (zie “Persoonlijke Instellingen”) zal, nadat het programma is gestart, het controlelampje dat bij de uitgestelde start hoort gaan knipperen: Controlelampjes lopende fase Als u de gewenste wascyclus heeft geselecteerd en gestart gaan de controlelampjes één voor één aan om te tonen op welk punt de cyclus is: Hoofdwas Spoelen Centrifuge Waterafvoer Einde hoofdwas Naar gelang de tijd verloopt wordt de resterende wachttijd getoond, met het knipperen van het betreffende controlelampje: Als de geselecteerde vertraging is verlopen zal het ingestelde programma van start gaan. Functietoetsen en betreffende controlelampjes Als u een functie selecteert gaat het bijbehorende controlelampje aan. Als de gekozen functie niet geschikt is voor het ingestelde programma gaat het betreffende controlelampje knipperen en zal de functie niet worden geactiveerd. Als de geselecteerde functie niet compatibel is met een optie die daarvòòr is ingesteld, zal het controlelampje van de eerder geselecteerde functie gaan knipperen en zal alleen de tweede functie worden geactiveerd; het controlelampje van de geactiveerde functie zal aangaan. Controlelampje deur geblokkeerd: Als het controlelampje aan is betekent het dat de deur is geblokkeerd om te verhinderen dat hij per ongeluk wordt geopend. Om het deurtje te openen moet u wachten tot het controlelampje uitgaat (wacht circa 3 minuten). Om de deur te openen tijdens de wascyclus drukt u op de knop START/PAUZE; als het controlelampje DEUR GEBLOKKEERD uit is, kunt u het deurtje openen. Een programma starten 1. Schakel de wasautomaat in met de AAN/UIT toets. Alle controlelampjes gaan een paar seconden aan en gaan dan weer uit en het controlelampje START/PAUZE knippert. 2. Laad het wasgoed in en sluit de deur. 3. Stel het gewenste programma in met de PROGRAMMAKNOP. 4. Stel de wastemperatuur in (zie “Persoonlijke instellingen”). 5. Stel het centrifugetoerental in (zie “Persoonlijke instellingen”). 6. Voeg wasmiddel en wasversterkers toe (zie “Wasmiddelen en wasgoed”). 7. Selecteer de gewenste functies. 8. Start het programma door op de START/PAUZE toets te drukken. Het betreffende controlelampje zal een vast groen licht vertonen. Om de ingestelde cyclus te annuleren zet u de wasautomaat op pauze door op de START/PAUZE toets te drukken en een nieuwe cyclus te kiezen. 9. Aan het einde van het programma gaat het controlelampje aan. Als het controlelampje DEUR GEBLOKKEERD uitgaat, kunt u het deurtje openen. Haal het wasgoed eruit en laat de deur op een kier staan zodat de trommel kan drogen. Schakel de wasautomaat uit in met de AAN/UIT toets. Downloaded From WashingMachine-Manual.com Manuals 29 NL Programma’s Programmatabel Programma’s NL Beschrijving van het Programma Maximale Maximaal Wasmiddel Duur cyclus Maximale lading (kg) toerental Temp (toeren per Bleek- WasverEco Eco (°C) minuut) Voorwas Wassen middel zachter Normaal Time Normaal Time Dagelijkse was 1 Katoen met voorwas: Zeer vuile witte was. 90° 1200 - 145 - 2 Katoen intensief wit: Zeer vuile witte was. 90° 1200 - 2 Katoen intensief wit (1-2): Zeer vuil wit en kleurecht bont wasgoed. 60° 1200 - 5 - 125 - 5 - 165 - 2 Katoen intensief wit (2): Zeer vuile witte en bonte fijne was. 40° 1200 - 3 Katoen: Zeer vuil wit en kleurecht bont wasgoed. 60° 1200 - 5 - 155 - 5 3,25 120 85 4 Katoen bont delicaat (3): Niet zo vuile witte en bonte was. 40° 1200 - 5 3,25 85 60 5 Synthetisch: zeer vuile kleurvaste bonte was. 60° 800 - 5 Synthetisch intensief (4): zeer vuile kleurvaste bonte was. 40° 800 - 2,5 2 100 70 2,5 2 90 65 6 Synthetisch delicat: niet zo vuile kleurvaste bonte was. 40° 800 - 2,5 2 70 50 40° 800 - - 1 - 70 - - 5 Speciale was 7 Wol: voor wol, kasjmier, etc. 8 Zijde/Gordijnen: voor zijde, viscose, lingerie. 30° 0 - - 1 - 55 - 9 Jeans 40° 800 - - 3 - 60 - 30° 800 - - 1,5 - 15 - 11 Sport Intensief 30° 600 - - 3 - 85 - 12 Sport Licht 30° 600 - - 3 - 58 - Max. 2 paar. - 55 - Express: voor het snel opfrissen van niet zo vuil wasgoed 10 (niet geschikt voor wol, zijde en handwas). Sport 30° 600 - - Spoelen - 1200 - - 5 - 40 - Centrifugeren - 1200 - - - - 5 - 15 - Afpompen - 0 - - - - 5 - 2 - 13 Sport Schoenen Delprogramma's De duur van de cyclus die wordt aangegeven op het display of op de gebruiksaanwijzing is een geschatte waarde die wordt gecalculeerd bij standaard omstandigheden. De effectieve tijd kan variëren aan de hand van talloze factoren zoals temperatuur en druk van de watertoevoer, de kamertemperatuur, de hoeveelheid wasmiddel, de hoeveelheid en type lading, de balancering van de was en de geselecteerde aanvullende opties. Voor alle Test Institutes: 1) Controleprogramma volgens de norm 2010/1061: selecteer het programma 2 met een temperatuur van 60°C en 40°C. 2) Programma katoen lang: selecteer het programma 2 met een temperatuur van 40°C. 3) Programma katoen kort: selecteer het programma 4 met een temperatuur van 40°C. 4) Synthetische Programma samen: selecteer het programma 5 met een temperatuur van 40°C. Speciale programma’s Express (programma 10) is bedoeld voor het snel wassen van niet zo vuil wasgoed: het duurt slechts 15 minuten en bespaart dus elektriciteit en tijd. Met het programma (10 op 30 °C) kunt u verschillende soorten stoffen samen wassen (behalve zijde en wol) met een lading van max. 1,5 kg. Sport Intensief (programma 11) is ontwikkeld voor het wassen van zeer vuile sportkleding (trainingspakken, sportbroeken, enz.). Om optimale resultaten te bereiken raden wij u aan nooit de maximaal aangegeven hoeveelheid te overschrijden die staat aangegeven in de “Programmatabel”. Sport Licht (programma 12) is ontwikkeld voor het wassen van niet zo vuile sportkleding (trainingspakken, sportbroeken, enz.). Om optimale resultaten te bereiken raden wij u aan nooit de maximaal aangegeven hoeveelheid te overschrijden die staat aangegeven in de “Programmatabel”. We raden u aan een vloeibaar wasmiddel te gebruiken, met een hoeveelheid die voldoende is voor een halve lading. Sport Schoenen (programma 13) is ontwikkeld voor het wassen van sportschoenen. Voor optimale resultaten dient u nooit meer dan 2 paar tegelijk te wassen. 30 From WashingMachine-Manual.com Manuals Downloaded Persoonlijke instellingen Instellen van de temperatuur NL Door aan de TEMPERATUURKNOP te draaien kunt u de wastemperatuur instellen (zie Programmatabel). De temperatuur kan verlaagd worden tot aan koud wassen ( ). De machine voorkomt dat u een temperatuur instelt die hoger is dan het maximum voorzien voor dat programma. Instellen van de centrifuge Door aan de CENTRIFUGEKNOP te draaien stelt u de snelheid van de centrifuge van het gekozen programma in. De maximum snelheden voorzien voor de programma’s zijn: Programma’s Maximum snelheid Katoen 1200 toeren per minuut Synthetisch 800 toeren per minuut Wol 800 toeren per minuut Zijde alleen waterafvoer U kunt de snelheid van de centrifuge verminderen, of uitsluiten met het symbool . De machine voorkomt automatisch dat er een centrifuge wordt uitgevoerd die sneller is dan het maximum voorzien voor dat programma. Functies De verschillende functies van de wasautomaat zorgen voor de door u gewenste schone en witte was. Voor het activeren van de functies: 1. druk op de toets die bij de gewenste functie hoort; 2. het aangaan van het betreffende controlelampje geeft aan dat de functie actief is. N.B.: Het snel knipperen van het lampje geeft aan dat de bijbehorende functie niet gekozen kan worden bij het ingestelde programma. Als u deze optie selecteert zullen de mechanische beweging, de temperatuur en het water geoptimaliseerd worden voor een beperkte lading van niet zo vuil katoenen en synthetisch wasgoed (zie “Programmatabel”). Met “ ” kunt u wassen in een kortere tijd en kunt u water en energie besparen. We raden u aan een hoeveelheid vloeibaar wasmiddel te gebruiken die voldoet voor een halve lading. ! Deze optie kan niet worden geactiveerd bij de programma’s 1, 2, 7, 8, 9, 10, 11, 12, 13, , , . Bleken Bleekprogramma in staat de meest hardnekkige vlekken te verwijderen. Vergeet niet bleekwater in het hiervoor bestemde bakje 4 te gieten (zie “Bleekcyclus”). ! Deze optie kan niet worden geactiveerd bij de programma’s 1, 7, 8, 9, 10, 11, 12, 13, , . Extra Spoelen Door deze functie te selecteren verhoogt u het spoelresultaat en zorgt u ervoor dat elk spoor van wasmiddel verdwijnt. Deze optie is vooral nuttig bij personen met een gevoelige huid. ! Deze optie kan niet worden geactiveerd bij de programma’s 10, , . Uitgestelde Start Stelt de start van de wasautomaat tot aan 12 uur uit. Druk meerdere malen op de toets totdat het controlelampje dat bij de gewenste vertraging hoort aangaat. Bij de vijfde druk op de toets wordt de functie uitgeschakeld. N.B.: Als de START/PAUZE knop eenmaal is ingedrukt kan de vertraging alleen verminderd worden voor u het ingestelde programma van start doet gaan. ! Deze optie is bij alle programma’s mogelijk. Downloaded From WashingMachine-Manual.com Manuals 31 Wasmiddelen en wasgoed NL Wasmiddelbakje Voorbereiden van het wasgoed Een goed wasresultaat hangt ook af van de juiste dosis wasmiddel: te veel wasmiddel maakt het wassen niet beter. Het wasmiddel blijft aan de binnenzijde van de wasautomaat zitten en zorgt voor het vervuilen van het milieu. • Verdeel het wasgoed volgens: - het soort stof / het symbool op het etiket. - de kleuren: scheid de bonte was van de witte was. • Leeg de zakken en controleer de knopen. • Overschrijd het aangegeven gewicht, berekend voor droog wasgoed, nooit: Kleurechte stoffen: max 5 kg Synthetische stoffen: max 2,5 kg Fijne stoffen: max 2 kg Wol: max 1 kg Zijde: max 1 kg ! Gebruik nooit wasmiddelen voor handwas aangezien die te veel schuim vormen. Trek het laatje naar voren en giet het wasmiddel of de wasversterker er als volgt in: 4 1 2 3 bakje 1: Wasmiddel voor voorwas (poeder) Voordat u het wasmiddel erin strooit moet u controleren of het bakje 4 is verwijderd. bakje 2: Wasmiddel voor hoofdwas (poeder of vloeibaar) Het vloeibare wasmiddel moet vlak voor de start in het bakje worden gegoten. bakje 3: Wasversterkers (wasverzachter, enz.) De wasverzachter mag niet boven het roostertje uitkomen. extra bakje 4: Bleekmiddel Bleekcyclus ! Het traditionele bleekmiddel kan alleen voor stevig wit wasgoed gebruikt worden, terwijl het delicate bleekmiddel geschikt is voor gekleurde stoffen, synthetische stoffen en wol. Plaats het bijgeleverde extra bakje 4 in bakje 1. Let er bij het gieten van het bleekwater op dat het niveau “max”, aangegeven op de centrale pin, niet wordt overschreden (zie afb.). Als u alleen wilt bleken giet u het bleekwater in het extra bakje 4, stelt u het programma “Spoelen” en activeert u de functie “Bleken” ( . Voor bleken tijdens het wassen giet u het wasmiddel en de toevoegmiddelen in de bakjes, stelt u het gewenste programma in en activeert u de functie “Bleken” ( . Gebruik van het extra bakje 4 sluit het voorwassen uit. 32 From WashingMachine-Manual.com Manuals Downloaded Hoeveel weegt wasgoed? 1 laken 400-500 g. 1 sloop 150-200 g. 1 tafelkleed 400-500 g. 1 badjas 900-1200 g. 1 handdoek 150-250 g. Bijzondere kledingstukken Wol: met het programma 7 is het mogelijk alle wollen kledingstukken in de wasautomaat te wassen, ook die met het etiket “alleen handwas” . Voor de beste resultaten dient u een specifiek wasmiddel te gebruiken en nooit de 1,5 kg wasgoed te overschrijden. Zijde: gebruik het speciale programma 8 om alle zijden kledingstukken te wassen. We raden u aan een speciaal wasmiddel voor fijne was te gebruiken. Gordijnen: vouw de gordijnen en doe ze in de bijgeleverde zak. Gebruik het programma 8. Jeans: draai de kledingstukken binnenstebuiten voor u ze wast en gebruik een vloeibaar wasmiddel. Gebruik het programma 9. Balanceersysteem van de lading Om overmatige trillingen te vermijden verdeelt de automaat de lading voor het centrifugeren op een gelijkmatige manier. Dit gebeurt door de trommel te laten draaien op een snelheid die iets hoger ligt dan de wassnelheid. Als na herhaaldelijke pogingen de lading nog steeds niet goed is gebalanceerd, zal de wasautomaat de centrifuge op een lagere snelheid uitvoeren dan die voorzien was. Als de lading zeer uit balans is zal de wasautomaat een verdeling uitvoeren in plaats van een centrifuge. Teneinde een betere distributie van de waslading en een juiste balancering te bereiken raden wij u aan kleine en grote kledingstukken te mengen. Voorzorgsmaatregelen en advies ! De wasmachine is ontworpen en geproduceerd volgens de internationale veiligheidsnormen. Deze aanwijzingen zijn voor uw eigen veiligheid geschreven en moeten aandachtig worden doorgenomen. Consumenten moeten contact opnemen met de locale autoriteiten voor informatie over de juiste wijze van vernietiging van hun oude apparaat. Algemene veiligheid • Het apparaat mag niet worden gebruikt door personen (kinderen inbegrepen), met beperkte lichamelijke, sensorische of mentale vermogens of met onvoldoende ervaring en kennis, tenzij het gebruik plaatsvindt onder het toezicht of volgens de instructies van een persoon die verantwoordelijk is voor hun veiligheid. Kinderen moeten in de gaten worden gehouden om te verzekeren dat ze niet met het apparaat spelen. • Dit apparaat is uitsluitend ontworpen voor huishoudelijk niet-professioneel gebruik. • Raak de machine niet aan als u blootsvoets bent of met natte of vochtige handen of voeten. • Trek de stekker nooit uit het stopcontact door aan het snoer te trekken, maar altijd door de stekker zelf beet te pakken. • Open het wasmiddelbakje niet terwijl de machine in werking is. • Raak het afvoerwater niet aan aangezien het zeer heet kan zijn. • Forceer de deur nooit: het veiligheidsmechanisme dat een ongewild openen van de deur voorkomt, kan beschadigd worden. • Probeer in geval van storingen nooit zelf de interne mechanismen van de wasautomaat te repareren. • Zorg ervoor dat kleine kinderen niet te dicht bij de machine komen als deze in werking is. • De deur kan tijdens het wassen zeer heet worden. • Als de machine verplaatst moet worden, doe dit dan met twee of drie personen tegelijk en zeer voorzichtig. Doe dit nooit alleen, want het apparaat is erg zwaar. • Voordat u het wasgoed in de automaat laadt, moet u controleren of hij leeg is. Afvalverwijdering • Het wegdoen van het verpakkingsmateriaal: houdt u aan de plaatselijke normen zodat het materiaal hergebruikt kan worden. • De Europese Richtlijn 2002/96/EC over Vernieti ging van Electrische en Electronische Apparatuur, vereist dat oude huishoudelijke electrische apparaten niet mogen vernietigd via de normale ongesorteerde afvalstroom. Oude apparaten moeten apart worden ingezameld om zo het hergebruik van de gebruikte materialen te optimaliseren en de negatieve invloed op de gezondheid en het milieu te reduceren. Het symbool op het product van de “afvalcontainer met een kruis erdoor” herinnert u aan uw verplichting, dat wanneer u het apparaat vernietigt, het apparaat apart moet worden ingezameld. Downloaded From WashingMachine-Manual.com Manuals 33 NL Onderhoud en verzorging NL Afsluiten van water en stroom Reinigen van de pomp • Sluit na iedere wasbeurt de kraan af. Hiermee beperkt u slijtage van de waterinstallatie van de wasmachine en voorkomt u lekkage. De wasautomaat is voorzien van een zelfreinigende pomp en hoeft dus niet te worden onderhouden. Het kan echter gebeuren dat kleine voorwerpen (muntjes, knopen) in het voorvakje dat de pomp beschermt en zich aan de onderkant ervan bevindt, terechtkomen. • Sluit altijd eerst de stroom af voordat u de wasautomaat gaat schoonmaken en gedurende onderhoudswerkzaamheden. ! Verzeker u ervan dat de wascyclus klaar is en haal de stekker uit het stopcontact. Reinigen van de wasautomaat Toegang tot het voorvakje: De buitenkant en de rubberen onderdelen kunnen met een spons en een lauw sopje worden schoongemaakt. Gebruik nooit schuurmiddelen of oplosmiddelen. Reinigen van het wasmiddelbakje Verwijder het bakje door het op te lichten en naar voren te trekken (zie afbeelding). Was het onder stromend water. Dit moet u regelmatig doen. 1. verwijder het afdekpaneel aan de voorkant van de wasautomaat met behulp van een schroevendraaier (zie afbeelding); 2. draai het deksel eraf, tegen de klok in (zie afbeelding): het is normaal dat er een beetje water uit komt; Onderhoud van deur en trommel • Laat de deur altijd op een kier staan om nare luchtjes te vermijden. 3. maak de binnenkant goed schoon; 4. schroef het deksel er weer op; 5. monteer het paneel weer, met de haakjes goed bevestigd in de juiste openingen, voordat u het paneel tegen de machine aandrukt. Controleren van de buis van de watertoevoer Controleer minstens eenmaal per jaar de slang van de watertoevoer. Als er barstjes of scheuren in zitten moet hij vervangen worden: gedurende het wassen kan de hoge waterdruk onverwachts breuken veroorzaken. ! Gebruik nooit tweedehands buizen. 34 From WashingMachine-Manual.com Manuals Downloaded Storingen en oplossingen Het kan gebeuren dat de wasautomaat niet werkt. Voor u contact opneemt met de Servicedienst (zie “Service”)moet u controleren of het niet een storing betreft die u zelf makkelijk kunt verhelpen met behulp van de volgende lijst. Storingen: Mogelijke oorzaken / Oplossing: De wasautomaat gaat niet aan. • De stekker zit niet in het stopcontact of niet ver genoeg om contact te maken. • Het hele huis zit zonder stroom. De wascyclus start niet. • De deur zit niet goed dicht. • De ON/OFF toets is niet ingedrukt. • De START/PAUSE toets is niet ingedrukt. • De waterkraan is niet open. • De uitgestelde start is ingesteld (zie “Persoonlijke Instellingen”). De wasautomaat heeft geen watertoevoer (het controlelampje van de eerste wasfase knippert snel). • De watertoevoerbuis is niet aangesloten op de kraan. • De buis is gebogen. • De waterkraan is niet open. • Het hele huis zit zonder water. • Er is onvoldoende druk. • De START/PAUSE toets is niet ingedrukt. De wasautomaat blijft water aanen afvoeren. • De afvoerbuis is niet op 65 tot 100 cm afstand van de grond af geïnstalleerd (zie “Installatie”). • Het uiteinde van de afvoerbuis ligt onder water (zie “Installatie”). • De afvoer in de muur heeft geen ontluchting. Als na deze controles het probleem niet is opgelost, moet u de waterkraan dichtdraaien, de wasautomaat uitzetten en de Servicedienst inschakelen. Als u op een van de hoogste verdiepingen van een flatgebouw woont kan zich een hevelingsprobleem voordoen, waarbij de wasautomaat voortdurend water aanen afvoert. Om deze storing te verhelpen zijn er in de handel speciale beluchters te koop. De wasautomaat voert het water niet af of centrifugeert niet. • Het programma voorziet geen afvoer: bij enkele programma’s moet dit met de hand worden gestart (zie “Starten en Programma’s”). • De afvoerbuis is gebogen (zie “Installatie”). • De afvoerleiding is verstopt. De machine trilt erg tijdens het centrifugeren. • De trommel is bij het installeren niet op de juiste wijze gedeblokkeerd (zie “Installatie”). • De wasautomaat staat niet goed recht (zie “Installatie”). • De wasautomaat staat te krap tussen meubels en muur (zie “Installatie”). De wasautomaat lekt. • De buis van de watertoevoer is niet goed aangeschroefd (zie “Installatie”). • Het wasmiddelbakje is verstopt (voor reiniging zie “Onderhoud en verzorging”). • De afvoerbuis is niet goed aangesloten (zie “Installatie”). De controlelampjes van de “Functies” en het controlelampje “START/PAUSE” gaan knipperen, en een van de controlelampjes van de “lopende fase” en van “deur geblokkeerd” blijven vast aanstaan. • Doe de wasautomaat uit en haal de stekker uit het stopcontact. Wacht circa 1 minuut en doe hem daarna weer aan. Als de storing voortzet, dient u de Servicedienst in te schakelen. Er ontstaat teveel schuim. • Het wasmiddel is niet bedoeld voor wasautomaten (er moet “voor wasautomaat”, “handwas en machinewas”, of dergelijke op staan). • U heeft teveel wasmiddel gebruikt. Downloaded From WashingMachine-Manual.com Manuals 35 NL Service 195093014.00 06/2011 - Xerox Fabriano NL Voordat u de Servicedienst inschakelt: • Controleer eerst of u het probleem zelf kunt oplossen (zie “Storingen en oplossingen”). • Start het programma opnieuw om te controleren of de storing is verholpen; • Als dit niet het geval is moet u contact opnemen met de erkende Technische Servicedienst via het telefoonnummer dat op het garantiebewijs staat. ! Wendt u nooit tot een niet erkende installateur. Vermeld: • het type storing; • het model van de machine (Mod.); • het serienummer (S/N); Deze informatie vindt u op het typeplaatje aan de achterkant van de wasautomaat en aan de voorzijde als u het deurtje opendoet. 36 From WashingMachine-Manual.com Manuals Downloaded