1
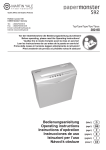
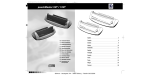
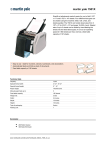
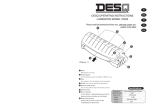
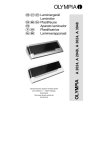
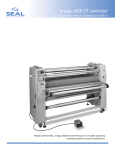
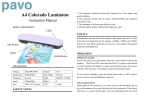
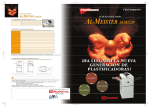
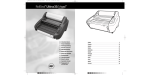
Papermonster 12"
Business Laminator
- LA3
Instruction Manual
Provided By
http://www.MyBinding.com
http://www.MyBindingBlog.com
LA4
Postfach / p.o.box 1420
D-88672 Markdorf / Germany
Tel.: +49(0)7544/60-0
Fax: +49(0)7544/60-248
E-mail: [email protected]
Internet: www.martinyale.de
Typ/Type/Type/Tipo/Típus:
397
Vor der Inbetriebnahme die Bedienungsanleitung durchlesen!
Before operating, please read the Operating Instructions!
Veuillez lire le mode d’emploi avant la mise en service!
Leer las instrucciones de uso antes de la puesta en servicio!
Prima della messa in funzione leggere attentamente le istruzioni!
Před uvedením do provozu si přečtěte návod k obsluze!
Bedienungsanleitung
Operating instructions
Instructions d’opération
Instrucciones de uso
Istruzioni per l’uso
Návod k obsluze
(Seite 2-3)
D
(page 4-5)
GB
(page 6-7)
F
(página 8-9)
E
(pagina 10-11)
I
(strana 12-13)
CZ
LAMINIERGERÄT
D
LA4
WICHTIGE SICHERHEITSHINWEISE
« Zur Benutzung muss das Gerät
standsicher (ebene Grundfläche)
aufgestellt sein!
« Verletzungsgefahr! Nicht mit den
Fingern in die Einlassöffnung fassen!
« Das Gerät darf nur außerhalb der
Reichweite von Kindern aufgestellt werden!
Sollte das Gerät in einem Umfeld von
Kindern eingesetzt werden müssen,
ist die Aufsicht durch einen befugten
Erwachsenen notwendig.
« Reparaturen dürfen nur von einem
Fachmann durchgeführt werden!
Zur Gewährleistung der Sicherheit
dürfen nur Original-MartinYale-Ersatzteile verwendet werden.
« Vor dem Öffnen des Gerätes ist
der Netzstecker zu ziehen!
FUNKTIONSELEMENTE
3
2
4
Legende
1 Laminiereinsatz
2 Ausgangsschacht
3 ABS-Schalter
4 OFF/AUS
5 HOT/HEISS
6 Anzeige
7 Schiebeschalter
8 COLD/KALT
5
8
1
6
7
Abb. 1
BEDIENUNGSANLEITUNG
(A) HEISSLAMINIEREN
Achtung!
Laminator-Oberseite während des
Betriebs nicht berühren.
Die Geräteoberseite wird während
des Betriebs sehr heiß und muss
nach Gebrauch ca. 3 - 4 Stunden
abkühlen.
Achtung!
In diesem Betriebsmodus keine wärmeempfindlichen Materialien, wie
z.B. Thermofax-Papier laminieren.
Diese Materialien sind nur für Kaltlaminierverfahren geeignet.
2. Schalter auf HOT (HEISS) stellen, um den
Vorheizprozess zu starten. Die Anzeige
leuchtet ROT auf.
3. Nach 3 - 5 Minuten Vorheizdauer leuchtet die
Anzeige BLAU, d.h. dass der Laminator die
richtige Betriebstemperatur erreicht hat und
zum Laminieren bereit ist.
4. Laminierobjekt in die Laminiertasche einlegen, dabei in der Tasche an die bereits versiegelte Kante anlegen. Um das Objekt herum einen Rand von 3 - 5 mm freilassen.
6. Die Laminiertasche durchläuft den Laminator
und wird an der Laminator-Rückseite wieder
ausgegeben.
1. Netzteil des Laminators an eine Steckdose
anschließen.
9. Netzteil des Laminators von der Steckdose
trennen.
(B) KALTLAMINIEREN
WICHTIG
Vor dem Kaltlaminieren muss der
Laminator etwa 2 Stunden lang
abkühlen, wenn er von Heiß- auf
Kaltlaminieren umgestellt wird.
Hinweis
Die Laminiertaschen müssen eine
Stärke von höchstens 250 Mikrometer (2 x 125 Mikrometer pro
Seite) und mindestens 100 Mikrometer (2 x 50 Mikrometer pro Seite)
aufweisen.
5. Die versiegelte Kante der Laminiertasche
gerade in die Mitte der Laminator-Öffnung
einschieben.
Abb. 2
8. Schalter nach Gebrauch auf AUS (OFF) stellen.
7. Manche Papiersorten werden nicht gleichmäßig laminiert oder sehen trübe aus. In diesem
Fall kann das Laminierobjekt erneut in den
Laminator eingelegt werden, um den Laminierprozess zu wiederholen.
2
Abb. 3
1. Netzteil des Laminators an eine Steckdose
anschließen.
2. Schalter auf COLD (KALT) stellen, um den
Laminierprozess zu starten. Die Anzeige
leuchtet ROT auf.
3. Kalt-Laminiertasche gerade in die Mitte der
Laminator-Öffnung einschieben. Nur Laminiertaschen verwenden, die ausdrücklich für
Kaltlaminierverfahren geeignet sind.
LAMINIERGERÄT
D
WARTUNG
BEDIENUNGSANLEITUNG
4. Die Laminiertasche durchläuft den Laminator
und wird an der Laminator-Rückseite wieder
ausgegeben.
Laminiertasche entnehmen, wenn sie sich
nicht mehr bewegt.
5. Schalter nach Gebrauch auf AUS (OFF) stellen.
6. Netzteil des Laminators von der Steckdose
trennen.
LA4
1. Gerät nach Gebrauch ausschalten und die
kleinen Öffnungen nicht abdecken, damit die
Hitze entweichen kann.
2. Auf dem Gerät keine schweren oder scharfen
Materialien ablegen, um das Gerät nicht zu
deformieren oder zu beschädigen.
3. Vor und nach dem Laminieren ein Blatt weißes Papier einlegen, um ggf. vorhandenen
Staub von der Walze zu entfernen.
4. Geräteoberflächen nicht mit ätzenden Lösungsmitteln reinigen. Beim Reinigen des
Geräts mit einem feuchten Tuch darauf achten, dass kein Wasser in das Gerät tropft, da
ansonsten Störungen in der Elektronik entstehen können.
5. Wird das Gerät über einen längeren Zeitraum
nicht benutzt, sollte es mit Plastikfolie oder
einem Tuch abgedeckt werden, um es vor
Staub zu schützen.
FOLIENSTAU BEHEBEN
Der Laminator ist mit einer Anti-Folienstaufunktion ausgerüstet, mit der sämtliche Folienstaus
beim Laminieren behoben werden können.
1. Schalter auf OFF (AUS) stellen und den Laminator von der Stromversorgung trennen,
sobald ein Stau auftritt. Laminator kurz abkühlen lassen.
2. Anti-Folienstauschalter (ABS) auf der Geräterückseite in Pfeilrichtung schieben und
festhalten, anschließend die gestaute Folie
vollständig aus der Laminator-Öffnung entfernen.
1
Abb. 4
Legende
1 ABS-Schalter
STÖRUNGSBESEITIGUNG
PROBLEM
GRUND
LÖSUNG
1. Die Geräteanzeige leuchtet blau, das lami- 1. Unsachgemäße Verwendung von Laminiernierte Material kommt nach dem Einlegen über folie, z.B.: ungleichmäßig laminierte Kanten der
einen längeren Zeitraum nicht aus dem Ausga- Folie verunreinigen die Walze mit Klebstoff; zu
beschacht und das Gerät verursacht Geräusche viel freier Bereich an der Folienvorderkante; die
Stärke des laminierten Dokuments liegt über der
sowie einen unangenehmen Geruch.
max. Laminierstärke.
Strom ausschalten und Gerät vom Netz trennen, gestaute Folie aus dem Einsatz entfernen;
besteht das Problem weiterhin, bitte vom Fachmann warten lassen..
2. Folienstau am Ausgangsschacht..
2. Die Stromanzeige leuchtet nicht..
1. Der Gerätestecker ist noch nicht eingesteckt.
2. Der Netzschalter ist noch nicht eingeschaltet.
3. Die elektrische Sicherung ist defekt..
Überprüfen, dass das Gerät mit der Stromversorgung verbunden ist, bzw. dass der Netzschalter
eingeschaltet ist oder einen Wartungstechniker
bitten, den Stromkreis zu prüfen; andernfalls das
Gerät bitte ins Wartungszentrum einsenden.+
3. Treten andere Probleme auf, Gerät abschalten und ins Wartungszentrum einsenden.
ENTSORGUNG
ENTSORGUNG DER MASCHINE:
Entsorgen Sie die Maschine am
Ende ihrer Lebensdauer stets umweltgerecht. Geben Sie keine Teile
der Maschine oder der Verpackung
in den Hausmüll.
SONDERZUBEHÖR
Benennung
Best.-Nr.
XXXXX
xxxxx
Hinweis: Bei Nachbestellung von Sonderzubehörteilen und bei Ersatzteilbedarf wenden Sie sich
bitte an Ihren Fachhändler..
Stromverbrauch:
Max. Laminierbreite:
Max. Laminierstärke:
Vorheizzeit:
Betriebszeit:
Laminiergeschwindigkeit:
Nettogewicht:
Abmessungen (L*B*H):
3
TECHNISCHE DATEN
220 V - 240 VAC, 50 Hz
230 mm
(125 x 2) Mikrometer
3 - 5 Min.
30 Min. ein, 30 Min. aus
200 mm/Min.
0,95 kg
385 x 110 x 66 mm
LAMINATOR
GB
LA4
IMPORTANT SAFETY NOTES
« Mount the machine in a stable position for use (on a level surface).
« Danger of injury! Never insert fingers into opening!
« Repairs should only be carried out
by a qualified specialist.
To ensure safety, only original
Martin Yale spare parts should be
used.
« Always ensure the machine is
mounted out of the reach of children.
If the cutter is to be used by children in certain circumstances, they
must be supervised by a responsible
adult.
« Always unplug the machine from
the mains power supply before
opening the machine!
FUNCTIONAL ELEMENTS
3
2
4
Legend
1 Laminating insert
2 Rear exit
3 ABS Switch
4 OFF
5 HOT
6 Indicator
7 Slide switch
8 COLD
5
8
1
6
7
Figure 1
OPERATION GUIDE
(A) HOT LAMINATING
Warning
Do not touch the top of the laminator during use.
The top of the laminator gets very
hot during use and takes approx.
3–4 hours to cool down after use.
Warning
Do not laminate any heat-sensitive
material e.g. thermo-fax paper in
this mode.
These materials are only suitable
for cold laminating.
2. Slide the switch to HOT to start the heating
process. The indicator will light up in RED.
3. After 3–5 minutes heating process, the indicator will light up in BLUE, meaning the laminator has reached the correct operating temperature and is ready to laminate.
4. Place the item to be laminated into the laminating pouch, centring it within the pouch
alongside the pre-sealed edge. Leave a margin of 3–5 mm all round the item.
Note
Do not use pouches thicker than
250 micron (2 x 125 micron per
side) or less than 100 micron
(2 x 50 micron per side).
8. Slide the switch to OFF after use.
9. Disconnect the laminator from the power supply outlet.
(B) COLD LAMINATING
IMPORTANT
Cold laminating requires the laminator to be cooled down for about
2 hours when it is switched from
hot to cold laminating
1. Connect the laminator to the power supply
outlet.
5. Insert the sealed edge of the laminating
pouch straightly into the centre of the laminator opening.
6. The laminating pouch will pass through the
laminator and exit at the rear of the laminator.
Figure 2
1. Connect the laminator to the power supply
outlet.
7. Some sorts of paper do not laminate evenly,
or appear somewhat cloudy. In such cases
the lamination can be fed through the laminator a second time and the lamination process
repeated.
4
Figure 3
2. Slide the switch to COLD to start the lamination process. the indicator light will light up in
RED.
3. Insert the could laminating pouches straightly
into the centre of the laminator opening. Only
use laminating pouches that are expressly
suitable for cold laminating.
LAMINATOR
GB
LA4
OPERATION GUIDE
4. The laminating pouch will pass through the
laminator and exit at the rear of the laminator.
Remove the laminating pouch when it has
stopped moving.
5. Slide the switch to OFF after use.
6. Disconnect the laminator from the power supply outlet.
MAINTENANCE
1. After using the machine, pls plug off the machine and pls don‘t cover up the small holes
so as to let out the heat.
2. Don‘t place heavy ore sharp materials onto
the machine in order not to distort or damage
the machine.
3. Before and after laminating, you may insert
1 pc of white paper so as to take out the possible dust in the roller.
4. Don‘t clean the surface of the machine with
corrosive solvent. Don‘t drop any water inside
the machine when cleaning the machine with
a wet cloth, otherwise, it may led to problems
in PCB.
5. If the machine is unused for a long time, pls
cover up the machine with a plastic or cloth to
get rid of the dust.
CLEARING A BLOCKAGE
This laminator is equipped with an anti-blockage
function to resolve any blockage of the laminating items during laminating.
1. Slide the switch to OFF and disconnect the
laminator from the power supply outlet immediately when its jammed. Cool the laminator
down briefly.
2. Slide and hold the anti-blockage switch (ABS)
on the back of the laminator as in the direction indicated by the arrow sign, and pull the
jammed item completely out from the laminator opening.
1
Figure 4
Legend
1 ABS Switch
BRIEF PROBLEM SHOOTING
PROBLEMS
1. When the Machine is in blue indicator, the laminating material doesn‘t come out from the exit
after inserting for a long time, and there is noise
as well as bad smell coming from the machine.
REASONS
SOLUTIONS
1. Improper use of laminating film, such as: une- Please switch off the power and unplug the maven laminates edges on the film which makes the chine, pull out the jammed films from the insert;
roller stuck with glue; you reserve too much area if there is still any problem, please turn to profesin the front of the film; the laminated thickness sional for maintenance.
has exceeded the max. laminating thickness.
2. There is a barrier at the rear exit.
2. The power indicator is not on.
1. The machine is not yet plug in;
2. The power switch is not switched on;
3. The electric current fuse has been destroyed.
Pls check and make sure if the machine is plug
in or not and if the power switch is switched on
or not, or pls ask the maintenance personnel to
check the circuit; otherwise, pls send the machine to maintenance centre.
3. If other problems happen, pls plug off the machine and send it to maintenance centre.
MALFUNCTION
DISPOSING OF THE MACHINE:
Dispose of the machine in an environmentally sound fashion at the
end of its usefull service life. Do not
dispose of any of the parts included
in the machine or its packing with
household trash.
SPECIAL ACCESSOIRES
Description
XXXXX
Note: For orders of special accessoires and spare parts, please contact your dealer.
TECHNICAL DATA
Power consumption:
Max. laminating width:
Max. laminating thickness:
Preheating time:
Working time:
Laminating speed:
Net Weight:
Dimensions (L*W*H):
5
220 V - 240 VAC, 50 Hz 1.1A
230 mm
(125 x 2) mic
3–5 min.
30 min. on, 30 min. off
200 mm/min.
0.95 kg
385 x 110 x 66 mm
Order-No.
xxxxx
APPAREIL DE LAMINAGE
F
LA4
RECOMMANDATIONS IMPORTANTES DE SÉCURITÉ
« La machine doit être installée en
position stable (surface plane)
avant l‘utilisation!
« Risque de blessure! N’introduisez
jamais les doigts dans l’ouverture!
« La machine doit impérativement
être installée hors de portée des
enfants!
Si la machine doit être utilisée dans
une zone où séjournent des enfants,
un adulte autorisé doit se charger de
leur surveillance.
« Les réparations ne doivent être effectuées que par un spécialiste!
Afin de garantir la sécurité, seules
des pièces de rechange d‘origine
Martin Yale doivent être utilisées.
« Débrancher le raccordement réseau avant d’ouvrir l’installation!
ELEMENTS FONC TIONNELS
3
2
4
Légende
1 Fente
2 Sortie arrière
3 Interrupteur ABS
4 OFF
5 CHAUD
6 Voyant
7 Interrupteur à glissière
8 FROID
5
8
1
6
7
fig. 1
MODE D’EMPLOI
(A) LAMINAGE A CHAUD
Avertissement
Ne jamais toucher le dessus de la
lamineuse pendant son utilisation.
La partie supérieure de la lamineuse est extrêmement chaude
pendant son fonctionnement, son
refroidissement dure environ 3 à
4 heures une fois la machine arrêtée.
Avertissement
Il est fortement prohibé de laminer
du matériau sensible à la chaleur
comme le papier thermique pour
fax.
Les matériaux non résistants à la
chaleur ne peuvent être utilisés
que pour le laminage à froid.
1. Branchez la lamineuse à une source de courant.
8. Poussez l’interrupteur vers OFF après l’utilisation de la lamineuse.
2. Poussez l’interrupteur à glissière sur CHAUD
pour lancer le chauffage. Le voyant est alors
au ROUGE.
9. Débranchez la lamineuse de l’alimentation
en courant.
3. Au bout de 3 à 5 minutes de chauffage le
voyant passe au BLEU. La lamineuse a atteint la bonne température et est prête à l’emploi.
4. Introduisez l’objet à laminer dans la poche de
laminage, centrez-le à l’intérieur de la poche
côté de la bordure pré-scellée. Prévoyez une
marge de 3 à 5 mm à la périphérie de l’objet.
IMPORTANT
Le laminage à froid nécessite environ 2 heures de refroidissement
de la lamineuse, lorsqu’elle doit
passer du mode laminage à chaud
au mode laminage à froid.
Remarque
Ne pas utiliser de poches plus
épaisses que 250 microns (2 x 125
microns par côté) ou inférieures à
100 microns (2 x 50 microns par
côté).
5. Insérez les bords scellés de la poche de laminage directement au centre de l’ouverture de
la lamineuse.
6. La poche de laminage doit passer à travers la
lamineuse et sortir à l’arrière.
fig. 2
(B) LAMINAGE A FROID
7. Certains types de papier ne se laissent pas
laminer sans se froisser ou présentent un aspect brumeux. Si tel est le cas, l’objet laminé
peut être introduit une seconde fois dans la
lamineuse et le laminage répété.
6
fig. 3
1. Branchez la lamineuse sur une source de
courant.
2. Poussez l’interrupteur à glissière vers FROID
de façon à lancer le laminage. Le voyant doit
être alors sur ROUGE.
3. Introduisez les poches de laminage froides
directement au centre de l’ouverture de la
lamineuse. N’utilisez que des poches de laminage prévues pour le laminage à froid.
APPAREIL DE LAMINAGE
F
MAINTENANCE
MODE D’EMPLOI
4. La poche de laminage passe à travers la lamineuse et sort par l’arrière.
Retirez la poche de laminage lorsqu’ elle a
cessé d’avancer.
5. Poussez l’interrupteur vers OFF, après utilisation de la lamineuse.
6. Débranchez la lamineuse de l’alimentation
en courant.
LA4
1. Après utilisation de l’appareil, débranchez-le
et n’obstruez pas les petits trous, de sorte
que la chaleur puisse en sortir.
2. Ne pas poser d’objets lourds ou coupants sur
l’appareil afin d’éviter toute distorsion ou tout
dommage de celui-ci.
3. Avant et après le laminage, insérez une
feuille de papier blanc de façon à extraire les
poussières risquant de polluer les rouleaux
de la lamineuse.
4. Lorsque vous nettoyez la surface de l’appareil, utilisez des produits de nettoyage non
corrosifs. Evitez que des gouttes d’eau ne pénètrent dans l’appareil, l’eau infiltrée risquant
d’endommager les plaquettes du circuit imprimé.
5. Si l’appareil n’est pas utilisé sur une période prolongée, protégez-le en le recouvrant
d’une housse plastique ou d’une couverture
pour empêcher la poussière de s’y déposer.
ELIMINER UN BLOCAGE
La présente lamineuse est dotée d’une fonction
antiblocage permettant d’éliminer tout blocage
d’objet en cours de laminage.
1. Poussez l’interrupteur sur OFF et débranchez
la lamineuse de sa source d’alimentation en
courant dès qu’un blocage survient. Patientez jusqu’à refroidissement de la lamineuse.
2. Poussez et maintenez l’interrupteur antiblocage (interrupteur ABS) situé sur la partie
arrière de la lamineuse en direction des flèches, de façon à pouvoir retirer l’objet bloqué
de l’ouverture de la lamineuse.
1
fig. 4
Légende
1 Interrupteur ABS
APERCU DES PANNES POSSIBLES
PROBLEMES
CAUSES
SOLUTIONS
1. Le voyant de l’appareil est au bleu et le maté- 1. Mauvaise utilisation du film de laminage : le
riel à laminer introduit ne ressort pas après un film bloque les rouleaux avec la colle, les bords
temps, l’appareil émet des bruits étranges et une et coins n’ayant pas été aplanis correctement.
mauvaise odeur s’en échappe.
Trop de marge sur l’avant du film. L’épaisseur
maximale de laminage est atteinte.
Arrêtez et débranchez l’appareil, de sorte à pouvoir ensuite retirer avec précaution le film resté
coincé dans la lamineuse. Si le problème persiste, veuillez vous adresser à un professionnel.
2. Quelque chose obstrue la sortie arrière.
2. Le voyant Power n’est pas allumé.
11. L’appareil n’a pas été branché.
2. L’interrupteur Power n’a pas été activé.
3. Le fusible a sauté.
Vérifiez si l’appareil a été branché correctement
et si l’interrupteur Power a été activé ou non.
Sinon, adressez-vous à un professionnel, qu’il
puisse vérifier si le circuit est encore en état de
fonction ou renvoyez l’appareil à notre SAV.
3. Si d’autres problèmes surviennent, débranchez l’appareil et retournez-le au SAV le plus proche.
ELIMINATION
ELIMINATION DE LA MACHINE:
En fin de vie, éliminez toujours la machine de façon conforme à l‘environnement. Ne jetez aucun composant
de la machine ou de son emballage
dans les ordures ménagères.
ACCESSOIRES
Designation
XXXXX
Notez: Pour les accessoires et pièces détachées, veuillez contacter votre agent.
CARACTÉRISTIQUES TECHNIQUES
Alimentation :
Largeur max. de laminage :
Epaisseur max. de laminage :
Temps de préchauffage :
Temps de fonctionnement :
Vitesse de laminage :
Poids net :
Dimensions (L, l, h) :
7
220 V - 240 VAC, 50 Hz
230 mm
(125 x 2) microns
3 - 5 min.
30 min. en marche, 30 min. d’arrêt
200 mm/min.
0,95 kg
385 x 110 x 66 mm
Ordre-No.
xxxxx
LAMINADORA
E
LA4
INDICACIONES DE SEGURIDAD IMPORTANTES
« ¡El aparato se tiene que colocar
sobre una superficie estable (superficie base plana) para el uso!
« ¡Peligro de lesión! No introducir
los dedos en la apertura de alimentación!
« ¡El aparato sólo se debe instalar
en un lugar fuera del alcance de
los niños!
Cuando la Cortadora vaya a ser instalada en una estancia frecuentada
por niños, se deberá prever obligatoriamente una supervisión por un
adulto autorizado.
« ¡Las reparaciones solamente deben ser llevadas a cabo por un
técnico cualificado!
Con el fin de garantizar una seguridad plena, solamente deberán emplearse piezas de repuesto originales de MartinYale.
« Antes de abrir el aparato hay que
extraer la clavija de red!
ELEMENTOS FUNCIONALES
3
2
4
Leyenda
1 Inserción de plastificado
2 Salida posterior
3 Interruptor antibloqueo (ABS)
4 Apagado/OFF
5 CALIENTE
6 Indicador piloto
7 Interruptor corredizo
8 FRÍO
5
8
1
6
7
Fig. 1
INSTRUCCIONES DE EMPLEO
(A) PLASTIFICADO EN CALIENTE
¡AVISO!
No toque la parte superior de la
plastificadora durante el empleo.
La parte superior de la plastificadora se calienta mucho durante el
uso y tarda aprox. 3 a 4 horas para
enfriarse tras el uso.
¡AVISO!
No plastifique de este modo materiales sensibles al calor, p. ej. papel
termofax.
Estos materiales solo se pueden
plastificar en frío.
3. Después de 3 a 5 minutos de proceso de calentamiento, el indicador piloto se conmutará
a color AZUL, lo que significa que la plastificadora ha alcanzado la temperatura correcta
de operación y está lista para el plastificado.
4. Coloque el artículo para ser plastificado dentro de la funda de plastificado, céntrelo dentro de la funda a lo largo del borde presellado.
Deje un margen de 3 a 5 mm alrededor del
artículo.
Nota
No utilice fundas de un espesor
superior a 250 micrones (2 x 125
micrones por lado) o bien de menos
de 100 micrones (2 x 50 micrones
por lado).
9. Desconecte la plastificadora del enchufe de
abastecimiento de corriente.
(B) PLASTIFICADO EN FRÍO
IMPORTANTE
El plastificado en frío requiere que la
plastificadora se haya enfriado durante unas 2 horas al conmutarla de
plastificado en caliente a en frío.
1. Conecte la plastificadora al enchufe de abastecimiento de corriente.
5. Inserte el borde sellado de la funda de plastificado en posición recta en el centro de la
apertura de la plastificadora.
6. La funda de plastificado pasará a través de
la plastificadora y saldrá en la parte posterior
de la plastificadora.
Fig. 2
1. Conecte la plastificadora al enchufe de abastecimiento de corriente.
2. Deslice el interruptor a CALIENTE para iniciar el proceso de calentamiento. El indicador
piloto se encenderá en VERDE.
7. Algunas clases de papel no se plastifican
planas, o aparecen algo opacas. En tales
casos, el plastificado puede hacerse avanzar
a través de la plastificadora una segunda vez
y repetir el proceso de plastificado.
8. Deslice el interruptor a la posición OFF de
apagado después del uso.
8
Fig. 3
2. Deslice el interruptor a la posición FRÍO
para iniciar el proceso de plastificado en frío,
el indicador piloto se encenderá en color
VERDE.
3. Inserte las fundas de plastificado en frío en
posición recta en el centro de la apertura de
la plastificadora. Utilice solo fundas de plastificado que sean aptas expresamente para el
plastificado en frío.
LAMINADORA
E
MANTENIMIENTO
INSTRUCCIONES DE EMPLEO
4. La funda de plastificado pasará a través de
la plastificadora y saldrá en la parte posterior
de la plastificadora.
Retire la funda de plastificado cuando haya
cesado de moverse.
5. Deslice el interruptor a la posición OFF de
apagado después del uso.
6. Desconecte la plastificadora del enchufe de
abastecimiento de corriente.
LA4
4. No limpie la superficie del equipo con un
disolvente corrosivo. No deje que se infiltre
agua dentro del equipo al limpiar el mismo
con un paño húmedo, porque sino se podrían
causar problemas en el tablero de circuitos
impresos.
1. Después de usar el equipo, desenchufe el
mismo y no cubra los pequeños orificios para
que pueda disiparse el calor.
2. No coloque materiales pesados o puntiagudos sobre el equipo a fin de no deteriorar
o dañar el equipo.
5. Si el equipo no se va a utilizar por un periodo
prolongado de tiempo, cubra el equipo con
un plástico o paño para mantenerlo libre de
polvo.
3. Antes y después del proceso de plastificado,
se deberá insertar 1 pieza de papel blanco
de tal modo que se pueda recoger la mayor
cantidad de polvo posible en el rodillo.
ELIMINACIÓN DE UN BLOQUEO
Esta plastificadora está equipada con una función
antibloqueo para eliminar todo tipo de bloqueos
de los artículos plastificados durante el proceso
de plastificado.
1. Deslice el interruptor a la posición OFF de
apagado y desconecte la plastificadora empleando el enchufe de abastecimiento de corriente, y hágalo de inmediato al producirse
un atasco. Deje enfriar brevemente la plastificadora.
2. Deslice y sujete el interruptor antibloqueo
(ABS) en la parte posterior de la plastificadora como en la dirección indicada por el signo
de flecha, y empuje el artículo atascado completamente hacia fuera de la apertura de la
plastificadora.
1
Fig. 4
Leyenda
1 Interruptor antibloqueo ABS
BREVE RELACIÓN DE LA ELIMINACIÓN DE ERRORES
PROBLEMAS
CAUSAS
SOLUCIONES
1. El equipo está en indicador piloto azul, el material plastificado no sale desde la salida posterior después de insertarlo por un periodo prolongado de tiempo, y se produce un ruido así como
un olor desagradable que procede del equipo..
1. Utilización inapropiada de la película de plastificado, como por ejemplo: bordes de plastificado
desnivelados sobre la película que conllevan que el
rodillo se haya quedado enganchado con adhesivo;
se ha reservado demasiado espacio en la parte
frontal de la película; el espesor de plastificado ha
excedido el espesor máx. de plastificado.
Desconecte el interruptor y desenchufe el equipo,
saque las películas dañadas desde la inserción; si
no se elimina el problema de esta manera, acuda al
especialista para que realice el mantenimiento.
2. El piloto de corriente no está encendido.
1. El equipo aún no se ha enchufado;
2. Hay una barrera en la salida posterior.
2. El interruptor de corriente no se ha conectado;
3. El fusible de corriente eléctrica se ha destruido.
Compruebe y cerciórese de que el equipo está
enchufado y el interruptor está conectado, o consulte al personal técnico de mantenimiento para
verificar el circuito; en otro caso; envíe el equipo
al centro de mantenimiento.
3. Si surgieran otros problemas, desenchufe el equipo y mande el equipo al centro de mantenimiento.
ELIMINACIÓN
ELIMINACIÓN DE LOS RESIDUOS DE LA MÁQUINA:
Elimine los residuos de la máquina
al final de su vida útil respetando
siempre las normas medioambientales. No tire partes de la máquina ni
el embalaje junto con la basura doméstica.
ACCESSORIO ESPECIAL
Denominación
N° de pedido
XXXXX
xxxxx
Inicación: En el caso de pedidos ulteriores de accesorios especiales y de piezas de repuesto, rogamos
se dirija a nuestro representante oficial.
CARACTERISTICAS TECNICAS
Consumo de corriente:
Anchura máx. de plastificado:
Espesor máx. de plastificado:
Duración de precalentamiento:
Duración de servicio:
Velocidad de plastificado:
Peso neto:
Dimensiones (Lon*An*Al):
9
220 V - 240 VAC, 50 Hz
230 mm
(125 x 2) mic
de 3 a 5 min
30 min. encendido, 30 min. apagado
200 mm / min
0,95 kg
385 x 110 x 66 mm
PLASTIFICATORE
I
LA4
IMPORTANTI ISTRUZIONI DI SICUREZZA
« Per poter essere impiegata, l‘apparecchio deve essere sistemata
su appoggio sicuro (superficie di
base piana)!
« Pericolo di lesioni! Non avvicinarsi
con le dita alla bocca d‘immissione!
« L‘apparecchio deve essere sistemata sempre fuori dalla portata di
bambini!
Nel caso che la taglierina debba essere impiegata in ambiente dove si
trovino bambini, è necessario che
venga sorvegliata da parte di un
adulto autorizzato.
« La riparazioni devono essere eseguite solo da parte di uno specialista!
Perché possa essere garantita la sicurezza devono essere utilizzati solamente ricambi originali MartinYale.
« Innanzi l‘apertura della macchina
staccare la spina!
ELEMENTI FUNZIONALI
3
2
4
Legenda
1 Inserto di laminazione
2 Porta di uscita posteriore
3 Interruttore anti-inceppamento
4 OFF
5 HOT (caldo)
6 Indicatore
7 Commutatore a slitta
8 COLD (freddo)
5
8
1
6
7
Fig. 1
GUIDA ALL‘USO
(A) LAMINAZIONE A CALDO
Attenzione
Non toccare la parte superiore del
laminatoio durante l‘uso.
Quest‘area, infatti, diventa molto
calda durante il funzionamento
e necessita di circa 3 - 4 ore per
raffreddarsi dopo l‘uso.
2. Portare il commutatore nella posizione HOT
(caldo) per avviare il processo di riscaldamento. L’indicatore si accende con luce ROSSA.
3. Dopo 3 - 5 minuti di riscaldamento, l‘indicatore diventa di colore BLU; ciò significa che
il laminatoio ha raggiunto la propria regolare
temperatura d‘esercizio ed è pronto per la laminazione.
Attenzione
Non utilizzare la laminazione a caldo
per materiali sensibili al calore, ad
esempio la carta termica per fax.
4. Inserire l‘oggetto da laminare nella sacca di
laminazione, centrandolo nella sacca rispetto
al bordo pre-sigillato. Lasciare un margine di
3 - 5 mm tutto intorno all‘oggetto.
Questi materiali possono essere
laminati soltanto a freddo.
Nota
Non utilizzare tasche di spessore
superiore a 250 micron (2 x 125
micron per lato) o inferiore a 100
micron (2 x 50 micron per lato).
8. Dopo l‘uso, portare il commutatore nella posizione OFF.
9. Scollegare il laminatoio dalla presa di corrente.
(B) LAMINAZIONE A FREDDO
IMPORTANTE
Per eseguire la laminazione a freddo
è necessario lasciar raffreddare il
laminatoio per 2 ore dopo la commutazione dal processo a caldo a
quello a freddo.
1. Collegare il laminatoio alla presa di corrente.
5. Inserire il bordo pre-sigillato della sacca di
laminazione al centro dell’apertura del laminatoio, mantenendolo dritto.
6. La sacca di laminazione attraverserà il laminatoio e uscirà dalla porta posteriore del laminatoio.
Fig. 2
1. Collegare il laminatoio alla presa di corrente.
7. Alcuni tipi di cara non vengono laminati in
maniera uniforme, o presentano degli offuscamenti. In tali casi l‘oggetto laminato può
essere inserito nuovamente nel laminatoio e
sottoposto a un secondo processo di laminazione.
10
Fig. 3
2. Portare il commutatore nella posizione COLD
(freddo) per avviare il processo di laminazione. L‘indicatore si accende con luce ROSSA.
3. Inserire le sacche di laminazione a freddo
nel centro dell‘apertura del laminatoio, mantenendole dritte. Utilizzare soltanto sacche
di laminazione espressamente intese per la
laminazione a freddo.
PLASTIFICATORE
I
LA4
MANUTENZIONE
GUIDA ALL‘USO
4. La sacca di laminazione attraverserà il laminatoio e uscirà dalla porta posteriore del laminatoio.
Attendere che la sacca di laminazione si arresti prima di prelevarla.
5. Dopo l‘uso, portare il commutatore nella posizione OFF.
6. Scollegare il laminatoio dalla presa di corrente.
1. Dopo aver utilizzato la macchina, staccare la
spina elettrica e non coprire i fori per permettere la fuoriuscita del calore.
2. Non appoggiare oggetti pesanti o affilati sulla
macchina per evitare deformazioni e danni
alla macchina stessa.
3. Prima e dopo la laminazione è vantaggioso
rimuovere eventuali tracce di polvere presenti sul rullo, inserendo 1 foglio di carta bianco
nella macchina.
4. Non pulire la superficie della macchina con
solventi corrosivi. Se si pulisce la macchina
con un panno bagnato, prestare la massima
attenzione a non far entrare la benché minima quantità d‘acqua all‘interno della macchina stessa; in caso contrario potranno verificarsi problemi al circuito stampato.
5. Se la macchina non deve essere utilizzata per
lungo tempo, coprirla con un telo di plastica o
di stoffa per evitare l‘accumulo di polvere.
COME COMPORTARSI IN CASO DI INCEPPAMENTO
Il laminatoio è dotato di una funzione anti-inceppamento per far fronte a eventuali inceppamenti degli
oggetti di laminazione durante il processo.
1. Non appena si verifica il problema, portare il
commutatore in posizione OFF e scollegare
il laminatoio dalla presa di corrente. Lasciare
raffreddare brevemente il laminatoio.
2. Spostare l‘interruttore anti-inceppamento, disposto sul retro del laminatoio, nella direzione indicata dalla freccia e mantenerlo in tale
posizione; allo stesso tempo estrarre completamente l‘oggetto incastrato dall‘apertura del
laminatoio.
1
Legenda
1 Interruttore anti-inceppamento
Fig. 4
BREVE GUIDA ALLA RISOLUZIONE DEI PROBLEMI
PROBLEMA
CAUSA
SOLUZIONE
1. L‘indicatore della macchina è acceso con luce
blu; il materiale di laminazione è dentro la macchina
da diverso tempo e non viene erogato dalla porta
di uscita; inoltre dalla macchina provengono rumori
e odori molesti.
1. Uso improprio della pellicola di laminazione, ad
esempio: bordi di laminazione non uniformi sulla
pellicola con conseguente attaccatura di colla
sul rullo; troppo spazio libero lasciato davanti alla
pellicola; spessore di laminazione superiore a
quello massimo consentito.
Staccare l‘alimentazione elettrica e isolare la
macchina, estrarre le pellicole incastrate dall‘inserto. Se i problemi permangono rivolgersi a un
esperto per la manutenzione..
2. Presenza di un ostacolo davanti alla porta di
uscita posteriore.
2. L‘indicatore di alimentazione non è acceso.
1. La macchina non è ancora stata collegata alla Verificare e assicurarsi che la macchina sia collegata alla rete elettrica e che il commutatore di
rete elettrica.
accensione sia inserito; in alternativa, richiedere
2. Il commutatore di accensione è disinserito.
al personale di manutenzione di verificare le
condizioni del circuito; in alternativa, inviare la
3. Il fusibile elettrico è danneggiato.
macchina al centro manutenzione.
3. Se si verificano altri problemi, staccare la macchina dalla rete elettrica e inviarla al centro di manutenzione.
SMALTIMENTO
ACCESSORI SPECIALI
SMALTIMENTO DELLA MACCHINA:
Smaltire la macchina nel rispetto
dell’ambiente al termine della durata d‘utilizzo. Non gettare parti della
macchina o dell’imballaggio nei rifiuti
domestici.
Denominazione
N. di matricola.
XXXXX
xxxxx
Nota: Per le ordinazioni di pezzi accessori speciali si prega di rivolgersi al proprio rivenditore specializzato.
DATI TECNICI
Potenza assorbita:
Larghezza di laminazione max.:
Spessore di laminazione max.:
Durata del pre-riscaldamento:
Durata della lavorazione:
Velocità di laminazione:
Peso netto:
Dimensioni (L*W*H):
11
220 V - 240 VAC, 50 Hz
230 mm
(125 x 2) mic
3–5 min.
30 min. acceso, 30 min. spento
200 mm/min.
0,95 kg
385 x 110 x 66 mm
LAMINOVACÍ
CZ
LA4
DŮLEŽITÁ BEZPEČNOSTNÍ UPOZORNĚNÍ
« Pro používání se řezačka musí
postavit na naprosto stabilní podklad (na rovnou plochu)!
« Nebezpečí poranění! Nestrkejte
prsty do přívodního otvoru!
« Řezačka smí stát jen na místech
mimo dosah dětí!
Je-li nutné používat řezačku v
přítomnosti a dosahu dětí, je nezbytné zajistit dozor dospělé osoby.
« Opravy smí provádět jen odborník!
K zajištění bezpečnosti se směji
používat jen originální náhradní díly
firmy Martin Yale.
« Před otevřením stroje vytáhněte
síťovou zástrčku!
FUNKČNÍ PRVKY
3
2
4
Legenda
1 Laminovací otvor
2 Zadní výstup
3 ABS spínač
4 VYP
5 HORKÁ LAMINACE
6 Kontrolka
7 Posuvný spínač
8 STUDENÁ LAMINACE
5
8
1
6
7
Obr.1
NÁVOD K PROVOZU
(A) HORKÁ LAMINACE
Varování
Nedotýkejte se horní části laminátoru při jeho používání.
Horní část laminátoru se při
používání velmi rychle zahřeje na
vysokou teplotu a její ochlazení
po použití trvá přibližně 3–4 hodiny.
Varování
V tomto režimu nelaminujte žádný
materiál citlivý na teplo, např. faxový termopapír.
Tyto materiály jsou vhodné pouze
1. Zapojte laminátor do elektrické zásuvky.
2. Pro spuštění procesu ohřevu nastavte
spínač do polohy HORKÁ LAMINACE. Kontrolka začne svítit ČERVENĚ.
3. Po 3–5 minutách procesu ohřevu se kontrolka rozsvítí MODŘE, což znamená, že laminátor dosáhl správné provozní teploty a je
připraven k laminaci.
4. Vložte dokument určený k zalaminování do
laminovací kapsy, zarovnejte ho v kapse podél předem zataveného okraje. Kolem celého dokumentu ponechejte okraj 3-5 mm.
6. Laminovací kapsa projde laminátorem
a vystoupí na zadní straně laminátoru.
pro studenou laminaci.
9. Laminátor vypojte z elektrické zásuvky.
(B) STUDENÁ LAMINACE
DŮLEŽITÉ
Studená laminace vyžaduje, aby
se laminátor ochlazoval alespoň
2 hodiny po té, co byl přepnut
z režimu horké laminace do
režimu studené laminace.
1. Zapojte laminátor do elektrické zásuvky.
Poznámka
Nepoužívejte kapsy s tloušťkou
větší než 250 mikronů (2 x 125
mikronů na jedné straně) nebo
menší než 100 mikronů (2 x 50
mikronů na jedné straně).
5. Vložte zatavený okraj laminovací kapsy
rovně doprostřed laminovacího otvoru.
Obr. 2
8. Po použití nastavte spínač do polohy VYP.
7. Některé druhy papíru se nelaminují
rovnoměrně nebo se jeví poněkud matně.
V takovýchto případech lze dokument vložit
do laminátoru podruhé a proces laminace
zopakovat.
12
Obr. 3
2. Pro spuštění procesu laminace nastavte
spínač do polohy STUDENÁ LAMINACE.
Kontrolka začne svítit ČERVENĚ.
3. Kapsy pro studenou laminaci vkládejte rovně
doprostřed laminovacího otvoru. Používejte
pouze takové laminovací kapsy, které jsou
výslovně určeny pro studenou laminaci.
LAMINOVACÍ
CZ
LA4
ÚDRŽBA
NÁVOD K PROVOZU
4. Laminovací kapsa projde laminátorem a
vystoupí na zadní straně laminátoru.
Až se laminovací kapsa přestane pohybovat,
vyjměte ji.
5. Po použití nastavte spínač do polohy VYP.
6. Laminátor vypojte z elektrické zásuvky.
1. Po použití přístroje ho, prosím, odpojte od
zdroje energie a nezakrývejte malé otvory,
které odvádí teplo.
2. Nepokládejte na přístroj těžké nebo ostré
materiály, jinak dojde k jeho deformaci nebo
poškození.
3. Před a po laminování můžete vložit 1 kus bílého papíru, čímž odstraníte případný prach
na válci.
4. Nečistěte povrch přístroje agresivním
rozpouštědlem. Dovnitř přístroje se nesmí dostat ani kapka vody, jestliže ho
čistíte mokrým hadříkem, jinak může dojít
k problémům s deskou plošných spojů.
5. Jestliže přístroj nebudete používat delší
dobu, zakryjte ho, prosím, plastem nebo látkou, abyste se zbavili prachu.
ODSTRANĚNÍ UCPÁNÍ
Laminátor je vybaven funkcí odstranění ucpání,
která zlikviduje jakékoliv ucpání způsobené laminovanými dokumenty během laminace.
1. Jestliže došlo k ucpání, okamžitě nastavte
spínač do polohy VYP a laminátor vypojte
z elektrické zásuvky. Nechejte laminátor
krátce vychladnout.
1
2. Posuňte a držte spínač pro odstranění
ucpání (ABS) na zadní straně laminátoru ve
směru znázorněné šipky a vytáhněte zaseknutý dokument zcela z otvoru laminátoru.
Obr. 4
Legenda
1 ABS spínač
RYCHLÉ ŘEŠENÍ PROBLÉMŮ
PROBLÉMY
PŘÍČINY
ŘEŠENÍ
1. Jestliže kontrolka přístroje svítí modře, jestliže
laminovaný materiál dlouho nevystupuje ven po
jeho vložení a jestliže je z přístroje slyšet hluk
a také cítit zápach..
1. Nesprávné použití laminovací fólie, jako
například: nestejné laminovací okraje na fólii,
které způsobují zaseknutí válce v důsledku
lepidla; ponecháváte příliš mnoho místa na
začátku fólie; tloušťka laminace překročila max.
tloušťku laminace.
Vypněte, prosím, zařízení a odpojte ho od
přívodu energie, vytáhněte zaseknuté fólie z laminovacího otvoru; pokud problém přetrvává,
obraťte se na profesionály s žádostí o údržbu..
2. V zadním výstupu se nachází překážka.
2. Kontrolka přívodu energie nesvítí.
1. Přístroj ještě není zapojen do zásuvky;
2. Přístroj není zapnutý na hlavním spínači;
3. Elektrická pojistka se přepálila.
Prosím, zkontrolujte a ujistěte se, zda je
přístroj zapojen do zásuvky a zda je zapnutý
hlavní spínač, nebo požádejte personál údržby
o kontrolu el. obvodu; jinak pošlete přístroj do
střediska údržby.
3. Jestliže se objeví jiné problémy, odpojte, prosím, zařízení od zdroje energie a pošlete nám ho do střediska údržby.
LIKVIDACE
LIKVIDACE STROJE:
Stroj na konci jeho životnosti likvidujte vždy s ohledem na životní
prostředí. Žádné díly stroje nebo obalu nedávejte do domácího odpadu.
ZVLÁŠTNÍ PŘÍSLUŠENSTVÍ
Název
Obj. čís.
XXXXX
xxxxx
Upozornění: Při dodatečném objednání dílů zvláštního příslušenství a potřebě náhradních dílů se
prosím obraťte na Vašeho odborného prodejce.
TECHNICKÉ ÚDAJE
Spotřeba energie:
Max. šířka laminace:
Max. tloušťka laminace:
Doba nahřívání:
Provozní doba:
Rychlost laminace:
Hmotnost netto:
Rozměry (D*Š*V):
13
220 V - 240 VAC, 50 Hz 1.1A
230 mm
(125 x 2) mikronů
3 - 5 min.
30 min. zap., 30 min. vyp.
200 mm/min.
0,95 kg
385 x 110 x 66 mm
LA4
14
LA4
Konformitätserklärung
Certificate of Conformity
Attestation de Conformité
Certificado de Conformidad
Bezeichnung der Maschine:
Type of machine:
Description de la machine:
Descripcion de la máquina:
Laminiergerät
Modell / Model / Modèle / Modelo:
papermonster LA4
Typ / Type / Type / Tipo:
397
Laminator
Appareil de laminage
Laminadora
Hiermit wird bestätigt, daß o. g. Gerät den Anforderungen der Niederspannungs-Richtlinie 2006/95/EG, sowie der
EMV-Richtlinie 2004/108/EG einschließlich allen bis heute veröffentlichten Änderungen bzw. Nachträgen entspricht.
Das o. g. Gerät entspricht folgenden Normen bzw. Richtlinien:
We do hereby certify that the above mentioned product meets the requirements set forth in EEC-Low-Voltage-Directive 2006/95 and EMC directive 2004/108/EC including all changes and addendums to date thereto. The above
mentioned product meets the following standards and guidelines:
Nous Vous Confirmons que l‘appareils cité ci-dessus correspond aux des directives de basse tension 2006/95/CEE
ainsi qu’ à la directive CEM 2004/108/CEE, ci-inclus toutes les modifications ainsi que tous les suppléments publiés
jusqu’à ce jour. L‘appareil mentionné correspond aux normes citées ci-après:
Confirmamos que los productos arriba citados cumplen las exigencias de las directivas de baja tensión 2006/95/CEE
y las directivas CEM 2004/108/CEE, incluidas todas las modificaciones publicadas hasta la fecha. Los productos
citados corresponden con las siguientes normas:
EN 60950-1: 2001+A11
EG-Richtinie / EG-Guidelines / EG-Directives / EG-directivas, 87/308/EG
EN 61000-3-2: 2006
EN 61000-3-3: 1995+A1+A2
EN 55014-1: 2000+A1+A2
EN 55014-2: 1997+A1
2009/08
ppa. K. Grundmann
Leiter Technik
Head of Technical Dpt.
Responsable Dép. Technique
Jefe del Departamento Técnico
Postfach / p.o.box 1420
D-88672 Markdorf / Germany
15
i. V. W. Madena
Leiter Elektrik
Head of Electrical Dpt.
Responsable Dép. Electricité
Jefe del Departamento Eléctrico
International Network
Headquarters
USA
MARTIN YALE GROUP
251 Wedcor Avenue
Wabash, IN 46992
www.martinyale.com
☏ +1 / 260 563-0641
fax +1 / 260 563-4575
[email protected]
Germany
MARTIN YALE INTERNATIONAL GmbH
Bergheimer Straße 6-12
88677 Markdorf / Bodensee
www.martinyale.de, www.intimus.com
☏ +49 / (0) 7544 60-0
fax +49 / (0) 7544 60-248
[email protected]
South Africa
MARTIN YALE Africa
S & B House, 7 Loveday Street
Marshall Town, Johannesburg
P. O. BOX 1291, Houghton 2041
www.martinyale.co.za
☏ +27 / (0) 11 838 72 81
fax +27 / (0) 11 838 73 22
[email protected]
United Kingdom
MARTIN YALE International
Unit C 2 The Fleming Centre, Fleming Way
Crawley, West Sussex, RH10 9NN
www.intimus.co.uk
☏ +44 / (0) 1293 44 1900
fax +44 / (0) 1293 61 11 55
[email protected]
France
MARTIN YALE International S.A.R.L.
40 Avenue Lingenfeld
77200 Torcy
www.martinyale.fr
☏ +33 / (1) 70 00 69 00
fax +33 / (1) 70 00 69 24
[email protected]
Spain
MARTIN YALE Ibérica S.L.
C/Maestrat, n° 26
Pol. Indus. Les Salines
08880 Cubelles (Barcelona)
www.martinyale.es
☏ +34 / 9 02 22 31 31
fax +34 / 9 02 22 31 32
[email protected]
Italy
Martin Yale Italia srl
Via A. Manzoni, 37
20052 Monza (MI)
www.martinyale.it
☏ +39 / 335 618 4924
fax +39 / 039 689 3124
[email protected]
Sweden
MARTIN YALE Nordic
Rotebergsvägen 1
S-192 78 Sollentuna
www.martinyale.se
☏ +46 / 8 556 165 20
fax +46 / 8 748 02 85
[email protected]
P.R. China
MARTIN YALE Beijing
Room 2003 D Building
Guojiang No 2 Dong Sanhuan Bei Lu
Chaoyang District, Beijing 100027
www.martinyale.com.cn
☏ +86 / (0) 10 84 47 10 70
fax +86 / (0) 10 84 47 10 75
[email protected]
Dieses Papier ist aus 100 % Altpapier ohne optische Aufheller hergestellt
This paper made from 100 % unbleached recycled paper
Papier recyclable à 100 %
90172 1 11/09
Branch Offices