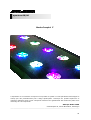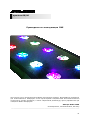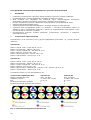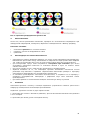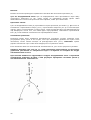
1
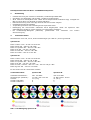
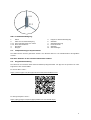
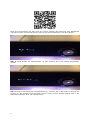
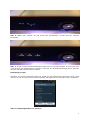
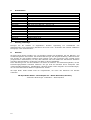
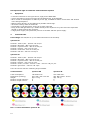
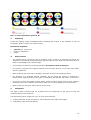
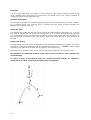
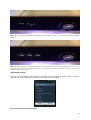
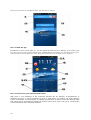
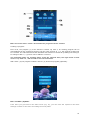
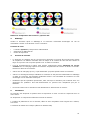
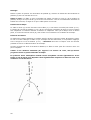
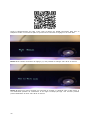
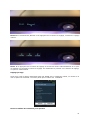
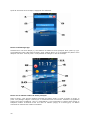
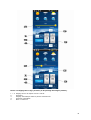
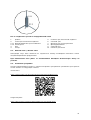
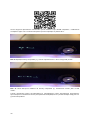
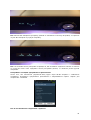
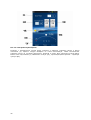
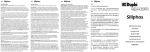
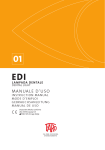
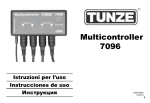
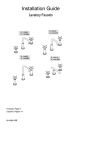
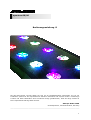
spectrus 60/90
Bedienungsanleitung D
Mit dem Kauf dieser Leuchte haben Sie sich für ein Qualitätsprodukt entschieden. Sie ist von
Fachleuten speziell für den aquaristischen Gebrauch entwickelt und erprobt worden. Hochwertige
Technik und beste Materialien sowie modernes Design gewährleisten, dass Sie lange Freude an
Ihrer Aquarienbeleuchtung haben werden.
AB Aqua Medic GmbH
Gewerbepark 24, 49143 Bissendorf, Germany
__________________________________________________________________________________________
1
LED-Aquarienleuchte für Meer- und Süßwasseraquarien
1.
•
•
•
•
•
•
•
•
Ausstattung
6-Kanal Steuerung der einzelnen Lichtfarben, Hochleistungs CREE LEDs
Simulation von Wolkenflug und Gewitter, variabel programmierbar
Wi-Fi Control für Smartphone oder Tablet durch entsprechende kostenlose App, verfügbar für
iOS im iTunes Store und Android im Google Playstore.
Manuelle Steuerung auch ohne App direkt an der LED-Leuchte möglich.
Ultraflaches Aluminium-Gehäuse
Temperaturgesteuerte aktive Kühlung durch supersilent Lüfter
Befestigung der LED-Leuchte wahlweise durch Bügelsystem direkt am Aquarium oder
Seilaufhängung aquafit 4. (Beide Systeme im Lieferumfang enthalten).
Ein Hochleistungs-Netzgerät (Meanwell) gewährleistet eine konstante und sichere
Stromversorgung.
2.
Technische Daten
Netzanschluss: 230 Volt, 50 Hz, andere Ausführungen (für USA etc.) siehe Typenschild.
spectrus 60
Kanal
Kanal
Kanal
Kanal
Kanal
Kanal
1
2
3
4
5
6
white 7.000 – 8.300 K 5 W 16 Stk.
blue 465 - 485 nm 3 W 8 Stk.
royal blue 450 - 460 nm 5 W 6 Stk.
UV 405 - 410 nm 3 W 2 Stk.
violet 420 - 430 nm 3 W 2 Stk.
red 620 – 630 nm 3 W 2 Stk.
spectrus 90
Kanal
Kanal
Kanal
Kanal
Kanal
Kanal
1
2
3
4
5
6
white 7.000 – 8.300 K 5 W 18 Stk.
blue 465 - 485 nm 3 W 10 Stk.
royal blue 450 - 460 nm 5 W 8 Stk.
UV 405 - 410 nm 3 W 4 Stk.
violet / red 420 - 430 nm + 620 - 630 nm 3 W je 3 Stk.
green 520 – 535 nm 3 W 2 Stk.
Es sind Linsen mit 90° Streuwinkel verbaut.
Technische Daten:
spectrus 60
spectrus 90
Gesamtstromaufnahme:
Abmessungen (Gehäuse):
Gewicht:
Anzahl Lichtkanäle:
Anzahl Lichtfarben:
max. 160 Watt
ca. 560 x 265 x 32 mm
ca. 5,5 kg
6
6
max. 210 Watt
ca. 880 x 265 x 32 mm
ca. 7,8 kg
6
7
Abb. 1: Farbbelegung spectrus 90
2
Abb. 2: Farbbelegung spectrus 60
3.
Auspacken
Prüfen Sie die Leuchte nach dem Auspacken auf etwaige Beschädigungen. Bei Beanstandungen
wenden Sie sich bitte unverzüglich an Ihren Fachhändler.
Lieferumfang:
•
•
•
4.
Leuchte spectrus inkl. Netzteil
Stahlseilaufhängung
Haltebügel
Sicherheitshinweise
•
Die Leuchte ist keine Aquarienabdeckung und darf nur über dem Aquarium montiert werden.
Der Mindestabstand zwischen Leuchte und Wasseroberfläche sollte so gewählt werden, dass
keine Wasser- oder Salzspritzer an oder in die Leuchte gelangen können.
•
Bei Betrieb kann das Gehäuse relativ heiß werden: Vorsicht bei Berührung! Zur Reinigung
trennen Sie die Leuchte vollständig vom Netz und lassen sie abkühlen. Anschließend hängen Sie
die Leuchte ab.
•
Bei der Reinigung achten Sie darauf, dass keine Feuchtigkeit in das Innere der Leuchte gelangt!
•
Achten Sie auf einen ausreichenden Wärmeaustausch! Die Leuchte darf nicht hinter
Verkleidungen oder in Abdeckungen montiert werden. Unzureichende Lüftung führt zu
Überhitzung der Leuchte und Schädigung der elektrischen Bauteile.
•
Unternehmen Sie keine eigenen Reparaturversuche, sondern schicken Sie die Leuchte zur
Prüfung mit einer Mängelbeschreibung ein. Auch defekte LEDs können nur vom Hersteller
getauscht werden.
•
Bei allen Arbeiten an der Leuchte unbedingt Netzstecker ziehen.
5.
Installation
Die Leuchte wird mit der beiliegenden Stahlseilaufhängung an der Decke oder den ebenfalls im
Lieferumfang enthaltenen Haltebügeln am Aquarium befestigt.
Die Aufhängung besteht aus je 2 Stück:
1. Deckenbefestigung mit Schrauben und Dübeln, Edelstahlseil 2,00 m lang, mit Stopper
2. Leuchtenbefestigungsstück (Seil mit Endhülsen)
3
Montage:
Zunächst werden die beiden Deckenbefestigungen (2) mit den Dübeln und Schrauben an der Decke
befestigt.
Stahlseil: Das Edelstahlseil wird jetzt durch die Kappe (5) der Deckenbefestigung gezogen, so
dass der Stopper (4) innen liegt. Die Mutter wird jetzt in die Deckenbefestigung geschraubt, so
dass das Seil nach unten hängt.
Leuchtenbefestigung:
Das Edelstahlseil (6) wird durch die Stahlseilhalterung (7) gezogen. Dazu wird es oben
eingeschoben (2.1.1). Es tritt aus der seitlichen Öffnung (2.1.2) wieder aus. Hier wird es so weit
herausgezogen, bis die Leuchte in der gewünschten Höhe über dem Aquarium hängt. Sobald die
Leuchte ausgerichtet ist, wird die Sicherungsschraube (8) angezogen, um ein ungewolltes
Verkippen der Leuchte zu verhindern.
Lösen der Befestigung:
Die Leuchtenbefestigung verfügt über einen Rückzugstop, so dass sich das Seil leicht justieren
lässt. Falls Seil nachgegeben werden muss oder die Leuchte abgehängt werden soll, kann mit dem
Finger auf die Fixierungsschraube (2.1.1) gedrückt werden. – Achtung: Leuchte festhalten! Das
Seil lässt sich jetzt wieder aus der Leuchtenbefestigung herausziehen.
Hängt die Leuchte in der endgültigen gewünschten Höhe, kann das Stahlseil mit einem
Seitenschneider eingekürzt werden.
Achten Sie dabei auf ausreichend Abstand
Spritzwasser an oder in die Leuchte gelangt!
zur
Wasseroberfläche,
damit
kein
Bei feuchter Umgebungsluft korrodiert auch Edelstahl im Laufe der Zeit. Deswegen die
Stahlseile regelmäßig kontrollieren und bei Bedarf ersetzen.
4
Abb. 3: Stahlseilaufhängung
1.
2.
2.1.1
2.1.2
3.
4.
Dübel
Hülse für Deckenbefestigung
Fixierungsschraube zum Lösen
Ende des Stahlseils
Schraube
Stopper
5.1.
Lampenmontage/Lampenwechsel
5.
6.
7.
8.
9.
10.
Kappe für Deckenbefestigung
Stahlseil
Stahlseilhalterung
Fixierschraube
Stahlseil
Schraubkappe
Die LEDs können einzeln getauscht werden. Der Wechsel darf nur von Fachbetrieben durchgeführt
werden.
Bei allen Arbeiten an der Leuchte Netzstecker ziehen!
5.2.
Programmeinstellung
Die Antenne wird seitlich neben dem Einstellknopf angeschraubt. Die App für die spectrus ist unter
folgenden Links downloadbar:
Im iTunes Store unter:
https://itunes.apple.com/de/app/ledcontroller6/id951543825?mt=8
Im Google Playstore unter:
https://play.google.com/store/apps/details?id=com.simalai.aqua
5
Nach dem Herunterladen der App muss die Leuchte zunächst über WLAN mit dem Mobiltelefon
verbunden werden. Dazu bringt man die spectrus mit dem Einstellknopf in den Wi-Fi Modus.
Abb. 4: Durch Drehen des Einstellknopfes (1) kann zwischen Wi-Fi und manuell umgeschaltet
werden.
Abb. 5: Nach kurzem Drücken des Einstellknopfes (1) erscheint „Run in Wifi mode“. Jetzt kann die
Leuchte per App gesteuert und eingestellt werden. Durch erneutes Drücken gelangt man in den
Wahlmodus zwischen Wi-Fi und manuell zurück.
6
Abb. 6: Wählt man „Manual“ an und drückt den Einstellknopf, erreicht man die manuelle
Einstellung.
Abb. 7: Durch Drücken des Einstellknopfes wählt man die einzelnen Kanäle an und kann diese
durch Drehen des Einstellknopfes verändern. Hält man den Einstellknopf danach länger gedrückt,
wird der manuelle Modus wieder verlassen.
Einstellung per App:
Nachdem die Leuchte (Aquamedic-XXX) per WLAN mit dem Mobiltelefon verbunden wurde, wählt
man sie an und wird nach einem Passwort gefragt. Das Passwort zum Verbinden lautet 12345678.
Abb. 8: Verbindungsaufbau zur spectrus
7
Nachdem eine Verbindung zur Leuchte aufgebaut wurde, kann die App gestartet werden.
Abb. 9: App starten.
IP-Adresse oder Name der Leuchte (1). Durch Anwählen gelangt man ins Hauptmenü. Unter „Just
Try“ (5) kann die App ohne Leuchte getestet werden. Unter „Change Wi-Fi“ (4) kann bei mehreren
Leuchten von einer zur anderen gewechselt werden. Unter Punkt 2 kann der Name der Leuchte
geändert werden.
Abb. 10: Man gelangt zunächst ins Hauptmenü:
Unter Punkt 1 können die Intensitäten der einzelnen Kanäle verändert werden. Punkt 2 simuliert
ein Gewitter, Punkt 3 Wolkenflug. Unter 5/6/7 wechselt man in die drei verschiedenen Menüs. 9
zeigt das aktuelle Programm in graphischer Darstellung. Mit Schalter 4 wird die Zeit zwischen
Leuchte und Mobiltelefon synchronisiert. Schalter 8 dient zum Ein- (rot) und Ausschalten (grau). 10
zeigt die aktuellen Intensitäten der einzelnen Kanäle.
8
Abb. 11: Im Menüpunkt „Timer“ können drei verschiedene Programme erstellt werden.
Erstellen eines Programms:
Zunächst wird das Programm (1) gewählt, das geändert werden soll. Unter Punkt 5 kann ein
bestehendes Programm von der jeweiligen spectrus heruntergeladen werden. Mit Hilfe der
schnellen Vorschau (6 + 7) kann das erstellte Programm begutachtet werden. Die einzelnen
Uhrzeiten und Intensitäten werden unter Punkt 8 eingestellt, indem man die zu verändernde
Einstellung anwählt. Mit +/- (3) können Punkte hinzugefügt oder entfernt werden.
Die angegebenen Zeiten sind Startzeiten. Ab der gewählten Zeit beginnt die Leuchte mit
1%/30 Sekunden auf die eingestellten Intensitäten herunter- bzw. herauf zu dimmen.
Mit „Save“ (2) wird das erstellte Programm gespeichert. (4) zeigt das Programm grafisch.
Abb. 12: Menüpunkt „System“
Von dort gelangt man zum Startbildschirm (Abb. 10) zurück, kann das System in die
Grundeinstellungen zurücksetzen und ins Menü für die Einstellung der Mondphase wechseln.
9
Abb. 13: Einstellung der Mondphase
Mit Schalter 1 wird die Mondphase zugeschaltet. Über Nr. 2 werden Start- und Endzeit (3)
eingegeben. Die Helligkeit (4) sollte nicht zu hoch gewählt werden, damit die Zooxanthellen der
Korallen nachts keine Photosynthese betreiben. Mit Schalter 5 kann die Mondphase eingestellt
werden. Der weiße Punkt über der Skala (7) kennzeichnet Vollmond, der rote, verstellbare Punkt
die eingestellte Mondphase.
10
Abb. 14: Einstellen von Gewitter (oben) und Wolkenflug (unten).
1. + 3.: Eingabe von Start- und Endzeit
2.
Stärke
4.
Automatische Ausführung im gewählten Zeitraum
5.
Sofortige Ausführung
6.
Speicherung
11
6.
Ersatzteilliste
Art.-Nr.
83010100
83010101
83010102
83010103
83010104
83010105
83010106
83010112
83010113
83010122
83010115
80403
83010114
83010110
83010111
LG1530
7.
Artikel
LED white cree XTE 7000 - 8300K 5 W
LED blue cree XPE 465 - 485 nm 3 W
LED Royal blue XPE cree 450 - 460 nm 5 W
LED UV 3535 405 – 410 nm 3 W
LED violet 3535 420 – 430 nm 3 W
LED red cree XPE 620 – 630 nm 3 W
LED green cree XPE 520 - 535 nm 3 W
Linse 90°
Linse 120°
Regelknopf
Antenne
aquafit 4
Halteeinheit kpl.
Netzteil spectrus 60
Netzteil spectrus 90
Netzzuleitung mit Schuko+Kalt schwarz
Wartung und Pflege
Reinigen Sie die Scheibe im abgekühlten Zustand regelmäßig von Rückständen aus
Wasserspritzern und Verdunstung behutsam mit einem Tuch. Verwenden Sie niemals zusätzliche
Reinigungs- oder Scheuermittel!
8.
Garantie
AB Aqua Medic GmbH gewährt eine 12-monatige Garantie ab Kaufdatum auf alle Material- und
Verarbeitungsfehler des Gerätes. Als Garantienachweis gilt der Original-Kaufbeleg. Während dieser
Zeit werden wir das Produkt kostenlos durch Einbau neuer oder erneuerter Teile instand setzen
(ausgenommen Frachtkosten). Im Fall, dass während oder nach Ablauf der Garantiezeit Probleme
mit Ihrem Gerät auftreten, wenden Sie sich bitte an Ihren Fachhändler.
Diese Garantie gilt nur für den Erstkäufer. Sie deckt nur Material- und Verarbeitungsfehler, die bei
bestimmungsgemäßem Gebrauch auftreten. Sie gilt nicht bei Schäden durch Transporte oder
unsachgemäße Behandlung, Fahrlässigkeit, falschen Einbau sowie Eingriffen und Veränderungen,
die von nicht autorisierten Stellen vorgenommen wurden.
AB Aqua Medic GmbH haftet nicht für Folgeschäden, die durch den Gebrauch des Gerätes
entstehen.
AB Aqua Medic GmbH - Gewerbepark 24 - 49143 Bissendorf/Germany
- Technische Änderungen vorbehalten – Stand 09/2015
12
spectrus 60/90
Operation Manual ENG
In purchasing this unit, you have selected a top quality product. It has been specifically designed
for aquarium use and has been tested by experts. High quality components and newest technology
as well as modern design guarantee that you will enjoy your aquarium lighting for many years.
AB Aqua Medic GmbH
Gewerbepark 24, 49143 Bissendorf, Germany
__________________________________________________________________________________________
13
LED aquarium light for saltwater and freshwater aquaria
1.
Equipment
• 6-channel controller for the light colours, high-power CREE LEDs
• Unique simulation of cloud movement and thunderstorms, programmable.
• Wi-Fi control for smartphone or tablet by a free app, available for iOS in iTunes Store and Android
in the Google Playstore.
• Manual control directly on the LED light is possible without app.
• Ultra-slim housing made of aluminium
• Temperature-controlled active cooling by a super-silent fan
• Fixing of the LED light either by a holder directly at the aquarium or by the steel wire suspension
aquafit 4. (Both systems are included).
• A high-power supply unit (Meanwell) ensures a constant and safe power supply.
2.
Technical Data
Line voltage: 230 Volt/50 Hz (if not stated otherwise on the ID-label).
spectrus 60
Channel
Channel
Channel
Channel
Channel
Channel
1
2
3
4
5
6
white 7,000 – 8,300 K 5 W 16 pcs.
blue 465 - 485 nm 3 W 8 pcs.
royal blue 450 - 460 nm 5 W 6 pcs.
UV 405 - 410 nm 3 W 2 pcs.
violet 420 - 430 nm 3 W 2 pcs.
red 620 – 630 nm 3 W 2 pcs.
spectrus 90
Channel
Channel
Channel
Channel
Channel
Channel
1
2
3
4
5
6
white 7,000 – 8,300 K 5 W 18 pcs.
blue 465 - 485 nm 3 W 10 pcs.
royal blue 450 - 460 nm 5 W 8 pcs.
UV 405 - 410 nm 3 W 4 pcs.
violet / red 420 - 430 nm + 620 - 630 nm 3 W je 3 pcs.
green 520 – 535 nm 3 W 2 pcs.
There are lenses with 90° scattering angle installed.
Technical data:
spectrus 60
spectrus 90
Total consumption:
Dimensions (housing):
Weight:
Number of light channels:
Number of light colours:
160 watts max.
app. 560 x 265 x 32 mm
app. 5.5 kg
6
6
210 watts max.
app. 880 x 265 x 32 mm
app. 7.8 kg
6
7
Pict. 1: Colour illustration spectrus 90
14
Pict. 2: Colour illustration spectrus 60
3.
Unpacking
Control the lighting system immediately after unpacking with respect to any damages. In case of
complaints, please contact your dealer directly.
Included in shipment:
•
•
•
4.
spectrus incl. power pack
steel wire suspension
Holder
Safety advices
•
The lighting system cannot be used as aquarium cover. It has to be mounted only above the
aquarium. The minimum distance between light and water surface should be selected so that no
water or salt splashes can reach the light.
•
The housing may become hot during operation. Be cautious when touching it!
•
For cleaning, disconnect the lighting system from the mains and let it cool down. Afterwards,
take the light down.
•
When cleaning, take care that no humidity enters the interior of the lighting system!
•
Pay attention to a sufficient thermal exchange. Do not mount the system in enclosures or
behind panels. Missing aeration may result in overheating and damage the electric components.
•
Do not try to repair the lighting system (LEDs, electronic parts). Please send it in for checking,
preferably with a list of defects. Even broken LEDs can only be changed by the manufacturer.
•
When working on the light, always pull all power plugs.
5.
Installation
The light is either mounted with the included steel wire suspension on the ceiling or with the
included holders at the aquarium.
The suspension system comprises 2 pcs. of each of the following:
1. Ceiling plate with screws and plugs, 2 metre stainless steel cable with stopper
2. Light fixing (cable with end bushes)
15
Mounting:
The two ceiling mountings (2) must be securely screwed to the ceiling by using the screws and
plugs. Suitable screws and plugs are provided but you should ensure your ceiling is capable of
holding the weight of the light in this way.
Stainless steel cable:
The stainless steel cable is now fed through the cap (5) of the ceiling mounting so that the stopper
(4) is retained inside. The retaining bush is screwed onto the ceiling mounting allowing the
stainless steel cable to hang free.
Fixing the light:
The stainless steel cable (6) has to be drawn through the stainless steel cable holder (7). To do so,
the cable is fed through the fixing from the top (2.1.1). It is drawn through the side opening
(2.1.2) and then it has to be pulled until the light is in the correct height above the aquarium. As
soon as the light is adjusted in the right position, tighten the safety bolt (8) to avoid a canting of
the light.
Release the fixing:
The light fixing has a non-return mechanism so that the cable can easily be adjusted. To remove
the light or re-adjust the height, press the adjustment screw (2.1.1). – Caution: Hold the light
tight! Now, the stainless steel cable can be pulled out of the light fixing.
When the light is mounted in the correct position, any surplus cable may be cut off by pliers.
Pay attention to a sufficient distance to the water surface so that no water splashes can
reach the light.
In course of time, even stainless steel can corrode by humid ambient air. Therefore,
check the steel cables regularly and replace them, if necessary.
16
Pict. 3: Steel cable suspension
1.
2.
2.1.1
2.1.2
3.
4.
Plug
Sleeve for sealing mounting
Fixing screw for release
End of cable
Screw
Stopper
5.1.
Assembling/changing the LEDs
5.
6.
7.
8.
9.
10.
Cap for ceiling
Stainless steel
Stainless steel
Fixing screw
Stainless steel
Screw cap
mounting
cable
cable holder
cable
The LED’s can be replaced individually but the replacement may only be done by specialists.
When working on the light, always pull all power plugs!
5.2.
Program’s setup
The antenna is laterally screwed next to the adjusting button. The app for spectrus can be
downloaded at the following links:
In the iTunes Store:
https://itunes.apple.com/de/app/ledcontroller6/id951543825?mt=8
In Google Playstore:
https://play.google.com/store/apps/details?id=com.simalai.aqua
17
After downloading the app, first of all the lamp has to be connected to the mobile phone via Wi-Fi.
To do so, the spectrus has to be put into the Wi-Fi mode by the adjusting button.
Pict. 4: By turning the adjusting button (1) you can switch between Wi-Fi and manual.
Pict. 5: After briefly pressing the button (1) "Run in Wifi mode" will appear. Now, the lamp can be
controlled and adjusted via app. By pressing (1) again, you will return to the selection mode
between Wi-Fi and manual.
18
Pict. 6: If you select „Manual“ and press the adjusting button (1), you will reach the manual
setting.
Pict. 7: By pressing the adjusting button, the individual channels are selected and they can be
changed by turning the adjusting button. If you keep the button pressed for a bit longer, the
manual mode is left again.
Adjustment by app:
After the light (Aquamedic-XXX) has been connected with your mobile by WLAN, it has to be called
and then you will be asked for a password. The password is 12345678.
Pict. 8: Connection to the spectrus
19
Once the connection to the light is done, the app can be started.
Pict. 9: Start the app.
IP-address or name of the light (1). You will reach the main menu by dialing. If you press „Just
Try“ (5) the app can be tested without light. „Change Wi-Fi“ (4) means you can switch from one to
another light if several lights are used. With item 2, the name of the light can be changed.
Pict. 10: First of all, you reach the main menu:
With point 1, the intensities of the individual channels can be changed. A thunderstorm is
simulated by point 2, cloud movement by point 3. With 5/6/7 you change into three different
menus. 9 shows the current program in a graphic presentation. By switch 4, the time between light
and mobile will be synchronized. Switch 8 is used for turning it on (red) or off (grey). 10 shows the
current intensities of the individual channels.
20
Pict. 11: In the menu "Timer" three different programs can be created.
Creating a program:
First of all, the program (1) to be altered is chosen. By item 5, an existing program can be
downloaded from the respective spectrus. By the quick preview (6 + 7), the program created can
be reviewed. The individual times and intensities are selected in section 8 by dialing the setting to
be changed. With +/- (3) items can be added or removed.
The indicated times are starting times. From the selected time, the light starts to dim
down or up with 1% / 30 seconds to the set intensities.
With "Save" (2) the program created is stored. (4) shows the program graphically.
Pict. 12: Menu „System“
From there you get back to the start screen (Fig. 10), you can reset the system to the basic
settings or switch to the menu for setting the moon phase.
21
Pict. 13: Setting the moon phase
By switch 1, the moon phase is activated. With No. 2, start and end times (3) are entered. The
brightness (4) should not be too high so that the zooxanthellae of corals doesn’t practice any
photosynthesis at night. By switch 5, the moon phase can be set. The white dot on the scale (7)
features a full moon, the red adjustable point the set moon phase.
22
Pict. 14: Adjusting thunderstorm (top pict.) and cloud movement (bottom pict).
1 + 3: Setting start and end time
2.
Intensity
4.
Automatic run in the selected period
5.
Immediate run
6.
Storage
23
6.
Spare parts list
Art.-No.
83010100
83010101
83010102
83010103
83010104
83010105
83010106
83010112
83010113
83010122
83010115
80403
83010114
83010110
83010111
LG1530
7.
Article
LED white cree XTE 7000 - 8300K 5 W
LED blue cree XPE 465 - 485 nm 3 W
LED Royal blue XPE cree 450 - 460 nm 5 W
LED UV 3535 405 – 410 nm 3 W
LED violet 3535 420 – 430 nm 3 W
LED red cree XPE 620 – 630 nm 3 W
LED green cree XPE 520 - 535 nm 3 W
Lens 90°
Lens 120°
Control knob
Antenna
aquafit 4
Holding unit cpl.
Transfomer spectrus 60
Transformer spectrus 90
Cable
Maintenance and Care
Clean the filter glass regularly (caution: let it cool down first!) from residues of water splashes and
evaporation with a moistened cloth. Never use additional cleansing agents!
8.
Warranty
Should any defect in material or workmanship be found within 12 months of the date of purchase
AB Aqua Medic GmbH undertakes to repair or, at our option, replace the defective part free of
charge – always provided the product has been installed correctly, is used for the purpose that was
intended by us, is used in accordance with the operating instructions and is returned to us carriage
paid. The warranty term is not applicable on the all consumable products.
Proof of Purchase is required by presentation of an original invoice or receipt indicating the dealer’s
name, the model number and date of purchase, or a Guarantee Card if appropriate. This warranty
may not apply if any model or production number has been altered, deleted or removed,
unauthorised persons or organisations have executed repairs, modifications or alterations, or
damage is caused by accident, misuse or neglect.
We regret we are unable to accept any liability for any consequential loss. Please note that the
product is not defective under the terms of this warranty where the product, or any of its
component parts, was not originally designed and / or manufactured for the market in which it is
used. These statements do not affect your statutory rights as a customer.
If your AB Aqua Medic GmbH product does not appear to be working correctly or appears to be
defective please contact your dealer in the first instance.
Before calling your dealer please ensure you have read and understood the operating instructions.
If you have any questions your dealer cannot answer please contact us.
Our policy is one of continual technical improvement and we reserve the right to modify and adjust
the specification of our products without prior notification.
AB Aqua Medic GmbH - Gewerbepark 24 - 49143 Bissendorf/Germany
- Technical changes reserved – 09/2015
24
spectrus 60/90
Mode d‘emploi F
L’acquisition de ce luminaire correspond à un produit de qualité. Il a été spécialement développé et
essayé par des professionnels pour l’usage aquariophile. Technique de qualité supérieure et
meilleurs matériaux ainsi qu’une conception moderne vous garantissent des années de plaisir avec
l’éclairage de votre aquarium.
AB Aqua Medic GmbH
Gewerbepark 24, 49143 Bissendorf, Allemagne
__________________________________________________________________________________________
25
Luminaire LED pour aquariums d’eau de mer ou d’eau douce
1.
•
•
•
•
•
•
•
•
Equipement
6 canaux de contrôle individuel des différentes couleurs, LED CREE haute performance
Simulation de passages nuageux et d‘orages, programmation variable
Wi-Fi Control pour Smartphone ou Tablet par App gratuit, disponible pour iOS dans les
boutiques iTunes Store et Android chez Google Playstore.
Commande manuelle possible sans App possible directement au niveau de la lampe LED.
Boîtier aluminum ultra plât
Contrôle actif de la température de refroidissement par ventilateurs super silencieux
Fixation au choix du luminaire LED par système de cintre directement à l’aquarium ou avec la
suspension par câbles aquafit 4 (Les deux systèmes sont compris dans le colis).
Une unité d’alimentation haute performance (Meanwell) permet un approvisionnement
électrique constant et sécurisé.
2.
Données techniques
Raccordement secteur: 230 Volt, 50 Hz
spectrus 60
Canal
Canal
Canal
Canal
Canal
Canal
1
2
3
4
5
6
blanc 7.000 – 8.300 K 5 W 16 éléments.
bleu 465 - 485 nm 3 W 8 éléments.
bleu royal 450 - 460 nm 5 W 6 éléments.
UV 405 - 410 nm 3 W 2 éléments.
violet 420 - 430 nm 3 W 2 éléments.
rouge 620 – 630 nm 3 W 2 éléments.
spectrus 90
Canal
Canal
Canal
Canal
Canal
Canal
1
2
3
4
5
6
white 7.000 – 8.300 K 5 W 18 éléments.
blue 465 - 485 nm 3 W 10 éléments.
royal blue 450 - 460 nm 5 W 8 éléments.
UV 405 - 410 nm 3 W 4 éléments.
violet / red 420 - 430 nm + 620 - 630 nm 3 W 3 éléments.
green 520 – 535 nm 3 W 2 éléments.
Ce sont des lentilles équipées avec un angle de dispersion de 90°.
Données techniques:
spectrus 60
spectrus 90
Consommation électrique totale:
Dimension (boîtier:)
Nombre de canaux lumineux:
Nombre couleurs de lumière:
max. 160 Watt
env. 5,5 kg
6
6
max. 210 Watt
env. 7,8 kg
6
7
Schéma 1: Composition des couleurs „spectrus 90“
26
Schéma 2: Composition des couleurs „spectrus 60“
3.
Déballage
Vérifier le luminaire après le déballage à la recherche d’éventuels dommages. En cas de
réclamation veuillez vous adresser à votre revendeur.
Contenu du colis:
•
•
•
4.
Luminaire spectrus y compris bloc d‘alimentation
Suspension à câbles d‘acier
Cintre de suspension
Conseils de sécurité
•
Le luminaire ne constitue pas un couvercle pour aquarium et ne peut être monté qu’au dessus
de l‘aquarium. La distance minimale entre la lampe et la surface de l’eau doit être choisie de
façon à ce que de l’eau ne puisse pénétrer sur ou dans le luminaire.
•
Lors du fonctionnement le boîtier peut devenir relativement chaud: Attention en cas de
contact! Pour le nettoyage séparez le luminaire complètement du secteur et laisser le refroidir.
Ensuite on décroche le luminaire.
•
Veiller lors du nettoyage qu’il n’y a pas d’humidité qui puisse pénétrer dans le luminaire!
•
Veiller à un échange thermique suffisant! Le luminaire ne doit pas être installé dans un habillage
ou dans un couvercle. Une aération insuffisante mène à une surchauffe du luminaire et à des
dommages sur les éléments électriques.
•
N’effectuez pas de réparation personnelle, mais renvoyez le luminaire pour exament avec une
description du problème. Des LED défectueuses ne peuvent être remplacées que par le
fabricant.
•
Pour tout travaux sur le luminaire il faut absolument le déconnecter du secteur.
5.
Installation
Le luminaire est suspendu au plafond avec la suspension en acier ou fixé sur l’aquarium avec le
cintre fourni.
La suspension se compose des éléments suivants en double:
1. Fixation de plafond avec vis et chevilles, câble en acier inoxydable d’une longueur de 2 mètres,
avec arrêt.
2. Elément de fixation de la lampe (câble avec ambout final)
27
Montage:
Mettre en place en premier lieu les fixation de plafond (2). Ensuite on installe les deux fixations de
plafond (2) avec les chevilles et les vis.
Câble en acier: Le câble en acier inoxydable est passé à travers le bout (5) de la fixation de
plafond, de façon à ce que l’arrêt (4) se trouve vers l’intérieur. L’écrou est maintenant vissé dans la
fixation du couvercle, de façon à ce que le câble pende vers le bas.
Fixation de la lampe:
Le câble en acier (6) est tiré à travers le fixe câble (7). A cet effet il est inséré par le haut (2.1.1).
Il ressort par l’ouverture latérale (2.1.2). On tire la longueur souhaitée de façon à ce que la lampe
soit suspendue à la hauteur désirée au dessus de l‘aquarium. Dès que la lampe est à sa bonne
place, la vis de sécurité est serrée (8), afin d’éviter une inclinaison non souhaitée de la lampe.
Déserrer la fixation:
Le fixation de la lampe dispose d’un système d’arrêt, de façon à pouvoir ajuster facilement le cable.
Au cas où il faut rallonger le câble ou que la lampe doit être décrochée, il est possible d’appuyer
avec le doigt sur la vis de fixation (2.1.1). – Attention: Bien tenir la lampe! Il est de nouveau
possible de retirer le câble de fixation de la lampe.
Lorsque la lampe est fixée à sa hauteur définitive, le câble en acier peut être raccourci avec une
pince coupante.
Veillez à une distance suffisante par rapport à la surface de l’eau, afin qu’aucune
projection d’eau ne puisse atteindre la lampe!
En présence d’une atmosphère humide l’acier inoxydable corrode également au fil du
temps. C’est la raison pour laquelle il faut régulièrement inspecter le câble en acier et le
remplacer en cas de besoin.
28
Schéma 3: Suspension câble en acier
1.
2.
2.1.1
2.1.2
3.
4.
Cheville
Douille pour fixation au plafond
Vis de fixation à déserrer
Fin du câble en acier
Vis
Bouchon
5.
6.
7.
8.
9.
10.
5.1.
Montage de la lampe/Changement de LED
Coiffe pour fixation au plafond
Câble acier
Fixation câble
Vis de fixation
Câble en acier
Cache de vis
Il est possible de changer les LED individuellement. Le remplacement ne peut être effectué que par
un professionnel.
Lors de toute intervention sur la lampe il faut retirer la prise du secteur!
5.2.
Réglage du programme
Visser l’antenne latéralement à côté du bouton de réglage. L‘ App pour la lampe spectrus peut
être téléchargée sous le lien suivant iTunes Store :
https://itunes.apple.com/de/app/ledcontroller6/id951543825?mt=8
Google Playstore voir:
https://play.google.com/store/apps/details?id=com.simalai.aqua
29
Après le téléchargement de l’App il faut relier la lampe par WLAN (Connection Wifi) avec le
téléphone mobile. A cet effet on place le spectrus avec le bouton de réglage sur le mode Wifi.
Photo 4: Par rotation du bouton de réglage (1) il est possible de changer entre Wi-Fi et manuel.
Photo 6: Après une courte pression sur le bouton de réglage (1) apparaît (Run in Wifi mode). Il
est maintenant possible de commander et de régler la lampe par App. Une nouvelle pression
permet d’atteindre le choix entre Wi-Fi et manuel.
30
Photo 6: En sélectionnant „Manual“ et en appuyant sur le bouton de réglage, on atteint le réglage
manuel.
Photo 7: En appuyant sur le bouton de réglage on choisit les canaux individuellement et on peut
les modifier en tournant le bouton de réglage. En maintenant la pression sur le bouton de réglage,
on quitte le mode manuel.
Réglage par App:
Après avoir relié la lampe (Aquamedic-XXX) par WLAN avec le téléphone mobile, on choisit et un
mot de passe est demandé. Le mot de passe pour la liaison est 12345678.
Photo 8: Schéma de connexion pour spectrus
31
Après la connexion avec la lampe, l’App peut être démarée.
Photo 9: Démarrage App.
Adresse IP ou nom de la lampe (1). Par sélection on atteint le menu principal. Sous „Just Try“ (5) il
est possible de tester l’App sans la lampe. Sous „Change Wi-Fi“ (4) il est possible de passer d’une
lampe à une autre. Sous le point 2 il est possible de changer le nom de la lampe.
Photo 10: On atteint d’abord le menu principal:
Sous le point 1 vous pouvez modifier l’intensité de chaque canal. Le point 2 simule un orage, le
point 3 un passage nuageux. Sous 5/6/7 on accède dans les trois menus. 9 affiche le programme
actuel sous forme graphique. Avec le commutateur 4 on synchronise le temps entre lampe et
téléphone mobile. Le bouton 8 sert à la mise en marche (rouge) et à l’arrêt (gris). 10 affiche
l’intensité du moment des canaux individuels.
32
Photo 11: dans le menu sous le point „Timer“ vous pouvez créer trois programmes
différents.
Création d’un programme:
Choisir d‘abord le programme (1), qui doit être modifié. Il est possible de charger un programme
existant sous le point 5 de la spectrus. A l’aide de l’aperçu rapide (6 + 7) le programme créé peut
être évalué. Les horaires individuels et l’intensité sont réglables sous le point 8, en sélectionnant le
réglage à modifier. Avec +/- (3) d’autres points peuvent être ajoutés ou supprimés.
Les horaires sélectionnés sont des horaires de départ. A partir de l’heure choisie le
luminaire démarre avec 1% en l’espace de 30 secondes à dimmer vers le haut ou le bas
sur l’intensité demandée.
Avec „Save“ (2) le programme
graphique.
choisi est mis en mémoire. (4) affiche le programme de façon
Photo 12: Menu „System“
A partir de là on retourne à l’image de l’écran de démarrage (Photo 10), on peut revenir au réglage
de départ et passer au menu de réglage de la phase lunaire.
33
Photo 13: Réglage de la phase lunaire
Avec l’interrupteur 1 on rajoute la phase lunaire. Avec la touche No. 2 on gère l’heure de départ et
celle d’arrêt (3). La luminosité (4) ne doit pas être trop intense, afin que les zooxanthelles des
coraux ne se livrent pas à la photosynthèse durant la nuit. Avec le commutateur 5 il est possible de
régler la phase lunaire. Le point blanc au dessus de l’échelle (7) marque la pleine lune, le rouge,
point réglable de la phase lunaire sélectionnée.
34
Photo 14: Réglage de l’orage (en haut) et du passage de nuages (en bas).
1 + 3: Réglage heure de départ et heure d’arrêt
2.
Puissance
3.
Réglage automatique dans la période sélectionnée
4.
Exécution immédiate
5.
Mise en mémoire
35
6.
Pièces de rechange
Art.-Nr.
83010100
83010101
83010102
83010103
83010104
83010105
83010106
83010112
83010113
83010122
83010115
80403
83010114
83010110
83010111
LG1530
7.
Article
LED blanche cree XTE 7000 - 8300K 5 W
LED bleue cree XPE 465 - 485 nm 3 W
LED bleue royal XPE cree 450 - 460 nm 5 W
LED UV 3535 405 - 410nm 3 W
LED Violet 3535 420 - 430nm 3 W
LED rouge cree XPE 620 - 630nm 3 W
LED verte cree XPE 520 - 535 nm 3 W
Lentille 90°
Lentille 120°
Bouton de réglage
Antenne
aquafit 4
Support kpl.
Alimentation spectrus 60
Alimentation spectrus 90
Réseau avec Schuko connecteur IEC
Maintenance et entretien
Nettoyez régulièrement avec soin la vitre refroidie des restes d’éclaboussures et d’évaporation avec
un tissu. Ne jamais utiliser de produits de nettoyage ou de produit abrasif!
8.
Garantie
AB Aqua Medic GmbH assure une garantie de 12 mois à partir de la date d’achat sur tous les
défauts de matériau et de fabrication de l‘appareil. La facture originale sert de preuve d’achat. La
preuve d’achat originale sert de preuve de garantie. Durant cette période nous remettrons
gratuitement le produit en état par mise en place de d’éléments neufs ou rénovés (hors frais de
transport). En cas de problème avec votre appareil durant ou après la fin de garantie veuillez vous
adresser à votre revendeur.
La garantie ne vaut que pour le premier acheteur. Elle ne couvre que les défauts de matériau et de
fabrication, qui peuvent survenir dans le cadre d’une utilisation normale. Elle ne vaut pas dans le
cadre de dommages dus au transport, ou une manipulation inapropriée, de la négligence, une
mauvaise installation ainsi que des interventions ou des modiffications effectuées par des
organismes non autorisées.
AB Aqua Medic GmbH ne peut être tenu comme responsable de dégats collatéraux, pouvant
résulter de l’utilisation de l’appareil.
AB Aqua Medic GmbH - Gewerbepark 24 - 49143 Bissendorf/Germany
- Sous réserve de modifications techniques – En date de 09/2015
36
spectrus 60/90
Руководство по эксплуатации RUS
При покупке этого светильника Вы выбрали качественное изделие. Он разработан специально
для использования в аквариумах и был протестирован специалистами. Высококачественная
технология и лучшие материалы, а также современный дизайн будут долго радовать Вас при
освещении Ваших аквариумов.
AB Aqua Medic GmbH
Gewerbepark 24, 49143 Bissendorf, Germany
_________________________________________________________________________________________
37
Светодиодный светильник для аквариумов с пресной и морской водой
1.
•
•
•
•
•
•
•
•
2.
Оснащение
6 каналов, регулирующих отдельные цвета светового излучения, мощные CREE LED
программируемая, в разных вариантах, имитация облачности и грозы
Wi-Fi контроль для смартфона или планшета через соответствующее бесплатное
приложение, доступное для iOS в iTunes Store и Android в Goole Playstore.
имеется возможность ручного управления непосредственно на светодиодной лампе
сверхплоский алюминиевый корпус
терморегулируемое активное охлаждение с помощью сверхтихого вентилятора
крепление для светодиодной лампы, по желанию, с помощью кронштейнов прямо на
аквариуме или с применением подвески с тросом из анодированной стали aquafit 4 (обе
системы входят в комплект поставки)
высокомощный источник питания (Meanwell) осуществляет постоянное и надежное
энергообеспечение.
Технические характеристики
Подключение к сети: 230 Вольт, 50 Гц, другие модификации (для США и т. д.) смотри типовую
табличку.
spectrus 60
Канал
Канал
Канал
Канал
Канал
Канал
1
2
3
4
5
6
белый 7.000 – 8.300 K 5 Вт, 16 шт.
голубой 465 - 485 Нм 3 Вт, 8 шт.
темно-голубой 450 - 460 Нм 5 Вт, 6 шт.
УФ 405 - 410 Нм 3 Вт, 2 шт.
фиолетовый 420 - 430 Нм 3 Вт, 2 шт.
красный 620 – 630 Нм 3 Вт, 2 шт.
spectrus 90
Канал
Канал
Канал
Канал
Канал
Канал
1
2
3
4
5
6
белый 7.000 – 8.300 K 5 Вт, 18 шт.
голубой 465 - 485 Нм 3 Вт, 10 шт.
темно-голубой 450 - 460 Нм 5 Вт, 8 шт.
УФ 405 - 410 Нм 3 Вт, 4 шт.
фиолетовый / красный 420 - 430 Нм + 620 - 630 Нм 3 Вт по 3 шт.
зеленый 520 – 535 Нм 3 Вт, 2 шт.
Установлены линзы с углом рассеивания в 90°.
Технические характеристики:
Общее потребление тока:
Габариты (корпус:)
Вес:
Количество цветовых каналов:
Количество цветов светового излучения:
spectrus 60
макс. 160 Ватт
ок. 560 x 265 x 32 мм
ок. 5,5 кг
6
6
Рис. 1: Цветовое распределение spectrus 90
38
spectrus 90
макс. 210 Ватт
ок. 880 x 265 x 32мм
ок. 7,8 кг
6
7
Рис. 2: Цветовое распределение spectrus 60
3.
Распаковывание
После того, как Вы распаковали светильник, проверьте его на возможные повреждения. При
обнаружении повреждений, пожалуйста, обратитесь незамедлительно к Вашему продавцу.
Комплект поставки:
•
•
•
4.
•
•
•
•
•
•
5.
светильник spectrus вкл. источник питания
подвеска с тросом из анодированной стали
кронштейн
Рекомендации по технике безопасности
светильник не должен накрывать аквариум, его нужно только навешивать над аквариумом.
Минимальное расстояние между светильником и поверхностью воды должно быть выбрано
так, чтобы на светильник или в него не могли попасть капли воды или соляные брызги
при эксплуатации корпус может нагреваться: Осторожно при контакте! При чистке
отсоедините светильник полностью от источника питания и пусть он остынет. Затем
снимите светильник
при чистке следите за тем, чтобы внутрь светильника не попадала влага
обратите внимание на то, что необходим хороший теплообмен! Светильник нельзя
размещать под панелями и экранами. Недостаточная вентиляция приведет к перегреву
светильника и повреждению его электрических компонентов
не пытайтесь ремонтировать светильник самостоятельно, а отправьте его на проверку с
описанием неисправностей. Светодиоды с дефектами могут быть заменены только
производителем
при любых работах со светильником вытащите штепсельную вилку из розетки
Установка
Светильник крепится к потолку с помощью подвесного устройства из стальных тросов или к
аквариуму имеющимися в комплектации кронштейнами.
Подвесное устройство состоит из двух парных частей:
1. крепления для потолка с болтами и дюбелями, троса из высококачественной стали длиной в
2 м со стопором
2. крепления для лампы (троса и выходной гильзы).
39
Монтаж:
Вначале на потолке фиксируются дюбелями и болтами оба потолочных крепления (2).
Трос из анодированной стали: трос из анодированной стали протягивается через гайку
потолочного крепления (5) так, чтобы стопор (4) размещался внутри. Далее гайка
завинчивается в потолочное крепление таким образом, чтобы трос свисал вниз.
Крепление лампы:
Трос из анодированной стали (6) протягивается через крепление для лампы (7). Для этого он
вставляется и протягивается сверху (2.1.1). Через боковое отверстие (2.1.2) он опять выходит
наружу. Здесь его протягивают на такую длину, чтобы светильник висел на требуемой высоте
над аквариумом. После того, как лампа будет отрегулирована, затягивается страховочный
болт (8), чтобы избежать нежелательного опрокидывания лампы.
Ослабление крепления:
Крепление лампы имеет возвратное блокировочное устройство, которое позволяет легко
регулировать длину троса. В том случае, если трос необходимо удлинить или нужно снять
светильник, можно нажать пальцем на фиксирующий винт (2.1.1). Внимание: крепко
держите светильник! Трос снова может выдернуться из крепления лампы.
Если светильник висит на окончательной желаемой высоте, трос можно укоротить кусачками.
Обратите внимание при этом на то, чтобы светильник располагался на достаточно
удаленном расстоянии от поверхности воды и её брызги не попадали во внутрь
светильника или на него!
При высокой влажности окружающего воздуха анодированная сталь со временем
подвергается коррозии. В связи с этим регулярно проверяйте состояние тросов и,
при необходимости, заменяйте их.
40
Рис. 3: Подвеска с тросом из анодированной стали
1.
2.
2.1.1
2.1.2
3.
4.
дюбель
гильза для потолочной подвески
фиксирующий винт для ослабления
конец троса
винт
стопор
5.1.
Монтаж ламп / Замена ламп
5.
6.
7.
8.
9.
10.
колпачок для потолочной подвески
стальной трос
фиксатор для троса крепления
фиксирующий винт
стальной трос
колпачок для винта
Светодиоды могут быть заменены по отдельности. Замену необходимо выполнять только
специализированным предприятием.
При выполнении всех работ со светильником вытащите штепсельную вилку из
розетки.
5.2.
Установка программы
Антенна привинчивается рядом с кнопкой настройки. Программное приложение для spectrus
можно скачать по следующим ссылкам:
iTunes Store:
https://itunes.apple.com/de/app/ledcontroller6/id951543825?mt=8
Google Playstore:
https://play.google.com/store/apps/details?id=com.simalai.aqua
41
После загрузки приложения светильник нужно вначале через WLAN соединить с мобильным
телефоном. Для этого кнопкой настройки spectrus приводят в режим Wi-Fi.
Рис. 4: Вращая кнопку настройки (1), можно переключаться с Wi-Fi на ручной режим.
Рис. 5: После быстрого нажатия на кнопку настройки (1) появляется сигнал „Run in Wifi
mode“.
Теперь светильник может регулироваться и настраиваться через программное приложение.
При повторном нажатии на кнопку настройки Вы возвращаетесь в режим выбора между Wi-Fi и
ручной настройкой.
42
Рис. 6: Если Вы выбираете программу „Manual“ и нажимаете на кнопку настройки, то в данном
случае Вы выходите на ручную настройку.
Рис. 7: Нажимая кнопку настройки и вращая её, Вы вызываете отдельные каналы и меняете
их. Если Вы после этого подержите кнопку настройки дольше, то покинете режим ручной
настройки.
Настройка с помощью программного приложения:
После того, как светильник (Aquamedic-XXX) будет через WLAN соединен с мобильным
телефоном, вызывается программное приложение и запрашивается пароль. Пароль для
соединения: 12345678.
Рис. 8: Установление соединения с spectrus
43
После установления
приложение.
соединения
со
светильником может быть
запущено программное
Рис. 9: Запуск программного приложения.
IP-адрес или имя светильника (1). При наборе номера Вы попадаете в главное меню. В иконке
под словами «Just Try» (5) программное приложение может быть протестировано без
светильника. В иконке под словами «Change Wi-Fi» (4) при нескольких светильниках можно
переходить от одного к другому. Под точкой 2 может быть изменено имя светильника.
Рис. 10: Вначале Вы входите в главное меню:
Используя точку 1, Вы можете изменить интенсивность отдельных каналов. Точка 2 имитирует
грозу, кнопка 3 – облачность. Используя кнопки 5/6/7, Вы переходите в три разных меню. 9
показывает текущую программу в графическом изображении. Кнопкой 4 устанавливается
синхронность времени между светильником и мобильным телефоном. Кнопка 8 служит для
включения (красный) и выключения (серый) прибора. Точка 10 показывает интенсивность
отдельных каналов в данный момент.
44
Рис. 11: В меню «Timer» могут быть созданы три разные программы
Создание одной из программ:
Вначале выбирается программа (1), которая подлежит изменению. В иконку под номером 5
загружается имеющаяся программа соответствующего spectrus. С помощью кнопок быстрого
просмотра (6 + 7) составленная программа может быть рассмотрена и рецензирована. Время
суток и интенсивность Вы настраиваете кнопкой 8, вызывая опцию, подлежащую изменению.
С помощью +/- (3) пункты могут добавляться или удаляться.
Заданные параметры времени являются стартовыми. С установленного времени
светильник начинает с 1% в 30 секунд, согласно заданным параметрам
интенсивности, увеличивать или уменьшать приглушение света.
Кнопкой «Save» (2) составленная программа вводится в память. Точка (4) показывает
программу графически.
Рис. 12: Пункт в меню « System»
Вы возвращаетесь в стартовое окно (рис. 10), отменяете систему в общих настройках и
меняете в меню настройку лунной фазы.
45
Рис. 13: Настройка лунной фазы
Кнопкой 1 подключается лунная фаза. Кнопкой 2 задается стартовое время и время
окончания (3). Яркость следует выбирать не очень интенсивную, чтобы зооксантеллы
кораллов ночью не ускорили фотосинтез. Кнопкой 5 может быть настроена лунная фаза.
Белая точка над шкалой (7) обозначает полную луну, перемещающаяся красная – заданную
лунную фазу.
46
Рис. 14: Настройка грозы (вверху) и облачности (внизу).
1 + 3: ввод времени старта и окончания
2.
интенсивность
4.
автоматическое выполнение в выбранном промежутке времени
5.
экстренное выполнение
6.
сохранение данных в памяти
47
6.
Перечень запасных частей
Арт.-Nr.
83010100
83010101
83010102
83010103
83010104
83010105
83010106
83010112
83010113
83010122
83010115
80403
83010114
83010110
83010111
LG1530
7.
Предмет
LED белый cree XTE 7000 - 8300K 5 Вт
LED голубой cree XPE 465 - 485 Нм 3 Вт
LED темно голубой XPE cree 450 - 460 Нм 5 Вт
LED УФ 3535 405 – 410Нм 3 Вт
LED фиолетовый 3535 420 – 430Нм 3 Вт
LED красный cree XPE 620 – 630Нм 3 Вт
LED зеленый cree XPE 520 - 535 Нм 3 Вт
линза 90°
линза 120°
кнопка регулировки
антенна
aquafit 4
удерживающее устройство в комплекте
источник питания spectrus 60
источник питания spectrus 90
провод подключения к сети с заземляющим контактом + холодный
черный
Техническое обслуживание и уход
Регулярно и осторожно очищайте влажной салфеткой остывшее стекло от следов испарения и
капель воды. Никогда не используйте дополнительные чистящие и абразивные средства!
8.
Гарантия
Фирма Aqua Medic предоставляет гарантию сроком на двенадцать месяцев со дня покупки и
гарантирует отсутствие дефектов в материалах и сборочных изделиях. Гарантийным
документом является кассовый чек. В течение гарантийного срока Aqua Medic обязуется
ремонтировать данный прибор путем замены неисправных узлов на новые или
восстановленные (накладные расходы не покрываются гарантией). Если у Вас в течение или
по истечении гарантийного срока возникли проблемы с данным прибором, то, пожалуйста,
обращайтесь в специализированные магазины, где Вы делали покупку. Гарантия
распространяется только на первого покупателя. Эта гарантия покрывает расходы
только на устранение дефектов материалов и технических неполадок, которые возникли при
использовании прибора соответственно инструкции. Гарантия не распространяется на
поломки, полученные при транспортировке или при нарушении правил эксплуатации,
халатности, неправильном монтаже или при внесении технических изменений конструкции,
непредусмотренных разработчиком.
Фирма Aqua Medic не
использованием прибора.
несёт
ответственности
за
косвенные
убытки,
связанные
AB Aqua Medic GmbH - Gewerbepark 24 - 49143 Bissendorf/Germany
- оставляем за собой право на технические изменения конструкции – 09/2015
48
с